VERSION 1 - AUGUST 2020 - Mass.gov
←
→
Page content transcription
If your browser does not render page correctly, please read the page content below
VERSION 1 - AUGUST 2020
CONTENTS

Introduction............................................................................................................................................................................. 4
    Electronic Filing in the Appeals Court ................................................................................................... 5
    Helpful Resources.................................................................................................................................... 5
Overview: Tools and Basic Steps for Electronic Brief Creation .................................................................. 6
    Tools You Will Need: ............................................................................................................................... 6
    Basic Steps: .............................................................................................................................................. 7
Step 1: Convert your Brief to a PDF. ........................................................................................................................... 7
    OPTION 1: MICROSOFT WORD .............................................................................................................. 7
        Word 2007 .......................................................................................................................................... 7
        Word 2010 & 2013 ............................................................................................................................ 8
        Word 2016 (Office 365) ................................................................................................................... 9
        Adobe Acrobat Ribbon in Word ................................................................................................... 10
    OPTION 2: ADOBE ACROBAT ............................................................................................................... 12
        Adobe Acrobat 9 .............................................................................................................................. 12
        Adobe Acrobat X Pro....................................................................................................................... 12
        Adobe Acrobat DC ........................................................................................................................... 13
Step 2: Convert your Addendum to a PDF. ............................................................................................................ 14
        Use websites to obtain electronic copies of legal authorities. ............................................... 14
        Web Resources: .................................................................................................................................. 14
        https://www.socialaw.com/ ............................................................................................................ 14
        Option 1: Convert webpages to PDF using Adobe PDFMaker in Internet Explorer ....................... 15
        Option 2: Convert webpages to PDF by Printing to PDF .................................................................. 15
        Use Online Resources to download PDF versions of legal authorities or resources. ........ 17
        Saving to PDF with Westlaw:............................................................................................................. 18
        Saving to PDF with Lexis: .................................................................................................................. 18
        Saving to PDF with HeinOnline: ........................................................................................................ 19
        Saving to PDF with Fastcase: ............................................................................................................. 19
    Scanning Documents in Acrobat ...................................................................................................... 19
Step 3: Combine the Brief and Addendum into one PDF. ............................................................................. 20
        Adobe Acrobat X .............................................................................................................................. 20
        Adobe Acrobat Pro DC .................................................................................................................... 22

                                                                                            2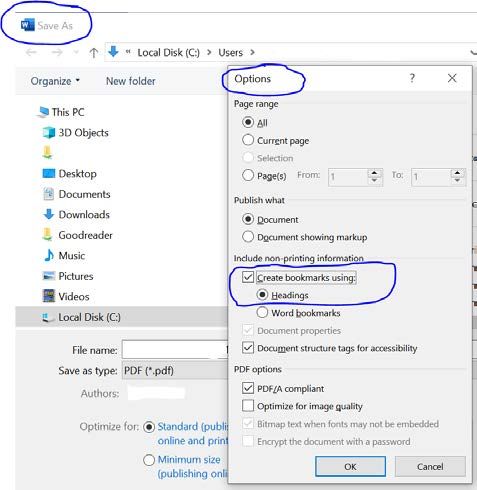
Step 4: Convert Appendix into a separate PDF. .................................................................................................. 24
      Scanning Appendix Documents .................................................................................................... 25
Step 5: Make any scanned materials OCR searchable. ................................................................................... 26
      Adobe Acrobat 9 .............................................................................................................................. 26
      Adobe Acrobat X .............................................................................................................................. 26
      Adobe Acrobat Pro DC .................................................................................................................... 27
Fixing Mistakes, Editing Pagination, Adding Bookmarks & Links, Redacting Information ...... 29
   How to Fix Mistakes in a PDF ............................................................................................................... 29
      Edit PDF in Adobe............................................................................................................................ 29
      Edit PDF in Word Processor .......................................................................................................... 29
   Adding Headers, Footers, and Page Numbers to a PDF ...................................................................... 29
   Bookmarking a PDF............................................................................................................................... 30
      Adobe Acrobat Automatically-Generated Bookmarks ............................................................ 30
      Word Automatically-Generated Bookmarks ............................................................................. 31
      Manually Adding Bookmarks ....................................................................................................... 32
      Editing Bookmarks ......................................................................................................................... 32
      Moving Bookmarks ......................................................................................................................... 32
      Nesting Bookmarks......................................................................................................................... 32
   Adding Internal Links in a PDF............................................................................................................. 32
      Adding Links in Word ..................................................................................................................... 33
      Adding Links in Adobe Acrobat Pro ............................................................................................ 33
      Additional Guidance on Bookmarks and Links ......................................................................... 34
   Inclusion of Impounded Materials in Briefs or Record Appendices ..................................................... 35
   Protection of Personally Identifying Information ................................................................................. 35
   Redaction ............................................................................................................................................... 36
      Redacting Using a Word Processor .............................................................................................. 37
      Redacting Using Adobe Acrobat X Pro ........................................................................................ 37
      Redacting Using Adobe Acrobat Pro DC ...................................................................................... 38

Version 1, dated August 2020
Cover photo: M&A Architectural Preservation-Restoration, https://archpres.com/

                                                                              3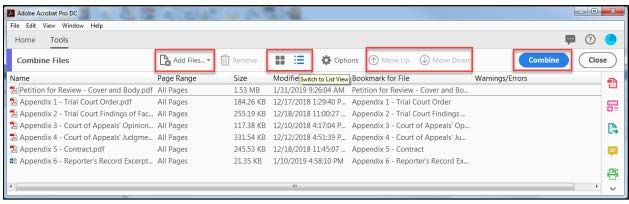
Introduction
Dear attorneys, self-represented parties, and legal assistants:

Welcome to the Massachusetts Appeals Court. As part of our continuing mission to provide
assistance with appeals and electronic filing, we have prepared this Guide to Electronic
Briefs. The Guide is intended to illustrate some processes you may use when creating a
portable document format (PDF) version of your brief and record appendix for submission
to the Appeals Court's eFileMA system. The Guide demonstrates:
   •   How to convert your Brief and Addendum to PDF
   •   How to combine PDF documents in your Brief, Addendum, and Appendix
   •   How to make scanned materials OCR searchable
   •   How to quickly edit small mistakes in a PDF
   •   How to add or edit pagination, headers, and footers in a PDF
   •   How to bookmark and create internal links in a PDF
Please note that the methods presented in this guide are suggestions based on some
current programs, and do not constitute endorsements of any particular product.
We hope you find the guide helpful. The concept for this guide is drawn from the Texas
Supreme Court eBrief guide, from which significant content was drawn. Please also review
the Massachusetts Appeals Court's related materials, the Guide to Preparing a Brief and
Record Appendix for the Appeals Court, and the Guide to Electronic Filing at the Appeals
Court.
                                     Joseph Stanton, Clerk
                           Terrence Pricher, First Assistant Clerk
                          Patricia Campbell Malone, Assistant Clerk
                                Julie Goldman, Assistant Clerk
                                  Paul Tuttle, Assistant Clerk
                                Anne Thomas, Assistant Clerk
                              Sean Connolly, Research Attorney
                Patricia Ryle, Deputy Clerk for Case Processing & Scheduling
                                Nancy Martins, Office Manager
                                        Anthony Duarte
                                         Matt Cutting
                                          Jean Shirley
                                        Marie Freeman
                                           John Nolan
                                        Yoshiko Taylor
                                     Franchesca Sanquitin
                                       Douglas Anderson
                                        Megan Sullivan

                                              4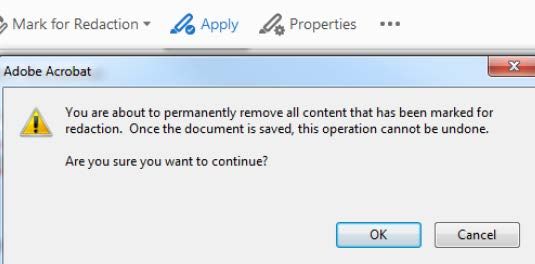
Electronic Filing in the Appeals Court
The Appeals Court's e-filing program is governed by Massachusetts Appeals Court (M.A.C.)
Rule 13.0. The Appeals Court provides additional instructions, tips, and guidance on its
website. In addition, the judicial branch's third-party vendor, Tyler Technologies, Inc.,
provides guidance. Please see below for links to these helpful resources.
To e-file, you must register at eFileMA.com, which is maintained by Tyler Technologies, Inc.
If you need guidance on registering or setting up a payment account, visit the vendor's self-
service page, where you will find instructional videos under the "Getting Started Videos"
tab.
As required by M.A.C. Rule 13.0, the Appeals Court requires all attorneys with cases
pending in the court to (1) register an account with eFileMA.com, (2) maintain their name
and address on the eFileMA.com "Public List," and (3) use eFileMA.com to electronically
file:
   •   all filings in criminal panel cases that are public or partially impounded;
   •   briefs and appendices in civil panel cases that are public or partially impounded;
   •   all docketing statements in civil or criminal cases that are public or partially
       impounded;
   •   all motions and letters filed after panel assignment in civil or criminal cases that are
       public or partially impounded; and
   •   all filings on the Single Justice docket in public or partially impounded cases.
In addition, attorneys may voluntary e-file any document not identified in the list above.
Self-represented parties are allowed, but not required, to e-file. The Appeals Court
encourages all parties to e-file every document submitted to the court.
For more information on e-filing generally, creating an e-file account, requirements for
filing into new and existing cases, and paying or waiving filing fees, please see the Appeals
Court's useful web pages describing Electronic Filing at the Appeals Court.

Helpful Resources
   •   Massachusetts Appeals Court Rule 13.0
       https://www.mass.gov/appeals-court-rules/appeals-court-rule-130-electronic-filing

   •   eFileMA Electronic Filing System
       http://www.efilema.com/

   •   Guide to Electronic Filing at the Appeals Court
       https://www.mass.gov/guides/electronic-filing-at-the-appeals-court

   •   Massachusetts Appeals Court Frequently-Used Forms
       https://www.mass.gov/lists/appeals-court-forms

                                                5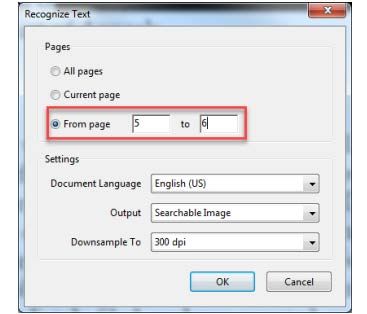
•   Civil Appeals Entry Form
           •   Civil Docketing Statement (Updated 10-28-19)
           •   Criminal Docketing Statement (Updated 10-28-19)
           •   Certificate of Service
           •   Certificate of Compliance

   •   Guide to Creating PDFs with Bookmarks and Internal Links
       https://www.mass.gov/service-details/how-to-create-pdfs-with-bookmarks-and-internal-links

   •   Appeals Court Clerk Joseph Stanton and Assistant Clerk Julie Goldman,
       Appellate Electronic Filing Tips for the 2020's, Boston Bar Journal (Feb. 2020)
       https://bostonbarjournal.com/2020/02/19/appellate-electronic-filing-tips-for-the-2020s-2/

   •   Supreme Judicial Court Rule 1:25: Massachusetts Rules of Electronic Filing
       https://www.mass.gov/supreme-judicial-court-rules/supreme-judicial-court-rule-125-
       massachusetts-rules-of-electronic

   •   Massachusetts Rules of Appellate Procedure
       https://www.mass.gov/law-library/massachusetts-rules-of-appellate-procedure

   •   Massachusetts Appeals Court Rules (M.A.C. Rules)
       https://www.mass.gov/law-library/massachusetts-appeals-court-rules

   •   Guide to Preparing a Brief and Record Appendix for the Appeals Court
       https://www.mass.gov/service-details/appeals-court-briefs

   •   Checklist for Preparing a Brief and Record Appendix for the Appeals Court
       https://www.mass.gov/files/documents/2019/07/22/Brief and Appendix Checklist.pdf

Overview: Tools and Basic Steps for Electronic
Brief Creation
Tools You Will Need:
Word Processor
Begin the creation of your brief in a word processing system, like Microsoft Word. This is
where you will draft, edit, and finalize your brief. After you have finished writing the brief,
save your document as a PDF. This process will be detailed below.

Adobe Acrobat
Adobe Acrobat Standard allows you to create and combine PDFs, and can be used to make
your PDF OCR-searchable, as required by the Appeals Court's Rules.

                                                6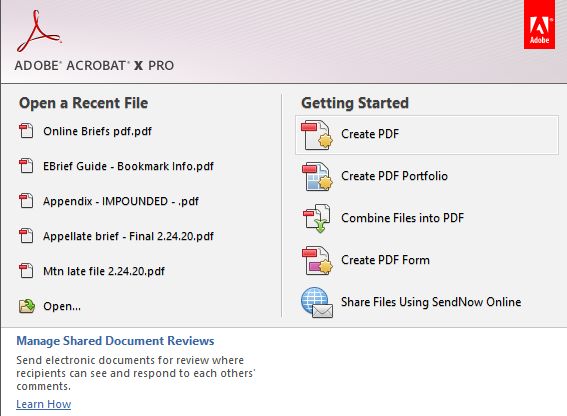
If you need to redact or edit information in a document, you will need to use Adobe Acrobat
Pro instead of Standard.

Scanner
You should never scan your brief, and wherever possible you should prepare appendix and
addendum materials in an electronic format. However, you may be required to submit
certain documents that are only available in a hard copy. In this case, you will need to use a
scanner.
If you must scan, set your scanner to black and white at 200 dpi to maintain a reduced file
size, unless you need color or high-resolution images for your submission. See S.J.C. Rule
1:25, Rule 10(c) & 10(d).

Basic Steps:
(1) Convert your brief from a word processing document directly to a PDF.
(2) Convert your addendum to a PDF.
(3) Combine the brief and addendum into one PDF file if they are not already
combined.
(4) Convert your appendix materials to a PDF. It remains separate.
(5) Make any scanned materials searchable using optical character recognition
(OCR) software like Adobe Acrobat.
          Each of these steps will be discussed in more detail in the coming pages.

Step 1: Convert your Brief to a PDF.
Do not print your brief to paper and scan it. Convert it to PDF format directly from your
word processing software, or convert it to PDF format using Adobe Acrobat. Different
methods of converting a brief to a PDF are outlined in detail below.

                       OPTION 1: MICROSOFT WORD
Word 2007
   1. In Word 2007, click the Microsoft Office Button in the top left-hand corner of Word.

                                              7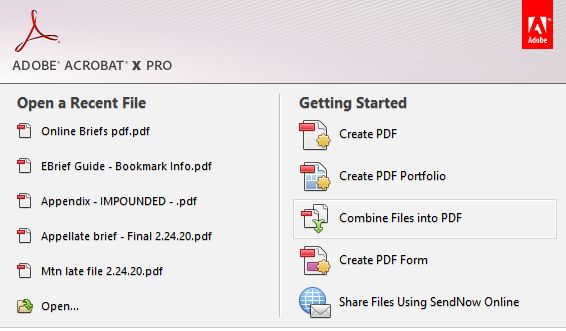
2. Choose Save As and select "PDF or XPS."

   3. In the dialog box that appears, click the button in the lower right hand corner that
      says Publish. Make sure to save a copy in Word as well.
***Please note, when you are converting a brief to from a word file to a PDF, you can
automatically create recommended bookmarks for any headings by following simple steps
available at: https://www.mass.gov/service-details/how-to-create-pdfs-with-bookmarks-
and-internal-links.

Word 2010 & 2013
   1. In Word 2010/2013, click on the File tab at the top left-hand corner of Word.

                                             8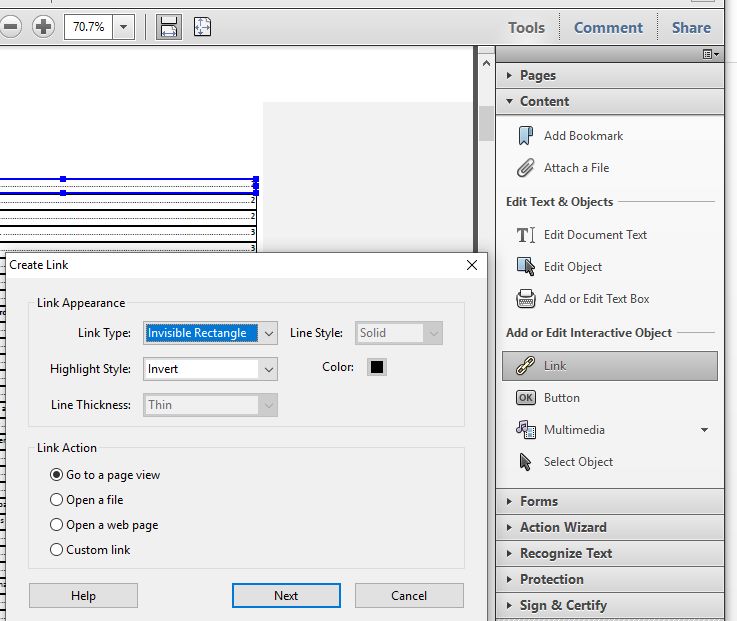
2. Choose Save As.
  3. In the dialog box that appears, choose the file type PDF.

  4. Click Save. Make sure to save a copy in Word as well, in case you need to make edits.

Word 2016 (Office 365)
                                        Option 1:
  1. In Word 2016, click the File button in the top left-hand corner of Word.

  2. Choose Save As Adobe PDF.

                                            9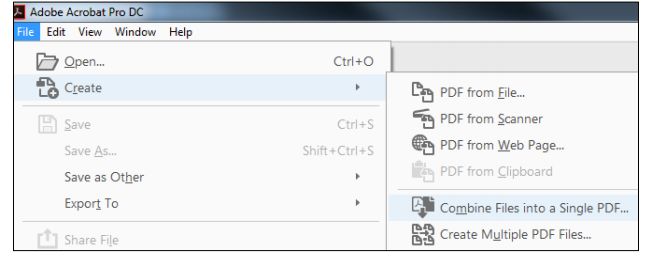
3. Click Save. Make sure to save a copy in Word as well, in case you need to edit it.
Option 2:
1. If Adobe Acrobat is installed, go to the Home menu, and select Create and Share
Adobe PDF.
2. Choose Save As Adobe PDF.
3. Click Save. Make sure to save a copy in Word as well, in case you need to edit it.
Adobe Acrobat Ribbon in Word
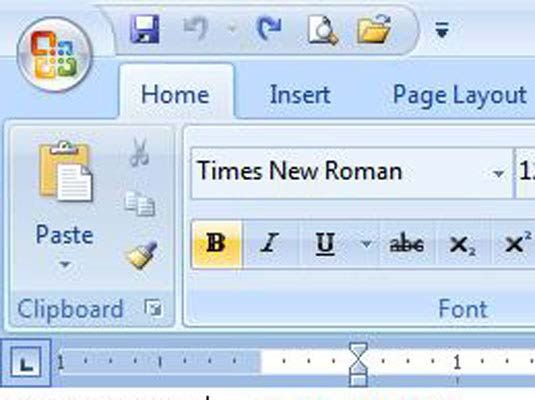
10Word 2007 & 2010
If you have installed Adobe Acrobat, the Acrobat button appears next to View. This button
will reveal the Acrobat ribbon. Use the following steps to convert your brief to PDF using
the Acrobat PDFMaker ribbon:
1. Choose Acrobat at the top of the screen, to the right of View.
2. Click Create PDF in the PDFMaker menu.
3. Click Save. Be sure to save a copy in Word as well.
Word 2016
If you have installed Adobe Acrobat, the Acrobat button appears next to Help. This button
will reveal the Acrobat ribbon. Use the following steps to convert your brief to PDF using
the Acrobat PDFMaker ribbon:
1. Choose Acrobat at the top of the screen, to the right of Help.
2. Click Create PDF in the PDFMaker menu.
113. If you are prompted to save the file, select "Yes" if you want to save the file as is.
Select "No" if you need to make changes. If you are not prompted, your work is
already saved.
4. In the dialog box that appears, click Save. Be sure to save a copy in Word as well.
OPTION 2: ADOBE ACROBAT
Adobe Acrobat 9
Option 1:
1. Choose File > Create PDF > From File.
2. Find the document that you wish to convert in the dialog box. Select the document,
and click Open.
3. Once the file is converted, save the document by clicking File > Save.
Option 2:
1. In the toolbar, click Create PDF and choose From File.
2. Find the document that you wish to convert in the dialog box. Select the document,
and click Open.
3. Once the file is converted, save the document by clicking File > Save.
Adobe Acrobat X Pro
1. In the welcome screen, click Create PDF, or in the Quick Tools toolbar, click Create
PDF, then choose PDF from File.
OR
2. Find the document that you wish to convert in the dialog box. Select the document,
and click Open.
3. Once the file is converted, save the document by clicking File > Save As or by
clicking File > Save As > PDF.
12Adobe Acrobat DC
Option 1:
1. Choose File > Create > PDF from File.
2. A dialog box will appear. Use the dialog box to locate the document you want to
convert to PDF. Select the document and click Open.
Option 2:
1. In the Tools menu, open the Create PDF tool under Create & Edit. Choose from
Single File, Multiple Files, Scanner, Web Page, Clipboard, or Blank Page, depending
on your need. Choose Select a File.
2. In the Create PDF from any format screen, click Create.
3. Once the file has been converted to PDF, save the document by clicking File > Save
As.
13Step 2: Convert your Addendum to a PDF.
Appellate briefs must include an addendum containing certain items. See Mass. R. A. P.
16(a)(13) and 16(b)(3).
In general, do not scan addendum materials unless you cannot obtain them in electronic
format. Scanning documents will create a larger file size, which may result in your
combined Brief and Addendum being too large for the Court's eFile system. Electronic
documents also tend to be more legible.
If you must scan a document that is not available online, please ensure that it is OCR
searchable, as detailed in Step 5.
Use websites to obtain electronic copies of legal authorities.
Many Massachusetts legal authorities can be located online. A good place to start is
checking www.mass.gov for Mass. Gen. Laws and recent court cases. Webpages may then
be saved in PDF format instead of printing and scanning.
Web Resources:
• Massachusetts General Laws:
https://malegislature.gov/laws/generallaws
• Massachusetts General Laws, Session Laws, & Bills:
https://www.mass.gov/massachusetts-general-laws-session-laws-bills
• Massachusetts Laws by Subject:
https://www.mass.gov/topics/laws-by-subject
• Massachusetts Court Cases:
https://www.mass.gov/topics/massachusetts-court-cases
• M.A.C. Rule 23.0 Summary Dispositions (formerly Rule 1:28)
https://128archive.com/
• Massachusetts Trial Court Law Libraries
https://www.mass.gov/orgs/trial-court-law-libraries
• Social Law Library at the John Adams Courthouse
https://socialaw.com/
Law Libraries:
• Massachusetts Trial Court Law Library Locator
https://www.mass.gov/orgs/trial-court-law-libraries/locations?_page=1
• Social Law Library at the John Adams Courthouse https://www.socialaw.com/
14Option 1: Convert webpages to PDF using Adobe PDFMaker in Internet
Explorer
Please note: this option will only work with certain versions of Adobe Acrobat. If you do not
have access to PDFMaker, see Option 2 for converting webpages.
1. Locate your desired webpage on Internet Explorer.
2. In the menu bar, choose Convert > Convert Web Page to PDF.
3. In the dialog box that appears, click Save.
Option 2: Convert webpages to PDF by Printing to PDF
Internet Explorer
1. In the menu bar, go to File > Print, or select Print directly from the taskbar.
2. When the Print dialog box appears, select Microsoft Print to PDF, then click Print.
3. In the dialog box that appears, click Save.
15Mozilla Firefox
1. Click the three-bar symbol at the upper right corner of the screen.
2. Select the Print icon in the dropdown menu.
cc
3. When the Print Preview appears, select Print at the upper left corner of the screen.
4. Under the Name dropdown, select Adobe PDF or Microsoft Print to PDF.
16Google Chrome
1. Click the three-dot symbol at the upper right corner of the screen, and select Print.
cc
2. In Destination, select Save As PDF, then click Save.
Use Online Resources to download PDF versions of legal
authorities or resources.
Per Mass. R. App. P. 16(a)(13), a brief must include an addendum that contains:
17A. a table of contents listing each item contained therein and the page on which it
begins;
B. any appealed judgment or order . . .
C. copies of constitutional provisions, statutes, rules, regulations, or relevant parts
thereof, as in effect at the relevant time, consideration of which is required for
determination of the issues presented;
D. a copy of any unpublished decision cited in the brief; and
E. in a case where geographical facts are of importance, unless appropriate plans are
reproduced in the printed record or record appendix, an outline plan (preferably
based on exhibits in evidence). This outline plan should be suitable for
reproduction on one 1 page of the printed law reports.
PDF versions of statutes and other court rules can be downloaded from the Massachusetts
Legislature webpage or the mass.gov pages and from common legal research subscription
databases such as Westlaw, Lexis, HeinOnline, or Fastcase. Follow the instructions below
to save a PDF from each of these databases.
If you need assistance accessing or utilizing these resources, consider the Massachusetts
Trial Court Law Library. You can find them at: https://www.mass.gov/orgs/trial-court-
law-libraries/locations?_page=1.
Depending upon the source, you can choose "Print" and "Print to PDF" (see above, "Option
2: Convert webpages to PDF by Printing to PDF") or "Save to PDF."
Saving to PDF with Westlaw:
On a Public Computer:
1. Click on the envelope icon in the top right corner of the source you wish to
download.
2. Select Email to bring up the dialog box that allows you to email a copy of the case to
yourself. Make sure the Format dropdown is set to PDF.
3. Under the Layout and Limits tab, uncheck the Dual column layout for Case checkbox
(while not strictly necessary, this will make the document easier to read).
4. Press Email and a PDF copy of the case will be sent to the email entered in the
Recipient tab.
On a Private Computer:
1. To download the document directly to your personal computer without emailing it,
navigate to the envelope icon and select Download.
2. Ensure Format is set to PDF, then click Download. When the Ready for Download
dialog box appears, select Download again.
Saving to PDF with Lexis:
On a Public Computer:
181. Click on the envelope icon at the top left corner of the source you wish to download.
2. Ensure you have selected Full Document under Email, and that File Type is set to
Portable Document Format (.PDF).
3. Under the Content-specific Options tab, select Single under Number of Columns
(again, this is optional, but will make the document easier to read).
4. Enter your email into the To field, and press Submit.
On a Private Computer:
1. At the top left corner of the source, select the arrow icon to Download.
2. Select your desired document settings, and click Download again to download the
PDF to your personal computer.
Saving to PDF with HeinOnline:
On a Public Computer:
1. Click on the envelope icon at the top left corner of the source you wish to download.
2. Enter your information into the relevant fields, then click Email.
On a Private Computer:
1. Click the Acrobat icon at the top left corner to download a PDF directly to your
computer.
Saving to PDF with Fastcase:
1. At the top of the source, select Email. Enter your information and select Send Email.
Scanning Documents in Acrobat
If your scanner is connected to a computer with Adobe Acrobat, you may be able to scan
the document using Acrobat to make it OCR-searchable.
First, open Adobe and choose Create > PDF from Scanner > My Custom Settings. Under
Color Mode, select Black and White, and under Resolution select 200 dpi. Under Output,
check the Recognize Text (OCR) box. Be sure to select Save Settings at the top right corner
of the screen to maintain these settings as your default.
Place the document in your scanner. In Acrobat, if your My Custom Settings box is still
open, you can select Scan from there. Otherwise, select Create > PDF from Scanner, and
choose Black and White, then scan.
19Step 3: Combine the Brief and Addendum into one
PDF.
The Brief and Addendum must be submitted as a single document. The Rules require the
brief's pagination to begin with the cover page as "1" and the pages thereafter to be
numbered consecutively through the last page, including the addendum. Mass. R. A. P.
20(a)(4)(A). Be sure that the pagination of the Addendum continues that of the Brief.
Adobe Acrobat 9
1. Choose Combine > Merge Files Into a Single PDF.
2. In the dialog box, add the individual files or folder of files you want to combine. The
files can be a mix of formats (i.e. Word, Excel, PDF, etc.)
3. Arrange the files into the order you want them to appear in using the Move Up and
Move Down buttons.
4. Select the Combine button in the dialog box and save the resulting combined file.
Adobe Acrobat X
Option 1:
1. Choose Create > Combine Files Into a Single PDF
2. In the dialog box, add the individual files or folder of files that you want to combine.
The files can be a mix of formats (i.e. Word, Excel, PDF, etc.)
3. Arrange the files in the order that you want them to appear in using the Move Up
and Move Down buttons.
4. Select the Combine button in the dialog box and save the resulting combined file.
20Option 2:
1. Choose Combine Files Into PDF in the Getting Started Menu.
2. In the dialog box, add the individual files or folder of files that you want to combine.
The files can be a mix of formats (i.e. Word, Excel, PDF, etc.)
3. Arrange the files in the order that you want them to appear in using the Move Up
and Move Down buttons.
4. Select the Combine button in the dialog box and save the resulting combined file.
21Adobe Acrobat Pro DC
Option 1:
1. Choose File > Create > Combine Files Into a Single PDF.
2. Select Add Files to select files from a folder on your computer. If the documents you
wish to combine are currently open, you can select Add Open Files instead.
3. In the dialog box, highlight all the files or folder of files that you want to combine
into a single PDF. The files can be a mix of formats (i.e. Word, Excel, PDF, etc.). Click
Open.
4. Choose between Thumbnail View and List View. Arrange the files in the order that
you want them to appear in using the Move Up and Move Down buttons or by
dragging and dropping the file names.
5. If you forgot a file, you can add it using the Add Files button.
6. Select the Combine button in the dialog box and save the resulting combined file to
your computer.
22Option 2:
1. Choose Tools > Combine Files.
2. Select Add Files to select files from a folder on your computer. If the documents you
wish to combine are currently open, you can select Add Open Files instead.
3. In the dialog box, highlight all the files or folder of files that you want to combine
into a single PDF. The files can be a mix of formats (i.e. Word, Excel, PDF, etc.). Click
Open.
4. Choose between Thumbnail View and List View. Arrange the files in the order that
you want them to appear in using the Move Up and Move Down buttons or by
dragging and dropping the file names.
5. If you forgot a file, you can add it using the Add Files button.
6. Select the Combine button in the dialog box and save the resulting combined file to
your computer.
23Step 4: Convert Appendix into a separate PDF.
The contents of the record appendix is governed by Mass. R. A. P. 18 and the format by
Mass. R. A.P. 20(a)(5)-(6). See the instructions in Step 2 for converting an Addendum to
PDF; you can follow the same steps to convert your Appendix into PDF, with one important
exception:
DO NOT COMBINE THE APPENDIX WITH THE BRIEF OR ANY MOTION.
Your Appendix must not be attached to your Brief or any motion. The appendix must be
submitted as its own, separate PDF. An Appendix that is not submitted as its own PDF file
will be rejected, and you will be required to re-submit your Brief and all of your
Appendices as separate PDFs.
Creation and Size of Appendix Volume(s).
Documents larger than the 25 MB size limit cannot be submitted for e-filing and must be
divided into separate segments, each below the 25 MB size limit.
Because each volume of appendix must be less than 25MB, it is recommended that you
ascertain the file size of the appendix before applying page numbers and completing your
table of contents and brief citations.
You must indicate both on the cover of the document and in the "Description" field
in eFileMA.com that the filing is one of multiple volumes (for example, after uploading an
Appendix volume, you should put in its Description field "Volume I of II" or “Volume II of
II”).
All briefs and appendix volumes must start with the cover as page 1, so that the page
numbers on the document match the page numbers displayed in the PDF reader software.
Blank pages should be avoided whenever possible. Any that remain should be marked
"Intentionally Blank" or similar, and should have a page number so that sequential
numbering is maintained.
To facilitate reading multi-volume appendices in electronic form:
(a) Each volume of the appendix shall be designated by a roman numeral on the cover and
shall be separately paginated beginning with the cover as page one. All subsequent pages
should be numbered consecutively, including the table of contents. Do not continue page
numbers across multiple volumes. Thus, your brief should cite to both the volume and its
page number (for example “App. I at 155” or “R.A. II at 49”).
(b) The first volume of the appendix shall include a complete table of contents referencing
all volumes of the appendix, and each individual volume shall include a table of contents for
that volume.
24Due to size limitations, you may need to submit multiple envelopes to e-file all of your
appendices. To minimize PDF file size, you must configure your scanners to scan text
documents at 200 dpi and in black and white rather than in color. You must verify the
legibility and orientation of all PDF documents before e-filing them. Any reproduction of an
exhibit in an appendix should be of sufficient resolution to ensure a legible and accurate
representation of the exhibit, including using color only if color is relevant. A color
photograph marked or admitted as an exhibit in the lower court and included in the
appendix must be in color. Lower court color-coded forms need not be reproduced in color.
Scanning Appendix Documents
You will likely need to scan certain materials, such as a copy of the notice of appeal or a
copy of the judgment, for your Appendix. If you scan any documents, please review Step 5
for ensuring the text of those documents is OCR searchable.
25Step 5: Make any scanned materials OCR
searchable.
All documents submitted for e-filing must be in searchable format, see S.J.C. Rule 1:25, Rule
9(a), which is also known as optical character recognition (OCR). OCR is a type of
technology that recognizes text in a digital image. OCR allows users -- including the Justices
of the Appeals Court as well as parties and other readers -- to search for keywords,
highlight text, insert notes, and copy and paste material within the PDF. While electronic
documents like webpages and PDFs obtained online are automatically searchable using
OCR technology, scanned documents frequently are not.
Making your Brief, Addendum, and Appendix OCR searchable is a critical step, and the
Appeals Court may reject your PDF if it is not OCR compliant.
While the Appeals Court recognizes that OCR software may not detect every line of text in
the PDF (for example, handwritten entries often go undetected), you should attempt to
render as much of your document OCR compliant as possible.
Adobe Acrobat 9
1. Choose Document > OCR Text Recognition > Recognize Text Using OCR.
2. In the Recognize Text dialog box, select an option under Pages.
3. Optionally, click Edit to open the Recognize Text-Settings dialog box, and specify the
options as needed. Click OK to start the OCR process.
Adobe Acrobat X
Option 1:
1. Choose View > Tools > Recognize Text > In This File.
262. In the dialog box, choose All Pages. Click Edit to adjust the dpi if needed, and click
OK.
3. If an alert appears stating that Acrobat could not perform OCR because the page
contains renderable text, this means the page is already searchable. Click Ignore
future errors in this document and click OK.
4. Save the document again.
Adobe Acrobat Pro DC
1. Choose Tools > Enhance Scans > Open.
2. In the Enhance Scans toolbar, select Recognize Text > In This File.
3. Select All Pages if the entire PDF document was scanned, or select Page Range to
choose which pages need to be made searchable.
4. If entering a page range, in the dialog box, enter the page numbers that need to be
made searchable. We recommend setting the Downsample To box to 200 dpi. Press
OK.
275. Click Recognize Text.
6. If an alert appears stating that Acrobat could not perform OCR because the page
contains renderable text, this means the page is already searchable. Click Ignore
future errors in this document and click OK.
7. Save the document again.
28Fixing Mistakes, Editing Pagination, Adding
Bookmarks & Links, Redacting Information
How to Fix Mistakes in a PDF
Edit PDF in Adobe
If you realize that you made an error in your brief or appendix after you have already
converted it to a PDF, you may be able to fix the mistake using the Edit PDF tool in Adobe
Acrobat.
Select Tools > Edit PDF > Open, or select Tools > Content > Edit Document Text.
Place the cursor where you want to edit, and you should be able to resolve a minor error or
typo.
This tool is useful if you have made a small mistake, but it cannot be used for unusual fonts
or for editing large portions of your document, since it does not move the text around in the
same way as a word processor.
Edit PDF in Word Processor
If you have made an error that is too sizeable to be corrected in the Edit PDF tool (for
example, if you have forgotten to add in a paragraph of information, or left out any other
significant amount of text), your best bet is to edit in the original word processing
document and re-save it as a new PDF. Follow the same steps outlined above to re-save
your corrected document as a PDF.
Adding Headers, Footers, and Page Numbers to a PDF
In Adobe Acrobat, select Tools > Edit PDF > Header & Footer > Add, or Tools > Pages >
Header & Footer > Add Header & Footer.
A dialog box containing several boxes labeled "Left Header Text," "Center Header Text," etc.
will open, along with two preview windows.
Add the page number, date, or any other desired text into the appropriate box. For
example, if you want a page number at the bottom right-hand corner, enter the page
number into the box labeled "Right Footer Text."
In order to insert page numbers, click in the box where you would like the page number to
appear, then select the Insert Page Number button.
You can adjust the page range where the header or footer appear by selecting Page Range
Options and selecting All Pages or Pages From to pick an appropriate range.
29Bookmarking a PDF
Although bookmarks are not required for electronically-filed briefs in Massachusetts, the
Appeals Court strongly encourages parties to add bookmarks. Justices frequently comment
that bookmarks are helpful and encourage their use in a brief and record appendix.
Bookmarks allow a reader to easily navigate to different sections of a document. They can
be helpful to a justice in quickly locating different areas of your argument or particular
documents in the record.
Bookmarks are visible in the Bookmarks Panel of Adobe Reader and Adobe Acrobat. If you
choose to bookmark your document, you should use descriptive labels (i.e., Table of
Contents; Table of Authorities; Issues Presented; etc.) rather than simply indicating page
numbers.
Adobe Acrobat Automatically-Generated Bookmarks
When using the Combine Documents feature, Acrobat automatically creates bookmarks by
merging file names. As such, when naming your files, choose names that allow them to be
easily identified so that you will not have to do the extra work of renaming your bookmarks
(i.e. Appendix 1 - Notice of Appeal; Appendix 2 - Trial Court Judgment; etc.)
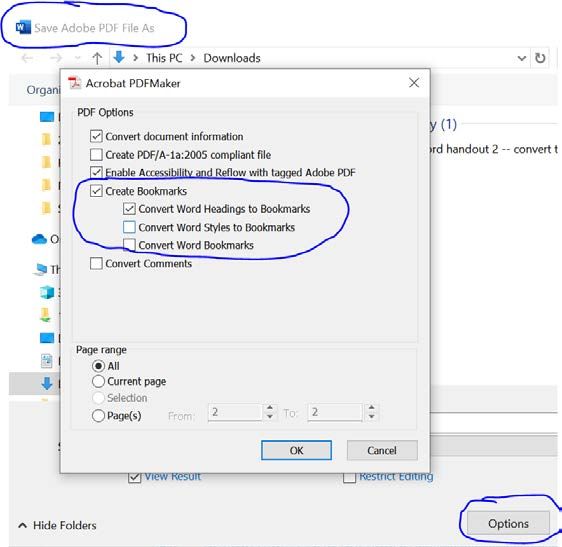
30Word Automatically-Generated Bookmarks
If you use Word's Styles feature to label headings within your document, then use the built-
in Acrobat PDF Maker to generate a PDF, the document will automatically include
bookmarks based on the document's headings. To do so, you must follow certain
instructions when converting the word file to PDF:
Or, if using the "Save as Adobe PDF" option:
31Manually Adding Bookmarks
To manually add a bookmark in Adobe Acrobat Pro:
1. Click the page where you would like to bookmark.
2. In the Bookmarks Panel, the new bookmark will appear at the top of the list. If you
would like to add a new bookmark in relation to an existing bookmark, click on the
bookmark above the location where you would like the new bookmark to appear.
The new bookmark will appear below the selected bookmark.
3. Click the New Bookmark Icon or use the command Ctrl + B on your keyboard to
create a new bookmark.
OR
Editing Bookmarks
To delete a bookmark, select the bookmark and press the delete key.
To edit the name of a bookmark, double click the bookmark to highlight the text. Retype
the name of the bookmark and press "enter" or "return."
Moving Bookmarks
To move a bookmark's location within the Bookmarks Panel, left click the bookmark
symbol beside the bookmark's name and drag the bookmark to the desired location. The
arrow and dotted line should appear in the new location. Release button and drop the
bookmark in its new location.
Nesting Bookmarks
Bookmarks can be nested beneath other bookmarks to create "tiers."
To nest a bookmark, drag it to the bookmark under which you would like it nested, and
without releasing the button, move it up and to the right. Release the mouse button once
the nested bookmark appears to be indented.
Adding Internal Links in a PDF
Like bookmarks, internal links are not required, but can be extremely helpful to the Justices
in navigating an electronic document such as a brief or record appendix.
32Adding Links in Word
Links can be added using Word's "Styles" feature, which automatically generates links for
phrases in the "Heading" styles. After the document is saved as a PDF, the links become
active.
To use this feature, highlight and right click the heading you wish to be linked, and hover
over Styles. Selecting Heading 1 or Heading 2 will generate the automatic links within the
document.
Adding Links in Adobe Acrobat Pro
Internal links can also be added directly to a PDF using Adobe Acrobat Pro. Under the
Tools tab, select Content and then Link. Click and drag a box around the words that you
would like to link. The Create Link dialog box should appear. Select Go to page view under
Link Action. Hit Next. With the Create Go To View dialog box open, navigate to the page
you wish to open when the link is clicked, then press Set Link.
33Additional Guidance on Bookmarks and Links
For more information about adding bookmarks and internal links to briefs, please see the
Appeals Court's online guide on How to Create PDFs with Bookmarks and Internal Links:
https://www.mass.gov/service-details/how-to-create-pdfs-with-bookmarks-and-internal-
links
34Inclusion of Impounded Materials in Briefs or Record Appendices
All filers must take appropriate precautions to ensure that confidential or impounded case
information does not become public. Appellate level impoundment procedures are governed by
Rule 1:15 of the Rules of the Supreme Judicial Court ("S.J.C. Rule 1:15") and
the Massachusetts Rules of Appellate Procedure. The rules apply regardless of whether the
appeal is made to a single justice or to the full court or panel. All information impounded in the
trial court will remain impounded in the appellate court, unless otherwise ordered, provided the
parties follow the required procedures. Parties must comply with Rules 16(d), 16(m), 18(a),
and 18(d) of Massachusetts Appellate Procedure if they wish to keep the information
confidential. These rules require that:
1. the parties refrain from disclosing impounded material, unless necessary.
2. the disclosing party, when disclosure is necessary, file and serve a notice of the disclosure or
filing of such information.
3. the cover of briefs, record appendices, and other filings containing impounded material clearly
indicate its inclusion (e.g., "Impounded" or "Contains references to impounded material").
4. in cases where only certain portions of the record need to be impounded, parties file a separate
record appendix volume containing only that material, its cover labeled as containing
impounded material.
5. the parties use a pseudonym or initials if a party's name is confidential or impounded.
6. a copy of any order of impoundment must be included in the record appendix.
7. the parties not disclose impounded material at oral argument unless necessary and, in such
instances, notify the clerk in advance and, in appropriate cases, make such disclosures in a
manner that protects the confidential information.
Protection of Personally Identifying Information
All parties must follow Supreme Judicial Court Rule 1:24 ("S.J.C. Rule 1:24") and Mass R.
App. P. 21 to protect Personally Identifying Information ("PII") when filing any publicly
accessible court document. This rule applies to briefs, appendices, motions, and any other filings
accessible to the public.
PII includes social security numbers, taxpayer identification numbers, driver's license numbers,
state-issued ID card numbers, passport numbers, financial account numbers, credit or debit card
numbers, and parent's birth surnames (if identified as such).
The filer of a document is responsible for redacting any PII unless a specific exemption
applies. Exemptions include a law or court order specifically requiring the information or the PII
is an account number necessary to identify an account subject to a forfeiture proceeding.
Section 10 of Rule 1:24 discusses appellate court filings in detail. PII must be redacted in the
appellate record appendix even if it was filed unredacted in the trial court. If a brief must contain
35unredacted PII pursuant to an exemption, one additional copy of the brief must be filed, labeled
"Limited Personal Identifying Information" on the cover, in which the PII has been redacted. To
file unredacted PII as part of the record appendix, parties must first obtain the leave of the
Appeals Court.
"Redacted" means a filing that either does not include complete PII or has portions of such
information whited or blacked out so they are not readable. To redact PII in documents drafted
for filing, either replace omitted information with "xxx", or use "beginning/ending with", for
example "driver's license number ending with 23", or "checking account no. xxx645". In all
documents that were not drafted for filing in court, such as copies of pre-existing exhibits, the
filer shall partially redact all personal identifying information as required by this rule. All
redactions shall be made in a way that prevents the redacted information from being read or
made visible.
Rule 1:24 has commentary from the drafting committee to provide aid in understanding and
applying the rule.
Redaction
While eFileMA allows users to designate their filings as "Public" or "Impounded," it may be
necessary for filers to redact certain information in their briefs and appendices in order to
comply with the various rules governing redaction of impounded or confidential material
in briefs and appendices. Parties are required to redact any personally-identifying
information in a publically-accessible brief or appendix.
In general, a party should avoid including personally-identifying, impounded, or
confidential material in their brief and appendix wherever possible. Where personally-
identifying information must be included, it should be redacted as follows:
Social Security Number, Driver's License/ID Card Number, and Passport Number:
All but the last 4 digits of the number must be redacted.
Example: Jodie's SSN is 555-55-5555. Her redacted number may be written
as "xxx-xx-5555," or "the SSN ending in 5555."
Parent's Birth Surname:
All but the first initial of the surname must be redacted.
Example: Jodie's name is Jodie Smith. Her redacted name is "Jodie S."
Financial Account Numbers/Credit Card Numbers:
All but the last 4 digits of the number must be redacted.
Example: Jodie's credit card number is 5500 0000 5555 0505. Her redacted
credit card number may be written as "xxxx xxxx xxxx 0505," or "the credit
card ending in 0505."
36While it is always the best option to avoid including sensitive information, sometimes it is
unavoidable. If that is the case, follow the methods below to ensure that your confidential
information is protected.
Redacting Using a Word Processor
If you have access to the original text document in a word processing system, the best way
to redact sensitive information is to do so in the original text file by locating the
information and replacing it with "xxx," an initial, or "beginning with" or "ending with"
where appropriate. For example:
Jodie Smith's checking account at Regional Bank is 5500 0000 5555 0505.
becomes
Jodie Smith's checking account at Regional Bank is xxx0505.
Redacting Using Adobe Acrobat X Pro
1. Go to View > Tools > Protection, and select Mark for Redaction.
2. A dialog box will appear to remind you that there are 2 steps to redaction: marking
content for redaction, then applying the redactions. Click OK.
3. Highlight the text you would like to redact. When you release your mouse, your blue
highlight should turn into a red box.
374. Hover your cursor over the red box to preview what the text will look like when it is
redacted.
5. Click Apply Redactions.
Redacting Using Adobe Acrobat Pro DC
1. In Acrobat Pro, select Tools > Redact > Open.
382. Select Mark for Redaction > Text & Images.
3. Highlight the text you would like to redact. When you release your mouse, your blue
highlight should turn into a red box.
4. Place your cursor over the word to preview what the redaction will look like.
5. Select Apply > OK.
39For more information on redacting personally-identifying information, please see SJC Rule
1:24.
40You can also read