Basic HTML 1 October 2003
←
→
Page content transcription
If your browser does not render page correctly, please read the page content below
Basic HTML 1
               October 2003

Information
Technologies
Copyright © 2003 University of Delaware. Permission to copy without fee all or part of this material is granted provided that the copies are not made or distributed for direct commercial advantage or profit and that the material duplicated is attributed to Information Technologies, University of Delaware. To copy otherwise or to republish requires specific permission and a fee.
Basic HTML 1

Overview
                       This class introduces you to HTML (HyperText Markup Language), an easy-to-
                       learn language for creating and formatting documents for the World Wide Web.
                       Web documents can include text, images, animation, sounds, and more.

Prerequisites
                       To take this class, you must have experience using a browser (e.g., Internet
                       Explorer, Netscape) to view documents on the Web. You must also know how to
                       create and save text files using a text editor or a word processing package and
                       have an active UNIX account.

                       Note: This tutorial is designed to be used at the Pearson Hall Training Center
                       (Room 116 Pearson Hall) on PCs running Windows XP. The exercises may not
                       work identically elsewhere.

UNIX computer accounts
                       All University of Delaware faculty, staff, and students can obtain an account on
                       the central UNIX server. This account is a privilege granted to you by the
                       University. You must act responsibly when you use it, or you can lose this
                       privilege. If you are uncertain about the proper use of computing resources, read
                       a copy of the Policy for Responsible Computing on the University’s web site
                       (http://www.udel.edu/ecce/policy.approved.html).

Conventions used in this document
                       The following conventions are used throughout the exercises in this document:

Document Conventions
                       Item                     Convention                        Example
                       Keyboard keys            UPPERCASE LETTERS                 ENTER
                       Text you can replace     italicized letters                filename
                       Text you type            mixed-case letters                gif
                                                (typewriter font)

                       All exercises are labeled as “Exercise” and are set off from the instructional text
                       by horizontal rules.

Information Technologies                                                                                     1
Basic HTML 1
Resources for learning more about WWW and HTML
There are many good online resources with information about preparing
documents for the Web, including HTML tutorials, style guides, editors, and
other tools. You can find many of them listed at http://www.udel.edu/ideacenter/.
Class objectives
In this class, you will prepare a document for the Web. When you complete the
class, you should:
be familiar with the basic structure of HTML.
be able to recognize and identify HTML tags.
be able to create an HTML document that includes the following elements:
• basic document-level tags
• headings
• paragraph and line breaks
• lists
• styles (bold, italics, etc.)
• horizontal rules
• images
• hyperlinks
be able to publish your document on a Web server using the SSH Secure
Shell File Transfer program.
2 October 2003Basic HTML 1
Introduction
HyperText Markup Language (HTML) is the language used to create documents
for the World Wide Web. A markup language consists of characters or symbols
that you insert in a text file to indicate how the text should look when it is
displayed or printed. A Web browser allows others to view your work; browsers
retrieve Web information and format Web documents.
Designing documents for the Web requires a shift in the way you think about
presenting your material. When you prepare a document for the Web, you
concentrate on the content and structure of your information rather than on how
the information will look on the page (fonts, etc.). In fact, what you put on the
Web may look very different on different computers.
On the Web, it is the individual browser and often also the user that control what
font will be used to display headings or text, whether something will be bold or
italics, and so forth. So when you write text for the Web, don’t worry about what
font you are using. Instead, think about the content of your document and about
the most effective way of structuring your message.
Planning your Web site
Planning your Web site ahead of time will help you stay organized and present
your ideas to your audience in the best possible way. It is helpful to sketch your
site on paper so that you have a visual image of how it will look. Each site begins
with a home page that can lead to other pages, depending upon how much
information you want to convey. Some helpful considerations in planning your
site are
1. What is your purpose for doing a Web page? What type of information do
you want to provide for people? How can you best organize that information
so that people will be able to find it easily?
2. Who is your audience? How should you present your information for the
audience you want to reach? Are they interested in quick facts? In getting
instructions for registering for classes? In being entertained?
Once you’ve identified your audience, you can decide what type of a Web
page will appeal to them. Is plain text appropriate or will your audience
expect graphics, sound, and animation?
Knowing your purpose and audience ahead of time will guide your decisions
about structuring your Web site.
Information Technologies 3Basic HTML 1
Setting up your Web directory
For people to see a Web site, its files must be placed on a Web server. At the
University of Delaware, a UNIX Web server named “udel.edu” holds
individuals’ Web files. The “www.udel.edu” UNIX Web server holds official
University Web files. To allow the “udel.edu” server to find your Web files, you
must place them in a directory on your account on Copland called “public_html.”
If you have never created a public_html directory, follow the directions below to
do so.
Exercise 1: Setting up a public_html directory
1. In the Applications folder, double-click the “Secure Shell Client” icon. In the
dialog box that appears, type your username and click “Connect.” If you see
a question about saving your “host key” to the local database, answer “No.”
In the next dailog box, type your password and click “OK.”
2. Create your public_html directory and give it the permissions necessary to
display web pages. At the UNIX (%) prompt, type
source /www/htdocs/learn/usered/html-setup
3. Press the ENTER key.
In addition to your public_html directory, you now have two shortcut com
mands (type the command at the UNIX % prompt):
* webpublish--If you create a subdirectory of your public_html directory,
you must make the files it contains available for readers. To do so, log into
Copland, change to the new directory using the "cd" command, then type
"webpublish" at the UNIX prompt.
* webdiskusage--You can find out how much space your files occupy in your
home directory by typing this command, then pressing the ENTER key. For
information about quotas, read the IT Help Center disk quota information.
4. Click the Minimize (underscore) button at the top right of the window to
minimze it.
HTML tags
Before you write an HTML document, decide how you will structure it. What
will the major heading be? How many subordinate headings will you have; how
much text will you include; will you use lists, and so on. You’ll present your
structure to your audience through special codes called HTML tags.
4 October 2003Basic HTML 1
HTML documents consist of text, images, and HTML tags for labeling each
element. Tags come in pairs (i.e., a beginning tag and an ending tag) and are
enclosed by angle brackets (the “less than” and “greater than” signs). The format
for an HTML tag is
text
Note that the ending tag name is preceded by a slash (/). It is important to include
the ending tag with its slash character. Otherwise, the rest of your document will
have the properties of the tag you forgot to finish.
Preparing an HTML document
In this class, you will prepare an HTML document for viewing on the Web. The
procedure for preparing any Web document is
1. Type your text in a text editor: use Notepad in Windows, TextEdit on the
Macintosh, or pico in UNIX. If you use a program like Microsoft Word, you
must save your file as a text file before you can use it on the Web. (A text
file contains only text; it does not contain any formatting codes [for layout,
headings, etc.].)
2. Save the file as a text file.
3. View the Web page you’ve created in your Web browser.
In the following exercise, you will begin your HTML file. The same HTML tags
are used for every browser.
Exercise 2: Creating an HTML file
1. To start Notepad,
A. Click the “Start” button.
B. Highlight “All Programs.”
C. Highlight “Accessories.”
D. Click “Notepad.”
E. From the “Edit” menu in NotePad, select “Word Wrap.” (If “Word
Wrap” is already checked, you need do nothing.)
Continued on next page
Information Technologies 5Basic HTML 1
Exercise, continued
2. Type the following text. Press the ENTER key at the end of each line:
Preparing a Document for the World Wide Web
Preparing a Document for the World Wide Web
3. From the “File” menu, select “Save.” When the “Save As” dialog box
appears, click the down arrow next to the “Save In:” box. Click (C:), then
double click “Scratch.” Give your file the name
index.html
4. Open the browser. In the Applications folder, double-click the “Netscape”
icon.
5. From the File Menu, select “Open File.”
6. Select the drive or folder where your HTML file is located.
7. Select the name of the file you want to open:
index.html
8. Click “Open.” Your HTML file will appear in the browser window.
9. Return to your text editor (Notepad) by clicking its name in the Taskbar
at the bottom of the screen.
Note: As you continue to create the document, check its appearance often. To do
this:
1. Save the changes that you’ve made.
2. From the appropriate menu or toolbar in your browser, select “Reload
current page” to view the changes.
There is no need to close either the editor or the browser as you work.
6 October 2003Basic HTML 1
The file you have just created contains the essential elements of every HTML
file:
* Every HTML file name has two parts, separated by a period. The first part is
any name you want to give the file. The second part must be “html.”
* Every HTML file begins and ends with the and tags.
The section of your document contains its title (and may contain
other preliminary information). Information in the section is meant
for the browser and is not generally displayed on the screen (except for the
which appears in the browser window at the very top of the screen).
Text and images that you want to see displayed on the screen go into the
section of your document.
Naming your home page
Most Web sites contain multiple files that are linked to a “home page” (your
main or introductory page). The most efficient way to handle a home page is to
give it the name
index.html
The advantage to naming your home page “index.html” is that most browsers
will display the “index.html” file if no specific HTML filename is given. Thus,
people searching for your personal Web page on the “udel.edu” Web server only
have to know your username to be able to find your files, and people on the
University’s central Web server only have to know the name of the directory in
which your files reside. They do not have to remember an HTML filename to get
to your information.
Headings
The organization of your document depends upon your effective use of headings
to produce manageable sections. There are six heading levels in HTML,
numbered 1 through 6, from most important to least important:
Heading level 1 most important
Heading level 2
Heading level 3
Heading level 4
Heading level 5
Heading level 6 least important
Headings are usually larger and bolder than regular HTML text. However, do not
assume that the way each heading appears on your computer screen will be the
Information Technologies 7Basic HTML 1
way it looks on every computer. Each browser can define how the headings look,
and the user can often change settings too. For this reason, use headings to show
how your information is organized logically. This means that you would use a
level 3 heading after a level 2 heading and not before.
The first heading of a document—which often repeats the text used for the
title—should use an tag. Most documents use only one tag. Headings
are automatically followed by a blank line.
Paragraphs
To indicate paragraphs in HTML, use the and tags.
1. The paragraph tag () indicates breaks between paragraphs by inserting a
blank line between them on the browser page.
2. Blank lines in your text file are ignored. Only a tag produces a blank
line on the browser page.
3. Tabs and multiple spaces are collapsed into one space.
4. Word wrapping can occur anywhere in your text document and doesn’t
affect the appearance of your browser page. In other words, you could type
whole paragraphs or your entire HTML document on one line and still have
the page nicely formatted in the browser. (This isn’t recommended because
it makes editing the text difficult.)
5. To include short lines in your Web document with no extra spaces between
lines (for example, lines in a mailing address or a poem), use the line break
tag.
To see how the paragraph and line break tags work in HTML, complete the
following exercise:
Exercise 3: Adding paragraphs
1. In your “index.html” file, between the and the lines, type the
following as it appears here, including the blank line. To make your text file
easy to edit, press the ENTER key at the end of each line.
Creating HTML pages takes planning,
but the results are worthwhile.
Imagine the excitement of having your Web page seen by
people all over the world.
Continued on next page
8 October 2003Basic HTML 1
Exercise, continued
Keep your Web pages to a few screens each.
You can link information together, so don’t worry about
including everything at once.
Remember that readers do not always find
your home page first.
A link from somewhere else can lead them to
the middle of your information,
so try not to use words like
back
forward
previous
next
to indicate navigation on your pages.
2. Save your text file.
3. In the browser window, click “Reload current page” to see the text you have
added.
You might prefer to leave blank lines between paragraphs in your HTML text
file to make it more readable as you’re editing, but that’s optional. Remember
that you will see blank lines on the browser screen only if you include a tag.
HTML lists
After headings, lists are the next most important way of organizing information
for your viewers. Lists are useful for creating tables of contents, step-by-step
instructions, outlines, glossaries, etc. The most common HTML lists are
Type of list Appearance on page
Ordered lists numbered
Unordered lists bulleted
Definition lists a term followed by a definition
Note: You can include a tag within a list item to move text to the
following line. The same indentation will be preserved, but no new bullet or
number will be produced.
Information Technologies 9Basic HTML 1
Ordered lists
Ordered lists () number their items sequentially. Tags for an ordered list are
List item 1
List item 2
List item 3
The list begins and ends with the ordered list tags and . Each item in
the list is indicated by a “list item” tag. This pattern is the same for most
lists with only the tag for the type of list changing.
The ordered list tags above would produce the following when you view your
HTML document in a browser:
1. List item 1
2. List item 2
3. List item 3
Unordered lists
Unordered lists () use bullets to indicate items. Tags for an unordered list
are
List item 1
List item 2
List item 3
The unordered list begins and ends with the tags and . Each item in the
list is indicated by a list item tag.
The unordered list tags above would produce the following in your HTML
document:
• List item 1
• List item 2
• List item 3
10 October 2003Basic HTML 1
Definition lists
Definition lists () are a little different from other lists because they use an
additional tag. Tags for a definition list are
Definition term
Definition
Definition term
Definition
The list begins and ends with the definition list tags and . There are
separate tags for the definition term and for the definition itself
. The definition term consists of a single line, while the definition can
contain multiple lines or paragraphs.
Definition lists are useful for glossaries and for any situation where you want to
set off one element (the definition term) and expand upon it (the definition).
The definition list tags above would produce something like the following in
your HTML document:
Definition term
Definition
Definition term
Definition
You can “nest” lists and types of lists (put one inside the other). Nesting is
another way to show the organization of your material.
The next exercise gives you practice using HTML lists.
Exercise 4: Building a list
1. In your “index.html” file, type the following text just above the tag:
Following are some HTML features to help you build a
great page:
HTML structural elements
Formatting tags
Continued on next page
Information Technologies 11Basic HTML 1
Exercise, continued
Heading tags
Paragraph tags
List tags
2. Save your file and then click “Reload current page” in the browser to view it.
Note: You’ll continue the ordered list in the next exercise.
Customizing the look of your lists
The challenge in using lists and nested lists is to begin and end each list in the
proper place. Failure to do so results in errors that become immediately apparent
when you view your Web document. One way to keep things straight for yourself
is to indent successive lists so that like elements are under each other. Notice that
Web browsers indent nested lists, making the structure clear.
How lists appear depends upon the browser being used and upon how the
individual user has set up the browser. For example, the bullet that appears in a
bulleted list might be a filled-in circle on one computer, an open circle on
another, and a square on a third. Some browsers put definitions on separate lines,
some do not. As the author, your concern is to indicate only what kind of list is
being presented.
You can exercise some control over how lists are numbered or over what kinds of
bullets are used by including modifiers with your HTML list tags. These
modifiers are called “attributes,” and they indicate exactly how the tag is to be
modified. For example, the “type” attribute, used with a list tag, allows you to
specify different numbering or bullet schemes. Attributes, in turn, can have
“values” that further define them. Thus, if you give the “type” attribute a value of
“A,” your ordered list will appear with capital letters. Values should be enclosed
in quotation marks. Similarly, other HTML tags have associated attributes and
values that let you control how your page looks. Directions for using the “type”
attribute with list tags follow:
Ordered lists
Tag:
type=“1” for numbers (default)
type=“A” for capital letters
type=“a” for lowercase letters
type=“I” for capital Roman numerals
type=“i” for lowercase Roman numerals
12 October 2003Basic HTML 1
Unordered lists
Tag:
type=“disc” for a solid round bullet
type=“circle” for a hollow round bullet
type=“square” for a hollow square bullet
Writing HTML with style
Another way to set off text in your Web documents is through the use of styles
like bold, italics, and so on. To indicate that text is to have a certain style,
enclose it in tags that define the style:
bold text bold text
italic text italic text
typewriter text typewriter text
Styles can be combined with each other. To combine styles, nest one style within
another. For example,
bold italics bold italics
The next exercise continues the ordered list and lets you see the effects of the
style tags on the text they surround.
Exercise 5: Using style tags
1. In your “index.html” file, type the following text just above the tag:
Style tags
Bold text
Italic text
Typewriter text
2. Save your file and then click “Reload current page” in the browser to view it.
Information Technologies 13Basic HTML 1
Other ways of setting off text
Preformatted text
If you have text for which you want to retain line breaks and spacing within
lines, use the HTML preformatted text tags:
preformatted text
Preformatted text is useful if you want to include a poem where spacing is an
important element, a computer program, directions for using commands, etc.
Preformatted text appears in fixed-width characters (typewriter text) with lines
and spaces as you typed them. Below is an example of how preformatted text
would appear in your text file:
There was an old woman who lived in a shoe.
She had so many children, she didn’t know what to do.
She gave them some broth without any bread.
She spanked them all soundly and put them to bed.
Here’s how it would appear on your Web page:
There was an old woman who lived in a shoe.
She had so many children, she didn’t know what to do.
She gave them some broth without any bread.
She spanked them all soundly and put them to bed.
Long quotations
To indicate long quotations in HTML, use the “blockquote” tag:
This is for long quotations.
Within the blockquote tags, include the tags you would usually use for formatting
text (, , ). How the blockquote appears depends upon
the browser with which it is viewed. Some browsers indent the quote while
others italicize it. You can use multiple paragraphs within the blockquote tags.
Horizontal rules
To separate major sections of your HTML page or to divide text from graphics,
use a horizontal rule tag:
14 October 2003Basic HTML 1
This tag has no text associated with it and stands alone. It will insert a rule
completely across your HTML page.
You can add attributes to the tag to change its appearance and increase the
graphic interest of your page.
The “width” attribute defines the width of the rule in pixels. You can also define
the width as a percentage of your screen. The “size” attribute defines the height
of the rule in pixels. The tags look like this:
where “n” is the number of pixels.
where “n” is the percentage of the screen you want
your rule to occupy.
where “n” is the number of pixels high your rule should be.
Note: The pixel is a very small unit. Try this exercise to get an idea of how large
to make your measurements:
Exercise 6: Adding a horizontal rule
1. Just above the tag in your document, type the following:
2. Save and reload your document.
Including images in an HTML file
One of the most exciting features of the Web is that it allows you to include
images in your document. Images that are viewed within the browser page are
called “inline images.” To create an inline image:
Convert your photograph or other image to “gif” or “jpg” format. Scanning
software and other software programs allow you to do this easily.
It is possible to include images located anywhere on the Web in your
documents; however, it is easiest to store the images in the same directory
or folder as your text file.
Filenames for images are case-sensitive. This means that “sunset.gif” is not
the same as “SUNSET.gif.”
Information Technologies 15Basic HTML 1
The tag for inline images is
or
In this tag, “img” indicates that you are including an image, and
“src=” identifies the image (“filename.gif” or “filename.jpg”). Be sure to
include the quotes around the filename.
The “alt” tag is used to include text that describes the image. Alternate text
makes Web content accessible to people with disabilities and to those
whose browsers do not display graphics.
You can place graphics either on their own lines on your Web page or
include them right in your text.
To include a graphic on a line by itself (for example, before or after a
heading), type the image tag in the appropriate place.
If the image occurs in the middle of text and you want extra space around
the image, include paragraph tags before and after the image tag.
You can place images right in your text by typing the image tag as part of a
paragraph. Suppose in the text you’ve already typed, you want to put a
spider web next to your first heading, “Preparing a Document for the World
Wide Web.” In your HTML file, immediately after the tag, you
would type
The entire line would look like this:
Preparing a Document for
the World Wide Web
In the next exercise, you will include an inline image on your Web page.
Exercise 7: Including an image
1. In your HTML file, immediately after the tag, type the following:
2. Save the changes you’ve made to the file.
3. In your Web browser, click “Reload current page” to view the image.
16 October 2003Basic HTML 1
If you type the image tag as above, the bottom of the image is aligned with the
baseline of your text (this is the default). Your image would look similar to the
one below:
Preparing a Document for the World Wide Web
You can align the top of the image with the top of your text by using the
following options in your “img” tag:
Your page would look similar to this:
Preparing a Document for the World Wide Web
You can align the center of the image with the baseline of your text by using the
following options in your “img” tag:
Your page would look similar to this:
Preparing a Document for the World Wide Web
Information Technologies 17Basic HTML 1
You can also have text flow around images by aligning the image to the left or
right of the page. The tags would look like this:
(image on the left; text to the right of it)
(image on the right; text to the left of it)
In the next exercise, you will add an “align” attribute to the “img” tag and see
how it changes the look of your document.
Exercise 8: Changing image placement
1. In your HTML file, add align=“left” to the image tag you’ve already
created. The tag should look like this:
2. Save the changes you’ve made to the file.
3. In your Web browser, click “Reload current page” to view the image.
Hypertext links
What makes hypertext “hyper” is its ability to link to other information. This can
be information in the same document, in another of your site’s documents, or
from documents anywhere in the world. It can be text, graphics, sounds, movies,
and more. Links appear on your Web page as highlighted (and sometimes,
underlined) text.
To create a link, you use the “anchor” tag. Anchors mark the beginning and end
of a hypertext link. The tag looks like the one below:
Interesting Web sites
The first part of a link contains the opening anchor tag. In the tag
• “a” indicates the anchor.
• “href” (Hypertext Reference) indicates a link to another object
(text, an image, etc.).
• The filename indicates the object being referred to. Instead of a
filename, you can include a URL (an Internet address) that names a
resource somewhere else on the Internet.
18 October 2003Basic HTML 1
The text after the opening tag (in the above example, “Interesting Web
sites”) will appear highlighted on your page.
The link ends with the closing anchor tag .
Note: Be sure that you don’t leave a space between your text and the closing
anchor tag or press ENTER before typing the closing anchor tag. Doing so
will cause a blank underlined space after your linked text.
Links to other documents in the same directory (folder)
The easiest hypertext links are to other documents in the same directory (folder)
as the document you are creating. For example, suppose you have discovered that
certain characters will not work as regular text in your Web documents because
they are part of HTML tags (e.g., “”).
In your page on preparing documents for the Web, you might want to add a link
to a document named “special.html” that shows how you can use special
characters in your Web documents. At the appropriate place in your text, you
would type
Special characters
On your Web page, “Special characters” will be highlighted and clicking those
words will take you to another document about using special characters.
The next exercise will allow you to create a link to another HTML document. In
addition, the link will be part of the list of HTML structural elements you have
already begun.
Exercise 9: Linking to a document in the same directory
1. In your HTML file, above the tag, type
Special characters
2. Save the changes to your HTML file.
3. In your Web browser, click “Reload” to view the page.
4. Click the “Special characters” link to see the page you have linked to.
Note: You can find many more references for special characters listed at
http://www.hotwired.lycos.com/webmonkey/reference/special_characters/.
Information Technologies 19Basic HTML 1
Links to other Internet resources
You can link to other resources anywhere on the Internet by creating a hypertext
reference to a URL (Uniform Resource Locator—the Web’s addressing system).
For example, suppose you know that there is a site that contains information
about creating Web pages as well as tutorials to help you do so. You might want
to add the Internet address to your Web page. To do this, you would type
Webmonkey: Web
Developer’s Resource
Notice that the entire URL for Webmonkey is included between the quotation
marks. In your text, “Webmonkey: Web Developer’s Resource” will be
highlighted and clicking the text will take you to the Webmonkey home page.
The next exercise will allow you to create a link to an Internet resource.
Exercise 10: Linking to Internet resources
1. In your HTML file, after the tag that follows the line, “to indicate
navigation on your pages,” type
The
Webmonkey: Web Developer’s Resource provides
tutorials for HTML and other Web programs. There is
plenty of information available to help you become an
expert spinner of Web documents.
2. Save the changes to your HTML file.
3. In your Web browser, choose “Reload current page” to see the link to the
Webmonkey site.
4. Click the highlighted “Web Monkey: Web Developer’s Resource” to see
what categories of information are offered.
5. Click the “Back” button on the navigation toolbar to return to your page.
Avoid the “click here” trap
When someone looks at your HTML file, the first thing they will notice is the
highlighted text that indicates information you have linked to. If readers see five
or six occurrences of “click here” on your page, they may not be motivated to
read through the text to discover what yet another “click here” refers to. A more
20 October 2003Basic HTML 1
useful practice is to choose one or two key words that will lead your reader to the
important information directly. Thus having “Bill of Rights” highlighted
(highlighted text indicated here by underlining) on your page is much more
useful than “Click here for the Bill of Rights.”
Signature
To identify your home page to its viewers, include a signature block at the
bottom of the page with contact and copyright information. The signature would
look something like this:
Copyright © 2003 University of Delaware
Comments or questions
Include the signature as the last element of your page before the tag.
Signatures are often preceded by an tag.
In the following exercise, you will put a signature on your page. Substitute your
own e-mail address for the italic address in the “mailto” on the following page.
Exercise 11: Adding a signature
1. In your “index.html” file, type the following just above the tag:
Copyright © 2003 University of Delaware
Comments or
questions
2. Save the changes to your file.
3. In your Web browser, click “Reload” to see the copyright and the “mailto”
link on your page.
Page Source
One of the best ways to learn HTML is to look at how other people have put
together their Web pages. Most browsers allow you to look directly at the HTML
tags for a particular document. For example, one of the choices from the
Netscape “View” menu is “Page Source.” When you choose “Page Source” from
the “View” menu, you will see a window that contains the text as well as the
HTML tags for the document you are viewing. You can then compare particular
sections of the finished document with the HTML version to learn how the
document was created.
Information Technologies 21Basic HTML 1
In the next exercise, you will view the source of the document you have created.
Exercise 12: Viewing the document source
1. From the browser’s “View” menu, choose “Page Source.”
2. Compare what you see on your Web page with the text in the Source
window.
3. To close the “Page Source” window, click the “X” in the upper-right corner
of the window.
4. To exit Notepad, choose “Exit” from the “File” menu.
Using the SSH Secure Shell File Transfer program to publish and
manage your Web files
For other people to be able to see your Web page, you must move it to a Web
server. Files you move to your Copland public_html directory can be viewed on
the University’s “udel.edu” Web server. To move your files to your UNIX
public_html directory, you will use the SSH Secure File Transfer program.
You can use the SSH Secure File Transfer program to publish new files and to
copy or remove existing files. (This program is available from the UD Software
Download web site ). To use SSH Secure File Transfer,
you must know where your files reside, both on your computer’s hard disk and in
your UNIX home directory.
On a Windows XP system, a simple way to find a file is to click the “Start” menu
in the taskbar, select “Search,” then “For Files or Folders.” Select “All files and
folders” from the left window pane. Type the name of the file you are looking for
in the box and choose “Search.” Another way to find files is to navigate through
directories (also called folders).
In the following exercise, you will use SSH Secure File Transfer to upload your
Web page to your public_html directory on the udel.edu Web server.
22 October 2003Basic HTML 1
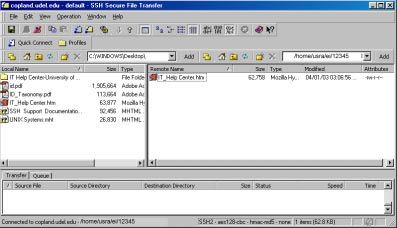
Exercise 13: Using the SSH File Transfer window to transfer files
The SSH File Transfer window allows you to transfer files from your desktop
computer to a remote computer and from a remote computer to your desktop
computer. You can transfer text files, graphics files, and files created by applica
tions such as Microsoft Word.
1. Click the SSH Secure Shell Client desktop icon in the taskbar at the bottom
of the Windows screen to maximize its window.
2. On the Toolbar, click the File Transfer Window button:
You will see a window similar to the one below:
Local Name
The Local Name pane on the left side of the window lists the files and
folders on your computer and enables navigation very similar to that in
Windows Explorer. Files can be dragged from your computer (Local
Name) to the server (Remote Name) or from the server to your computer.
Continued on next page
Information Technologies 23Basic HTML 1
Exercise, continued
Remote Name
This area displays directories and files in your home directory on the
UNIX server. You may also view other server directories and files as
needed.
File Transfer Status and History
The status of each uploaded or downloaded file will appear on the
Transfer tab. All actions are displayed in an exportable history list. The
Queue tab displays files ready for upload or download.
3. In the Remote Name window pane, double-click the “public_html” folder.
4. Click the (ASCII) button. (This mode is used for files that contain
only text or program source code. Examples are files that end with .html,
.htm, and .txt.)
5. In “Local Name” pane, select the “Scratch” directory, then select the
index.html file by clicking the file name. Hold the CRTL key down and
select the special.html file. Release the CTRL key and mouse button
when you have selected your files.
6. Click the highlighted group of files and drag the selection to the “Remote
Name” window pane.
Release the mouse button and observe the file transfer. If a file name in the
destination folder is the same as one you are transferring, you will be
asked if it is OK to replace it. You will see the progress of the transfer on
the Transfer tab at the bottom of the screen. The file will be listed in the
desired location if the transfer was successful.
7. Click the (Binary) button. (This mode is for files that contain
formatting codes such as files produced by word processing, spreadsheet,
or graphics programs. Examples are Microsoft Word, Microsoft Excel,
.gif, and .jpg files.)
Note: If you are unsure of the format of the files you want to transfer, use the
(Auto) button.
8. Click the spid.gif file and drag it to the “Remote Name” window pane.
Continued on next page
24 October 2003Basic HTML 1
Exercise, continued
Note: If you do not see your file in the target location, click the Refresh
button .
To transfer files from the server directory to your local computer, follow the
directions above, dragging the selected files from the right to the left window
pane.
How to set file and folder permissions (attributes)
If you are uploading a file that others will view on the web, you must ensure that
web users will be able to see the pages. Even though people may type the correct
web address to view your site, they will not be able to see the material without
permission. The attributes for a file or the folder it is in must be set correctly on
the server to give this permission.
Attributes are shown to the far right of the file or folder name. Use the scroll bar
at the bottom of the file window to reveal the attributes column.
Users
Files and folders can have three types of users:
Owner The user with full rights to all files and directories within a
specific server directory space; this user can change file and folder
attributes.
Group A select group of users listed by the owner.
Other All other users; users accessing your pages and directories through
the web or the network.
Information Technologies 25Basic HTML 1
Attributes
Files and folders can have the following attributes on the server:
D The listing is a directory.
R The file or folder can be read (viewed).
W The file or folder can be written to.
X The folder can be opened to access files (execute); the user can
view web pages in the folder.
Recommended Attributes
The following settings are recommended to enable you to share your web
pages over the Internet. Verify that that these settings have been applied to
your web folder and all files and folders in it.
Folder Settings
File Settings
26 October 2003Basic HTML 1
Note: If you are part of a group where more than one person will make changes
to the web files, click the “Write” check box for the group. The Permission mode
will change to 664.
Exercise 14: Changing Attributes
1. Right-click the file or folder name.
2. Click Properties.
3. Click the check box for the desired attribute for the Owner, Group, and Other
categories.
4. Click OK.
How to delete files or folders using the SSH File Transfer program
1. Select a file or folder you wish to delete from either the Local Name or
Remote Name window pane.
2. From the Operation menu, select Delete to delete the file or folder.
Alternatively, you can click the red X on the File bar.
3. A Confirm Delete dialog box appears, allowing you to confirm that you
really want to delete the selected files or folders. Click Yes to delete the
selected items or Cancel to keep them.
Quit the SSH File Transfer program and view your Web page
In the following exercise, you will quit the SSH File Transfer program and view
your Web page on the “copland” Web server:
Exercise 15: Quitting the SSH File Transfer program and viewing your Webpage
1. On the Toolbar, click the Disconnect button to quit the current File
Transfer session.
2. From the File menu, select Exit to quit the SSH File Transfer program.
Continued on next page
Information Technologies 27Basic HTML 1
Exercise, continued
3. To view your Web document, in the browser “Location” box, type
http://udel.edu/~username/
substituting your UNIX username for username.
If you named your file anything other than “index.html,” you will have to
type the filename after the final slash. Press the ENTER key.
4. Click the X in the upper-right corner to close the browser window.
Finding your files online
For the “udel.edu” Web server, someone searching for your web page would type
http://udel.edu/~username
where username is your UNIX username.
If your files were on the “www.udel.edu” central Web server, someone searching
for your Web page would type
http://www.udel.edu/directoryname/
28 October 2003Basic HTML 1
HTML tags
placed at the very beginning and at the end of a
document
placed after the tag; the “head” contains
general information about the document. Use the
tag at the close of the “head” section.
placed between the head tags. Search engines
use the title to find your page.
placed after the tag and before the final
tag. Contains the information that
appears on your web page in the browser
window.
There are 6 levels of headings, to .
often uses the same text as the title.
Heading levels indicate the importance of text in
your document:
heading level 1 most important level
heading level 2
heading level 3
heading level 4
heading level 5
heading level 6 least important level
inserts an image
indicates that you want the text between these
tags to display as preformatted text—exactly as
you designed it
bold
italic
typewriter spacing (monospaced)
sets off a long quotation
Information Technologies 29Basic HTML 1
unordered, bulleted list (without numbers)
list item
x can be “disc” (round solid bullet), “circle”
(round hollow bullet) or “square” (square
hollow bullet)
ordered list (with numbers)
list item
x can be “1” (for numbers [default]), “A”
(capital letters), “a” (lowercase letters), “I”
(capital Roman numerals), or “i” (lowercase
Roman numerals)
a definition list (a term followed by a definition)
definition term
definition
inserts a paragraph break
inserts a line break
inserts a horizontal rule
30 October 2003You can also read