Clock Control Block (ALTCLKCTRL) IP Core User Guide - Intel
←
→
Page content transcription
If your browser does not render page correctly, please read the page content below
Clock Control Block (ALTCLKCTRL) IP Core
                                                                                       User Guide

101 Innovation Drive
San Jose, CA 95134
www.altera.com

UG-MF9604-2018.04.04            Document last updated for Altera Complete Design Suite version:       UG-MF9604-
                                                                    Document publication date:         2018.04.04

                                                                                                  Feedback Subscribe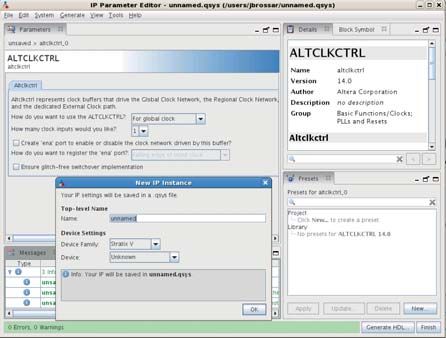
© 2018 Altera Corporation. All rights reserved. ALTERA, ARRIA, CYCLONE, HARDCOPY, MAX, MEGACORE, NIOS, QUARTUS and STRATIX words and logos
are trademarks of Altera Corporation and registered in the U.S. Patent and Trademark Office and in other countries. All other words and logos identified as
trademarks or service marks are the property of their respective holders as described at www.altera.com/common/legal.html. Altera warrants performance of its               ISO
semiconductor products to current specifications in accordance with Altera's standard warranty, but reserves the right to make changes to any products and               9001:2008
services at any time without notice. Altera assumes no responsibility or liability arising out of the application or use of any information, product, or service         Registered
described herein except as expressly agreed to in writing by Altera. Altera customers are advised to obtain the latest version of device specifications before relying
on any published information and before placing orders for products or services.

April 2018     Altera Corporation                                                                                               Clock Control Block (ALTCLKCTRL) IP Core
                                                                                                                                                             User Guide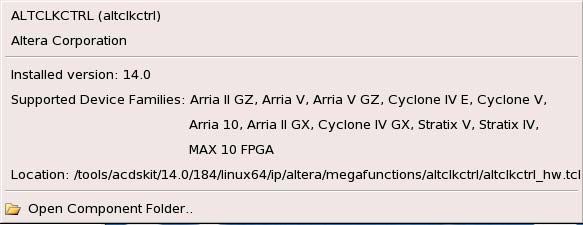
Contents                                                                                                                                                                    iii

                                                                                                                                                       Contents

Chapter 1. About this Megafunction
   Features . . . . . . . . . . . . . . . . . . . . . . . . . . . . . . . . . . . . . . . . . . . . . . . . . . . . . . . . . . . . . . . . . . . . . . . . . . . . . . . . 1–1
   Device Support . . . . . . . . . . . . . . . . . . . . . . . . . . . . . . . . . . . . . . . . . . . . . . . . . . . . . . . . . . . . . . . . . . . . . . . . . 1–1

Chapter 2. Parameter Settings
   MegaWizard Parameter Settings . . . . . . . . . . . . . . . . . . . . . . . . . . . . . . . . . . . . . . . . . . . . . . . . . . . . . . . . . . 2–1
   Command Line Interface Parameters . . . . . . . . . . . . . . . . . . . . . . . . . . . . . . . . . . . . . . . . . . . . . . . . . . . . . . . 2–5

Chapter 3. Functional Description
   Clock Control Block . . . . . . . . . . . . . . . . . . . . . . . . . . . . . . . . . . . . . . . . . . . . . . . . . . . . . . . . . . . . . . . . . . . . . 3–1
     Global Clock Control Block . . . . . . . . . . . . . . . . . . . . . . . . . . . . . . . . . . . . . . . . . . . . . . . . . . . . . . . . . . . . . 3–2
     Regional Clock Control Block . . . . . . . . . . . . . . . . . . . . . . . . . . . . . . . . . . . . . . . . . . . . . . . . . . . . . . . . . . . 3–3
     External PLL Output Clock Control Block . . . . . . . . . . . . . . . . . . . . . . . . . . . . . . . . . . . . . . . . . . . . . . . . 3–3
     Clock Enable Signals . . . . . . . . . . . . . . . . . . . . . . . . . . . . . . . . . . . . . . . . . . . . . . . . . . . . . . . . . . . . . . . . . . 3–4
        Single Register Clock Enable Circuit . . . . . . . . . . . . . . . . . . . . . . . . . . . . . . . . . . . . . . . . . . . . . . . . . . 3–4
        Double Register Clock Enable Circuit . . . . . . . . . . . . . . . . . . . . . . . . . . . . . . . . . . . . . . . . . . . . . . . . . 3–5
     Clock Enable Timing . . . . . . . . . . . . . . . . . . . . . . . . . . . . . . . . . . . . . . . . . . . . . . . . . . . . . . . . . . . . . . . . . . 3–5
   Connectivity Restrictions . . . . . . . . . . . . . . . . . . . . . . . . . . . . . . . . . . . . . . . . . . . . . . . . . . . . . . . . . . . . . . . . . 3–5
     General Restrictions . . . . . . . . . . . . . . . . . . . . . . . . . . . . . . . . . . . . . . . . . . . . . . . . . . . . . . . . . . . . . . . . . . . 3–5
   ALTCLKCTRL Megafunction Ports . . . . . . . . . . . . . . . . . . . . . . . . . . . . . . . . . . . . . . . . . . . . . . . . . . . . . . . . 3–7
     Input Ports . . . . . . . . . . . . . . . . . . . . . . . . . . . . . . . . . . . . . . . . . . . . . . . . . . . . . . . . . . . . . . . . . . . . . . . . . . . 3–7
     Output Ports . . . . . . . . . . . . . . . . . . . . . . . . . . . . . . . . . . . . . . . . . . . . . . . . . . . . . . . . . . . . . . . . . . . . . . . . . 3–7
   Prototypes and Component Declarations . . . . . . . . . . . . . . . . . . . . . . . . . . . . . . . . . . . . . . . . . . . . . . . . . . . 3–8
     Verilog HDL Prototype . . . . . . . . . . . . . . . . . . . . . . . . . . . . . . . . . . . . . . . . . . . . . . . . . . . . . . . . . . . . . . . . 3–8
     VHDL Component Declaration . . . . . . . . . . . . . . . . . . . . . . . . . . . . . . . . . . . . . . . . . . . . . . . . . . . . . . . . . 3–8
     VHDL LIBRARY-USE Declaration . . . . . . . . . . . . . . . . . . . . . . . . . . . . . . . . . . . . . . . . . . . . . . . . . . . . . . 3–9

Additional Information
   Document Revision History . . . . . . . . . . . . . . . . . . . . . . . . . . . . . . . . . . . . . . . . . . . . . . . . . . . . . . . . . . . Info–1
   How to Contact Altera . . . . . . . . . . . . . . . . . . . . . . . . . . . . . . . . . . . . . . . . . . . . . . . . . . . . . . . . . . . . . . . . Info–2
   Typographic Conventions . . . . . . . . . . . . . . . . . . . . . . . . . . . . . . . . . . . . . . . . . . . . . . . . . . . . . . . . . . . . . Info–3

April 2018   Altera Corporation                                                                                            Clock Control Block (ALTCLKCTRL) IP Core
                                                                                                                                                        User Guide
iv Contents Clock Control Block (ALTCLKCTRL) IP Core April 2018 Altera Corporation User Guide
Chapter 1: About this IP Core                                                                                                             1–1
Features

                                                                                                  1. About this IP Core

                            The Altera clock control block (ALTCLKCTRL) megafunction IP core that you can
                            easily configure with the IP Catalog and parameter editor.
                            The common applications of using this IP core are as follows:
                            ■     Dynamic clock source selection—When using the clock control block, you can
                                  select the dynamic clock source that drives the global clock network. However,
                                  only certain combinations of signal sources are supported, as described in “Global
                                  Clock Control Block” on page 3–2. You cannot select clock sources dynamically to
                                  drive the regional clock networks and the dedicated external clock-out path.
                            ■     Dynamic power-down of a clock network—The dynamic clock enable or disable
                                  feature allows internal logic to power-down the clock network. When a clock
                                  network is powered-down, all the logic fed by that clock network is not toggling,
                                  thus the overall power consumption of the device is reduced.

Features
                            The ALTCLKCTRL IP core provides the following additional features:
                            ■     Supports specification of operation mode of the clock control block
                            ■     Supports specification of the number of input clock sources
                            ■     Provides an active high clock enable control input

Installing and Licensing IP Cores
                            The Altera IP Library provides many useful IP core functions for production use
                            without purchasing an additional license. You can evaluate any Altera IP core in
                            simulation and compilation in the Quartus II software using the OpenCore evaluation
                            feature.
                            Some Altera IP cores, such as MegaCore® functions, require that you purchase a
                            separate license for production use. You can use the OpenCore Plus feature to
                            evaluate IP that requires purchase of an additional license until you are satisfied with
                            the functionality and performance. After you purchase a license, visit the Self Service
                            Licensing Center to obtain a license number for any Altera product. For additional
                            information, refer to Altera Software Installation and Licensing.
                            Figure 1–1. IP core Installation Path

                                                      acds
                                                         quartus - Contains the Quartus II software
                                                         ip - Contains the Altera IP Library and third-party IP cores
                                                             altera - Contains the Altera IP Library source code
                                                                  - Contains the IP core source files

                   1        The default installation directory on Windows is :\altera\;
                            on Linux it is /altera/.

April 2018   Altera Corporation                                                                       Clock Control Block (ALTCLKCTRL) IP Core
                                                                                                                                   User Guide
1–2 Chapter 1: About this IP Core
IP Catalog and Parameter Editor
IP Catalog and Parameter Editor
The Quartus II IP Catalog (Tools > IP Catalog) and parameter editor help you easily
customize and integrate IP cores into your project. You can use the IP Catalog and
parameter editor to select, customize, and generate files representing your custom IP
variation.
1 The IP Catalog (Tools > IP Catalog) and parameter editor replace the MegaWizard™
Plug-In Manager for IP selection and parameterization, beginning in Quartus II
software version 14.0. Use the IP Catalog and parameter editor to locate and
paramaterize Altera IP cores.
The IP Catalog lists IP cores available for your design. Double-click any IP core to
launch the parameter editor and generate files representing your IP variation. The
parameter editor prompts you to specify an IP variation name, optional ports, and
output file generation options. The parameter editor generates a top level Qsys
system file (.qsys) or Quartus II IP file (.qip) representing the IP core in your project.
You can also parameterize an IP variation without an open project.
Use the following features to help you quickly locate and select an IP core:
■ Filter IP Catalog to Show IP for active device family or Show IP for all device
families.
■ Search to locate any full or partial IP core name in IP Catalog. Click Search for
Partner IP, to access partner IP information on the Altera website.
■ Right-click an IP core name in IP Catalog to display details about supported
devices, installation location, and links to documentation.
Figure 1–2. Quartus II IP Catalog
Search and filter IP for your target device
Double-click to customize, right-click for information
Clock Control Block (ALTCLKCTRL) IP Core April 2018 Altera Corporation
User GuideChapter 1: About this IP Core 1–3
Using the Parameter Editor
1 The IP Catalog is also available in Qsys (View > IP Catalog). The Qsys IP Catalog
includes exclusive system interconnect, video and image processing, and other
system-level IP that are not available in the Quartus II IP Catalog.
Using the Parameter Editor
The parameter editor helps you to configure your IP variation ports, parameters,
architecture features, and output file generation options:
■ Use preset settings in the parameter editor (where provided) to instantly apply
preset parameter values for specific applications.
■ View port and parameter descriptions and links to detailed documentation.
■ Generate testbench systems or example designs (where provided).
Figure 1–3. IP Parameter Editors
View IP port
and parameter
details
Legacy parameter
editors
Specify your IP variation name Apply preset parameters for
and target device specific applications
Specifying IP Core Parameters and Options
The parameter editor GUI allows you to quickly configure your custom IP variation.
Use the following steps to specify IP core options and parameters in the Quartus II
software. Refer to Specifying IP Core Parameters and Options (Legacy Parameter
Editors) for configuration of IP cores using the legacy parameter editor.
1. In the IP Catalog (Tools > IP Catalog), locate and double-click the name of the IP
core to customize. The parameter editor appears.
2. Specify a top-level name for your custom IP variation. The parameter editor saves
the IP variation settings in a file named .qsys. Click OK.
April 2018 Altera Corporation Clock Control Block (ALTCLKCTRL) IP Core
User Guide1–4 Chapter 1: About this IP Core
Specifying IP Core Parameters and Options
3. Specify the parameters and options for your IP variation in the parameter editor,
including one or more of the following. Refer to your IP core user guide for
information about specific IP core parameters.
■ Optionally select preset parameter values if provided for your IP core. Presets
specify initial parameter values for specific applications.
■ Specify parameters defining the IP core functionality, port configurations, and
device-specific features.
■ Specify options for processing the IP core files in other EDA tools.
4. Click Generate HDL, the Generation dialog box appears.
5. Specify output file generation options, and then click Generate. The IP variation
files generate according to your specifications.
6. To generate a simulation testbench, click Generate > Generate Testbench System.
7. To generate an HDL instantiation template that you can copy and paste into your
text editor, click Generate > HDL Example.
8. Click Finish. The parameter editor adds the top-level .qsys file to the current
project automatically. If you are prompted to manually add the .qsys file to the
project, click Project > Add/Remove Files in Project to add the file.
9. After generating and instantiating your IP variation, make appropriate pin
assignments to connect ports.
f For information about using a legacy parameter editor, refer to “Specifying IP Core
Parameters and Options (Legacy Parameter Editors)” in the Introduction to Altera IP
Cores.
Clock Control Block (ALTCLKCTRL) IP Core April 2018 Altera Corporation
User GuideChapter 1: About this IP Core 1–5
Files Generated for Altera IP Cores
Files Generated for Altera IP Cores
The Quartus II software v14.0 Arria 10 Edition and later generates the following
output file structure for Altera IP cores.
Figure 1–4. IP Core Generated Files
.qsys - System or IP integration file
.sopcinfo - Software tool-chain integration file
n _tb
IP variation files IP variation files testbench system
_tb.qsys
.cmp - VHDL component declaration file Testbench system file
_bb.v - Verilog HDL black box EDA synthesis file
_inst.v or .vhd - Sample instantiation template _tb
.ppf - XML I/O pin information file testbench files
.qip - Lists IP synthesis files _tb.csv
.sip - Lists files for simulation _tb.spd
_generation.rpt - IP generation report
.debuginfo - Contains post-generation information sim
.html - Connection and memory map data simulation files
.bsf - Block symbol schematic
.spd - Combines individual simulation scripts
sim synth n
Subcore libraries
Simulation files IP synthesis files
.v or .vhd .v or .vhd
Top-level simulation file Top-level IP synthesis file
synth sim
Subcore Subcore
synthesis files Simulation files
Simulator scripts
Table 1–1. IP Core Generated Files
File Type Description
The Qsys system or top-level IP variation file. is the name that you
.qsys
give your IP variation.
Describes the connections and IP component parameterizations in your
Qsys system. You can parse its contents to get requirements when you
develop software drivers for IP components.
.sopcinfo Downstream tools such as the Nios II tool chain use this file. The .sopcinfo
file and the system.h file generated for the Nios II tool chain include
address map information for each slave relative to each master that
accesses the slave. Different masters may have a different address map to
access a particular slave component.
The VHDL Component Declaration (.cmp) file is a text file that contains
.cmp
local generic and port definitions that you can use in VHDL design files.
A report that contains connection information, a memory map showing the
.html address of each slave with respect to each master to which it is connected,
and parameter assignments.
April 2018 Altera Corporation Clock Control Block (ALTCLKCTRL) IP Core
User Guide1–6 Chapter 1: About this IP Core
Files Generated for Altera IP Cores
Table 1–1. IP Core Generated Files
File Type Description
_generation IP or Qsys generation log file. A summary of the messages during IP
.rpt generation.
Contains post-generation information. Used to pass System Console and
Bus Analyzer Toolkit information about the Qsys interconnect. The Bus
.debuginfo
Analysis Toolkit uses this file to identify debug components in the Qsys
interconnect.
Contains all the required information about the IP component to integrate
.qip
and compile the IP component in the Quartus II software.
.csv Contains information about the upgrade status of the IP component.
A Block Symbol File (.bsf) representation of the IP variation for use in
.bsf
Quartus II Block Diagram Files (.bdf).
Required input file for ip-make-simscript to generate simulation scripts
.spd for supported simulators. The .spd file contains a list of files generated for
simulation, along with information about memories that you can initialize.
The Pin Planner File (.ppf) stores the port and node assignments for IP
.ppf
components created for use with the Pin Planner.
You can use the Verilog black-box (_bb.v) file as an empty module
_bb.v
declaration for use as a black box.
Contains information required for NativeLink simulation of IP components.
.sip
You must add the .sip file to your Quartus II project.
_inst.v or HDL example instantiation template. You can copy and paste the contents
_inst.vhd of this file into your HDL file to instantiate the IP variation.
If IP contains register information, .regmap file generates. The .regmap file
describes the register map information of master and slave interfaces. This
.regmap file complements the .sopcinfo file by providing more detailed register
information about the system. This enables register display views and user
customizable statistics in the System Console.
Allows HPS System Debug tools to view the register maps of peripherals
connected to HPS within a Qsys system.
.svd During synthesis, the .svd files for slave interfaces visible to System
Console masters are stored in the .sof file in the debug section. System
Console reads this section, which Qsys can query for register map
information. For system slaves, Qsys can access the registers by name.
.v
HDL files that instantiate each submodule or child IP core for synthesis or
or
simulation.
.vhd
Contains a ModelSim® script msim_setup.tcl to set up and run a
mentor/
simulation.
Contains a Riviera-PRO script rivierapro_setup.tcl to setup and run a
aldec/
simulation.
Contains a shell script vcs_setup.sh to set up and run a VCS® simulation.
/synopsys/vcs
Contains a shell script vcsmx_setup.sh and synopsys_ sim.setup file to set
/synopsys/vcsmx
up and run a VCS MX® simulation.
Contains a shell script ncsim_setup.sh and other setup files to set up and
/cadence
run an NCSIM simulation.
/submodules Contains submodule HDL files and /sim and /synth directories.
Clock Control Block (ALTCLKCTRL) IP Core April 2018 Altera Corporation
User GuideChapter 1: About this IP Core 1–7
Specifying IP Core Parameters and Options (Legacy Parameter Editors)
Specifying IP Core Parameters and Options (Legacy Parameter Editors)
Some IP cores use a legacy version of the parameter editor for configuration and
generation. Use the following steps to configure and generate an IP variation using a
legacy parameter editor.
1 The legacy parameter editor generates a different output file structure than the latest
parameter editor. Refer to Specifying IP Core Parameters and Options for configuration
of IP cores using the latest parameter editor.
Figure 1–5. Legacy Parameter Editors
Legacy parameter
editors
1. In the IP Catalog (Tools > IP Catalog), locate and double-click the name of the IP
core to customize. The parameter editor appears.
2. Specify a top-level name and output HDL file type for your IP variation. This
name identifies the IP core variation files in your project. Click OK.
3. Specify the parameters and options for your IP variation in the parameter editor.
Refer to your IP core user guide for information about specific IP core parameters.
4. Click Finish or Generate (depending on the parameter editor version). The
parameter editor generates the files for your IP variation according to your
specifications. Click Exit if prompted when generation is complete. The parameter
editor adds the top-level .qip file to the current project automatically.
1 To manually add an IP variation generated with legacy parameter editor to a project,
click Project > Add/Remove Files in Project and add the IP variation .qip file.
f For information about using the latest parameter editor, refer to “Specifying IP Core
Parameters and Options” in the Introduction to Altera IP Cores.
April 2018 Altera Corporation Clock Control Block (ALTCLKCTRL) IP Core
User Guide1–8 Chapter 1: About this IP Core
Files Generated for Altera IP Cores (Legacy Parameter Editor)
Files Generated for Altera IP Cores (Legacy Parameter Editor)
The Quartus II software generates the following output file structure for Altera IP
cores that use a legacy parameter editor:
Figure 1–6. IP Core Generated Files (Legacy Parameter Editor)
.qip or .qsys - System or IP integration file
.sopcinfo - Software tool-chain integration file
- IP core variation files
_bb.v - Verilog HDL black box EDA synthesis file
_inst.v or .vhd - Sample instantiation template
_generation.rpt - IP generation report
.bsf - Block symbol schematic file
.ppf - XML I/O pin information file
.spd - Combines individual simulation startup scripts 1
_syn.v or .vhd - Timing & resource estimation netlist 1
.html - Contains memory map
simulation - IP simulation files
.sip - NativeLink simulation integration file
.v, .vhd, .vo, .vho - HDL or IPFS models2
- Simulator setup scripts
synthesis - IP synthesis files
.qip - Lists files for synthesis
.debuginfo - Lists files for synthesis
.v or .vhd - Top-level IP variation synthesis file
testbench - Simulation testbench files 1
- Testbench for supported simulators
_tb - Testbench for supported simulators
_tb.v or .vhd - Top-level HDL testbench file
Notes:
1. If supported and enabled for your IP variation
2. If functional simulation models are generated
Modifying an IP Variation
You can easily modify the parameters of any Altera IP core variation in the parameter
editor to match your design requirements. Use any of the following methods to
modify an IP variation in the parameter editor.
Table 1–2. Modifying an IP Variation
Menu Command Action
Select the top-levelHDL(.v, or .vhd) IP variation file to
File > Open launch the parameter editor and modify the IP variation.
Regenerate the IP variation to implement your changes.
Clock Control Block (ALTCLKCTRL) IP Core April 2018 Altera Corporation
User GuideChapter 1: About this IP Core 1–9
Upgrading IP Cores
Table 1–2. Modifying an IP Variation
Menu Command Action
Double-click the IP variation to launch the parameter
View > Utility Windows >
editor and modify the IP variation. Regenerate the IP
Project Navigator > IP Components
variation to implement your changes.
Select the IP variation and click Upgrade in Editor to
Project > Upgrade IP Components launch the parameter editor and modify the IP variation.
Regenerate the IP variation to implement your changes.
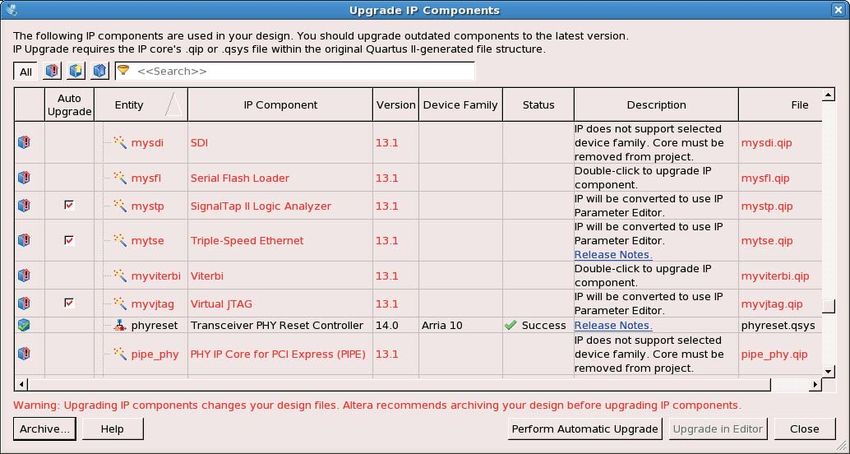
Upgrading IP Cores
IP core variants generated with a previous version of the Quartus II software may
require upgrading before use in the current version of the Quartus II software. Click
Project > Upgrade IP Components to identify and upgrade IP core variants.
The Upgrade IP Components dialog box provides instructions when IP upgrade is
required, optional, or unsupported for specific IP cores in your design. You must
upgrade IP cores that require it before you can compile the IP variation in the current
version of the Quartus II software. Many Altera IP cores support automatic upgrade.
The upgrade process renames and preserves the existing variation file (.v, .sv, or .vhd)
as _ BAK.v, .sv, .vhd in the project directory.
Table 1–3. IP Core Upgrade Status
IP Core Status Corrective Action
Required Upgrade IP You must upgrade the IP variation before compiling in the current
Components version of the Quartus II software.
Upgrade is optional for this IP variation in the current version of the
Optional Upgrade IP Quartus II software. You can upgrade this IP variation to take
Components advantage of the latest development of this IP core. Alternatively you
can retain previous IP core characteristics by declining to upgrade.
Upgrade of the IP variation is not supported in the current version of
the Quartus II software due to IP core end of life or incompatibility
Upgrade Unsupported with the current version of the Quartus II software. You are prompted
to replace the obsolete IP core with a current equivalent IP core from
the IP Catalog.
Before you begin
■ Archive the Quartus II project containing outdated IP cores in the original version
of the Quartus II software: Click Project > Archive Project to save the project in
your previous version of the Quartus II software. This archive preserves your
original design source and project files.
■ Restore the archived project in the latest version of the Quartus II software: Click
Project > Restore Archived Project. Click OK if prompted to change to a
supported device or overwrite the project database. File paths in the archive must
be relative to the project directory. File paths in the archive must reference the IP
variation .v or .vhd file or .qsys file (not the .qip file).
April 2018 Altera Corporation Clock Control Block (ALTCLKCTRL) IP Core
User Guide1–10 Chapter 1: About this IP Core
Upgrading IP Cores
1. In the latest version of the Quartus II software, open the Quartus II project
containing an outdated IP core variation. The Upgrade IP Components dialog
automatically displays the status of IP cores in your project, along with
instructions for upgrading each core. Click Project > Upgrade IP Components to
access this dialog box manually.
2. To simultaneously upgrade all IP cores that support automatic upgrade, click
Perform Automatic Upgrade. The Status and Version columns update when
upgrade is complete. Example designs provided with any Altera IP core
regenerate automatically whenever you upgrade the IP core.
Figure 1–7. Upgrading IP Cores
Displays upgrade
status for all IP cores
in the Project
Double-click to
individually migrate
Checked IP cores
support “Auto Upgrade”
Successful
“Auto Upgrade”
Upgrade
unavailable
Upgrades all IP core that support “Auto Upgrade”
Upgrades individual IP cores unsupported by “Auto Upgrade”
Upgrading IP Cores at the Command Line
You can upgrade IP cores that support auto upgrade at the command line. IP cores
that do not support automatic upgrade do not support command line upgrade.
■ To upgrade a single IP core that supports auto-upgrade, type the following
command:
quartus_sh –ip_upgrade –variation_files .
Example: quartus_sh -ip_upgrade -variation_files mega/pll25.v hps_testx
■ To simultaneously upgrade multiple IP cores that support auto-upgrade, type the
following command:
quartus_sh –ip_upgrade –variation_files “.;
.”
Example: quartus_sh -ip_upgrade -variation_files
"mega/pll_tx2.v;mega/pll3.v" hps_testx
Clock Control Block (ALTCLKCTRL) IP Core April 2018 Altera Corporation
User GuideChapter 1: About this IP Core 1–11
Migrating IP Cores to a Different Device
f IP cores older than Quartus II software version 12.0 do not support upgrade. Altera
verifies that the current version of the Quartus II software compiles the previous
version of each IP core. The MegaCore IP Library Release Notes reports any verification
exceptions for MegaCore IP. The Quartus II Software and Device Support Release Notes
reports any verification exceptions for other IP cores. Altera does not verify
compilation for IP cores older than the previous two releases.
Migrating IP Cores to a Different Device
IP migration allows you to target the latest device families with IP originally
generated for a different device. Some Altera IP cores require individual migration to
upgrade. The Upgrade IP Components dialog box prompts you to double-click IP
cores that require individual migration.
1. To display IP cores requiring migration, click Project > Upgrade IP Components.
The Description field prompts you to double-click IP cores that require individual
migration.
2. Double-click the IP core name, and then click OK after reading the information
panel. The parameter editor appears showing the original IP core parameters.
3. For the Currently selected device family, turn off Match project/default, and then
select the new target device family.
4. Click Finish, and then click Finish again to migrate the IP variation using best-
effort mapping to new parameters and settings. Click OK if you are prompted that
the IP core is unsupported for the current device. A new parameter editor opens
displaying best-effort mapped parameters.
5. Click Generate HDL, and then confirm the Synthesis and Simulation file options.
Verilog is the parameter editor default HDL for synthesis files. If your original IP
core was generated for VHDL, select VHDL to retain the original output HDL
format.
6. To regenerate the new IP variation for the new target device, click Generate. When
generation is complete, click Close.
7. Click Finish to complete migration of the IP core. Click OK if you are prompted to
overwrite IP core files. The Device Family column displays the migrated device
support. The migration process replaces .qip with the .qsys top-
level IP file in your project.
1 If migration does not replace .qip with .qsys, click Project
> Add/Remove Files in Project to replace the file in your project.
8. Review the latest parameters in the parameter editor or generated HDL for
correctness. IP migration may change ports, parameters, or functionality of the IP
core. During migration, the IP core's HDL generates into a library that is different
from the original output location of the IP core. Update any assignments that
reference outdated locations. If your upgraded IP core is represented by a symbol
in a supporting Block Design File schematic, replace the symbol with the newly
generated .bsf after migration.
April 2018 Altera Corporation Clock Control Block (ALTCLKCTRL) IP Core
User Guide1–12 Chapter 1: About this IP Core
1 The migration process may change the IP variation interface, parameters, and
functionality. This may require you to change your design or to re-parameterize your
variant after the Upgrade IP Components dialog box indicates that migration is
complete. The Description field identifies IP cores that require design or parameter
changes.
f For more information about specific IP cores, refer to IP user guide documentation
and the Altera IP Release Notes.
Clock Control Block (ALTCLKCTRL) IP Core April 2018 Altera Corporation
User GuideChapter 2: Parameter Settings 2–1
Parameter Settings
2. Parameter Settings
This section describes the parameter settings for the ALTCLKCTRL IP core.You can
parameterize the IP core in the parameter editor GUI, or the command-line interface
(CLI).
f This user guide assumes that you are familiar with IP cores and how to create them. If
you are unfamiliar with Altera® IP cores, refer to the Introduction to Altera IP Cores.
Parameter Settings
Table 2–1. ALTCLKCTRL Parameters (Part 1 of 3)
Configuration Setting Description
Specify the ALTCLKCTRL buffering mode. You can select
from the following modes:
Auto—Allows the Compiler to pick the best clock buffer
to use.
For global clock—Allows a clock signal to reach all parts
of the chip with the same amount of skew; you can select
input port clkselect to switch between the four clock
inputs.
For dual regional clock—half chip (5)—Allows a clock
signal to reach half of the chip by using two regional
clocks to drive two quadrants; only one clock input is
accepted.
For regional clock —quarter chip (5)—Allows a clock
How do you want to use the ALTCLKCTRL? signal to reach a quadrant of the chip; only one clock
input is accepted.
For regional clock—This mode is available for Arria 10
and Cyclone 10 GX devices only. Allows a clock to reach
a region covering six interface tiles vertically (two at the
edge of the device), and the entire chip horizontally.
For external path (5)—Represents the clock path from
the outputs of the PLL to the dedicated clock output pins;
only one clock output is accepted.
For periphery clock—Allows a clock signal to reach a
quadrant or an octant of the chip depending on the
device; only one clock input is accepted. For tile-based
architectures like Arria 10 and Cyclone 10 GX devices, a
periphery clock will reach a region aligned with the
source interface tile, and half the chip horizontally.
Specify the number of input clock sources for the clock
How many clock inputs would you like? (1)
control block. You can specify up to four clock inputs.
Turn on this option if you want to create an active high
Create ‘ena’ port to enable or disable the clock
clock enable signal to enable or disable the clock
network driven by this buffer (2)
network.
April 2018 Altera Corporation Clock Control Block (ALTCLKCTRL) IP Core
User Guide2–2 Chapter 2: Parameter Settings
Parameter Settings
Table 2–1. ALTCLKCTRL Parameters (Part 2 of 3)
Configuration Setting Description
Turn on this option to choose the register mode for the
ena port. The available register modes are:
Falling edge of input clock—the clkout pin is the
output of the first falling edge driven register.
Double register with input clock—the clkout pin is
the output of the second falling edge driven register.
How do you want to register the 'ena' port? Not registered—the clkout pin is set to one of the
clkin input (after the multiplexer).
This option is available after you turn on the Create ‘ena’
port to enable or disable the clock network driven by
this buffer option.
This option is available in Stratix III, Stratix IV, and Stratix
V devices only.
Turn on this option to implement a glitch-free switchover
when you use multiple clock inputs.
You must ensure the clock that is currently selected is
running before switching to another source. If the
selected clock is not running, the glitch-free switchover
Ensure glitch-free switchover implementation
implementation will not be able to switch to the new
clock source.
By default, the clkselect port is set to 00. A clock must
be applied to inclk0x for the values on the clkselect
ports to be read.
Turn on this option if you want to generate a netlist for
your third-party EDA synthesis tool to estimate the timing
and resource usage of the IP core. If you turn on this
option, a netlist file (_syn.v) is generated. This file is a
Generate netlist
representation of the customized logic used in the
Quartus II software and provides connectivity of the
architectural elements in the IP core but may not
represent true functionality.
Clock Control Block (ALTCLKCTRL) IP Core April 2018 Altera Corporation
User GuideChapter 2: Parameter Settings 2–3
Parameter Settings
Table 2–1. ALTCLKCTRL Parameters (Part 3 of 3)
Configuration Setting Description
Specify the types of files to be generated. Only the files
marked with red check marks are optional.
Choose from the following types of files:
■ Variation file (1)
■ AHDL Include file (.inc)
■ VHDL component declaration file
(.cmp)
Summary Page ■ Quartus II symbol file (.bsf)
■ Instantiation template file (_inst.v)
■ Verilog HDL black box file (_bb.v)
■ Synthesis area and timing estimation netlist
(_syn.v) (4)
For more information about the wizard-generated files,
refer to Quartus II Help or to the Recommended HDL
Coding Styles chapter in volume 1 of the Quartus II
Handbook.
Notes to Table 2–1:
(1) You can change the number of clock inputs only if you choose the Auto or For global clock options.
(2) Not supported if you chose the For periphery clock option.
(3) The Variation file contains wrapper code in the language you specified on page 2a and is automatically generated.
(4) The synthesis area and timing estimation netlist file (_syn.v) is automatically generated if the Generate netlist option on
page 4 is turned on.
(5) This mode is not supported in Arria 10 and Cyclone 10 GX devices.
April 2018 Altera Corporation Clock Control Block (ALTCLKCTRL) IP Core
User Guide2–4 Chapter 2: Parameter Settings
Command Line Interface Parameters
Command Line Interface Parameters
Expert users can choose to instantiate and parameterize the IP core through the
command-line interface using the clear box generator command. This method
requires you to have command-line scripting knowledge.
f For more information about using the clear box generator, refer to the Introduction to
Altera IP Cores.
Table 2–2 lists the parameters for the ALTCLKCTRL IP core.
Table 2–2. ALTCLKCTRL Parameters
Parameter Name Type Required Comments
This parameter specifies the operation mode. The values are:
Value Signal Selection
AUTO Auto-selected clock
(default value)
GCLK Global clock
clock_type String Yes
LCLK Regional clock
EXTCLK External clock
SIDE_CLK Dual-regional clock
The clkselect and ena ports are unavailable if the
clock_type parameter is set to EXTCLK.
Register mode for the ena port. Values are NONE,
FALLING_EDGE, and DOUBLE_REGISTER. Only available in
ena_register_mode String No
Arria II GX, Arria II GZ, Arria V, Arria V GZ, Arria 10, Cyclone V,
Cyclone 10 GX, Stratix III, Stratix IV, and Stratix V devices.
Allows you to specify Altera-specific parameters in VHDL
lpm_hint String No
Design Files (.vhd). The default value is UNUSED.
Identifies the library of parameterized modules (LPM) entity
lpm_type String No
name in VHDL Design Files (.vhd).
Used for modeling and behavioral simulation purposes. Create
intended_device_family String No the ALTCLKCTRL IP core with the parameter editor to get the
value for this parameter.
Specifies if you want the clock control unit to be implemented
implement_in_les String No using logic elements (LEs). Values are “ON” or “OFF”. The
default setting is “OFF”.
Specifies the number of global-type clock inputs. Values are
number_of_clocks Integer Yes numeric type (1 to 4). For other clock types, only one clock
input is accepted.
Specifies if you want to implement a glitch-free switchover
use_glitch_free_switch_over
String No when you use multiple clock inputs. Values are “ON” and
_implementation
“OFF”. If omitted, the default setting is “OFF”.
Specifies the width of the clock select when you use multiple
clock inputs. The clock select inputs dynamically selects the
width_select Integer Yes
clock source that drives the clock network. The values are 1 or
2. If omitted, the default value is 1, which means 1-bit width.
Clock Control Block (ALTCLKCTRL) IP Core April 2018 Altera Corporation
User GuideChapter 3: Functional Description 3–1
Clock Control Block
3. Functional Description
This chapter describes the functional description and the design examples of the
ALTCLKCTRL IP core. This section also includes the prototype, component
declarations, and the ports descriptions of the ALTCLKCTRL IP core. You can use the
ports to customize the ALTCLKCTRL IP core according to your application.
Clock Control Block
A clock control block is a dynamic clock buffer that allows you to enable and disable
the clock network and dynamically switch between multiple sources to drive the
clock network. Table 3–1 shows the clock control block and the devices that support it.
Table 3–1. Clock Buffers that Drive the Clock Control Block
Clock
Arria 1 Arria II Stratix Stratix Stratix Cyclon Cyclon Cyclon Cyclon Cyclone I
Control Arria V
0 GX V IV III e 10 GX e 10 LP eV e IV II
Block
Global
Clock v v v v v v v v v v v
Network
Dual
Regional
— v v v v v — — v — —
Clock
Network
Regional
Clock v v v v v v v — v — —
Network
Dedicated
External
v v v v v v v v v v v
Clock Out
Path
For
Periphery v v v v v v v — v — —
Clock
April 2018 Altera Corporation Clock Control Block (ALTCLKCTRL) IP Core
User Guide3–2 Chapter 3: Functional Description
Clock Control Block
The following table describes the clock control block.
Table 3–2. Clock Control Block
Clock Control Block Description
Allows a clock signal (or other global signals) to
Global Clock Network reach all parts of the chip with a similar amount
of skew.
Allows a signal to reach one quadrant of the chip
(though half of the chip can be reached by
driving two quadrants).
Regional Clock Network For Arria 10 and Cyclone 10 GX devices, the
regional clock network drives a “sliding window”
of SCLK regions corresponding to six interface
tiles high.
Represents the clock path from the outputs of
the phase-locked loop (PLL) to the dedicated
External Clock-Out Path PLL_OUT pins. The ALTCLKCTRL IP core also
provides glitch-free implementation for multiple
clock input signals.
1 You must ensure the clock that is currently selected is running before switching to
another source. If the selected clock is not running, the glitch-free switchover
implementation will not be able to switch to the new clock source.
Global Clock Control Block
When a clock control block is configured to drive a global clock network, you can
select the clock source statically or you can control the selection dynamically by using
internal logic to drive multiplexer selector inputs. When selecting the clock source
statically, you can set the clock source to any of the inputs. For example, you can use
the dedicated CLK pin, internal logic, and PLL outputs.
When selecting the clock source dynamically, you can select two PLL outputs (such as
c0 or c1), a combination of clock pins, or PLL outputs.
Clock Control Block (ALTCLKCTRL) IP Core April 2018 Altera Corporation
User GuideChapter 3: Functional Description 3–3
Clock Control Block
Figure 3–1 shows a clock control block and the possible sources that can drive the
global clock network.
Figure 3–1. Global Clock Control Block
CLKp Pin
2 CLKn Pin
2
PLL Counter Outputs
2
CLKSELECT [1..0]
Internal Logic
(1)
This multiplexer
supports user-controlled Static Clock Select
dynamic switching. (2)
Enable/
Disable
Internal Logic
GCLK
Notes to Figure 3–1:
(1) You can dynamically control these clock select signals through internal logic only when the device is operating in user
mode.
(2) You can only set these clock select signals through a configuration file and cannot be dynamically controlled during
user-mode operation.
f For more information about global clock control block or network in a specific device,
refer to the respective device handbook.
April 2018 Altera Corporation Clock Control Block (ALTCLKCTRL) IP Core
User Guide3–4 Chapter 3: Functional Description
Clock Control Block
Regional Clock Control Block
When the clock control block is configured to drive a regional clock network, you can
only control the clock source selection statically. You can set any inputs to the clock
select multiplexer as the clock source.
Figure 3–2 shows a clock control block configured to drive a regional clock network.
Figure 3–2. Regional Clock Control Block
CLKp Pin CLKn Pin
(2)
2
PLL Counter Outputs Internal Logic
Static Clock Select
(1)
Enable/
Disable
Internal Logic
RCLK
Notes to Figure 3–2:
(1) You can only control these clock select signals through a configuration file and cannot be dynamically controlled
during user-mode operation.
(2) Only the CLKn pins on the top and bottom of the device feed to the regional clock control blocks.
The unused global and regional clock networks are powered down automatically in
the configuration file generated by the Quartus II software. The dynamic clock enable
feature allows the internal logic to control the power for the GCLK and RCLK
networks. You can enable or disable the clock network with the ALTCLKCTRL IP
core.
f For more information about regional clock control block or network in a specific
device, refer to the respective device handbook.
External PLL Output Clock Control Block
When the clock control block is configured to drive the dedicated external clock out,
you can only control the clock source selection statically. You can only set the PLL
outputs as the clock source.
Clock Control Block (ALTCLKCTRL) IP Core April 2018 Altera Corporation
User GuideChapter 3: Functional Description 3–5
Clock Control Block
Figure 3–3 shows a clock control block configured to drive a dedicated external clock
out.
Figure 3–3. External PLL Output Clock Control Block (1)
PLL Counter Outputs
(c[0..5])
6
Static Clock
Select (1)
Enable/
Disable
Internal Logic
Internal Logic
Static Clock
Select (1)
PLL_Out Pin
Notes to Figure 3–3:
(1) The clock control block feeds to a multiplexer within the PLL_OUT pin’s I/O element (IOE). The PLL_OUT pin is a dual-
purpose pin. Therefore, this multiplexer selects either an internal signal or the output of the clock control block.
(2) You can only set these clock select signals through the configuration file and cannot be dynamically controlled during
user-mode operation.
f For more information about external PLL output clock control block or network in a
specific device, refer to the respective device handbook.
Clock Enable Signals
Single Register Clock Enable Circuit
In Cyclone III, Cyclone IV, and Cyclone 10 LP devices, the clock enable signals are
supported at the clock network level. This allows you to enable or disable the GCLK
and RCLK networks, or the PLL_OUT pins, which is useful for applications that require
low power or sleep mode.
Figure 3–4 shows how the ena clock enable signal is implemented.
Figure 3–4. Clock Enable Implementation in Cyclone III, Cyclone IV, and Cyclone 10 LP Devices
clkena D Q clkena out
clk
clk_out
April 2018 Altera Corporation Clock Control Block (ALTCLKCTRL) IP Core
User Guide3–6 Chapter 3: Functional Description
Connectivity Restrictions
1 Single register is applicable for Cyclone III, Cyclone IV, and Cyclone 10 LP devices
only.
f For more information about clock enable signals in a specific device, refer to the
respective device handbook.
Double Register Clock Enable Circuit
The double register clock enable circuit in Arria V, Arria 10, Cyclone V,
Cyclone 10 GX, Stratix III, and Stratix IV devices helps with asynchronous
enable/disable of the clock network, and avoid metastability issues. If the enable
signal can toggle at any time, it’s possible that if the enable toggles at the same instant
as the falling clock edge, the register can get “stuck” in a state between 0 and 1 for
some time, before resolving. Having two registers on the path acts as a
synchronization chain and reduces the probability of getting stuck in this state.
Figure 3–5 shows the double register clock enable circuit.
Figure 3–5. Double Register Clock Enable Circuit
f For more information about metastability issues, refer to Managing Metastability with
the Quartus II Software chapter of the Quartus II Handbook.
Clock Enable Timing
Figure 3–6 shows a functional timing waveform example for clock-output enable.
Clock enable is synchronous with the falling edge of the input clock.
Figure 3–6. Clock Enable Timing
inclk
ena
outclk
Connectivity Restrictions
The following section describes the restrictions associated with the signal sources that
can drive the inclk[] input.
Clock Control Block (ALTCLKCTRL) IP Core April 2018 Altera Corporation
User GuideChapter 3: Functional Description 3–7
Connectivity Restrictions
General Restrictions
■ The inclk[] ports that you use must be consistent with the clkselect[] ports that
you use.
■ When you are using multiple input sources, the inclk[]ports can only be driven
by the dedicated clock input pins and the PLL clock outputs. Dedicated clock
input pins must feed only inclk[0] and inclk[1], while the PLL clock outputs
must feed only inclk[2] and inclk[3].
f For mapping between the clock input pins, PLL counter outputs, and clock
control block inputs in Arria 10 devices, refer to Pin Mapping in Arria 10
Devices.
■ The clock control block can multiplex up to four different clock inputs. You cannot
cascade clock control blocks to construct a wider multiplexer.
■ When you are using the glitch free switchover feature, the clock you are switching
from must be active. If it is not active, the switchover circuit will not be able to
transition from the clock you originally selected.
April 2018 Altera Corporation Clock Control Block (ALTCLKCTRL) IP Core
User Guide3–8 Chapter 3: Functional Description
ALTCLKCTRL Ports
ALTCLKCTRL Ports
Input Ports
Table 3–3. ALTCLKCTRL Input Ports
Port Name Required Description Comments
Input port[1 DOWNTO 0] wide.
If omitted, the default is GND.
If this signal is connected, only the global clock
network can be driven by this clock control block.
Input that dynamically selects
the clock source to drive the Binary Value Signal Selection
clkselect[] No
clock network that is driven by
the clock buffer. 00 inclk[0]
01 inclk[1]
10 inclk[2]
11 inclk[3]
If omitted, the default value is VCC.
ena No Clock enable of the clock buffer This option cannot be used for periphery clock
network path in Stratix® III and Stratix IV devices.
Input port [3 DOWNTO 0] wide.
You can specify up to four clock inputs, inclk[3:0].
inclk[] Yes Clock input of the clock buffer Clock pins, clock outputs from the PLL, and core
signals can drive the inclk[] port.
Multiple clock inputs are only supported for the global
and auto-selected clock networks.
Output Ports
Table 3–4. ALTCLKCTRL Output Ports
Port Name Required Description Comments
outclk Yes Output of the clock buffer. —
Clock Control Block (ALTCLKCTRL) IP Core April 2018 Altera Corporation
User GuideAdditional Information Info–1
Document Revision History
Additional Information
Document Revision History
Date Version Changes
April 2018 2018.04.04 Removed “Prototypes and Component Declarations” section.
June 2017 2017.06.16 Added support for Cyclone 10 GX and Cyclone 10 LP devices.
December 2016 2016.12.05 Updated “General Restrictions” on page 3–7.
■ Added information about specifying parameters for IP cores targeting Arria 10
devices.
■ Added information about the latest IP output for Quartus II version 14.0a10
August 2014 2014.08.18 targeting Arria 10 devices.
■ Added information about individual migration of IP cores to the latest devices.
■ Added information about editing existing IP variations.
■ Replaced MegaWizard Plug-In Manager information with IP Catalog.
■ Added standard information about upgrading IP cores.
■ Added standard installation and licensing information.
June 2014 2014.06.30
■ Removed outdated device support level information. IP core device support is now
available in IP Catalog and parameter editor.
■ Removed all references to obsolete SOPC Builder tool.
■ Updated the “ALTCLKCTRL Parameters” on page 2–4 to add the information for the
How do you want to register the 'ena' port? and How do you want to use the
ALTCLKCTRL? parameter settings.
■ Updated Table 3–1 on page 3–1 to include Arria 10 and Stratix V devices
February 2014 3.1 information. Also added a row for Large Periphery Clocks.
■ Added “Double Register Clock Enable Circuit” on page 3–6.
■ Removed “Stratix II Devices Restrictions”, “Design Example: Global Clock Buffer”,
and “Functional Simulation in the ModelSim-Altera Software” because beginning
from Quartus II software version 13.1, Stratix II devices are no longer supported.
■ Updated information for switchover usage.
February 2012 3.0
■ Added a note about assigning clock type through assignment editor.
September 2010 2.5 Updated ports and parameters.
April 2018 Altera Corporation Clock Control Block (ALTCLKCTRL) IP Core
User GuideInfo–2 Additional Information
How to Contact Altera
Date Version Changes
■ Updated the following sections:
■ “Device Family Support” section
■ “Introduction” section
■ “General Description” section
■ “Design Example: Global Clock Buffer” section
■ “Functional Simulation in the ModelSim-Altera Software” section
■ “This chapter describes the prototype, component declaration, ports, and
parameters of the ALTCLKCTRL megafunction. These ports and parameters are
available to customize the ALTCLKCTRL megafunction according to your
application.” section
■ “How to Contact Altera” section
■ Removed the following sections:
December 2008 2.4
■ “Resource Utilization & Performance” section
■ “Software and System Requirements” section
■ “Inferring Megafunctions from HDL Code” section
■ “Instantiating Megafunctions in HDL Code or Schematic Designs” section
■ “Identifying a Megafunction after Compilation” section
■ “SignalTap II Embedded Logic Analyzer” section
■ Removed all screenshots in the “MegaWizard Plug-In Manager Page Descriptions”
section
■ Reorganized the “MegaWizard Plug-In Manager Page Descriptions” section into
table format.
■ Renamed “About this User Guide” section to “Additional Information” and moved
the section to the end of the user guide.
Updated for Quartus II software version 7.1, including:
May 2007 2.3 ■ Added information on Cyclone® III and Arria® GX device support
■ Added Referenced Documents section
March 2007 2.2 Added Cyclone III device to list of supported devices.
December 2006 2.1 Updated device family support to include Stratix® III devices.
Updated for Quartus II version 6.0, including
October 2006 2.0 ■ Screen shots
■ ModelSim section in Chapter 2
September 2004 1.0 Initial release
How to Contact Altera
To locate the most up-to-date information about Altera products, refer to the
following table.
Contact (1) Contact Method Address
Technical support Website www.altera.com/support
Clock Control Block (ALTCLKCTRL) IP Core April 2018 Altera Corporation
User GuideAdditional Information Info–3
Typographic Conventions
Contact (1) Contact Method Address
Website www.altera.com/training
Technical training
Email custrain@altera.com
Product literature Website www.altera.com/literature
Nontechnical support (general) Email nacomp@altera.com
(software licensing) Email authorization@altera.com
Note to Table:
(1) You can also contact your local Altera sales office or sales representative.
Typographic Conventions
The following table shows the typographic conventions this document uses.
Visual Cue Meaning
Indicate command names, dialog box titles, dialog box options, and other GUI
Bold Type with Initial Capital
labels. For example, Save As dialog box. For GUI elements, capitalization matches
Letters
the GUI.
Indicates directory names, project names, disk drive names, file names, file name
bold type extensions, software utility names, and GUI labels. For example, \qdesigns
directory, D: drive, and chiptrip.gdf file.
Italic Type with Initial Capital Letters Indicate document titles. For example, Stratix IV Design Guidelines.
Indicates variables. For example, n + 1.
italic type Variable names are enclosed in angle brackets (< >). For example, and
.pof file.
Indicate keyboard keys and menu names. For example, the Delete key and the
Initial Capital Letters
Options menu.
Quotation marks indicate references to sections in a document and titles of
“Subheading Title”
Quartus II Help topics. For example, “Typographic Conventions.”
Indicates signal, port, register, bit, block, and primitive names. For example, data1,
tdi, and input. The suffix n denotes an active-low signal. For example, resetn.
Indicates command line commands and anything that must be typed exactly as it
Courier type appears. For example, c:\qdesigns\tutorial\chiptrip.gdf.
Also indicates sections of an actual file, such as a Report File, references to parts of
files (for example, the AHDL keyword SUBDESIGN), and logic function names (for
example, TRI).
r An angled arrow instructs you to press the Enter key.
1., 2., 3., and Numbered steps indicate a list of items when the sequence of the items is important,
a., b., c., and so on such as the steps listed in a procedure.
■ ■ ■ Bullets indicate a list of items when the sequence of the items is not important.
1 The hand points to information that requires special attention.
h The question mark directs you to a software help system with related information.
f The feet direct you to another document or website with related information.
m The multimedia icon directs you to a related multimedia presentation.
A caution calls attention to a condition or possible situation that can damage or
c
destroy the product or your work.
April 2018 Altera Corporation Clock Control Block (ALTCLKCTRL) IP Core
User GuideInfo–4 Additional Information
Typographic Conventions
Visual Cue Meaning
A warning calls attention to a condition or possible situation that can cause you
w
injury.
The envelope links to the Email Subscription Management Center page of the Altera
website, where you can sign up to receive update notifications for Altera documents.
Clock Control Block (ALTCLKCTRL) IP Core April 2018 Altera Corporation
User GuideYou can also read