FreeRTOS Qualification Guide - AWS Documentation
←
→
Page content transcription
If your browser does not render page correctly, please read the page content below
FreeRTOS Qualification Guide
FreeRTOS Qualification Guide

FreeRTOS: Qualification Guide
Copyright © 2021 Amazon Web Services, Inc. and/or its affiliates. All rights reserved.

Amazon's trademarks and trade dress may not be used in connection with any product or service that is not
Amazon's, in any manner that is likely to cause confusion among customers, or in any manner that disparages or
discredits Amazon. All other trademarks not owned by Amazon are the property of their respective owners, who may
or may not be affiliated with, connected to, or sponsored by Amazon.
FreeRTOS Qualification Guide

Table of Contents
  AWS Qualification Program for FreeRTOS .............................................................................................. 1
       What is FreeRTOS ...................................................................................................................... 1
       What is the AWS Qualification Program for FreeRTOS? ................................................................... 2
             Qualification FAQs .............................................................................................................. 2
             Documentation history ....................................................................................................... 3
  Qualifying your device ........................................................................................................................ 4
       Hello world demo ...................................................................................................................... 5
             Configuring the FreeRTOS download for demos ..................................................................... 6
             Creating the demo project .................................................................................................. 6
       Getting started guide ................................................................................................................. 7
             Getting started guide template ............................................................................................ 8
       CMakeLists.txt file ...................................................................................................................... 9
             Prerequisites .................................................................................................................... 10
             CMakeLists.txt template .................................................................................................... 10
             Building FreeRTOS with CMake .......................................................................................... 17
       Open source license .................................................................................................................. 21
  Qualification checklist ....................................................................................................................... 22
       Manifest file instructions ........................................................................................................... 23
       manifest.yml ............................................................................................................................ 25

                                                                      iii
FreeRTOS Qualification Guide
What is FreeRTOS
AWS Qualification Program for
FreeRTOS
What is FreeRTOS
Developed in partnership with the world's leading chip companies over a 15-year period, and now
downloaded every 175 seconds, FreeRTOS is a market-leading real-time operating system (RTOS)
for microcontrollers and small microprocessors. Distributed freely under the MIT open source license,
FreeRTOS includes a kernel and a growing set of libraries suitable for use across all industry sectors.
FreeRTOS is built with an emphasis on reliability and ease of use.
FreeRTOS includes libraries for connectivity, security, and over-the-air (OTA) updates. FreeRTOS also
includes demo applications that show FreeRTOS features on qualified boards.
FreeRTOS is an open-source project. You can download the source code, contribute changes or
enhancements, or report issues on the GitHub site at https://github.com/aws/amazon-freertos. We
release FreeRTOS code under the MIT open source license, so you can use it in commercial and personal
projects.
We also welcome contributions to the FreeRTOS documentation (FreeRTOS User Guide, FreeRTOS Porting
Guide, and FreeRTOS Qualification Guide). The markdown source for the documentation is available at
https://github.com/awsdocs/aws-freertos-docs. It is released under the Creative Commons (CC BY-ND)
license.
The FreeRTOS kernel and components are released individually and use semantic versioning. Integrated
FreeRTOS releases are made periodically. All releases use date-based versioning with the format
YYYYMM.NN, where:
• Y represents the year.
• M represents the month.
• N represents the release order within the designated month (00 being the first release).
For example, a second release in June 2021 would be 202106.01.
Previously, FreeRTOS releases used semantic versioning for major releases. Although it has moved to
date-based versioning (FreeRTOS 1.4.8 updated to FreeRTOS AWS Reference Integrations 201906.00),
the FreeRTOS kernel and each individual FreeRTOS library still retain semantic versioning. In semantic
versioning, the version number itself (X.Y.Z) indicates whether the release is a major, minor, or point
release. You can use the semantic version of a library to assess the scope and impact of a new release on
your application.
LTS releases are maintained differently than other release types. Major and minor releases are frequently
updated with new features in addition to defect resolutions. LTS releases are only updated with changes
to address critical defects and security vulnerabilities. No new features are introduced in a given LTS
release after launch. They are maintained for at least three calendar years after release, and provide
device manufacturers the option to use a stable baseline as opposed to a more dynamic baseline
represented by major and minor releases.
1FreeRTOS Qualification Guide
What is the AWS Qualification Program for FreeRTOS?
What is the AWS Qualification Program for
FreeRTOS?
The AWS Device Qualification Program for FreeRTOS validates pre-integrated FreeRTOS projects ported
to microcontroller-based boards, giving developers confidence that the FreeRTOS port behaves correctly
and consistently with AWS IoT.
Those in the Amazon Partner Network can use the AWS Device Qualification Program to officially qualify
a microcontroller (MCU) development board for FreeRTOS.
Qualified boards are eligible for listing on the AWS Partner Device Catalog.
To qualify a device for FreeRTOS, you must port FreeRTOS to your device, and then follow the AWS
Device Qualification Program steps. For information, see the AWS Device Qualification Program page and
the AWS Device Qualification Program Guide.
For information about qualifying your device for FreeRTOS, see Qualifying your device (p. 4).
Qualification FAQs
Q: Can I qualify an MCU that doesn't have Wi-Fi or Ethernet?
A: Yes. There are qualified MCUs that use external Wi-Fi modules and offload various functions to
the Wi-Fi module, including TCP/IP and TLS. An example is the STM32L4 Discovery Kit that uses an
Inventek Wi-Fi module. Follow the Device Qualification Program submittal process and let us know
how we can help with your efforts.
Q: If a version of FreeRTOS is released after I have started porting a previous version, do I need to start over
using the latest version?
A: Always start porting the latest version of FreeRTOS. If we release a new version of FreeRTOS while
you are working on your port, you can still qualify on the previous version.
Q: My board uses a kernel architecture that I have modified and that is not part of the official FreeRTOS
release. Can I still qualify?
A: Unfortunately, only official kernel ports are accepted. These are available from GitHub or
SourceForge. If you have an unsupported architecture or additional functionality to add to an
existing kernel port, contact your local APN representative.
Q: If I want to update a port listed on the Device Catalog to a newer version of FreeRTOS, do I need to
qualify all over again?
A: After you have updated your port, run the AWS IoT Device Tester again and check the FreeRTOS
qualification checklist (p. 22) to see if any items have been impacted (especially the Getting
Started Guide). Submit a Device Qualification Program ticket with a copy of your passing log to
update the Device Catalog listing to point to your new port.
Q: My device does not support Wi-Fi. Is a port of the FreeRTOS Wi-Fi library required to qualify for
FreeRTOS?
A: The primary requirement is that your device can connect to the AWS Cloud. If your device
can connect to the AWS Cloud across a secure Ethernet connection, the Wi-Fi library is not a
requirement.
Q: My device does not support Bluetooth Low Energy or over-the-air (OTA) updates. Are ports for these
FreeRTOS libraries required to qualify for FreeRTOS?
A: Bluetooth Low Energy and OTA ports are optional for qualification.
2FreeRTOS Qualification Guide
Documentation history
Q: My board does not have on-chip TCP/IP functionality. Is a particular TCP/IP stack required for FreeRTOS
qualification?
A: If your board does not have on-chip TCP/IP functionality, you can use either the FreeRTOS+TCP
TCP/IP stack or the latest version of the lwIP TCP/IP stack to pass TCP/IP qualification requirements.
For the latest version of lwIP supported by FreeRTOS, see the changelog.md file on the GitHub
website. For more information, see Porting a TCP/IP Stack in the FreeRTOS Porting Guide.
Q: Is a particular TLS stack required for qualification?
A: FreeRTOS supports mbedTLS and off-chip TLS implementations, such as those found on some
network processors. No matter which TLS implementation is used by your device's port of FreeRTOS,
the port must pass the Device Tester validation tests for TLS. For more information, see Porting the
TLS Library in the FreeRTOS Porting Guide.
Q: Does my device need to pass all of the AWS IoT Device Tester validation tests to qualify? Is there a way
to qualify without passing all of the tests?
A: Your device must pass all of the required validation tests to qualify for FreeRTOS. The only
exceptions are for Wi-Fi, Bluetooth Low Energy, and OTA.
Q: My device uses only one of the protocols (HTTP, MQTT) and only one of the available communication
channels (Wi-Fi, Ethernet, BLE). If all the OTA related IDT tests pass using just one protocol-communication
channel combination, then will my device get listed as OTA qualified in the device catalog?
A: Yes. We encourage you to get other combinations qualified on your device as well, if possible. In
this way, you can provide support for more customer use cases.
Q: We will be hosting our FreeRTOS port in our own repo as per the qualification requirements. What should
we include in the repo in terms of folders and demos to support?
A: Host all the files and folders necessary to make the port work as an out of the box
experience for a customer who downloads it from the repository. You should include your entire
freertos_kernel, libraries, and tools folders, along with a docs folder for your documents,
a projects folder for your IDE projects, and a vendors folder for your vendor-specifc files. Also
include your entire demo folder.
Note
The coreMQTT Mutual Authentication demo must be supported. Other demos are at your
discretion. Also, the tools folder isn't required. However, we recommend that you host this
folder to assist customers with testing.
If you have questions about qualification that are not answered on this page or in the rest of the
FreeRTOS Qualification Guide, contact your AWS representative or the FreeRTOS engineering team.
Documentation history
See the Revision history of FreeRTOS porting and qualification documentation at Porting FreeRTOS to your
IoT device in the FreeRTOS Porting Guide.
3FreeRTOS Qualification Guide
Qualifying your device
To qualify your device for FreeRTOS
1. Port the FreeRTOS libraries to your device.
Note
Currently, ports of the FreeRTOS OTA and Bluetooth Low Energy libraries are not required
for qualification.
If your device does not support Wi-Fi, you can use an ethernet connection to connect to the
AWS Cloud instead. A port of the FreeRTOS Wi-Fi library is not necessarily required.
For instructions on porting FreeRTOS to your device, see the FreeRTOS Porting Guide.
2. Validate your ports with AWS IoT Device Tester for FreeRTOS.
When using Device Tester to validate your ports for qualification, you must specify information in
the features attribute of the device.json configuration file about the following ports:
• TCP/IP
{
"name": "TCP/IP",
"value": "On-chip | Offloaded | No"
}
• TLS
{
"name": "TLS",
"value": "On-chip | Offloaded | No"
}
• Wi-Fi
{
"name": "WIFI",
"value": "Yes | No"
}
• OTA
{
"name": "OTA",
"value": "Yes | No"
}
Device Tester uses this information to determine which tests to run against your ported FreeRTOS
code. Device Tester runs all other required library port tests by default.
For information about AWS IoT Device Tester for FreeRTOS, see Using AWS IoT Device Tester for
FreeRTOS in the FreeRTOS User Guide.
3. Create the following for qualification submission:
4FreeRTOS Qualification Guide
Hello world demo
• A "Hello World" demo application that publishes messages from your device to the AWS Cloud
over MQTT.
For information, see Setting up a hello world demo (p. 5).
• A "Getting Started with FreeRTOS" guide for your device.
For information, see Creating a getting started with FreeRTOS guide for your device (p. 7).
• A CMakeLists.txt file for building FreeRTOS applications for your device.
Note
A CMake list file is not required to qualify a board through the AWS Device Qualification
Program. The file is only required for listing devices on the FreeRTOS Console. The file is
also required to build project files for your platform using CMake.
For information, see Creating a CMakeLists.txt file for your platform (p. 9).
• A list of detailed information for your hardware platform.
For information, see FreeRTOS qualification checklist (p. 22).
• An appropriate open source license file for your device's FreeRTOS port.
For information, see Providing an open source license for your code (p. 21).
• (For boards qualifying for OTA updates) Instructions for code-signing.
For examples, see Create a Code-Signing Certificate in the FreeRTOS User Guide.
• (For boards qualifying for OTA updates that use custom bootloader) Information and instructions
on the custom bootloader application.
For a list of requirements, see Porting the Bootloader Demo in the FreeRTOS Porting Guide.
These items are required for your device to be listed on the FreeRTOS console, for your device's code
to be on GitHub, and for your device to receive Getting Started documentation support.
4. Submit your qualified board for listing in the AWS Partner Device Catalog through the Device Listing
Portal on APN Partner Central. All submissions require an AWS IoT Device Tester test result file that
indicates that you passed all mandatory test cases. You must be a registered APN Partner to submit
your board for listing.
You can use the FreeRTOS qualification checklist (p. 22) to keep track of the list of required steps for
qualification.
Setting up a hello world demo
To qualify for FreeRTOS, set up a Hello World demo application that runs on your qualified device. This
demo publishes messages from your device to the AWS Cloud over MQTT.
To set up the hello world demo
1. Follow the instructions in Configuring the FreeRTOS download for demos (p. 6) to configure the
directory structure of your FreeRTOS download to fit your device.
2. Follow the instructions in Creating the demo project (p. 6) to create a demo project in your IDE.
After you set up the demo, create a "Getting Started with FreeRTOS" guide for your device. This guide
walks users through setting up your device to run the Hello World demo.
5FreeRTOS Qualification Guide
Configuring the FreeRTOS download for demos
Configuring the FreeRTOS download for demos
Under the download's root directory (freertos), the vendors folder is structured as follows:
vendors
+ - vendor (Template, to be renamed to the name of the MCU vendor)
+ - boards
| + - board (Template, to be renamed to the name of the development board)
| + - aws_demos
| + - aws_tests
| + - CMakeLists.txt
| + - ports
+ - driver_library (Template, to be renamed to the library name)
+ - driver_library_version (Template, to be renamed to the library version)
The vendor and board folders are template folders that we provide to make it easier to create demo
and test projects. Their directory structure ensures that all demo and test projects have a consistent
organization.
The aws_demos folder has the following structure:
vendors/vendor/boards/board/aws_demos
+ - application_code (Contains main.c, which contains main())
| + - vendor_code (Contains vendor-supplied, board-specific files)
| + - main.c (Contains main())
+ - config_files (Contains FreeRTOS config files)
To configure the demo project files
Copy main.c and main.h files for the demo application to the application_code folder. You can
reuse the main.c from the aws_tests project that you used to test your ports.
1. Save any required vendor-supplied, board-specific libraries to the vendor_code folder.
Important
Do not save vendor-supplied libraries that are common across a target board's MCU family
to any subdirectories of aws_tests or aws_demos.
2. Replace vendor in the vendor_code folder with the name of the vendor.
3. Rename the board folder to the name of the development board.
After you configure the demo project files, you can create the project in the IDE. For instructions, see
Creating the demo project (p. 6).
If you are creating a CMake listfile (p. 9), make sure that you provide a CMakelist entry for the demo
project.
Creating the demo project
After you configure your FreeRTOS download, you can create an IDE project with the required project
structure for the Hello World demo.
Follow the instructions below to create an IDE project with the required IDE project structure for demo
applications.
Important
If you are using an Eclipse-based IDE, do not configure the project to build all the files in any
folder. Instead, add source files to a project by linking to each source file individually.
6FreeRTOS Qualification Guide
Getting started guide
1. Create a project named aws_demos and save the project to the projects/vendor/board/ide
directory.
2. In your IDE, create two virtual folders under aws_demos:
• application_code
• config_files
Under aws_demos, there should now be two virtual subdirectories in the IDE project:
application_code and config_files.
Note
Eclipse generates an additional includes folder. This folder is not a part of the required
structure.
3. Import all of the folders and files in aws_demos/application_code and its subdirectories into
the application_code virtual folder in your IDE.
4. Import all of the files from aws_demos/config_files into the config_files virtual folder in
your IDE.
5. Import all of the folders and files from the following directories into the application_code
virtual folder in your IDE:
• freertos/demos/demo_runner
• freertos/demos/coreMQTT
• freertos/libraries/.../provisioning/src
6. Import the freertos/demos/include directory and its contents into the application_code
virtual folder in your IDE.
7. Import the following directories and their contents into the aws_demos IDE project:
Note
Only import the files and directories that apply to your platform and port.
• freertos/libraries
• freertos/freertos_kernel
• freertos/vendors/vendor/boards/board/driver_library/driver_library_version
8. Open your project's IDE properties, and add the following paths to your compiler's include path:
• freertos/demos/include
• freertos/freertos_kernel/portable/compiler/architecture
• freertos/libraries/3rdparty/mbedtls/include
• freertos/vendors/vendor/boards/board/aws_demos/config_files
• Any paths required for vendor-supplied driver libraries.
Creating a getting started with FreeRTOS guide for
your device
To qualify for FreeRTOS, you need to create a Getting Started with FreeRTOS guide for your device.
This guide walks users through setting up the hardware and development environment for developing
applications for FreeRTOS devices, and building, running, and flashing the FreeRTOS Hello World demo
on a device.
This guide must be available to customers on a public website. The URL to the guide is a requirement for
listing a qualified board in the AWS Partner Device Catalog.
7FreeRTOS Qualification Guide
Getting started guide template
Your guide must include the following instructions:
• Setting up the device hardware.
• Setting up the development environment.
• Building and running the demo project.
• Debugging.
• Troubleshooting.
We also recommend that your guide includes:
• A link to the MCU datasheet.
• A Printed Circuit Board (PCB) schematic.
• A default image boot up console log.
Important
Where instructions differ by operating system, you must provide instructions for Windows,
Linux, and macOS operating systems.
Follow the Getting started guide template (p. 8) when you write the guide for your board. You can
find examples of published guides for other qualified boards in the FreeRTOS User Guide.
Getting started guide template
Write an overview that provides a brief description of the board. This section should answer the
following questions:
• Which hardware is required to run the FreeRTOS Hello World demo?
Provide links to pages on your company website for more detail.
• Which IDEs are supported for developing applications for the board?
Provide links to IDE user guides and download pages.
• Which toolchains and other software utilities are required for development?
Provide links to user guides and download pages.
• Are there any other prerequisites for getting started with FreeRTOS on the board?
Provide links to purchasing pages, user guides, and download pages.
Setting up your hardware
In this section, provide instructions for setting up the platform's hardware. Make sure that you provide
links to any user guides or other documentation for setting up hardware.
These instructions include the following:
• Configuring jumper settings.
• Downloading and installing drivers.
Provide links to download pages and other documentation for supported driver versions.
• Connecting the board to a computer.
• Any other steps required to set up the hardware.
8FreeRTOS Qualification Guide
CMakeLists.txt file
Setting up the development environment
In this section, provide instructions for setting up the platform's supported development environment.
Make sure that you provide links to any download pages, user guides, or other documentation for each
item.
These instructions include the following:
• Establishing a serial connection.
• Downloading and installing the toolchain.
• Downloading and installing a supported IDE.
• Any other software that is required to develop and debug applications for the device.
Build and run the FreeRTOS demo project
Build the FreeRTOS demo
In this section, provide instructions for building the FreeRTOS demo code in a supported IDE, or with
supported command line tools.
Note
You must provide instructions for building the demo application on your board with CMake.
Run the FreeRTOS demo project
In this section, provide instructions for flashing and running the FreeRTOS demo code on your board.
Debugging
In this section, provide instructions for using on-board or external debuggers.
Troubleshooting
In this section, provide troubleshooting tips for resolving common or potential problems.
Creating a CMakeLists.txt file for your platform
A CMakeLists.txt file is used to list your device on the FreeRTOS console, and it makes it possible for
developers to build FreeRTOS code for the device without an IDE.
Note
A CMake list file is not required to qualify a board through the AWS Device Qualification
Program. The file is only required for listing devices on the FreeRTOS Console.
For more information about the CMake build system, see CMake.org.
Follow the instructions in Creating a list file for your platform from the CMakeLists.txt
template (p. 10) to create a CMake list file from the template provided with FreeRTOS.
Important
Before you submit your CMake list file, you must verify that you can use the file to build the
FreeRTOS test project and the Hello World demo project with CMake.
9FreeRTOS Qualification Guide
Prerequisites
For instructions, see Building FreeRTOS with CMake (p. 17).
Prerequisites
Make sure that your host machine meets the following prerequisites before you continue:
• Your device's compilation toolchain must support the machine's operating system. CMake supports all
versions of Windows, macOS, and Linux.
Windows subsystem for Linux (WSL) is not supported. Use native CMake on Windows machines.
• You must have CMake version 3.13 or later installed.
You can download the binary distribution of CMake from CMake.org.
Note
If you download the binary distribution of CMake, make sure that you add the CMake
executable to the PATH environment variable before you use CMake from command line.
You can also download and install CMake using a package manager, like homebrew on macOS, and
scoop or chocolatey on Windows.
Note
The CMake package versions in the package managers for many Linux distributions are out-of-
date. If your distribution's package manager does not include the latest version of CMake, you
can try linuxbrew or nix.
• You must have a compatible native build system.
CMake can target many native build systems, including GNU Make or Ninja. Both Make and Ninja
can be installed with package managers on Linux, macOS, and Windows. If you are using Make on
Windows, you can install a standalone version from Equation, or you can install MinGW, which bundles
Make.
Note
The Make executable in MinGW is called mingw32-make.exe, instead of make.exe.
We recommend that you use Ninja, because it is faster than Make and also provides native support to
all desktop operating systems.
Creating a list file for your platform from the
CMakeLists.txt template
A CMakeLists.txt template file is provided with FreeRTOS, under freertos/vendors/vendor/
boards/board/CMakeLists.txt.
The CMakeLists.txt template file consists of four sections:
• FreeRTOS console metadata (p. 11)
• Compiler settings (p. 12)
• FreeRTOS portable layers (p. 13)
• FreeRTOS demos and tests (p. 16)
Follow the instructions to edit these four sections of the list file to match your platform. You can refer to
the CMakeLists.txt files for other qualified vendor boards under freertos/vendors as examples.
Two primary functions are called throughout the file:
10FreeRTOS Qualification Guide
CMakeLists.txt template
afr_set_board_metadata(name value)
This function defines metadata for the FreeRTOS console. The function is defined in freertos/
tools/cmake/afr_metadata.cmake.
afr_mcu_port(module_name [ [targets...]])
This function defines the portable-layer target associated with a FreeRTOS module (that
is, library). It creates a CMake GLOBAL INTERFACE IMPORTED target with a name of the
form AFR:module_name::mcu_port. If DEPENDS is used, additional targets are linked
with target_link_libraries. The function is defined in freertos/tools/cmake/
afr_module.cmake.
FreeRTOS console metadata
The first section of the template file defines the metadata that is used to display a board's information in
the FreeRTOS console. Use the function afr_set_board_metadata(name value) to define each field
listed in the template. This table provides descriptions of each field.
Field Name Value Description
ID A unique ID for the board.
DISPLAY_NAME The name of the board as you want it displayed
on the FreeRTOS console.
DESCRIPTION A short description of the board for the FreeRTOS
console.
VENDOR_NAME The name of the vendor of the board.
FAMILY_NAME The name of the board's MCU family.
DATA_RAM_MEMORY The size of the board's RAM, followed by
abbreviated units. For example, use KB for
kilobytes.
PROGRAM_MEMORY The size of the board's program memory, followed
by abbreviated units. For example, use "MB" for
megabytes.
CODE_SIGNER The code-signing platform used for OTA updates.
Use AmazonFreeRTOS-Default for SHA256 hash
algorithm and ECDSA encryption algorithm. If you
want to use a different code-signing platform,
contact us.
SUPPORTED_IDE A semicolon-delimited list of IDs for the IDEs that
the board supports.
IDE_ID_NAME The name of the supported IDE. Replace ID with
the ID listed for the IDE in the SUPPORTED_IDE
field.
IDE_ID_COMPILER A semicolon-delimited list of names of supported
compilers for the supported IDE. Replace ID with
the ID listed for the IDE in the SUPPORTED_IDE
field.
11FreeRTOS Qualification Guide
CMakeLists.txt template
Field Name Value Description
KEY_IMPORT_PROVISIONING Set to TRUE if the board demo project imports
the credentials from the pre-provisioned
aws_clientcredential_keys.h header file;
in this case, Quick Connect will be enabled in the
FreeRTOS console.
Set to FALSE if the intended board provisioning
mechanism is JITR/JITP or multi-account
registration; in this case, Quick Connect will be
disabled in the FreeRTOS console.
Compiler settings
The second section of the template file defines the compiler settings for your board. To create a target
that holds the compiler settings, call the afr_mcu_port function with compiler in place of the
module_name to create an INTERFACE target with the name AFR::compiler::mcu_port. The kernel
publicly links to this INTERFACE target so that the compiler settings are transitively populated to all
modules.
Use the standard, built-in CMake functions to define the compiler settings in this section of the list file.
As you define the compiler settings, follow these best practices:
• Use target_compile_definitions to provide compile definitions and macros.
• Use target_compile_options to provide compiler flags.
• Use target_include_directories to provide include directories.
• Use target_link_options to provide linker flags.
• Use target_link_directories to provide linker-search directories.
• Use target_link_libraries to provide libraries to link against.
Note
If you define the compiler settings somewhere else, you don't need to duplicate the information
in this section of the file. Instead, call afr_mcu_port with DEPENDS to bring in the target
definition from another location.
For example:
# your_target is defined somewhere else. It does not have to be in the same file.
afr_mcu_port(compiler DEPENDS your_target)
When you call afr_mcu_port with DEPENDS, it calls
target_link_libraries(AFR::module_name::mcu_port INTERFACE your_targets),
which populates the compiler settings for the required AFR::compiler::mcu_port target.
Using multiple compilers
If your board supports multiple compilers, you can use the AFR_TOOLCHAIN variable to dynamically
select the compiler settings. This variable is set to the name of the compiler you are using, which should
be same as the name of the toolchain file found under freertos/tools/cmake/toolchains.
For example:
if("${AFR_TOOLCHAIN}" STREQUAL "arm-gcc")
afr_mcu_port(compiler DEPENDS my_gcc_settings).
12FreeRTOS Qualification Guide
CMakeLists.txt template
elseif("${AFR_TOOLCHAIN}" STREQUAL "arm-iar")
afr_mcu_port(compiler DEPENDS my_iar_settings).
else()
message(FATAL_ERROR "Compiler ${AFR_TOOLCHAIN} not supported.")
endif()
Advanced compiler settings
If you want to set more advanced compiler settings, such as setting compiler flags based on
programming language, or changing settings for different release and debug configurations, you can use
CMake generator expressions.
For example:
set(common_flags "-foo")
set(c_flags "-foo-c")
set(asm_flags "-foo-asm")
target_compile_options(
my_compiler_settings INTERFACE
$ # This only have effect on C files.
$ # This only have effect on ASM
files.
)
CMake generator expressions are not evaluated at the configuration stage, when CMake reads list files.
They are evaluated at the generation stage, when CMake finishes reading list files and generates build
files for the target build system.
FreeRTOS portable layers
The third section of the template file defines all of the portable layer targets for FreeRTOS (that is,
libraries).
You must use the afr_mcu_port(module_name) function to define a portable layer target for each
FreeRTOS module that you plan to implement.
You can use any CMake functions you want, as long as the afr_mcu_port call creates a target with a
name that provides the information required to build the corresponding FreeRTOS module.
The afr_mcu_port function creates a GLOBAL INTERFACE IMPORTED library target with a name of
the form AFR::module_name::mcu_port. As a GLOBAL target, it can be referenced in CMake list
files. As an INTERFACE target, it is not built as a standalone target or library, but compiled into the
corresponding FreeRTOS module. As an IMPORTED target, its name includes a namespace (::) in the
target name (for example, AFR::kernel::mcu_port).
Modules without corresponding portable layer targets are disabled by default. If you run CMake to
configure FreeRTOS, without defining any portable layer targets, you should see the following output:
FreeRTOS modules:
Modules to build:
Disabled by user:
Disabled by dependency: kernel, posix, pkcs11, secure_sockets, mqtt, ...
Available demos:
Available tests:
As you update the CMakeLists.txt file with porting layer targets, the corresponding FreeRTOS
modules are enabled. You should also be able to build any FreeRTOS module whose dependency
13FreeRTOS Qualification Guide
CMakeLists.txt template
requirements are subsequently satisfied. For example, if the coreMQTT library is enabled, the Device
Shadow library is also enabled, because its only dependency is the coreMQTT library.
Note
The FreeRTOS kernel dependency is a minimum requirement. The CMake configuration fails if
the FreeRTOS kernel dependency is not satisfied.
Setting up the kernel porting target
To create the kernel porting target (AFR::kernel::mcu_port), call afr_mcu_port with the module
name kernel. When you call afr_mcu_port, specify the targets for the FreeRTOS portable layer and
driver code. After you create the target, you can provide the dependency information and the FreeRTOS
portable layer and driver code information for the target to use.
Follow these instructions to set up the kernel porting target.
To set up the kernel porting target
1. Create a target for the driver code.
For example, you can create a STATIC library target for the driver code:
add_library(my_board_driver STATIC ${driver_sources})
# Use your compiler settings
target_link_libraries(
my_board_driver
PRIVATE AFR::compiler::mcu_port
# Or use your own target if you already have it.
# PRIVATE ${compiler_settings_target}
)
target_include_directories(
my_board_driver
PRIVATE "include_dirs_for_private_usage"
PUBLIC "include_dirs_for_public_interface"
)
Or you can create an INTERFACE library target for the driver code:
# No need to specify compiler settings since kernel target has them.
add_library(my_board_driver INTERFACE ${driver_sources})
Note
An INTERFACE library target does not have build output. If you use an INTERFACE library
target, the driver code is compiled into the kernel library.
2. Configure the FreeRTOS portable layer:
add_library(freertos_port INTERFACE)
target_sources(
freertos_port
INTERFACE
"${AFR_MODULES_DIR}/freertos_kernel/portable/GCC/ARM_CM4F/port.c"
"${AFR_MODULES_DIR}/freertos_kernel/portable/GCC/ARM_CM4F/portmacro.h"
"${AFR_MODULES_DIR}/freertos_kernel/portable/MemMang/heap_4.c"
)
target_include_directories(
freertos_port
INTERFACE
"${AFR_MODULES_DIR}/freertos_kernel/portable/GCC/ARM_CM4F"
"${include_path_to_FreeRTOSConfig_h}
14FreeRTOS Qualification Guide
CMakeLists.txt template
)
Note
You can also configure the FreeRTOS portable layer by specifying these source files and
their include directories directly in the AFR::kernel::mcu_port target.
3. Create the kernel portable layer target:
# Bring in driver code and freertos portable layer dependency.
afr_mcu_port(kernel DEPENDS my_board_driver freertos_port)
# If you need to specify additional configurations, use standard CMake functions with
# AFR::kernel::mcu_port as the target name.
target_include_directories(
AFR::kernel::mcu_port
INTERFACE
"${additional_includes}" # e.g. board configuration files
)
target_link_libraries(
AFR::kernel::mcu_port
INTERFACE
"${additional_dependencies}"
)
4. To test your list file and configuration, you can write a simple application that uses the FreeRTOS
kernel port. For more information about developing and building FreeRTOS applications with
CMake, see Building FreeRTOS with CMake (p. 17).
5. After you create the demo, add add_executable and target_link_libraries calls to the list
file, and compile the kernel as a static library to verify that the kernel portable layer is correctly
configured.
add_executable(
my_demo
main.c
)
target_link_libraries(
my_demo
PRIVATE AFR::kernel
)
Setting up the porting targets for FreeRTOS modules
After you add the portable layer target for the kernel, you can add portable layer targets for other
FreeRTOS modules.
For example, to add the portable layer for the Wi-Fi module:
afr_mcu_port(wifi)
target_sources(
AFR::wifi::mcu_port
INTERFACE "${AFR_MODULES_DIR}/vendors/vendor/boards/board/ports/wifi/iot_wifi.c"
)
This example Wi-Fi module portable layer has only one implementation file, which is based on the driver
code.
If you want to add the portable layer for the FreeRTOS Secure Sockets module, the module depends
on TLS. This makes its portable layer target slightly more complicated than that of the Wi-Fi module.
FreeRTOS provides a default TLS implementation based on mbedTLS that you can link to:
15FreeRTOS Qualification Guide
CMakeLists.txt template
afr_mcu_port(secure_sockets)
target_sources(
AFR::secure_sockets::mcu_port
INTERFACE ${portable_layer_sources}
)
target_link_libraries(
AFR::secure_sockets::mcu_port
AFR::tls
)
In this example code, the standard CMake function target_link_libraries states that the Secure
Sockets portable layer depends on AFR::tls.
You can reference all FreeRTOS modules by using their target name AFR::module_name. For example,
you can use the same syntax to also state a dependency on FreeRTOS-Plus-TCP:
target_link_libraries(
AFR::secure_sockets::mcu_port
AFR::freertos_plus_tcp
AFR::tls
)
Note
If your platform handles TLS by itself, you can use your driver code directly. If you use your
driver code directly for TLS, you don't need to call target_link_libraries, because all
FreeRTOS modules implicitly depend on the kernel that includes your driver code.
Because all non-kernel FreeRTOS modules implicitly depend on the kernel, their porting layers
don't require you to specify the kernel as a dependency. The POSIX module, however, is defined
as an optional kernel module. If you want to use POSIX, you must explicitly include it in your
kernel portable layer. For example:
# By default, AFR::posix target does not expose standard POSIX headers in its
public
# interface, i.e., You need to use "freertos_plus_posix/source/
FreeRTOS_POSIX_pthread.c" instead of "pthread.h".
# Link to AFR::use_posix instead if you need to use those headers directly.
target_link_libraries(
AFR::kernel::mcu_port
INTERFACE AFR::use_posix
)
FreeRTOS demos and tests
The final section of the template file defines the demo and test targets for FreeRTOS. CMake targets are
created automatically for each demo and test that satisfies the dependency requirements.
In this section, define an executable target with the add_executable function. Use aws_tests as
the target name if you're compiling tests, or aws_demos if you're compiling demos. You might need to
provide other project settings, such as linker scripts and post-build commands. For example:
if(AFR_IS_TESTING)
set(exe_target aws_tests)
else()
set(exe_target aws_demos)
endif()
set(CMAKE_EXECUTABLE_SUFFIX ".elf")
add_executable(${exe_target} "${board_dir}/application_code/main.c")
16FreeRTOS Qualification Guide
Building FreeRTOS with CMake
target_link_libraries is then called to link available CMake demo or test targets to your
executable target.
Note
You still need to modify aws_demos/config_files/aws_demo_config.h and aws_tests/
config_files/aws_test_runner_config.h to enable demos and tests.
Running post-build commands
For information about running post-build commands, see add_custom_command. Use the second
signature. For example:
# This should run an external command "command --arg1 --arg2".
add_custom_command(
TARGET ${exe_target} POST_BUILD COMMAND "command" "--arg1" "--arg2"
)
Note
CMake supports many common, platform-independent operations for creating directories,
copying files, and so on. For more information about CMake command-line operations, see the
CMake command-line tool reference. You can reference the CMake command-line tool from a
CMake list file with the built-in variable ${CMAKE_COMMAND}.
Building FreeRTOS with CMake
CMake targets your host operating system as the target system by default. To use CMake for cross
compiling, provide a toolchain file that specifies the compiler that you want to use. You can find some
examples in freertos/tools/cmake/toolchains.
If you're using a compiler different from the one provided with FreeRTOS, write this toolchain file before
you build FreeRTOS with CMake. You must also set the CMAKE_TOOLCHAIN_FILE variable before CMake
reads your top-level CMakeLists.txt file. The CMAKE_TOOLCHAIN_FILE variable specifies which
compiler to use and sets some CMake variables, like the system name and the default search path. For
more information about cross compiling with CMake, see Cross Compiling on the official CMake wiki.
The CMakeLists.txt and toolchain files must be in the correct locations. Before you build FreeRTOS
with CMake, make sure that you have set up the FreeRTOS directory structure on your local machine to
match the FreeRTOS directory structure on GitHub. See the README.md file for instructions.
To build a CMake-based project
1. Run CMake to generate the build files for a native build system, like Make or Ninja.
You can use either the CMake command-line tool or the CMake GUI to generate the build files for
your native build system.
For information about generating FreeRTOS build files, see Generating build files (CMake command-
line tool) (p. 17) and Generating build files (CMake GUI) (p. 19).
2. Invoke the native build system to make the project into an executable.
For information about making FreeRTOS build files, see Building FreeRTOS from generated build
files (p. 20).
Generating build files (CMake command-line tool)
You can use the CMake command-line tool (cmake) to generate FreeRTOS build files from the command
line or terminal.
17FreeRTOS Qualification Guide
Building FreeRTOS with CMake
To generate the build files, run cmake. For the DVENDOR option, specify the vendor. For the DBOARD
option, specify the board. For the DCOMPILER option, specify the compiler. Use the S option to specify
where your source code is. Use the B option to specify where to write the generated files.
Note
The compiler must be in the system's PATH variable, or you must specify the location of the
compiler.
For example, if the vendor is Texas Instruments, and the board is the CC3220 Launchpad, and the
compiler is GCC for ARM, you can issue the following command to build the source files from the current
directory to a directory named build-directory:
cmake -DVENDOR=ti -DBOARD=cc3220_launchpad -DCOMPILER=arm-ti -S . -B build-directory
Note
If you are using Windows, you must specify the native build system because CMake uses Visual
Studio by default. For example:
cmake -DVENDOR=ti -DBOARD=cc3220_launchpad -DCOMPILER=arm-ti -S . -B build-
directory -G Ninja
Or:
cmake -DVENDOR=ti -DBOARD=cc3220_launchpad -DCOMPILER=arm-ti -S . -B build-
directory -G "Unix Makefiles"
The regular expressions ${VENDOR}.* and ${BOARD}.* are used to search for a matching board, so
you don't have to use the full names of the vendor and board for the VENDOR and BOARD options. Partial
names work, provided there is a single match. For example, the following commands generate the same
build files from the same source:
cmake -DVENDOR=ti -DCOMPILER=arm-ti -S . -B build-directory
cmake -DBOARD=cc3220 -DCOMPILER=arm-ti -S . -B build-directory
cmake -DVENDOR=t -DBOARD=cc -DCOMPILER=arm-ti -S . -B build-directory
You can use the CMAKE_TOOLCHAIN_FILE option if you want to use a toolchain file that is not located in
the default directory cmake/toolchains. For example:
cmake -DBOARD=cc3220 -DCMAKE_TOOLCHAIN_FILE='/path/to/toolchain_file.cmake' -S . -B build-
directory
If the toolchain file does not use absolute paths for your compiler, and you didn't add your compiler
to the PATH environment variable, CMake might not be able to find it. To make sure that CMake finds
your toolchain file, you can use the AFR_TOOLCHAIN_PATH option. This option searches the specified
toolchain directory path and the toolchain's subfolder under bin. For example:
cmake -DBOARD=cc3220 -DCMAKE_TOOLCHAIN_FILE='/path/to/toolchain_file.cmake' -
DAFR_TOOLCHAIN_PATH='/path/to/toolchain/' -S . -B build-directory
18FreeRTOS Qualification Guide
Building FreeRTOS with CMake
To enable debugging, set the CMAKE_BUILD_TYPE to debug. With this option enabled, CMake adds
debug flags to the compile options, and builds FreeRTOS with debug symbols.
# Build with debug symbols
cmake -DBOARD=cc3220 -DCOMPILER=arm-ti -DCMAKE_BUILD_TYPE=debug -S . -B build-directory
You can also set the CMAKE_BUILD_TYPE to release to add optimization flags to the compile options.
Generating build files (CMake GUI)
You can use the CMake GUI to generate FreeRTOS build files.
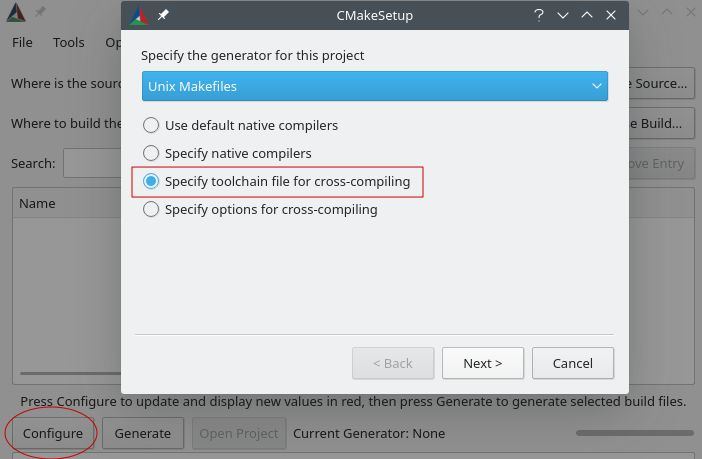
To generate build files with the CMake GUI
1. From the command line, issue cmake-gui to start the GUI.
2. Choose Browse Source and specify the source input, and then choose Browse Build and specify the
build output.
3. Choose Configure, and under Specify the build generator for this project, find and choose the
build system that you want to use to build the generated build files.
19FreeRTOS Qualification Guide
Building FreeRTOS with CMake
4. Choose Specify toolchain file for cross-compiling, and then choose Next.
5. Choose the toolchain file (for example, freertos/tools/cmake/toolchains/arm-ti.cmake),
and then choose Finish.
The default configuration for FreeRTOS is the template board, which does not provide any portable
layer targets. As a result, a window appears with the message Error in configuration process.
6. The GUI should now look like this:
Choose AFR_BOARD, choose your board, and then choose Configure again.
7. Choose Generate. CMake generates the build system files (for example, makefiles or ninja files), and
these files appear in the build directory you specified in the first step. Follow the instructions in the
next section to generate the binary image.
Building FreeRTOS from generated build files
You can build FreeRTOS with a native build system by calling the build system command from the output
binaries directory. For example, if your build file output directory is build, and you are using Make as
your native build system, run the following commands:
20FreeRTOS Qualification Guide
Open source license
cd build-directory
make -j4
You can also use the CMake command-line tool to build FreeRTOS. CMake provides an abstraction layer
for calling native build systems. For example:
cmake --build build-directory
Here are some other common uses of the CMake command-line tool's build mode:
# Take advantage of CPU cores.
cmake --build build-directory --parallel 8
# Build specific targets.
cmake --build build-directory --target afr_kernel
# Clean first, then build.
cmake --build build-directory --clean-first
For more information about the CMake build mode, see the CMake documentation.
Providing an open source license for your code
For qualification, provide an open source license for your ported FreeRTOS code. To determine which
license you want to use, see the License and Standards on the Open Source Initiative website.
21FreeRTOS Qualification Guide
FreeRTOS qualification checklist
Use the following checklists to keep track of qualification items.
You must pass each of these items in order to be listed in the AWS Partner Device Catalog.
• Review the steps you must follow for Porting FreeRTOS to your device. These steps are summarized in
the FreeRTOS porting flowchart. For more information, see the FreeRTOS Porting Guide.
• You must port a FreeRTOS qualified kernel architecture and can't make modifications to it on your
own. For more information, see Configuring a FreeRTOS kernel port in the FreeRTOS Porting Guide.
• Validate your FreeRTOS port with AWS IoT Device Tester.
• A successful IDT log (with all test groups passing on one log) is required in your Device Qualification
Portal (DQP) submission.
• All qualification submissions must be made through the Device Listing Portal on APN Partner
Central.
• Create a Hello World demo.
• See the Setting up a hello world demo (p. 5).
• Create a Getting Started Guide (GSG) for your device
• See the Creating a getting started with FreeRTOS guide for your device (p. 7).
• Create an appropriate open source license text file and place it with your code.
• FreeRTOS is distributed under the MIT license.
• Provide an accessible location to download your code.
• We recommend that you use a GitHub repository, but don't use a personal GitHub repository. Use an
official company GitHub repository.
• Mitigate the following threat in regard to the random number generator (RNG):
• To mitigate the risk of network spoofing and man-in-the-middle attacks that can result in
unauthorized data disclosure, a true hardware random number generator (TRNG) is required for
FreeRTOS qualification. The TRNG is recommended by the FreeRTOS libraries that implement
protocols such as DHCP, DNS, TCP/IP, and TLS. Consistent with the guidance published by NIST,
the TRNG on your board is used by FreeRTOS as the entropy source for a standard implementation
CTR_DRBG. For more information, see page 50 in the NIST SP 800-90A.
Per the NIST SP 800-90B description, a TRNG is a "physical noise source" (section 2.2.1) that
produces "independent and identically distributed" (IID) samples (section 5), for example, a ring
oscillator.
• To control BOM costs and for some customer use cases, certain boards will not have a dedicated
TRNG. If you are qualifying these boards, add the following advisory notice in the header of the
file core_pkcs11.h that you have ported for the core_pkcs11_pal.h API. View our changelog for
examples of boards that are similar.
Note
For best security practice, we recommend that you use a random number generation
solution that is truly randomized and conforms to the guidelines provided in the FreeRTOS
qualification checklist. The random number generator method presented in this file by the
silicon vendor is not truly random in nature. Contact the silicon vendor for details regarding
the method implemented.
• If you're qualifying for OTA, verify that you mitigate the risks defined in the OTA Threat Model
described in Porting the OTA library in the FreeRTOS Porting Guide.
To be designated as supporting the long-term support (LTS) version of FreeRTOS in the AWS Partner
Device Catalog, you must provide a manifest file. This isn't required for standard qualification. You must
22FreeRTOS Qualification Guide
Manifest file instructions
use a LTS version of FreeRTOS and include a manifest.yml file in the root directory. The requirements
for the manifest file are described in FreeRTOS manifest file instructions (p. 23) and a template is
provided as a Example manifest.yml (p. 25). The FreeRTOS repository includes a compatible manifest
file by default.
To be listed in the Online Configuration Wizard, contact your APN representative and provide the
following items:
• Create a CMake list file, and build the test and demo applications with this file.
• For instructions, see Creating a CMakeLists.txt file for your platform (p. 9).
Note
A CMake list file isn't required to qualify a board through the AWS Device Qualification
Program. The file is only required for listing devices on the FreeRTOS console.
• Provide the following hardware information for your device:
• The compiler options for optimizations.
• The Supported IDE, with latest supported version number.
• The CLI command to build target executables.
• The CLI command to flash the target.
FreeRTOS manifest file instructions
A manifest file is required in all LTS-based FreeRTOS projects to help customers delineate between
dependency versions that are being used, which libraries are LTS, and other metadata that helps
customers evaluate and use the software more quickly.
The file should meet the following requirements:
• Named manifest.yml
• Placed in the freertos/vendors/vendor/boards/board/ directory
• Be in YAML format and follow the YAML 1.2 specification
The parameters can be in any order, but we recommended that you put them in the order listed below
for optimal readability. Add comments to the file that help customers use or understand your package.
File path
Located at the root of a package or library. There is only one manifest per package. Dependencies
that are brought in might have their own manifest files.
Parameters
name
The name of the package. All spaces should be replaced with an underscore (_). For example, My
project name - 2020 should be changed to My_project_name_-_2020.
• type: string
• required: true
• minLength: 1
• maxLength: 40
version
The version of the package. The version can be a release version or version tag.
• type: string
23FreeRTOS Qualification Guide
Manifest file instructions
• required: true
• minLength: 1
• maxLength: 30
description
The human-readable description of the package. The description should clearly describe what
the package is and what it provides.
• type: string
• required: true
• minLength: 30
• maxLength: 255
dependencies
A list of all first level dependencies that are required for a user to successfully build this package
and which can be retrieved by a Git, Subversion, or Mercurial source code host. Don't include
dependencies that are not available through Git, SVG, or hg. Don't include dependencies used
for tests, documentation generation, or development. To ensure a good experience for the
general public, we recommend that you avoid listing dependencies that are gated or private.
• type: array
• required: false
• minLength: 0
dependencies[].name
The package name of a dependency. This must match the package name found in the
dependency's name parameter.
• type: string
• required: true
• minLength: 1
• maxLength: 40
dependencies[].version
The version of a dependency. The version can be a release version or a version tag. If any
dependencies are included within the package itself, the version must match the manifest
file that is in the dependency.
• type: string
• required: true
• minLength: 1
• maxLength: 30
dependencies[].repository
Describes the location of the dependency source code.
• type: dictionary
• required: true
dependencies[].repository.type
The type of repository.
• type: string
• required: true
• enum: [git, svn, hg]
24You can also read