Running Adobe Creative Cloud on Amazon AppStream 2.0 - Deployment Guide - Awsstatic
←
→
Page content transcription
If your browser does not render page correctly, please read the page content below
Running Adobe® Creative Cloud
on Amazon AppStream 2.0
Deployment Guide

July 2020

Notices
Customers are responsible for making their own independent assessment of the
information in this document. This document: (a) is for informational purposes only, (b)
represents current AWS product offerings and practices, which are subject to change
without notice, and (c) does not create any commitments or assurances from AWS and
its affiliates, suppliers or licensors. AWS products or services are provided “as is”
without warranties, representations, or conditions of any kind, whether express or
implied. The responsibilities and liabilities of AWS to its customers are controlled by
AWS agreements, and this document is not part of, nor does it modify, any agreement
between AWS and its customers.

© 2020 Amazon Web Services, Inc. or its affiliates. All rights reserved.
Contents
Overview ..............................................................................................................................1
Before You Begin ................................................................................................................2
Cost ......................................................................................................................................4
Instance Types and Sizing ..................................................................................................4
Fleet Types & Capacity .......................................................................................................5
Architecture Overview .........................................................................................................5
Getting Started.....................................................................................................................6
Create network resources ...................................................................................................7
Create an AppStream 2.0 image builder ............................................................................9
Install Adobe Creative Cloud Applications........................................................................16
Create an image with Adobe Creative Cloud Applications ..............................................18
Provision a fleet .................................................................................................................25
Create an AppStream 2.0 stack ........................................................................................28
Manage user access with an AppStream 2.0 user pool ...................................................30
Test the end user authentication and application streaming experience ........................33
Take the next step with AppStream 2.0 ............................................................................34
Troubleshooting and Best Practices .................................................................................35
Clean up your AppStream 2.0 resources..........................................................................37
Conclusion .........................................................................................................................38
Contributors .......................................................................................................................38
Additional Resources ........................................................................................................39
Document Revisions..........................................................................................................39
About this Guide
This guide helps cloud architects to build an Amazon AppStream 2.0 environment and
deploy Adobe Creative Cloud applications such as Adobe Photoshop, Adobe Premiere
Pro to users. Adobe Creative Cloud is a collection of 20+ desktop and mobile apps and
services for photography, design, video, web, UX and more. Amazon AppStream 2.0 is
a fully managed, secure application streaming service.

This guide is intended for IT decision-makers and infrastructure or networking
professionals who are familiar with the basic concepts of networking, operating
systems, installing and operating Adobe Creative Cloud products.
Amazon Web Services                    Running Adobe® Creative Cloud on Amazon AppStream 2.0

Overview
Adobe Creative Cloud is a collection of 20+ desktop and mobile apps and services for
photography, design, video, web, UX and more. Amazon AppStream 2.0 is a fully
managed application streaming service.

Accessing Adobe Creative Cloud products in virtualized environments has become
increasingly important for educational institutions to provide remote access to students.
Educational institutions can use AppStream 2.0 to simplify application delivery and
provide every student access to the Adobe Creative Cloud applications they need for
education on any computer anywhere.

This guide helps cloud architects quickly deploy a secure and scalable Amazon
AppStream 2.0 stack running Adobe Creative Cloud applications.

What you’ll accomplish:
    •   Provision an Amazon Virtual Private Cloud (Amazon VPC) to provide an
        isolated virtual network infrastructure within the AWS Cloud. Your AppStream
        2.0 resources will use this VPC.
    •   Use the AWS Management Console to perform the basic administrative tasks
        required to build an AppStream 2.0 environment. Specifically, you will perform
        the following tasks:
        o   Install and configure Adobe Creative Cloud applications for streaming using
            an AppStream image builder.
        o   Provision a fleet of instances to stream your applications. This fleet will use
            either a Graphics Design or Graphics G4 instance type and adhere to
            scaling policies set by you to match the number of users that you want to
            stream applications concurrently.
        o   Provision a stack to create a web portal from which users can stream your
            applications.
        o   Configure persistent storage that users can access across application
            streaming sessions.
        o   Create a user pool for authentication and user management for streaming
            applications.

                                                                                              1
Amazon Web Services                   Running Adobe® Creative Cloud on Amazon AppStream 2.0

Before You Begin
You should consider and know the following information prior to starting the instructions
included in this guide.

    •   Skill Level: You do not need prior experience with AWS to complete these
        exercises. A basic understanding of core AWS technologies, including Amazon
        Virtual Private Cloud (Amazon VPC), Security Groups, Network Access Control
        Lists, subnetting, and routing is helpful but not required.
    •   Adobe Creative Cloud License: You will need access to a named user license
        for Creative Cloud to install the desired applications such as Adobe Photoshop,
        Adobe Premiere Pro etc. Education licenses for Creative Cloud can be
        purchased from Adobe.com or Amazon.com. Shared Device License (SDL) is
        not permissible in a virtualized environment at this time. Request a consultation
        with Adobe1 for questions regarding licensing for Education.
    •   Adobe Creative Cloud Virtualization Support Policy: Creative Cloud
        products are permitted in virtualized environments. Adobe will support technical
        issues that can be replicated in a virtual environment as well in a supported OS
        environment. For more information, see Adobe’s virtualization policy and
        support for Adobe’s Products in virtual environments.
    •   An AWS account: You would need an AWS account to use AppStream 2.0
        and other AWS services. For more information, see How do I create and
        activate a new AWS account.
    •   AWS Privileges: You would need sufficient privileges to setup and manipulate
        the required resources involved in this guide. For instructions on setting
        permissions for AppStream 2.0 resources and operations, see Identity and
        Access Management for Amazon AppStream 2.0 in the Amazon AppStream 2.0
        Administrator Guide. AWS recommends applying the principles of least
        privilege when granting access to resources to reduce potential attack surface.
        This principle entails granting users no more than the minimum amount of
        privilege required to perform their role.

                                                                                         2
Amazon Web Services                   Running Adobe® Creative Cloud on Amazon AppStream 2.0

    •   Increase Service Limits: By default, AWS sets quotas (also referred to as
        limits) for the resources that you can create and the number of users who can
        use the service. The service limit quotas for AppStream 2.0, which include
        various instance types and families can be found here. To request a quota
        increase, use the AppStream 2.0 Limits form. Also, you can see the current
        AWS service quotas assigned to your AWS account by using the Service
        Quotas console. For more information, see AWS service quotas.
    •   Supported Availability Zones: As of date of publication, Amazon AppStream
        2.0 is supported in nine AWS regions across the world. See the AWS Region
        Table for current list of supported regions.
    •   End user client requirements: Users can access streaming applications
        hosted on AppStream 2.0 through an HTML5-capable web browser such as
        Google Chrome, Mozilla Firefox, Microsoft Edge, or Internet Explorer 11+ on
        desktop computers such as a Windows, Mac, Chromebook, or Linux.
        AppStream 2.0 streaming is also supported on touch enabled tablet devices
        such as Chrome or Safari on an iPad (iOS 11 or later), Android tablets (Android
        8 or later), and Microsoft Surface Pro (Windows 10) tablets. Also, there is
        Windows client available for true windows native experience. For more
        information, see AppStream Supported Clients.
    •   Bandwidth recommendations: AppStream 2.0 uses an adaptive streaming
        protocol (NICE DCV) to deliver an interactive streaming session to users. It is
        recommended that users have a broadband Internet connection with 5 Mbps
        bandwidth per user for graphics applications. For more information, see
        bandwidth recommendations for AppStream 2.0. The best user experience is
        achieved when maximum roundtrip latency is around than 100ms and users are
        located within 2000 miles from the AWS Region where AppStream 2.0 is
        hosting applications. Although, users who have less bandwidth available can
        still stream their applications, the frame rate or image quality may not be
        optimal.
    •   Creative Cloud Applications on AppStream 2.0: As of date of publication,
        Adobe Fresco and Adobe XD (known issues) are not compatible or have
        issues with creating images or streaming on AppStream 2.0.
    •   Creative Cloud Applications Installation Method:
        o   Using Creative Cloud Desktop App: For individual or small number of
            users, Creative cloud applications can be installed by installing the Creative
            Cloud Desktop Application on AppStream 2.0 image builder instance. This
            method is also suitable for building a proof of concept.

                                                                                             3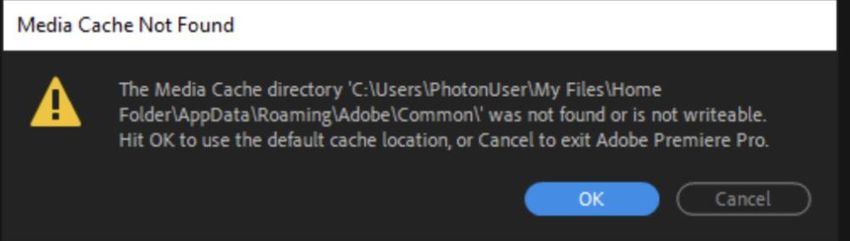
Amazon Web Services                   Running Adobe® Creative Cloud on Amazon AppStream 2.0

        o   Using Packager: For enterprise licenses, Creative cloud applications can
            be installed by using Adobe Packager to create a package and then install
            the package on image builder instances. Installation using packages
            provides IT admins with additional control over creative cloud applications,
            updates and settings.
    •   Managing User Access: This guide describes how to manage user access to
        AppStream 2.0 with user pool which is a built-in identity management feature
        that supports default maximum of 50 users. For deployments that must support
        100 or more AppStream 2.0 users, we recommend using SAML 2.0. For
        information about configuring third-party SAML 2.0 identity providers, see
        AppStream 2.0 Integration with SAML 2.0.

Cost
The AWS cost associated depends upon Amazon AppStream 2.0 streaming resources
that you provision plus a small monthly fee per streaming user. Streaming resources
consist of AppStream 2.0 fleet instances (on-Demand or always-on) and image
builder instances. Fleet instances and image builder instances are billed per hour, and
the price per hour is based on the instance type and size you select and the selected
AWS region where you deploy the resources.

For more information on pricing, see AppStream 2.0 pricing. Also, AppStream 2.0
pricing tool can be a useful resource to estimate costs.

Instance Types and Sizing
Adobe Creative Cloud requires compute from the AppStream Graphics Instance
families which include Graphics Design, Graphics G4, and Graphics Pro.
Graphics Design instance family is recommended to run Adobe Creative Cloud
applications. Alternately, Graphics G4 instances can be used for higher performance
for graphic intensive workloads.

Size of the instances such as large, extra-large dictate the number of vCPU cores,
memory and GPU memory available to applications.

This guide uses stream.graphics-design.xlarge instance type and size in the
setup instructions based on Adobe’s recommendation for Photoshop to use a GPU
memory of 2 GiB or more. This instance size offers a good price and performance
balance.

                                                                                           4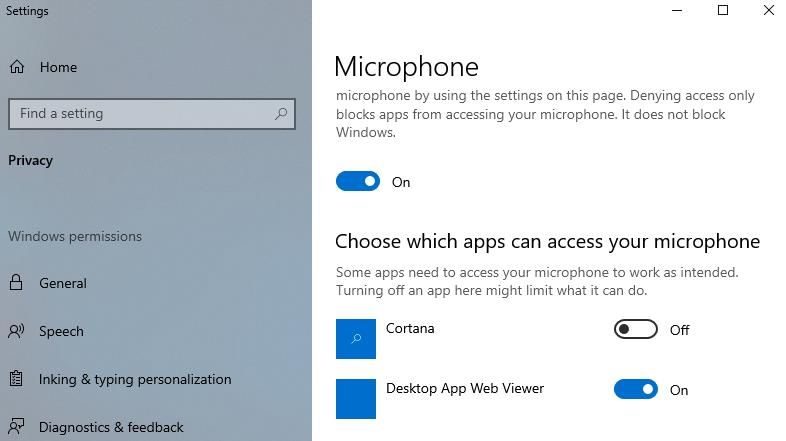
Amazon Web Services Running Adobe® Creative Cloud on Amazon AppStream 2.0
G4 instance type (stream.graphics.g4dn.xlarge or above) is recommended for
graphic intensive applications such as Adobe Dimension based on Adobe’s
recommendation to have 16GiB GPU memory. Although, Adobe Dimension will still run
on stream.graphics-design.xlarge as it meets the minimum GPU memory
requirements specified by Adobe.
The best size of the instance to use will depend upon the requirements for Adobe
Creative Cloud applications you want to run, your users’ workload needs, and the cost
considerations of your organization.
To learn more about the number of vCPU cores, GPU memory and memory
specifications of these instance families, see Amazon AppStream 2.0 pricing.
Fleet Types & Capacity
Amazon AppStream 2.0 offers two fleet types: Always-On and On-Demand. Always-On
fleet instances are in a running state, even if no users are connected. This is best when
your users need high availability and instant access to their applications. On-Demand
fleets instances don’t start until a user connects to an instance within the fleet. This fleet
type is best when your users can wait up to 2 minutes to start their applications, and for
streaming applications that have sporadic use.
The maximum fleet capacity depends upon the simultaneous users that you expect to
stream applications concurrently. AppStream 2.0 monitors your fleet utilization and
performs automatic adjustments to fleet capacity to meet your user demand. The
capacity adjustments are made based on scaling policies that you define based on the
current utilization or based on a schedule. Auto scaling applies both to Always-On and
On-Demand fleets.
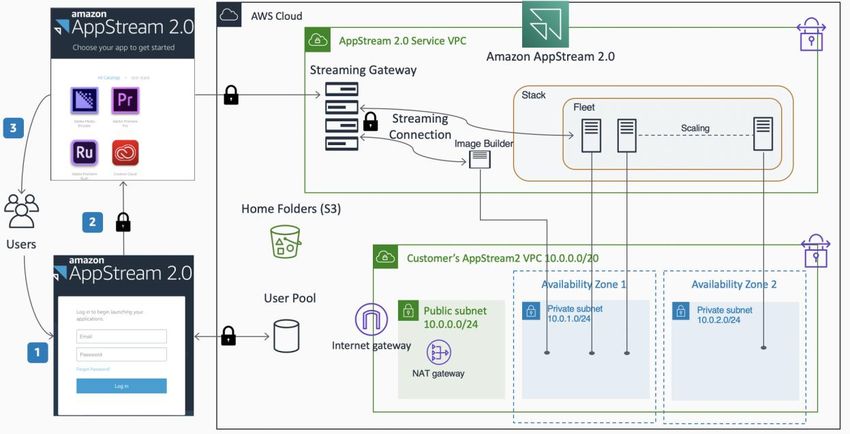
Architecture Overview
Below is an architectural diagram illustrating the AppStream 2.0 environment that you
will create:
5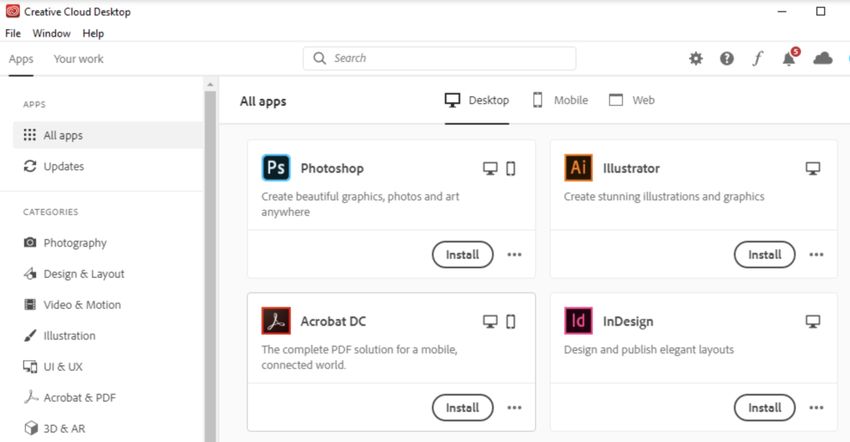
Amazon Web Services                   Running Adobe® Creative Cloud on Amazon AppStream 2.0

      Figure 1 – AppStream 2.0 environment hosting Adobe Creative Cloud Applications

Getting Started
This section describes the steps for provisioning Adobe Creative Cloud Applications on
AppStream 2.0:

Sign in to the AWS Management Console and select an AWS Region
If you do not have an AWS account, see How do I create and activate a new
AWS account.

    1. Sign in to the AppStream 2.0 console
    2. Type your email address or your AWS account ID, and choose Next
    3. Type your AWS account password, and choose Sign In.
    4. Select one of the following seven Regions in which AppStream 2.0 is available
       from the menu in the upper right corner of the console. It is recommended to
       choose the region closest to your user base to provide the best experience.

                                                                                         6
Amazon Web Services Running Adobe® Creative Cloud on Amazon AppStream 2.0
Figure 2 – AWS console region selection menu
Create network resources
In this section, you will create an Amazon Virtual Private Cloud (Amazon VPC) and
other network resources required for your AppStream 2.0 environment. The following
steps use a template in AWS CloudFormation to automatically create and configure the
necessary network resources. To manually create and configure network resources,
see create and configure a new VPC in the AppStream 2.0 developer guide.
1. Sign in to the AWS Management Console.
2. In the following list of regional choices, open the link associated with the AWS
Region in which you want to build your AppStream 2.0 environment. By clicking
the below mentioned links, AWS CloudFormation console will open, displaying
the URL of a template2 that will be used to create your network resources and
the name of the resulting AWS CloudFormation stack.
• US East (N. Virginia)
• US West (Oregon)
• EU (Frankfurt)
• EU (Ireland)
7Amazon Web Services Running Adobe® Creative Cloud on Amazon AppStream 2.0
• Asia Pacific (Singapore)
• Asia Pacific (Sydney)
• Asia Pacific (Tokyo)
3. Customize the Stack name in the text box shown below. Then, choose Create
Stack. AWS CloudFormation starts creating the resources and displays a
status message to indicate progress.
Figure 3 – CloudFormation create stack wizard
4. When the creation process completes, usually within five minutes, the AWS
CloudFormation console displays the status CREATE_COMPLETE.
5. Navigate to the Amazon VPC console by choosing Services, then VPC from
the services menu in the AWS console.
8Amazon Web Services Running Adobe® Creative Cloud on Amazon AppStream 2.0
6. In the navigation pane, under Virtual Private Cloud, select Your VPCs.
7. In the list of VPCs, you should see the following VPC that was automatically
created (you may need to select the region where you created your AppStream
2.0 environment).
Note: The VPC ID value will differ for your VPC.
8. In the navigation pane, under Virtual Private Cloud, choose Subnets. In the
list of subnets, you should see the following subnets that were automatically
created:
Note: The Subnet ID and VPC values will differ for your subnets.
You have now successfully created your network resources by using AWS
CloudFormation. You can proceed to deploy an image builder to install Adobe Creative
Cloud applications.
Create an AppStream 2.0 image builder
AppStream 2.0 uses Amazon Elastic Compute Cloud (Amazon EC2) instances to
stream applications. To create your own custom image, you must connect to an image
builder instance, install and configure your applications for streaming, and then create
your image by creating a snapshot of the image builder instance.
9Amazon Web Services Running Adobe® Creative Cloud on Amazon AppStream 2.0
To install and configure Adobe Creative Cloud applications to stream to your users, you
must create and configure an image builder instance. In this section, you will learn how
to:
• Deploy an image builder instance to install applications
• Connect to the image builder instance
• Configure Image Builder Settings
o Disable Internet Explorer Enhanced Security Configuration
o Configure Privacy Settings for Microphone Access
Deploy an image builder instance to install applications
1. Open the AppStream 2.0 console by choosing Services, then AppStream 2.0
from the services menu in the AWS console.
2. Choose or verify that you are still in the desired AWS region from the top right
menu bar.
3. If you have not previously configured any AppStream 2.0 settings, the following
page appears:
Note: If the AppStream 2.0 navigation page appears, proceed to step 6.
10Amazon Web Services Running Adobe® Creative Cloud on Amazon AppStream 2.0
4. Choose Get started.
5. Select Skip (this guide walks you through a different process for getting started
with AppStream 2.0).
6. In the right navigation pane, choose Images, Image Builder, then Launch
Image Builder.
7. In Step1: Choose Image of Launch an AppStream 2.0 Image Builder, in the list
of images, select the image builder with the name AppStream-Graphics-
Design-WinServer2019-mm-dd-YYYY or AppStream-Graphics-G4dn-
WinServer2019-mm-dd-YYYY, where mm-dd-yyyy represents the most recent
date.
For best results, the image builder you choose should match the instance
type of the virtual machines you intend to deploy (see before you begin
section of this guide for recommendations). Base images include the latest
updates to Microsoft Windows and the AppStream 2.0 agent software.
You will use this base image to create a custom image that includes your
own applications.
8. After selecting the appropriate image, select Next.
9. In Step 2: Configure Image Builder, enter the following information:
11Amazon Web Services Running Adobe® Creative Cloud on Amazon AppStream 2.0
Option Value
Name Provide a unique name identifier for the image builder, such as Adobe-
CC_Image_v1_mmddyyyy, using any of the following characters: a-Z, 0-
9, -,_.
Display Name Provide an optional name, such as Adobe CC Image v1 June 2020, to be
displayed in the console for easier reference and readability.
Instance Type Choose the size of the instance type from available size options that best
matches your organizations cost and your users performance criteria.
For purposes of this guide, we will use stream. graphics-design. xlarge.
10. Choose Next
11. In Step 3: Configure Network, enter the following information:
Option Value
Default Internet Access Make sure that this option is not selected.
VPC Select the option corresponding to AppStream 2 VPC.
Subnet Select the subnet with the IP address range 10.0.1.0/24
(AppStream2 Private Subnet1).
Security group(s) Accept the default security group listed.
Active Directory Domain (Optional) Do not configure any options
12. Choose Review and confirm the details for the image builder. To change the
configuration for any section, choose Edit and make your changes.
12Amazon Web Services Running Adobe® Creative Cloud on Amazon AppStream 2.0
13. After you finish reviewing the configuration details, choose Launch. If an error
message notifies you that you don’t have sufficient limits to create the image
builder, submit a limit increase request through the AWS Support Center. For
more information, see AWS Service Limits.
14. The image builder creation process takes about 15 minutes to complete. During
this process, the status of the image builder displays as Pending while
AppStream 2.0 provisions the necessary resources.
15. Click the Refresh icon periodically to update the image builder status. After the
status changes to Running, the image builder is ready to use and you can
create a custom image.
Note: Charges accrue for an image builder instance while it is running,
even if no user is actively connected. You can stop or delete the image
builder at any time. No user fees are incurred when users connect to an
image builder. For more information, see AppStream 2.0 Pricing.
Connect to the image builder instance
1. Open the AppStream 2.0 console by choosing Services, then AppStream 2.0
from the services menu in the AWS console
2. In the navigation pane, choose Images, Image Builder.
3. Select the image builder instance that you created earlier (Adobe-
CC_Image_v1_mmddyyyy). Verify that its status is Running and choose
Connect.
Note: If the status is Stopped, select the instance, and choose Actions,
Start. Click the Refresh icon periodically to update the instance list until
the status is Running.
4. A new browser tab opens, displaying options for logging into the image builder
instance. Choose Local User, Administrator.
13Amazon Web Services Running Adobe® Creative Cloud on Amazon AppStream 2.0
Note: If a new browser tab does not open, configure your browser to allow
popups from https://console.aws.amazon.com/.
5. You are now connected to the image builder instance with administrator rights.
Configure Image Builder Settings
In this step, we will configure settings that are required for proper functioning of Adobe
Creative Cloud apps.
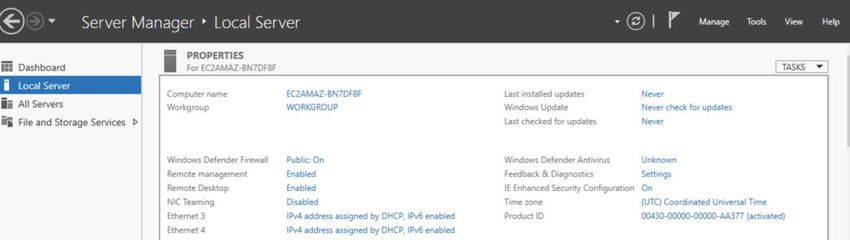
Disable Internet Explorer Enhanced Security Configuration
By default, Internet Explorer Enhanced Security Configuration is enabled on Windows
Server by Microsoft. Internet Explorer Enhanced Security Configuration places servers
and Internet Explorer in a configuration that limits exposure to the internet. However,
this configuration can impact Adobe Creative Cloud applications. Adobe Creative Cloud
applications require internet access to validate license, download creative cloud
templates and provision Adobe Creative Cloud files.
AppStream administrators can either disable Internet Explorer Enhanced Security
Configuration or allow the appropriate Adobe domains as per their organizations
security policy. For purposes of this guide, we will disable Internet Explorer Enhanced
Security configuration.
1. Connect to the image builder instance with administrator rights.
2. Open Server Manager. Choose the Windows Start button, and then
choose Server Manager.
3. In the left navigation pane, choose Local Server.
4. In the right properties pane, select the On link next to IE Enhanced Security
Configuration.
14Amazon Web Services Running Adobe® Creative Cloud on Amazon AppStream 2.0
5. In the Internet Explorer Enhanced Configuration dialog box, select
the Off option under Administrators and Users, then choose OK.
6. In the upper right area of the image builder desktop, choose Admin
Commands, then Switch User.
7. From Local User tab, choose Template User.
8. Open Internet Explorer and reset your settings using the following procedure:
a. In the upper right area of the Internet Explorer browser window, choose
the Tools icon, then choose Internet options.
b. Choose the Advanced tab, then choose Reset.
c. When prompted to confirm your choice, choose Reset again.
d. When the Reset Internet Explorer Settings message displays, select Close.
9. Choose Admin Commands, Switch User, and then choose Administrator.
Configure Privacy Settings for Microphone Access
Adobe Creative Cloud apps require microphone access to allow creating and editing of
audio content. Without the appropriate microphone access, you may receive MMI
interface errors during running Adobe Creative Cloud applications.
1. Connect to the image builder instance with administrator rights.
2. In the upper right area of the image builder desktop, choose Admin
Commands, then Switch User.
15Amazon Web Services Running Adobe® Creative Cloud on Amazon AppStream 2.0
3. From Local User tab, choose Template User
4. Choose Start, Settings, then select Microphone Privacy Settings.
5. Enable microphone access
6. Enable microphone access for Desktop App Web Viewer.
7. Choose Admin Commands, Switch User, and then choose Administrator.
Install Adobe Creative Cloud Applications
After provisioning an image builder, you can install and configure the Adobe Creative
Cloud applications that you wish to stream to your users on the image builder.
Creative Cloud applications can be installed on the AppStream 2.0 image builder
instance using the following procedure:
1. Install using Adobe Creative Cloud Desktop Application.
This method is suitable for individual or small number of users.
2. Install using Adobe Creative Cloud Packager (Enterprise License)
16Amazon Web Services Running Adobe® Creative Cloud on Amazon AppStream 2.0
Adobe Packager requires an enterprise Creative Cloud license and allows IT
admins to create packages with desired Creative Cloud applications with
custom preferences. Installation using packages provides IT admins with
additional control over creative cloud applications, updates and settings. To
learn how to create packages with the desired applications, the
Adobe Packager User Guide.
Install using Adobe Creative Cloud Desktop Application
1. Connect to the image builder instance with administrator rights.
2. Open Internet Explorer and navigate to Adobe Create Cloud.
3. Select Download from the top right menu to download Adobe Creative Cloud
installer.
4. You will be asked to sign in using your Adobe ID. If you do not have an Adobe
ID then use the Create an account to create an account.
5. Once signed in, then follow the prompts to download and install Creative Cloud.
6. Once installation is completed. Log in to Creative Cloud using your Adobe
credentials. After logging in, install the desired applications from the All apps
menu by clicking on the Install button as shown below. For purposes of this
guide, we will install PhotoShop, Premiere Pro and Rush applications.
Note: As of date of publication, Adobe Fresco and Adobe XD (known issues)
are not compatible or have issues streaming on AppStream 2.0.
17Amazon Web Services Running Adobe® Creative Cloud on Amazon AppStream 2.0
Install using Adobe Creative Cloud Packager (Enterprise License)
1. Connect to the image builder instance with administrator rights.
2. Open Internet Explorer and navigate to Adobe Admin Console
3. Follow the instructions to create a named user license package with the desired
Creative Cloud applications.
4. After configuration is complete, download the package and install by double
clicking on the package.
Create an image with Adobe Creative Cloud
Applications
At this point, you have launched an image builder instance and installed desired Adobe
Creative Cloud applications on the image builder. Now you’ll prepare the applications
for streaming, optimize them for streaming performance, and create your image.
In this section, you will perform the following tasks:
• Create an application catalog by using Image Assistant
• Configure apps for any default values to be used for users
18Amazon Web Services Running Adobe® Creative Cloud on Amazon AppStream 2.0
• Test the application by using a local user account that has the same
permissions that end users will have in their streaming sessions.
• Optimize the application’s launch performance
• Configure the image
• Finish creating the image
Step1: Create your AppStream 2.0 application catalog
The process of creating an AppStream 2.0 application catalog includes specifying the
name, display name, executable file to launch, and icon to display for each application
that you plan to stream.
1. Open Image Assistant from the image builder desktop
2. In the Add Applications to Image dialog box, on the Add Apps tab, choose Add
App.
3. For purposes of this guide, we will use our previously installed applications
Adobe Photoshop, Adobe Premiere Pro, and Adobe Rush.
4. Adobe Creative Cloud Applications are installed in C:\Program
Files\Adobe. Navigate to the install location for Photoshop application
(usually C:\Program Files\Adobe\Adobe Photoshop 2020). Select the
Adobe Photoshop executable (Photoshop.exe), and then choose Open.
19Amazon Web Services Running Adobe® Creative Cloud on Amazon AppStream 2.0
5. In App Launch Settings, customize the default values, if needed, and choose
Save.
6. Repeat Steps 2 through 5 for Adobe Premiere Pro and Adobe Rush
applications or other desired applications.
7. Now that you have added Photoshop, Premiere Pro and Rush applications to
your catalog, choose Next.
Step 2: Configure Apps
During this step, we will configure any default values that we want to use for the
applications.
1. Select Switch User and select Template User from the local user tab
20Amazon Web Services Running Adobe® Creative Cloud on Amazon AppStream 2.0
2. Open Image Assistant
3. Launch the installed creative cloud applications to ensure they are working
properly.
4. After verification, open regedit and find the following two keys: FolderPath and
DatabasePath in this path for Adobe Media Cache and update them to map to
a persistent storage. For purposes of this guide, we will update the location to
be on AppStream home folder. See AppStream Home Folder administering for
more details.
Note: The regedit has to be done in the template user profile.
Registry Path = Computer\HKEY_USERS\\Software\Adobe\Common
14.0\Media Cache
DatabasePath = C:\Users\PhotonUser\My Files\Home
Folder\AppData\Roaming\Adobe\Common\
FolderPath= C:\Users\PhotonUser\My Files\Home
Folder\AppData\Roaming\Adobe\Common\
21Amazon Web Services Running Adobe® Creative Cloud on Amazon AppStream 2.0
5. Choose Switch User from the Image Assistant dialog box.
6. Return to the Administrator account, and once again, proceed to the
Configure step of the Image Assistant, and Save Settings
Step 3: Test your application by using a local user account
An image builder includes a test user account that enables you to test your applications
by using the same policies and permissions as your users. Follow these steps to
confirm that your applications open correctly.
1. In the Test tab, choose Switch User, then Test User. You are now logged into
the same Windows Server instance as a local user who has regular (non-
administrative) user rights.
2. Open Image Assistant. In Test Applications, Adobe Creative Cloud
applications (Photoshop, Premiere Pro and Rush) are displayed.
3. Choose the desired application to open it.
4. After successful authentication with Adobe Creative Cloud sign in service, wait
for the application to launch fully. After validating the launch, close the
application window.
5. Choose Switch User.
22Amazon Web Services Running Adobe® Creative Cloud on Amazon AppStream 2.0
6. On the Local User tab, choose Administrator.
7. On the Image Assistant Test tab, choose Next.
Note: You can click OK to dismiss the below mentioned warning about
MediaCache directory while testing. This warning is because the home
folders are provisioned during the Stack creation process which is
discussed later in this guide.
Step 4: Optimize the launch performance of your applications
During this step, Image Assistant opens your applications one after another, identifies
their launch dependencies, and performs optimizations to ensure that applications
launch quickly.
1. On the Optimize tab, choose Photoshop, then Launch.
2. Wait for Photoshop to completely start, as prompted by the Image Assistant
dialog.
3. After you complete the first run experience for the application, verify that it
functions as expected.
4. Repeat Steps 1 through 3 for Premiere Pro, Rush and other installed Adobe
Creative applications.
5. Choose Continue.
Step 5: Configure the image
1. Minimize the Image Assistant window.
2. Click Start, right click on PowerShell, select More, and then Run as
administrator.
3. Run the following command to remove AdobeNotificationClient package which
is not compatible with Sysprep command.
23Amazon Web Services Running Adobe® Creative Cloud on Amazon AppStream 2.0
Get-AppxPackage -AllUsers AdobeNotificationClient | Remove-
AppxPackage -AllUsers
4. Once the -AppxPackage command is complete, close PowerShell and return
to Image Assistant, Configure Image.
5. On the Configure Image tab, enter the following information.
Option Value
Name The unique name identifier for the image, such as
AdobeCC_Image _v1_mmddyyyy, using any of the following
characters: a-Z,0–9,-,_,.
Note: The name cannot begin with "Amazon,"
"AWS," or "AppStream.”
Display Name A user-friendly name to display in the console
Description An optional description for the image: for example, Image v1
created by (your initials or name) on mm/dd/20yy.
Option Value
Always use latest agent Leave this check box selected so that streaming instances that
version are launched from your image always include the latest
AppStream 2.0 features, performance improvements, and
security updates. For more information, see Amazon
AppStream 2.0 Agent Version History.
Step 6: Finish creating the image
Complete the following steps to disconnect from the remote session and start the image
creation process.
1. Review the image details, and choose Disconnect and Create Image.
2. The remote session disconnects within a few moments. When the Lost
Connectivity message appears, close the browser tab.
24Amazon Web Services Running Adobe® Creative Cloud on Amazon AppStream 2.0
3. Navigate to the Amazon AppStream 2.0 console and choose Images, and
Image Registry. While your image is being created, the image status in the
image registry of the console appears as Pending. While your image is being
created, you cannot connect to it.
4. Click the Refresh icon periodically to update the status. Image creation takes
about 20 minutes. After your image is created, the image status changes to
Available and the image builder is automatically stopped.
Note: To make changes to your image, such as adding other applications
or updating existing applications, you must create a new image. To do so,
restart and reconnect to the image builder, make your changes, and then
repeat the Image Assistant process to create a new image that includes
the changes.
Provision a fleet
An AppStream 2.0 fleet defines the hardware, network, Active Directory (if applicable),
and scaling configuration for your application streaming infrastructure. For more
information, see Amazon AppStream 2.0 Stacks and Fleets.
In this section, you will perform the following tasks:
• Provide details for your fleet.
• Choose an image.
• Configure the fleet.
• Configure the network.
25Amazon Web Services Running Adobe® Creative Cloud on Amazon AppStream 2.0
Provide fleet details
1. Open the AppStream 2.0 console
2. In the navigation pane, choose Fleets, Create Fleet.
3. For Step 1: Provide Fleet Details, enter the following text, and choose Next.
Option Value
Name The unique name identifier for the fleet, such as
AdobeCC_Fleet_v1_mmddyyyy, using any of the following
characters: a-Z,0–9,-,_,.
Note: The name cannot begin with "Amazon," "AWS," or
"AppStream."
Display Name The name displayed in the console, such as AdobeCC Fleet v1
July 2020.
Description An optional description for the fleet. For example, Fleet v1
created by (your initials or name) on mm/dd/20yy.
Choose an image
1. For Step 2: Choose an image, choose the image that you created, scroll to the
bottom of the page, and then choose Next.
Configure the fleet
1. For Step 3: Configure fleet, in Choose instance type, you define the
hardware configuration for each of the instances that make up your fleet.
Because you created the image by using the Graphics Design or Graphics Pro
family, the instance type is already populated. However, you can select any of
the four instance type options that are presented.
2. For this exercise, select the Graphics Design instance family, and then
choose stream.graphics-design.xlarge. For more information, see Amazon
AppStream 2.0 Instance Families.
3. Under Fleet Type details, choose a fleet type that suits your needs. The fleet
type determines the availability of streaming instances and affects your costs.
You can choose either of the following:
26Amazon Web Services Running Adobe® Creative Cloud on Amazon AppStream 2.0
4. Always-on: Instances run all the time, even when no users are streaming
applications. When this option is selected, instances are immediately available
for the next user to connect to immediately.
5. On-Demand: Instances run only when users are streaming applications. Idle
instances that are available for streaming are in a stopped state. When this
option is selected, a user must wait for one to two minutes for an instance to
start up.
For this exercise, select the Always-on option.
6. Under User session details, define the maximum amount of time that users
can be connected to streaming sessions and how long streaming sessions
should remain active after users disconnect.
7. Maximum session duration defines how long user streaming sessions can
remain active. If users are still connected to a streaming session five minutes
before this limit is reached, they are prompted to save any open documents
before being disconnected. Choose a time most appropriate for your users. For
example,12 hours.
8. Disconnect timeout defines how long user streaming sessions can remain
active after users are disconnected. If users try to reconnect to the streaming
session after a disconnection or network interruption within this time interval,
they are connected to the previous session. After the disconnect timeout
expires, the session is terminated, and the user must start a new session to
reconnect. Choose a time most appropriate for your users (e.g. 15 minutes)
9. Configure your Fleet capacity.
10. Capacity is defined in terms of the number of instances within a fleet and,
consequently, every unique user streaming session that is served by a separate
instance.
11. The minimum capacity for your fleet is the minimum number of users who are
expected to be streaming at the same time (for example 2).
12. The maximum capacity for your fleet is the maximum number of users who are
expected to be streaming at the same time (for example 6).
13. Choose Next.
27Amazon Web Services Running Adobe® Creative Cloud on Amazon AppStream 2.0
Configure the network
1. For Step 4: Configure Network, make sure that the Default Internet Access
check box is not selected. This option does not need to be selected because
you already configured a VPC with a NAT gateway to provide internet access.
2. For VPC, select vpc-xxxxxxxx (AppStream2 VPC).
3. For Subnet 1, choose subnet-xxxxxxxx | (10.0.1.0/24). This is the
AppStream2 Private Subnet1.
4. For Subnet 2, choose subnet-xxxxxxxx | (10.0.2.0/24). This is the
AppStream2 Private Subnet2.
5. For Security group(s), choose the default option.
6. Choose Next.
7. Confirm the fleet configuration details. To change settings for any section,
choose Edit, and make the needed changes. After you finish reviewing the
configuration details, choose Create.
8. In the pricing acknowledgement dialog box, select the acknowledgement check
box, and choose Create to begin provisioning your fleet with the initial set of
running instances.
Note: If an error message notifies you that you don’t have sufficient limits to
create the fleet, submit a limit increase request to the AWS Support Center. For
more information, see Amazon AppStream 2.0 Service Limits.
9. Fleet provisioning usually takes 10 minutes to finish. While your fleet is being
created and fleet instances are provisioned, the status of your fleet displays as
Starting in the Fleets list. Choose the Refresh icon periodically to update the
fleet status until the status is Running.
10. After the status changes to Running, the fleet is available and you can use it to
create a stack.
Create an AppStream 2.0 stack
An AppStream 2.0 stack consists of a fleet, user access policies, and storage
configurations. You create a stack to start streaming applications to users.
In this section, you will perform the following tasks:
28Amazon Web Services Running Adobe® Creative Cloud on Amazon AppStream 2.0
• Provide details for your stack and associate your stack with a fleet.
• Enable persistent storage for the stack.
Provide stack details and associate the stack with a fleet
1. Open the AppStream 2.0 console
2. In the navigation pane, choose Stacks, Create Stack.
3. For Step1: Stack Details, enter the following information, and choose Next.
Option Value
Name The unique name identifier for the stack, such as
AdobeCC_Stack_mmddyyyy, using any of the following
characters: a-Z,0–9,-,_.
Note: The name cannot begin with "Amazon," "AWS," or
"AppStream."
Display Name The name displayed in the console, such as AdobeCC Stack
July 2020.
Description An optional text box where you can enter details of the stack.
Redirect URL (Optional) An optional URL to which users are redirected at the end of
their streaming session.
Type: https://aws.amazon.com
Feedback URL (Optional) An optional URL for your users to submit feedback
Type: https://aws.amazon.com
Fleet Select the fleet that you created previously.
29Amazon Web Services Running Adobe® Creative Cloud on Amazon AppStream 2.0
Enable persistent storage for the stack
1. For Step 2: Enable Storage, make sure that the Enable Home Folders option
is selected. When this option is selected for an AppStream 2.0 stack, users of
the stack are presented with a persistent storage folder in their AppStream 2.0
sessions. Data stored by users in their Home Folders is backed up to an
Amazon S3 bucket that is automatically created in your AWS account. You can
also enable Google Drive for G Suite or OneDrive for Business as user storage
options if you use of these storage providers. For more information, see
Persistent Storage with AppStream 2.0.
2. For Step 3: User Settings, choose the Clipboard, file transfer, and Print to
local device options for your users. The default settings grant your users
maximum flexibility.
3. For better performance, we recommend to not use applications persistence.
Ensure that Enable applications settings persistence box is unchecked.
4. Choose Review.
5. Confirm the stack configuration details. To change the settings for any section,
choose Edit and make the needed changes. After you finish reviewing the
configuration details, choose Create.
6. After a few moments, the Stacks list reappears. Your stack is listed with a
status of Active.
Manage user access with an AppStream 2.0
user pool
An AppStream 2.0 user pool is a built-in identity management feature that you can use
to enable users to access their streamed applications. Alternatively, you can use SAML
30Amazon Web Services Running Adobe® Creative Cloud on Amazon AppStream 2.0
2.0 to federate through Microsoft Active Directory or any other custom identity solution
provider that supports SAML 2.0.
Note: By default, AppStream 2.0 user pools support a maximum of 50
users. For deployments that must support 100 or more AppStream 2.0
users, we recommend using SAML 2.0.
This guide describes how to manage user access to AppStream 2.0 with the user pool.
For information about configuring third-party SAML 2.0 identity provider solutions to
work with AppStream 2.0, see AppStream 2.0 Integration with SAML 2.0.
To enable users in the user pool to open applications after they sign in to the
AppStream 2.0 user portal, you must assign each user to at least one stack that
contains applications. After you assign the user to a stack, AppStream 2.0 sends an
optional notification email to the user with instructions about how to access the stack
and a URL. The user can access the stack by using the URL until you delete the stack
or unassign the user from the stack.
In this section, you’ll configure an AppStream 2.0 user pool and grant a user access to
AppStream 2.0 by performing the following tasks:
• Create a user in the user pool. AppStream 2.0 then sends a welcome email with
instructions and a temporary password.
• Assign the stack that you created to the user.
Create a user
1. Open the AppStream 2.0 console
2. In the navigation pane, choose User Pool, Create User.
3. In the Create User dialog box, type the following information and choose
Create User.
Option Value
Email An active email address that you can access.
First Name The first name of the user.
31Amazon Web Services Running Adobe® Creative Cloud on Amazon AppStream 2.0
Option Value
Last Name The last name of the user.
4. After a few moments, the User Pool list refreshes, and the user is listed and
enabled.
Figure 4 - The User Pool dashboard showing the newly created user.
Assign a stack to the user
1. In the navigation pane, choose User Pool, and select the user that you created.
2. Choose Actions, Assign Stack.
3. In the Assign Stack dialog box, for Stack, select the stack that you created
earlier.
4. Leave the Send email notification to user option selected.
5. Choose Assign Stack.
6. After a few moments, the User Pool list refreshes. The user that you created
appears under User Details with as an assigned stack.
32Amazon Web Services Running Adobe® Creative Cloud on Amazon AppStream 2.0
Test the end user authentication and
application streaming experience
In the previous section, you added a user to the user pool by providing a name and an
email address and then assigned a stack to the user. AppStream 2.0 sent an email to
the email address after each action. To test the end user experience, sign in to
AppStream 2.0 as the user that you created and start a streaming session.
1. Open the first notification email that you received, and open the Log in page
link. The AppStream 2.0 portal sign-in page opens in your browser.
33Amazon Web Services Running Adobe® Creative Cloud on Amazon AppStream 2.0
2. Type the email address used for the user that you created and the temporary
password that was provided in the email, and then choose Log in.
3. When prompted, type a new password, confirm it, and then choose Set
Password. The AppStream 2.0 application catalog page opens, displaying the
applications that are available for streaming.
4. Choose an application to begin streaming.
Take the next step with AppStream 2.0
Congratulations, you have now successfully created an AppStream 2.0 environment to
stream applications.
To increase your understanding of AppStream 2.0 and take advantage of more
features, consider doing the following:
1. Try using different instance types and sizes to match your application’s
requirements. For information about the different instance types and sizes
available for AppStream 2.0, and their pricing, see Amazon AppStream 2.0
Pricing.
34Amazon Web Services Running Adobe® Creative Cloud on Amazon AppStream 2.0
2. Enable single sign-on (SSO) access to your streamed applications through
SAML. When you do this, your users can use their existing credentials to sign
into AppStream 2.0 streaming sessions through your own web portal. For more
information, see Single Sign-on Access to AppStream 2.0 Using SAML 2.0.
3. Join your AppStream 2.0 fleets and image builders to domains in Microsoft
Active Directory. Your users can then benefit from access to Active Directory
network resources such as printers and file shares from within their streaming
sessions. You can also apply Group Policy settings to your streaming instances
and users to meet the needs of your organization. For more information, see
Using Active Directory with AppStream 2.0.
4. Configure your fleet scaling policies to increase or decrease the number of
instances available to users in response to changes in user demand or
according to time of day. For more information, see Fleet Auto Scaling for
Amazon AppStream 2.0.
5. This guide uses default settings for Security Group. Review the Security Group
best practices for AppStream 2.0 to manage and setup security policies to meet
your organizational needs.
Important: Remember to delete the resources that you created in these
exercises to avoid further charges to your AWS account. For information
about how to delete AppStream 2.0 resources, see Clean up your
AppStream 2.0 resources.
Troubleshooting and Best Practices
I am having trouble with the Image Builder
• Review the Image Builder Troubleshooting guide
• Run the below mentioned command to check if Adobe Notification Client is
present. Follow the steps in this section to remove Adobe notification client, if
present.
Get-AppxPackage -AllUsers AdobeNotificationClient
• Review the logs in C:\Windows\System32\Sysprep\Panther folder for
issues.
35Amazon Web Services Running Adobe® Creative Cloud on Amazon AppStream 2.0
Users receive Audio MMI errors or no sound when working in Creative Cloud
Applications such as Premiere Pro, Rush etc.
• Review that Microphone privacy settings are setup to allow microphone access
as described in Configure Privacy Settings for Microphone Access section.
• Alternately per your organizations security policy, you can setup an
administrative policy (group policy) within windows to force allow microphone
access for Adobe apps under Configuration, Administrative Templates,
Windows Components, App Privacy.
Users receive Media Cache directory access errors
Review that you have correctly configured the Media Cache directories and replaced
$AppData using regedit as described in Step 2: Configure Apps. Also, confirm that
Home Folders is enabled in Stack settings.
Users receive Creative Cloud Activation limit reached
As a best practice, ask your users to sign out of Creative Cloud Desktop application
before ending their streaming session. Alternately, customers can sign out of any of
their earlier sessions using the interstitials that pops up during their subsequent sign-ins
into Creative Cloud on AppStream 2.0. See Creative Cloud Activation limit reached for
details.
36Amazon Web Services Running Adobe® Creative Cloud on Amazon AppStream 2.0
Clean up your AppStream 2.0 resources
Although you can continue to use this AppStream 2.0 environment, keep in mind that
you pay for your running resources. Cleaning up the resources that you created frees
up resources and helps you avoid unintended charges to your account.
Stop and delete your image builder
1. Open the AppStream 2.0 console
2. In the navigation pane, choose Images, Image Builder.
3. Confirm whether the image builder that you created in Step 3 in this guide is in
a stopped state. If not, select the image builder and choose Actions, Stop. If
you created multiple image builders, repeat this step for each image builder that
you created.
4. After the image builder has stopped, choose Actions, and Delete. Repeat this
step for each image builder that you created.
Revoke stack permissions for users in the user pool
1. In the navigation pane, choose User Pool.
37Amazon Web Services Running Adobe® Creative Cloud on Amazon AppStream 2.0
2. Select the user you created in Step 9 in this guide and choose Actions,
Unassign stack. This action revokes the stack permissions for the user.
Disassociate your fleets from your stack and delete your stack
1. In the navigation pane, choose Stacks.
2. Select the stack you created and choose Actions, and Dissociate Fleet. This
action dissociates the fleet from the stack.
3. To delete the stack, choose Actions, and Delete.
Stop and delete your fleet
1. In the navigation pane, choose Fleets.
2. Confirm whether the fleet that you created in Step 6 in this guide is in a stopped
state. If not, select the fleet and choose Actions, and Stop.
3. After the fleet has stopped, choose Actions, and Delete.
Conclusion
Using Amazon AppStream to stream Adobe Creative Cloud applications simplifies the
IT management and overhead required to manage streaming applications while
providing remote virtualized access to Adobe Creative Cloud applications anywhere, on
the go and on low powered devices.
This implementation guide provides a guided approach to setup Adobe Creative Cloud
applications on Amazon AppStream to evaluate the setup for your organizations
business objectives.
Contributors
Contributors to this document include:
• Anuj Ratra, Sr. Solutions Architect, AWS Business Applications
• Jesse Molano, Specialty Solutions Architect, AWS End User Computing
38Amazon Web Services Running Adobe® Creative Cloud on Amazon AppStream 2.0
Additional Resources
For additional information, see:
• AWS AppStream Troubleshooting3
• Adobe best practices for Creative Cloud deployment on VDI4
• Adobe Creative Cloud licensing for Education (Students/Teachers, K-12
Schools and Higher ED)5
Document Revisions
Date Description
July 2020 First publication
Notes
1 https://www.adobe.com/creativecloud/buy/education.html#edu-rfi
2 https://s3.amazonaws.com/appstream-demo-vpc-cfn-
template/AppStreamDemoVPCTemplate.template
3 https://docs.aws.amazon.com/appstream2/latest/developerguide/troubleshooting.html
4 https://helpx.adobe.com/enterprise/using/creative-cloud-deployment-on-vdi.html
5 https://www.adobe.com/creativecloud/buy/education.html
39You can also read