Customer Portal User Guide February 2020
←
→
Page content transcription
If your browser does not render page correctly, please read the page content below

—
EN T ER PR I SE S O F T WA R E

Customer Portal User Guide
February 2020

Enterprise Software Customer Experience

http://new.abb.com/enterprise-software/services/maintenance/support

Support Mail Box

CustomerCare.ES@abb.com

                                                                      1 /35
CU STOM ER PORTAL US ER GU ID E

Copyright Information
The software product described in this publication is contracted through ABB Power Grids and is licensed to authorized users
under a written license agreement with ABB Power Grids. The information in this publication is confidential and proprietary to
ABB Power Grids. No part of this software product or associated documentation may be copied, reproduced, transmitted, or
distributed by any third party in any form, without the prior written consent of ABB Power Grids. This publication is subject to
change without notice. ABB Power Grids assumes no responsibility for any errors that may appear in this document.

This publication is intended to provide information regarding the software product. It is provided with the understanding that
ABB Power Grids is not engaged in rendering legal, accounting, or other professional services through the production of this
publication. Further, ABB Power Grids makes no claims that use of this software in accordance with this publication will ensure
compliance with any federal or state laws, rules or regulations. ABB Power Grids recommends that the customer seek profes-
sional advice in order to determine that its policies and practices are in compliance with applicable laws, rules, or regulations.

Because of the nature of this publication, numerous hardware and software products are mentioned by name. In most, if not all,
cases these product names are claimed as trademarks by the companies that manufacture the products. It is not our intent to
claim these names or trademarks as our own.

Copyright © 2020
ABB Power Grids
All Rights Reserved

 Manual                   Customer Portal User Guide

 Product and Version      Customer Portal 19

 Publication Date         February 2020

CPSP C -0010 -02 20 -00                                                                                                  2 /35
CU STOM ER PORTAL US ER GU ID E

Contents
Overview .................................................................................................................................................................... 5
  Introduction ......................................................................................................................................................................... 5
  Additional Documents ...................................................................................................................................................... 5

Accessing the Customer Portal ............................................................................................................................... 6
   Customer Portal Access .................................................................................................................................................... 6
   Logging in to the Customer Portal ................................................................................................................................ 6
   Setting Password on First Login..................................................................................................................................... 6

Home Page Overview ................................................................................................................................................ 8
  1 – Alerts and Notifications .............................................................................................................................................. 8
  2 – Shortcut Menu .............................................................................................................................................................. 8
  3 – Main Menu Tabs ............................................................................................................................................................ 8
  4 – Search and Personal Settings ................................................................................................................................... 9
      Personal Settings ......................................................................................................................................................... 9
      Search.............................................................................................................................................................................. 9

Personal Profile and Settings ................................................................................................................................ 10
   Personal Profile ..................................................................................................................................................................10
   Personal Settings ..............................................................................................................................................................10
      Location Settings ........................................................................................................................................................ 11
      Security Settings ......................................................................................................................................................... 11
      Email Settings .............................................................................................................................................................. 11
      Activity Reminders ...................................................................................................................................................... 11
      Approved Connections ............................................................................................................................................... 11
   Change Password .............................................................................................................................................................. 11

Searching Customer Portal .................................................................................................................................... 13
   1 – Search Results .............................................................................................................................................................. 13
   2 – Records Searched ........................................................................................................................................................ 13
   3 – Refining Search ............................................................................................................................................................14

Chatter ..................................................................................................................................................................... 15
  1 – Viewing Menu ...............................................................................................................................................................15
  2 – Message Display ..........................................................................................................................................................15
  3 – Recommendations ...................................................................................................................................................... 17

Knowledge ............................................................................................................................................................... 18
  1 – Knowledge Articles .....................................................................................................................................................18
  2 - Searching Knowledge ................................................................................................................................................. 19

Cases ........................................................................................................................................................................ 20
  Case Home Page ............................................................................................................................................................... 20
      1 – Case List View........................................................................................................................................................ 20
      2 – Create New Case................................................................................................................................................... 20
      3 – Case View Selection ............................................................................................................................................. 20
      4 – Case View Quick Selection .................................................................................................................................. 21
  Case View ............................................................................................................................................................................ 21
      1 – Short Cut Links....................................................................................................................................................... 21
      2 – Case Detail ............................................................................................................................................................. 22
      3 – PD Information ...................................................................................................................................................... 22
      4 – Case Work Log ...................................................................................................................................................... 22

CPSP C -0010 -02 20 -00                                                                                                                                                      3/3 5
CU STOM ER PORTAL US ER GU ID E

     Creating a New Case........................................................................................................................................................ 22
     Updating a Case ............................................................................................................................................................... 23
        Adding New Information to a Case ........................................................................................................................ 23
        Updating Case Detail Information ......................................................................................................................... 25
     Closing a Case ................................................................................................................................................................... 25

Code Changes and Fixes ........................................................................................................................................ 26
  Viewing a Change Request............................................................................................................................................. 26
     Within a Case ............................................................................................................................................................... 26
     Searching Change Requests .....................................................................................................................................27
  Viewing a PD Issue ............................................................................................................................................................27
     Within a Case ................................................................................................................................................................27
     Searching PD Issues ................................................................................................................................................... 28

Reports and Dashboards........................................................................................................................................ 29
   Customer Portal Reports ................................................................................................................................................ 29
      1 – List of Folders ........................................................................................................................................................ 29
      2 – List of Reports ...................................................................................................................................................... 29
      3 – Report List Filters ................................................................................................................................................. 30
      4 – Searching for Reports ......................................................................................................................................... 30
   Viewing a Report .............................................................................................................................................................. 30
      1 – Report Options...................................................................................................................................................... 30
      2 – Action Buttons ....................................................................................................................................................... 31
      3 – Report Data............................................................................................................................................................. 31
   Customer Portal Dashboards ......................................................................................................................................... 31
      1 – Dashboard Search ................................................................................................................................................ 32
      2 – Dashboard.............................................................................................................................................................. 32
   Requesting Special Reports or Dashboards .............................................................................................................. 32

Workspaces, Content, and Subscriptions ............................................................................................................ 33
  Workspaces........................................................................................................................................................................ 33
  Content ............................................................................................................................................................................... 34
     1 – Filter Menu ............................................................................................................................................................. 34
     2 – Content Search...................................................................................................................................................... 34
     3 – Content Display..................................................................................................................................................... 35
  Subscriptions .................................................................................................................................................................... 35

CPSP C -0010 -02 20 -00                                                                                                                                                      4/3 5
CU STOM ER PORTAL US ER GU ID E

Overview

Introduction
Welcome to the Customer Portal User Guide. The Customer Portal is the primary and most effective way for
you to access information about your product or request support from Customer Experience (CX). This doc-
ument provides a functional guide on how to use the Customer Portal.
The Customer Portal gives you access 7 x 24 to:

– Find important documentation

– Review Technical Service Bulletins (TSBs)

– Use the Knowledge Database to find answers or solutions to common questions or issues

– Interact with like customers through online user communities

– Download/request available software product updates and/or patches

– Track support cases

   •   Submit new cases
   •   Attach supporting documentation or files to a case
   •   Update open cases or close resolved cases
   •   View details on any cases reported by your organization

– Submit Customer/Company satisfaction surveys

– Update personal information

This document provides a functional guide on how to access these features through the Customer Portal.

Additional Documents
– Customer Experience Policy Guide

   •   This document provides a description of how Customer Experience (CX) provides support to ABB cus-
       tomers. This description includes suggestions on what information to provide when opening cases as
       well as definitions for case priority levels.
   •   The policy guide is available through the official CX web page – see URL on the front page of this doc-
       ument.

CPSP C -0010 -02 20 -00                                                                              5 /35
CU STOM ER PORTAL US ER GU ID E

Accessing the Customer Portal

Customer Portal Access
The Customer Portal can be accessed from the CX web page found at the following URL:

https://new.abb.com/enterprise-software/services/maintenance/support

The link to the Customer Portal is at the top of the page.

The Customer Portal can also be accessed directly using the following URL:

https://enterprisesoftware.force.com/customerportal/login

Important. Before you can log into the Customer Portal it is important you have an account. Please contact
your CX representative to request access to the Customer Portal. Once an account has been created you will
receive an e-mail with your login and password information. You will be asked to change the password on
your first login. Please see the CX web page (link above) for details on contacting CX.

Logging in to the Customer Portal
– When you access the Customer Portal you will be presented with the following login picture

                                    Figure 1. Customer Portal login dialog
– Enter the username and password as provided via email

   •   If a password is not available, click Forgot your password? Enter the user name and click Submit. An
       e-mail will be sent to the address you have registered with a temporary password

– Press Log In to proceed to the Customer Portal home page

Setting Password on First Login
Logging into the Customer portal for the first time, or if your password has been reset by ABB, you will be
asked to set a new password when you log in. In this scenario the following password dialog will be dis-
played.

CPSP C -0010 -02 20 -00                                                                              6/3 5
CU STOM ER PORTAL US ER GU ID E

                          Figure 2. New password dialog on first login or reset password
– Create a password that is at least (each condition will light up green when met)

   •   8 alphanumeric characters in length
   •   Contains at least 1 letter
   •   Contains at least 1 number

– Confirm New Password by entering it again

   •   An error will be displayed if the two entries do not match

– Press Change Password to complete setting your new password

   •   Note. This button only activates when the form is correctly filled

CPSP C -0010 -02 20 -00                                                                               7/3 5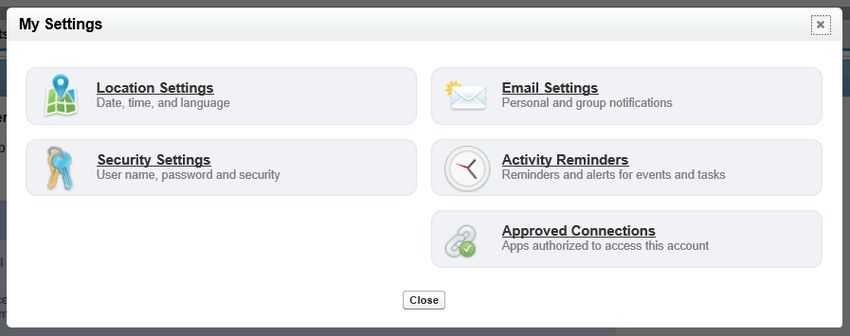
CU STOM ER PORTAL US ER GU ID E

Home Page Overview
Upon successfully logging into the Customer Portal the portal home page is displayed. The home page con-
sists of 4 functional areas – fenced and numbered in red – which are described below in detail.

              Figure 3. Customer Portal home page with four main functional areas highlighted

1 – Alerts and Notifications
The main section of the home page is used to display general alerts and notifications from ABB to all cus-
tomers. Each notification contains a link to additional details.

2 – Shortcut Menu
The shortcut menu provides quick access to the functions described below

– Your profile and Logout. Selecting the link to your profile allows you to see/edit the information CX has
  on you, including contact e-mail and phone.

– Calendar – this is a general calendar you can use to record events associated with your usage of the Cus-
  tomer Portal for example.

– Recent items you have worked on. For example, this will list links to any support cases you have recently
  accessed.

– Customer Portal Links – provides links to other CX web sites.

– Questions? Provides information on how you can contact CX via phone with any questions.

The shortcut menu can be minimized by clicking either of the left-point arrows at the top or bottom of the
menu. The menu will be visible when accessing most functions in the Customer Portal.

3 – Main Menu Tabs
The main menu is always visible at the top of your Customer Portal view and consists of the following
tabs/options. Each feature is described in greater detail in other parts of this document.

– Home takes you back to the Customer Portal home page from anywhere. If you were in the middle of ed-
  iting any item, any unsaved data will be lost.

CPSP C -0010 -02 20 -00                                                                              8 /35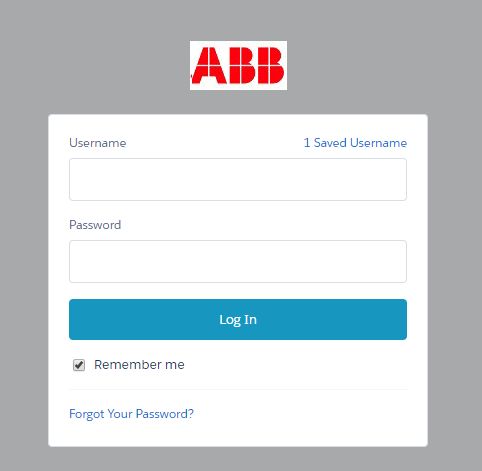
CU STOM ER PORTAL US ER GU ID E

– Chatter will allow you to sign up to and read messages posted within SalesForce on cases or within user
  communities (general or product specific).

– Knowledge allows you to search for Technical Service Bulletins (TSBs) concerning your products as well
  as search an extensive repository of knowledge articles with answers/resolutions to common questions
  and issues.

– Cases allows you to view, create or close cases from your company. Security levels can be defined within
  the Customer Portal user profile to limit whether a user can see all cases from a company or only their
  own, as well as whether or not the user can close cases. Please contact your CX representative if re-
  strictions are required.

– Change Request View allows you to view all published Change Requests for products under mainte-
   nance. Published Change Requests include any case which has been forwarded to development for a de-
   fect correction for example. Customers will be able to see Change Requests published, including those
   submitted by other customers, but will not be able to access any details about the other customers (for
   examples names, contacts, etc.).

   •   Note. As of January 1st, 2020 ABB has moved to a new tool for tracking code changes. The Change Re-
       quest View will therefore only display information on Change Requests released prior to that date.
       Please see section on Code Changes and Fixes later in this document for more details.

– Reports provides you access to several standard reports which have been developed for our Customers
  to get real-time information about their support cases with CX.

– Dashboards provides access to standard dashboards which have been developed for our Customers to
  track multiple types of information about the status of their cases.

– Workspaces provides a list of all product download workspaces with which you are associated. A Work-
  space product download folder houses content related to product workspace.

– Content lists all the available media (e.g. Emergency Patches and Patch Releases) you can download
  based on workspace security and contractual entitlement.

– Subscriptions provides a list of Workspaces and Contents to which you have subscribed.

   •   When you subscribe to a Workspace, you will get automatic notifications from the Customer Portal
       when new content is added to the workspace or altered.

4 – Search and Personal Settings
Personal Settings
Clicking on your name in the top right hand of the screen will display a dropdown menu with two options

– My Settings – Use this option to edit your Customer Portal settings. For example, your time zone or to
  change your password.

– Logout – Use this option to end your session with the Customer Portal

Search
The search feature is used to search for information in the Customer Portal. The results of a search are pre-
sented sorted into logical groups such as cases, Change Requests, knowledge articles, etc. Selecting one of
these groups you can limit your search to only items within the selected group.

CPSP C -0010 -02 20 -00                                                                              9/3 5
CU STOM ER PORTAL US ER GU ID E
Personal Profile and Settings
Personal Profile
To view or update personal profile, select My Profile link in the shortcut menu on the left of your screen. (If
you cannot see it check if you have minimized the menu or return to the home page by clicking Home at the
top of your portal view.) This will display the following information.
Figure 4. User profile information view
To edit your personal information, press the Edit button at the top of page.
Important. It is very important that your contact information is accurate and up to date. This information is
automatically copied into any cases you open and is used by CX representatives to contact you for follow up
on your case. If the information is not correct issue resolution will be delayed while trying to reach you.
Update any applicable information. When finished, press Save.
Personal Settings
Selecting My Settings, from the dropdown menu activated by clicking your name on the top right of your
Customer Portal view, will display the following options.
CPSP C -0010 -02 20 -00 1 0/3 5CU STOM ER PORTAL US ER GU ID E
Figure 5. My Settings options
Location Settings
Use this option to select your language, locale, and time zone. These can also be set by editing your profile
as described in the previous section.
Security Settings
Allows you to change your Customer Portal account password.
Email Settings
Use this option to configure which events in SalesForce will trigger the system to send you an e-mail notifi-
cation. An option exists to turn off any and all e-mail notifications.
Activity Reminders
Use this feature to configure when (or if) SalesForce should display or send you reminders – for example re-
minders on activities recorded in the SalesForce calendar.
Approved Connections
This feature is disabled and provides no options.
Change Password
Two options exist to change your Customer Portal account password.
The first option is to open your personal profile as described in first section of this chapter, and then press
the Change My Password button at the top of the page – see figure 4.
This will display the following form.
CPSP C -0010 -02 20 -00 1 1/3 5CU STOM ER PORTAL US ER GU ID E
Figure 6. Change My Password dialog screen
Enter the old and new password. When finished, press Save.
The second option calls for you to open My Settings as described in the previous section and selecting Se-
curity Settings. This will display the following dialog.
Figure 7. Security Settings dialog to change password
Enter the old and new password. When finished, press Save.
CPSP C -0010 -02 20 -00 1 2/3 5CU STOM ER PORTAL US ER GU ID E
Searching Customer Portal
The Search feature (top righthand corner) allows you to perform a free text search through all areas your
profile allows you access to. Searches could for example be for a specific case using the case number or key
phrases used in the case – like in the case subject or description, as well as in any case comment.
Note. Any search will be limited to information you have access to only. For example, only cases opened by
you or your organization will show up in the results if they match your search criteria.
The figure below shows how results from a sample search are presented with the three main areas high-
lighted. Each area is described in detail below the figure.
Figure 8. Presentation of search results
1 – Search Results
This is where the system displays the results of the search you requested. Results are grouped by the type of
record where a match to your search criteria was found. The record type is listed at the top of each group
along with a count of how many matches were found within this record type. Only the top 5 matches are
shown within each group by default (or less if less than 5 matches were found). To view the full list of
matches within a specific record type click the Show More link at the bottom of the relevant group.
Clicking on any one of the displayed records will bring up a view of that one record.
2 – Records Searched
The left-hand side of the search results view displays a list of all the record types searched by the Customer
Portal in response to your request. Record types where matches were found are highlighted in blue detailing
the number of matches found within the record.
Clicking on a highlighted (in blue) record type will take you to a full listing of all the matches found within
that record type.
CPSP C -0010 -02 20 -00 13 /35CU STOM ER PORTAL US ER GU ID E
3 – Refining Search
At the top of the results view is a new search field allowing you to enter a new search phrase. There are two
ways in which to limit/filter your search.
– Using the Options… link displayed to the right of the search field allows you to limit the search to only
items you own and/or search only for the exact phrase you provided.
– Drilling down into any of the record types where matches were found will limit your search to only rec-
ords of this particular type. For example, using the example above, if we were to drill down into the list of
matching knowledge articles any new search using the new search field will limit the search to only
knowledge articles matching your new search criteria as show on the figure below.
Figure 9. View articles searches are limited to articles only
Note. To make a new general search simply use the original search field in the top right corner of the Cus-
tomer Portal.
CPSP C -0010 -02 20 -00 1 4/3 5CU STOM ER PORTAL US ER GU ID E
Chatter
Customer Portal Chatter is your path to interacting with ABB people and like customers by posting
thoughts, ideas, comments, and ask questions of a general nature. You can post within a specific product
user community, to the general community, or to specific people.
The following figure shows the Chatter view in the Customer Portal with the main functional areas high-
lighted.
Figure 10. Customer Portal Chatter view
1 – Viewing Menu
The viewing menu in the Chatter view allows you to select what you want to view. By default, your personal
feed will be selected. All the options are:
– Feed – your personal feed displaying any new messages directed at you or from people/groups followed
– People – new postings from specific people followed
– Groups – new postings within groups followed (for example product related user communities)
– Files – any files recently viewed, uploaded, or modified
– Topics – a list of topics in Chatter sorted by number of people participating in conversations
2 – Message Display
This is the area where any new updates to the feeds you follow (have joined) will be displayed. You can use
the menu options described above to select which feeds are displayed and to limit the number of messages
displayed.
At the top of the message display area are four activities to allow you to interact with other people using
Chatter.
– Post – use this function to start a new conversation by posting a comment. Who can see the new com-
ments depends on your selection of target audience. If you select My Followers (default) any person fol-
CPSP C -0010 -02 20 -00 1 5/3 5CU STOM ER PORTAL US ER GU ID E
lowing you will be notified and see the message. If you select A Group, the audience will be all the mem-
bers of the selected group. The audience is displayed at the bottom of the posting dialog as shown on
the figure below.
Figure 11. Chatter posting dialog with audience pointed out
When you have completed composing your new comment press Share to post the comment to the se-
lected conversation/feed.
– File – use this function to start a new conversation along with an attached file. The file to upload can be
located within Chatter or originate from your PC as shown in the figure below.
Figure 12. Chatter posting comment with attached file dialog
The rules described above concerning posting audience apply to this posting. When you have completed
composing your new comment press Share to post the comment to the selected conversation/feed.
– Link – use this function to post a link to a website alongside your comment when starting a new conver-
sation. You will be asked to enter the URL address of the link as well as a name for the link.
The rules described above concerning posting audience apply to this posting. When you have completed
composing your new comment press Share to post the comment to the selected conversation/feed.
– Poll – use this function to start a poll in Chatter. At the top of the dialog you are required to enter the
question you are polling. Below you can define the answers the poll audience can select from. By default,
you are provided two answers, but more can be added if so desired.
The rules described above concerning posting audience apply to this posting. When you have completed
composing your poll press Share to post the poll to the selected conversation/feed.
Beyond starting a new conversation in Chatter, you can also comment on an existing ongoing conversation
displayed in the message display area. Below each comment displayed are three functions
– Comment – use this function to post a comment in an existing conversation thread; you can attach a file
to your comment
CPSP C -0010 -02 20 -00 16 /35CU STOM ER PORTAL US ER GU ID E – Like – use this function to indicate you like what you read in the comment – Share – use this function to forward the comment to other people you know who might find it interesting 3 – Recommendations The Customer Portal will display a set of Chatter feeds that it recommends you join based on feeds already joined and your and your company’s profiles. To join any of the recommended feeds simply click the join but- ton displayed with each recommended feed. CPSP C -0010 -02 20 -00 1 7/35
CU STOM ER PORTAL US ER GU ID E

Knowledge
Customer Portal Knowledge is a knowledge database which contains Technical Service Bulletins, answers to
common questions, and resolutions for common issues. You are encouraged to search the knowledge arti-
cles for answers/solutions to your questions/challenges prior to submitting a case to CX.
The figure below shows the view when you first open Knowledge. The two main areas are highlighted and
are described in detail below the figure.

                             Figure 13. Default Knowledge view when first opened

1 – Knowledge Articles
This area provides a list of relevant knowledge articles. By default, this list will display all the latest
knowledge articles added to the system since your last visit. When you perform a search (see next section)
in the knowledge database this area will list the articles that match your search criteria.

Clicking on the title line of any knowledge article will bring up the article for you to read as shown in the fig-
ure below. Each article contains a step-by-step section containing main content of the article. Below this
section will be any attachments (up to 3) that are part of the article (if any).

The article view contains three functions highlighted on the figure.

– Back to Knowledge Search – takes you back to the main knowledge view shown on figure 13 above.

– Show Properties – shows the article properties - publishing dates, targeted audience, article number,
  and article summary.

– Printable View – presents the article in a view formatted for easy printing.

CPSP C -0010 -02 20 -00                                                                                  1 8/3 5
CU STOM ER PORTAL US ER GU ID E
Figure 14. Article view in Customer Portal
If an article you read provided you with just the right answer to your question, please rate the article that
assisted you using the rating feature immediately below the article title. This will not only help other people
looking for the same answer, but also assist you in finding the same article should you need it again at a
later date.
2 - Searching Knowledge
The search function provided at the top of the Knowledge view allows you to search for specific knowledge
articles. The search is limited to only knowledge articles. You can enter a search phrase in the search field,
and further limit your search using the two filter options below the search field.
– Product – limits your search to articles on a specific product, for example Asset Suite or Ellipse. Clicking
the button will provide you with a drop-down menu listing all available product options, including sub-
modules for some product lines.
You can only select one Product at a time or all. Please note that the button text changes to match your
selection. By default, all products are selected for your search.
– All Article Types – limits your search to specific article types. Clicking the button will provide you with a
drop-down menu listing all available type options, for example documentation, known error, TSB, etc.
You can select multiple article types for each search. Please note that the button text changes to match
your selection. By default, all types are selected.
– Reset – resets the filters back to default, all products, all article types.
The results of your search are displayed as a list in the main area as described above.
CPSP C -0010 -02 20 -00 19 /35CU STOM ER PORTAL US ER GU ID E
Cases
If you are unable to find an answer/solution to your question/issue in the Knowledge section of the Cus-
tomer Portal, the next logical step will be to open a case with ABB Customer Experience (CX). This chapter
will go through the details of opening, monitoring, updating, and closing cases with ABB Customer Experi-
ence (CX).
Case Home Page
The figure below shows the Cases view. Key areas and functions are highlighted and described in detail be-
low the figure.
Figure 15. Case home page view
1 – Case List View
The main area of the case home page displays a list of cases based on the selected view (see below). From
this list you can open an individual case to review, update, or close it. To open a case, click on the case num-
ber or the case subject. Please find a description of the case view later in this chapter.
2 – Create New Case
Use this function to submit a new case with a request for assistance to ABB Customer Experience. Please
see a more detailed description below.
3 – Case View Selection
Use this field to select which cases are listed in the case list view. By default, the case home page will always
display a list of cases recently viewed. To change the list of cases shown first select a view from the
dropdown list, and then press Go to generate the new case list.
The default views available are:
– All Cases – will display all cases created by your organization whether open or closed
– All Closed Cases – will display all cases created by your organization which have been resolved and closed
– All Open Cases – will display all cases created by your organization which remain open
– My Closed Cases – will display all cases created by you which have been resolved and closed
CPSP C -0010 -02 20 -00 2 0/3 5CU STOM ER PORTAL US ER GU ID E
– My Open Cases – will display all cases created by you which remain open
– Recently Viewed Cases – will display cases recently viewed by you
Note. Other views may be available to you and/or your organization.
4 – Case View Quick Selection
Use this feature to easily switch between views of cases recently viewed and all cases created by you re-
maining open.
Case View
The figure below shows a full case form. The full form is usually longer than can fit on one screen requiring
you to scroll down (or up) to see all parts of it. Each highlighted area on the figure is described in detail be-
low.
Figure 16. Case view
1 – Short Cut Links
The short cut links provide easy access to relevant areas/functions to add information to the work log of the
case. The functions are described further in the section on updating a case below.
CPSP C -0010 -02 20 -00 2 1/3 5CU STOM ER PORTAL US ER GU ID E
2 – Case Detail
The information contained in the Case Detail area is the information you provide when opening a case with
CX. This is the title and introduction to the request you have as well as how CX may get hold of you.
3 – PD Information
Here you will find a list of requests raised with ABB Product Development for code changes/fixes. If your
case does not involve any code changes/fixes this section will remain empty. Please see the next chapter for
details.
4 – Case Work Log
This area is where you can monitor and contribute to case progress towards resolution. Please see below on
updating a case for details.
Creating a New Case
To submit a new case to CX click the Create New Case button on the case home page – see figure 15. This
will open the new case view shown in the figure below.
Figure 17. Create new case view
The form consists of two types of fields:
– Mandatory fields - indicated by a red line on the left side of the entry field.
Note. You cannot submit a case until all mandatory fields have been filled.
– Optional fields - additional fields that can be filled in where relevant.
CPSP C -0010 -02 20 -00 2 2/35CU STOM ER PORTAL US ER GU ID E
Note. Some fields are filled in with default values. Please review these values before submitting the case to
ensure they are correct.
Please see the Customer Experience Policy Guide for guidance on the information to enter in each field and
definitions of the case Priority levels. You can find the guide on the CX official website at the link shown on
the front page of this guide.
When all relevant fields have been completed, press Save to submit the case to CX. The completed case sub-
mitted will be displayed as shown in the figure below.
Figure 18. New case just submitted to CX
Updating a Case
Adding New Information to a Case
Once you have submitted a case to CX for assistance updates you make to a case will focus on case com-
ments, attachments, and managing case collaborators. All these functions can be found below the Case De-
tail section (see #4 in figure 16 above) and are presented as shown in the figure below.
CPSP C -0010 -02 20 -00 23 /35CU STOM ER PORTAL US ER GU ID E
Figure 19. Functions for interacting with a case and CX
– Case Collaborators – use this function if additional people within your organization should receive e-mail
notifications from this case. Click New Case Collaborator to open the collaborator entry dialog, enter the
collaborator’s name and e-mail address, and press Save to submit the information to the case, or press
Save & New if you need to add more than one collaborator to the case.
– Case comments – use this function to add comments to a case. Click New Case Comment to open the
comment entry dialog, enter your comment, and press Save to submit the comment into the case. The
case owner will receive a notification you have entered a new comment in the case.
– Attachments – use this function to add files, screen shots, etc. to your case as supporting information or
upon request from CX. Click Attach File to open the attachment dialog. You will be asked to perform
three steps
• Select a file to upload from your PC (or shared drive available on your PC) – click Choose File
• Attach the selected file to the case – click Attach File
Repeat the two above steps for all the files you wish to attach to the case before moving to the third
step.
• Click Done to complete attaching files to the case.
– Articles – use this function to search the knowledge database for articles pertaining to your case. Click
Find Articles to access the Knowledge search screen.
You may attach any articles you find to the case by answering Yes, Close My Case at the top of the article
you have found. Please note this will only attach the article to your case and take you back to the case
view – your case will not be closed unless you decide to do so.
If the article found does not help and you do not want it attached to the case press No, Keep My Case
Open, which will return you to the knowledge article search page. To go back to your case, click the Back
to case ### link at the top of the article search page.
– Case Lookup – Support Surveys – use this function to submit feedback on the case handling by CX. Click
New Support Survey to open the survey form.
The form will ask you to rate 4 parameters each on your satisfaction with case handling and CX overall.
Each parameter can be rated from 0 to 10 with 0-6 being a negative rating, 7-8 being a neutral rating, and
9-10 being a positive rating. Default is 8. In each case you are also given the option to provide additional
written feedback to expand on your rating.
Click Save to submit the feedback to CX.
CPSP C -0010 -02 20 -00 2 4/3 5CU STOM ER PORTAL US ER GU ID E
Updating Case Detail Information
As a general rule you should not update the Case Detail section of a case once CX has started working the
case towards resolution. If you, at any time, find there is any information you want to update – for example
changing the case priority – please reach out to the CX representative working your case to have them per-
form the needed changes. This ensures that no information is missed and minimizes risks of delays/misun-
derstandings.
If you have just submitted a case and find, during your review, you have missed a key piece of information or
entered incorrect information you do have the option to update the Case Detail information yourself. To do
so go to the case home page and select to view My Open Cases. In the list of cases presented there will be
an Edit link to the left of the case number as shown in the figure below.
Figure 20. Link to edit case
Find the case you need to update and click the Edit link next to the relevant case number. This will display
the same form seen when you enter a new case (figure 17 above) with the fields filled in with the current in-
formation. Update the required information and press Save to submit the changes.
Closing a Case
There are two options for closing a case
– You can request CX to close the case when they provide you with the resolution to your request
– You can close a case yourself at any time during the case’s lifecycle
To close a case yourself, open a view of the case you wish to close using one of the methods described at
the start of this chapter. At the top of the case view click the Close Case button to open the close case dia-
log shown in the figure below.
Figure 21. Close case dialog
Select status Closed and select a Close Reason to match why you are closing this case from the dropdown
options provided. Press Submit to confirm the case closure, or press Cancel to keep the case open.
CPSP C -0010 -02 20 -00 2 5/3 5CU STOM ER PORTAL US ER GU ID E
Code Changes and Fixes
Some of your cases will result in the need for a code change or defect fix to be generated. All code change
requests, whatever their nature, will be submitted to ABB Product Development for execution. You will be
able to monitor progress of such requests through the Customer Portal from within the associated case.
Up until December 31st, 2019 such code change requests were tracked as Change Requests in your cases.
Any code changes released prior to this date will still be shown in their corresponding Change Request.
From January 1st, 2020 ABB has initiated a new process which has resulted in code change requests being
tracked as PD Issues in your cases. Any code change request submitted prior to this date and not re-
solved/released by the date have been migrated into PD Issues. All future progress on these will be recorded
in the PD Issue only. Any new code change requests submitted post the above date will exist only as PD Is-
sues.
This chapter will describe how you can view each type of request.
Viewing a Change Request
Within a Case
Change requests are recorded in the worklog section of a case – see previous chapter. The Change Request
list in the case worklog will only be displayed if the case has any associated Change Requests.
Figure 22. Change Request list in case
To view details about a Change Request, scroll to the Change Request list in the case worklog and click the
Change Request ID for the relevant Change Request. This will open the detail view shown below.
Figure 23. Change Request detail view
Note. All Change Requests that were migrated to the new tracking tool will appear with a status of Can-
celled in the search results.
CPSP C -0010 -02 20 -00 26 /35CU STOM ER PORTAL US ER GU ID E
Searching Change Requests
You can search for all Change Requests submitted against a single product and version. For example, to see
what fixes are included in a later version of your product which you are considering updating to.
To perform a Change Request search, click the Change Request View tab in the Customer Portal menu bar.
In the form displayed fill in a product and a version and press Load. The results from your search will be pre-
sented in the following format.
Figure 24. Change Request search results display
Note. All Change Requests that were migrated to the new tracking tool will appear with a status of Can-
celled in the search results.
Click on the Change Request ID to view the detail view for the selected Change Request – see figure 23
above.
Viewing a PD Issue
Within a Case
As of January 1st, 2020, all code changes and fixes are tracked as PD Issues. PD Issues are listed in the PD In-
formation section of a case – see figure 16 above. This section will only have content if a PD Issue has actu-
ally been associated with the case.
When one (or more) PD Issue(s) exist in a case they will be displayed in the PD Information section as shown
below.
Figure 25. PD Issue information listed in a case
The information displayed on a PD Issue includes the following new fields:
– Fix Version – This field indicates the targeted or actual version in which an issue was fixed dependent on
the status of the PD Issue. When Issue Status is Done the Fix Version is actual and in all other situations
it is targeted.
Note. The fix version may change if still only a target version, as in work on resolving the PD Issue is still
in progress. This may occur due to added complexity or failed quality testing making it mis code deadline
for example.
– Resolution – This field will provide information on how the issue was resolved.
CPSP C -0010 -02 20 -00 27 /35CU STOM ER PORTAL US ER GU ID E
You can open the PD Issue detail view by clicking on the PD Issue Key. This will display the following view
with details on the PD Issue.
Figure 26. PD Issue detail view
Searching PD Issues
There is currently no feature available that would allow you to search all PD Issues for a given product and/or
version matching the Change Request View described above. If you find you do need, for example, a list of
all PD Issues fixed/released against a specific product/version you are planning to upgrade to, please con-
tact your CX representative with the details. They will be able to create a list which they can submit to you.
CPSP C -0010 -02 20 -00 2 8/35CU STOM ER PORTAL US ER GU ID E
Reports and Dashboards
The Customer Portal provides you with tools to get an overview of your cases, open and closed, with ABB
Customer Experience (CX) in the form of Reports and Dashboards. This chapter describes how you use
these tools and how you can request additional reports or dashboards.
Customer Portal Reports
To view reports, click the Reports tab on your Customer Portal home page. The figure below shows the re-
sulting view with the key areas/features highlighted and described below the figure.
Figure 27. Reports view in Customer Portal
1 – List of Folders
The left side of the report view contains a list of report folders you have access to. The figure above displays
the three default folders available to all customers, but your view may show more folders depending on the
configuration and needs of your organization. Above the list of folders is a search function to allow you to
search for a specific folder.
By default, all folders are selected and any searches for a specific report (see below) will result in all folders
being included in the search. Select a single folder by clicking its name. This will limit all searches to just that
folder and update the list of reports (see below) to show the contents of this folder only.
2 – List of Reports
This area will display a list of reports depending on your folder selection, filter settings (see below), and
search criteria. By default, the list will display a list of the reports and dashboards you have most recently
viewed.
To open a report (or dashboard) from the list click the name of the report.
At the beginning of each line you can access a couple of actions
– For reports you can create an export of the report data in a comma separated format
– For dashboards you can choose to follow the dashboard and receive notification when it is updated
CPSP C -0010 -02 20 -00 29 /35CU STOM ER PORTAL US ER GU ID E
3 – Report List Filters
Two filters exist to control which reports (and dashboards) are displayed in the report list
– Based on your connection to a report; options are
• All Items
• Recently Viewed
• Items I’m Following
• Items I Created
– Based on type; options are
• All Types
• Reports
• Dashboards
4 – Searching for Reports
You can search for a specific report by entering a search string in this field. The search will match you search
string against the report (or dashboard) name and display the results in the report list.
By default, the search will search through all folders you have access to. You can limit your search to only re-
ports in a single folder by selecting that folder from the folders list prior to initiating your search.
Viewing a Report
The figure below shows the view of a sample report. Highlighted areas are described below the figure.
Figure 28. Sample report view
1 – Report Options
The report options allow you to control what data the report will display. You can select how data is summa-
rized, what cases to show, what date field to use for selection, and which start and end dates the report
should cover.
ABB CX recommends that you only update the start and end dates in this section. If you have specific needs,
please consult with your CX representative on how best to achieve the results you are looking for.
CPSP C -0010 -02 20 -00 30 /35CU STOM ER PORTAL US ER GU ID E
2 – Action Buttons
The action buttons allow you to take specific actions on the report being viewed
– Run Report – asks the system to run the report again. Note that you will need to re-run the report if you
make changes to the date interval from which cases are selected.
– Hide Details – toggles between displaying all data or just a summary of data. Note button will change to
Show Details when a summary view is in use.
– Printable View – allows you to create a printer formatted view of the report which can be loaded into Ex-
cel for printing.
– Export Details – allows you to export report data in a comma separated format
3 – Report Data
Is where the actual data produced by the report is displayed. Which columns and data are displayed depends
on how the report was built. You can sort the report by a column by clicking on the column name.
You can access a single case by clicking on the case number for the relevant case in displayed in the report.
Customer Portal Dashboards
Dashboards provide a highlevel graphical summary view of a specific area of your organization’s interaction
with ABB through the Customer Portal. There are two ways in which you can open a dashboard for viewing
– You can select the dashboard from one of the lists displayed under the Reports tab as described above
– You can click the Dashboards tab in your Customer Portal menu bar
Either method will provide a view as shown in the figure below.
Figure 29. Dashboard view
CPSP C -0010 -02 20 -00 31 /35You can also read