Technical Drawing Specifications Resource - A guide to support VCE Visual Communication Design study design 2018-22 - Victorian ...
←
→
Page content transcription
If your browser does not render page correctly, please read the page content below
Technical Drawing
Specifications Resource
          A guide to support
   VCE Visual Communication Design
         study design 2018–22

             January 2018

                       VICTORIAN CURRICULUM
                     AND ASSESSMENT AUTHORITY

                 1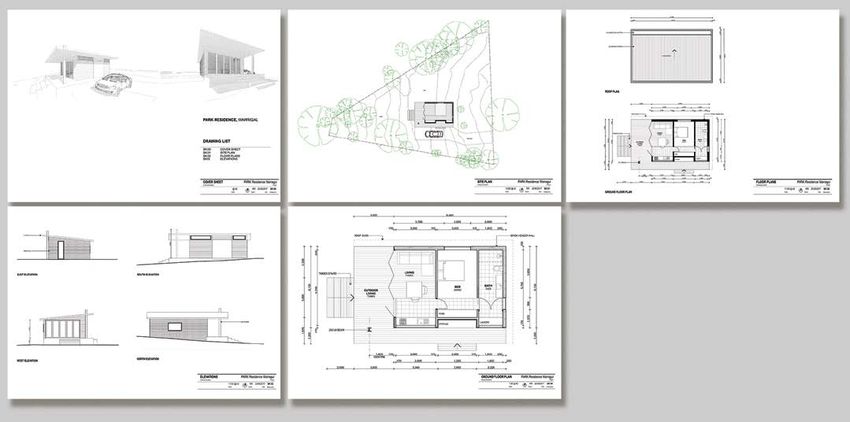
Technical Drawing Specifications Resource

Contents
Introduction                                                         4
      Australian Standards (AS)                                      4
      Presentation drawings                                          4
       Key knowledge and key skills incorporating links to revised
       Visual Communication Design study design                       4

Technical drawing methods used in VCE Visual Communication Design     5
     Three-dimensional drawing                                        5
         Paraline drawing methods                                     5
         Isometric drawing                                            5
         Planometric drawing                                          6
         Description and purposes of perspective drawing methods      7
         One-point perspective                                        8
         Two-point perspective                                        8
         Ellipses in paraline drawing                                 9
         Constructing and applying ellipses in perspective drawing   11

Two-dimensional drawing                                              12
     Communication design drawings                                   12
        Packaging net                                                12

Industrial design drawings                                           13
      Third-angle orthogonal drawing                                 13
          Plan your layout                                           13
          Appropriate scales                                         14
          The views                                                  14
          Placement of views                                         14
          Labelling orthogonal drawings                              16
          Line styles and conventions                                17
          Line styles and weights                                    17
          Coinciding lines                                           19
          Dimensioning orthogonal drawings                           20
          Dimensioning guidelines and styles                         20
          Dimension placement                                        21
          Dimensioning circles and arcs                              22
          Naming and identifying your drawing                        23
          Third angle orthogonal projection symbol                   24

                                                   2
Technical Drawing Specifications Resource

Environmental design drawings                            25
      Three-dimensional drawing – architectural design   25
      Two-dimensional drawing – architectural design     26
      Conventions for environmental design               27
         Appropriate scales                              27
      Placement and use of ‘north point’ symbol          28
         The views                                       28
         Setting out architectural drawings              28
         Plan for landscape design                       28
         Line styles and conventions                     31
         Symbols in plans and elevations                 31
         Relationship to scale                           31
         Representing walls                              31
         Representing doors                              33
         Representing windows                            33
         Representing interior features                  34
         Stairs and ramps                                34
         Dimensioning plans and elevations               35
         Dimension placement                             35
         Labelling plans and elevations                  36
         Labelling features on drawings                  36
      Identifying environmental drawings                 36

                                                 3
Technical Drawing Specifications Resource
Introduction
This resource material provides advice and support on technical drawing specifications relating to key
knowledge and key skills in VCE Visual Communication Design study 2018–22. The content of this
resource document offers guidance for technical drawing conventions relevant to the fields of practice that
Visual Communication Design students explore. This includes communication, industrial and environmental
design. This resource document draws upon conventions from the Australian Standards (AS). Specified
labeling has been included in this resource for teaching and learning purposes. Students undertaking
Units 1–4 of this study are not expected to know and employ all conventions from the Australian Standards
Australian Standards (AS)
Technical drawings are based on a set of standards that have been globally agreed upon by the International
Standards Organisation (ISO). These standards are then tailored to the needs of each country, depending
on their measuring system (metric or imperial), environmental conditions, manufacturing processes and
developments in technology. The Australian Standard AS 1100 provides the technical conventions for all
Australian engineers, architects, designers, surveyors and patternmakers to follow.
Australian standards for technical drawing can be found at:
https://infostore.saiglobal.com/en-au/as1100many
Presentation drawings
Technical drawings are based on a set of standards that have been globally agreed upon by the International
Standards Organisation (ISO). These standards are then tailored to the needs of each country, depending
on their measuring system (metric or imperial), environmental conditions, manufacturing processes and
developments in technology. The Australian Standard AS 1100 provides the technical conventions for all
Australian engineers, architects, designers, surveyors and patternmakers to follow.
Key knowledge and key skills incorporating links to revised
Visual Communication Design study design
This resource material supports the key knowledge and key skills required in the following Areas of Study:
Unit 1
Area of Study 1 Drawing as a means of communication
Unit 2
Area of Study 1 Technical drawing in context
Area of Study 3 Applying the design process
Unit 3
Area of Study 1 Analysis and practice in context
Area of Study 3 Developing a brief and generating ideas
Unit 4
Area of Study 1 Development, refinement and evaluation
Area of Study 2 Final presentations
4Technical Drawing Specifications Resource
Technical drawing methods used
in VCE Visual Communication
Design
Three-dimensional drawing
The types of three-dimensional representation drawings that are relevant to this study include paraline
(isometric and planometric) and perspective (one and two point).
Paraline drawing methods
Objects drawn using this method use receding lines remaining parallel to each other (hence the term
‘paraline’ drawing). Paraline drawings are a most convenient way to create dimensionally accurate drawings
because true measurements may be made to a consistent scale in each plane. Types of paraline drawings
in this study include ‘isometric’ and ‘planometric’.
Isometric drawing
Isometric drawings are constructed with both sides receding from a corner edge at 30 degrees to the
horizontal. The isometric drawing provides a comprehensive overall view of the object and is often used in
Communication and Industrial design. Refer to Figure 1.
30o 30o
Figure 1 Isometric drawing
5Technical Drawing Specifications Resource
Planometric drawing
Planometric drawings are very similar to isometric drawings. However, the base (or plan) of the object retains
its true form – the angle between two perpendicular sides receding from the front corner is 90 degrees.
A Planometric drawing may be done where both receding planes are 45 degrees or one side is set at
30 degrees and the other is at 60 degrees. Planometric drawings are often used to depict interiors in
environmental design. Refer to Figure 2.
45o 45o 60o 30o
Figure 2 Planometric drawings showing 45 degrees and 60/30 degrees.
6Technical Drawing Specifications Resource
Description and purposes of perspective drawing methods
‘Perspective’ is a system to depict objects and structures in a naturalistic manner consistent with human
vision. Although perspective drawings may appear similar to paraline drawings in the creation of form,
perspective receding lines converge towards the horizon (eye level) rather than remaining parallel to each
other. The placement of a horizon line determines the height of the ‘viewer’ and provides capacity for
different views of an object or the relationship of parts to each other. Refer to Figure 3.
Horizon line is a horizontal line drawn across the page that represents the eye level height of the viewer.
The height of an object is then drawn in relation to the height of the eye level. Objects in perspective may be
situated below, above or across the horizon line.
Vanishing points
are points to
which parallel
lines (in the
actual world)
converge. A
Spectator point is the position an object is viewed perspective
from. The height and distance of spectator point from drawing may be
an object will determine how much of an object is set up with one
visible. or more vanish-
ing points.
Figure 3 Illustration of terms used in perspective drawing.
7Technical Drawing Specifications Resource
One-point perspective
Objects or structures are drawn ‘front on’ on the picture plane. Sides of the object recede with lines
converging to one vanishing point on the horizon line. The vanishing point may be situated outside
the object for an exterior view, or inside it for an interior view. Actual measurements may be applied
consistently to the horizontal and vertical lines (parallel to the picture plane) but not to the receding lines.
Refer to Figure 4.
Figure 4 One-point perspective drawing.
Two-point perspective
Objects or structures are drawn with a corner closest to the viewer and sides drawn with receding lines
converging to two vanishing points on the horizon line. The corner closest the viewer may be placed
anywhere between, but not outside, the vanishing points. Refer to Figure 5.
Figure 5 Two-point perspective drawing.
8Technical Drawing Specifications Resource
Ellipses in paraline drawing
Minor axis
Major axis
a. b.
Figure 6 Figure 6 is an explanation of how you can use a square to draft an ellipse. Figure 6a
shows the relationship of the circle to the square. In Figure 6b both the square and
circle are shown in isometric. The isometric circle is now called an ‘ellipse’.
A good method of drawing an ellipse is to use the box method:
1. Note the relationship between a circle and a square. The red and green dots are the points that you use
to draft your ellipse.
2. Draw a square in isometric, add centre and diagonal lines
3. Mark out the positions where the circle cuts the diagonal lines in the isometric projection
4. Join all points with one flowing curved line to make the ellipse.
Refer to Figures 6, 7 and 8.
9Technical Drawing Specifications Resource
Figure 7 This figure shows how an ellipse can be applied to each face of an isometric cube.
In each case the ellipse is the same but the major axis is rotated.
Figure 8 Ellipses can be applied to each face of a planometric cube in the same way.
However, note that the ellipse angle is different to those shown in isometric drawing, and that because a
planometric drawing is based on an undistorted ‘top’ view, circles remain true to their shape on the top of
a planometric form. 10Technical Drawing Specifications Resource
Constructing and applying ellipses in perspective drawing
Ellipses are constructed in the same way for one- and two-point perspective as both drawing methods use
receding planes. However, circles remain as circles on planes parallel to the picture plane (front) in a one-
point perspective. Refer to Figure 9.
Original ellipse with halfway
point in the middle, prior to
putting into perspective
Horizon line
Perspective Centre Point
(the centre has shifted to the
right)
Figure 9 Constructing ellipses in perspective.
Unlike in paraline drawing ellipses must be formed within correctly proportioned squares in one or two-point
perspective. The vertical centre line of the square and ellipse shift towards the vanishing point in keeping
with the reduction in size of objects as they recede from the viewer.
11Technical Drawing Specifications Resource
Two-dimensional drawing
Types of two-dimensional representation drawings applicable to this study include packaging nets, third
angle orthogonal, and floor plans and elevations. Two-dimensional drawings are used in all fields of design.
Communication design drawings
A communication designer may create form when they are designing objects such as album covers, bags
and packaging. Communication designers may design both a three-dimensional package to be folded
from a flat sheet such as paper or board, and the surface graphics to be printed on the package prior to
assembly.
Packaging net
A packaging net is a drawing of a flat two-dimensional shape that when folded becomes a three-dimensional
form. It can also be referred to as a development net. Often a packaging net will include tabs for stability and
fastening. The drawings are to scale and involve the use of line conventions that indicate fold lines (broken
lines) and cutting edge (solid outline). Refer to Figure 10.
Figure 10 Packaging net that when cut out and folded will form a simplified version of a car.
12Technical Drawing Specifications Resource
Industrial design drawings
There are occasions where a three-dimensional drawing may not provide enough information about an
object for it to be constructed. Orthogonal drawing is a multi-view two-dimensional drawing system that
resolves this problem.
Third-angle orthogonal drawing
Third-angle orthogonal drawings bear a direct relationship to three-dimensional paraline and perspective
drawings produced in industrial design.
Each view of an object (front, sides and the base) is drawn separately using only two dimensions, but is
kept aligned and to the same scale. Combining multiple views allows all three dimensions to be considered.
‘Third-angle’ projection refers to the layout of views and is identified by a special symbol placed on each
sheet. Refer to Figure 11.
50
30
10
10
TOP VIEW
25 10
10
10
5
30
10
R15
20
80
25
10
25 10
LEFT SIDE VIEW FRONT VIEW RIGHT SIDE VIEW
ALL DIMENSIONS IN MILLIMETRES
2.5
10
STUDENT NAME 5
CLASS DRAWING TITLE SCALE DATE
10
Figure 11 Third-angle orthogonal drawing showing four labelled views, title box and the Third
Angle Orthogonal symbol.
Plan your layout
It is important to plan your drawing and consider placement as a whole, before you start. A presentation
drawing should first have been drafted in order to calculate the placement of all the views before
transcribing them onto a final sheet. Figure 11 shows appropriate positioning using an A3 sheet of paper.
An isometric view may also be positioned in the top right-hand corner to provide a connection between the
two‑dimensional shapes of orthogonal and more visually representative three-dimensional isometric form.
13Technical Drawing Specifications Resource
Appropriate scales
The actual size of the object and the scale of its representation will determine the size of the drawing.
A scale is expressed as a ratio where the first number refers to the drawn view and the second to the actual
object. For example, the scale 1:50 means the size of the drawing is fifty times smaller than the object.
In this study, the following scales are used for industrial design drawings:
• Where objects are too big to fit on a sheet choose from 1:2, 1:5, 1:10, 1:20, 1:50 and 1:100.
• Where objects are too small to be drawn in detail choose from 2:1, 5:1 or 10:1.
The views
Third-angle orthogonal drawings can include six views to communicate the features of an object. In practice
only the views required to describe the object clearly are drawn. Hence you will often see only four views
drawn as seen in Figure 11.
The views are known as:
• TOP VIEW
• FRONT VIEW
• LEFT SIDE VIEW or RIGHT SIDE VIEW
• BASE VIEW
• BACK VIEW
The conventions of this drawing method dictate that the FRONT VIEW is chosen as the view that
communicates the most information about the object.
Placement of views
The TOP VIEW is always directly above the FRONT VIEW and the SIDE VIEWS are always ‘next to’ and
‘aligned to’ the FRONT VIEW. At times the views can be placed apart equidistantly. However, the views
can be placed at different distances from the FRONT VIEW, depending on what information, such as
dimensions, needs to be included.
If you want to place your views equidistantly then you can use the 45-degree method to place and project
your views. The following steps describe the process.
1. The FRONT VIEW must be drawn first, then vertical lines should be projected up to give the width/
length of the TOP VIEW.
2. Measure and complete the TOP VIEW.
3. Project the horizontal lines from the FRONT VIEW to give the height of the SIDE VIEW.
4. Where the maximum width and height projection lines on the FRONT VIEW meet, a 45 degree line is
drawn.
5. Project horizontal lines from the TOP VIEW to meet the 45 degree line, then where they cross that line,
draw them vertically down, until they return to the base line of the drawing. This method will create the
width of the SIDE VIEW.
6. All line types should now be present on the TOP VIEW.
7. Referring to the FRONT and SIDE VIEW the various lines will need to be defined and drawn using the
correct line type.
8. Once completed all views will be equidistant.
Refer to Figure 12.
14Technical Drawing Specifications Resource
50
30
10
10
TOP VIEW
25
10 450 10
10
30
10
80
20
15
R
25
10
LEFT SIDE VIEW FRONT VIEW RIGHT SIDE VIEW
STUDENT NAME CLASS
DRAWING TITLE SCALE 1:1 ALL DIMENSIONS IN MILLIMETRES
Figure 12 Third-angle orthogonal drawing showing the ‘45-degree method’ of construction.
Use this method to project the widths of your SIDE VIEW from the TOP VIEW. This keeps the views aligned
and equidistant.
15Technical Drawing Specifications Resource
Labelling orthogonal drawings
In VCE Visual Communication Design each view must be labelled. Each view is:
• labeled using an uppercase, sans serif typeface.
• labels are to be 5mm in height
• view labels are located in a centred position under each view, 10mm below the view. Refer to Figure 13.
Figure 13 Procedure for setting out the naming of views.
16Technical Drawing Specifications Resource
Line styles and conventions
Line styles and weights
The use of different line styles and widths is important in technical drawing as they are used to describe
details and features of objects. Line styles make drawings easier to read: for example, solid lines used
to show the outline of an object will stand out from broken lines showing hidden details. For this study,
it is appropriate for students to use a minimum of two line weights to meet line style conventions when
completing final presentation drawings. This will include:
• A heavier line to draw the views that represent the object being drawn and dashed lines to represent
hidden lines
• A thinner ‘half weight’ line to provide additional information such as centre, projection and dimension
lines.
The table below depicts the appropriate line styles and conventions for third-angle orthogonal drawings
that are used in this study.
Table 1
Line styles and conventions for manual drawing
Thick continuous Visible lines are used on each view; includes
arcs/circles/curves/title block and border
Thick dashed Hidden lines are used on each view. Dashes
start and end with contact to a visible or hidden
line.
Thin continuous Thin continuous lines are used for dimension
lines, projection lines, leaders, and type used in
title block.
Thin chain Centre lines, are for axes of solid forms, pitch
lines (think of a roof line)
Note: centre lines show symmetry
When using different line types the following rules apply.
• The length and spacing of dashes should be consistent on any particular drawing(s). It is recommended
that only one thickness of dash line by used in any one drawing. Dashed lines should start and end with
dashes in contact with the visible or hidden lines from which they originate. If a dashed line meets a
curved line tangentially, it should be with a solid portion of the line.
• Chain lines should start and finish with a long dash.
• When centre lines define centre points they should cross one another at dash portions of the line. Centre
lines should extend only a short distance beyond the features unless required for dimensioning or other
purposes. Centre lines should not stop at another line of the drawing.
17Technical Drawing Specifications Resource
Table 2
Line styles and conventions for manual drawing mm
Visible lines are used on each view; includes arcs/circles/curves/title block and border 0.35
Hidden lines are used on each view. Dashes start and end with contact to a visible or hidden lines 0.35
Thin continuous lines are used for dimensioning lines, projection lines, leaders; type used in the 0.18
title block.
Centre lines, are used for axes of solid forms, pitch lines (ie: a roof line) 0.18
Note: centre lines show symmetry
18Technical Drawing Specifications Resource
Coinciding lines
Frequently in orthogonal drawing visible lines, hidden lines and/or centre lines coincide. In VCE Visual
Communication Design there are two rules to follow:
1. Visible (or object) outlines are always shown in preference to hidden lines or centre lines.
2. Hidden lines take precedence over centre lines.
If a visible line obscures a centre chain line that extends beyond the outline of the object, the whole centre
line is removed as in Figure 15.
If you are provided with a three-dimensional view,
presume a hole goes all the way through.
But does the hole go all the way through the object? The
answer can be found in the TOP and SIDE VIEWS.
Figure 14 How to interpret the depth of a circle.
Note: the depth of the circular hole can be confirmed when viewed in the TOP and SIDE VIEWS.
19Technical Drawing Specifications Resource
2. Hidden line takes precedence
over a centreline
1. Visible line takes prece-
dence over a hidden line.
Figure 15 Lines taking precedence over other lines
Order of precedence is: visible line, hidden line and then centre line.
Dimensioning orthogonal drawings
Dimensioning guidelines and styles
The following dimensioning guidelines and styles apply to this study:
• The position where dimension lines should be placed is based on easy access. Placement between the
views, with consideration of where other dimensions would need to be placed, is a good starting point.
• Wherever possible place dimensions outside the outline of the object.
• It is a convention that all measurements are shown in millimetres. However, do not write ‘mm’ after every
measurement; write ‘ALL DIMENSIONS IN MM’ in the title block.
20Technical Drawing Specifications Resource
• Dimension figures are written on top of the dimension lines. When placing dimension figures on vertical
dimension lines, rotate your page or drawing once to the right. Then continue to place dimension
figures. Refer to Figure 16
• Never repeat a dimension. Always check that dimensions are not repeated on another view. Place
dimensions on the view that shows a detail most clearly. If there are repeated components, such as
holes of the same size, only one is required to be dimensioned.
• Ensure that there are dimensions for the height, width and depth.
• Ensure that all crucial dimensions are included to allow the object to be interpreted.
• Try to avoid dimensioning hidden lines.
• Space dimension lines so that the dimensions are not over-crowded.
Dimension figures
Arrow heads 3mm x 1mm
Projection lines Stand off 1mm
Dimension lines
Smaller dimensions are placed inside
larger dimensions
Figure 16 Examples of dimension lines, projection lines and arrowheads.
Dimension placement
Projection lines are thin lines which are placed 1mm from the drawing and extend beyond the last
dimension line by 2mm. They define the area being dimensioned and never touch the actual object.
Dimension lines are thin continuous lines with arrowheads placed at each end touching the projection
line. Each dimension line starts 10mm from the object and is then 10mm apart from the next. Smaller
dimensions are placed closer to the object. Longest dimension lines are furthest away from a view (for
example, total height).
Arrowheads are drawn 3mm long by 1mm wide. They can be open or solid and always touch (but do not
cross) projection lines.
Refer to Figure 16.
21Technical Drawing Specifications Resource
Dimensioning circles and arcs
Curves such as rounded corners are shown as an arc. The full circle may be shown as a construction line
and its centre is shown as it occurs within the arc. The arc is dimensioned by its radius and the centre is
marked with the ‘chain line’ cross (Figure 17).
Holes are shown as circles using the correct line for outlines. They are dimensioned by their diameter with
the ‘Ø’ symbol and are marked with the ‘chain line’ cross.
When dimensioning a circle often a leader is used. Leaders stop with an arrowhead touching a line. They
are always ‘sloped’ and are used to carry dimension numbers for diameters (Ø) and radii. They may carry
a notation, for example, Ø20 (Figure 18).
Diameter symbol shown beside
the figure
Leader at 45o from the
centre of circle, with 1 arrow
head toucing the outside of
the circle
R symbol Leader at 45o from the
denotes radius. centre of circle, with 1
This is used for arrow head toucing
an arc or part the inside of the arc
of a circle
Figure 17 Example of dimensioning holes and arcs.
22Technical Drawing Specifications Resource
R15
30
30
15
R
30
Figure 18 Alternative methods for dimensioning arcs and circles.
Naming and identifying your drawing
When creating a technical drawing for a final presentation, you should include a ‘title’ block which includes:
• title of the work
• name of the author
• date drawn
• scale including a reference to the units used in the drawings
Refer to Figure 19.
Figure 19 Size and placement of written information in the title block.
23Technical Drawing Specifications Resource
Third angle orthogonal projection symbol
All drawings must show the correct projection symbol to identify the projection system used. The projection
symbol is part of labelling requirements and is placed on the drawing along with the labelling of views. When
drawing this symbol you should maintain the same proportions and line conventions as seen in Figure 20
and place your symbol in the top right hand corner as seen in Figure 21.
Figure 20 Third angle orthogonal symbol.
Figure 21 Third angle orthogonal drawing showing views, dimensions, naming of views, third angle
orthogonal symbol and isometric view.
24Technical Drawing Specifications Resource
Environmental design drawings
Environmental drawings are for the communication of information regarding architectural, interior design or
landscape structures to specific audiences. In this study, there are different types of drawings for environmental
design, ranging from freehand visualization drawings showing broad concepts for communication of initial
ideas to clients, to multi-sheet, highly detailed presentation drawings.
Figure 22 An urban landscape design drawn in planometric view.
Three-dimensional drawing – architectural design
In addition to the information given earlier in this resource planometric drawings are recommended for
drawing of measured environmental spaces such as interior or landscape views. Two-point perspective is
also an ideal way to visualize form and spaces when precise measurements are not required.
25Technical Drawing Specifications Resource
Two-dimensional drawing – architectural design
Plans and elevations developed by students in VCE Visual Communication Design may include:
• a site plan (showing relationship of the building to site, orientation of site with title boundary, larger foliage
or landscape features)
• landscape plans (design concepts for external landscaping for gardens, parks etc.)
Environmental Design drawings may include:
• overhanging roof lines
• openings including windows and doors
• stairways
• key dimensions for overall sizes, rooms, doors and windows where appropriate
• labelling; for example, rooms and key descriptive notes
• north point symbol
• a title block including scale, date drawn, author’s name, drawing number and site address if applicable
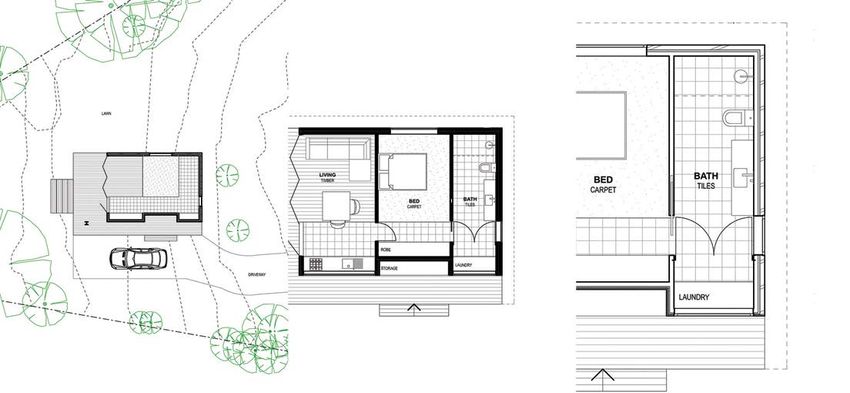
Figure 23 ‘Ground floor plan’ at 1:100 (not reproduced at scale) showing an overview of line conventions
used for architectural drawings.
26Technical Drawing Specifications Resource
Conventions for environmental design
Appropriate scales
Environmental drawings usually depict large objects. Some drawings may depict a group of buildings
together, yet others show a section of a room. For this reason, designers who work in this field use a wide
range of scales including 1:500, 1:100, 1:15, 1:20 and 1:5.
See Figures 24 and 25 for examples.
Figure 24 Examples of the same building in plans (from left) at 1:200, 1:100 and 1:50 (not to scale).
The level of detail increases consistently as does the scale.
27Technical Drawing Specifications Resource
Plan for landscape design
Figure 25 Landscape plan detailing site, contour levels, trees and vegetation types at the appropriate
scale of 1:200.
Placement and use of ‘north point’ symbol
A building must be considered in relation to its ‘aspect’, as sunlight and shade are a large factor in enjoyment
and sustainability. A ‘north point’ symbol needs to be clearly shown on plans. A plan should be orientated
so the north elevation (written as NORTH ELEVATION) is at the top of the drawing.
The views
Where orthogonal drawing refers to views, architectural drawings use plan and elevation. In addition, there
may be a site plan, ground floor plan, first floor and subsequent floor plans. Elevations are named by
the direction they face, shown in relation to the north point on the plan. Thus, the four elevations of a
rectangular building are written as NORTH ELEVATION, EAST ELEVATION, SOUTH ELEVATION and WEST
ELEVATION.
Setting out architectural drawings
Plans and elevations are set out differently from a third-angle orthogonal drawing. It is common for architectural
drawings to show one (or more) plan per sheet and one (or more) elevation per sheet (Figure 26). Although
groups of drawings will be drawn to the same scale, they do not need to correspond with each other in
terms of visual alignment.
28Technical Drawing Specifications Resource
Figure 26 Two floor plans are set out at left. Four elevations are set out at right.
Use the following table when producing architectural drawings that require more than one sheet.
(See also Figure 27).
Table 3
Drawing type Drawings per sheet Typical scale
Cover sheet (optional) Pictorial views and ‘Drawing list’ contents
Site plan Usually one per sheet, centred. 1:200
Floor Plans: (in order) ground floor One or two plans to a sheet, centred. 1:100
plan, first and other floor plans, roof
plan, etc.
Elevations: (in order) front elevation Usually two elevations to a sheet, centred. 1:100
of building seen from street and
opposite elevation, or north and
south, and east and west.
29Technical Drawing Specifications Resource
Figure 27 A collection of drawings for a project. From left clockwise: the cover sheet, site plan, plans,
elevations and plan at a larger scale.
30Technical Drawing Specifications Resource
Line styles and conventions
In keeping with other design fields, architectural drawings also employ accepted conventions regarding the
kinds of line style and width. Table 4 describes lines used in architectural drawings.
Table 4
Line styles and conventions for manual drawing
Thick continuous Outlines of building, Ground lines.
Thick chain Title boundary
Thick dashed Roof over in plan/ eaves
Thin continuous General building forms and details
Roof ridge lines
Fall indicator in showers, bath, etc.
Direction of swing indicator for doors and panels
Doors, windows
Dimension lines, projection lines
Thin chain Centres for plumbing fixtures
Symbols in plans and elevations
In addition to lines, other symbols are used to denote features of buildings.
Relationship to scale
All architectural symbols need to be drawn at the same scale as the drawing on which they are shown.
Tables 5 and 6 show a range of architectural features with typical dimensions and suggested finished sizes
in a range of scales.
Representing walls
There are two main kinds of walls in buildings: exterior and interior.
Interior walls are represented differently depending on the scale of the drawing. At 1:100 they are shown
as a solid, continuous line 1mm thick; at 1:50 or 1:20 they are shown as two parallel thin lines 2mm or
5mm apart respectively.
Exterior walls are shown as two parallel lines representing the thickness of the wall. They are usually filled
in black or grey (the grey to reduce visual impact) or hatched to represent a particular material. Refer to
Tables 5 and 6.
31Technical Drawing Specifications Resource
Table 5
Typical widths/thicknesses of architectural features shown in plan
Item Width in mm At 1:100 in mm At 1:50 in mm At 1:20 in mm
Exterior wall 270 3 6 15
Interior wall 110 1 2 5
Door 820 8 16 40
Kitchen bench 600 6 12 30
Island bench 1000 10 20 50
Bathroom bench 500 5 10 25
Toilet space allowance Min w 900 x 1500 9 x 15 18 x 30 45 x 90
Wardrobe 600 6 12 30
Table 6
Typical widths/thicknesses of architectural features shown in plan
Item Width in mm At 1:100 in mm At 1:50 in mm At 1:20 in mm
Domestic floor to ceiling Typical 2700 27 34 170
Door 2040 20 40 120
Kitchen bench 900 9 18 45
Island bench 900 9 18 45
Bathroom bench 900 9 18 45
Dining table, study desk 750 7.5 15 37.5
Coffee table 400 4 8 20
32Technical Drawing Specifications Resource
Representing doors
In the plan view, doors are shown as a thick line running perpendicular to the closed position and full open
position of the door. A thin line arc is used to describe the swing. Sliding doors are shown as thick lines,
spaced apart, as if positioned in a double or triple track, and arrows are placed parallel to the direction of
slide to denote direction of movement. Refer to Table 5 for examples of door widths.
In the elevation views, doors are shown as plain rectangles without handles. Doors to wardrobes,
cupboards or other joinery are shown with thin diagonal lines extending from the upper and lower corners
on the hinged side to the centre on the opposite side to denote direction of swing. Refer to elevation views
in Figure 28.
Panel door Sliding door Double sliding doors Joinery doors
In plan
In elevation
Figure 28 Doors at 1:100 scale
Representing windows
Windows are represented using combinations of thin lined rectangles.
In the plan view, windows are shown as a long, white rectangular gap, the same thickness as the wall in
which it is placed. The glass is then shown by one or two thin continuous lines centred and parallel to the
wall. Windows in the elevation views are drawn to scale and are shown as thin lined rectangles. Frames are
shown simply, and the direction of opening is shown with a diagonal ‘V’. See Figure 29.
Glass panel window Double sliding doors/windows Bifold doors/windows
In plan
In elevation
Figure 29 Doors at 1:100 scale
33Technical Drawing Specifications Resource
Representing interior features
Environmental drawings use a consistent set of symbols to represent interior fittings and fixtures. The
emphasis is on clarity so details are minimal and do not detract from the purpose of a drawing. Symbols
are constructed from thin continuous lines. See Figure 30.
Symbols at 1:100
Bath
Lounge Lounge Dining Double
chair suite table bed Shower
Kitchen Toilet (WC)
sink
Hot Hand
plates basin
Figure 30 Symbols used to represent fittings and fixtures.
Stairs and ramps
In the plan view, stairs are shown as an outline. A thin continuous line is drawn through the centre of the
staircase to indicate the direction of rise. In the elevation views, a stair case is drawn as it appears from
the front, rear or side, including relevant handrails. A ramp is shown in the plan view as a simple rectangle.
See Figure 31.
Stairs at 1:100
Stairs rising from a plan (such as a ground floor plan)
are represented by drawing only some treads then
terminated in a jagged ‘break’ line as they rise above
the view of the plan
Stairs shown as a full Stairs shown as they Ramp
staircase ascend on a Ground
floor plan
Stairs rising to a plan (such as on A ramp is shown with an open
a first floor plan) are drawn in full, ended leader indicating the
as they appear below the level of direction of rise
the plan
Figure 31 Stairs and ramps details
34Technical Drawing Specifications Resource
Dimensioning plans and elevations
For the purpose of this study, students do not need to show all possible dimensions. For example, a floor
plan may include room dimensions but for the sake of clarity and its purpose, may not include sizes of
kitchen cupboards.
Dimension placement
Dimensions are constructed by referencing features in the following order:
1. The first line (closet to the building) external features such as windows or other openings and external
walls.
2. The second line shows internal features such as internal rooms and wall thicknesses
3. The third line shows the overall external building dimensions, corner to corner.
Dimensions are made between parallel projection lines. Unlike projection lines used in third angle
orthogonal drawing, projection lines used in architectural drawings do not extend from a point adjacent an
object, but are shown only where they cross dimension lines. They are short, 3mm long and centred on
each dimension line.
Architectural drawings do not use arrows to terminate dimensions. Dimensions in plans and elevations are
terminated with short, 3mm long 45 degree cross marks, again centred on dimension lines.
Dimensions are shown in small sans serif figures. Numbers are placed above dimension lines and
centred across the space. Dimensions to denote sizes too small to fit the numbers may be placed directly
adjacent the space. Dimension figures should print at 2mm high.
All dimensions in architectural drawings are to be recorded in millimetres. Refer to Figure 32.
Figure 32 Dimension placement - three lines of dimensions outside each wall.
35Technical Drawing Specifications Resource
Labelling plans and elevations
When a sheet contains only one view, the name of the view is shown in the title area of the drawing. Where
the sheet contains more than one view, each view is titled at the lower left corner of the view. View names
should be shown at approximately 3mm high, in sans serif uppercase.
Labelling features on drawings
Plans and elevations sometimes require additional information that may not be apparent in the drawing. An
example of an annotation could be “ROOF OVER” to denote a roof line above in a plan. These annotations
should be in small blocks of left aligned, sans serif uppercase at 2mm high.
Identifying environmental drawings
A final presentation of an environmental drawing should include a title block (See Figure 33). The title block
will include:
• drawing title
• project title
• scale
• sheet size
• north
• author’s name
• date drawn
• sheet number.
Figure 33 Right aligned title block placed in the bottom right corner of a sheet, placed within an
appropriate margin (10–20mm) from the edge of the sheet.
36You can also read