Verizon Enterprise Center Overview - CALNET 3 Version: 5.15 Last Updated: July 2015
←
→
Page content transcription
If your browser does not render page correctly, please read the page content below
Verizon Enterprise Center
Overview
CALNET 3
User Guide
Version: 5.15
Last Updated: July 2015
© 2015 Verizon. All Rights Reserved.
The Verizon names and logos and all other names, logos and slogans identifying Verizon's
products and services are trademarks and service marks or registered trademarks and service
marks of Verizon Trademark Services LLC or its affiliates in the United States and/or other
countries. All other trademarks and service marks are the property of their respective owners.
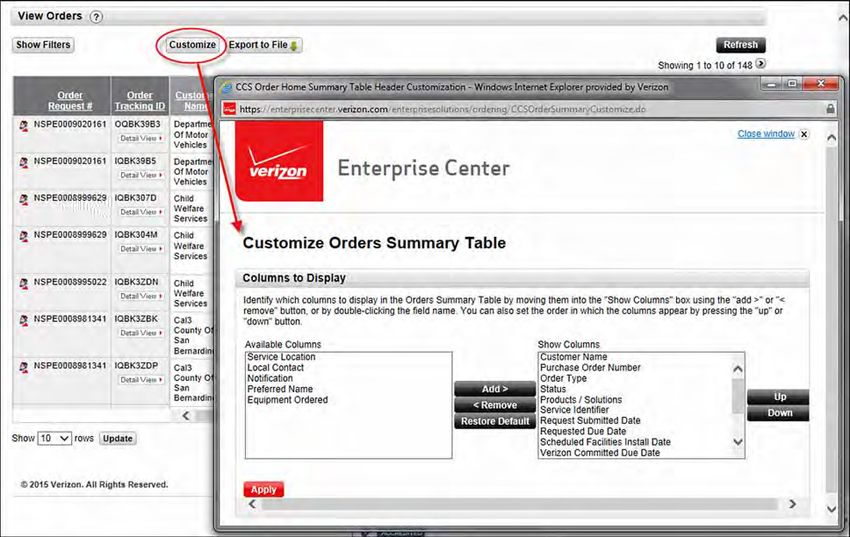
TABLE OF CONTENTS
Register................................................................................................... 1-1
             Need a New User ID ................................................................................................. 1-4
             Already Have a User ID ............................................................................................. 1-5
    VERIZON ENTERPRISE CENTER HOME ................................................................. 1-9
Getting Started ....................................................................................... 2-1
    WELCOME SCREEN OPTIONS ............................................................................ 2-2
    SIGN IN ....................................................................................................... 2-3
    FIRST TIME LOGIN/SECURITY AUTHENTICATION .................................................... 2-5
             You Know It’s Verizon............................................................................................... 2-5
             Device Registration Helps Protect You and Your Business....................................... 2-6
             A One-Time Passcode Can Help You Retrieve Your Information - Securely ............. 2-6
             How to Set Up Your Security Image ......................................................................... 2-6
             Register Your Device............................................................................................... 2-10
             Keep Your Information Private ............................................................................... 2-10
             More Resources...................................................................................................... 2-10
    VERIZON ENTERPRISE CENTER HOME ............................................................... 2-11
    SETTINGS ................................................................................................... 2-13
             User Settings...........................................................................................................      2-14
             Access Request .......................................................................................................        2-17
             Download Center....................................................................................................           2-18
             Support ...................................................................................................................   2-19
             Training...................................................................................................................   2-19

Accounts & Maintenance ...................................................................... 3-1
    SERVICE MANAGEMENT DASHBOARD ................................................................. 3-2
             Dashboard ................................................................................................................ 3-3
             Views ........................................................................................................................ 3-4
             Map .......................................................................................................................... 3-5
             Inventory .................................................................................................................. 3-6
             Tickets/Events .......................................................................................................... 3-8
             Alarms....................................................................................................................... 3-9
             Topology ................................................................................................................. 3-10
             Charts ..................................................................................................................... 3-11

Orders ..................................................................................................... 4-1
    VIEW ORDERS AND CHECK STATUS .................................................................... 4-2
    CUSTOMIZE ORDERS SUMMARY TABLE ............................................................... 4-3
Invoices................................................................................................... 5-1
    HOME ......................................................................................................... 5-2
    VIEW INVOICES ............................................................................................. 5-3
    INQUIRIES & DISPUTES ................................................................................... 5-4
             Reasons for Creating an Invoice Inquiry................................................................... 5-5
    VIEW INQUIRIES ............................................................................................ 5-6
             Invoice Inquiry Status ............................................................................................... 5-7
    PAYMENTS ................................................................................................... 5-8
    ANALYSIS & REPORTING.................................................................................. 5-9
    PAPERLESS BILLING ...................................................................................... 5-10
Repairs.................................................................................................... 6-1
    VIEW AND UPDATE TICKETS ............................................................................. 6-2
    CREATE A TICKET ........................................................................................... 6-3
    TROUBLE TICKET DETAILS ................................................................................ 6-4
    CUSTOMIZE TICKET LIST .................................................................................. 6-5
    INITIATE A TEST ............................................................................................. 6-6
Training and Documentation ................................................................ A-1
    ACCESS FROM THE VERIZON ENTERPRISE CENTER .................................................. A-1
    CREATE A TRAINING ACCOUNT ......................................................................... A-2
    ENROLL IN TRAINING ...................................................................................... A-3
    ACCESS TUTORIALS AND USER GUIDES ............................................................... A-4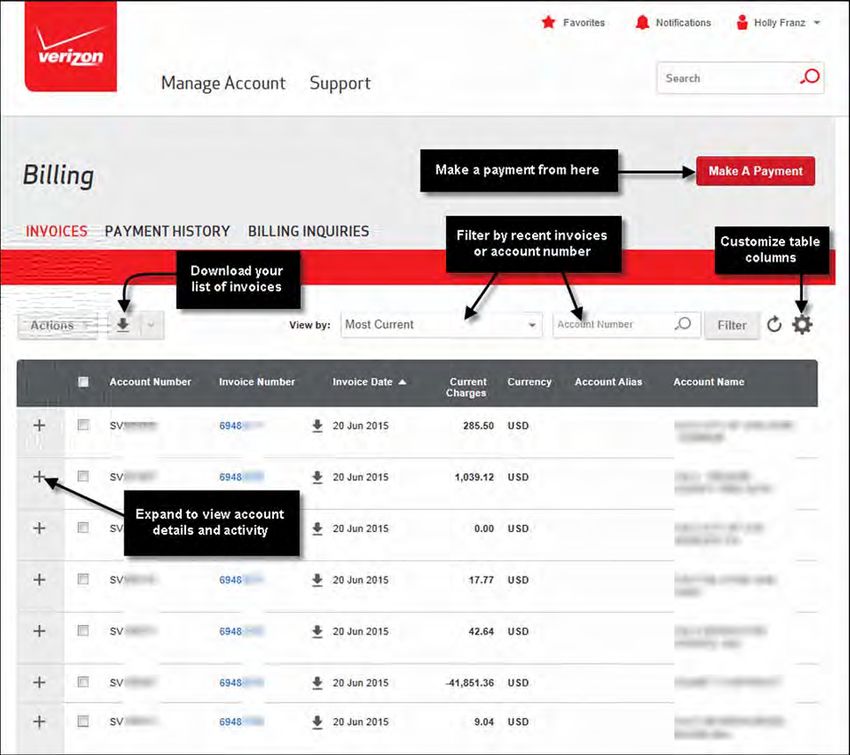
REGISTER
                                                                                     21
You must first register for the Verizon Enterprise Center if you do not have a user name and
password.

1. Go to http://calnet3.verizon.com.
2. Click Account Login.

                                       Figure 1-1: Account Login

3. Click Register. The Enter Invitation Code screen opens in another browser window.

   Note: Refer to Section 2 Getting Started for information on the menu items listed under
         Account Login.

                                                                                               1-1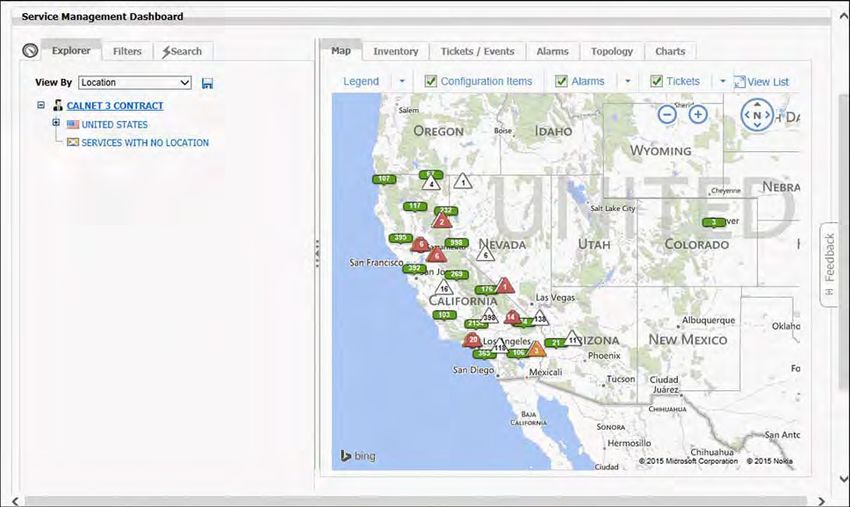
Register

                                    Figure 1-2: Enter Invitation Code

4. Select I don’t have an Invitation Code if you do not have one. A message displays that
   provides a toll-free number to call to obtain your invitation code.
5. Call the toll-free number on the screen to obtain your invitation code.
6. Return to this screen after you have your invitation code.

                          Figure 1-3: My Verizon Enterprise Center Registration

7. Select I have an Invitation Code and enter the code.
8. Click Next. The Confirm Tools screen appears listing the tools and accounts associated with
   the invitation code you entered.

1-2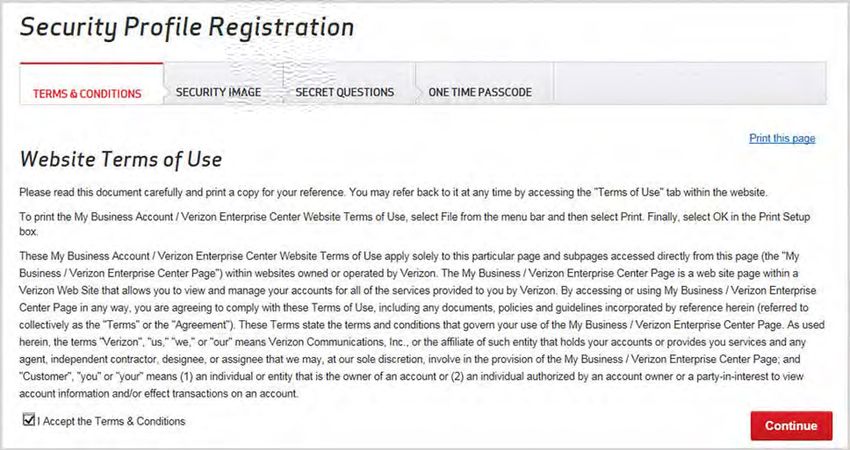
Register

                                      Figure 1-4: Confirm Tools

9. Check the boxes under Additional Access to add or remove tools, if applicable.

   Note: Refer to Section 5, page 5-11 (Invoices) for information on how to set up paperless
         billing.

10. Click Next to create your profile or add an account to your existing profile. The Manage
    Profile screen appears.

                                                                                               1-3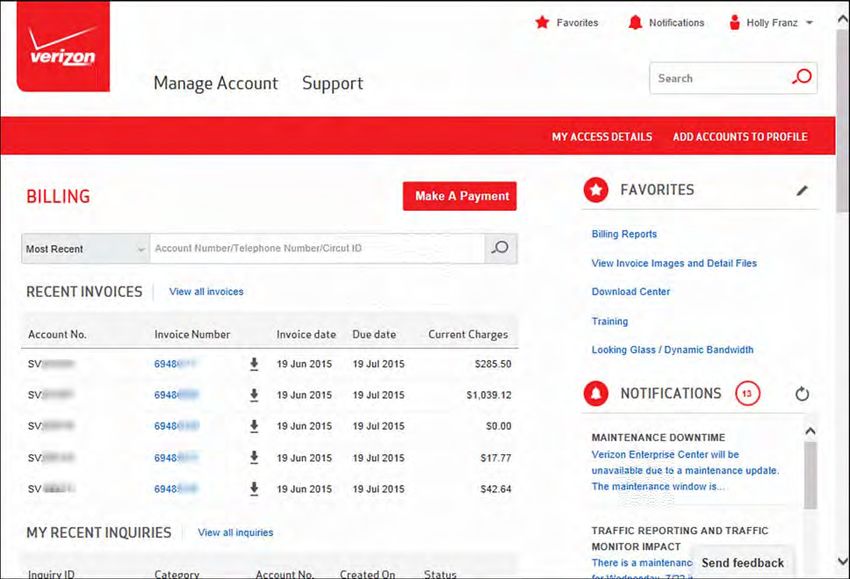
Register

Need a New User ID
1. Select I need a new User ID.

                                    Figure 1-5: Manage Profile

2. Enter your User Information.
3. Create your user ID and password.
4. Select a secret question and assign an answer.
5. Enter a project code if your account team provided one.
6. Click Register. A confirmation appears informing you that an email was sent.

1-4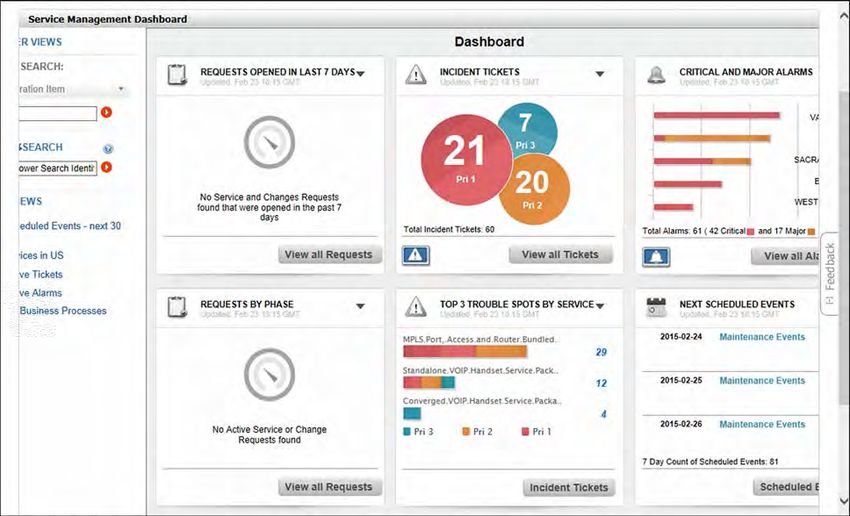
Register

Already Have a User ID
1. Select I already have a User ID, if applicable.

                                      Figure 1-6: Manage Profile

2. Enter your user ID and password.
3. For security purposes, enter the letters/numbers that appear in the box (not case-sensitive).
   Click Reload Image if you want to see a refreshed set of numbers/letters.
4. Enter a Project Code if your account team provided one (optional).
5. Click Add Account to complete your registration. A confirmation screen appears indicating
   the registration and entitlement for that account is complete.

                                                                                             1-5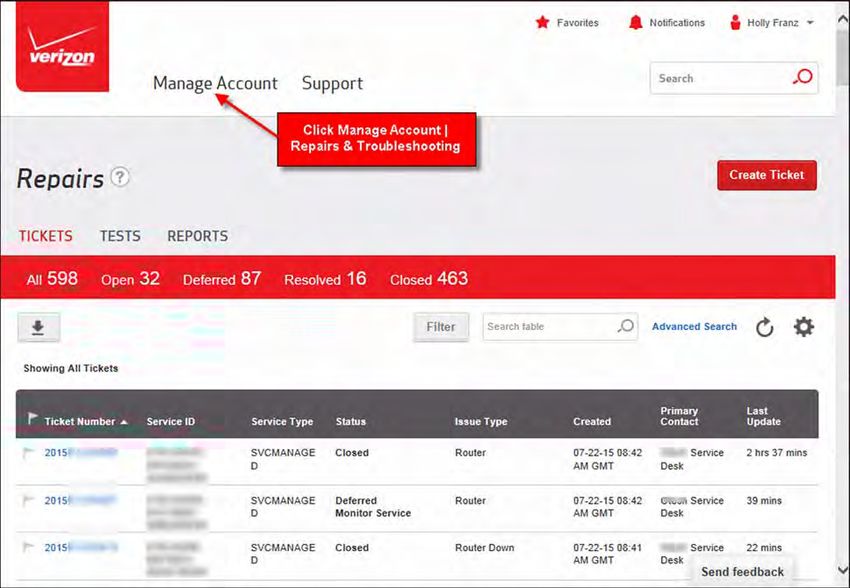
Register
Figure 1-7: Registration Confirmation
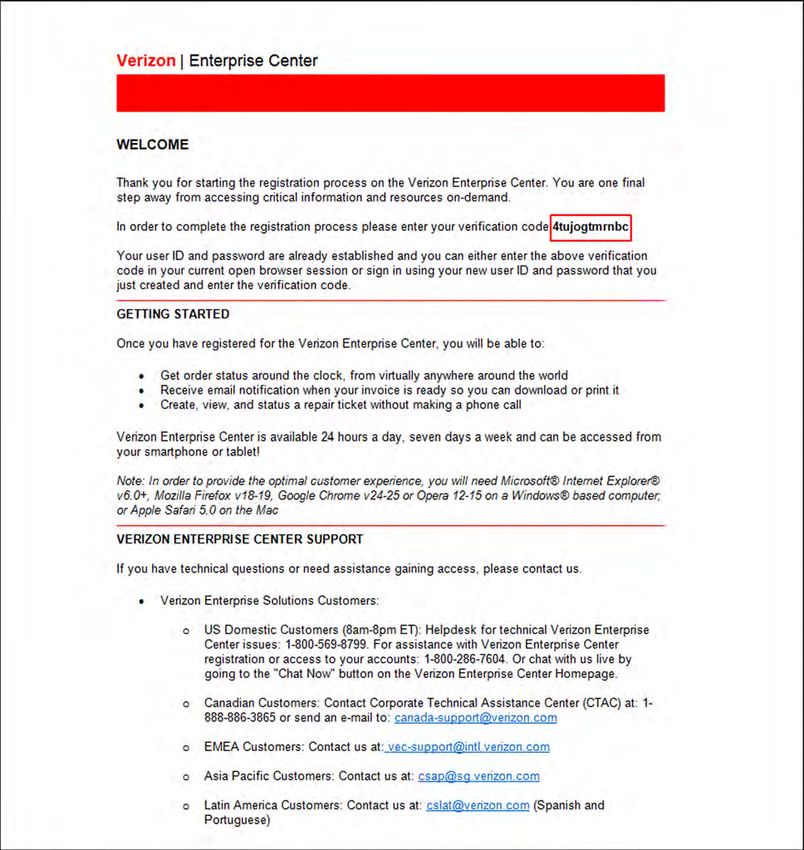
6. Click Proceed to Verizon Enterprise Center. The Verification Code screen appears.
Figure 1-8: Verification Code
7. Leave this screen open and check your Inbox for the confirmation email that includes a
verification code.
1-6Register
Figure 1-9: Confirmation Email
8. Copy the verification code from your confirmation email.
9. Go back to the Verification Code screen and paste your Verification Code in the field
provided.
10. Click Continue. The Terms & Conditions screen appears.
1-7Register
Figure 1-10: Terms & Conditions
11. Read and accept the terms and conditions.
12. Click Continue. The Verizon Enterprise Center Home screen appears.
1-8Register
Verizon Enterprise Center Home
The Verizon Enterprise Center enables you to manage your Verizon services, streamline business
processes, and control critical business functions and costs. Supported by a host of powerful,
comprehensive self-service capabilities, the portal is available 24 hours a day, seven days a week
and provides you the ability to track and customize Verizon products to make them work for your
business.
Figure 1-11: Verizon Enterprise Center Home
Click Manage Account to access a drop-down menu that lists the tool to which you are entitled.
1-9Register 1-10
GETTING STARTED
                                                                                      22
If you are already a registered user, you can sign in with your user ID and password. Refer to
Section 1 for instructions on how to register.

Go to http://calnet3.verizon.com. The Account Login appears.

                                      Figure 2-1: Account Login

                                                                                                 2-1
Getting Started
Welcome Screen Options
There are several options on the Welcome screen. The following table provides a description of
each option.
Option Description
Account Login Log in to the Verizon Enterprise Center.
Contract Information View the CALNET 3 contract information, provisions, terms, and con-
ditions.
Service Level Agree- View Service Level Agreements (SLAs) for all of your services, e.g.,
ments MPLS, VoIP, etc.
Product Catalog View the catalog with descriptions and features of each service.
Billing Open the Billing Inquiry function in the Verizon Enterprise Center.
Contact the Service Desk for additional support. Refer to the Invoices
User Guide for instructions on submitting a billing inquiry.
Trouble Ticket Tool Access the Repairs and Create Quick Ticket tools in the Verizon Enter-
prise Center. Refer to the Repairs User Guide for instructions on
using Repairs and creating a Quick Ticket.
CALNET 3 Escalation Access contact information for escalations for any of your services.
Procedures
Taxes and Fees View reports on service taxes, fees, surcharges, and credits.
Training Access training and documentation for the Verizon Enterprise Center
tools at https://customertraining.verizon.com.
Frequently Asked Access a list of frequently asked questions about the Verizon Enter-
Questions prise Center.
Announcements View important announcements about the Verizon Enterprise Cen-
ter.
User Instructions View contract instructions for CALNET 3. Includes contract informa-
tion and ordering guidelines.
Contact Us Contact your CALNET 3 sales or service team.
2-2Getting Started
Sign In
1. Click Account Login. The Account Login screen appears.
Figure 2-2: Sign In
2. Enter your user name.
3. Click Sign In. The Sign In page appears.
2-3Getting Started
Figure 2-3: Enter Password
4. Enter your password.
5. Click Continue. The Verizon Enterprise Center Home page appears.
2-4Getting Started
First Time Login/Security Authentication
You will set up your security authentications if this is the first time you are logging in. Verizon
introduced a new security process for Verizon's business portals to help maintain the security of
your data.
We don't want anyone to access your Verizon business account without your permission. That's
why Verizon is using some of the latest security technologies to help protect your company
information from potential phishing scams and unauthorized use.
The change requires just a few simple steps:
• A single sign-on process to access information in the portal in which you are currently
enrolled was implemented.
• Your user ID and password are entered on two separate pages.
• You will be asked to add a Security Image - this will be implemented 7/24/15.
See our Security Image FAQs for more information.
You Know It’s Verizon
Criminals can create fake websites that look very similar to legitimate business websites. The
Security Image feature was created to help you confirm you're visiting a legitimate Verizon
website and to identify your company's Verizon business account.
Figure 2-4: Add Security Image
We will ask you to review and accept the Terms &
Conditions (T&C), select a Security Image, and establish
three Secret Question/Secret Answer combinations, and
select two delivery methods to save on file for a one-time
passcode.
Once you've selected a Security Image for your account, it
appears every time you enter your user ID on the Sign-in
page for your Verizon account. When you see the Security
Image you chose, you'll know that you're accessing an
official Verizon website.
2-5Getting Started
Device Registration Helps Protect You and Your Business
A device is defined as your computer, tablet, or smart phone. When we see attempted access to
your account from a device we don't recognize, we'll ask you one of the three Secret Questions
you've selected or you can receive the one-time passcode. It's an added step of protection just in
case your login credentials end up in the wrong hands.
With these and other security technologies in place, we help protect your company's Verizon
account information.
A One-Time Passcode Can Help You Retrieve Your Information -
Securely
Establishing two methods to receive a one-time passcode helps protect you from unauthorized
access to your account. If you forget your password or your device isn't registered; you can
receive your passcode to your selected email or device to proceed with retrieving your private
information and securely sign in.
How to Set Up Your Security Image
When prompted, you can set up your Security Image in a few simple steps.
Review and Accept the Terms and Conditions
You will also be asked to review and accept the terms and conditions the first time you sign in
with the new Security Image authentication process.
Figure 2-5: Security Profile Registration
2-6Getting Started
Select a Security Image and Name It
You'll be presented with a variety of images from which to choose. Select one and create a name
for it that's easy to remember and hard for others to guess. Once you've chosen a Security
Image, you'll see the image and the name every time you enter your user ID/password. You are
given an option on the password page to have Verizon remember your device. Check Remember
My Device if you want this option.
This lets you know that you're on the legitimate Verizon website. It also helps protect you from
phishing scams designed to capture your login information.
Figure 2-6: Select Security Image
2-7Getting Started
Select Your Secret Questions and Enter Your Answer
You'll choose from a list of questions that focus on a distinct aspect of your life and then you'll
enter a unique answer. Your answer should be something that's easy for you to remember, but
hard for someone else to guess. If you need to access your Verizon account from a computer we
don't recognize, we'll prompt you to answer one of your Secret Questions to help verify your
identity. This question is used to validate any security changes to your account including; forgot
password, password reset, and change security image.
Figure 2-7: Secret Questions
Note: If you forgot your password and need to change it, you must answer two of the three
questions correctly. Otherwise you will need to contact your company administrator
or call the CALNET Service Desk at 1-855-CALNET3 (1-855-225-6383), option 2.
During this new process you are not required to change your password, however you
may choose to do so at this time. Refer to Security Image FAQs for password rules.
2-8Getting Started
Establish a One-Time Passcode
Establishing a delivery method of your choice to receive a one-time passcode for future use is
the final step in your security registration. You can elect to receive your passcode to two
contacts. A minimum of two options must be selected, and a maximum of five. One must be an
email address; the second can be a text or another email address of your choice. This
information will be saved on file. In the event you need to recover your sign in information in the
future, the passcode can be delivered securely via one of these contact methods. A one-time
passcode will be used if you forget your password or if you are using a device that is not yet
registered. You do not need to call anyone and can easily sign in using the one-time passcode.
Figure 2-8: One-Time Passcode
Figure 2-9: Enter Code
Enter your code and sign in.
2-9Getting Started Register Your Device If you checked Continue and Register on the security image page, your device is now verified. If there is another computer or mobile device that you use regularly to access your Verizon account, then you will need to register it. You will be asked to do so at your next login if it has not been registered. This helps us recognize that it's your device, and you won't need to answer your Secret Question the next time you sign in from that device. Keep Your Information Private It's important to always keep your Secret Question and Answer private and never register a public computer. More Resources • Refer to our Security Image FAQs to learn more about these new security measures. • Our Privacy Policy. • Tips for Guarding your Information and Report Suspicious Activity. 2-10
Getting Started

Verizon Enterprise Center Home

The Verizon Enterprise Center enables you to order, manage, and pay for your voice and data
services through one portal. You can access multiple tools 24 X 7 with a single user ID and
password. You can also review and pay invoices online, monitor and configure your inbound and
outbound network, report on network performance, create trouble tickets, and order Verizon
products and services.

                             Figure 2-10: Verizon Enterprise Center Home

Click Manage Account to access a drop-down menu that lists the tool to which you are entitled.

                                                                                           2-11
Getting Started
Access to the Verizon Enterprise Center functions is divided into task-oriented groups under
Manage Account: Billing, Accounts & Maintenance, Orders, Repairs & Troubleshooting, and
Manage Products.
Figure 2-11: Manage Account Menu
2-12Getting Started
Settings
There are links at the top of every page for quick and easy access to tasks and utilities.
Figure 2-12: Settings
2-13Getting Started
User Settings
My Profile
The My Profile page enables you to change your password, as well as update basic information,
contact information, and display preferences. You can also select your language, time zone, and
notification preferences.
1. Click on your name in the top right corner.
2. Click My Profile.
Figure 2-13: My Profile
2-14Getting Started
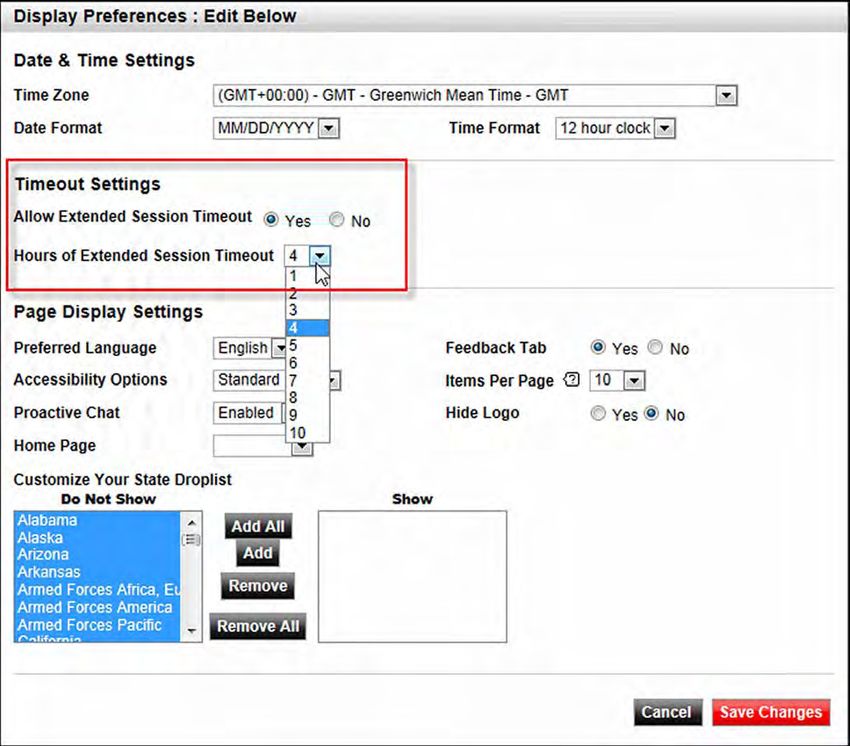
Extended Session Timeout
You can change your accessibility options, time zone, date/time format, and start page. You can
also allow for extended session time-out. The default timeout period is 15 minutes. You can
extend that from 1 - 10 hours.
1. Click the Site Preferences tab.
2. Click Edit on the Display Preferences header.
Figure 2-14: Display Preferences
3. Select Yes next to Allow Extended Session Timeout.
4. Select between 1 - 10 hours before your Verizon Enterprise Center session times out.
5. Click Save Changes.
2-15Getting Started
Administration
As a User Administrator on the Verizon Enterprise Center, you have authorized control over who
can access information in your company. Depending on your contractual requirements, you can
approve entitlements for a range of tools. An entitlement is a secure permission that provides
access to your agency’s information about your Verizon account.
By specifying a hierarchical company structure that represents your business organization, you
can group accounts to make flexible and easy assignments of those groupings.
As your company’s User Administrator, you can also:
• create new users and manage existing users
• view any user with access to your account
• view and delete any or all of their entitlements
• add new entitlements for specified applications
• establish subordinate administrators
• grant CPNI authorization without manual forms
• self-manage all your applications and accounts in real-time
Once established, you do not need to interact with Verizon staff to manage your users’ access to
the Verizon Enterprise Center. Updates made by the User Administrator take effect without
requesting and waiting for action.
Refer to the User Administrator User Guide for instructions on managing users and roles.
1. Click on your name in the top right corner.
2. Click Profile Administration.
Figure 2-15: Administration
2-16Getting Started
Access Request
1. Click on your name in the top right corner.
2. Click Access Request to request entitlements to additional tools.
Figure 2-16: Access Request
2-17Getting Started
Download Center
Retrieve download requests and recent invoices.
1. Click on your name in the top right corner.
2. Click Download Center.
Figure 2-17: Download Center
2-18Getting Started
Support
Contact Customer Support for any Verizon Enterprise Center issues. They can assist you with
product and general platform questions, errors, and password resets.
Contact your account team with any account specific questions on equipment or service, pricing
information, or adding additional users to Verizon Enterprise Center.
Click on your name in the top right corner. Click Contact Us & Send Feedback to obtain customer
support.
• Call toll-free at 1-800-569-8799.
• Send an e-mail for technical questions or to inquire about purchasing products or services.
Figure 2-18: Contact Us & Send Feedback
Training
Go to https://customertraining.verizon.com to enroll in training and/or download user and
reference guides.
2-19Getting Started 2-20
ACCOUNTS & MAINTENANCE
                                                                                    23
You can view the account structure of accounts, from summary information to individual lines
and circuits. You can also submit and search for account inquiries and perform additional tasks
on the accounts relating to billing, orders, and invoices.

                                    Figure 3-1: Account Explorer

                                                                                              3-1
Accounts & Maintenance
Service Management Dashboard
The Service Management Dashboard provides visibility into your near-real time Verizon
inventory and its associated incidents, service and change requests, network alarms, and
maintenance events allowing you to manage your network at the service level. The information
is presented in a centralized, graphical user interface accessible around the globe via the Verizon
Enterprise Center portal.
You can also view the dashboard by scrolling to the bottom of the Home page. You can customize
your views of inventory, alarms, and tickets.
Refer to the Service Management Dashboard User Guide for more information.
Figure 3-2: Access Service Management Dashboard
Select Manage Account | Service Management Dashboard.
3-2Accounts & Maintenance
Dashboard
The Dashboard provides a snapshot of your tickets, alarms, trouble spots, and scheduled events.
Figure 3-3: Dashboard
3-3Accounts & Maintenance
Views
The Explorer tab provides View By filters that you can select from a drop-down list to display
different hierarchies. You can drill down according to the type of filter you selected. For example,
you can select Topology to filter by region.
Figure 3-4: Service Management Dashboard
• Location - lists locations in the hierarchy with countries at the top level, then states (if
applicable), cities, streets, and service.
• Service - lists all of your products and services, e.g., Internet, Private IP, Audio
Conferencing, etc. You can expand each service to display location information.
• Topology - displays your service entities by region and provides a network device view of
related configuration items. The hierarchy is location based starting with country, state,
city, street address, and location.
• Critical Business Process - customer defined group of configuration items with a common
business purpose. Contact the service desk at 855-CALNET3 if you want to use this view.
• Business Site - customer defined grouping of configuration items at a common location or
address. Contact the service desk at 855-CALNET3 if you want to use this view.
• Bundle - groups configuration items by the service bundle with which they are associated.
The hierarchy starts with the bundle name and can be expanded to view the country, state
(if applicable), city, and street with a unique bundle identifier.
• Resource Units - this hierarchy only applies if your organization has services billed as
resource units. The hierarchy lists defined resource unit names that you can expand to
display the location hierarchy.
• Account Hierarchy - Shows the accounts to which your user ID is entitled.
• My Saved Views - displays your saved views for easy access. For example, if you frequently
drill down to a specific city in the Location view, you can save it so you do not have to drill
down every time you want to access that city.
3-4Accounts & Maintenance
Map
You can view the location and distribution of your tickets and alarms on the map. You can apply
filters or see everything active at one time.
Figure 3-5: Map Tab
Click the Legend drop-down arrow to view a key to the symbols that display on the map for
alarm severities and ticket priorities.
Figure 3-6: Map Legend
3-5Accounts & Maintenance
Inventory
The Inventory tab provides a global view of your configuration items and data such as servers,
devices, routers, etc. It also provides a view of your services with Verizon including data, voice,
Internet, Managed Services, etc.
Figure 3-7: Inventory Tab
Figure 3-8: Inventory Details Pop-Up
Click next to a configuration item. A pop-up menu appears.
3-6Accounts & Maintenance
Click to open the Row Level and Column Settings pop-up to adjust the row level.
Figure 3-9: Row Level and Column Settings
Selecting Detail prompts the system to display information at the configuration item or network
element ID (NEID) level on the Explorer and Inventory tabs. A row for every service and
Configuration Item (CI) is listed.
Selecting Summary displays information at the service level. The service level displays services
by a unique key known as the Primary Service Key (PSK); these keys may be comprised of
multiple CIs.
The best practice for most users is to set the default row level to Detail.
1. Select Detail under Row level.
2. Select Update Defaults to apply the detail configuration setting. It is active every time you
log in.
3. Click Save. Note: You must click Save for your changes to take effect. If you close the Row
Level and Column Settings pop-up without saving, your changes will not automatically be
saved.
3-7Accounts & Maintenance
Tickets/Events
The Service Management Dashboard provides access to current and up to 12 months of
historical configuration item Incidents, Change Requests (CRs), Service Requests (SRs), and
Maintenance Event History information.
Figure 3-10: Tickets/Events Tab
You can use icons and filters to control the display of ticket/event information, as well as export
data.
• Customize Display - click to customize the display of rows and columns.
• Export to Zip - click to export the tickets/events list as a .zip file.
• Export to Excel - click to export the tickets/events list as an .xls file.
• Pop Out Inventory Viewer - click to open a new tickets/events window.
• Dashboard View- click to open the Dashboard view in a new browser window.
3-8Accounts & Maintenance
Alarms
Current configuration item related alarm information displays on the Alarms tab.
Figure 3-11: Alarms Tab
You can use icons and filters to control the display of alarm information, as well as export data.
• Click to view a visual indication that the displayed alarm information is current. The
Service Management Dashboard polls the source system every two minutes to gather
alarm information. When updates are found, the indicator changes to . Click to
refresh.
• Click change your alarm settings. The Alarm Update Settings pop-up appears.
The default setting is Manual. If Automatic is
selected, the icon does not display and the
alarm date is sorted by the Alarm Last Update
D/T column with all other sorting disabled.
New alarms are subsequently added to the top
of the list.
• Export to Zip - click to export the alarm list
as a .zip file.
• Export to Excel - click to export the alarm list as an .xls file.
• Pop Out Inventory Viewer - click to open a new alarm window.
3-9Accounts & Maintenance
Topology
The Topology tab provides access to network device detail, including a graphical network
diagram. Unlike the Inventory tab, which provides a global view of all configuration items, the
Topology tab only displays network devices. The information is displayed in list format via the
Entities sub-tab, as well as in a graphical format via the Diagram sub-tab.
Figure 3-12: Topology Tab
3-10Accounts & Maintenance
Charts
The Charts tab provides a graphical representation of your alarms and tickets/events. Instead of
displaying the alarms, tickets, and events in a list format, the data is displayed in pie charts or bar
graphs.
Figure 3-13: Charts Tab
Select the chart you want to view from the drop-down list:
• Alarms by Severity
• Active Tickets by Priority
• Alarm Trouble Spots
• Ticket Trouble Spots
• Network Equipment Adds
3-11Accounts & Maintenance 3-12
ORDERS
                                                                                    24
You can view your orders and check the status. Hover over Orders to see a pop-up menu of
available options. You can also view a summary of your orders in a graphical format in the Order
Type Summary section on the Orders home page.

Refer to the Orders User Guide for more information.

Select Manage Account | Orders.

                                        Figure 4-1: Orders

                                                                                             4-1
Orders
View Orders and Check Status
Scroll to the bottom of the Orders Home page to view your orders, or click View Orders at the
top of the page.
You can filter and customize the list, and export it to a file. The status of an order displays in the
Status column.
Figure 4-2: View Orders
4-2Orders
Customize Orders Summary Table
You can choose which columns you want displayed on the View Orders table.
Click Customize. The Customize Orders Summary Table pop-up appears and you can add or
remove the columns you want.
Figure 4-3: Customize Orders Summary Table
4-3Orders 4-4
INVOICES
                                                                                         25
The Invoices tool enables you to view invoices, generate reports, and pay your bills online. You
can view current charges, previous charges and adjustments, providers, legacy invoices, a
summary of charges by account, and other billing related information. Other features include:

   •   Pay Online - Pay your accounts via Online Payment by credit card (American Express,
       Discover, MasterCard, or Visa), or Electronic Funds Transfer (EFT) from your checking
       account. A Pay by Mail option also exists, allowing you to print a remittance slip and mail
       your check to the appropriate payment center.
   •   Reporting and Analysis - Analyze invoice reports for specific corporate, location, and
       service level details, identify exceptions through call record sorting, and make invoice
       inquiries online.
   •   Billing Inquiry - Get the status on open tickets for billing discrepancies, questions, and
       concerns. You can open billing inquiry tickets from the Send a Bill Inquiry link.
   •   Notifications - Access Verizon Enterprise Center Notification Rules. This tool allows you to
       control whether or not to receive an e-mail and/or pager notification from eligible billing
       systems when your online invoice is available.
   •   View Historical Invoices - View invoices from up to seven years ago depending on the
       billing system from the drop-down menu on the Invoices home page. You are provided
       with an online image of the historical invoice.
   •   Manage e-Media - The Manage Voice, Data, and IP e-Media section allows you to access
       any of your billing data downloads.

   Note: Refer to the Invoices User Guide for more information.

                                                                                                    5-1
Invoices
Home
The Invoices tool is entitlement based. When your account is created, your account team must
entitle you to see invoices. Contact your account team if you do not see the invoices you need.
Select Manage Account | Billing.
Figure 5-1: Billing
5-2Invoices
View Invoices
You can download and view available invoices. The Summary Bill provides access to previous
invoices, payments, actions, reports, and inquiries. You can also change the billing address, set
up recurring payments, and update your paperless billing preferences.
Figure 5-2: Summary Bill
Click the Quick Access link next to an invoice to see a list of tools you can use for a specific
invoice.
Click the Account Number to view a bill.
5-3Invoices
Inquiries & Disputes
You can initiate a bill inquiry or dispute if you find a discrepancy on your bill or if you have a
question about an invoice. You can then view those inquiries you submitted and track the
progress.
Click Manage Account | View Bill Inquiries at the top of the screen.
-OR-
Click Actions on the Billing home page to access Invoice Inquiries and Disputes.
Figure 5-3: Access Inquiries & Disputes
5-4Invoices
Reasons for Creating an Invoice Inquiry
The following table lists the reasons for creating an invoice inquiry:
Request an Action Disagree with a Charge or Payment
Receive a copy of an invoice Charge for inactivated service
Change the billing address Charge for service still being installed
Change the point of contact or authorized Charge for unusable service due to inactivated
user for an account hub location
Go paperless Charge from an unauthorized carrier
Receive credit for extended down time of Charge for disconnected service
service
Receive refund for credit balance Tax charge but company is tax exempt
Transfer a credit balance to another Charged twice for same service
account
Cancel a contract or service agreement Late payment charge
Payment not reflected on invoice Unrecognized charge
Payment applied to incorrect account Service rate does not match expectation
Service rate does not match contracted rate
Promotional price, rate or credit not reflected
on invoice
Incorrect credit or debit adjustment
5-5Invoices
View Inquiries
You can view your inquiries and track the progress. You have the same functions that you have
when viewing invoices. You can download, select the columns you want to view, and filter.
Select Manage Account | View Bill Inquiries at the top of the screen.
-OR-
Click Billing Inquires on the Billing home page.
Figure 5-4: Billing Inquiries
Click on a Inquiry Tracking Number to view detailed status information.
5-6Invoices
Invoice Inquiry Status
The Invoice Inquiry Status screen displays all the information related to the inquiry you selected:
attachments (if any), notes, e-mail notifications, related inquiries, and claims.
Figure 5-5: Inquiry Detail
5-7Invoices
Payments
You can submit/schedule payments, view history and status, and manage payment account
information.
There are several different ways to access payment options.
Click Manage Account | Make a Payment at the top of the screen.
-OR-
Click Manage Account | Manage Payment Methods at the top of the screen.
-OR-
Click Make a Payment on the Invoices home page or the Summary Bill screen.
-OR-
Click a payment option under Payments on the Summary Bill screen.
-OR-
Click Actions on the Billing home page and select an option under Manage Payments.
Figure 5-6: Access Payments
5-8Invoices
Analysis & Reporting
You can view bill reports for a single account or multiple accounts. You can also schedule to view
a report at a later date, as well as schedule recurring monthly reports. Create a Reporting
Structure if you want to view reports for a certain account or group of accounts.
Not all reports are available for all invoices. Some reports give you the option to filter for certain
types of information, such as the Summary of Current Charges report that enables you to sort by
Provider, Summary Account/Provider, Type of Charge, or type of Charge and Provider.
Select Manage Account | Reports at the top of the page. The Analysis & Reporting screen
appears.
Figure 5-7: Analysis & Reporting
5-9Invoices
Paperless Billing
You can set up paperless billing so that you no longer receive a paper invoice in the mail. You can
set up paperless after you receive your first invoice.
1. Select Manage Account | Update Paperless Billing (under Billing). The Update Paperless
Billing screen appears.
Figure 5-8: Update Paperless Billing
2. Enter the account number.
3. Click . The paperless settings display.
5-10Invoices
Figure 5-9: Update Paperless Billing
4. Select Paperless from the New Settings drop-down list.
5. Accept the terms and conditions.
6. Click Save Settings.
7. Repeat steps 1 - 6 to set additional accounts as paperless.
8. Check the accounts you want to set as paperless.
5-11Invoices 5-12
REPAIRS
                                                                                        26
The Repairs tool is an electronic ticketing system that allows you to monitor your own trouble
tickets.
   •   Create tickets for voice, data, IP, or CPE issues
   •   User the Repair Summary table for quick access to ticket status
   •   Test your circuits or test a POTS line before you create a ticket and avoid service
       maintenance charges
   •   Stay informed with email updates

Refer to the Repairs User Guide for instructions on using the Repairs tool.

The Repairs home page provides easy access to work with tickets, tests, and reports.

                                            Figure 6-1: Repairs

                                                                                                 6-1
Repairs
View and Update Tickets
You can search for tickets, as well as download, filter, sort, or customize the ticket list. You can
also define specific criteria to limit the number and types of tickets that display in the ticket list.
Figure 6-2: Filter Tickets
6-2Repairs
Create a Ticket
Begin the ticket creation process by entering your circuit number in the Service ID field. You can
also search for your circuit if you are not sure what it is. The process walks you through step-by-
step and shows you where you are. Each service type presents a different set of questions to
answer when you are creating a ticket.
Figure 6-3: Create Ticket
Figure 6-4: Create Ticket
6-3Repairs
Trouble Ticket Details
You can track ticket details, comments, contact information, and activities.
Figure 6-5: Trouble Ticket Details
6-4Repairs
Customize Ticket List
You can specify the columns you want to view in the ticket list (up to seven).
Figure 6-6: Customize Ticket List
6-5Repairs
Initiate a Test
You can initiate your own circuit monitoring and loop-back testing. There is automatic referral of
any found issues to the appropriate maintenance team. Test and monitor results are accessible
online for six months.
Verizon customers can initiate a test for ATM service, Frame Relay service, Private Line, Private IP
service, Internet Dedicated, and Dedicated Long Distance Voice service. Former Verizon
customers can initiate a test for Serial Circuits, Telephone Number Circuits, and POTS/ISDN/DPA.
Circuit Analysis is not available for local access circuits, non?]U.S. circuits, or Managed Services
circuits.
Figure 6-7: Initiate Test
6-6TRAINING AND DOCUMENTATION
2A
Access from the Verizon Enterprise Center
You can access training and documentation from the Verizon Enterprise Center.
Figure A-1: Verizon Enterprise Center Home
Note: You can access the Customer Training and Documentation site directly at:
https://customertraining.verizon.com.
A-1Training and Documentation
Create a Training Account
Figure A-2: Customer Training and Documentation
1. Click Login on the home page.
2. Click I need to create an account.
3. Enter your details to set up a training account.
Note: You only need an account to sign up for instructor led training. You do not need an
account to access tutorials and user guides.
A-2Training and Documentation
Enroll in Training
Figure A-3: Customer Training and Documentation Enroll
A-3Training and Documentation
Access Tutorials and User Guides
Bookmark https://customertraining.verizon.com to easily access tutorials and user guides.
Figure A-4: Customer Training and Documentation
A-4INDEX
A M
Accounts & Maintenance ......................................3-1 My Profile ............................................................2-14
Service Management Dashboard ....................3-2
Administration .....................................................2-16
Analysis & Reporting ..............................................5-9 O
Orders ....................................................................4-1
Customize Orders Summary Table ..................4-3
C View Orders/Check Status ..............................4-2
Check Status ..........................................................4-2
Create Ticket ..........................................................6-3
Customer Support ...............................................2-19 P
Customize Orders Summary Table ........................4-3 Paperless Billing ...................................................5-10
Customize Ticket List .............................................6-5 Payments ...............................................................5-8
D R
Documentation ..................................................... A-1 Register .................................................................1-1
Already Have a User ID ...................................1-5
Need a New User ID ........................................1-4
E Repairs ...................................................................6-1
E-Payment .............................................................5-1 Create Ticket ...................................................6-3
Extended Session Timeout ..................................2-15 Customize Ticket List ......................................6-5
Initiate a Test ..................................................6-6
Ticket Details ...................................................6-4
F View Tickets ....................................................6-2
First Time Login/Security Authentication ..............2-5
S
G Service Management Dashboard ..........................3-2
Getting Started ......................................................2-1 Alarms .............................................................3-9
First Time Login/Security Authentication .......2-5 Charts ............................................................3-11
Set Up Security Image .....................................2-6 Dashboard .......................................................3-3
Verizon Enterprise Center Home ..................2-11 Inventory .........................................................3-6
Welcome Screen Options ................................2-2 Map .................................................................3-5
Tickets/Events .................................................3-8
Topology .......................................................3-10
Views ...............................................................3-4
I Set Up Security Image ...........................................2-6
Initiate a Test .........................................................6-6 One-Time Passcode ........................................2-9
Inquiries & Disputes ..............................................5-4 Secret Questions/Answer ...............................2-8
Invoices ..................................................................5-1 Select Image ....................................................2-7
Analysis & Reporting .......................................5-9 Terms and Conditions .....................................2-6
Home ...............................................................5-2 Settings ................................................................2-13
Inquiries & Disputes ........................................5-4 Access Request .............................................2-17
Paperless Billing ............................................5-10 Download Center ..........................................2-18
Payments .........................................................5-8 Support .........................................................2-19
View ................................................................5-3 Training .........................................................2-19
View Inquiries ..................................................5-6User Settings .................................................2-14
T
Ticket Details .........................................................6-4
Tickets ....................................................................6-4
Training ................................................................. A-1
U
User Settings ........................................................2-14
V
Verizon Enterprise Center Home ................. 1-9, 2-11
View Inquiries ........................................................5-6
Status ..............................................................5-7
View Invoices .........................................................5-3
View Orders ...........................................................4-2
View Tickets ...........................................................6-2You can also read