Veritas NetBackup Self Service Installation Guide - 9.0 Document version
←
→
Page content transcription
If your browser does not render page correctly, please read the page content below
Veritas NetBackup™ Self
Service Installation Guide

9.0

Document version: 1
Veritas NetBackup™ Self Service Installation Guide
          Last updated: 2021-03-01

          Legal Notice
          Copyright © 2021 Veritas Technologies LLC. All rights reserved.

          Veritas, the Veritas Logo, and NetBackup are trademarks or registered trademarks of Veritas
          Technologies LLC or its affiliates in the U.S. and other countries. Other names may be
          trademarks of their respective owners.

          This product may contain third-party software for which Veritas is required to provide attribution
          to the third party (“Third-party Programs”). Some of the Third-party Programs are available
          under open source or free software licenses. The License Agreement accompanying the
          Software does not alter any rights or obligations you may have under those open source or
          free software licenses. Refer to the Third-party Legal Notices document accompanying this
          Veritas product or available at:

          https://www.veritas.com/about/legal/license-agreements

          The product described in this document is distributed under licenses restricting its use, copying,
          distribution, and decompilation/reverse engineering. No part of this document may be
          reproduced in any form by any means without prior written authorization of and its licensors,
          if any.

          THE DOCUMENTATION IS PROVIDED "AS IS" AND ALL EXPRESS OR IMPLIED
          CONDITIONS, REPRESENTATIONS AND WARRANTIES, INCLUDING ANY IMPLIED
          WARRANTY OF MERCHANTABILITY, FITNESS FOR A PARTICULAR PURPOSE OR
          NON-INFRINGEMENT, ARE DISCLAIMED, EXCEPT TO THE EXTENT THAT SUCH
          DISCLAIMERS ARE HELD TO BE LEGALLY INVALID. SHALL NOT BE LIABLE FOR
          INCIDENTAL OR CONSEQUENTIAL DAMAGES IN CONNECTION WITH THE FURNISHING,
          PERFORMANCE, OR USE OF THIS DOCUMENTATION. THE INFORMATION CONTAINED
          IN THIS DOCUMENTATION IS SUBJECT TO CHANGE WITHOUT NOTICE.

          The Licensed Software and Documentation are deemed to be commercial computer software
          as defined in FAR 12.212 and subject to restricted rights as defined in FAR Section 52.227-19
          "Commercial Computer Software - Restricted Rights" and DFARS 227.7202, et seq.
          "Commercial Computer Software and Commercial Computer Software Documentation," as
          applicable, and any successor regulations, whether delivered by Veritas as on premises or
          hosted services. Any use, modification, reproduction release, performance, display or disclosure
          of the Licensed Software and Documentation by the U.S. Government shall be solely in
          accordance with the terms of this Agreement.

          2625 Augustine Drive
          Santa Clara, CA 95054

          http://www.veritas.com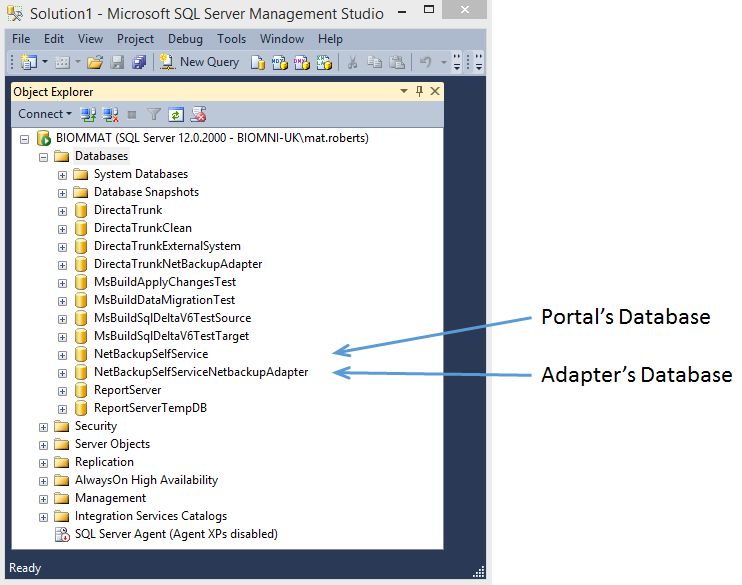
Technical Support
Technical Support maintains support centers globally. All support services will be delivered
in accordance with your support agreement and the then-current enterprise technical support
policies. For information about our support offerings and how to contact Technical Support,
visit our website:

https://www.veritas.com/support

You can manage your Veritas account information at the following URL:

https://my.veritas.com

If you have questions regarding an existing support agreement, please email the support
agreement administration team for your region as follows:

Worldwide (except Japan)                 CustomerCare@veritas.com

Japan                                    CustomerCare_Japan@veritas.com

Documentation
Make sure that you have the current version of the documentation. Each document displays
the date of the last update on page 2. The latest documentation is available on the Veritas
website:

https://sort.veritas.com/documents

Documentation feedback
Your feedback is important to us. Suggest improvements or report errors or omissions to the
documentation. Include the document title, document version, chapter title, and section title
of the text on which you are reporting. Send feedback to:

NB.docs@veritas.com

You can also see documentation information or ask a question on the Veritas community site:

http://www.veritas.com/community/

Veritas Services and Operations Readiness Tools (SORT)
Veritas Services and Operations Readiness Tools (SORT) is a website that provides information
and tools to automate and simplify certain time-consuming administrative tasks. Depending
on the product, SORT helps you prepare for installations and upgrades, identify risks in your
datacenters, and improve operational efficiency. To see what services and tools SORT provides
for your product, see the data sheet:

https://sort.veritas.com/data/support/SORT_Data_Sheet.pdf
Contents

Chapter 1   Introduction           ........................................................................... 6

            About Self Service components ........................................................ 6

Chapter 2   Prerequisites ......................................................................... 8
            About prerequisites ........................................................................ 8

Chapter 3   Installation         ........................................................................... 10

            Installation overview ......................................................................      10
            IIS considerations .........................................................................      11
            Install Portal ................................................................................   11
            Install Adapter .............................................................................     14
            Validation ....................................................................................   15
            Installed components ....................................................................         15

Chapter 4   Upgrade ................................................................................ 19
            Review current environment configuration .........................................                19
            Upgrade preparation .....................................................................         21
            Upgrade the Portal .......................................................................        22
            Upgrade the Adapter .....................................................................         23
            Validation ....................................................................................   24
            Post upgrade resynchronization ......................................................             26
            Post upgrade steps .......................................................................        26
            Rollback .....................................................................................    27

Chapter 5   Post-installation validation                      .............................................. 28

            About post-installation validation ......................................................         28
            Visual Check ...............................................................................      28
            Configuration Check .....................................................................         29
            Windows Service ..........................................................................        30

Chapter 6   Uninstallation            ...................................................................... 31

            Uninstalling NetBackup Self Service ................................................. 31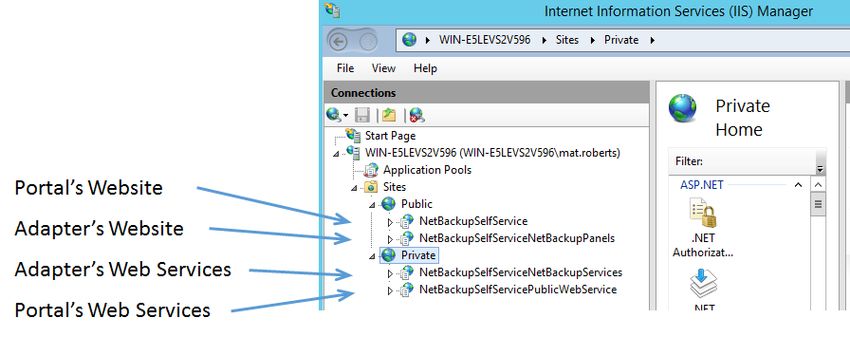
Contents   5

Appendix A   Software requirements ..................................................... 32
             NetBackup software requirements for Self Service .............................. 32

Appendix B   Troubleshooting             ................................................................. 34

             About PowerShell execution policy ................................................... 34
             Recovering a lost application key ..................................................... 36

Appendix C   Configuring HTTPS ........................................................... 38
             About configuring HTTPS ............................................................... 38

Appendix D   Load balanced installation                    .............................................. 40

             About load-balanced installation ...................................................... 40

Appendix E   Customizing image upload                       ............................................. 42

             About Customizing Image Upload .................................................... 42

Appendix F   Reduced Database Permissions for Database
               Upgrade .......................................................................... 44
             Reduced Database Permissions for Database Upgrade ....................... 44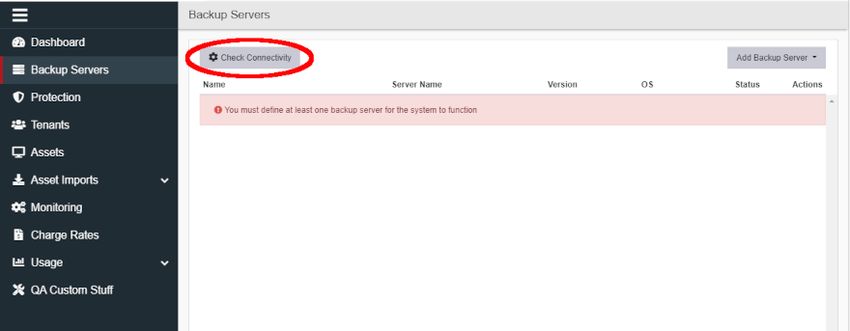
Chapter                             1
Introduction
         This chapter includes the following topics:

         ■   About Self Service components

About Self Service components
         Two installers are required to install NetBackup Self Service:
         ■   NetBackup Self Service Portal 9.0.exe
         ■   NetBackup Self Service Adapter 9.0.exe
         The installers install a total of eight components:
         ■   Portal
             ■   Website
             ■   Web service
             ■   Windows Service
             ■   Database

         ■   Adapter
             ■   Panels
             ■   Web service
             ■   Tasks
             ■   Database

         You can distribute the components a number of different ways, but the focus of this
         guide is the two-server install. A web server that hosts the websites, web services
         and Windows Service, and a database server that hosts the databases.
Introduction 7
About Self Service components
Figure 1-1 Two-server installation
You can extend your NetBackup Self Service solution by using one of the additional
add-ons. You can find more information, as well as download details, on the Veritas
Open Exchange (VOX). A link takes you to the specific post.
■ Veritas NetBackup Self Service app for Mobile, available for both iOS and
Android.
https://tinyurl.com/y7g56u2r
■ Veritas NetBackup Self Service bot for Microsoft Teams
https://tinyurl.com/ycqkhfzh
■ Veritas NetBackup Self Service app for Slack
https://tinyurl.com/yc5snw7z
■ Veritas NetBackup Self Service app for ServiceNow
https://tinyurl.com/yadg2obh
■ Veritas NetBackup Self Service plug-in for VMware vRealize Automation
https://tinyurl.com/ybldbpcx
■ Veritas NetBackup Self Service plug-in for VMware vCloud Director
https://tinyurl.com/y77f68jvChapter 2
Prerequisites
This chapter includes the following topics:
■ About prerequisites
About prerequisites
The person who installs NetBackup Self Service needs a working knowledge of
SQL Server, Windows Services, and Internet Information Services (IIS).
NetBackup Self Service can be installed on the following Windows platforms:
■ Windows Server 2012 R2
■ Windows Server 2016
■ Windows Server 2019
Note: Apply the latest service packs to the operating system.
The prerequisites for each component are:
Table 2-1
Component Requirement
Database ■ Microsoft SQL Server 2014, 2016, 2017, or 2019
■ Azure SQL database or Microsoft SQL Server on Amazon
RDS
■ At least 5 GB free disk space for data and 2 GB for logsPrerequisites 9
About prerequisites
Table 2-1 (continued)
Component Requirement
Website, web service, and ■ Microsoft .NET Framework version 4.7.2
Windows Service ■ IIS installed by configurator
■ Microsoft PowerShell 3.0 part of standard Windows
installation
■ Access to an SMTP server
■ At least 1 GB free disk spaceChapter 3
Installation
This chapter includes the following topics:
■ Installation overview
■ IIS considerations
■ Install Portal
■ Install Adapter
■ Validation
■ Installed components
Installation overview
The Self Service installation is a multi-part installation. Table 3-1 provides an
overview of the process. Additionally, this chapter provides details on where the
various Self Service components are installed.
Table 3-1 Installation overview
Step Additional information
IIS considerations See “IIS considerations” on page 11.
Https See “About configuring HTTPS” on page 38.
Install Portal See “Install Portal” on page 11.
Install Adapter See “Install Adapter” on page 14.
Validation See “Validation” on page 15.Installation 11
IIS considerations
IIS considerations
Before you begin installation, you should give some consideration to how you want
to configure IIS. Four components are installed within IIS:
■ Portal website
■ Portal web services
■ Adapter pages
■ Adapter web services
The security considerations for these components are different. The portal website
and adapter pages must be visible to all the users of the system. This requirement
can mean exposing the website over the public Internet. The portal web services
and adapter web service provide an integration point. Only internal systems need
access to these pages.
The recommended configuration is to create two IIS websites for the components.
The first IIS website hosts the portal website and adapter pages. The second IIS
website hosts the portal web services and adapter web services.
Create two websites in IIS. The first is the public facing website to host the portal
and the adapter panels. The second is the private website to host the web services.
Configure the security of the IIS websites. Be sure to restrict the visibility of the
private IIS website so that it is not exposed over the public Internet.
Install Portal
This section describes the installation of the NetBackup Self Service Portal.
To install the portal
1 Install the NetBackup Self Service Portal before the NetBackup Self Service
Adapter.
2 Install the NetBackup Self Service Portal on the web server. The portal
installation does create a database on a remote machine.Installation 12
Install Portal
3 Run NetBackup Self Service Portal 9.0.exe.
The installer runs and copies the installation onto the computer. When the
installation completes, a configurator launches.
4 In the configurator select Install a New NetBackup Self Service Portal.
5 On the component screen, confirm that all options are selected and select
Next.
6 A validation screen runs to check that IIS is configured correctly
7 Use the New Install Configuration Options dialog to specify the site
configuration.
■ The Company Name is the name of your company.
■ The Portal Name field defines the name of the site. It is used to create the
names of the IIS Applications and Windows service the installer creates.
The portal name cannot be changed once the installer runs. Choose the
Portal Name carefully.
■ The Install Portal as field gives you the option to install the main website
in an IIS application or directly under the website root. If you install in an
IIS application the URL is similar to www.example.com/portalname, whereInstallation 13
Install Portal
portalname is the Portal Name. If you install in the root of the IIS website,
the URL of the website is similar to www.example.com.
The advantage of installing in an IIS application is that other websites can
co-exist on the web server. The advantage of installing under the root of
the website is a more attractive URL.
■ Specify the IIS website where you want the components installed. Select
the IIS website you want to use for the portal and the web services. Veritas
recommends that you use two websites. Use Public to host the portal and
Private to host the web services.
■ System Base Currency defines the currency type that Self Service uses.
■ The System Base Language defines the language that is displayed in the
user interface.
8 On the Database Installer Connection dialog, enter information about the
database to be created, and the credentials to use while creating the database.
Veritas recommends that you keep the default database name, which is the
same as the Portal Name. The credentials provided must exist and have
sysadmin access to the database instance. The credentials are used by the
installer to create the database.
9 Enter the user credentials that the portal, web service and windows service
use to connect to the database. This database user is created as part of the
install process, and is used by the application to connect to the database.
10 Generate a new Application Key in the Application Security dialog.
The Application Key is used to encrypt third party passwords in the system.
For example, the adapters contain credentials for connecting to other systems
and the application key is used to encrypt them. If the installation is for a new
system, click Generate Key to create a new key. If the installation is for a new
component for an existing system, paste the key from the original installation
into the box.
If you intend to install a second website to load-balance the system, keep a
copy of the application key. You must use the same application key when you
install the second website.
Caution: The application key is not used to encrypt the user's logon credentials.
11 A validation screen runs to check that the database credentials are correct.Installation 14
Install Adapter
12 A confirmation screen is presented. Confirm that the details are correct and
click Install.
13 On completion of the installation and configuration of the portal, log into to the
website.
The final page of the configurator contains the URL for the website. The
credentials for initial logon are:
User ID: Admin. The user ID is not case sensitive.
Password: password. The password is case-sensitive. You are required to
change the password at first logon.
Keep a copy of the URL from this final screen. Use this URL to connect to the
system.
Install Adapter
This section guides you though the installation of the NetBackup Self Service
Adapter.
To install the adapter
1 From the web server, run NetBackup Self Service Adapter 9.0.exe. The
installer runs and copies the installation files onto disk. When it completes, the
configurator launches.
2 Select Install NetBackup Self Service Adapter from the Select Installation
dialog box.
3 Confirm that all options are selected in the Select Components dialog and
select Next.
4 A validation screen runs, to check that PowerShell 3.0 or later is installed.
5 On the Select Portal Web Service screen, specify the Portal Web Service
Virtual Root for your system. The adapter communicates with the portal by
the portal's web services.
6 Select the IIS websites where you want to install the adapter pages and adapter
services in the Select IIS Websites dialog. Veritas recommends that the pages
are on a public site and the services are on a private site.Installation 15
Validation
7 The Database Installer Connection dialog is used to create the database for
the adapter. Select the database server where the database is created and
choose a name for the database. Veritas recommends that you accept the
default database name, which is derived from the Site Name of the portal. The
credentials that are entered are used to create the database. The user that is
specified must have the sysadmin database privilege. This user is only used
while the configurator is active and the credentials are not stored.
8 Create a database user which the adapter pages and services can use to
connect the database on the Application Connection dialog.
9 A validation screen runs to check that the database credentials are correct.
10 A confirmation screen is presented. If the details are correct, click Install.
11 The installation runs.
Validation
When the installation completes, log into to the website with the URL and credentials
from the final screen of the portal installation. More information on how to validate
the installation and perform the initial setup is available.
See “About post-installation validation” on page 28.
Installed components
This section shows the result of a default installation of NetBackup Self Service. It
shows the components that are installed and where they are installed.
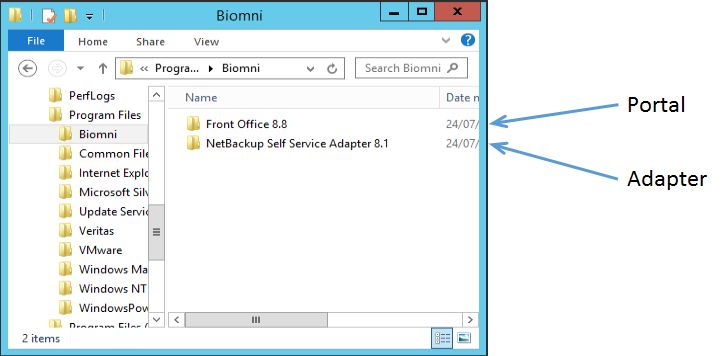
File System
The portal and the adapter are installed under C:\Program Files\Biomni.
■ Portal: C:\Program Files\Biomni\Front Office version_number
■ Adapter: C:\Program Files\Biomni\NetBackup Self Service Adapter
version_numberInstallation 16
Installed components
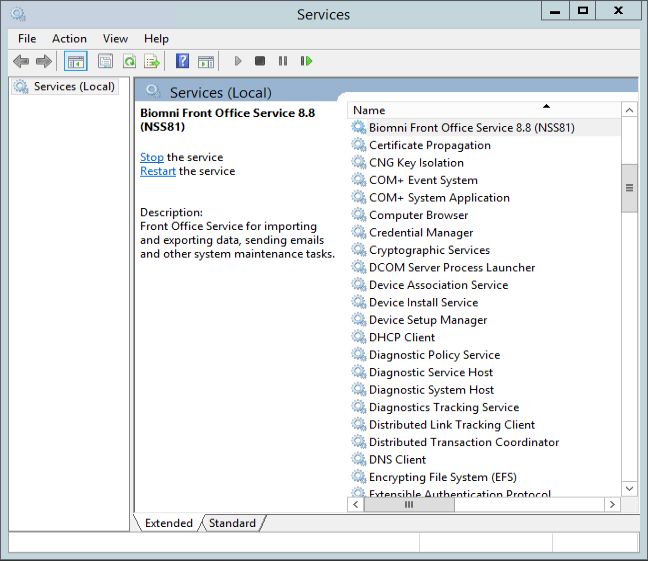
Windows Service
The portal installs a Windows Service.
Figure 3-1 Portal Windows ServiceInstallation 17
Installed components
IIS
Four components are installed in IIS. The figure shows the recommended
configuration. In this configuration, two IIS websites are created: a public site to
host the webpages and a private site to host the web services.
Figure 3-2 Installed IIS components
Database
Two databases are created:
■ Portal's database: NetBackupSelfService
■ Adapter's database: NetBackupSelfServiceNetBackupAdapterInstallation 18
Installed components
Figure 3-3 Self Service DatabasesChapter 4
Upgrade
This chapter includes the following topics:
■ Review current environment configuration
■ Upgrade preparation
■ Upgrade the Portal
■ Upgrade the Adapter
■ Validation
■ Post upgrade resynchronization
■ Post upgrade steps
■ Rollback
Review current environment configuration
Before you begin the upgrade, review existing installation. Self Service has eight
components that are typically distributed across two servers.
Table 4-1 Typical Self Service configuration
Location Component
IIS server ■ Portal website
■ Portal public web service
■ Adapter panels
■ Adapter web serviceUpgrade 20
Review current environment configuration
Table 4-1 Typical Self Service configuration (continued)
Location Component
Windows services ■ Portal Windows service
■ Adapter Tasks (Self Service 7.7.3 and
later)
SQL server ■ Portal database
■ Adapter database
You can identify the components in your environment from within NetBackup Self
Service.
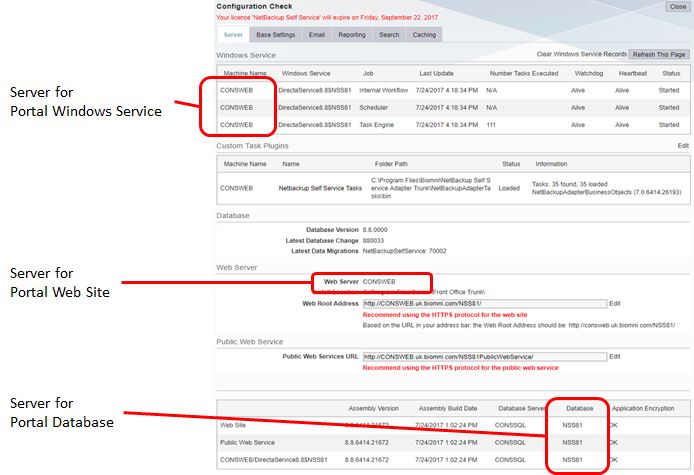
■ Determine the servers where the portal components are installed by examining
the configuration check page in the Self Service website.
Log into Self Service and navigate to the configuration check page (Admin >
Support > Configuration Check).
Identify the servers where the components are installed.Upgrade 21
Upgrade preparation
■ Identify the IIS components.
Log into the web server and open Internet Information Services (IIS) Manager.
Browse the sites and identify the four IIS components that are listed in Table 4-1.
See Figure 3-2 on page 17.
■ Identify the Windows service.
Log into the server with the Windows Service. In a default installation of Self
Service, the service is located on the web server.
Open Services and locate the Portal Windows Service.
See Figure 3-1 on page 16.
■ Identify the databases.
Open Microsoft SQL Server Management Studio, and connect to the database
server.
Identify the two databases that are listed in Table 4-1.
See Figure 3-3 on page 18.
Upgrade preparation
You must perform several steps to prepare for an upgrade.
To prepare for an upgrade
1 Back up the databases
You should back up both Self Service databases before you start the upgrade.
The default names for the databases are NetBackupSelfService and
NetBackupSelfServiceNetBackupAdapter. Perform these steps in SQL
Server Management Studio.
■ Make a note of the NetBackupSelfService database recovery model.
■ Set the database recovery model to Simple.
■ Back up the database.
■ Make a note of the NetBackupSelfServiceNetBackupAdapter database.
■ Set the database recovery mode to Simple.Upgrade 22
Upgrade the Portal
■ Back up the database.
2 Take the portal offline.
Veritas recommends that you prevent user logon and user activity while the
upgrade is active. The best way to prevent user logon and user activity is to
use Internet Information Services (IIS) Manager to stop the application pool
for the portal website.
If a user attempts to connect to the website when the application pool is
stopped, they receive an HTTP Error 503. The service is unavailable
error in their web browser.
Do not stop the other application pools during the upgrade. If you stop the
application pools with the suffix PublicWebServiceAppPool then the upgrade
fails. The public web service is used for the upgrade.
Upgrade the Portal
To upgrade the portal
1 On the web server, run the installer NetBackup Self Service Portal
9.0.exe.
The installer runs and copies the installation to the computer. When the
installation completes, a configurator launches.
2 Select Upgrade a NetBackup Self Service Portal in the configurator and click
Next.
3 Confirm that all components are selected in the Select Components dialog
and click Next.
4 A validation page runs to confirm IIS is configured correctly.
5 Choose the correct Website Virtual Root and Web Service Virtual Root
websites for upgrade.
Be sure that you select the correct websites for upgrade. In a default Self
Service installation the four websites are named as follows:
■ NetBackupSelfService - website virtual root
■ NetBackupSelfServiceNetBackupPanels - do not choose this website
■ NetBackupSelfServiceNetBackupServices - do not choose website
■ NetBackupSelfServicePublicWebService - web service Virtual Root
6 Select the correct Windows service to upgrade.Upgrade 23
Upgrade the Adapter
7 On the Upgrade Database dialog box, choose the database you want to
upgrade and supply credentials to connect to the database.
The database user who performs the upgrade must have the sysadmin Server
Role. This user is only used during the upgrade process and is not stored once
the configurator is complete.
If your database administrator does not want to grant the sysadmin role to you,
you can perform a database upgrade with a reduced permission set. More
information is available.
See “Reduced Database Permissions for Database Upgrade” on page 44.
8 On the confirmation screen, confirm that all the parameters that are entered
are correct. Click Install.
9 The configurator upgrades the portal.
Upgrade the Adapter
To upgrade the adapter
1 On the web server, run the installer NetBackup Self Service Adapter
9.0.exe.
The installer runs and copies the installation onto the computer. When the
installation completes, a configurator launches.
2 Select Upgrade NetBackup Self Service Adapter in the configurator and
click Next.
3 Leave all the options selected on the Select Components dialog box and click
Next.
4 A validation screen runs, to confirm that PowerShell is installed and enabled.
5 Select the correct Portal Panels Virtual Root and Web Services Virtual Root
websites that you want to upgrade.
6 A validation screen runs to confirm that you can connect to the portal web
services and that the portal has been upgraded.Upgrade 24
Validation
7 On the Upgrade Database dialog box, choose the adapter database you want
to upgrade and supply credentials to connect to the database.
The database user who performs the upgrade must have the sysadmin Server
Role. This user is only used during the upgrade process and is not stored once
the configurator is complete.
If your DBA does not want to grant the sysadmin role to you, you can do a
database upgrade with a reduced permission set. More information is available.
See “Reduced Database Permissions for Database Upgrade” on page 44.
8 A validation screen runs, to confirm that you can connect to the database
9 A confirmation screen is presented. Check the parameters are correct and
then click Install to run the upgrade.
Validation
To validate the upgrade:
1 Start the portal application pool to bring the website online.
2 Log into the portal.
3 Perform the validation steps to confirm correct installation.
See “About post-installation validation” on page 28.
4 Confirm that the license is correct.
Check license and check request type codes for changes
Request types are used to perform actions within NetBackup Self Service. The
NetBackup Self Service license specifies that you can use a maximum of 22 active
request types. By default, after upgrade the system has 17 request types. You can
view the request types in Self Service on the website in Admin > Request &
Approval > Request Type.
Request types are split into two broad categories which relate to the main
dashboards’ solution. The categories are: request types that cannot be deactivated
and default request types.
Table 4-2 Request types which cannot be deactivated
Name Code
Add Tenant NEWTENANT
Add vCloud Director Import NEWVCLOUDUpgrade 25
Validation
Table 4-2 Request types which cannot be deactivated (continued)
Name Code
New Computer User NEWMACUSER
Set vCloud Director Password VCLOUDPWD
Table 4-3 Default request types associated with the dashboard end-user
actions
Name Code
Backup Now gargoyle030@yahoo.comDBBACKNOW
Protect DBNEWBACK
Restore File ALFRORIG
Restore File DBRESTFILE
Restore File to Alternate VM ALFRALT
Restore Virtual Machine DBRESTVM
Restore Cloud Asset DBRESTCLD
Unprotect DBREMBACK
Restore Oracle Backup DBRESTORA
Restore SQL Database DBRESTSQL
Register VM for File Restore DBREGDNS
Restore VM Disks VMDISKREST
Confirm that all of the request types in Table 4-2 and Table 4-3 are active.
As part of the upgrade, the current versions of these five request types are installed.
The existing request types are exported to disk and stored in the
install_location\MsBuild\DataExport directory. The Integration Settings and
Action Request Types section is reset to the default request types. Review any
locally customized request types and update or replace the new request type as
appropriate.
These are the only request types currently used in NetBackup Self Service by
default. Any other shipped request types are deactivated on upgrade. Confirm their
status in Admin > Request & Approval > Request Type.Upgrade 26
Post upgrade resynchronization
Post upgrade resynchronization
After the upgrade, manually resynchronize the data between NetBackup and vCloud
Director, if used. Two scheduled tasks run once per day: System Sync and Asset
Import. System Sync imports any new backup images from all backup servers,
expires old backup images, and calculates usage. Until these tasks are run, the
data that is displayed to the user may be incomplete.
To resynchronize the data
1 Log in to the website as an administrator, and navigate to the Monitoring tab.
The left side of the screen shows scheduled tasks.
2 Click the cog next to the System Sync task and select Run Now.
3 (Conditional) If you use vCloud Director, click the cog next to the Asset Import
task, and select Run Now.
4 The Activity section on the right side of the screen monitors the progress of
these tasks.
If you do not perform these steps manually, the tasks run automatically overnight.
Post upgrade steps
As part of the upgrade, the two databases were backed up and the recovery mode
was set to Simple. Revert the database's recovery mode to its initial value.
To revert the database to its initial value:
1 Shrink both databases.
2 Set the recovery mode of the databases back to its original value.
When an upgrade is performed a new set of code is placed in a new location on
the server. Once the upgrade is complete, remove the old installation.
To remove old installation code
1 Go to Add/Remove Programs.
2 Uninstall any previous versions of:
■ NetBackup Self Service Portal
■ NetBackup Self Service AdapterUpgrade 27
Rollback
Rollback
To revert back to the previous version, a restore of the two NetBackup Self Service
databases is required. Additionally, you must reinstall the previous portal and
adapters or restore their web server from a backup).
If you reinstall the portal and the adapters, ensure Database is not selected on the
Select Components dialog box during install. In both cases the database is restored
and does not need to be reinstalled.
During the portal reinstallation, when prompted for an application key, enter the
application key from the previous installation. This application key is the key used
to encrypt third party passwords in the restored databases and was recorded when
the previous version was deployed.Chapter 5
Post-installation validation
This chapter includes the following topics:
■ About post-installation validation
■ Visual Check
■ Configuration Check
■ Windows Service
About post-installation validation
When you complete the installation, you can validate the installation with a series
of checks.
Table 5-1 NetBackup Self Service validation checklist
Validation Additional details
Perform a visual check of the website main See “Visual Check” on page 28.
screen.
Perform a configuration check of the See “Configuration Check” on page 29.
NetBackup Self Service components.
Confirm the Windows service is configured See “Windows Service” on page 30.
correctly.
Visual Check
After installation it is important to check that the system has installed correctly. Log
on to the portal website. The main screen of the website should display correctly.Post-installation validation 29
Configuration Check
Configuration Check
After installation, check that the system is configured correctly with the
Configuration Check screen (Admin >Support > Configuration Check).
Server Tab
■ Windows Service: Shows the status of the Windows services that are connected
to the Self Service database. Each Windows service writes heartbeat information
into the database every 5 minutes. If the database has not received a heartbeat
within 7 minutes the service is highlighted in red.
If the environment is an upgrade, you may need to click the Clear Windows
Service Records hyperlink. You may have references to previous installations
in red text with a status of Stopped.
You can configure the system with multiple Windows services connected to a
single database, which is a useful configuration for redundancy. Each Windows
service writes three records into the Windows service table, so if for example
there are two Windows services, six records are displayed.
■ Custom Task Plugins: Shows the custom tasks that are plugged into the task
engine. The table has one row for NetBackup Self Service Tasks. The status
of the tasks is Loaded.
■ Database: Shows the database version and most recent database change.
These fields are useful in support scenarios.
■ Web server: The critical field is the Web Root Address. This field should be
the URL of the home page of Self Service, as seen by a user of the system.
This setting is used when you construct emails with hyperlinks into NetBackup
Self Service.
■ Public web service: If the Public web service URL is incorrect the webpage
displays an error message.
■ Table: The table that is displayed at the bottom of the page shows the version
numbers, connection strings, and application encryption status of all the
components in the system. All of the version numbers and connection strings
must match; if they do not an error message is displayed. If the application key
is incorrect, the application encryption status indicates this problem, and an
error is displayed.
Base Settings Tab
Check that the base settings for Self Service are appropriate:
■ System Language - US-English is the only supported language option.Post-installation validation 30
Windows Service
■ System Time Zone - choose a time zone which is an acceptable default for the
majority of users
■ Image Upload - Click the image icon to open the Image Manager. The Image
Manager should list the UploadedImages folder. Select the UploadedImages
folder and click upload. Browse to an image file and upload the file. If the file
is successfully uploaded, the image appears on the right-hand side of the Image
Manager dialog.
Email Tab
■ To configure SMTP settings for outbound email, click Edit SMTP Settings.
■ Review core email addresses for the system.
■ Send test email. Click Send Test Email to send a test email from the Self Service
system. For the email to be sent, a Windows service must be active, the email
task must be enabled, and the SMTP settings must be correct.
■ Check the email queue. To view queued emails click Email Queue. The email
queue shows any errors that are encountered with sending the email. When the
mail is sent successfully it is removed from the queue.
Windows Service
After an install, it is advisable to check that the Windows service is running correctly.
On the server where the Windows service is installed:
■ Open Event Viewer, and navigate to the Application Log.
■ Find messages with a source of DirectaService9.4$NetBackupSelfService.
The name may vary slightly - the naming convention is
DirectaService9.4$SiteName, where SiteName is the name of the website.
■ If the Windows service has logged any errors then it is possible there is a
configuration problem. Examine the detail of the error.
A common configuration problem is the Windows service cannot connect to the
database. The Windows service checks to confirm that connectivity to the database
is defined in the configuration file. If the service cannot connect to the database it
logs an error in the Windows Event Log.Chapter 6
Uninstallation
This chapter includes the following topics:
■ Uninstalling NetBackup Self Service
Uninstalling NetBackup Self Service
The uninstallation process removes the Windows service, the website, and the
public web service that are connected to the installation location. It then deletes
the software on the hard disk and the Start Menu shortcut.
The uninstallation does not delete the two databases that were created. The
databases must be deleted manually.
To uninstall a NetBackup Self Service
1 Determine the version of NetBackup Self Service you want to uninstall.
2 In Windows open Programs and Features.
3 Locate NetBackup Self Service Adapter version, and select uninstall.
4 Locate NetBackup Self Service Portal version, and select uninstall.
When the uninstall process finishes, delete the databases from within SQL Server
Management studio. From Object Explorer, expand the Databases node.
Right-click on each of the relevant databases and select Delete.Appendix A
Software requirements
This appendix includes the following topics:
■ NetBackup software requirements for Self Service
NetBackup software requirements for Self Service
NetBackup 8.0 or later with the latest service pack is required. With a Windows
master server, only US English operating system and code page installations of
NetBackup are supported. NetBackup language packs are not supported.
With a UNIX master server, the character encoding of the master server operating
system must be UTF-8. Multiple locales are supported. NetBackup language packs
are supported.
NetBackup appliances are supported.
Software requirements for Self Service
The Self Service software requirements are
■ If using a vCloud Director Integrated configuration, check the Software
Compatibility List for supported API versions.
http://www.netbackup.com/compatibility
■ NetBackup Self Service works on any virtual platform, such as Hyper-V or
vSphere, provided one of the supported operating systems is installed.
The lists that are shown define the supported operating systems, SQL servers, and
web browsers. The latest service pack should always be used.
Note: Any version of operating system, SQL server, and web browser that is not
listed as Supported is considered unsupported.
Supported operating systems:Software requirements 33
NetBackup software requirements for Self Service
■ Windows Server 2012 R2
■ Windows Server 2016
■ Windows Server 2019
Supported SQL server:
■ SQL Server 2014
■ SQL Server 2016
■ SQL Server 2017
■ SQL Server 2019
■ Azure SQL database
■ SQL Server on Amazon RDS
Supported browsers:
■ Internet Explorer 11
■ Edge
■ Firefox
■ Chrome
■ Safari (supported, but not recommended)Appendix B
Troubleshooting
This appendix includes the following topics:
■ About PowerShell execution policy
■ Recovering a lost application key
About PowerShell execution policy
The PowerShell execution policy determines if PowerShell can run scripts. The
installer sets the execution policy to Remote Signed which allows scripts to run.
Problems are encountered if this step of the installer fails or the execution policy is
changed after install. This appendix describes diagnosing and solving execution
policy issues.
Diagnosis
■ Log on to the website
■ Click the Location tab.
■ Click the Check Connectivity iconTroubleshooting 35
About PowerShell execution policy
Figure B-1 Check connectivity
If you receive the error message shown, there may be an execution policy issue.
If Check Connectivity does not generate an error, the execution policy is set
correctly.
Figure B-2 Import failed pop-up box
To confirm there is an execution policy issue, navigate to the error log. Select Admin
> Support > Error Log and examine the errors. An example of an execution policy
issue is shown.
"CreateRequest failed with error:
File C:\Temp\NetBackupAdapter\NetBackupAdapterServices\PowerShellScripts\
ValidationHook\Initial.p s1 cannot be loaded because running scripts is
disabled on this system. For more information, see about_Execution_Policies
at http://go.microsoft.com/fwlink/?LinkID=135170. File C:\Temp
\NetBackupAdapter\NetBackupAdapterServices\PowerShellScripts\ValidationHook\
Initial.p s1 cannot be loaded because running scripts is disabled on this
system. For more information, see about_Execution_Policies at
http://go.microsoft.com/fwlink/?LinkID=135170."Troubleshooting 36
Recovering a lost application key
Solution
1 Log on to the web server
2 Open a PowerShell command prompt as administrator.
3 Type: Get-ExecutionPolicy –List
The list of the current execution policies is shown
4 If the Local Machine Scope is not set to Remote Signed, type the command:
Set-ExecutionPolicy -Scope LocalMachine -ExecutionPolicy
RemoteSigned
Execution policy scope treats items higher up the list as higher priority, overriding
those lower in the list. If the scope MachinePolicy is set to Restricted, then even
though LocalMachine is set to RemoteSigned you are still unable to run scripts.
This Stack Overflow post describes how to solve such problems.
http://stackoverflow.com/a/27755459
Recovering a lost application key
The application key is critical to the correct operation of the system. If the application
key is lost it is not possible to recover the third party passwords. Logging on is
unaffected but passwords for adapters and integration settings must be re-entered.
In practice, there are two ways the application key can be lost:
■ The web server fails
■ The website is uninstalled
To mitigate the first issue, a backup of the web server should be kept.
An example of the second issue is the need to move the web server to a different
physical computer. The application key should be copied from the configuration file
on the old server and the new website should be installed using the application key.
Test that the new server works correctly and verify that there is a valid backup of
the server. Once the installation is complete, uninstall the website from the old
server.
The application key, as well as the database connections strings, are stored in an
encrypted section of the configuration files for the components. Two scripts are
available to decrypt and encrypt the configuration files:
■ install_location\MsBuild\ConfigEncrypt.bat
■ install_location\MsBuild\ConfigDecrypt.bat
The files that are encrypted and decrypted are:Troubleshooting 37
Recovering a lost application key
■ install_location\WebSite\web.config
■ install_location\PublicWebService\web.config
■ install_location\ServiceHost\DirectaSvcHost.exe.configAppendix C
Configuring HTTPS
This appendix includes the following topics:
■ About configuring HTTPS
About configuring HTTPS
You can provide additional security by configuring the websites to use secure web
browsing (HTTPS). If secure web browsing is required, it is simpler to configure
after installation.
Self Service is composed of a portal and an adapter, which must talk to each other
over HTTP or HTTPS. When you want to configure HTTPS, these system URLs
must be edited and changed to HTTPS.
The NetBackup Self Service Configurator contains a wizard, which lets you edit
and validate all of the system URLs in a single place.Configuring HTTPS 39
About configuring HTTPS
Table C-1 How to configure an IIS website with HTTPS
Step Action Process
1 Import the SSL 1 In a production system, an SSL certificate must be
certificate into IIS. sourced from a certificate provider such as Verisign.
You must import the certificate into IIS.
2 For a test system, a self-signed certificate can be
created in IIS.
2 Configure the 1 In IIS, navigate to the website where you want to install
website to use Self Service.
secure browsing.
2 Right click and select Edit Bindings.
3 Select Add.
4 Select Type "https", choose the SSL certificate, and
then select OK.
5 Accept the confirmation.
3 Edit the NSS 1 In Windows Explorer navigate to the NetBackup Self
system URLs. Service Adapter installation location. By default, this
location is C:\Program Files\Biomni\NetBackup
Self Service Adapter x.x
2 Double click
NetBackupSelfServiceAdapterConfigurator.exe
3 Select the Edit URLs in NetBackup Self Service
Adapter option, click Next
4 The next page loads the existing URLs for the system,
click Next
5 The Edit Self Service URLs page lets you edit the four
URLs in the system. Change the URL scheme to
HTTPS, and change the host name to match the host
name that is specified in the SSL certificate. Click Next.
6 The Validate URLs page calls each of the four URLs
and confirms that they connect. If you have difficulty
getting the URLs to validate, the information in the Log
file may help you.
7 If the URLs validate correctly, click Next.
8 Update URLs. The configurator runs and updates the
URLs in Self Service.
9 You should now be able to log on to Self Service using
the new URL, and the system should load cleanly.Appendix D
Load balanced installation
This appendix includes the following topics:
■ About load-balanced installation
About load-balanced installation
A load-balanced installation has a single database server and database, but multiple
instances of the website, web service and Windows service. This configuration
provides load balancing and redundancy.
Figure D-1
You can run the installation on any web server or application server. The installation
process copies all of the required files onto the server. You can select the
components to install or upgrade at the Configurator stage. For example, to configure
an application server that hosts the Windows service, choose to configure only the
Windows service.Load balanced installation 41
About load-balanced installation
When you create a load-balanced installation, all of the components must be installed
with the same application key. On the first installation of the system, generate a
new application key. On subsequent installs, copy the application key, rather than
generate a new key. More information about the application key is available.
See “Recovering a lost application key” on page 36.Appendix E
Customizing image upload
This appendix includes the following topics:
■ About Customizing Image Upload
About Customizing Image Upload
Image upload is configured automatically. The uploaded images are stored in
C:\inetpub\Biomni\Images by default. In a load-balanced installation, all of the
web servers need to share any images that users may upload to the system. You
must configure the uploaded images to reside on a common network storage area.
This section describes how to change the storage location.
To change the storage location
1 Launch Internet Information Services (IIS) Manager.
2 Navigate to the NetBackup Self Service Application.
3 Expand the view, and locate the UploadedImages virtual directory.
4 Right click Manage Virtual Directory and select Advanced Settings.
5 In the physical path text box enter the path to where you want the virtual
directory to exist on disk. This path is where any uploaded images are stored.
The path can either be a path on the local server, such as C:\uploadedimages
or a UNC share, such as \\myshare\uploadedimages.
6 By default the connection to the physical directory is set to be pass-through
authentication. If a UNC Share was chosen then click Physical Path
Credentials > Specific User and enter the credentials.
7 In either scenario the connecting credentials require read and write access to
the physical location.Customizing image upload 43
About Customizing Image Upload
To verify that the image upload works correctly
1 Log on to the website as Admin.
2 Admin > Support > Configuration Check > Base Settings.
3 Click the image icon.
4 The Image Manager should list the UploadedImages folder.
5 Select the UploadedImages folder and click the upload icon.
6 Browse to an image file and upload. If the image is successfully uploaded, it
should appear to the right of the image manager dialog box.Appendix F
Reduced Database
Permissions for Database
Upgrade
This appendix includes the following topics:
■ Reduced Database Permissions for Database Upgrade
Reduced Database Permissions for Database
Upgrade
When you upgrade the database it is necessary to choose a database logon to
perform the database upgrade. The simplest choice is to use a user that has the
‘sysadmin’ role.
If your database administrator (DBA) is unwilling to grant the sysadmin role to you,
you can do a database upgrade with a reduced permission set. This appendix
describes the upgrade process with reduced permissions.
The following SQL script creates a logon UpgradeUser which is suitable for
upgrading the database.
To create a reduced permissions user for upgrade
1 Run this script in SQL Management Studio, to create a logon and user suitable
for upgrading the database
2 When you run the configurator and select the database to upgrade, choose:
■ Authentication Mode: Sql
■ DB User: UpgradeUserReduced Database Permissions for Database Upgrade 45
Reduced Database Permissions for Database Upgrade
■ DB Password: password
3 Once install is complete you can disable or delete the UpgradeUser, since it
is only used during the upgrade process.
-- Create a login for upgrading the database
use master
Create Login UpgradeUser WITH PASSWORD = 'password', Check_Policy = OFF
GO
-- Make a database user for the login
-- and give them db_owner role on the target database
USE NetBackupSelfService
CREATE USER UpgradeUser FOR LOGIN UpgradeUser
GO
ALTER ROLE db_owner ADD MEMBER UpgradeUser
GO
-- Allow ownership of database to be transferred to sa.
-- The sa login can be disabled as per good dba practice,
-- and everything will still work ok.
use master
GRANT IMPERSONATE ON LOGIN::sa to UpgradeUserYou can also read