DUNDALK LEISURECRAFT PANORAMIC BARREL SAUNA ASSEMBLY INSTRUCTIONS
←
→
Page content transcription
If your browser does not render page correctly, please read the page content below
Ver. 3.1

      Dundalk LeisureCraft Panoramic Barrel Sauna
                 Assembly Instructions
             Please read and understand the complete instructions prior to assembly and use of your sauna. Customer agrees not to hold
           Dundalk LeisureCraft Inc. and any of its authorized dealers liable for improper installation, maintenance and repair of this product

                                                                                                Requirements:
                                                                                        2 People (recommended)
                                                                                         * Carpenter’s Hammer
                                                                                              * Step Ladder
                                                                                    * Cordless Drill (we supply the bit)
                                                                                             * Tape Measure
                                                                                            Carpenter’s Level
                                                                                             * Rubber Mallet

                           View the assembly process on
             ph: 519-923-9813 | info@dundalkleisurecraft.com| web: www.dundalkleisurecraft.com
Dundalk LeisureCraft Panoramic Barrel Sauna
           Assembly Instructions

                                   Index
                 Sauna Base Preparation (Standard) – Page 3

              Sauna Barrel Assembly (Standard) – Page 4 to 12

          Standard Bench Installation (Standard) – Page 13 to 17

           Signature Bench Installation (Option) – Page 18 to 25

             Lounge Bench Installation (Option) – Page 26 to 29

            Cedar Bevel Roof Installation (Option) Page 30 to 32

            Electric Heater Installation (Option) – Page 33 to 35

         Harvia Wood Heater Installation (Option) – Page 36 to 42

                     Sauna Vent Kit (Option) – Page 43,44

                      Sauna Light (Option) – Page 45,46

                    Cove Assembly (Option) – Page 47,48

            Completion/Maintenance/Warranty – Page 49 to 51

  ph: 519-923-9813 | info@dundalkleisurecraft.com| web: www.dundalkleisurecraft.com
Dundalk LeisureCraft
                                     Panoramic Barrel Sauna
                                      Assembly Instructions
                        Sauna Base Preparation
   A solid base for your sauna is recommended and can be made from any of the following.

                                                                                                                          Sauna Base Preperation
                     Concrete Pad                                                    Wooden Deck

                    Crushed Gravel                                          Patio Stones/Paver Blocks
                           (Refer to the below chart for minimum base requirements)

                        It is recommended to build a base larger than required to provide
                               a sitting area for cooling off during your sauna session.
 Sauna Size    76”x6' (193x182) 76'x7' (193x214) 76'x8' (193x244) 7'x6' (214x182)     7'x7' (214x214)   7'x8' (214x244)

Minimum Base      48"x60"          48"x72"          48"x84"           60"x60"            60"x72"           60"x84"
    Size        (120x150cm)      (120x183cm)      (120x213cm)       (150x150cm)        (150x183cm)       (150x213cm)

  Options
   Porch                                          Add 24" (60cm) to total length.
Changeroom                                        Add 48" (120cm) to total length.

                              * All measurements in above chart are “width x lengths”
                                                                                                                                   3
       ph: 519-923-9813 | info@dundalkleisurecraft.com| web: www.dundalkleisurecraft.com
Dundalk LeisureCraft
                  Panoramic Barrel Sauna Assembly Instructions

                                                                                                                    Panoramic Barrel Sauna Assembly (Standard)
           *Please note that the number of Barrel Cradles supplied depends on the overall length of the sauna.

  *Saunas with overall lengths greater than 10’ (305cm) have 3 cradles while saunas less than 10’ (305cm) have 2.

                                                          Make sure the placement for your sauna is level with a
                                                                  slight slope to the back for drainage.

                                                                       Start by laying out the cradles.

                                                               Lay the first bottom stave in the center of the
                                                                                   cradles.

                                                           This stave will have convex edges on both sides as in
                                                                                  inset.1.
Inset. 1
                                                            Mark the centre of the cradles horizontally. Fig. 2a

                                           Fig 2a

                                                          Measure 5” (13cm) from each end of the stave to the
                                                                       cradles, as shown. Fig. 2b
                                           Fig 2b

                                                            Secure stave into cradle using 2 ½” (64mm) screws.

                                                                        Repeat for remaining cradles.

                                                         *Always ensure that you have the correct screw length
                                                            so that there will be enough thread to hold, and
                                                            especially so that the screw won’t go all the way
                                                           through the material and come out the other side.

     ph: 519-923-9813 | info@dundalkleisurecraft.com| web: www.dundalkleisurecraft.com                                               4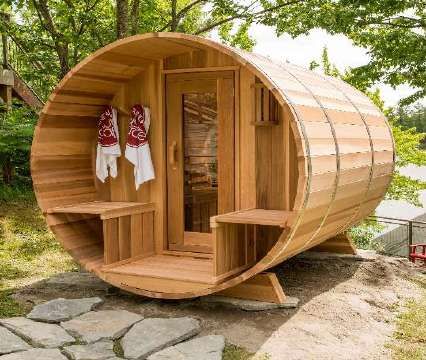
Dundalk LeisureCraft
         Panoramic Barrel Sauna Assembly Instructions

                                                                                                     Panoramic Barrel Sauna Assembly (Standard)
                                        Start laying down the wall staves. Keep the dado grooves
                                           in line with the correctly positioned bottom stave.

                                         Make sure there are no gaps between the edges of the
                                        staves, and that the groove line for the dome is lined up
                                                                perfect.

                                         Attach the stave supports using 2 ½” (64mm) screws
                                        making sure they are flush with the curve of the cradle.

                                            *These supports are temporary to assist in the
                                         installation of the acrylic dome and will be removed
                                                     later in the assembly process .

                                        Place the door section into the dado groove in the staves.

                                         Make sure the door is centered with the middle stave.

                                         Using 2 people, gently place the acrylic dome into the
                                                   groove at the back of the sauna.

ph: 519-923-9813 | info@dundalkleisurecraft.com| web: www.dundalkleisurecraft.com                                     5
Dundalk LeisureCraft
              Panoramic Barrel Sauna Assembly Instructions

                                                                                                          Panoramic Barrel Sauna Assembly (Standard)
                                             Use the top special stave to go from the front wall to the
                                                        dome to help stabilize the sauna.

                                                  *The top special stave has 2 concaved edges
                                                                    (inset 2.)

Inset. 2

                                             Using your carpenters level and rubber mallet, level up
                                                                the front wall.

                                                         Install the front side wall panels.

                                             Screw each side panel into place at the top and bottom
                                                           with 2 ½” (64mm) screws.

                                              Start adding staves from the bottom up gently tapping
                                             them with the rubber mallet to finesse them into place.

     ph: 519-923-9813 | info@dundalkleisurecraft.com| web: www.dundalkleisurecraft.com                                     6
Dundalk LeisureCraft
         Panoramic Barrel Sauna Assembly Instructions

                                                                                                     Panoramic Barrel Sauna Assembly (Standard)
                                        Secure every 2nd stave on the bottom of the sauna with
                                                   the provided nails. (if required)

                                          Continue installing the staves from the bottom up
                                          installing a few staves at a time, alternating sides.

                                        When installing staves, tap tightly together while leaving
                                         as much of a gap as possible between stave and wall
                                             using the pencil line as a guide as in picture.

                                          *This will make the tightening of the bands easier.

                                        When you reach the top, you will find that the last wall
                                         stave doesn't look like it fits properly, this is normal.

ph: 519-923-9813 | info@dundalkleisurecraft.com| web: www.dundalkleisurecraft.com                                     7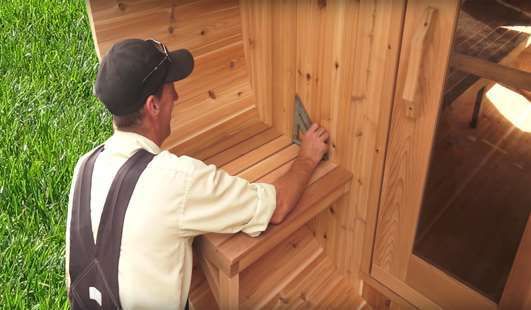
Dundalk LeisureCraft
         Panoramic Barrel Sauna Assembly Instructions

                                                                                                     Panoramic Barrel Sauna Assembly (Standard)
                                         Assemble the steel bands by sliding the rod with a nut
                                          on one end through the other end and secure with a
                                                             second nut.

                                        Slide the band over the front of the sauna about 2” (5cm)
                                                       from the edge of the stave.

                                         Repeat the process for the back of the sauna ensuring
                                        the band is 3” (8cm) from the end of the stave so it is in
                                                the same location as the dome groove.

                                         Slide the front wall band around the sauna using the
                                               nails as a guide to where the front wall is.

                                            Measure all around the sauna to ensure the
                                         measurement of the band is consistent with the front
                                                           wall location.

                                          *If a porch and/or changeroom option is chosen, a
                                         band should be positioned over top of each of those
                                                              walls also.

ph: 519-923-9813 | info@dundalkleisurecraft.com| web: www.dundalkleisurecraft.com                                     8
Dundalk LeisureCraft
         Panoramic Barrel Sauna Assembly Instructions

                                                                                                      Panoramic Barrel Sauna Assembly (Standard)
                                        The final band should be centered between the sauna
                                                                walls.
                                         Snug up all bands with a cordless drill or ¾” (19mm)
                                                               wrench.

                                        Use the rubber mallet to tap the staves as needed to get
                                        the last wall stave and top stave to sit properly together.

                                        Tap up (from the inside of the sauna so you don’t break
                                       the ends) or down, by hammering on the band to attain a
                                                         uniform circle shape.

                                        Once this is achieved and the “peak” at the top is gone,
                                                    you can start adjusting the band.

                                                  Tighten all bands as tight as possible.

                                           * Don’t be worried about making them too tight,
                                                       you cannot overtighten!

                                        Remove the plywood wall supports from the back of the
                                                             sauna.

                                        Carefully remove the protective plastic from the acrylic
                                                               dome.

ph: 519-923-9813 | info@dundalkleisurecraft.com| web: www.dundalkleisurecraft.com                                      9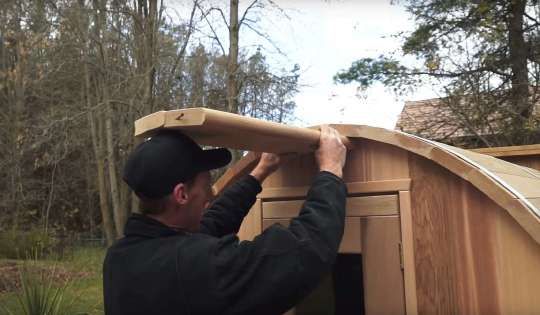
Adding a Spacer
                                                  to the
                                             Top Sauna Stave

  In your sauna package you will find a spacer stave that is square on both sides that is only required If there
                    happens to be a “gap” after installing all of the staves, (as in picture)

         You will need to follow the following instructions to add this spacer to the top special stave.

                                                                                                                   Adding Spacer to Top Stave
    Locate the Top Stave with the 2 concave sides          Insert square spacer in between the two stave halves.
     and remove all the screws out of the stave.

Screw all pieces back together with 3” (76mm) screws        Reinstall the now wider Top Stave following the
                                                                      sauna assembly instructions.

                                                                                                                           10
       ph: 519-923-9813 | info@dundalkleisurecraft.com| web: www.dundalkleisurecraft.com
Making the Top Sauna Stave
narrower
In rare instances, your sauna staves will be too tight not allowing the staves to settle into position correctly.
(as in picture)
This doesn’t happen often and the sauna staves and bands are always better being as tight as possible.
Making Top Stave narrower
You will need to follow the following instructions to make the top special stave narrower.
Locate the top special stave and remove all the screws. Measure from flat edge 3/4 “ (2cm) on each stave and
safely cut to make staves thinner.
¾” ¾”
(2cm) (2cm)
A circular saw or table saw is best for cutting the staves.
Follow all of your saws safety precautions when cutting staves.
Screw the 2 pieces back together with 2” (64mm) screws Reinstall the now narrower Top Stave following the
sauna assembly instructions.
11
ph: 519-923-9813 | info@dundalkleisurecraft.com| web: www.dundalkleisurecraft.comDundalk LeisureCraft
Panoramic Barrel Sauna Assembly Instructions
Panoramic Barrel Sauna Assembly (Standard)
Install towel hanger at desired height on outer wall using
1 1/2” (38mm) screws.
Center outer the door handle (small) on outside of the
door and secure with 2” (51mm) screws using the
pre-drilled holes.
*Magnets are very strong and may require some force
to pull the door open the first time.
Repeat this process for the inside handle installing it at
desired height centered horizontally on door.
* If the Changeroom option is ordered, install the
inside and outside handles in the same manner.
* The main structure of your Panoramic Cedar Barrel Sauna is complete.
* Please refer to each of the remaining sections to install the various upgrades and options chosen.
Benches
*Standard
*Signature
*Lounge
Heater
Saaku Electric
Harvia M3 Wood Burning
ph: 519-923-9813 | info@dundalkleisurecraft.com| web: www.dundalkleisurecraft.com 12Dundalk LeisureCraft
Panoramic Barrel Sauna Assembly Instructions
Standard Bench Installation (Standard)
The flat floor (If Purchased) Is shipped semi assembled.
You will need to add the bottom support onto the floor before assembling the benches.
* Note that the middle support is only included in 7’ diameter Saunas*
A
B
Locate the flat floor (A) and bottom support (B). Flip over flat floor, measure the center and place the
bottom support in the center.
Secure the bottom support to the bottom of the flat Flip the flat floor back over and it is ready to be
floor using 2 ½” (6mm) screws in the pre drilled holes. installed inside the sauna.
Start the assembly of your standard benches by Ensure the flat floor is centered in sauna and that it
installing the flat floor. is level, you can use the door frame to confirm it is
(If Purchased) level.
13
ph: 519-923-9813 | info@dundalkleisurecraft.com| web: www.dundalkleisurecraft.comDundalk LeisureCraft
Panoramic Barrel Sauna Assembly Instructions
Standard Bench Installation (Standard)
Install the Dome bench bracket ½” (13mm)from the Using the pre drilled holes in the bracket, screw the
dome groove in the staves making sure the top of the dome bench bracket to the sauna on the top and
bench bracket is level. bottom with 2” (51mm) screws.
If the sauna floor is purchased, the Front of the dome
bench bracket should sit tight to the side of the flat
floor.
Repeat on opposite side of sauna. * For Electric Heater option skip to next step!
You can use a level to ensure both brackets are at same If you purchased a Harvia M3 wood heater or full
height. length benches on both sides with your Panoramic
Barrel Sauna install the bench brackets on the front
wall on either side in the same manner as the dome
bench brackets.
14
ph: 519-923-9813 | info@dundalkleisurecraft.com| web: www.dundalkleisurecraft.comDundalk LeisureCraft
Panoramic Barrel Sauna Assembly Instructions
Standard Bench Installation (Standard)
If you purchased an electric heater with your To install the short bench bracket, first measure the
Panoramic Barrel Sauna Install the bench bracket on short sauna bench and then measure the same
the front wall opposite the side of where the electric distance from the outside of the dome bench bracket
heater will be mounted. to position the front bracket.
Place the curved dome bench on the dome Place the side benches on the side bench brackets.
bench brackets.
Do not Fasten yet! Do not Fasten yet!
15
ph: 519-923-9813 | info@dundalkleisurecraft.com| web: www.dundalkleisurecraft.comDundalk LeisureCraft
Panoramic Barrel Sauna Assembly Instructions
Standard Bench Installation (Standard)
Match up the dome bench with the 2 side benches and Screw the side benches down from the top into the
screw from the bottom of the dome bench brackets support braces.
into the dome bench using 2 ½” (64mm) screws.
Ensure to screw in between the bench seat slats so
* The Bench should not be rubbing on the that the screws are not visible.
Panoramic dome at all.
Do this at the front and back braces. Install 2 of the remaining 4 smaller bench supports
under the side bench.
Repeat on other side bench
Place them under the horizontal bench support slats
and screw the front leg in to the floor with a 2 ½”
(64mm) screw.
Fasten the top bench down by screwing between the
bench seat slats using 1 ½” (38mm) screws to make the
screws less visible.
Repeat for opposite side bench. 16
ph: 519-923-9813 | info@dundalkleisurecraft.com| web: www.dundalkleisurecraft.comDundalk LeisureCraft
Panoramic Barrel Sauna Assembly Instructions
Standard Bench Installation (Standard)
To install the standard porch seats, screw the legs
into the end of the seats with 2 ½ ” (64mm) screws.
Attach brace from the seat to the leg with a 2 ½ ”
(64mm) screw.
Use a level or carpenters square to make sure the porch seat is level.
Secure the porch seat to the front wall from underneath using (3) - 2 ½” (64mm) screws.
Screw the front of the porch seat into the wall Secure the leg to the floor using a 2 ½” (64mm) screw.
from the outside using a 2 ½” (64mm) screw.
Repeat for standard porch bench on other side.
Repeat on other porch bench ensuring they are level with each other.
ph: 519-923-9813 | info@dundalkleisurecraft.com| web: www.dundalkleisurecraft.com 17Dundalk LeisureCraft
Panoramic Barrel Sauna Assembly Instructions
Signature Bench Installation (Option)
The flat floor (If Purchased) Is shipped semi assembled.
You will need to add the bottom support onto the floor before assembling the benches.
* Note that the middle support is only included in 7’ diameter Saunas*
A
B
Locate the flat floor (A) and bottom support (B). Flip over flat floor, measure the center and place the
bottom support in the center.
Secure the bottom support to the bottom of the flat Flip the flat floor back over and it is ready to be
floor using 2 ½” (6mm) screws in the pre drilled holes. installed inside the sauna.
Start the assembly of your standard benches by Ensure the flat floor is centered in sauna and that it
installing the flat floor. is level, you can use the door frame to confirm it is
(If Purchased) level.
18
ph: 519-923-9813 | info@dundalkleisurecraft.com| web: www.dundalkleisurecraft.comDundalk LeisureCraft
Panoramic Barrel Sauna Assembly Instructions
Signature Bench Installation (Option)
(Electric Heater Models) * For the Harvia M3 Heater option, or full length
benches on both sides, skip this step!
Position the short bench enclosure ½” (13mm) from the
dome groove on the edge of the floor at the dome end, With the short bench enclosure square to the floor,
use it as a guide to install the angled bench supports
Do not Fasten! to the barrel wall using 2 ½” (64mm) screws.
* Do not fasten the front enclosure yet.
Repeat at other end of bench. With the long bench enclosure square to the floor,
use it as a guide to install the angled bench supports
to the front barrel wall using a 2 ½” (64mm) screw.
The top of the flat end of the bench support and the
top of the front enclosure should be flush.
19
ph: 519-923-9813 | info@dundalkleisurecraft.com| web: www.dundalkleisurecraft.comDundalk LeisureCraft
Panoramic Barrel Sauna Assembly Instructions
Signature Bench Installation (Option)
Screw bench brackets into end walls as well using 3- 2 ½” Remove the front enclosures and gently place the
(64mm) screws in each bracket. bench seats on the 2 x 4 (51mm x 104mm)
brackets. Ensure that seats are all the way back
* Do not fasten the front enclosure yet. against the side of the barrel.
If you purchased a Harvia M3 wood heater or full length
benches on both sides with your Panoramic Barrel Sauna
perform this step for both side benches of your sauna.
Using 2 ½” (64mm) screws, Install the small support Screw up through brackets into the bench seat
brackets ensuring they are flush with the bottom of the using 1 ½” (38mm) screws.
bench seats. (3 screws per bracket)
With a 2 ½” (64mm) screw, fasten the bottom of the
support into the floor.
Make sure seats stay back against the side of barrel.
20
ph: 519-923-9813 | info@dundalkleisurecraft.com| web: www.dundalkleisurecraft.comDundalk LeisureCraft
Panoramic Barrel Sauna Assembly Instructions
Signature Bench Installation (Option)
Slide the front enclosures back into position. Screw the enclosures and the seat benches to the
front wall with 2 ½” (64mm) screws.
Screw between the slats to ensure screws are less
visible
If the Harvia M3 wood heater or full length benches
on both sides were chosen with your Panoramic
Barrel Sauna then you will do this step for both side
benches of your sauna.
If the electric heater option was chosen, screw the Screw the angled bracket into the short bench seat
angled bench support to the short front enclosure using using 2 ½” (64mm) screws in the pre drilled pocket
2 ½” (64mm) screws in the pre drilled holes. holes.
21
ph: 519-923-9813 | info@dundalkleisurecraft.com| web: www.dundalkleisurecraft.comDundalk LeisureCraft
Panoramic Barrel Sauna Assembly Instructions
Signature Bench Installation (Option)
Screw the angled bracket into the front enclosure and Screw the front enclosure and the bench seats
the bench seat, using together on the front tabs with 2 ½” (64mm) screws.
2 ½” (64mm) screws in the pre drilled pocket holes.
* Pre drill these holes first to prevent splitting!
Repeat on other side.
Install the dome bench brackets to the end of both Screw dome bench into dome brackets on either side
benches using 3 - 2 ½” (64mm) screws per bracket. using 3- 2 ½” (64mm) screws per side.
* Note the height so the dome bench is level with the
side bench seats.
22
ph: 519-923-9813 | info@dundalkleisurecraft.com| web: www.dundalkleisurecraft.comDundalk LeisureCraft
Panoramic Barrel Sauna Assembly Instructions
Signature Bench Installation (Option)
Position the angled center dome bench support so that Screw the dome bracket to the dome seat from
the bench is level and brace is also flush with the underneath using 4- 1 ½” (38mm) screws.
bottom of the bench.
Using 2 ½” (64mm) screws, screw the bottom of the
bench support into the floor on the front and in either
side using the pre drilled pocket holes.
To install the signature back rest, position on wall at
desired height and fasten with 2 ½” (64mm) screws.
* Place screws under the top board in the vertical
uprights to keep them less visible.
23
ph: 519-923-9813 | info@dundalkleisurecraft.com| web: www.dundalkleisurecraft.comDundalk LeisureCraft
Panoramic Barrel Sauna Assembly Instructions
Signature Bench Installation (Option)
To install the porch signature bench, first position the
floor making sure it is level.
Secure the sauna floor to the sauna staves with 2 ½” (64mm)
screws.
* Screwing between the floor boards will make the screws less
visible.
On a clean flat surface, assemble the porch bench and
front wall enclosure using 2 ½” (64mm) screws into
the pre drilled pocket holes.
ph: 519-923-9813 | info@dundalkleisurecraft.com| web: www.dundalkleisurecraft.com 24Dundalk LeisureCraft
Panoramic Barrel Sauna Assembly Instructions
Signature Bench Installation (Option)
Position the assembled bench on the porch floor and up against the front
wall of the barrel Sauna.
Using a level, make sure the bench is level and square to the porch floor.
Fasten the assembled porch bench to the front wall using 2 ½” (64mm) screws.
(5pcs- 3 on the seat and 2 on the front wall enclosure)
Screw the front of the porch seat into the sauna wall from the outside
using a 2 ½” (64mm) screw.
Repeat for signature porch bench on other side.
Congratulations on the assembly of your
Dundalk Leisurecraft
Signature Bench!
25
ph: 519-923-9813 | info@dundalkleisurecraft.com| web: www.dundalkleisurecraft.comDundalk LeisureCraft
Panoramic Barrel Sauna Assembly Instructions
The flat floor (If Purchased) Is shipped semi assembled.
Lounge Bench Installation (Option)
You will need to add the bottom support onto the floor before assembling the benches.
* Note that the middle support is only included in 7’ diameter Saunas*
A
B
Locate the flat floor (A) and bottom support (B). Flip over flat floor, measure the center and place the
bottom support in the center.
Secure the bottom support to the bottom of the flat Flip the flat floor back over and it is ready to be
floor using 2 ½” (6mm) screws in the pre drilled holes. installed inside the sauna.
Start the assembly of your standard benches by
installing the flat floor.
(If Purchased)
26
ph: 519-923-9813 | info@dundalkleisurecraft.com| web: www.dundalkleisurecraft.comDundalk LeisureCraft
Panoramic Barrel Sauna Assembly Instructions
Lounge Bench Installation (Option)
Ensure the flat floor is centered in sauna and that it is
level, you can use the door frame to confirm it is level.
Using the pre drilled holes, assemble the lounge bench
support to the longer front lower bench wall using 2”
(51mm) screws.
Position assembly in place and secure to sauna walls and
floor using 5- 2 ½” (64mm) screws on the top and
bottom rails.
*Be careful not to screw into any stave joints.
Place lounge bench on top of bench support.
27
ph: 519-923-9813 | info@dundalkleisurecraft.com| web: www.dundalkleisurecraft.comDundalk LeisureCraft
Panoramic Barrel Sauna Assembly Instructions
Lounge Bench Installation (Option)
Ensure bench is flush with bench support and secure
with 2 ½” (64mm) screws in pre drilled holes.
* If sauna is purchased with wood burning heater,
repeat process for opposite bench.
* If electric heater is chosen, continue onto next step.
Assemble bench support to the short front lower bench
wall in the same manner as in opposite bench.
Secure to floor and walls ensuring bench is level.
Ensure bench is flush and secure with 2 ½” (64mm)
screws between the seat boards so the screws are less
visible.
Install backrest with 2” (51mm) screws at desired height
making sure that the lounge bench can still operate
correctly.
Repeat for other side.
28
ph: 519-923-9813 | info@dundalkleisurecraft.com| web: www.dundalkleisurecraft.comDundalk LeisureCraft
Panoramic Barrel Sauna Assembly Instructions
Lounge Bench Installation (Option)
If the porch option is selected, start by installing the
floor ensuring it is level.
Secure with 2” (51mm) screws between the floor
boards into the barrel wall.
Assemble the 2 pieces for the porch seat together using
2 ½” (64mm) screws.
.
Fasten bench to floor and sauna wall using 3 - 2 ½”
(64mm) screws on the top and bottom.
Repeat process for other bench.
Congratulations on the assembly of your
Dundalk Leisurecraft
Lounge Bench!
.
29
ph: 519-923-9813 | info@dundalkleisurecraft.com| web: www.dundalkleisurecraft.comDundalk LeisureCraft
Cedar Barrel Sauna Assembly Instructions
Unroll the EPDM membrane over the top of the
sauna.
Even out the membrane over the sides of the
sauna.
Bevel Roof Assembly
Starting at one end of the sauna, pull the
membrane tight and secure to the edge of the
staves with staples.
Using a utility knife, cut off the excess rubber
flush to the edge of the staves.
.
Pull the membrane tight at the other end of the
sauna and follow the same steps of stapling
then cutting the excess off.
Center one of the trim pieces at the top of the
sauna flush with the bottom edge of the staves.
Fasten the trim piece using a 2” (51mm) screw.
Only use 1 screw per piece at this time.
.
30
ph: 519-923-9813 | info@dundalkleisurecraft.com| web: www.dundalkleisurecraft.comDundalk LeisureCraft
Cedar Barrel Sauna Assembly Instructions
Add the next piece of trim flush to the first
piece and secure with a 2” (51mm) screw.
Continue attaching the remaining trim pieces
following the same process as the previous step.
Bevel Roof Assembly
Once all of the trim is on and fits nicely, add 2
more screws to each piece of trim.
.
Repeat the same process for the other end of
the sauna.
Cut off any excess membrane sticking out past
the trim using your utility knife.
Line up your first piece of bevel siding with the
wide end flush with the edge of the middle
stave.
Fasten the bevel siding to the sauna using a
staple gun with 1 ¼” (32mm) crown staples.
When stapling, Be careful not to hit the
aluminum bands.
31
ph: 519-923-9813 | info@dundalkleisurecraft.com| web: www.dundalkleisurecraft.comDundalk LeisureCraft
Cedar Barrel Sauna Assembly Instructions
Use the provided spacing blocks as shown to get
the correct placement of the next piece of bevel
siding.
Fasten the siding in the same manner as the
previous step.
Bevel Roof Assembly
Continue adding the bevel siding using the
spacer block working your way up the sauna.
Use as many staples as possible to secure the
siding to the sauna.
.
When you have installed the bevel siding up to
the top, start installing the other side following
the same process.
Fasten the remaining pieces of bevel siding in
the same manner alternating sides until the
siding overlaps at the top.
Use one last piece of the bevel siding to overlap
the 2 sides.
Staple both sides of this piece to secure firmly.
.
32
ph: 519-923-9813 | info@dundalkleisurecraft.com| web: www.dundalkleisurecraft.comDundalk LeisureCraft
Panoramic Barrel Sauna Assembly Instructions
The following installation instructions are for the Helo Cup (Saaku) electric heater.
Always refer to the original sauna heater manual for confirmation.
Electric Heater Installation (Option)
Read all instructions carefully.
Measure the proper distances for the heater template according to the heater manufacturers instructions.
Using the template provided, drill four 9/64" holes to fasten the heater to the wall.
Install the two longer hex head lag screws (supplied with the heater) into the upper two holes.
Hang the heater on the two upper screws.
Install the two shorter hex head lag screws (supplied with the heater) into the two lower mounting holes.
Ensure the heater is level and then tighten all 4 hex head lag screws to lock the heater in place.
Rinse the rocks with water before placing in the heater.
Carefully place the rocks loosely so that the air can circulate through the heater.
Packing the rocks too tightly may cause the heater high limit switch to trip.
The rocks must fully cover the heating elements.
• Operate the heater for an hour with the sauna door fully open to burn off any residual coating from the
manufacturing process before using.
*The wiring for the electric heater most times enters the sauna underneath the heater as shown above.
* All wiring should be installed according to the heater manufacturers instructions and by a licensed
electrician.
• Do NOT use a G.F.I breaker
33
ph: 519-923-9813 | info@dundalkleisurecraft.com| web: www.dundalkleisurecraft.comDundalk LeisureCraft
Panoramic Barrel Sauna Assembly Instructions
Electric Heater Installation (Option)
Locate the pieces for your heater guard.
C They consist of the following:
(A) Assembled side piece
B (B) 3 - Heater guard support slats
(C) –Wall Support
A
4 – 2 ½” screws
8 – 1 ½” screws
Assemble side piece (A) (highlighted) of the heater
guard to front wall using 2 ½” screws in the pre drilled
holes.
Screw the longest support slat (B) flush to the wall
support (C) using 2 - 2 ½” srews.
B
Ensure the long support slat is flush with the
assembled side piece and secure with 2 – 2 ½” screws.
34
ph: 519-923-9813 | info@dundalkleisurecraft.com| web: www.dundalkleisurecraft.comDundalk LeisureCraft
Panoramic Barrel Sauna Assembly Instructions
Electric Heater Installation (Option)
Secure the wall support to the sauna wall with 2 ½”
(64mm) screws in the predrilled holes at the top and
Bottom.
Screw the middle support slat to the assembled side
with 2- 2 ½” (64mm) screws at each end.
Repeat for the remaining bottom support slat.
35
ph: 519-923-9813 | info@dundalkleisurecraft.com| web: www.dundalkleisurecraft.comDundalk LeisureCraft
Panoramic Barrel Sauna Assembly Instructions
Harvia Wood Heater Installation (Option)
The Panoramic Acrylic Dome cannot be exposed to high temperatures for more than 6 hours at a time.
Maximum Temperatures at the acrylic dome not to exceed 100 degrees Celsius (212 degrees Fahrenheit).
For Safety and warranty purposes, Please respect all minimum distances for the heater installation in saunas
with an acrylic dome as referred to in this assembly manual.
Prior to installation, remove the protective film from the stainless steel pieces.
Install the floor plate centered between the benches at
least 16” (41cm) from the inside groove of the dome.
Using 2 people, place the Harvia M3 Heater centered
between the benches on the floor plate.
* The heater can be positioned a little more to the back
of the floor plate so more of the floor plate is out the
front to help keep debris and ash of the sauna floor.
Connect the extension pipes together on top of the
heater.
This is to find the placement for the hole you will soon
cut out.
36
ph: 519-923-9813 | info@dundalkleisurecraft.com| web: www.dundalkleisurecraft.comDundalk LeisureCraft
Panoramic Barrel Sauna Assembly Instructions
Harvia Wood Heater Installation (Option)
Once the extensions are connected close to the roof of
the sauna, locate the center of the pipe and use a pen or
pencil to mark the roof.
* Once you have your mark, remove the extensions so
they are out of your way when cutting.
In your preferred method, draw a circle ¼” (6mm) larger
than the diameter of the extension pipe.
Start a hole inside your circle with a drill bit or other
method, then use a reciprocating saw to cut out the
circle as neat as possible.
Place a piece of the pipe through the hole to make sure
it fits before moving on to the next steps.
37
ph: 519-923-9813 | info@dundalkleisurecraft.com| web: www.dundalkleisurecraft.comDundalk LeisureCraft
Panoramic Barrel Sauna Assembly Instructions
Harvia Wood Heater Installation (Option)
* If the water tank option was not purchased, continue
on to the next step.
Connect the water tank to the stove adapter on top of
the Harvia M3.
* Spin the water tank until the tap is your desired
location.
* If the water tank option was purchased, continue on
to the next step.
Attach the first extension piece to the stove adapter on
top of the Harvia M3.
Slip the larger stove pie through the hole in the roof and
then connect it to the extension pipe out of the stove.
Locate the 2 inner Flange pieces.
38
ph: 519-923-9813 | info@dundalkleisurecraft.com| web: www.dundalkleisurecraft.comDundalk LeisureCraft
Panoramic Barrel Sauna Assembly Instructions
Harvia Wood Heater Installation (Option)
Get a helper to hold the chimney centered in the hole
while you place the 2 flange pieces around the pipe.
With the pipe centered, secure the flange pieces to the
roof with the provided 1” (25mm) screws in the 2 slotted
grooves.
Locate the rubber outer flange.
Slip it snugly over the chimney pipe as shown.
39
ph: 519-923-9813 | info@dundalkleisurecraft.com| web: www.dundalkleisurecraft.comDundalk LeisureCraft
Panoramic Barrel Sauna Assembly Instructions
Harvia Wood Heater Installation (Option)
Slide the top chimney piece over the bottom chimney
pipe.
Pull the rubber flange over the seam where the 2 pipes
connect.
Place the tightening clamp around the rubber flange
and tighten up with screwdriver.
Using the provided 1” (25mm) stainless steel screws,
secure the rubber flange to the sauna roof spacing the
screws out as evenly as possible.
40
ph: 519-923-9813 | info@dundalkleisurecraft.com| web: www.dundalkleisurecraft.comDundalk LeisureCraft
Panoramic Barrel Sauna Assembly Instructions
Harvia Wood Heater Installation (Option)
Connect the cap to the top of the chimney pipe.
Connect the stove handle to the door with the 2
provided screws.
Using a screwdriver or wrench, remove the cover plate
off the back of the heater.
Insert the plug that was supplied with heater into the
back of pipe.
41
ph: 519-923-9813 | info@dundalkleisurecraft.com| web: www.dundalkleisurecraft.comDundalk LeisureCraft
Panoramic Barrel Sauna Assembly Instructions
Harvia Wood Heater Installation (Option)
Replace the cover plate.
* Rinse the rocks with water before placing in the
heater.
Carefully place the rocks loosely so that the air can
circulate through the heater.
Congratulations on the installation of your Harvia M3 Wood Burning Heater!
42
ph: 519-923-9813 | info@dundalkleisurecraft.com| web: www.dundalkleisurecraft.comDundalk LeisureCraft
Panoramic Barrel Sauna
Vent Kit Assembly Instructions
(Optional)
It is strongly advised to install the vent kit in your Panoramic Barrel Sauna to increase air flow circulation as
well as ventilation when the sauna is not in use.
Vent Kit
Contents
Stainless Steel 3”x 7” Grill (X2)
Cedar Vent Cover
Vent Kit (Option)
1 ½” Stainless Steel screws (X13)
Tools Required
Hole saw or drill bit to drill holes
Cordless Drill
Robertson bit
* If a Change Room is added to the Panoramic Barrel Sauna then a second vent kit will be sent as well.
The Location of the vents in a panoramic sauna will be in the same location whether an electric heater or
wood burning heater was chosen
Inlet Vent on front wall Outlet Vent high up close to dome wall
43
ph: 519-923-9813 | info@dundalkleisurecraft.com| web: www.dundalkleisurecraft.comDundalk LeisureCraft
Panoramic Barrel Sauna
Vent Kit Assembly Instructions
Drill inlet holes centered underneath the heater.
Fig.1
* A 2” diameter hole saw was used for these
pictures but more holes with a smaller drill size
will also work.
Install 1 of the stainless steel vent grills over the
inlet holes on the outside of the sauna centered
over the holes using 1 ½” screws. (6pcs) Fig. 2
Vent Kit (Option)
Fig.1 Fig.2
On the middle stave, close to the dome, drill the
outlet holes in the same manner as the previous
step. Fig.3
(Ensure you are on the inside of the aluminum
band before drilling) Fig.4
Install the other Stainless Vent cover over the
outlet holes on the outside using 1-1/2” stainless
steel screws. (6pcs)
*To prevent water from entering sauna when it
rains, Do not place holes any higher than the
middle stave.
Fig.3 Fig.4
Install the cedar vent cover over the outlet holes
on the inside of the sauna with a 1 ½” screw.
Fig.5
* Tighten screw enough that the vent cover
still rotates smoothly. Fig.6
Fig.5 Fig.6 44
ph: 519-923-9813 | info@dundalkleisurecraft.com| web: www.dundalkleisurecraft.comDundalk LeisureCraft
Sauna Light Assembly Instructions
(Optional)
If a light is ordered, Dundalk Leisurecraft supplies the light fixture only.
The light switch and any other electric components need to be purchased separately and should be installed
according to the light manufacturers instructions and by a licensed electrician.
We cannot supply any other electrical components needed to wire up the light..
Sauna Light (Option)
For outdoor saunas, you can use weatherproof boxes, conduit and light switches.
Weatherproof Light Switch
(purchased separately)
Weatherproof Conduit & Light Switch
If you are installing a light switch on the outside of your sauna, it is recommended to install it outside the door
using the appropriate weatherproof conduit and switches.
45
ph: 519-923-9813 | info@dundalkleisurecraft.com| web: www.dundalkleisurecraft.comDundalk LeisureCraft
Sauna Light Assembly Instructions
(Optional)
Recommended low profile "pancake box" rather than standard octagon
box. This can be surface mounted flush inside of the sauna with light
fixture fitting over the box.
Sauna Light (Option)
.
The best placement for your light would be to the side or above the door on the front wall.
You can also install on the ceiling.
( Do not install light where you may hit your head on it)
Installing the light under one of the benches can create a relaxing ambiance within the sauna that
many customers enjoy.
PRODUCT MAINTENANCE:
1. To clean the outside of the fixture, use a dry or slightly dampened clean cloth (use clean
water, never a solvent) to wipe the surface of the fixture.
2. To clean the inside of the fixture, first disconnect power to the fixture by turning off the
circuit breaker or by removing the fuse at the fuse box. Next, use a dry or slightly dampened
clean cloth (use clean water, never a solvent) to wipe the interior surface of the fixture.
3. Do not use any cleaners with chemicals, solvents or harsh abrasives. Use only a dry soft
cloth to dust or wipe carefully.
46
ph: 519-923-9813 | info@dundalkleisurecraft.com| web: www.dundalkleisurecraft.comDundalk LeisureCraft
Cedar Barrel Sauna Assembly Instructions
Line up the cove pieces starting with the smallest
pieces on the end and working towards the middle
forming a semi circle.
Place 2 ½” screws in the pre-drilled holes to assist in
the assembly of the cove.
Cove Assembly (Option)
Center the 2 middle (longest) pieces under the lip of
the sauna.
Ensure cove pieces are tight to the wall of the sauna.
Secure with 2 ½” screws from the underneath.
Fasten each cove piece to the next through the pre
drilled holes on the front of each piece using a 2 ½”
screw
47
ph: 519-923-9813 | info@dundalkleisurecraft.com| web: www.dundalkleisurecraft.comDundalk LeisureCraft
Cedar Barrel Sauna Assembly Instructions
Continue building the cove from the middle until the
cove is complete.
Cove Assembly (Option)
When installed, the cove should be centered and tight
together and to the wall of the sauna.
Enjoy your new sauna cove!
48
ph: 519-923-9813 | info@dundalkleisurecraft.com| web: www.dundalkleisurecraft.comCongratulations on the assembly of your new
Western Red Cedar
Panoramic Barrel Sauna!
For assistance in the assembly of your Barrel sauna please visit our support page at:
Completion/Maintenance/Warranty
https://www.dundalkleisurecraft.com/support/
Or to view the assembly process got to:
https://www.youtube.com/watch?v=0k40eB2dY5k
49
ph: 519-923-9813 | info@dundalkleisurecraft.com| web: www.dundalkleisurecraft.comMAINTAINING YOUR SAUNA AFTER INSTALLATION
Interior
It is recommended to vacuum or sweep out the inside of your sauna frequently to remove dirt and other debris.
Under normal conditions, a slight wash of the floor and benches with warm soapy water several times a year
will maintain its cleanliness. You can use a sheet of fine grit sandpaper or a low pressure wash to remove more
stubborn stains or for a deeper cleaning of the interior of your sauna.
Never use ammonia or harsh cleaners as they can turn the wood gray.
Exterior
Depending on the humidity and weather conditions in your area, the cedar will either shrink or expand based on
the amount of moisture absorption. The desired effect is to have the cedar expand into the bands therefore
making the sauna staves much tighter.
Over time the lumber will weather naturally as a result of sun and rain, it will change into a weathered grey
colour. This natural weathering will not harm the wood or impair the sauna’s performance.
If you wish to retain the natural color of your Dundalk Leisurecraft Sauna, there are many cedar stains on the
market and almost as many opinions as to which is best.
We encourage you to rely on your own research and referrals.
Recommended Stains Include:
Behr Premium Semi-Transparent Waterproofing Stain & Sealer
Sikkens Proluxe Cetol SRD Translucent Stain
https://www.realcedar.com/outdoor/finishing-choices/
Note: never treat the interior of the Sauna, and never apply paint or varnish to the exterior.
You may need to tighten the bands after a period of time, usually within the first few months.
(Barrel Saunas Only)
Water Seepage
Some minor water seeping into the sauna is expected and normal for an outdoor sauna.
If your sauna is properly installed, you should not have water dripping in but you should
expect some water seepage, especially on the top and sides of the sauna.
This is due to the porous characteristics of the wood and to the ball-and-socket profile
design of the staves.
Water Seepage will not harm the sauna. The moisture will evaporate once you turn on
the heater and the sauna heats up.
If the water marks are bothersome, they can be easily removed with a light sanding
(80 or 100 grit) Normal Water seepage
To minimize seepage, select a location for your sauna that is under cover, or choose one
of our roofing options.
50
ph: 519-923-9813 | info@dundalkleisurecraft.com| web: www.dundalkleisurecraft.comHOW TO TAKE A SAUNA
1. Pre-heat your sauna to the desired temperature (usually between 80-100°C)
2. While it’s warming up, take a nice hot shower.
3. Enter the pre-heated sauna, relax and allow your body to perspire in the soft dry heat. Do not throw water on
the rocks during the first part of the session.
4. Cool off with a cold shower or a quick swim in a lake or pool.
5. Re-enter the sauna and sprinkle water on the rocks. This will increase humidity to assist in perspiration. Half a
cup every 5 minutes should be enough. Too much water will just cool off the rocks and you’ll get less steam.
6. After a 20-30 minute sauna, cool off in the shower or lake or pool.
7. Repeat this sauna/cold shower process as often as desired.
8. After each use, leave the door fully open for a few hours if possible so the wood can dry out.
Warranty
These are guidelines only. Enjoy your sauna in whichever way you desire.
Children must be supervised by an adult.
WARRANTY
Dundalk LeisureCraft Inc. warrants our saunas against defects in materials and workmanship under
normal/residential use for a period of five (5) years, as applicable, from the date of receipt of the product by the
original end-user consumer. This warranty does not apply to normal wear and tear and/or natural weather
conditions. This warranty does not cover regular required maintenance of the sauna, (eg. Tightening bands on
the barrels, cleaning or staining the sauna) refer to your sauna assembly manual for maintenance guidelines.
This warranty does not cover misuse or negligence and the manufacturer and associated retailers are not liable
for any injury or damage caused by the product. This warranty is a parts only warranty and any service or labor
costs would not be considered as part of the 5 year warranty.
Purchaser Name: ________________________ Date: _______________
Purchased From: ________________________
51
ph: 519-923-9813 | info@dundalkleisurecraft.com| web: www.dundalkleisurecraft.comYou can also read