STEP BY STEP EXCHANGE 2019 INSTALLATION GUIDE - RIAZ JAVED BUTT MS EXPERT TALK | WWW.MSEXPERTTALK.COM TWITTER: @RIAZJAVEDBUTT - TECHNET GALLERY
←
→
Page content transcription
If your browser does not render page correctly, please read the page content below
STEP BY STEP EXCHANGE 2019
     INSTALLATION GUIDE

             Riaz Javed Butt
 MS EXPERT TALK | www.msexperttalk.com
         Twitter: @RiazJavedButt
Facebook: https://web.facebook.com/msexperttalk
   LinkedIn: https://pk.linkedin.com/in/riazbutt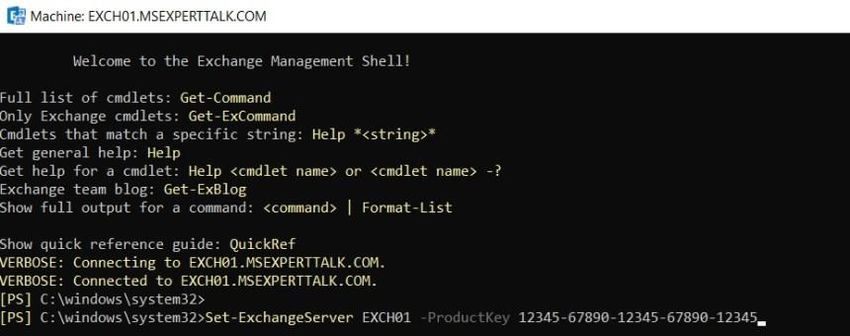
Author: Riaz Javed Butt
Blog: www.msexperttalk.com

Table of Contents
Exchange Server 2019 Installation Step by Step ........................................................................................... 3
   Exchange 2019 compatibility Requirements ............................................................................................ 3
   Exchange 2019 Pre-requisites ................................................................................................................... 4
      .Net Framework Installation ................................................................................................................. 5
      Install Visual C++ Redistributable Packages for Visual Studio 2013 ..................................................... 5
      Microsoft Unified Communications Managed API 4.0 ......................................................................... 6
      Windows Server 2019 prerequisites for Exchange Server 2019 ........................................................... 9
      Check Windows Updates .................................................................................................................... 10
Exchange Server 2019 Installation .............................................................................................................. 10
   Step 1: Extend the Active Directory schema........................................................................................... 10
   Step 2: Prepare Active Directory............................................................................................................. 11
   Step 3: Prepare Active Directory Domains ............................................................................................. 12
      Step 3.1: Prepare all domains in the Active Directory forest.............................................................. 12
      Step 3.2: Choose the Active Directory domains to prepare ............................................................... 13
   Exchange Active Directory versions ........................................................................................................ 13
   Exchange Server 2019 Installation .......................................................................................................... 14
Verify Exchange Server 2019 Installation ................................................................................................... 25
   Get-ExchangeServer Cmdlet ................................................................................................................... 25
   Exchange Setup Logs ............................................................................................................................... 26
Exchange 2019 Post Installation Steps........................................................................................................ 27
   Rename Exchange Database ................................................................................................................... 27
      Option 1 - Rename Exchange 2019 Database from GUI ..................................................................... 28
      Option 2 - Rename the database by using Exchange Management Shell .......................................... 30
   Activate Exchange Server 2019 ............................................................................................................... 30
      Option 1 – Enter the Product key using GUI ....................................................................................... 31
      Option 2 – Enter the Product key using Exchange Management Shell .............................................. 33
   Configure mail flow and client access on Exchange servers ................................................................... 34
      Create an internet Send connector..................................................................................................... 34
   Configure Exchange Server 2019 Virtual Directories .............................................................................. 40
      Configure Outlook on the Web Virtual Directory ............................................................................... 40
      Configure ECP Virtual Directory .......................................................................................................... 40
      Configure Outlook Anywhere ............................................................................................................. 41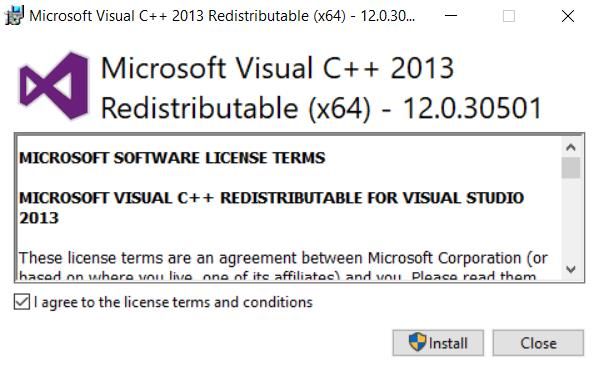
Author: Riaz Javed Butt
Blog: www.msexperttalk.com

     Configure ActiveSync Virtual Directory ............................................................................................... 41
     Configure Exchange Web Services Virtual Directory .......................................................................... 41
     Configure OAB Virtual Directory ......................................................................................................... 42
     Configure AutoDiscover Virtual Directory .......................................................................................... 42
     Configure MAPI Virtual Directory ....................................................................................................... 43
  Configure Default Email Address Policy .................................................................................................. 43
  Configure Exchange Server 2019 Certificate .......................................................................................... 46
     Certificate Requirements for Exchange services ................................................................................ 46
     Best practices for Exchange certificates ............................................................................................. 47
     Create SSL Certificate Request for Exchange Server........................................................................... 48
     Complete SSL Certificate Request for Exchange Server...................................................................... 53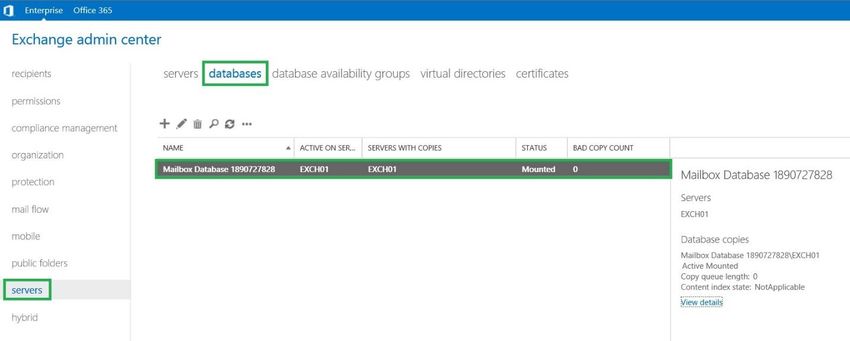
Author: Riaz Javed Butt
Blog: www.msexperttalk.com

Exchange Server 2019 Installation Step by Step
October 22, 2018 Microsoft announced the final build of Exchange Server 2019 available to download
from the Volume Licensing Service Center. Exchange Server 2019 is designed to deliver security,
performance and improved administration and management capabilities.

Exchange 2019 compatibility Requirements
Before you install Exchange Server 2019, we recommend that you review this topic to ensure your
network, hardware, software, clients, and other elements meet the requirements for Exchange 2019.
Also, make sure you understand the coexistence scenarios that are supported for Exchange 2019 and
earlier versions of Exchange.

The supported coexistence scenarios between Exchange 2019 and earlier versions of Exchange are
described in the following table:

Exchange version              Exchange 2019 organization coexistence

Exchange 2010 and earlier
                              Not supported
versions

                              Supported with Exchange 2013 Cumulative Update 21 (CU21) or later on
Exchange 2013                 all Exchange 2013 servers in the organization, including Edge Transport
                              servers.

                              Supported with Exchange 2016 CU11 or later on all Exchange 2016
Exchange 2016
                              servers in the organization, including Edge Transport servers.

                              Supported if all Exchange 2013 and Exchange 2016 servers in the
Mixed Exchange 2013 and
                              organization meet the requirements as previously described in this
Exchange 2016 organization
                              table.

The requirements for the network and the directory servers in your Exchange 2019 organization are
described in the following table:

Component                     Requirement

                              All domain controllers in the forest need to be running one of the
                              following versions of Windows Server:
Domain controllers            • Windows Server 2019 Standard or Datacenter
                              • Windows Server 2016 Standard or Datacenter
                              • Windows Server 2012 R2 Standard or Datacenter

                              The Active Directory forest functional level is Windows Server 2012 R2
Active Directory forest
                              or higher.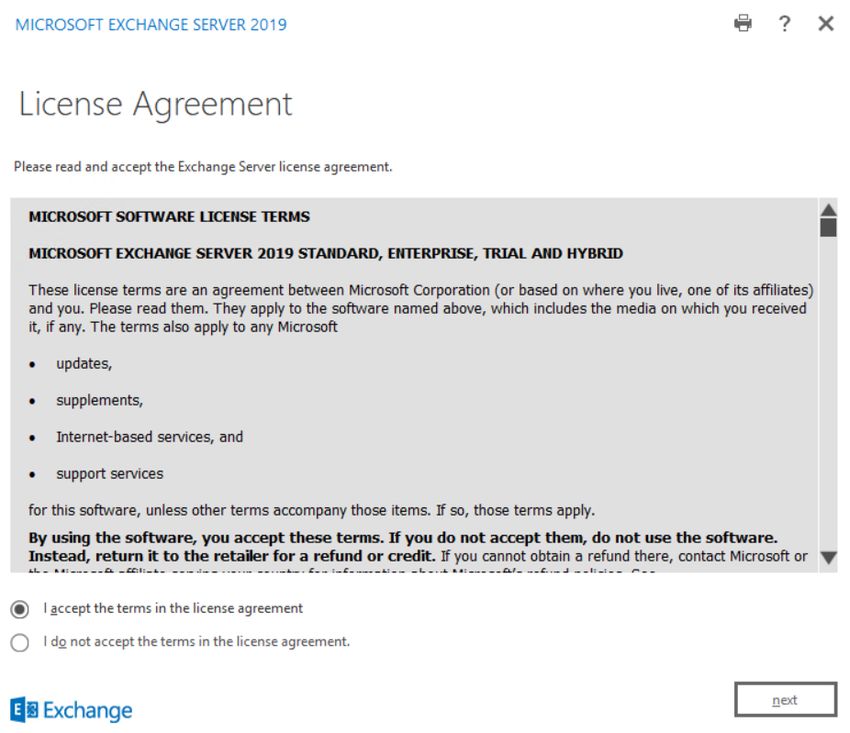
Author: Riaz Javed Butt
Blog: www.msexperttalk.com

Component                      Requirement

                               The Active Directory site where you install the Exchange Server must
                               contain at least one writeable domain controller that's also a global
Active Directory site          catalog server, or the installation will fail. Furthermore, you can't install
                               the Exchange server and then remove the domain controller from the
                               Active Directory site.

                               Exchange 2019 supports the following DNS namespaces:
                               • Contiguous
DNS namespace                  • Noncontiguous
                               • Single label domains
                               • Disjoint

                               Exchange 2013 and later support IPv6 only when IPv4 is also installed
                               and enabled on the Exchange server.
IPv6                           If you deploy Exchange in this configuration, and your network supports
                               IPv4 and IPv6, all Exchange servers can send data to and receive data
                               from devices, servers, and clients that use IPv6 addresses.

Installing Exchange 2019 on a computer that's running Windows Server Core is fully supported and
recommended by Microsoft. The Desktop Experience feature is no longer required.

Exchange 2019 Pre-requisites
You can use any member of the Active Directory domain to prepare Active Directory for Exchange 2019.
The computer requires the following software:

   •   .NET Framework 4.7.2 or later
   •   Visual C++ Redistributable Package for Visual Studio 2012

The Visual C++ Redistributable package is required if you're using the Exchange Setup Wizard to prepare
Active Directory. If you're using unattended Setup from the command line to prepare Active Directory,
this package isn't required.

   •   Install the Remote Tools Administration Pack by running the following command in Windows
       PowerShell:

Install-WindowsFeature RSAT-ADDS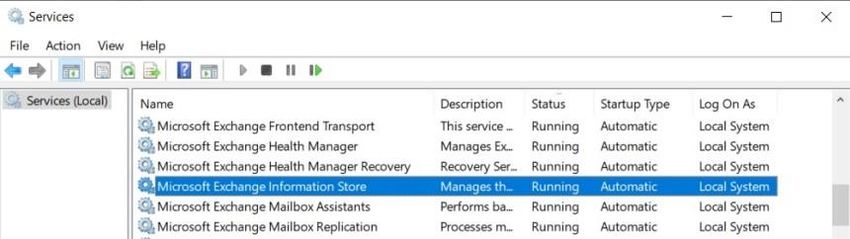
Author: Riaz Javed Butt
Blog: www.msexperttalk.com

.Net Framework Installation
If you are installing Exchange Server 2019 on Windows Server 2019 then no action is required as
Windows Server 2019 comes with .Net Framework 4.7.2. For Windows Server 2016, you need to install
.Net Framework 4.7.1 or higher.

    •   .NET Framework 4.7.1 or above (Windows Server 2016)
    •   .NET Framework 4.7.2 (comes default with Windows Server 2019 preview)

If .Net Framework on Windows Server 2019 isn’t installed, you can install this from Server Manger.

Install Visual C++ Redistributable Packages for Visual Studio 2013
Download Visual C++ Redistributable package for VS 2013 and install on Exchange server. Visual C++
Redistributable Packages for Visual Studio 2013 can be downloaded from Microsoft website.
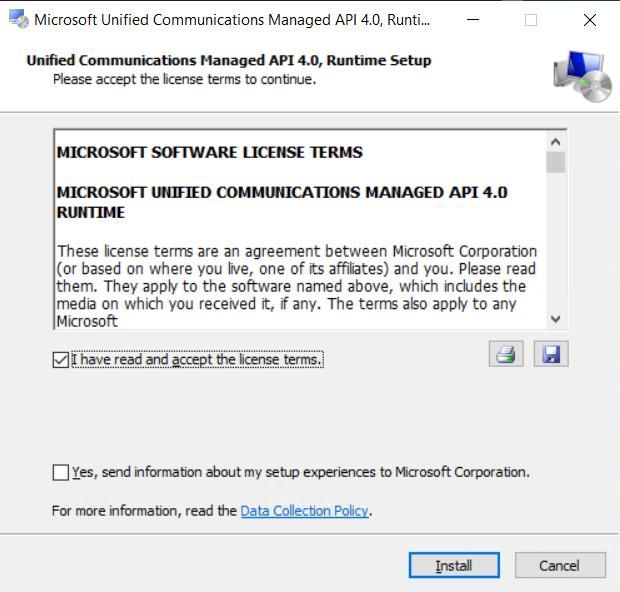
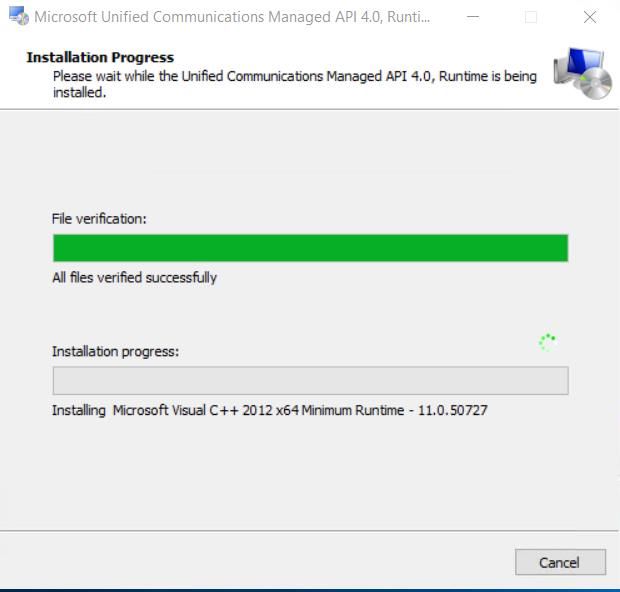
Author: Riaz Javed Butt
Blog: www.msexperttalk.com

Microsoft Unified Communications Managed API 4.0
Download and install Unified Communications Managed API (UCMA) 4.0 package from Microsoft
website.
Author: Riaz Javed Butt
Blog: www.msexperttalk.com
Author: Riaz Javed Butt
Blog: www.msexperttalk.com
Author: Riaz Javed Butt
Blog: www.msexperttalk.com

Windows Server 2019 prerequisites for Exchange Server 2019
Run the following powershell cmdlet to install Windows Server 2019 prerequisites for Exchange server
2019.

Install-WindowsFeature Server-Media-Foundation, NET-Framework-45-Features, RPC-over-HTTP-proxy,
RSAT-Clustering, RSAT-Clustering-CmdInterface, RSAT-Clustering-Mgmt, RSAT-Clustering-PowerShell,
WAS-Process-Model, Web-Asp-Net45, Web-Basic-Auth, Web-Client-Auth, Web-Digest-Auth, Web-Dir-
Browsing, Web-Dyn-Compression, Web-Http-Errors, Web-Http-Logging, Web-Http-Redirect, Web-Http-
Tracing, Web-ISAPI-Ext, Web-ISAPI-Filter, Web-Lgcy-Mgmt-Console, Web-Metabase, Web-Mgmt-
Console, Web-Mgmt-Service, Web-Net-Ext45, Web-Request-Monitor, Web-Server, Web-Stat-
Compression, Web-Static-Content, Web-Windows-Auth, Web-WMI, Windows-Identity-Foundation,
RSAT-ADDS

Once installation is completed, you will see a following message in your PowerShell window.
Author: Riaz Javed Butt
Blog: www.msexperttalk.com

Check Windows Updates
Before Installing Exchange Server 2019 or any version of Exchange server, it’s highly recommended to
ensure you have all windows patches installed on your windows server.

Exchange Server 2019 Installation
Once all pre-requisites are completed. Now is the time to extend your Active Directory with Exchange
Server 2019. It’s recommended to perform this task after hours and ensure you have a backup of your
active directory available before you perform following steps.

Step 1: Extend the Active Directory schema
When you extend the Active Directory schema for Exchange, the following requirements apply:

   •   Your account needs to be a member of the Schema Admins and Enterprise Admins security
       groups. If you have multiple Active Directory forests, make sure you're logged into the right one.
   •   The computer needs to be a member of the same Active Directory domain and site as the
       schema master.
   •   If you use the /DomainController: switch, you need to specify the
       domain controller that's the schema master.
   •   The only supported way to extend the schema for Exchange is to use Setup.exe with
       /PrepareSchema, /PrepareAD, or the Exchange Setup wizard. Other ways of extending the
       schema aren't supported.

Run the following cmdlet from PowerShell to extend AD Schema for Exchange Server 2019.

.\Setup.exe /IAcceptExchangeServerLicenseTerms /PrepareSchema
Author: Riaz Javed Butt
Blog: www.msexperttalk.com
I have Exchange Server 2019 setup mounted in E Drive.
Step 2: Prepare Active Directory
After Active Directory schema has been extended, you can prepare other parts of Active Directory for
Exchange. During this step, Exchange will create containers, objects, and other items in Active Directory
to store information. The collection of the Exchange containers, objects, attributes, and so on, is called
the Exchange organization.
When you prepare Active Directory for Exchange, the following requirements apply:
• Your account needs to be a member of the Enterprise Admins security group. If you skipped
Step 1 because you want the /PrepareAD command to extend the schema, the account also
needs to be a member of the Schema Admins security group.
• The computer needs to be needs to be a member of the same Active Directory domain and site
as the schema master and must be able to contact all of the domains in the forest on TCP port
389.
• Wait until Active Directory has finished replicating the schema changes from Step 1 to all
domain controllers before you try to prepare Active Directory.
• You need to select a name for the Exchange organization. The organization name is used
internally by Exchange and isn't typically seen by users, doesn't affect the functionality of
Exchange, and doesn't determine what you can use for email addresses.
o The organization name can't contain more than 64 characters and can't be blank.
o Valid characters are A to Z, a to z, 0 to 9, hyphen or dash (-), and space, but leading or
trailing spaces aren't allowed.
o You can't change the organization name after it's set.
To prepare Active Directory for Exchange, run the following command in a Windows Command Prompt
window:
.\Setup.exe /IAcceptExchangeServerLicenseTerms /PrepareAD /OrganizationName: “MS Expert Talk"
I’m using the Exchange installation files on drive E: and names the Exchange organization "MS Expert
Talk".Author: Riaz Javed Butt
Blog: www.msexperttalk.com
If you have a hybrid deployment configured between your on-premises organization and Exchange
Online, add the /TenantOrganizationConfig switch to the command.
As in Step 1, you'll need to wait while Active Directory replicates the changes from this step to all your
domain controllers before you proceed, and you can use the repadmin tool to check the progress of the
replication.
Step 3: Prepare Active Directory Domains
The final step is to prepare the Active Directory domain where Exchange servers will be installed or
where mail-enabled users will be located. This step creates additional containers and security groups
and sets the permission, so Exchange can access them.
If you have multiple domains in your Active Directory forest, you have the following choices in how to
prepare them:
• Prepare all domains in the Active Directory forest
• Choose the Active Directory domains to prepare
Regardless of the method you choose, wait until Active Directory has finished replicating the changes
from Step 2 to all domain controllers before you proceed. Otherwise, you might get an error when you
try to prepare the domains.
Step 3.1: Prepare all domains in the Active Directory forest
When you prepare all domains in the Active Directory forest for Exchange, your account needs to be a
member of the Enterprise Admins security group.Author: Riaz Javed Butt
Blog: www.msexperttalk.com
To prepare all domains in your Active Directory forest, run the following command in a Windows
Command Prompt window:
.\Setup.exe /IAcceptExchangeServerLicenseTerms /PrepareAllDomains
Step 3.2: Choose the Active Directory domains to prepare
You don't need to do this step in the domain where you ran the /PrepareAD command in Step 2,
because the /PrepareAD command has automatically prepared that domain for you.
When you prepare specific domains in your Active Directory forest, the following requirements apply:
• You need to prepare every domain where an Exchange server will be installed.
• You need to prepare any domain that will contain mail-enabled users, even if the domain won't
contain any Exchange servers.
• Your account needs to be a member of the Domain Admins group in the domain that you want
to prepare.
• If the domain that you want to prepare was created after you ran /PrepareAD in Step 2, your
account also needs to be a member of the Organization Management role group in Exchange.
To a prepare a specific domain in your Active Directory forest, run the following command in a Windows
Command Prompt window:
.\Setup.exe /IAcceptExchangeServerLicenseTerms /PrepareDomain:
If you have a single domain AD forest, you are not required to perform step 3.2. For this tutorial, I only
have signle forest root domain and I am not required to run this cmdlets in my topology.
Exchange Active Directory versions
The tables in the following sections contain the Exchange objects in Active Directory that are updated
each time you install a new version of Exchange (a new installation or a CU). You can compare the object
versions you see with the values in the tables to verify that Exchange successfully updated Active
Directory during the installation.Author: Riaz Javed Butt
Blog: www.msexperttalk.com
• rangeUpper is located in the Schema naming context in the properties of the ms-Exch-Schema-
Version-Pt container.
• objectVersion (Default) is the objectVersion attribute located in the Default naming context in
the properties of the Microsoft Exchange System Objects container.
• objectVersion (Configuration) is the objectVersion attribute located in the Configuration
naming context in Services > Microsoft Exchange in the properties of the container.
Exchange 2019 version rangeUpper objectVersion (Default) objectVersion (Configuration)
Exchange 2019 RTM 17000 13236 16751
Exchange 2019 Preview 15332 13236 16213
Exchange Server 2019 Installation
Before you install an Exchange Server 2019, verify the following prerequisites:
• The target server must be a member of an Active Directory domain.
• The account that you use to install Exchange requires the following permissions:
o Enterprise Admins group membership: Required if this is the first Exchange server in the
organization.
o Schema Admins group membership: Required if you haven't previously extended the
Active Directory schema or prepared Active Directory for Exchange 2019.
o Exchange Organization Management role group membership: Required if you've already
prepared the Active Directory domain that will contain the Exchange server, or if other
Exchange servers already exist in the organization.
At this point, you are ready to install your first Exchange 2019 server. As mentioned previously in the
document, this lab is focused on installation of Exchange server 2019 on Windows Server 2019 with
Desktop Experience. I’ll upload a separate documentation for installing Exchange Server 2019 on
Windows Server Core. To install Exchange Server 2019, follow the following steps:
• Run Setup.exe as administratorAuthor: Riaz Javed Butt Blog: www.msexperttalk.com It’s recommended to always check for updates before you start the installation, Click Next to proceed. In next step, setup will start the copy process to copy Exchange files.
Author: Riaz Javed Butt
Blog: www.msexperttalk.com

The Copying Files page shows the progress of copying files to the local hard drive. Typically, the files are
copied to %WinDir%\Temp\ExchangeSetup, but you can confirm the location in the Exchange Setup log
at C:\ExchangeSetupLogs\ExchangeSetup.log
Author: Riaz Javed Butt
Blog: www.msexperttalk.com

On the Introduction page, Microsoft recommend that you visit the Exchange Server deployment
planning links if you haven't already reviewed them. Click Next to continue.
Author: Riaz Javed Butt
Blog: www.msexperttalk.com

On the License Agreement page, review the software license terms, select I accept the terms in the
license agreement, and then click Next to continue. I would say you probably don’t have any other
option other then accepting the agreement or you can’t install Exchange server ☺
Author: Riaz Javed Butt
Blog: www.msexperttalk.com

On the Recommended Settings page, choose one of the following settings:

   •   Use recommended settings: Exchange automatically sends error reports and information about
       your computer hardware and how you use Exchange to Microsoft. For information about what's
       sent to Microsoft and how it's used, click ? or the help links on the page.

   •   Don't use recommended settings: These settings are disabled, but you can enable them at any
       time after Setup completes.

I highly recommend to us “Recommended Settings”. Click Next to continue.
Author: Riaz Javed Butt
Blog: www.msexperttalk.com
On the Server Role Selection page, configure the following options:
• Mailbox role: Select this option, which also automatically installs the Management Tools.
• Automatically install Windows Server roles and features that are required to install Exchange:
Select this option to have the Setup wizard install the required Windows prerequisites. You
might need to reboot the computer to complete the installation of some Windows features. If
you don't select this option, you need to install the Windows features manually.
Selecting this option installs only the Windows features that are required by Exchange. You need to
install other prerequisites manually.
Click Next to continue.Author: Riaz Javed Butt Blog: www.msexperttalk.com On the Installation Space and Location page, either accept the default installation location (C:\Program Files\Microsoft\Exchange Server\V15) or click Browse to choose a new location. Make sure that you have enough disk space available in the location where you want to install Exchange. It’s highly recommended not to install Exchange Server on OS drive. As I’m doing an installation in lab environment, we’re good to do the installation on C/OS drive. For production implementation, I highly recommend leveraging a separate drive for Exchange installation. Click Next to continue.
Author: Riaz Javed Butt
Blog: www.msexperttalk.com

On the Malware Protection Settings page, choose whether you want disable malware scanning.
Malware scanning is enabled by default (the value No is selected). If you disable malware scanning, you
can enable it in the future. Click Next to continue.
Author: Riaz Javed Butt
Blog: www.msexperttalk.com

On the Readiness Checks page, verify that the organization and server role prerequisite checks
completed successfully. If they haven't, the only option on the page is Retry, so you need to resolve the
errors before you can continue.
Author: Riaz Javed Butt
Blog: www.msexperttalk.com

On the Setup Progress page, a progress bar indicates how the installation is proceeding.
Author: Riaz Javed Butt
Blog: www.msexperttalk.com

On the Setup Completed page, click Finish, and then restart the computer.

Verify Exchange Server 2019 Installation
After you install Exchange Server 2019, Microsoft recommend that you verify the installation by running
the Get-ExchangeServer cmdlet and by reviewing the Exchange Setup log. If the setup process fails or
errors occur during installation, you can use the Setup log to find the source of the problem.

Get-ExchangeServer Cmdlet
To verify that Exchange installed successfully, run the following commands in the Exchange
Management Shell.

Get-ExchangeServer
Author: Riaz Javed Butt
Blog: www.msexperttalk.com

Exchange Setup Logs
Exchange Setup logs events in the Application log of the Windows Server. This log contains a history of
each action that the system takes during Exchange setup and any errors that occurred (By default, the
logging method is set to Verbose). You can use the Windows Event Viewer to find the messages related
to Exchange setup.

The Exchange Setup log is available at :\ExchangeSetupLogs\ExchangeSetup.log
( is the drive where Windows is installed). The Setup log tracks the progress of every task
during the Exchange installation and configuration. The file contains information about the status of the
prerequisite and system readiness checks before installation starts, the application installation progress,
and the configuration changes that are made to the system. Check this log file to verify that Exchange
was installed as expected. Below is the snipped of how ExchangeSetup.Logs file looks like.
Author: Riaz Javed Butt
Blog: www.msexperttalk.com
Exchange 2019 Post Installation Steps
Once you have your Exchange 2019 server installed, next step is to perform post installation
configuration to ensure your server is ready to handle day to day messaging operations. Post installation
activities includes:
• Create admin mailbox
• Exchange 2019 Product Activation
• Configure mail flow and Client access on Exchange Servers
• Install Exchange Management tools
• Configure IM integration
• Configure Virtual Directories
• Configure Offline Address Book
Rename Exchange Database
Just like previous version of Exchange, Exchange 2019 installation also creates a default database with
the name “Mailbox Database 123456789” in default installation directory. In my case, the default
database is being created in “C:\Program Files\Microsoft\Exchange Server\V15\Mailbox\” as I have
installed Exchange Server 2019 in default directory.
It’s not recommended to install Exchange server on operating system drive.
One of the Exchange 2019 Post-Installation step is to rename the default database as per the naming
convention used by your organization. There are two methods available to rename your database in
Exchange 2019.
• Rename Exchange 2019 Database from GUI
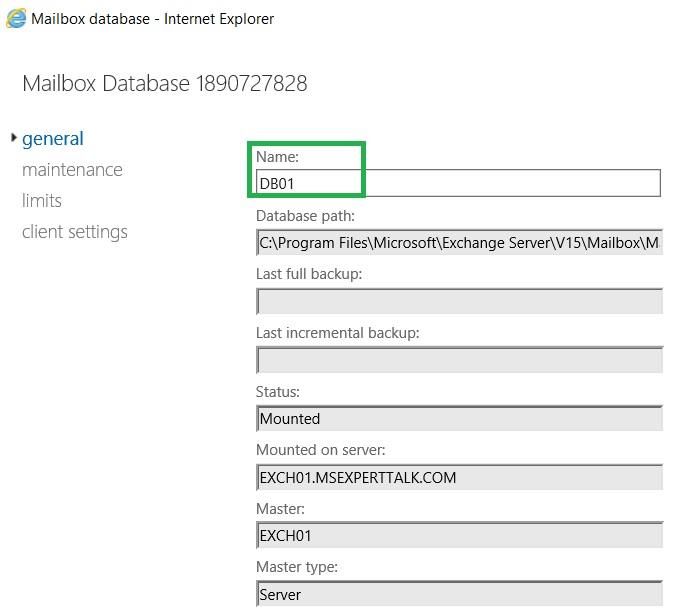
• Rename Exchange 2019 Database from Exchange Management ShellAuthor: Riaz Javed Butt Blog: www.msexperttalk.com Option 1 - Rename Exchange 2019 Database from GUI To rename your database using GUI method, follow the following steps. • Login to Exchange Admin Center. • Navigate to Exchange Admin Center –> Servers –> Databases • Select the database and click on Edit • Enter the new name of the Database in “Name” field and Click on Save
Author: Riaz Javed Butt
Blog: www.msexperttalk.com

   •   Hit Save button and you are done renaming your database via GUI.
Author: Riaz Javed Butt
Blog: www.msexperttalk.com

Option 2 - Rename the database by using Exchange Management Shell
Another method of renaming your Exchange 2019 database is to use Exchange Management Shell. To
rename your database using EMS, follow the following steps.

    •   Run Exchange Management Shell as Administrator

    •   Run the following cmdlet in Exchange Management Shell

C:\> Set-Mailboxdatabase -Identity DB01 -Name “Default Database”

To verify that the database is renamed, run the following cmdlet to retrieve database information

    •   Get-MailboxDatabase | ft Name, Server

Activate Exchange Server 2019
A product key tells Exchange Server 2019 that you have purchased a Standard or Enterprise Edition
license.

Enterprise Edition let you mount more than five databases per server in addition to everything that’s
available with a Standard Edition license. If you want to read more about Exchange licensing, see
Exchange Server editions and versions. If you don’t enter a product key, your server is automatically
Author: Riaz Javed Butt
Blog: www.msexperttalk.com
licensed as a trial edition. The trial edition has Exchange Standard Edition server features and is helpful if
you want to try out Exchange before you buy it, or to run tests in a lab.
Exchange Server 2019 edition trial edition is valid for up to 180 days. If you want to keep using the
server beyond 180 days, you’ll need to enter a product key or the Exchange admin center (EAC) will start
to show reminders that you need to enter a product key to license the server.
Exchange Server 2019 product key can be entered by using Exchange Admin Center (GUI) or by using
Exchange Management Shell. You can use either of these options to enter your Exchange Server product
key. Once you enter the product key, you need to restart Information Store service.
Option 1 – Enter the Product key using GUI
To enter Exchange Server 2019 product key using Exchange Admin Center, Follow the below steps:
• In the Exchange Admin Center, Navigate to Servers > Servers, select the server you want to
license, and then click Edit or Click Enter Product Key option in details pane.
• The Exchange server properties window opens. On the General tab, enter the product key in the
Enter a valid product key text box.Author: Riaz Javed Butt
Blog: www.msexperttalk.com
• When you’re finished, click Save. You will see the following message to restart your Exchange
Information Store service.Author: Riaz Javed Butt
Blog: www.msexperttalk.com
After you license a mailbox server, do the following steps to restart the Microsoft Exchange Information
Store service:
• On the Exchange server, open the Windows Services console. Open Server Manager, and then
click Tools > Services.
You can also launch services snap in by running the command services.msc from the Run dialog, a
Command Prompt window, or the Exchange Management Shell.
• In the list of services, right-click on Microsoft Exchange Information Store, and then click
Restart.
Once you restart the service, Your Exchange Server 2019 product is activated.
Option 2 – Enter the Product key using Exchange Management Shell
Exchange Server 2019 can product key can be activated with Exchange Management Shell. To enter the
product key in the Exchange Management Shell, use this syntax:
Set-ExchangeServer -ProductKey
Note that this command works to license an unlicensed server or to upgrade a licensed server from a
Standard Edition license to an Enterprise Edition license.
This example license the Exchange server named EXCH01.
Set-ExchangeServer EXCH01 -ProductKey 12345-67890-12345-67892-09876Author: Riaz Javed Butt
Blog: www.msexperttalk.com
Once the product key is activated, run the following comdlet to restart Exchange Information Store
service.
Restart-Service MSExchangeIS
For detailed syntax and parameter information, see Set-ExchangeServer.
Configure mail flow and client access on Exchange servers
After you've installed Exchange Server 2019, you need to configure Exchange for mail flow and client
access. Without these steps, you won't be able to send mail to the internet and external clients (for
example, Microsoft Outlook, and Exchange ActiveSync devices) won't be able to connect to your
Exchange.
You will receive certificate warnings when you connect to the Exchange admin center (EAC) website until
you configure a secure socket layer (SSL) certificate on the Mailbox server.
Create an internet Send connector
When install your first Exchange 2019 server, the server can not send email outside of your Exchange
organization. To send email outside of your Exchange organization, you need to create a Send connector.
By default, a Receive connector named "Default Frontend _" is created when Exchange is
installed. This Receive connector accepts anonymous SMTP connections from external servers. You don't
need to do any additional configuration if this is the functionality you want. If you want to restrict inbound
connections from external servers, modify the Default Frontend Receive connector on
the Mailbox server.
Until you create a Send connector, mail can't flow from your Exchange to the internet. The exception is
if you install an Edge Transport in your perimeter network and subscribe the Edge Transport to your
Exchange organization.
Option 1 - Use the EAC to create an internet Send connector
• In the EAC, navigate to Mail flow > Send connectors, and then click Add . This starts the New
Send connector wizard.Author: Riaz Javed Butt
Blog: www.msexperttalk.com
• On the first page, enter the following information:
o Name: Enter a descriptive name for the Send connector, for example, Outbound to
internet.
o Type: Select Internet.
o When you're finished, click Next.Author: Riaz Javed Butt
Blog: www.msexperttalk.com
• On the next page, verify that MX record associated with recipient domain is selected. This means
the connector uses DNS on the internet to route mail, as opposed to routing all outbound mail to
a smart host. When you're finished, click Next.Author: Riaz Javed Butt
Blog: www.msexperttalk.com
• On the next page, enter the following information:
o In the Address space section, click Add . In the Add domain dialog box that appears,
in Fully Qualified Domain Name (FQDN), enter an asterisk (*), and then click Save. This
value indicates that the Send connector applies to messages addressed to all external
domains.Author: Riaz Javed Butt
Blog: www.msexperttalk.com
o The Scoped send connector setting is important if your organization has Exchange
servers installed in multiple Active Directory sites:
o If you don't select Scoped send connector, the connector is usable by all transport
servers (Exchange 2013 or later Mailbox servers and Exchange 2010 Hub Transport
servers) in the entire Active Directory forest. This is the default value.
o If you select Scoped send connector, the connector is only usable by other transport
servers in the same Active Directory site.
• When you're finished, click **Next**.
• On the next page, in the Source server section, click Add . In the Select a Server dialog box
that appears, select one or more Mailbox servers that you want to use to send mail to the
internet. If you have multiple Mailbox servers in your environment, select the ones that can
route mail to the internet. If you have only one Mailbox server, select that one. After you've
selected at least one Mailbox server, click Add, click OK, and then click Finish.Author: Riaz Javed Butt
Blog: www.msexperttalk.com
Option 2 - Use the Exchange Management Shell to create an internet Send connector
• Open the Exchange Management Shell. Run the following Exchange Management cmdlet:
New-SendConnector -Name -AddressSpaces * -Internet [-SourceTransportServer
,...]
This example creates the internet Send connector named "To internet" with the following properties:
• The usage type is Internet.
• The Send connector uses DNS routing. We aren't using the DNSRoutingEnabled parameter, and
the default value is $true.
• The Send connector is for all external domains (*).
• The local Exchange server is the source server. We aren't using the SourceTransportServer
parameter, and the default value is the local Exchange server.
• The Send connector isn't scoped to the local Active Directory site. We aren't using the
IsScopedConnector parameter, and the default value is $false.Author: Riaz Javed Butt Blog: www.msexperttalk.com Configure Exchange Server 2019 Virtual Directories You can use the Exchange admin center (EAC) or the Exchange Management Shell to view or modify the properties of Exchange 2019 virtual directories. Configure Outlook on the Web Virtual Directory Although the name has changed to Outlook on the web for OWA, the name of the virtual directory is still "owa". To configure Outlook on the web virtual directory, run the following Exchange Management Shell commands. $namespace = “webmail.msexperttalk.com” Set-OwaVirtualDirectory -Identity “HOSTNAME\OWA (Default Web Site)” -ExternalUrl https://$Namespace/owa -InternalUrl https://$Namespace/owa To verify the OWA URL, run the following command. Get-OwaVirtualDirectory | Select Server,ExternalURL,InternalURL | fl Configure ECP Virtual Directory To configure ECP virtual directory, run the following Exchange Management Shell commands. $namespace = “webmail.msexperttalk.com” Set-EcpVirtualDirectory -Identity “HOSTNAME\ECP (Default Web Site)” -ExternalUrl https://$namespace/ecp -InternalUrl https://$namespace/ecp To verify the configuration of ECP virtual directory, run the following cmdlet. Get-EcpVirtualDirectory | Select Server,ExternalURL,InternalURL | fl
Author: Riaz Javed Butt
Blog: www.msexperttalk.com

Configure Outlook Anywhere
To configure Outlook Anywhere, run the following command.

Set-OutlookAnywhere -Identity “HOSTNAME\RPC (Default Web Site)” -ExternalHostname $namespace -
InternalHostname $namespace -ExternalClientsRequireSsl $true -InternalClientsRequireSsl $true -
DefaultAuthenticationMethod NTLM

To verify Outlook anywhere configuration, run the following command.

Get-OutlookAnywhere | Select Server,ExternalHostname,Internalhostname | fl

Configure ActiveSync Virtual Directory
Run the following command to configure activesync virtual directory.

Set-ActiveSyncVirtualDirectory -Identity “HOSTNAME\Microsoft-Server-ActiveSync (Default Web Site)” -
ExternalUrl https://$namespace/Microsoft-Server-ActiveSync -InternalUrl
https://$namespace/Microsoft-Server-ActiveSync

To verify the active sync configuration, run the following command.

Get-ActiveSyncVirtualDirectory | select server,externalurl,internalurl | fl

Configure Exchange Web Services Virtual Directory
Run the following command for exchange web services virtual directory configuration.
Author: Riaz Javed Butt
Blog: www.msexperttalk.com

Set-WebServicesVirtualDirectory -Identity “HOSTNAME\EWS (Default Web Site)” -ExternalUrl
https://$namespace/EWS/Exchange.asmx -InternalUrl https://$namespace/EWS/Exchange.asmx

To verify the configuration, run the following cmdlet.

Get-WebServicesVirtualDirectory | Select Server,ExternalURL,InternalURL | fl

Configure OAB Virtual Directory
Run the following command to configure OAB virtual directory.

Set-OabVirtualDirectory -Identity “HOSTNAME\OAB (Default Web Site)” -ExternalUrl
https://$namespace/OAB -InternalUrl https://$namespace/OAB

To verify the OAB virtual directory URL configuration, run the following command.

Get-OabVirtualDirectory | Select Server,ExternalURL,InternalURL | fl

Configure AutoDiscover Virtual Directory
Configure AutoDiscover Service Internal URI. By default, it’s setup with server hostname.

Set-ClientAccessService -Identity  –AutoDiscoverServiceInternalUri
“https://autodiscover.msexperttalk.com/Autodiscover/Autodiscover.xml”

To verify, run the following cmdlet.

Get-ClientAccessService | fl identity,autodiscoverserviceinternaluri
Author: Riaz Javed Butt
Blog: www.msexperttalk.com

Configure MAPI Virtual Directory
Run the following command to configure MAPI virtual directory.

Set-MapiVirtualDirectory -Identity “HOSTNAME\mapi (Default Web Site)” -ExternalUrl
https://$namespace/mapi -InternalUrl https://$namespace/mapi

To verify, run the following command.

Get-MapiVirtualDirectory | Select Server,ExternalURL,InternalURL | fl

Once all Exchange virtual directories are configured, restart IIS service by running the following
command.

C:\> IISReset

Configure Default Email Address Policy
We recommend that you configure a user principal name (UPN) that matches the primary email address
of each user. If you don't provide a UPN that matches the email address of a user, the user will be
required to manually provide their domain\user name or UPN in addition to their email address. If their
UPN matches their email address, Outlook on the web (formerly known as Outlook on the web),
ActiveSync, and Outlook will automatically match their email address to their UPN. To configure the
default email address policy, run the following steps:

    •   In the EAC, go to Mail flow > Email address policies.
Author: Riaz Javed Butt Blog: www.msexperttalk.com • Select the email address policy that you want to modify and click on Edit • Select the policy and modify the configuration as per your email address policy
Author: Riaz Javed Butt
Blog: www.msexperttalk.com

   •   Select the email address policy that you want to apply (a policy that has the Status value
       Unapplied).
   •   In the details pane, click Apply.

   •   After you click Apply, a warning message that appears. Click Yes to apply the policy by using the
       EAC. A progress bar allows you to monitor the recipient update process. When updates are
       complete, click Close.
Author: Riaz Javed Butt
Blog: www.msexperttalk.com
Configure Exchange Server 2019 Certificate
One of the most important post installation tasks is to configure SSL certificate in Exchange 2019.
Ensuring that certificates are installed and configured correctly is key to deliver a secure messaging
infrastructure. Certificate management in the EAC can help administrators:
• Minimizing the number of certificates that are required.
• Minimizing the interaction that's required for certificates.
• Allowing the centralized installation and management of certificates on all Exchange servers in
the organization.
There are 2 methods available in Exchange 2019 to configure SSL Certificate.
• SSL Certificate using Exchange Admin Center
• SSL Certificate using Exchange Management Shell
Certificate Requirements for Exchange services
The Exchange services that certificates can be assigned to are described in the following table.
Service Description
IIS By default, the following services are offered under the default website in the Client
(HTTP) Access (frontend) services on a Mailbox server, and are used by clients to connect to
Exchange:
• Autodiscover
• Exchange ActiveSync
• Exchange admin center
• Exchange Web Services
• Offline address book (OAB) distribution
• Outlook Anywhere (RPC over HTTP)
• Outlook MAPI over HTTP
• Outlook on the webAuthor: Riaz Javed Butt
Blog: www.msexperttalk.com
Service Description
• Remote PowerShell*
Because you can only associate a single certificate with a website, all the DNS names
that clients use to connect to these services need to be included in the certificate.
You can accomplish this by using a SAN certificate or a wildcard certificate.
POP or The certificates that are used for POP or IMAP can be different from the certificate
IMAP that's used for IIS. However, to simplify administration, we recommend that you also
include the host names that are used for POP or IMAP in your IIS certificate, and use
the same certificate for all of these services.
SMTP SMTP connections from clients or messaging servers are accepted by one or more
Receive connectors that are configured in the Front End Transport service on the
Exchange server.
Best practices for Exchange certificates
Although the configuration of your organization's digital certificates will vary based on its specific needs,
information about best practices has been included to help you choose the digital certificate
configuration that's right for you.
• Use as few certificates as possible: Very likely, this means using SAN certificates or wildcard
certificates. In terms of interoperability with Exchange, both are functionally equivalent. The
decision on whether to use a SAN certificate vs a wildcard certificate is more about the key
capabilities or limitations (real or perceived) for each type of certificate as described in the
Digital certificates overview.
• Use certificates from a commercial CA for client and external server connections: Although you
can configure most clients to trust any certificate or certificate issuer, it's much easier to use a
certificate from a commercial CA for client connections to your Exchange servers. No
configuration is required on the client to trust a certificate that's issued by a commercial CA.
Many commercial CAs offer certificates that are configured specifically for Exchange. You can
use the EAC or the Exchange Management Shell to generate certificate requests that work with
most commercial CAs.
• Verify that the CA is trusted by the clients (operating systems, browsers, and mobile devices)
that connect to your Exchange servers.
• Verify that the CA supports the kind of certificate that you need. For example, not all CAs
support SAN certificates, the CA might limit the number of common names that you can use in aAuthor: Riaz Javed Butt
Blog: www.msexperttalk.com
SAN certificate, or the CA may charge extra based on the number of common names in a SAN
certificate.
• See if the CA offers a grace period during which you can add additional common names to SAN
certificates after they're issued without being charged.
• Verify that the certificate's license allows you to use the certificate on the required number of
servers. Some CAs only allow you to use the certificate on one server.
• Use the Exchange certificate wizard: A common error when you create certificates is to forget
one or more common names that are required for the services that you want to use. The
certificate wizard in the Exchange admin center helps you include the correct list of common
names in the certificate request. The wizard lets you specify the services that will use the
certificate and includes the common names that you need to have in the certificate for those
services.
• Use as few host names as possible: Minimizing the number of host names in SAN certificates
reduces the complexity that's involved in certificate management. Don't feel obligated to
include the host names of individual Exchange servers in SAN certificates if the intended use for
the certificate doesn't require it. Typically, you only need to include the DNS names that are
presented to the internal clients, external clients, or external servers that use the certificate to
connect to Exchange.
For this documentation, we’re going to configure SSL Certificate on Exchange 2019 using the Exchange
Admin Center. To configure the SSL Certificate, follow the instructions mentioned below.
Create SSL Certificate Request for Exchange Server
• Open the EAC and navigate to Servers > Certificates.
• In the Select server list, select the Exchange server where you want to install the certificate, and
then click Add .
• The New Exchange certificate wizard opens. On the This wizard will create a new certificate or a
certificate request file page, verify that Create a request for a certificate from a certification
authority is selected, and then click Next.Author: Riaz Javed Butt
Blog: www.msexperttalk.com
• On the Friendly name for this certificate page, enter a descriptive name for the certificate, and
then click Next.Author: Riaz Javed Butt
Blog: www.msexperttalk.com
• On the Request a wildcard certificate page, make one of the following choices:
o If you want a wildcard certificate: Select Request a wildcard certificate, and enter the
wildcard character (*) and the domain in the Root domain field. When you're finished,
click Next.
• In the Store certificate request on this server page, click Browse and select the Exchange server
where you want to store the certificate request (where you want to install the certificate), click
OK, and then click Next.Author: Riaz Javed Butt
Blog: www.msexperttalk.com
• On the Specify information about your organization page, enter the following values:
o Organization name
o Department name
o City/Locality
o State/Province
o Country/Region name
Note: These X.500 values are included in the certificate's Subject field. Although a value is required in
every field before you can proceed, the CA might not care about certain fields (for example, Department
name), while other fields are very important (for example, Country/Region name and Organization
name). Check the Subject field requirements of your CA.Author: Riaz Javed Butt
Blog: www.msexperttalk.com
• When you're finished, click Next.
• On the Save the certificate request to the following file page, enter the UNC path and filename
for the certificate request. For example, \\FileServer01\Data\ExchCertRequest.req. When you're
finished, click Finish.Author: Riaz Javed Butt
Blog: www.msexperttalk.com
Complete SSL Certificate Request for Exchange Server
• Open the EAC and navigate to Servers > Certificates.
• In the Select server list, select the Exchange server that holds the pending certificate request.
• A pending certificate request has the following properties:
o In the list of certificates, the value of the Status field is Pending request.
o When you select the certificate request from the list, there's a Complete link in the
details pane.Author: Riaz Javed Butt
Blog: www.msexperttalk.com
o Select the pending certificate request that you want to complete, and then click
Complete in the details pane.
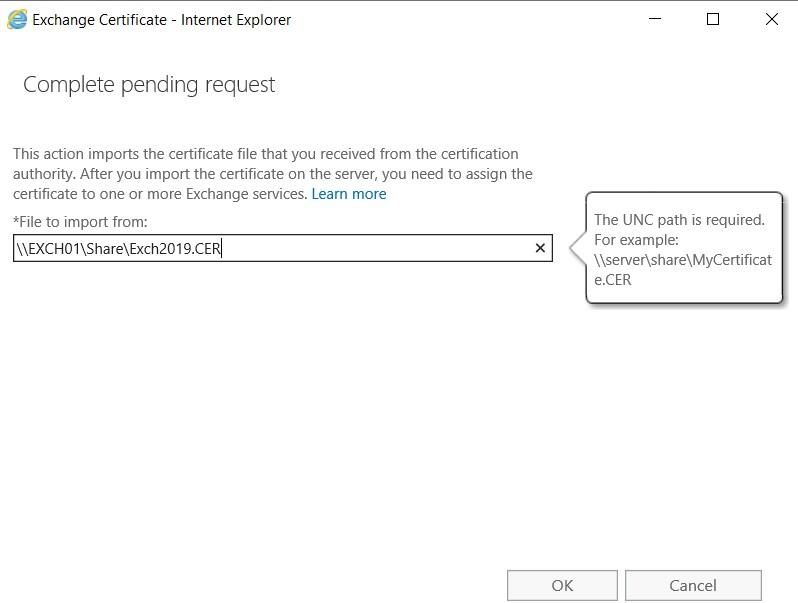
• On the Complete pending request page that opens, in the File to import from field, enter the
UNC path and filename for the certificate file. For example, When you're finished, click OK.
• Once the certificate request is completed. Next Step is to assign the services to the SSL
certificate. To assign the services, Select the SSL certificate and click on Edit and select the
services under services tab and click Save.You can also read