Deploying Server Persistent Memory on Microsoft Windows Server 2016 and Windows Server 2019 - HPE
←
→
Page content transcription
If your browser does not render page correctly, please read the page content below
Technical white paper

Deploying Server Persistent Memory on
Microsoft Windows Server 2016 and
Windows Server 2019
Technical white paper

Contents
Abstract .................................................................................................................................................................................................................................................................................................................................................3
Windows Server 2016/2019 overview .....................................................................................................................................................................................................................................................................3
     Software and drivers ............................................................................................................................................................................................................................................................................................................3
Persistent Memory.......................................................................................................................................................................................................................................................................................................................3
     Introduction..................................................................................................................................................................................................................................................................................................................................3
     Hardware and firmware requirements ................................................................................................................................................................................................................................................................4
     Hardware and firmware configuration.................................................................................................................................................................................................................................................................4
     Windows Server 2016 Storage Class Memory (SCM) enablement .......................................................................................................................................................................................... 5
Windows Server 2019 Persistent memory disk or SCM in Device Manager.......................................................................................................................................................................... 6
     HPE NVDIMM use scenarios with Windows Server 2016/2019.............................................................................................................................................................................................13
     HPE NVDIMM Performance with Windows Server 2016...............................................................................................................................................................................................................15
     HPE Persistent Memory resources, contacts, or additional links .............................................................................................................................................................................................17
Installing Windows Server 2016 ..................................................................................................................................................................................................................................................................................17
     Preinstallation tasks...........................................................................................................................................................................................................................................................................................................17
     Installing Windows Server 2016/2019 from the OS media .........................................................................................................................................................................................................18
     Installing Windows Server 2016/2019 using iLO .................................................................................................................................................................................................................................18
Installing components from the HPE Service Pack for ProLiant (SPP) ...................................................................................................................................................................................18
ReFS file system ..........................................................................................................................................................................................................................................................................................................................19
     ReFS formatting ....................................................................................................................................................................................................................................................................................................................19
Use case for more than 24 NVDIMMs on the Server ...............................................................................................................................................................................................................................19
     Resources....................................................................................................................................................................................................................................................................................................................................20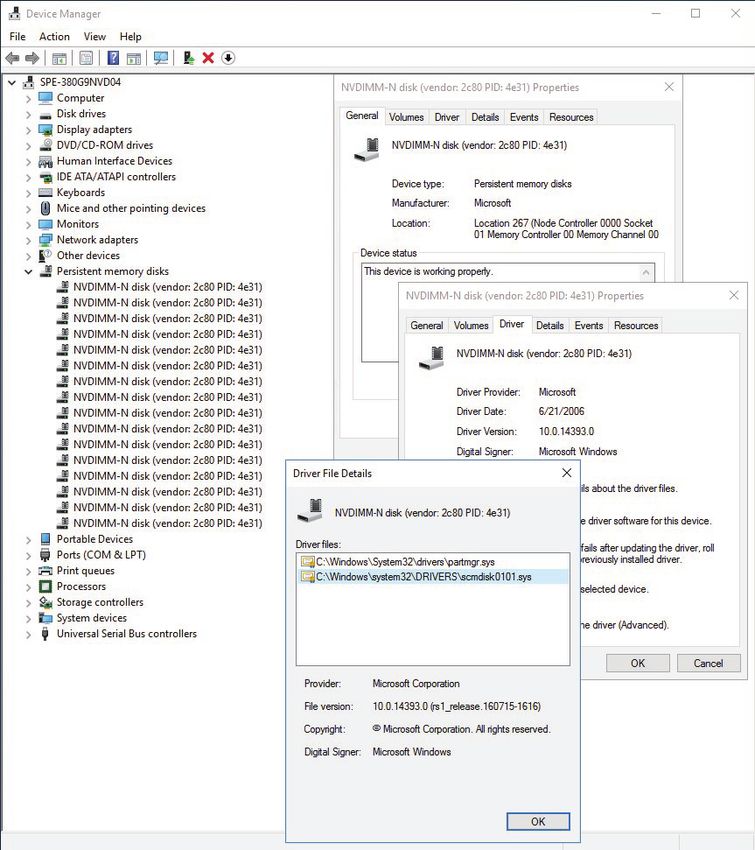
Technical white paper                                                                                                                 Page 3

Abstract
This technical white paper provides guidance and describes the persistent memory support available for the Microsoft® Windows Server®
2016 and Windows Server 2019 operating system release on HPE ProLiant servers.

Windows Server 2016/2019 overview
At the heart of the Microsoft Cloud OS vision, Windows Server delivers global-scale cloud services into your infrastructure. Windows Server
2016/2019 provides a wide range of new and enhanced features and capabilities spanning server virtualization, storage, software-defined
networking, server management and automation, web and application platform, access and information protection, virtual desktop
infrastructure, and more.

Software and drivers
Currently, many drivers for storage options, network interface controllers (NICs), and converged network adapters (CNAs) are available on
the Windows Server 2016 and 2019 media. Some HPE drivers are available in the Service Pack for ProLiant (SPP).
Download the Service Pack for ProLiant (SPP) from hpe.com/servers/spp/download.

Persistent Memory
Hewlett Packard Enterprise has developed Non-Volatile DIMM (NVDIMM) technology, a Storage Class Memory medium that effectively
combines system memory performance with true power-off data storage. HPE ProLiant DL360 and DL380 Gen9 Servers shipped with
Intel® Xeon® E5-v4 processors are equipped to use HPE NVDIMMs and when running a supportive operating system. Microsoft has
announced native support of Storage Class Memory with Windows Server 2016 and Windows Server 2019 for using HPE NVDIMMs as
Windows® storage solutions. This paper discusses the Microsoft Windows Server 2016/2019 support of HPE NVDIMMs and describes
recommended scenarios for their implementation.
Gen 10 supported platforms:
• HPE NVDIMM-N 16 GB: ProLiant DL360 Gen10, DL380 Gen10, DL560 Gen10 and DL580 Gen10, SY480 Gen10, SY660 Gen10,
  BL460c Gen10
For the latest information, please refer to the HPE Persistent Memory website.

Introduction
Hewlett Packard Enterprise introduced HPE NVDIMM technology, a Persistent Memory medium that provides the extreme performance of
DRAM components and the persistency of NAND flash-based components for emergency storage. Close (memory bus) association with the
system’s processor allows HPE NVDIMMs to be used as extreme-performance workload accelerators in the top tier of a storage hierarchy.
Joint Electron Device Engineering Council (JEDEC) defines these NVDIMM devices as NVDIMM-N energy-backed devices.
Microsoft has developed Windows Server 2016/Windows Server 2019 with native support of Persistent Memory as Storage Class Memory
(SCM). This capability allows:
• Zero-copy access to SCM
• Most existing user-mode applications to be run without modification
• Sector granular failure modes to preserve application compatibility
The initial Persistent Memory enablement offered by Windows Server 2016/2019 through its SCM support allows it to be implemented two
different ways:
• With a block-interface overlay, using SCM as block-storage devices that applications can readily use the same as SATA HDDs or SAS SSDs
• With a byte-addressable memory interface, allowing applications directly accessing physical memory locations on the SCM device using
  Direct Access Storage (DAX), enabled on a per-volume basis.
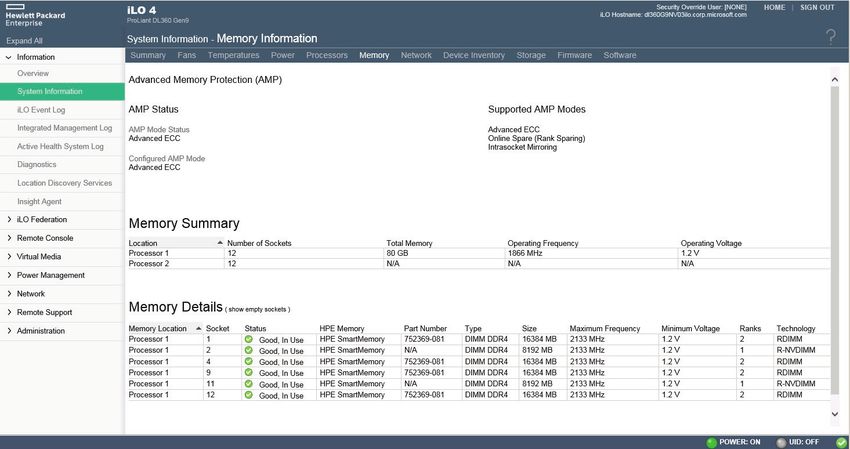
Technical white paper                                                                                                                Page 4

Hardware and firmware requirements
HPE NVDIMMs must be deployed on HPE platforms designed for NVDIMM functionality. Using Windows Server 2016/2019, following
HPE ProLiant platforms offer NVDIMM functionality when used with the following options:
• HPE NVDIMM-N 8 GB: HPE ProLiant DL380 Gen9 Servers, HPE ProLiant DL360 Gen9 Servers
• HPE NVDIMM-N 16 GB: ProLiant DL360 Gen10, DL380 Gen10, DL560 Gen10 and DL580 Gen10, SY480 Gen10, SY660 Gen10,
  BL460c Gen10
• Server with HPE Smart Storage Battery
• Server with a minimum of one registered DIMM (RDIMM) per processor
Hardware and firmware configuration
To configure a platform for HPE NVDIMM operation, proceed as follows:
1. Install HPE NVDIMMs as described in the “Installation” section of the HPE NVDIMM User Guide for HPE ProLiant Gen9 Servers
   P/N 860023-003 or HPE ProLiant Gen 10 servers.
2. Verify or Install/update the server BIOS and iLO firmware images as required.
3. Reboot system and press F9 at the POST display to go to RBSU (via System Utilities).
4. In RBSU, enable NVDIMM (as shown in Figure 1) and, if appropriate, sanitize NVDIMM. For more information on the NVDIMM sanitize,
   refer to the HPE NVDIMM user guide.

Figure 1. RBSU control of HPE NVDIMM devices

Note
In addition to the support of individual HPE NVDIMM devices, HPE Host BIOS allows the interleaving of NVDIMM devices within a processor
socket, if desired.

5. Press F10 to save configuration and press Esc several times to return to the System Utilities menu and Enter to reset the server and boot
   Windows Server 2016 or Windows Server 2019.
As part of its server management of the HPE ProLiant servers as presented in Figure 2, HPE Integrated Lights Out (iLO) reports the
enumeration and health of the HPE NVDIMM devices in the System Information Memory pane and in the Integrated Management Log
records.
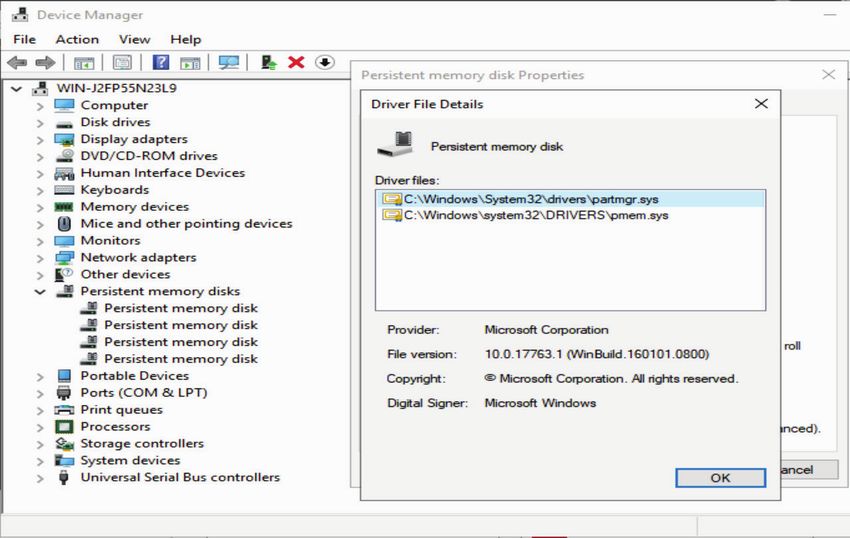
Technical white paper                                                                                                         Page 5

Figure 2. The iLO 4 Memory Information pane reports the HPE R-NVDIMM devices

Windows Server 2016 Storage Class Memory (SCM) enablement
Windows Server 2016 supports inbox the HPE NVDIMM devices. As shown in Figure 3, NVDIMMs are presented in the Windows Device
Manager as Persistent Memory Disk devices.

Notes
In addition to the BIOS interleaving support of HPE NVDIMMs, Windows Server components like Storage Spaces can be used to group
NVDIMM devices together and create larger simple or mirrored SCM volumes.

Figure 3. Windows Server 2016 Device Manager
Technical white paper                                                                                                           Page 6

A storage volume and then a Windows File System (NTFS or ReFS) can be created on SCM devices. At mount time, the File System detects if
a given volume resides on SCM hardware. If this is the case, a decision must be made if an SCM volume should be formatted for Direct
Access Storage (DAX) mode or traditional block mode (the default being traditional block mode).

Windows Server 2019 Persistent memory disk or SCM in Device Manager

Figure 4. Windows Server 2019 Device Manager

Below figure shows how to format an SCM device for DAX through the /DAX parameter of the format command. The Block vs. DAX type can
be then determined with the following command:
cmd> format /q /y /fs:ntfs /DAX
cmd> fsutil fsinfo volumeinfo

Figure 5. Windows Disk Manager and cmd window screens showing selection of DAX mode for SCM volume format.
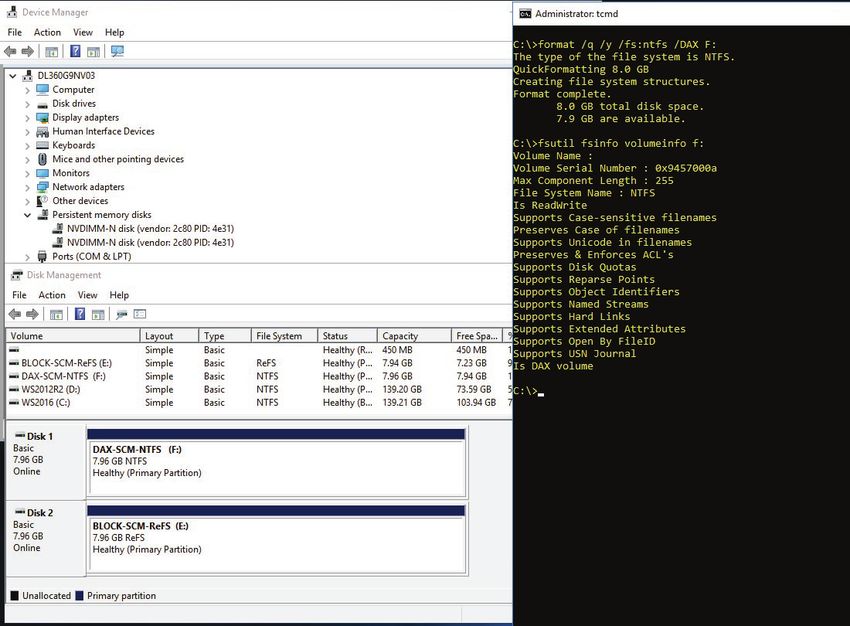
Technical white paper                                                                                                                                    Page 7

Below figure shows Windows Device Manager and Disk Manager showing a 2-way interleaved SCM device and the corresponding SCM
volume with DAX enabled NTFS file system.

Figure 6. Windows Device Manager and Disk Manager showing a 2-way interleaved SCM device and the corresponding SCM volume with a DAX enabled NTFS file system.

Windows SCM drivers
Microsoft has implemented a new driver model based on two types of SCM drivers:
• SCM Bus Driver: This driver is responsible for the enumeration of physical and logical SCM devices on the host. It should be noted that for
  optimization the SCM Bus Driver is not part of the I/O path.
• SCM Disk Driver: An SCM disk driver exists for each SCM disk type and implements the storage abstraction layer to the OS. The SCM disk
  driver can be in-box or vendor-specific. For HPE NVDIMM devices, the driver is in-box. Windows uses a native 4 KB sector size for the
  SCM devices.
These SCM drivers enable byte addressable storage and management of the SCM devices.
SCM Block Volumes
With this default mode at supporting SCM devices, Windows Server 2016/2019 provides full compatibility with existing applications and
maintains existing storage semantics. All I/O operations traverse the storage stack to the SCM NVDIMM driver. It supports the Windows File
Systems and storage filters. As expected, Disk Management and PowerShell cmdlets initialize the SCM disk, create the new block volume and
format the volume with a File System.

Notes
With Windows Server 2016/2019, creating a software RAID array of SCM devices using Disk Management is not supported.
Technical white paper                                                                                                               Page 8

DAX Volumes
Windows Server 2016/2019 introduces DAX Volumes, a new class of volumes enabling DAX mode: Memory-mapped files provide
applications with direct access to byte-addressable SCM to maximize performance. DAX mode is chosen at volume format time.

Note
With Windows Server 2016/2019, DAX mode is not supported with ReFS. Compatibility issues might exist with specific components like file
system filters, BitLocker and Volsnap.

DAX mode can use three possible I/O paths:
• Memory Mapped I/O:
  – Memory-mapped sections map directly to the SCM devices.
  – Offers true zero-copy access to storage and allows an application direct access to persistent memory.
  – There are no paging reads or writes.
• Cached I/O:
  – For an application request for cached I/O on a DAX enabled volume, the Windows cache manager creates a cache map that maps
    directly to the SCM device.
  – The cache manager copies directly between the user application’s buffer and the persistent memory.
  – Cached I/O has one-copy access to persistent memory.
• Non-Cached I/O:
  – I/O operations are sent down the software storage stack to the SCM device disk driver.
  – Existing failure semantics for application compatibility are maintained.
With Windows Server 2016/2019, file system metadata doesn’t use DAX mode sections. This results in paging reads and writes needed to
maintain existing ordered write guarantees for write-ahead logging support.
Please refer to the Microsoft documentation for the other impacts to File System functionalities by the Windows Server 2016 SCM DAX mode.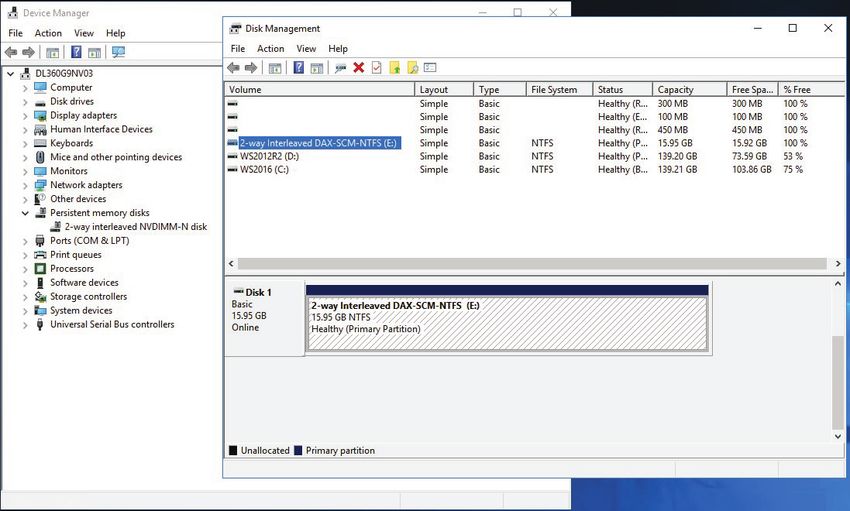
Technical white paper                                                                                                           Page 9

Below figure compares Block and DAX volume stacks with that of traditional storage volumes.

                                                                                        Source: Microsoft

Figure 7. Software I/O stack comparison

DAX Volume Creation
The following commands allow the creation of a DAX Volume on a SCM device with F: being used as an example of a drive letter:
• Format F: /dax /q
• PS> Format-Volume-DriveLetter F-IsDAX $true
DAX Volume Identification
The following Win32 APIs and command allow the identification of a DAX Volume:
• Application wanting to identify a DAX Volume
   – calls GetVolumeInformation(“F:\,” ... )
   – checks lpFileSystemFlags for FILE_DAX_VOLUME (0x20000000) • cmd window
   – fsutil fsinfo volumeinfo F:
• Application wanting to know if a specific file is on a DAX Volume
   – Calls GetVolumeInformationByHandleW(hfile, … )
   – checks lpFileSystemFlags for FILE_DAX_VOLUME (0x20000000)
Windows Server 2016 SCM/Windows Server 2019 SCM device Management with PowerShell
In addition to Windows Server Device Manager and Disk Manager, PowerShell commands like Get-PhysicalDisk and Reset-PhysicalDisk allow
health control of the SCM devices. Figure 8 presents their use with a transient error from a SCM device.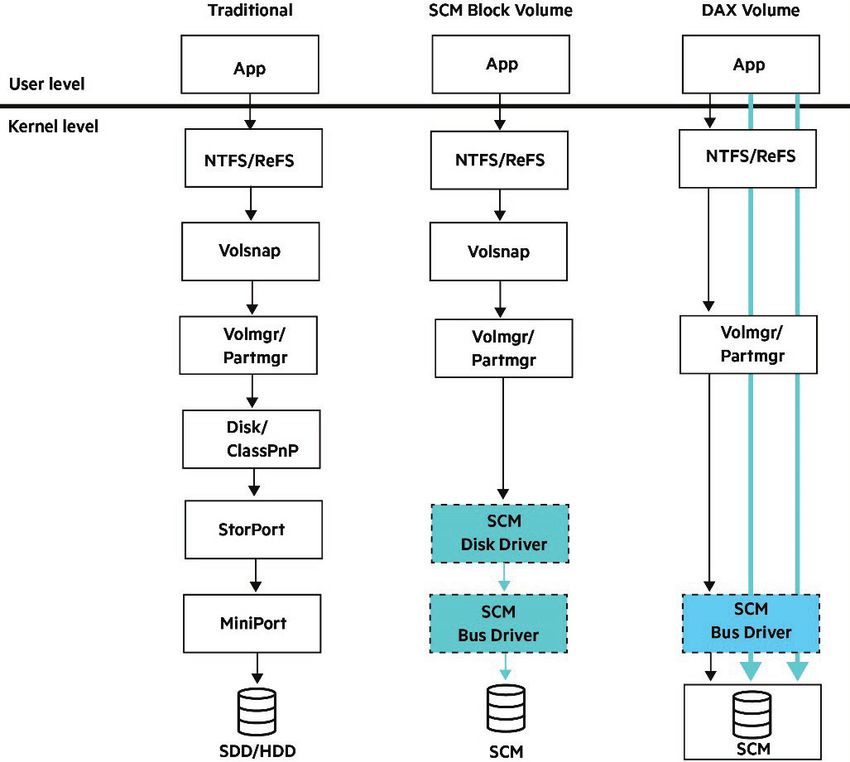
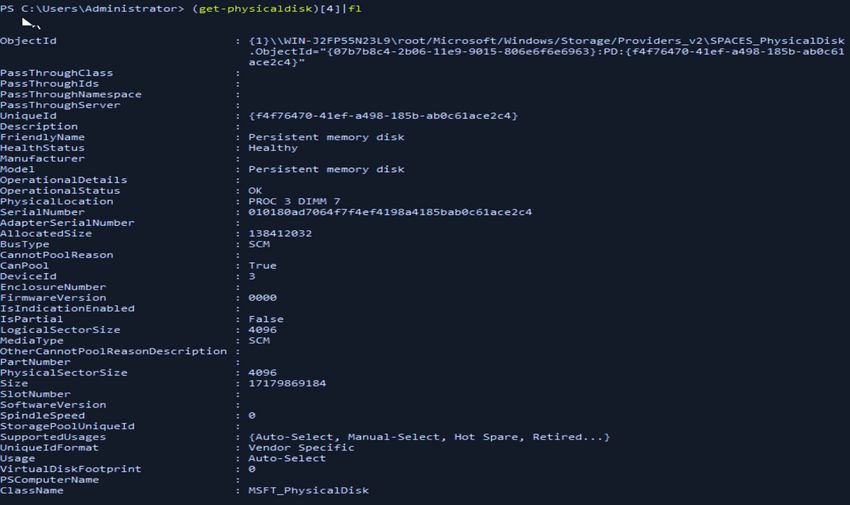
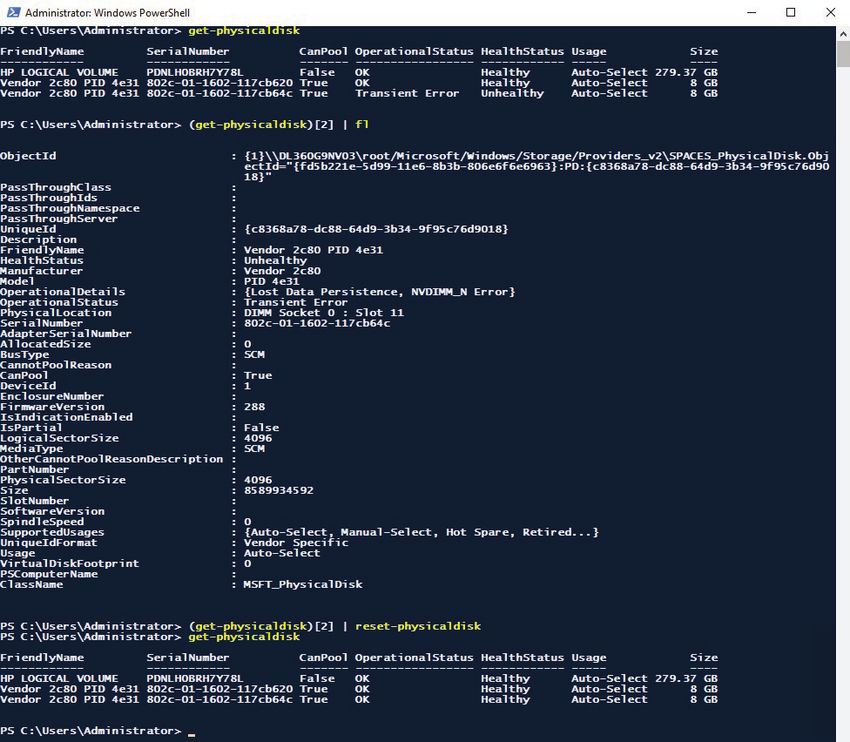
Technical white paper                                                                      Page 10

Figure 8. PowerShell Physical Disk commands handling a SCM device on Windows Server 2016

Windows Server 2019 SCM Device management with PowerShell

Figure 9. Powershell commands to get physical disk on Windows 2019
Technical white paper                                                                                                    Page 11

Figure 10. Powershell command on Windows 2019

Notes
A Windows Server software RAID array (RAID 5) of SCM devices using Windows Server 2016/2019 Disk Management is not supported.
Storage Spaces allows grouping SCM devices together and create larger simple or mirrored SCM volumes.

Windows Server 2016 Operational and Diagnostics Channels for SCM devices
Windows Server 2016 reports operational and diagnostic information for SCM devices in the Windows Server Computer Management
Services Logs: SCMBus and SCMDisk0101. Figure 11 shows the Windows Server Computer Management presentations of these channels.
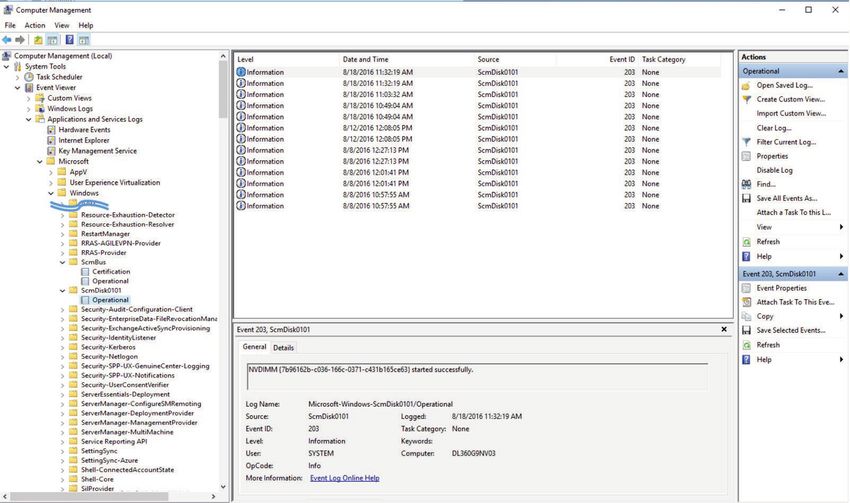
Technical white paper                                                                                                        Page 12

Figure 11. Windows Server 2016 operational and diagnostics channels for SCM devices in Windows Server Computer Management.

Figure 12. Windows 2019 event view data of persistent memory

Figure 13. Windows 2019 event view data of persistent memory
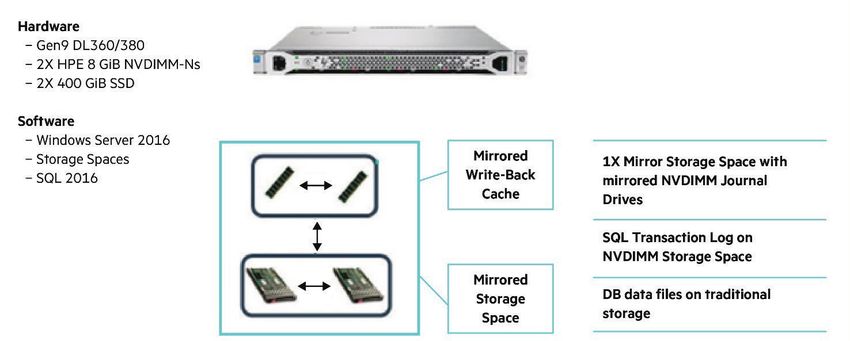
Technical white paper                                                                                                         Page 13

HPE NVDIMM use scenarios with Windows Server 2016/2019
HPE NVDIMM offers various uses for applications in the Windows Server 2016/2019 environment, like:
• SQL Server can store transaction logs in the NVDIMM devices
• Exchange Server can store in the NVDIMM device
This section describes two scenarios of interest for using HPE NVDIMM with Windows Server 2016/2019:
• Mirrored Storage Space
• SCM DAX
Mirrored Storage Spaces scenario
This scenario presents a Mirrored Persistent Write-Back Cache in front of a Mirrored SSD pool, as illustrated in Figure 14.

Figure 14. Mirrored Storage Space: SQL Server SCM with resilience.

To configure NVDIMMs for mirrored Storage Space, we present as an example these steps using PowerShell cmdlets:
1. Identify NVDIMMs and SSDs:
   # List physical disks
   PS> Get-PhysicalDisk
   # List disks
   PS> get-disk
   # Ensure there is no partition or any configuration on the disk
   PS> clear-disk -Number  -RemoveOEM -RemoveData
2. Create a new storage pool with all identified devices:
   PS> $pd = Get-PhysicalDisk -CanPool $true
   PS> new-storagepool -StorageSubSystemFriendlyName *Storage* -FriendlyName SCM_Pool -PhysicalDisks $pd
3. For Windows Server 2016: Change the SSD MediaType to “HDD” by entering:
   PS> Get-PhysicalDisk -UniqueID 600508B1001CD8368AB7B7FC46D47A07 | Set-PhysicalDisk -MediaType HDD
Technical white paper                                                                                                            Page 14

4. Set NVDIMM Usage to “Journal”:
    # use Get-PhysicalDisk to identify the Friendly Names of the NVDIMM devices
    PS> Get-PhysicalDisk

    PS> Get-PhysicalDisk -FriendlyName 2c* | Set-PhysicalDisk -Usage Journal
5. Create the StorageSpaces disk:
    PS> New-VirtualDisk -StoragePoolFriendlyName SCM_Pool -FriendlyName SCM_Mirror -ResiliencySettingName Mirror -UseMaximumSize
    -ProvisioningType Fixed
6. Initialize the SCM Disk:
    # Get the SCM disk number using Get-Disk
    PS> Get-Disk

    # Initialize SCM disk
    PS> Initialize-Disk -Number  -PartitionStyle GPT
7. Format the filesystem:
    PS> $partition = New-Partition -DiskNumber  -AssignDriveLetter –UseMaximumSize PS> Format-Volume -Partition
    $partition -FileSystem NTFS
8. List the Windows Disks:
    PS> Get-Disk

Output example:

No.          Friendly Name        Serial Number                      Health Status   Op Status   Total Size          Partition

3            HPE LOGICAL          PDNLH0BRH9B8I1                     Healthy         Online      279.37 GB           GPT
6            SCM_Mirror           {2faa7a8f-eb4c-472f-acc6-dc2e...   Healthy         Online      371 GB              RAW

SCM DAX scenario
Microsoft SQL Server 2016/2019 introduces its first DAX Volume support with its Tail of Log (or Persistent Main Memory extensions to the
SQL Server Log Manager) feature, using a single HPE NVDIMM and de-staging to a SATA, SAS HDDs or SSDs or NVMe SSDs.
With a server configuration as:
• 1X HPE ProLiant DL380 Gen9 (both sockets populated)
• 1X HPE 8 GB NVDIMM—for the tail of the log
• 2X SATA SSD (400 GB)—as the store for Database files
• 1X Write-Intensive NVMe SSD (400 GB)—as the store for both logs
• 128 GB Memory
• Software: Windows Server 2016 and SQL Server 2016 RTM
    – SQL Tables are stored on 2X SATA SSDs that are striped (Simple Space)
    – SQL Tail of the Log enabled
    – Table Size configured to match Data and Log storage capacities
    – Threads: 1 per Windows logical processor
    – SQL queries: Create, Insert, Update
    – SQL Performance Collectors: None
    – Batch Size: 1
    – Row Size: 32B
Technical white paper Page 15 Figure 15 presents the performance results: Figure 15. SQL Server 2016 transaction performance improvements with its Tail of Log enablement using HPE Persistent Memory on Windows Server 2016 SCM. Log solution Transactions/sec Latency per update NVMe SSD 71K 14 µs Tail of the Log on the single HPE NVDIMM 147K (2X) 7 µs (2X) Please refer to the resources presented in the following “Persistent Memory Resources” section for more information. HPE NVDIMM Performance with Windows Server 2016 Windows Server 2016 SCM Block Volume performance with Microsoft DiskSpd tool Microsoft DiskSpd is a tool that can simulate many types of workloads in various configurations. The next tables show results of running DiskSpd on the following Server configuration: Server Model: HPE ProLiant DL360 Gen9 Memory: Six DIMMs and two HPE NVDIMMs (the test accessed only one HPE NVDIMM) File System1: NTFS SCM Block Volume on one HPE NVDIMM File System2: NTFS Block Volume on one SATA SSD Large area of sequential concurrent writes of 64 KB blocks. 1 outstanding I/Os. Disable both software caching and hardware write caching: diskspd.exe –c4G –w100 –b64k –o1 –F4 –T1b –s8b –d10 –h file Storage type Bytes I/Os MB/s IOPS SCM Block Volume 59915567104 914239 5713.89 91422.17 SATA SSD 4767875072 72752 454.69 7275.04
Technical white paper                                                                                                                 Page 16

Large area of random concurrent reads of 8 KB blocks. Disable both software caching and hardware write caching:
diskspd.exe –c4G –r –w0 –b8k –o32 –t8 –d10 –h file

Storage type                Bytes                        I/Os                        MB/s                          IOPS

SCM Block Volume            59640225792                  7280301                     5687.74                       728031.31

SATA SSD                    4482473984                   547177                      427.47                        54716.78

Large area of random concurrent writes of 64 KB blocks. Disable both software caching and hardware write caching:
DiskSpd.exe -c4G -d10 -r -w100 -t8 -o32 -b64K -h file
Storage type               Bytes                         I/Os                       MB/s                          IOPS

SCM Block Volume           81534582784                   1244119                    7775.57                       124409.18

SATA SSD                   4595187712                    70117                      438.22                        7011.60

Large area of random concurrent 60% reads and 40% writes of 8 KB blocks. Disable both software caching and hardware write caching:
DiskSpd.exe -c4G -d10 -r -w40 -t8 -o32 -b8K -h file
Storage type               Bytes                         I/Os                        MB/s                         IOPS

SCM Block Volume           22215933952                   2711906                     2118.63                      271184.18

SATA SSD                   1521860608                    185774                      145.13                       18576.96

Windows Server 2016 SCM DAX Volume performance
The following table presents I/O performance results of running a simple application with DAX Volume awareness.
Server configuration:
Server Model: HPE ProLiant DL360 Gen9
Memory: Six DIMMs and two HPE NVDIMMs (the test accessed only one HPE NVDIMM)
File System: NTFS DAX Volume on one HPE NVDIMM
               I/O Depth      Reads/s            MB/s               Writes/s          MB/s

               1              3.5 M              13441              2.7 M             10494              10 threads on local CPU, 4 KB random
IOPS
               16             3.5 M              13462              2.7 M             10483

               1              57.7 K             14090              37.3 K            9322               10 threads on local CPU, 256 KB random
BW
               16             59.0 K             14759              37.5 K            9386

Note
It is important to note that in case of errors during NVDIMMs backup, erase or restore operations on that device (DRAM to/from NAND), this
type of failure is reported in the HPE ProLiant iLO management log (as well as the Windows Server 2016 diagnosis channels), the device will
be unavailable after reboot and data will be lost.
HPE recommends to back up data on any storage device including NVDIMMs, as in rare circumstances this failure may occur.
Technical white paper Page 17
HPE Persistent Memory resources, contacts, or additional links
HPE Persistent Memory hpe.com/us/en/servers/persistent-memory.html and IQFDPNJOGPQFSTJTUFOUNFNPSZ
HPE 8 GB NVDIMM Single Rank x4 DDR4-2133 Module (782692-B21)
hpe.com/us/en/product-catalog/servers/server-memory.html
youtube.com/watch?v=BKA_SOPqHfg
twitter.com/hpe/status/717103146204397568
HPE Improving Microsoft SQL Server Database Performance with HPE NVDIMM
hpe.com/h20195/v2/Getdocument.aspx?docname=4AA6-7123ENW
Microsoft Storage Class Memory (NVDIMM-N) Health Management in Windows
technet.microsoft.com/en-us/windows-server-docs/storage/storage-spaces/storage-class-memory-health
Microsoft presentation of Windows SCM at SNIA
snia.org/sites/default/files/SDC15_presentations/file_sys/NealChristiansen_SCM_on_Windows.pdf
Microsoft Configuring Storage Spaces with a NVDIMM-N Write-Back Cache
msdn.microsoft.com/library/mt650885.aspx
Using Non-volatile Memory as Block Storage in Windows Server 2016
channel9.msdn.com/events/Build/2016/P466
Using Non-volatile Memory as Byte-Addressable Storage in Windows Server 2016
channel9.msdn.com/events/Build/2016/P470
Microsoft SQL Server 2016 and Windows Server 2016 SCM—FAST
channel9.msdn.com/Shows/Data-Exposed/SQL-Server-2016-and-Windows-Server-2016-SCM--FAST
Microsoft DiskSpd Utility
gallery.technet.microsoft.com/DiskSpd-a-robust-storage-6cd2f223
Installing Windows Server 2016
Windows Server 2016 may be installed manually from the Windows Server 2016 media.
Preinstallation tasks
Before installing Windows Server 2016, complete the following tasks:
• Review the Microsoft Windows Server 2016 release notes.
• Make sure that your server, storage controller, and NIC are listed in this paper as a supported server or option.
• Reset the server to default settings and configure the boot controller order if necessary:
– For legacy BIOS servers (ProLiant Gen8 Servers, except for the ProLiant DL580 Gen8 server), reboot the server and press F9 from the
main boot screen to start the HPE ROM Based Setup Utility (RBSU). For instructions on using the RBSU, see the HPE ROM-Based
Setup Utility User Guide.
– For UEFI-capable servers (ProLiant DL580 Gen8 and ProLiant Gen9 Servers), reboot the server and press F9 when prompted during the
startup sequence to start the System Utilities. Select System Configuration. For instructions on using System Configuration, see the HPE UEFI
System Utilities User Guide for HPE ProLiant Gen9 Servers at h20564.www2.hpe.com/hpsc/doc/public/display?docId=c04398276.
– For HPE ProLiant Gen10 and Synergy Servers, the document is located at hpe.com/support/UEFIGen10-UG-en.
• Make sure that the server firmware is up-to-date. If necessary, complete the following:
– Update the System ROM to the latest version. You can download the latest BIOS for the ROM from the HPE Support Center at
h20565.www2.hpe.com/portal/site/hpsc.
– Update the iLO firmware to the latest version. You can download the latest iLO firmware from the HPE Support Center at
h20565.www2.hpe.com/portal/site/hpsc.Technical white paper Page 18
• Depending on your installation method, make sure that you have either of the following:
– If installing from the Windows Server 2016 media, the server must have a DVD drive either installed or attached to the server receiving
the installation.
– If using iLO virtual media to install Windows Server 2016 to a ProLiant ML or DL server, you need an advanced iLO key if not already
present.
Installing Windows Server 2016/2019 from the OS media
To install Windows Server 2016/2019 on a server using the Windows Server 2016/2019 media, complete the following steps:
1. Insert the Windows Server 2016/2019 media into the DVD drive and boot the server to the DVD.
2. Follow the steps on the installation screens to complete the OS installation.
Installing Windows Server 2016/2019 using iLO
1. Power on the server in which Windows will be installed. This server is referred to as the Installation Server (IS).
2. From an alternate Windows Server or PC, referred to as the Console System (CS), verify that the CS has access to the network of the IS.
3. Open a supported web browser on the CS and browse to the iLO IP of the IS. Log in to iLO.
4. Expand the Remote Console drop-down, select the Remote Console option, and click the Launch button under the Integrated Remote
Console section of the Remote Console page.
5. After the iLO Integrated Remote Console window opens, open the Virtual Drives drop-down menu and select Image File CD-ROM/DVD.
6. In the Mount Image File pop up window, browse to the ISO location on the CS and Open the ISO. The ISO is virtually mounted as
CD-ROM/DVD.
7. Follow the steps on the installation screens to complete the OS installation.
Installing components from the HPE Service Pack for ProLiant (SPP)
Download and install the HPE Service Pack for ProLiant (SPP) latest supported version from hpe.com/servers/spp/download.
Note
The download of the SPP requires an active warranty, HPE Care Pack, or support agreement that is linked to your HPE Support Center
profile. To determine eligibility, you must sign in to access the download. For information on how warranties, HPE Care Packs, and support
agreements enable access to select downloads or site functions, click Help on the HPE Support Materials website.
To install components from the HPE Service Pack for ProLiant (SPP) to Standard version of the Operating System locally, complete the
following steps:
1. Mount SPP through iLO.
2. Click on “launch_sum.bat” to launch SUM.
3. Click on “Local-host Guided updates.”
4. Choose Interactive mode of flashing and Click OK.
5. Once inventory of Baseline and node is complete, click Next.
6. On review page, select the required components to be installed and proceed with the deployment by clicking on “Deploy” button.
7. After deployment, SUM will list all the components that were selected for installation with the installation results.
8. Reboot the server as per requirement and re-launch following steps 1–8, to install the firmware that was not installed on the first launch.Technical white paper Page 19 For automatic mode of flashing, follow steps 1–3 as stated above and proceed with below steps: 1. Choose automatic mode of flashing. 2. Baseline inventory, node inventory and deployment completes without any human intervention. 3. Once deployment is complete, SUM will list all the components that were installed with the installation results. 4. Reboot the server and re-launch following steps 1–6, to install any firmware components that was not installed on the first launch. As a security feature, Microsoft disabled access to admin$ share by default for all admin group users other than default “Administrator.” But admin$ share is accessible for domain admin users. Adding the below key in the registry will solve accessing the admin$ share problem. Link for reference support.microsoft.com/en-us/kb/951016 Key: HKEY_LOCAL_MACHINE\SOFTWARE\Microsoft\Windows\CurrentVersion\Policies\System Value: LocalAccountTokenFilterPolicy Data: 1 (to disable, 0 enables filtering) Type: REG_DWORD (32-bit) To install components from the Service Pack for ProLiant (SPP) remotely, complete the following steps: 1. Make a folder on the server Desktop and copy the extracted contents of the Service Pack for ProLiant (SPP) to the folder. 2. Launch SUM. 3. Click on baseline library and complete the baseline inventory. 4. Click Add node and enter the details (IP, target type, baseline, and credentials) of the target machine and click on “ADD” to add the target. 5. Click on “inventory” to complete the node inventory. 6. After the inventory completes, click “Review and Deploy updates” link, click on “OFF” button on the screen and choose proceed anyway to view the list of component to be installed and follow the on-screen instructions. ReFS file system ReFS formatting Prior to Windows Server 2016 the default sector size (allocation unit size) for ReFS formatting was 64K. Unless otherwise specified during the format command (i.e., PowerShell) the default size is now 4K, thus it advisable to determine the appropriate sector size and specify during formatting, e.g., Format-Volume [-AllocationUnitSize ] [-FileSystem ReFS] … Use case for more than 24 NVDIMMs on the Server If there are more drives than number of letters. In Windows “Volume mount point” can be used. Following steps can be followed 1. Open command prompt and run diskmgmt 2. Right click on NVDIMM 3. Select “New Simple Volume.” 4. Select Next 5. Specify volume size window, select next 6. Assign drive letter or path window, select “Mount in the following empty ntfs folder” radio button 7. Assign value from existing folder. For example: “c:\TempA” folder to a drive 8. Select next 9. Now c:\TempA folder can be used as that NVDIMM drive.
Technical white paper

Resources
docs.microsoft.com/en-us/windows-server/storage/storage-spaces/storage-spaces-direct-overview
blogs.msdn.com/b/clustering/archive/2015/05/27/10617612.aspx
aka.ms/privsec
microsoft.com/en-us/cloud-platform/windows-server

What’s New in the Windows Server 2016
technet.microsoft.com/library/dn765472.aspx
Microsoft Windows Server 2016 Product Page
microsoft.com/en-us/server-cloud/products/windows-server-2016/
Microsoft Windows Server 2016 Release Notes
technet.microsoft.com/library/dn765470.aspx
Shielded VMs and Guarded Fabric Operations Guide for Windows Server 2016 (TPM)
gallery.technet.microsoft.com/Shielded-VMs-and-Guarded-b05d8078
Platform Vision & Strategy (5 of 7): Security and Assurance Overview
Security and Assurance in Windows Server 2016
Microsoft Windows Processor Requirements

Learn more at
hpe.com/servers
microsoft.com/windowsserver
hpe.com/us/en/storage.html

     Share now

    Get updates

                                              © Copyright 2014–2019 Hewlett Packard Enterprise Development LP. The information contained herein is subject to change
                                              without notice. The only warranties for Hewlett Packard Enterprise products and services are set forth in the express warranty
                                              statements accompanying such products and services. Nothing herein should be construed as constituting an additional warranty.
                                              Hewlett Packard Enterprise shall not be liable for technical or editorial errors or omissions contained herein.

                                              Intel and Intel Xeon are trademarks of Intel Corporation in the U.S. and other countries. Microsoft, Windows, and Windows Server are
                                              either registered trademarks or trademarks of Microsoft Corporation in the United States and/or other countries. All other third-party
                                              marks are property of their respective owners.

                                              4AA5-5841ENW, April 2019, Rev. 12
You can also read