The ACT Test Technical Guide State Testing District Testing - Online Testing
←
→
Page content transcription
If your browser does not render page correctly, please read the page content below
®
The ACT Test
Technical Guide
State Testing
District Testing

    Online Testing

                     www.act.org
                       [Type text]   [Type text]
Contact Information
Please direct all questions to ACT State and District Testing, 7:00 a.m.–5:00 p.m., central time, Monday–Friday.
Phone...................................................................................................................................... 800.553.6244, ext. 2800
Contact Us Website ................................................................................ http://www.act.org/stateanddistrict/contactus

Frequently Used Links
Technical Requirements and Technical Guide webpage .................. http://www.act.org/stateanddistrict/onlinetesting
TestNav Online Support................https://support.assessment.pearson.com/display/TN/TestNav+8+Online+Support
PearsonAccessnext .................................................................................................................. https://testadmin.act.org
PearsonAccessnext Mock Administration .................................................................... https://training.testadmin.act.org
Download TestNav, ProctorCache Software .................................................................... http://download.testnav.com
Contents

Overview ...................................................................................................................................................................... 1
   PearsonAccessnext and TestNav ................................................................................................................................ 1
   Requirements for an Online Administration ............................................................................................................... 1
   Site Readiness ........................................................................................................................................................... 2
   Administrative Monitoring in Each Room ................................................................................................................... 3
   Test Content Security ................................................................................................................................................ 3
   Disabling Automatic Application Launching............................................................................................................... 3
Proctor Caching Overview ......................................................................................................................................... 5
   Proctor Caching and its Benefits ............................................................................................................................... 5
   Process Overview ...................................................................................................................................................... 6
ProctorCache System Requirements ....................................................................................................................... 7
   Hardware Requirements ............................................................................................................................................ 7
   Software Requirements ............................................................................................................................................. 7
   Whitelisting ................................................................................................................................................................ 7
Installing ProctorCache Software ............................................................................................................................. 8
   System and Staff Prerequisites ................................................................................................................................. 8
   Choosing Proctor Caching Computers ...................................................................................................................... 8
   How to Install the ProctorCache Software ................................................................................................................. 9
   Updating Files If Using Upstream Proxy Server ...................................................................................................... 10
Using Saved Response File (SRF) and Log Files .................................................................................................. 11
   Understanding SRF and Log Files .......................................................................................................................... 11
   Configurations and Primary Save Locations for TestNav—Windows and Mac OS X ............................................. 11
   Configurations and Primary Save Location for TestNav—Chromebooks ............................................................... 11
   Secondary Save Location ........................................................................................................................................ 12
   Storing This Information in PearsonAccessnext ........................................................................................................ 12
Configuring Proctor Caching Computers .............................................................................................................. 13
   When to Set Defaults ............................................................................................................................................... 13
   How to Set Defaults ................................................................................................................................................. 13
   Using Default ProctorCache Settings ...................................................................................................................... 15
TestNav Information ................................................................................................................................................. 16
   New Version of TestNav .......................................................................................................................................... 16
   Conducting a Mock Administration .......................................................................................................................... 16
   Understanding Chromebooks .................................................................................................................................. 16
   Understanding App Check with TestNav ................................................................................................................. 16
TestNav System Requirements ............................................................................................................................... 17
   Hardware Requirements .......................................................................................................................................... 17
   Software Requirements ........................................................................................................................................... 17
Whitelisting............................................................................................................................................................... 18
  Wireless Network Best Practices ............................................................................................................................. 18
Installing TestNav ..................................................................................................................................................... 19
  How to Download TestNav on Windows or Mac OS X ............................................................................................ 19
  How to Download TestNav on Chromebooks .......................................................................................................... 20
  How to Run App Check ........................................................................................................................................... 21
  Freezing the Test Environment................................................................................................................................ 23
Working with Precached Test Content ................................................................................................................... 24
  Precaching before Test Day .................................................................................................................................... 24
  How to Precache Test Content ................................................................................................................................ 24
  How to Verify the Status of Precached Test Content .............................................................................................. 25
  Monitoring ProctorCache Activity during Testing..................................................................................................... 25
  How to Purge Cached Test (or Client) Content ....................................................................................................... 26
Overview

Overview
This guide will help technical staff configure an organization’s systems for the ACT test taken online.

This section includes information on:
•   PearsonAccessnextTM and TestNav™
•   Requirements for an online administration
•   Site readiness
•   Administrative monitoring in each room
•   Test content security
•   Disabling automatic application launching

PearsonAccessnext and TestNav
PearsonAccessnext is the web application used by testing staff (i.e., test coordinators, room supervisors) to start
and monitor tests. It is located at https://testadmin.act.org.
TestNav is the secure test delivery engine used by examinees to take the tests. The instructions to download the
TestNav application are discussed in a later section of this document.

Requirements for an Online Administration
To test online, your organization must meet the following requirements:
•   Site readiness must be completed to ensure the equipment meets hardware, software, and other technical
    requirements defined by ACT. Site readiness also includes performing an app check to ensure that the device
    is running a supported operating system (OS) and OS version.
•   The proctor caching process must be followed as defined by ACT in this guide. Proctor caching is the process
    of storing encrypted test content on a local computer. This stored or cached test content is distributed to the
    examinee computers during a testing session. It accelerates the delivery of test content to examinees and
    reduces the amount of bandwidth required for online testing.
Note: Uninstall any previous versions of ProctorCache software that may be installed on the computer before
installing the updated version.

Note: Using proctor caching does not require special hardware, equipment, or an underlying server-based
operating system.

                                                                                                                      1
Overview
Site Readiness
To ensure technical readiness, the test coordinator and technical coordinator should work together to gather the
following information.
Category Information You’ll Need to Know
Internet Connection • Type of internet connection at your organization
• Internet bandwidth/speed
Devices • Number of devices available for examinees to use
• Number of devices to be used for administrative access
• Types of devices
• Device owner/administrator
Operating System, • Operating system for each device
Processor, Memory • Processor for each device
• Memory for each device
Monitors • Screen resolution for each device
• Display size of each device
Browsers • Beginning with the 2018-2019 school year, browser based-testing is no longer
supported.
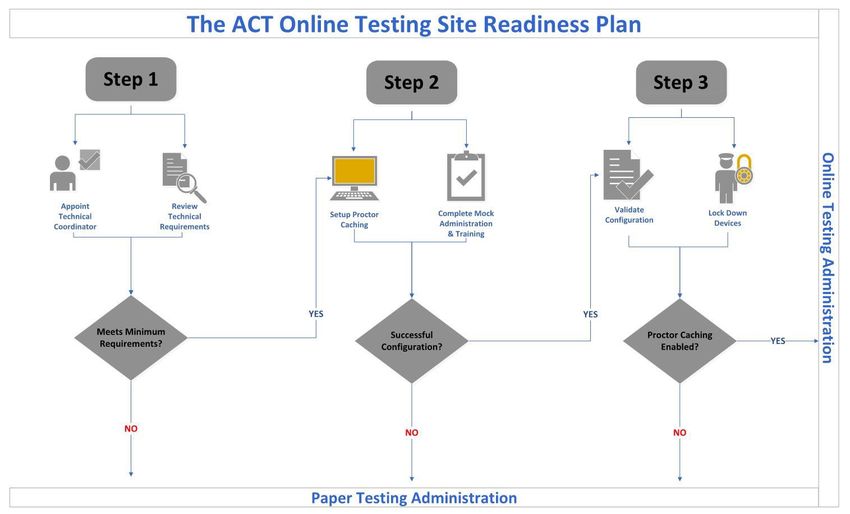
The ACT Online Testing Site Readiness Plan can be found on your state’s ACT website under Configuration. This
plan will provide a process to help determine what testing format your organization should use. The specific tasks
for each of these steps are outlined in this guide.
2Overview
Step Action
1 Appointed Technical Coordinator Reviews Technical Requirements
Technical coordinators are responsible for the tasks listed below:
• Ensure the school’s computers and infrastructure meet online testing requirements.
• Read and follow the procedures listed in this guide.
• Create the TestNav™ configuration in PearsonAccessnext at both
https://training.testadmin.act.org/ and https://testadmin.act.org.
• Install ProctorCache software on the proctor cache computer.
• Precache before testing and purge test content after testing.
• Help the test coordinator and other staff set up for test day (includes examinee and
administrative computers and test rooms).
• Troubleshoot technical issues staff or examinees may have on test day.
2 Setup Proctor Caching and Complete Mock Administration and Training
Once the technical coordinator has set up proctor caching, your organization will need to perform
a mock administration using all testing computers to confirm that they meet technical requirements.
A mock administration is done at https://training.testadmin.act.org. You will need to set up your
organization’s TestNav Configuration(s), create sessions, and launch mock administration tests to
confirm that the technical requirements are met for online administration of the ACT. Refer to The
ACT Test Mock Administration Guide for Online Testing for additional information. The guide is
located on your state’s ACT website under section 3, The ACT: Verification – Ensure nothing was
missed.
3 Validate Configuration and Lock Down Devices
After you have successfully performed a mock administration, the technical coordinator must confirm
that the system is properly configured and freeze the testing environment.
Administrative Monitoring in Each Room
Each test room must have a separate computer that the room supervisor will use to access PearsonAccessnext to
start and stop test sessions, and monitor testing progress. This computer must meet the requirements listed at
https://support.assessment.pearson.com/display/PAsup/System+Requirements and reside in an area where the
room supervisor can see all examinees in the room.
Test Content Security
The ACT® test online must be given using TestNav, a “locked down” testing application. To help ensure test
security, all software applications, internet browsers, cameras (still and video), screen capture programs (live and
recorded, such as Skype), email, instant messaging, application switching, media players (such as iTunes), and
printing must be closed before testing begins.
Administrative devices must also be configured prior to testing to ensure content security. Turn off or disable any
management software that would allow secure test content on examinee testing devices to be viewed on any other
device; e.g., LanSchool, NetopVision, Hapara, or similar applications.
Disabling Automatic Application Launching
You must configure any applications that may automatically launch on a computer to disable automatic launch
during testing sessions. Such launches commonly occur when:
• Anti-virus software performs automatic updates
• Power management software on laptops warns of low battery power
• Screensavers start or go into sleep mode
• Email notifications appear
3Overview
• Calendar notifications appear
• Sticky keys – Shift key is pressed 5 times (Windows only)
• Laptops prompt for automatic software updates
4Proctor Caching Overview
Proctor Caching Overview
This section includes information on:
• Proctor caching and its benefits
• Process overview
Proctor Caching and its Benefits
Proctor caching is the process of storing encrypted test content on a local computer using software called
ProctorCache. This stored or cached test content is distributed to examinee devices during a testing session.
Proctor caching improves the online testing experience for examinees and testing staff by:
• Allowing examinees to complete the tests even if the internet connection fails (unless the examinee has not yet
logged in and started testing)
• Reducing delays caused by network congestion
• Reducing the amount of bandwidth required for online testing by reducing the download redundancy caused by
each examinee downloading an independent copy of the test
The following diagram illustrates the technical benefit of using proctor caching.
5Proctor Caching Overview
Process Overview
The table below provides an overview of the process of installing and using ProctorCache.
Stage Description
1 Prepare network environment. See TestNav System Requirements.
2 Identify proctor caching computer(s) and verify that identified computer(s) meet(s) minimum system
requirements.
IMPORTANT! For an optimal proctor caching experience, the ProctorCache computer must be
in the same building where testing will occur.
3 Install ProctorCache software on all proctor caching computers.
4 Add default proctor caching settings to each organization in PearsonAccessnext.
5 Use App Check to verify connectivity between testing computers and proctor caching computers. See
How to Run App Check.
6 Precache the test content from PearsonAccessnext no sooner than two business days before testing
begins.
7 Verify that all test content was successfully cached.
8 Have test coordinator create and prepare test sessions the day before testing. Refer to “How to
Prepare a Test Session” section in The ACT Administration Manual – Online Testing.
9 Monitor cached content and connections to the proctor caching computers.
10 At the end of the testing window, purge content from proctor caching computers.
Note: Proctor caching is not complete until you reach the “SUCCESS!” message in this document.
For additional information regarding proctor caching, visit
https://support.assessment.pearson.com/display/TN/ProctorCache+System+Requirements.
6ProctorCache System Requirements
ProctorCache System Requirements
This section includes information on:
• Hardware requirements
• Software requirements
• Whitelisting
Hardware Requirements
Below are the minimum hardware requirements for devices used for proctor caching.
Windows
Processor x86/x32 and x64
Minimum 2GHz
Memory 2GB RAM
Software Requirements
Supported Operating Systems for the use of the ProctorCache software include Windows Server 2008, Windows 7,
Windows Server 2012, Windows 8, Windows 10, or Windows Server 2016.
Whitelisting
The following URLs and ports must be whitelisted or opened in any firewalls, proxy servers, or software used for
internet content filtering or SSL inspection:
URL:Port
• .act.org:80
• .act.org:443
• .pearsontestcontent.com
• .thawte.com
• .usertrust.com
• .comodoca.com
• .googleanalytics.com
Default Port Settings for ProctorCache: port 4480 and port 4481 (pertains to LAN traffic only).
7Installing ProctorCache Software
Installing ProctorCache Software
This section provides the instructions for installing the ProctorCache software. The technical coordinator will find
information on:
• System and staff prerequisites
• Choosing proctor caching computers
• How to install the software
• Updating files if using an upstream proxy server
System and Staff Prerequisites
Before installing and using ProctorCache, you must meet the following requirements.
The technical coordinator must have:
• Full local administrator permissions
• Working knowledge of your network
• A new user account for PearsonAccessnext with a technical coordinator role
Note: The test coordinator creates the new account in the product and organization for the current
year (e.g., ACT 2019).
The organization system must have:
• Fixed internal IP addresses
• A network connection of 100 Mbps full-duplex or higher (the minimum is 10/100)
• A network set up to use IPv4 DNS (Domain Name System) servers
Note: If you have not made any explicit changes to use only IPv6 for DNS, you should meet all of the system
prerequisites. You will know if this is properly configured because TestNav and ProctorCache computers will
communicate properly with one another.
• TCP Ports open:
o 80 (Internet); 443
o 4480 and 4481 (Local Network)
Note: Using proctor caching does not require special hardware, equipment, or an underlying server-based
operating system.
Choosing Proctor Caching Computers
When choosing proctor caching computers:
• Choose computers on the same network as the examinees’ testing computers.
• Choose computers that are in the same building as the examinees’ testing computers.
• Choose computers that do not need to run anything other than the proctor cache software on test day.
• Choose computers that will quickly boot up.
• Do not choose the same computers used for testing examinees.
• Do not choose a computer that is tasked with network services such as a domain controller (i.e. Active
Directory Server, Print Server, etc.).
8Installing ProctorCache Software
How to Install the ProctorCache Software
Step Action
1 Go to the intended proctor caching computer.
2 Go to http://download.testnav.com.
3 Select Download ProctorCache.
4 Open the file you downloaded to open the installer screen. A security message appears. Select the
Run or Yes button as needed to launch the installer.
5 After the software loads, read the introduction, and then select the Next button.
6 Proxy information displays. The Server Name will default to the computer name. If your site is using a
proxy server, verify that the proxy server information is correct or enter the correct value. Select the
Next button.
7 Accept the default destination folder and select the Next button.
Note: If the computer uses an upstream proxy computer to access the internet, see Updating Files If
Using Upstream Proxy Server.
8 Select the location to create the ProctorCache icon(s). Select the Create icons for all users check
box, and then select the Next button.
Note: If the ProctorCache computer uses an upstream proxy computer to access the internet, refer to
Updating Files If Using Upstream Proxy Server.
9 On the Start ProctorCache page, check the box next to Start ProctorCache automatically when
install completes.
10 Review the pre-installation summary, and then select the Install button. ProctorCache begins
installing.
11 When the software is installed, select the Done button to close the installation.
12 Restart your computer.
13 Go to the Configuring Proctor Caching Computers section to complete ProctorCache set up.
9Installing ProctorCache Software
Updating Files If Using Upstream Proxy Server
ProctorCache computers using an upstream proxy computer to access the internet require additional changes to
the original proctor caching files. Use the appropriate set of instructions below to make those changes.
If the upstream Then find this file … And change the value of … To the new value of …
proxy is …
Authenticated squid\etc\squid.conf ##cache_peer address parent cache_peer
parent 0
login=: default
no-query http11
##never_direct allow all never_direct allow all
Unauthenticated squid\etc\squid.conf ##cache_peer address parent cache_peer
parent 0
default no-query http11
##never_direct allow all never_direct allow all
10Using Saved Response File (SRF) and Log Files
Using Saved Response File (SRF) and Log Files
This section includes information on:
• Understanding SRF and log files
• Configurations and primary save locations on Windows and Mac OS X
• Configurations and primary save location on Chromebooks
• Secondary save location
• Storing this information in PearsonAccessnext
Understanding SRF and Log Files
When an examinee responds to a test question, TestNav saves the response in a saved response file (SRF) and
sends these responses to the Pearson server. After the responses successfully save to the server, TestNav deletes
the SRF.
TestNav also writes to a log file during the testing session. These files help to troubleshoot issues, if they occur.
You cannot configure the log file save location.
Configurations and Primary Save Locations for TestNav—Windows and Mac OS X
For Windows and Mac OS X, you must:
1. Configure a primary and an optional secondary save location then enter this information in the TestNav
Configurations screen within PearsonAccessnext.
Note: When nothing is designated for the primary save location, the SRF file will automatically save to the
default primary save locations.
2. Configure examinee user accounts to have complete read, write, and delete access in all save locations.
If using a secondary save location, it is strongly recommended that you configure a shared network folder that can
be accessed from all testing devices for SRFs to ensure that you do not lose responses, even if an examinee
cannot continue to test on the same device. You must verify that you can access the location from multiple testing
devices.
The default primary save location is described below.
Operating System SRF Location Log File Location
Windows {USER.HOME}\Pearson\srf\ {USER.HOME}\Pearson\logs\
Mac OS X {USER.HOME}\Pearson\srf\ {USER.HOME}\Pearson\logs\
Configurations and Primary Save Location for TestNav—Chromebooks
On Chromebooks, the SRF default primary save location is not customizable. The primary save location will be on
the local device and the secondary save location can be customized to use a SFTP server path, if necessary.
To find files, take these steps.
Step Action
1 Launch the TestNav app.
2 Focus your cursor in the username or password field.
3 Press z, and the File Viewer box appears.
Note: If the File Viewer does not display, select on the window and then press z again.
4 Plug in a USB memory stick.
11Using Saved Response File (SRF) and Log Files
Step Action
5 Select the download button next to the SRF and log file(s) you want to download.
6 When the window opens, select the USB memory stick, and select Save.
Secondary Save Location
You can place backup SRFs in a directory on the network file server, on the examinee’s testing device, or on a
secure file transfer protocol (SFTP) site. The following table outlines the pros and cons of each option; however, as
a best practice, we recommend using both a primary save location and a secondary save location:
Back up Location Options Pros Cons
Directory on network Backup file is accessible from other • Uses more internal network
computer computers. bandwidth.
• Responses save to the network
drive more slowly than to the local
directory. As a result, test items
take more time to load.
• Does not provide secondary save
for Chromebooks.
Local directory on testing • Uses less internal network • Backup file is not accessible from
computer (TestNav client) bandwidth. any other computer.
• Responses save to local directory • Does not provide secondary save
more quickly than to the network for Chromebooks.
drive. As a result, test items take
less time to load.
SFTP • Provides secondary save location • Requires SFTP site setup.
for all supported testing
computers and devices.
• Chromebooks can only use SFTP
as a secondary save location.
Note: You should familiarize yourself with default response file backup locations. Some save locations are
configurable. If you set a network file server as a primary or secondary backup location, do not use:
• Spaces in the save location path.
• A location that requires authentication. If authentication is required, TestNav cannot access the shared location.
• A Windows Uniform Naming Convention (UNC) or network path on a device with macOS or Linux, such as
\\ComputerName\SharedFolder\Resource. It’s recommended that you specify a mapped drive location such as
D:\TopDirectory\NextDirectory\SaveLocation.
Storing This Information in PearsonAccessnext
Once you have determined your SRF locations, you will enter that information when you enter your TestNav
configurations. See Configuring Proctor Caching Computers.
12Configuring Proctor Caching Computers
Configuring Proctor Caching Computers
This section includes information on:
• When to set defaults
• How to set defaults
• Using default proctor caching settings
When to Set Defaults
You can specify a default proctor caching computer that will automatically be associated with new test sessions.
How to Set Defaults
Take the following steps to set default ProctorCache settings.
Note: You must have the technical coordinator role in PearsonAccessnext to set default ProctorCache settings.
Step Action
1 Log in to PearsonAccessnext at https://testadmin.act.org.
2 In the upper right hand corner of your screen, make sure your correct test administration and
organization are selected. If not, select the correct ones from the drop-downs.
3 Select the Setup icon.
4 Select the TestNav Configurations title from the drop-down.
5 In the Tasks window, under Select Tasks, select the checkbox for the Create / Edit TestNav
Configurations title.
6 Select the Start button.
7 Create a name for your configuration settings and enter it for your organization.
Note: If the TestNav Configurations are being set up at the district level you will want to make sure you
choose all organizations testing online from the Organizations drop-down. If this is not done, the
organizations will not be set up correctly for proctor caching and will be switched to paper testing.
8 Locate the IP address on the proctor caching computer. Use the following table to determine your next
step.
If the Operating System is … Then locate the IP address by …
Windows • Opening the Command Prompt
• Typing IPCONFIG for the IP address to display
9 Enter the details of the proctor caching computer that you will use to precache tests, using port 4480 in
the Port field.
13Configuring Proctor Caching Computers
Step Action
10 In the Response File Backup Locations fields, enter the locations determined. See Using Saved
Response File (SRF) and Log Files.
11 Do not check the Precaching Computer Override checkbox.
12 Select the Create button.
Note: Test content is not yet downloaded and precached. Precaching is something you must perform
manually. See the section on Working with Precached Test Content.
13 If more than one proctor caching computer will be used, select the configuration from the list on the left
side of the screen. Select the Add button and complete the precaching computer configuration as
many times as needed.
14. Verify the connection to the precaching computer by opening a new browser window and navigating to
http://:. If the ProctorCache interface does not appear, reference the setup
instructions.
Note: If you still cannot install proctor caching, contact ACT for assistance.
14Configuring Proctor Caching Computers
Using Default ProctorCache Settings
Once you have entered default ProctorCache settings, the IP address and port you saved will automatically
populate for each test session created when you select the precaching computer during setup. Initial settings can
be changed later.
SUCCESS! You have successfully set up proctor caching.
15TestNav Information
TestNav Information
This section includes information on:
• New version of TestNav
• Conducting a mock administration
• Understanding Chromebooks
• Understanding App Check with TestNav
New Version of TestNav
As of July 2018, TestNav app version 1.7.x is required. You will receive an error message if you do not have the
updated version installed. For more information regarding app updates, go to:
https://support.assessment.pearson.com/x/HgACAQ.
Conducting a Mock Administration
A mock administration is strongly recommended to verify the technology setup is complete and to familiarize test
coordinators, room supervisors, and proctors with the testing process. Refer to The ACT Test Mock Administration
Guide and use the training site found at https://training.testadmin.act.org to complete the mock administration
before the actual test day.
Note: Live tests must not be accessed via TestNav by anyone other than the examinees testing on test day.
Understanding Chromebooks
As of Spring 2019, ACT only supports managed Chromebooks.
To set up TestNav on Chromebooks, you should first ensure the Chromebooks used for testing are managed. You
can manage your organization’s Chrome devices from a single place using Chrome device management. To
confirm that a Chromebook is managed, view the Check if your Chromebook is managed section at:
https://support.google.com/chromebook/answer/1331549?hl=en.
Understanding App Check with TestNav
Running App Check without a Configuration Identifier will confirm TestNav's ability to enter full screen or "kiosk"
mode as well as checking connectivity to Pearson's servers. It also checks for whether the following features that
should be disabled are enabled on the testing computer:
• The ability to save multiple items in the Cloud Clipboard
• Being able to sync across devices in the Cloud Clipboard
• Airplay screen-sharing
Running App Check with a Configuration Identifier will also check the application's ability to communicate with the
organization's defined ProctorCache server and SRF save locations.
You must run App Check on every device running TestNav in your testing environment.
16TestNav System Requirements
TestNav System Requirements
This section includes information on:
• Hardware requirements
• Software requirements
• Whitelisting
• Wireless network best practices
Note: Technical requirements may change on a quarterly basis.
Hardware Requirements
Below are the minimum hardware requirements for devices used for testing.
Windows macOS Chrome OS
Supported Devices Desktop Desktop Chromebook
Laptop Laptop
Processor x86/x32 and x64 only Intel-basedTM Any
Memory 2GB RAM 2GB RAM 2GB RAM
Screen Size 9.5 inch 9.5 inch 9.5 inch
Screen Resolution 1024x768 1024x768 1024x768
Other • External keyboard and • Local File access to • Convertible
mouse (or touchpad) for home directory Chromebooks cannot be
touchscreen devices • Wired hardware is used in tablet mode*
required recommended • Touchscreen not
• Wired hardware is supported
recommended
• Local File access to
home directory
*In order for Chromebooks to be used, they must be used with a keyboard and mouse/touchpad. Tablet mode
refers to using the device as a touchscreen device without a keyboard and mouse/touchpad attached.
Software Requirements
Use the links below to download and set up the TestNav app for your supported operating system:
Operating System Download TestNav Setup Instructions
Chrome OS 66, 67, 68, 69, 70+ From Chrome Web Store Set Up TestNav on Chromebook
OS X: 10.11, 10.12, 10.13, 10.14+ From TestNav Downloads Set Up TestNav on OS X, macOS
Windows: 7, 8.1, 10 (includes From TestNav Downloads Set Up TestNav on Windows
Windows Store App)
17TestNav System Requirements
Whitelisting
The following URLs and ports must be whitelisted or opened in any firewalls, proxy servers, or software used for
internet content filtering or inspection:
URL:Port
• *.testnav.com:80
• *.testnav.com:443
• *.act.org:80
• *.act.org:443
• *.pearsontestcontent.com
• *.thawte.com
• *.usertrust.com
• *.comodoca.com
• .googleanalytics.com
Wireless Network Best Practices
The increase in devices accessing organization networks increases the need for stable WiFi networks, daily
monitoring, and maintenance. To help network admins stabilize WiFi for online testing, take the following steps:
• Minimize impact
o Prior to Test Day
Disable low-end wireless protocols not being used
Disable WiFi on mobile devices to avoid potential interference
o On Test Day
Ask classrooms to stagger logins to minimize initial loading time.
• Conduct a site survey to evaluate infrastructure, network design, and WiFi to determine how many wireless
access points each organization will need.
o A site survey should include:
Evaluating the existing infrastructure
Counting the number of user devices
Examining the type of user traffic and interference
• Design for density
o Install access points more densely to decrease potential for overload with too many examinee
devices.
o Reduce WiFi interference from solid materials such as brick, concrete, metal, bookshelves, and
cabinets.
o If your WiFi access points have adjustable antennas, point the antenna to aim the signal at the
examinee devices or move the examinee devices directly under the access point.
o Reduce interference from other WiFi networks by ensuring that no other WiFi networks are on the
same channel.
o Check your access point user guide to determine whether your access points can detect the least
congested WiFi channel.
o Reduce interference from devices that may not be on the WiFi network but may still use the same
frequencies to connect (e.g., cordless phones, Bluetooth-enabled devices, and examinee mobile
devices).
o Temporarily turn off or unplug electronics to reduce wireless interference during testing.
18Installing TestNav
Installing TestNav
This section includes information on:
• How to download TestNav on Windows or Mac OS X
• How to download TestNav on Chromebooks
• How to run App Check
• Freezing the test environment
How to Download TestNav on Windows or Mac OS X
Follow the steps below to download TestNav on Windows or Mac OS X.
Step Action
1 Go to http://download.testnav.com.
2 Use the following table to determine your next step.
If the Operating Then …
System is …
Windows 1. Select Windows .msi installer or .exe installer.
Note: The .msi installer (Microsoft installer) file contains explicit
instructions about installing and removing an application. The .exe
installer file provides a built-in installation wizard. You can
choose program file locations using this type of installation.
2. Select the file you downloaded or save and open if required by
your browser.
3. The Open File—Security Warning appears and asks if you want
to run the TestNav file. Select Run.
4. If you downloaded the .msi installer, the installer window appears
and automatically installs TestNav.
5. If you downloaded the .exe installer:
a. The Setup—TestNav window appears and asks if you
want to continue installing TestNav. Select Yes.
b. The TestNav Setup Wizard appears. Select Next.
c. The Select Destination Location window appears. By
default, TestNav program files save in C:\Program Files
(x86)\TestNav. You can keep the default setting, or
select Browse to choose another location. Then select
Next.
d. The Select Start Menu Folder window appears. By
default, the setup wizard also stores program shortcuts in
a Pearson folder in the Start menu folder. You can keep
the default setting or select Browse to choose another
location. Then select Next.
e. Select Install.
f. By default, the Launch TestNav checkbox is selected. If
you do not want to immediately launch TestNav, deselect
the checkbox, then select Finish.
19Installing TestNav
Step Action
Mac OS X 1. Select Download TestNav for another platform.
2. Select macOS.
3. Select the file you downloaded. The TestNav install window
appears.
4. Drag the TestNav icon into the Applications folder.
5. Eject the TestNav installer from Devices in the Finder sidebar.
Note: You can also eject it from the Desktop.
3 Run App Check. See How to Run App Check.
How to Download TestNav on Chromebooks
Follow the steps below to download TestNav on Chromebooks. Setup instructions can be found at:
https://support.assessment.pearson.com/display/TN/Set+Up+TestNav+on+Chrome+OS
Step Action
1 1. Log into the Admin console for your domain.
2. From the Admin console, select Device Management > Chrome devices.
3. Select the icon at the top right of the page for Chrome device settings.
4. IMPORTANT! Scroll down to find the User Data section. If Do not erase all local user data is
not currently selected, select it.
5. Above the Kiosk Apps section, you see the Kiosk Settings section. If not already selected,
ensure that the Auto-Launch Kiosk App drop-down is set to None.
Note: Make sure the devices you want to administer the test with are under the organizational
unit you select for TestNav.
6. Scroll down to Kiosk Apps and select Manage Kiosk Applications.
7. The Kiosk Apps dialog appears and you should see TestNav in the Total to Install column.
a. If TestNav does not appear in that column, select Chrome Web Store, and search for
TestNav in the search field.
b. Select Add. Then select Save.
Select Save at the bottom of the page.
2 Run App Check. See How to Run App Check.
20Installing TestNav
How to Run App Check
Follow the steps below to run App Check on each device.
Step Action
1 TestNav automatically creates a shortcut on the Desktop. Find the icon on your Desktop and select
it, or from the Start menu, select All Programs>Pearson>TestNav. When TestNav opens for the first
time on the device, the Customer Selection screen is displayed. Select The ACT from the list.
Note: If a test other than the ACT is taken in TestNav, you will need to select Choose a different
customer from the User drop-down menu.
Note: For Chromebooks, you will need to open the app in kiosk mode (open TestNav app without
logging into the Chromebook).
2 Select the user drop-down menu and select App Check.
21Installing TestNav
3 Enter the Configuration Identifier (optional) that was generated when you set up TestNav
Configuration(s) in PearsonAccessnext. Select Run App Check.
Note: The Configuration Identifier is found on the Create/Edit TestNav Configurations screen in
PearsonAccessnext once a Proctor Caching computer is established.
Note: While optional, it is highly recommended you run App Check with Configuration Identifier. If
you do not have TestNav Configuration(s) set up at the time of the initial App Check, rerun App
Check with the Configuration Identifier once TestNav Configuration(s) are completed.
If you enter an invalid Configuration Identifier, an error message will appear.
4 If the user does not enter a Configuration Identifier, only Kiosk Mode Pass/Fail and Connectivity
Pass/Fail will be displayed.
Note: Passing systems display a green success message; failing systems display a red failure
message.
22Installing TestNav
Freezing the Test Environment
Once you have configured the testing environment for TestNav, you should freeze the configuration until online
testing is finished at your organization. This includes not accepting operating system updates.
Note: Test coordinators can verify that the TestNav Configurations have been configured within PearsonAccessnext
by going to Reports > Operational Reports > Online Testing > Organizations that have Precaching Server
Configuration.
23Working with Precached Test Content
Working with Precached Test Content
In this section, you will find information on:
• Precaching before test day
• How to precache test content
• How to verify the status of cached test content
• Monitoring ProctorCache activity during testing
• How to purge cached test (or client) content
Precaching before Test Day
Test content should be precached:
1. After you have created all test sessions
2. Within two business days before testing begins
This prevents delays in administering the test on test day.
How to Precache Test Content
Take the following steps to precache the test content.
Step Action
1 Turn on the proctor caching computer.
2 Log in to PearsonAccessnext at https://testadmin.act.org from a device other than the proctor caching
computer.
3 Select the Setup button.
4 Select the Precache By Test button.
5 Select the tests you wish to precache. Select the Precache Server.
6 Select the Precache button. A pop-up window opens. Select Precache again.
Note: Verify the connection to the Precaching Computer by opening a new browser window and
navigating to http://:. If the ProctorCache interface does not appear, reference the
setup instructions or contact customer support.
7 Once content has been cached, you can monitor ProctorCache activity from the Test and Clients
screens of TestNav ProctorCache to verify the status of cached content.
Note: ProctorCache must be running for content to successfully precache. If either of the services are stopped,
content will not precache.
24Working with Precached Test Content
How to Verify the Status of Precached Test Content
Two business days before testing begins, verify test content has been cached. To view and verify that test content
has been cached and is current before the assessment window, take the following steps.
Step Action
1 Go to the proctor caching computer.
2 Open ProctorCache.
3 Select the Tests tab. A list of all tests will display.
4 Review the caching status of all items in the test form.
Test Status options are as follows:
• Green OK—content is successfully cached
• Yellow not loaded—content is not cached
• Yellow waiting...—content is waiting to be loaded
• Yellow loading...—content is currently loading
• Red Failed to load content—caching content failed
• Red MD5 check invalid—MD5 comparison failed*
• Red MD5 Mismatch—MD5 comparison succeeded, but files did not match*
*– If you see this option, call ACT.
Monitoring ProctorCache Activity during Testing
During testing, you can monitor ProctorCache activity from the Tests and Clients screens of TestNav ProctorCache.
The Tests tab provides a high level view of the test content downloaded by test form and last cache date. The
Status column indicates whether the test content was successfully cached for the test form. The number of content
entries successfully cached is also displayed with the date the content was last cached. If test content is
successfully cached, a green status icon displays. If test content is not successfully cached, a yellow or red icon
displays.
Note: Each URL represents item content, along with the number of hits, which indicates the number of examinees
who have accessed the item.
25Working with Precached Test Content
The Clients tab provides a list of all clients (testing computers) by name, IP address, and platform that have
recently requested test content.
How to Purge Cached Test (or Client) Content
Take the following steps to purge cached content from a proctor caching computer.
Step Action
1 Go to a proctor caching computer.
2 Open the shortcut to ProctorCache.
3 Select the Tests (or Clients) tab.
Note: To filter your list, enter search criteria and select a value from the drop-down list. Select the
Clear button to reset your search criteria.
4 Check the box next to the test (or client) to purge.
5 Select the Purge (or Purge Client) button.
6 Enter the following proctor password in the popup window: t35t1n6
7 Repeat these steps on each proctor caching computer.
Note: Do not purge content until the end of the testing window unless otherwise directed by ACT or Pearson.
Purging cached content during a test may impede or prevent examinees’ access to cached test content.
26© 2019 by ACT, Inc. All rights reserved. MA10008.CJ0283 Updated 2019.2.7
You can also read