Application Notes Introduction to MICA Programming - HARTING MICA
←
→
Page content transcription
If your browser does not render page correctly, please read the page content below
Application Notes Introduction to MICA Programming
Introduction to MICA Programming

1. Edition 2018

© HARTING IT Software Development, Espelkamp

All rights reserved, including those of the translation.

No part of this manual may be reproduced in any form (print, photocopy, microfilm or any
other process), processed, duplicated or distributed by means of electronic systems without
the written permission of HARTING IT Software Development GmbH & Co. KG, Espelkamp.

Version 1.2. Subject to alterations without notice.

2                                                                 HARTING IT Software Development

Introduction to MICA Programming

     Contents

     Contents ........................................................................................................................ 3
     1     Overview................................................................................................................. 4
           1.1    Overview of the MICA Software Architecture ........................................ 4
           1.2    Micro services ........................................................................................... 5
           1.3    Network Topology of MICA ...................................................................... 5
     2     The MICA Development Process ......................................................................... 6
     3     Hello World in Python ........................................................................................... 6
           3.1    Download and install the Python Demo container. ............................... 6
           3.2    Hello World in the Web Shell ................................................................... 7
           3.3    A Hello World Project ............................................................................... 7
     4     Hello World Application in Java........................................................................... 8
     5     MICA Base System - Web API .............................................................................. 8
           5.1   Web Socket JSON RPC Web Service ...................................................... 8
                 5.1.1    Parameter Declaration ................................................................ 9
                 5.1.2    Login and Passwords ............................................................... 12
                 5.1.3    Transferring Files ...................................................................... 14
                 5.1.4    Performing a MICA Base Update ............................................. 15
                 5.1.5    Getting Information about the MICA Base System................... 15
                 5.1.6    Changing Settings of the MICA Base System .......................... 16
                 5.1.7    Getting Information about a Container ..................................... 18
                 5.1.8    Set Container ............................................................................ 19
     6     Coding Examples ................................................................................................ 21
           6.1   Python JSON RPC Client Class ............................................................. 21
           6.2   Cross Compiling ..................................................................................... 23

                                                                                                                                           3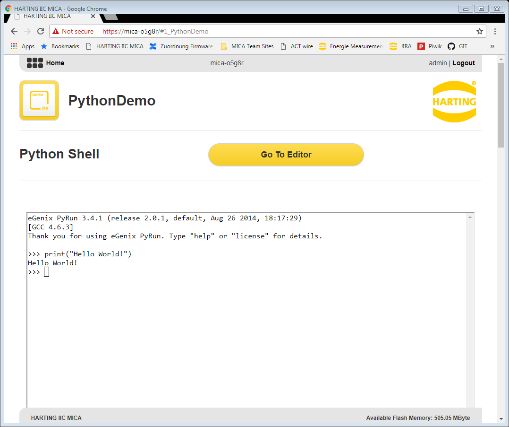
Introduction to MICA Programming

1 Overview
MICA is an ARM-based edge computer with network connectivity powered by a Linux-based operating sys-
tem and a virtualized application environment build around Linux containers (LXC) 1, a common and well un-
derstood virtualization technology.
A typical MICA application might contain many containers, written in many programming languages, each
doing a very specific job, and all communicating via IP protocols.
While the operating system, called MICA Base, is provided by HARTING, containers may also be developed
by third party developers and system integrators.

1.1 Overview of the MICA Software Architecture
The MICA uses a Busybox operating system based on a recent Linux kernel.
All MICA applications consist of one or more LXC containers, which run in separate kernel namespaces. This
automatically provides a number of containment tools, which prevent one container to gain malicious access
to another one or the base system.

                                              Fig. 1: Containers and MICA Base System
Communication between containers happen using IP protocols with websockets or wss being the lowest
level communication protocol. In many cases, container developers choose higher level protocols like MQTT
or OPC-UA.
User-generated data is exclusively stored in the overlay file system of each container, which is fully con-
tained inside the container, and not accessible from other containers. Provisions for securing or encrypting
the data in the container fall to the container developer.

1
    For more information on LXC, see https://linuxcontainers.org/

4                                                                                        HARTING IT Software Development
Introduction to MICA Programming
1.2 Micro services
One important concept for MICA developers is its emphasis on micro services: any MICA application should
consists of multiple containers that each perform a very specific task. This allows rapid development and re-
use of MICA applications, as well as a way to adjust existing systems quickly by just swapping out containers
in an application.
Fig. 2: A typical MICA application might contain many containers—
written in many programming languages, each with a very specific job and all
communicating via IP protocols.
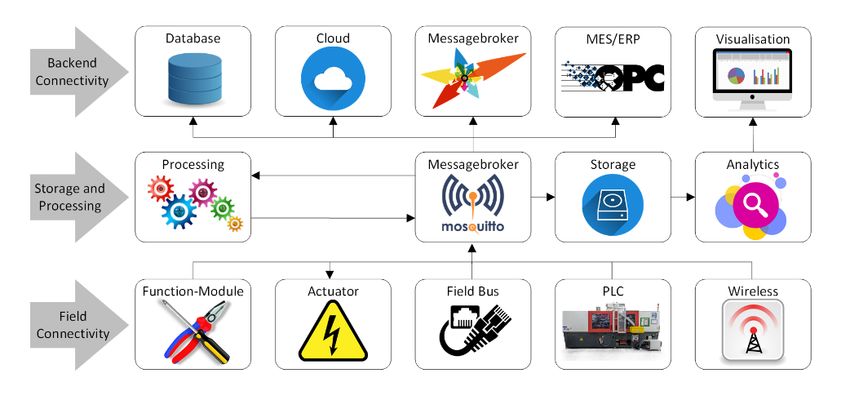
1.3 Network Topology of MICA
By default, the MICA base creates its own internal network and assigns each container a IPv6 ULA and Link
Local address. Each container can be reached by these addresses directly, except for port 80, 8080, 443
and 8443 which get rerouted through the MICA base.
Fig. 3: MICA network topology
5Introduction to MICA Programming
The MICA base also performs name resolution while containers have their own MDNS and LLRP
responders.
This means that containers can be addressed via /containername. For example, http://mica-
test/gpio (or http://mica-test.local/gpio on Linux and Mac OS) will bring up the default web page of the
container named gpio running on mica-test if a webserver is runing in the container and a warning message
that no web server is running otherwise.
Adding a #1_ to the URL will bring up the default website of the container as an iFrame in the MICA base
web page.
Admins can also enable IPv4 and DHCP on the MICA base and containers as well as assign additional IPv4
and IPv6 addresses. When DHCP is enabled, the containers and the MICA will get their addresses from the
selected DHCP server.
1.3.1 Aliased Communication
Starting with MICA Base firmware version 4, MICA supports aliased communication. Aliased communication
lets containers connect to the MICA Base and other containers on the same MICA using the aliases mica
which resolved to the IPv6 ULA of the MICA Base or a containername which resolve to the IPv6 ULA of the
container.
2 The MICA Development Process
A MICA application consists of one or more LXC containers which communicate via IP protocols. The typical
development process consists of the following steps:
1. Mapping out the application
2. Installing existing capabilities as containers, for example, if you need an MQTT broker, install the
MQTT container from mica-container.com on your MICA.
3. Choosing a development environment, either a preexisting container like Node Red, or a basic de-
velopment container like busybox or Debian Stretch.
4. Building the tool chain, if necessary.
5. Implementing application specific functionality
6. Connecting the containers running the individual micro services
7. Testing and deployment
3 Hello World in Python
For a basic example, we are going to implement the infamous Hello World example in the Python Demo con-
tainer first through the included web editor and then remotely via a SSL connection.
3.1 Download and install the Python Demo container.
To install the Python Demo container on your MICA, go to mica-container.com and download the Python
Demo archive to your PC.
Log in to your MICA, click Install, choose the Python Demo archive on your PC, and click Execute. In the fol-
lowing example, we assume that your Python Demo container is called PythonDemo for convenience.
6 HARTING IT Software DevelopmentIntroduction to MICA Programming
3.2 Hello World in the Web Shell
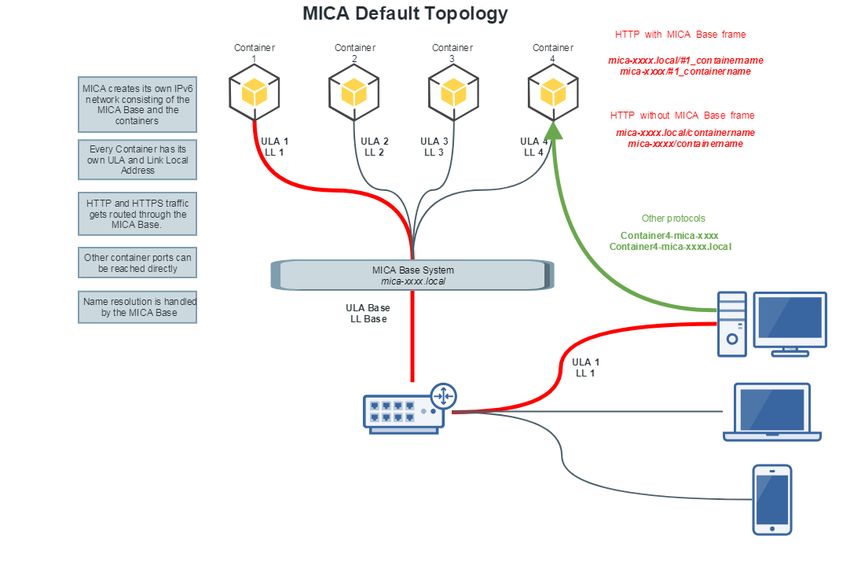
Right click the PythonDemo icon and choose Start App.
Fig. 4: Starting a Container
Once the PythonDemo icon has changed its color to yellow, click the icon to open the PythonDemo app.
Click Go To Webshell, enter
print("Hello World!”)
and press Return.
The Python shell will print "Hello World!”
Fig. 5: Python demo shell
3.3 A Hello World Project
You can also create a Hello World project and save it as a file in the Python Demo container. To do this,
open the PythonDemo container (see 3.2) and click Add Project. Name the project Hello.py.
Click Add Script and enter:
print("Hello World!”)
Click Start Script. The MICA will print Hello World in the output field.
7Introduction to MICA Programming
4 Hello World Application in Java
After installing a HARTING Java container you can write your own Java programs on your PC and transfer
the executable to the Java container using ssh, scp or sftp.
After installing a Java Development Kit (JDK) on your PC, create and save a simple Java program like
class HelloWorldApp {
public static void main(String[] args) {
System.out.println("Hello World!"); }}
Save the file as "HelloWorld.java” with "ANSI” encoding.
You can then compile your HelloWorld.java by
javac Helloworld.java
You can push over the executable java file HelloWorldApp.class to root level of the Java container, for exam-
ple
Pscp -scp c:\documents\HelloWorldApp.class root@
You may have to enter the root password for the Java container (by default root).
After copying the container, you can connect to the Java container over ssh
ssh root@ or ssh root@
and run the Java application.
java -cp HelloWorldApp
If everything worked, you should see the following in your ssh shell
Hello World!
5 MICA Base System - Web API
The MICA uses a very small JSON2 RPC API to communicate between container and the MICA base sys-
tem. Except for some trivial functions, executing a RPC command requires authentication.
Starting with firmware 2 all administrative functions and containers are using websockets for communication,
so tokens do not need to be passed for each RPC. Instead only a one-time login RPC is needed, which re-
turns a token to the process.
After logging in to the MICA Single Sign On Service you can pass this token to other applications. All appli-
cations are responsible for checking the validity of the tokens they receive.
When one application used a validate RPC with a valid token, this application receives a notification from the
Single Sign On Service if the token has been invalidated, thus the signed in application disconnected.
5.1 Web Socket JSON RPC Web Service
Each functionality provided by MICA Base is available via JSON Remote Procedure Calls. The general re-
quest – response sequence is always the same.
Request:
2
For more information on JSON RPC, see http://www.jsonrpc.org/specification.
8 HARTING IT Software DevelopmentIntroduction to MICA Programming
{ "method":"ping",
"params":[],
"id":1, "jsonrpc":"2.0"
}
Response:
{ "result":"pong",
"id":1, "jsonrpc":"2.0"
}
Since websockets are an asynchronous protocol, the IDs are being used to identify calls if they arrive back
out of sequence. The service can be accessed using:
wss://devicename(.local)/ws/
Starting with MICA Base firmware 2 (April 2018), JSON RPC calls are only available via websockets.These
include get_base, set_base, get_container, set_container, changepasswd, sign_in, get_cli-
ents and set_client.
Note: While earlier versions of the MICA base firmware also provided RPC access via
HTTPS, this functionality is deprecated and will be removed in an upcoming firmware
release not later than March 31, 2019. For this reason, this guide is not covering the
HTTPS interface.
5.1.1 Parameter Declaration
In the following examples, all parameters are passed as JSON objects, but they can also be passed by posi-
tion in an array. For readability the "id" and "jsonrpc" properties (see 5.1) are left out. Each message repre-
sents a JSON object.
For example:
message datetime
{
string time
string date
}
represents
"datetime" : {
"time" : time,
"date" : date
}
Where time and date are of type string.
9Introduction to MICA Programming
MICA JSON RPC Parameters
string selector
string auth_token
any value
string user
string pwd
any base_info
string name
enum IPv4M
{
DISABLED : 0,
DHCP : 1,
STATIC : 2
}
enum IPv6M
{
LINKLOCALONLY : 0,
STATIC : 1
}
enum MCP_STATE
{
LOW : 0,
HIGH : 1
}
message mcp_config
{
int pin
MCP_STATE state
}
message datetime
{
string time
string date
}
message net_config
{
string hostname
IPv4M ipv4Mode
int ipv4Prefix
string ipv4Address
string ipv4Gateway
string ipv4Nameserver
IPv6M ipv6Mode
int ipv4Prefix
string ipv6Address
string ipv6Gateway
string ipv6Nameserver
}
message certfile
10 HARTING IT Software DevelopmentIntroduction to MICA Programming
{
string filename
}
message cnt_net_config
{
string hostname
IPv4M ipv4Mode
int ipv4Prefix
string ipv4Address
string ipv4Gateway
IPv6M ipv6Mode
int ipv4Prefix
string ipv6Address
string ipv6Gateway
repeated string addNetworkInterfaceList
string addNetworkInterface
}
# the following RPC calls are only relevant for MICA with WiFi capability
message wlan_config
{
message ap
message client
string country # "EU" or "US"
string selected_mode # "sta" for client mode or "ap" for access point
mode
}
message ap
{
int channel
bool dhcp
string psk
string ssid
string standard # "g" for 2,4 GHz or "a" for 5 GHz
}
message client
{
bool advanced_roaming
string selected_sec_mode # "open", "wpa" (Enterprise) or "wpapsk"
string standard # "both", "b" for 2,4 GHz and "a" for 5 GHz
string ssid
optional message wpapsk
}
message wpapsk
{
string cipher # set to "auto"
string psk
}
11Introduction to MICA Programming
5.1.2 Login and Passwords
5.1.2.1 Signing in with user name and password
Since the MICA RPC interface is using websockets no tokens need to be passed for individual RPCs. In-
stead only a one-time login RPC has to be created using the sign_in method which passes the username --
either "user", "containeradmin" or "admin"–and the base64 encoded password for the MICA base system
you are logging into to the SSO service.
{
"method" : "sign_in",
"params" : { "user": "admin", "pwd": "YWRtaW4=" }
}
The SSO service returns a security token.
{ "result" : "C8TAaLc8IH" }
5.1.2.2 Signing in from a container
If you are logging in from within a container running on the same MICA to its base, you do not have to pass
any parameters. This feature is only available using either the keyword mica (which resolves to the IPv6 ULA
or the MICA Base), or the IPv6 ULA of the MICA Base itself.
{ "method" : "sign_in", "params" : {}
}
The SSO service returns a security token.
{ "result" : "C8TAaLc8IH" }
5.1.2.3 Validating tokens
After logging in to the SSO service, applications can pass this token to other applications. All applications are
responsible for checking the validity of the tokens they receive.
{ "method" : "validate", "params" : { "token": "C8TAaLc8IH" } }
If the token is valid, the SSO service returns the host ID and the user role.
{
"result" : [
{
"host": "10.99.129.27",
"role": "user"
}
]
}
If the token validation fails, the SSO service returns "invalid token”.
12 HARTING IT Software DevelopmentIntroduction to MICA Programming
If a token gets invalidated after a session started, for example if the user logs out, or the web socket connec-
tion gets interrupted, the SSO service sends a "invalidated token” message with the token to the application
which originally called the "validated” method.
{ "invalidated token" : "C8TAaLc8IH" }
5.1.2.4 Listing logged in clients
You can get a list of all clients that are signed in to the SSO service, including containers, using get_clients.
{
"method" : "get_clients",
"params" : []
}
The SOO service returns the host, the client role, the status and the log in time.
{
"result" : [
{
"host": "10.99.133.27",
"role": "admin",
"signedIn": true,
"since": {"time": "02:42:55", "date": "2016-06-04"}
}
]
}
5.1.2.5 Setting the Access Level of a Client
In some cases, you might want to explicitly set the access level at which a container can access the MICA
base system or other containers. To do this, you can call set_client with the host and the user level as pa-
rameters. This operation requires the access level of the requested level, for example, admin to set the ac-
cess level to admin.
{
"method" : "set_client",
"params" : { "host": "gpio", "user": "admin" }
}
The SSO service returns the result of the call.
{ "result" : "Success" }
5.1.2.6 Changing Passwords
You can change the password of a user with changepasswd by passing the new password in base64 repre-
sentation. Up to and including MICA firmware 3, only ASCII characters are supported in passwords.
{
"method" : "changepasswd",
"params" : { "user": "admin", "new_pwd": "YWRtaW4y" }
}
If the change succeeds, the SSO service returns "password successfully changed".
13Introduction to MICA Programming
{ "result" : "password successfully changed" }
5.1.3 Transferring Files
Some operations, for example firmware upgrades and container installations require transferring files to the
MICA programmatically. This is done by transferring base64 encoded file chunks to the MICA via websock-
ets.
All file operations require admin authentication.
5.1.3.1 Initializing a file transfer
The transfer_start RPC initiates the upload and tells the MICA which file is uploaded. It takes the following
parameters:
name - the filename
totalsize - the size of the file
chunksize - the size of the individual chunks
{
"method" : "transfer_start",
"params" : {
"name": "update.tar",
"totalsize": 551751551,
"chunksize":1023
}
}
}
Upon successful initialization, the MICA responds with
{ "result" : "transfer created" }
5.1.3.2 Transferring Chunks of Data
After initializing the file transfer the actual data can be uploaded using transfer_chunk with the following pa-
rameters:
name - the filename
chunk_num - identifier of the chunk
base64_encoded_data – the base64 encoded data payload
{
"method" : "transfer_chunk",
"params" : {
"name": "update.tar",
"chunk_num": 3,
"base64_encoded_data": "A9a89kLH=......../(NKL"
}
}
Upon successful completion of the chunk transfer, the MICA returns
14 HARTING IT Software DevelopmentIntroduction to MICA Programming
{ "result" : "file transfer completed" }
5.1.3.3 Checking the Status of the File Transfer
You can use the transfer_state method to check on the status of the file transfer.
{
"method" : "transfer_state",
"params" : { "name": "update.tar" }
}
The MICA returns the number of total chunks, the transfer state (1 – chunk transferred, 0 – chunk queued),
the name of the file, the chunk size of all but the last chunk, the size of the last chunk which typically is
smaller, and the total size of the file.
{
"result" : {
"total_chunks": 14,
"chunk_state": [1, 1, 1, 1, 1, 1, 1, 1, 1, 0, 0, 0, 0, 0],
"name": "update.tar",
"chunk_size": 1048576,
"last_chunk_size": 183319,
"size": 13814807
}
}
5.1.4 Performing a MICA Base Update
To perform a MICA Base upgrade, the upgrade file first has to be transferred to the MICA (see 5.1.3). If the
archive has been transferred to the MICA, you start the update by calling the update method. Update needs
admin privileges and takes the name of the archive and the signature type as parameters.
{
"method" : "update",
"params" : { "archive": "update.tar", "signature": "sha-256" }
}
Update returns a status message
{ "result" : "execution of update triggered" }
5.1.5 Getting Information about the MICA Base System
To get information about the MICA Base System, you can use the method get_base with the appropriate se-
lector. The identity parameter is only used to identify a MICA when using the device_info selector.
.interface_doc – The documentation of the MICA JSON RPC interface
.datetime - Date and time
.tz_list - Available timezones
.user_settings - Settings given by the user
.service_version - Version of the MICA JSON RPC interface
.available_userspace - Remaining user flash memory
.name - Hostname of the MICA
.system_version - Firmware version of the MICA
.info_text - Text shown on Information Web GUI page
15Introduction to MICA Programming
.system_summary - Complete system summary including device label information
.storage_info - Remaining user flash memory
.recovery_info - List of containers whose container config was broken
.has_wlan – Whether the MICA is a MICA Wireless or not
.wlan – The wifi configuration
.device_info - Meta information about a Linux device that can be given to a container, eg. major
number. Requires passing an identity parameter to identify the device (eg. /dev/ttyUSB0)
.available_devices - List of all devices that can be given to a container
.settings.system - All system settings, if no subselector is given. Use subselectors for more limited
information, for example .settings.system.net for network settings
.base_info - basic information about MICA without SSO login.
When using .settings.system.net, you can also use subselectors; for more information see the examples be-
low.
Example: Getting network settings
{
"method" : "get_base",
"params" : { "selector": ".settings.system.net"
}
}
{ "result" : {"ipv6Mode":0, "hostname":"mica-any", ....} }
Example: Getting all system settings
{
"method" : "get_base",
"params" : { "selector": ".settings.system" }
}
{ "result" : {"timezone":"UTC", "mac":"00:0a:ed:7b:ff:ff" ...} }
Example: Getting the MICA product name
{
"method" : "get_base",
"params" : { "selector": ".settings.system.productName" }
}
{ "result" : "HAIIC MICA DEV" }
5.1.6 Changing Settings of the MICA Base System
To change settings, or perform actions in the MICA Base System, you can use the method set_base with the
appropriate selector, except for hostname. Using set_base requires admin privileges.
The following selectors are implemented:
.reset - Firmware Reset to default settings, containers will remain untouched
.reboot - Restart MICA device
.use_ntp - Switch on / off ntp, requires value parameter representing a bool (on = true, off = false)
16 HARTING IT Software DevelopmentIntroduction to MICA Programming
.ntp_list - Set which NTP servers the MICA should query. Requires value parameter representing
the ntp server list as comma separated string.
.timezone - Set the timezone. Requires value parameter representing the timezone as string.
.mcp_gpio - Set MCP GPIO pin (only wireless). Requires value parameter representing the mcp
configuration as mcp_config JSON object. (see Parameter Declaration above)
.datetime - Set date and time. Requires value parameter representing the datetime configuration
as datetime JSON object.
.settings.system.net - Set network settings. Requires value parameter representing the network
config as net_config JSON object.
.cert - Replace Web certificate. Requires value parameter representing the certification file
as certfile JSON object.
.cert_reset - Reset Web certificate to default.
.ssh - Switch SSH on or off. Requires value parameter representing a boolean (on = true, off
= false), dev_mode needs to be turned on
_.wlan - Set Wifi configuration, requires value parameter represented by wlan_config JSON object
Example: Turning on IPv4.
{
"method" : "set_base",
"params" : {
"selector": ".settings.system.net",
"value":{"ipv4Mode":1}
}
}
{ "result" : "success" }
Using the fully qualified selector name has the same effect.
{
"method" : "set_base",
"params" : {
"selector": ".settings.system.net.ipv4Mode",
"value":1
}
}
{ "result" : "success" }
Example: Setting the date and time.
{
"method" : "set_base",
"params" : {
"selector": ".datetime",
"value":{"time":"00:00:13", "date":"05.03.2017"}
}
}
17Introduction to MICA Programming
{ "result" : "success" }
Example: Setting a MICA Wireless into WiFi client mode using WPA Encryption
{
"method" : "set_base",
"params" :
{
"selector": ".wlan",
"value":
{
"selected_mode":"sta",
"country":"EU",
"selected_sec_mode": "wpapsk",
"client":
{
"ssid" : "myap",
"wpapsk": { "cipher": "auto", "psk": "mypsk" }
}
}
}
}
{ "result" : "success" }
5.1.7 Getting Information about a Container
To get information about containers installed on a MICA, you can use the method get_container with the ap-
propriate selector and container name.
When using .vmsettings, you can also use subselectors; for more information see the examples below.
The following selectors are implemented:
.exists – Whether a container is installed or not installed.
.devices - All Linux devices passed to the container.
.state - Current container state.
.rfs - Triggers an export of the container base root file system.
.overlay - Triggers an export of the container overlay root file system.
.storage_info - Disk space usage of both container root file systems base and overlay.
.vmsettings - Current container settings.
.metrics - cpu usage and memory consumption, will return information about all containers if name
parameter is left blank.
Example: Getting the network settings of a container using the .net subselector.
{
"method" : "get_container",
"params" : {
"selector": ".vmsettings.net",
"name": "gpio"
}
}
18 HARTING IT Software DevelopmentIntroduction to MICA Programming
{ "result" : "done" }
Example: Exporting a container overlay file system
{
"method" : "get_container",
"params" :
{
"selector": ".overlay",
"name": "gpio"
}
}
The container RFS image is stored on the mica, the export JSON RPC returns the relative location to the im-
age-file.
{ "result": {"exported_container_file": "i6GN1m1ps3XA00/gpio_overlay.tar.gz"} }
The absolute download path is
https://devicename(.local)/file_down/?what=i6GN1m1ps3XA00/gpio_overlay.tar.gz
5.1.8 Configuring Containers
To change settings, or perform actions on containers installed on the MICA, you can use the method
set_container with the appropriate selector. This operation requires admin privileges.
hostname cannot be set via the .vmsettings.net - selector.
When using .vmsettings, you can also use subselectors; for more information see the examples below.
The following selectors are implemented:
.delete - Remove a container from MICA.
.reset - Remove the overlay root file system. Network settings stay unchanged.
.start - Start a container.
.stop - Stop a container.
.merge - Merge the overlay file system into the base root file system.
.add_device - Add a Linux device to a container. Requires value parameter representing the device
name as string, eg. /dev/ttyUSB0.
.del_device – Delete a Linux device from a container. Requires value parameter representing the
device name as string, eg. /dev/ttyUSB0.
.copy - Duplicate the container file systems to a new container. Requires value parameter represent-
ing the duplicated container name as string.
.readonly - Set permission to delete container. Requires value parameter representing the delete
flag as bool (deletable = false, not deletable = true).
.vmsettings.net - Set container network settings. Requires value parameter representing the con-
tainer network config as cnt_net_config JSON object.
19Introduction to MICA Programming
.update - Replace a container base root file system. Requires value parameter representing the file-
name as string. Make sure to upload the new rfs image prior to calling this method. (See 5.1.3).
.to_overlay - Replace a container overlay root file system. Requires value parameter representing
the filename as string. Make sure to upload the new rfs image prior to calling this method. (See
5.1.3).
.install - Install a new container. Requires value parameter representing the filename as string.
Make sure to upload the container archive prior to calling this method. (See 5.1.3).
Example: Turning on IPv4 for a container named gpio.
{
"method" : "set_container",
"params" : {
"selector": ".vmsettings.net",
"name": "gpio",
"value":{"ipv4Mode":1}
}
}
{ "result" : "done" }
Using the fully qualified selector name has the same effect.
{
"method" : "set_container",
"params" : {
"selector": ".vmsettings.net.ipv4Mode",
"name": "gpio",
"value":1
}
}
{ "result" : "done" }
Example: Adding a tty device to a container.
{
"method" : "set_container",
"params" : {
"selector": "add_device",
"name": "pydem",
"value": "/dev/ttyUSB0"
}
}
{ "result" : "Creating Device successfully!" }
20 HARTING IT Software DevelopmentIntroduction to MICA Programming
6 Coding Examples
6.1 Python JSON RPC Client Class
In the following example we create a JSON RPC Client Class to access the JSON RPC Services.
It is recommended that you use one of the Python development containers available on mica-container.com,
which already include the necessary libraries. If you are just starting on MICA programming, the Python
Demo container might be the most convenient since it already includes a web-based Python shell and an
editor.
If you are building your own development container, you may have to install the 'websocket-client' and 'url-
lib3' – packages using a package manager like pip.
If you are using the Python Demo container, you can just copy and paste the following code into the editor. If
you are using another Python container, log into the container from the command line (or any other method
offered by the container) and enter the following code. If you are using the Python Demo container, you can
also import mica_helper.py and rpc_call.py directly.
import urllib3
import json
import websocket
import ssl
import sys
import os
import subprocess
urllib3.disable_warnings()
# allows script to run on python2 and python3
P3 = sys.version_info[0] == 3
def as_str( bytes ):
return str( bytes, "utf-8" ) if P3 else bytes
# intended to make linux shell calls, can be found under /usr/lib/py-
thon3.4/site-packages/mica_helper.py
def shell_call( script ):
try:
p = subprocess.Popen( script, env=os.environ, \
stdout=subprocess.PIPE, stderr=subprocess.PIPE,shell=True)
output, err = p.communicate()
rc = p.returncode
return [ output.decode("utf-8","ignore"), err.decode("utf-8","ig-
nore"), rc ]
except:
return [ "exception", sys.exc_info()[0].decode("utf-8") ]
# JSON RPC Client Class for websockets and http, can be found under /usr/lib/py-
thon3.4/site-packages/rpc_call.py
class rpc:
def __init__( self, url ):
if url.startswith( "ws" ):
self.ws = websocket.create_connection( url, sslopt = {
"cert_reqs": ssl.CERT_NONE, "check_host-
name":False
}
21Introduction to MICA Programming
)
self.use_ws = True
else:
self.pool = urllib3.PoolManager(cert_reqs='CERT_NONE')
self.rpc_urls=[url]
self.use_ws = False
self.gid = 0
#Function used to add more URLs if more than one MICA shall be remote
controlled.
def add_url( self, new_url ):
self.rpc_urls.append( new_url )
return len( self.rpc_urls )-1
#Function to make JSON RPC calls, uses the first URL entered by default.
def call( self, method, params=[], url_ind=0 ):
self.gid += 1
payload =
{"jsonrpc":"2.0","id":self.gid,"method":method,"params":params}
payload_as_string = json.dumps(payload )
rep_data_str=""
if self.use_ws:
self.ws.send( payload_as_string )
rep_data_str = self.ws.recv()
else:
response= self.pool.urlopen('POST',
self.rpc_urls[url_ind], body=payload_as_string)
rep_data_str = as_str( response.data )
try:
ret=json.loads( rep_data_str )
except:
ret="error"
return( ret )
if __name__ == '__main__':
# initialize RPC Clients
# Since 2.0 you can use 'mica' within a container as universal identi-
fier for the Host MICA Base where the container is running
r_http = rpc( "https://mica/base_service/" )
r_ws = rpc( "wss://mica/ws/" )
# this requires the script to be called from within container
# otherwise pass user and base64 encoded password
print( r_ws.call( "sign_in", [] ) ) # [ "admin", "YWRtaW4=" ]
print( r_ws.call( "get_base", [ ".system_version" ] ) )
# DEPRECATED USE
auth_token = r_http.call( "get_auth_token", [ "admin", "YWRtaW4=" ] )[
"result" ][ 1 ]
print( r_http.call( "get_system_version", [ auth_token ] ) )
22 HARTING IT Software DevelopmentIntroduction to MICA Programming
6.2 Cross Compiling
Due to the relative resources available on a PC versus the MICA, it is often more convenient to do develop-
ment of MICA applications on a PC and then transfer the code to a development container as the runtime
environment.
Many of the development containers also do not have a full C/C++/Java etc. tool chain. In the cases where
the development container contains a runtime environment such as a JVM, or a Python interpreter, you can
just transfer the finished package to the MICA container using tools like scp or sftp and then execute the
code in the container.
For programming languages with a compile cycle, it is often possible to cross compile the code for ARM pro-
cessors and then run the binary in a Debian or Busybox container.
In this example, we cross compile libusb for MICA busybox containers using the gcc-linaro toolchain that was
also used for building MICA firmware. It is available at:
https://releases.linaro.org/components/toolchain/binaries/4.9-2016.02/arm-linux-
gnueabihf/gcc-linaro-4.9-2016.02-x86_64_arm-linux-gnueabihf.tar.xz
Download libusb-sources from the URL below and put it and the linaro toolchain into a directory name
sources.
http://downloads.sourceforge.net/libusb/libusb-1.0.9.tar.bz2
Create a build script, for example build.sh with the following content:
#!/bin/bash
BASE=$(pwd)
SOURCES=$BASE/sources
BUILD=$BASE/blm
TARGET=$BUILD/target/rfs
INCLUDE=$TARGET/include
LIB=$TARGET/lib
PACKAGES=$BUILD/packages
TOOLCHAIN=$BUILD/toolchain
export PATH=$PATH:$TOOLCHAIN/bin
export LD_LIBRARY_PATH=$LD_LIBRARY_PATH:$TOOLCHAIN/lib
## Install cross compiling libraries
function prepare_gcc {
sudo apt-get install ia32-libs libc6-i386 lib32z1 lib32stdc++6
}
function gcclinaro {
mkdir -p $PACKAGES/gcc-linaro
tar xvf $SOURCES/gcc-linaro-4.9-2016.02-x86_64_arm-linux-gnueabihf.tar.xz -C
$PACKAGES/gcc-linaro
cp -r $PACKAGES/gcc-linaro/gcc-linaro-4.9-2016.02-x86_64_arm-linux-gnueabihf/*
$TOOLCHAIN
}
function libusb {
mkdir -p $PACKAGES/libusb
23Introduction to MICA Programming
tar xvjf $SOURCES/libusb-1.0.9.tar.bz2 -C $PACKAGES/libusb
cd $PACKAGES/libusb/libusb-1.0.9
./configure CC=arm-linux-gnueabihf-gcc CXX=arm-linux-gnueabihf-g++ --host=arm-linux-gnuea-
bihf --prefix=$TARGET LDFLAGS="-L${TOOLCHAIN}/arm-linux-gnueabihf/libc/usr/lib/arm-linux-gnueabihf"
make all
make install
}
function clean {
if [ -d $BUILD ]; then
rm -rf $BUILD
fi
mkdir -p $INCLUDE $LIB $TOOLCHAIN $TARGET
}
clean
prepare_gcc
gcclinaro
libusb
Your directory structure should look like:
/my/path/build.sh
/my/path/sources/gcc-linaro-4.9-2016.02-x86_64_arm-linux-gnueabihf.tar.xz
/my/path/sources/libusb-1.0.9.tar.bz2
Make build.sh executable and call it:
chmod +x build.sh
./build.sh
You can now transfer the resulting executable into a MICA busybox or Debian container and integrated into
a larger project.
24 HARTING IT Software DevelopmentYou can also read