SPEEDY - User Guide United Kingdom - bricon
←
→
Page content transcription
If your browser does not render page correctly, please read the page content below

SPEEDY

    User Guide
       United Kingdom
         version UK-010 or higher

              BRICON nv
 Europark Oost 15c, 9100 Sint-Niklaas, Belgium.
  Tel: +32 3 777 39 74 Fax: +32 3 778 07 35
website: www.bricon.be email: bricon@bricon.be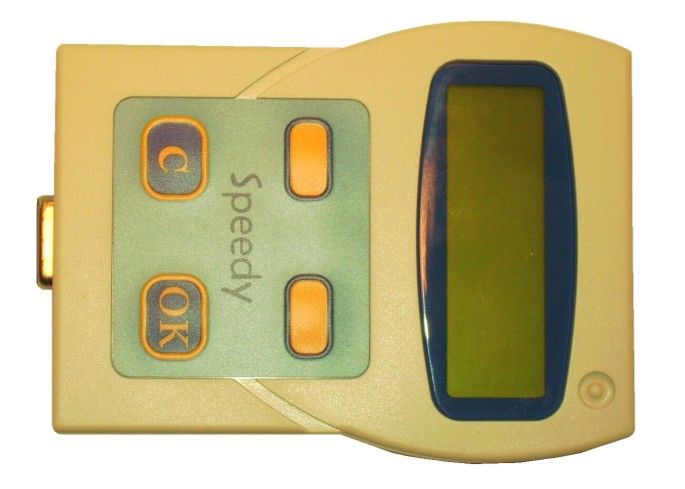
THE SPEEDY is intended for the electronic timing of racing pigeons.
THE SPEEDY should only be used for the purpose that it is intended.
Protect THE SPEEDY against liquid and extreme sunlight and temperatures.
Modifications reserved.
Speedy Security
Security Security is paramount to Bricon, and the Speedy employs a
Seal unique safe housing system which is sealed at production.
A system can only be compromised if its electronic driving
system is accessed, but the Speedy will not allow this without
there being signs of damage to the housing.
TNO reports prove the efficiency of this technique.
Furthermore the Speedy has an additional visible security seal
which can be found in the top right hand corner of the clock.
This seal should remain intact and complete at all times.
The Speedy therefore does not need any open screws or
holographic seals which are open to abuse or argument.
SPEEDY 2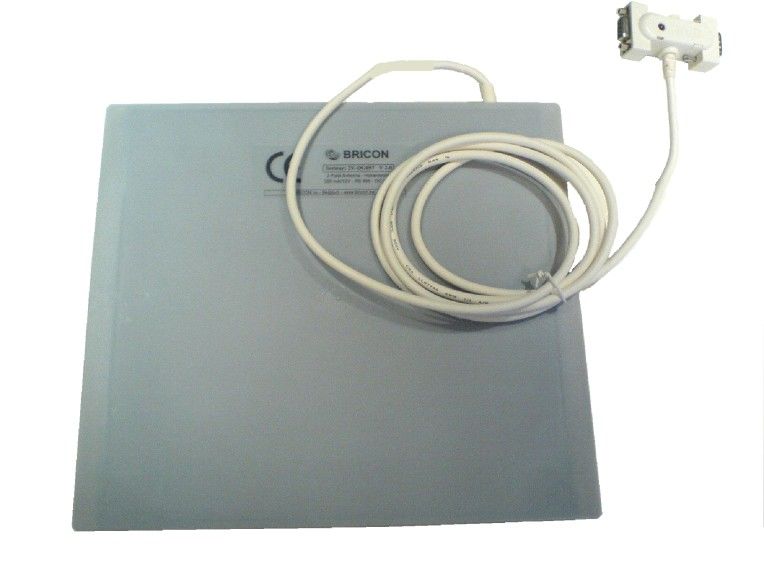
Index:

                                                                           Page

   1. Installation.
         1.1. Foreword.                                                    4
         1.2. The Speedy system.                                           4
         1.3. Assembly of the Bricon electronic timing system.             4
         1.4 The Power supply .                                            5
         1.5 Connecting additional antenna pads .                          5
         1.6 Numbering the antenna pads.                                   5

   2. Preparation of the system.
         2.1. Before you can clock.                                        6
         2.2. Exploring the Speedy menu.                                   6
         2.3. Antenna testing.                                             8
         2.4. Installing the antennas.                                     9
         2.5. Connecting and testing the system.                           11

   3. Speedy - a quick start.
        3.1. Linking birds.                                                12
        3.2. Browse pigeons.                                               12
        3.3. Input/edit fanciers.                                          13
        3.4. Clocking.                                                     13
        3.5. Racing in a club using a Bricon Club-Master.                  14
        3.6. Racing in a club using an alternative brand of club system.   14
               3.61. Basketing.                                            14
               3.62. Read out.                                             16

   4. Other functions.
         4.1. Printing.                                                    17
         4.2. Races.                                                       17
         4.3. Set date and time.                                           17
         4.4. Racepoints                                                   18

   5. Bricon Print Manager                                                 18

   6. Unives 1.7.                                                          18

   7. Maintenance and service.                                             18

   8. Technical data.                                                      18

   9. Frequently Asked Questions.                                          19

   10. Declaration of conformity.                                          20

                                                                                  SPEEDY   3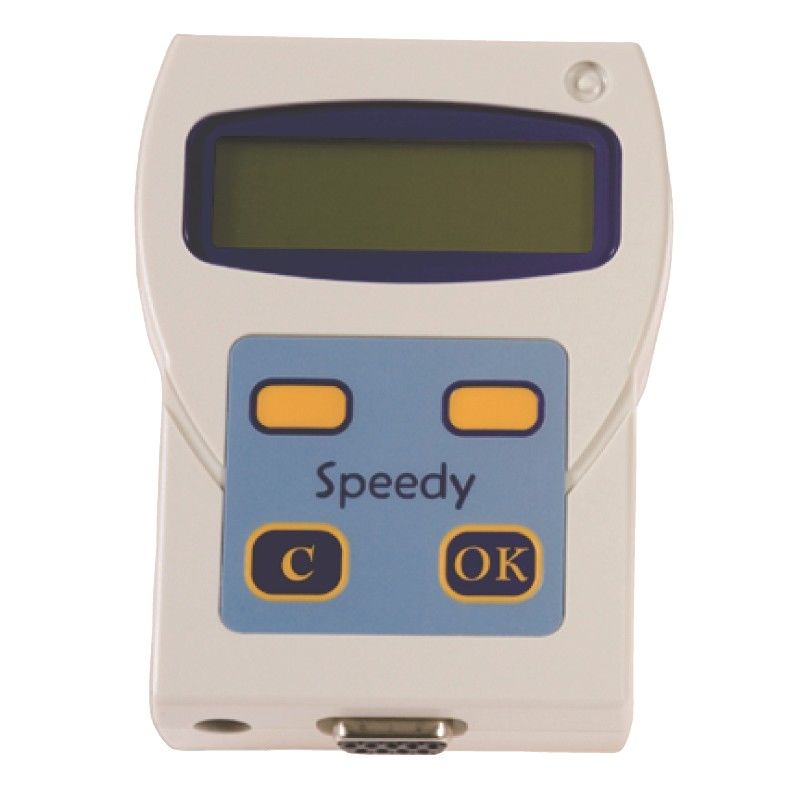
1. Installation

1.1. Foreword.
     Thank you for your trust and confidence in BRICON.
     This manual will give a detailed explanation of the functions of your Speedy clock.
     We are confident that your Bricon electronic timing system will bring you much enjoyment.

1.2. The Speedy system.
     A Speedy pack contains:

            1             2               3               4                5               6

           1. Speedy clock (ETS)
           2. Speedy carrying bag
           3. Wall holder
           4. The power supply (12 volt transformer)                                   7
           5. Connection cable (male-female)
           6. End plug (only supplied for five pad systems)
           7. Antenna pad with 1.8 metre integral cable

1.3. Assembly of the Bricon electronic timing system.

                                    The assembly shown here is of a two antenna pad system.

                       Male

                                 Female                                                        End Plug
                                                                            Female             Not needed
                                                   Male

                                                                                               SPEEDY       4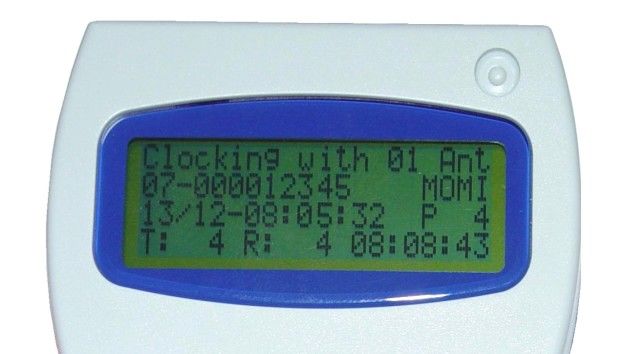
1.4. The Power Supply.

    The standard power supply provided is a 12 volt 1500mA transformer with a three pin UK plug.
    This will give sufficient current for any Bricon system with one antenna pad. When multiple
    antenna pads are connected then an additional or larger power supply may be needed. The
    power consumption of the Speedy and the antenna pads can be found on each item and is
    expressed in milliamps (mA) where 1000mA equals 1 Amp of electrical current. Where possible,
    the power supply should be connected so as to supply the power into the centre of the system.

    After completion of the assembly of the system, the power should be connected and the red light
    on the Antenna connection box should light up red and the Speedy should start up.

1.5. Connecting additional antenna pads.

    Additional antenna pads can be connected to the system with a Bricon connection cable which
    has a 9-pin male connector on one end and a 9-pin female connector on the other end.
    The end plug should be fitted at the end of the line when a large number of pads are connected.

    The Speedy clock will operate with up to 4 antenna pads of any size connected. A Bricon antenna
    buffer must be fitted where 5 or more antenna pads are required to be connected together.

1.6. Numbering the antenna pads.

    When two or more antenna pads are connected in the same system, it is very important that
    each antenna is given its own internal identity. If two pads have the same identity number then
    at some stage there will be a data collision when the clocking information is sent to the Speedy
    and the system may cease to function.
    Each antenna pad retains its own identity number within its memory, and when purchased each
    antenna is pre-set as a number 1. When two or more antenna pads are connected each antenna
    pad must be programmed to have its own number between 1 and 4.

    The programming of each antenna pad should be carried out using the following procedure.

    (i). Ensure that the Speedy and each individual antenna are disconnected from one another.
    (ii). Connect the power supply directly into the bottom of the Speedy clock.
    (iii). When the Speedy menu appears on the display, press the right hand orange button until

          the ‘Antenna Program’ icon         is in the centre of the display and then press OK.
    (Iv). Press the right hand orange button until the required number appears (between 1 and 4).
    (v). Connect just one antenna pad to the Speedy clock and within a few seconds press OK.
    (vi). The programming has been successful only if the Speedy indicates ‘Antenna Progr : nr OK’
    (vii). If ‘No Antenna Available’ appears, repeat the process ensuring that OK is pressed promptly.
    (viii). Disconnect the antenna pad from the Speedy and repeat the process for any additional pad.

    To confirm that the antenna pads have been numbered correctly,

    (a). Connect the antenna pads together in the full system.
    (b). Connect the Speedy clock and proceed to the ‘Antenna Testing’ icon and press OK.
    (c). If for example, three antenna pads are connected then the Speedy display must indicate
                 Testing with 03 Ant.
                 01 02 03
    Line 1 indicates the number of different identities found, and line 2 the antenna numbers found.

    VERY IMPORTANT: If the numbers of antennas shown do not match the actual number of
    antenna pads connected, then two or more antenna pads may have the same internal number
    and the antenna programming has not been carried out correctly and must be repeated.

                                                                                            SPEEDY       5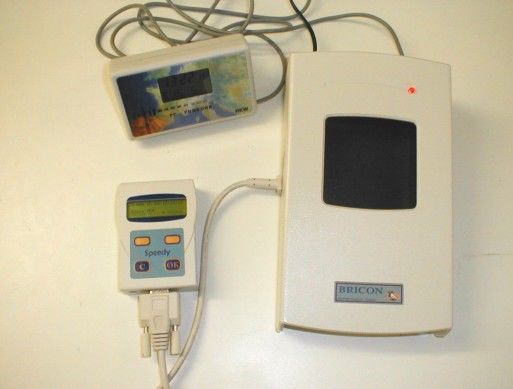
2. Preparation of the system

2.1. Before you can clock.

    Before you can time pigeons, you must go through the following steps:
    - If you have more than one antenna pad connected to the system, then you must have carried
    out the programming of the antenna pad numbers (see section 1.6).
    - After having programmed the antennas, the installation can then be completed by connecting
    the Speedy and the antennas pads to each other within the system (see section 1.3).
    - The ring numbers of the birds can then be linked to the electronic chip rings (see 3.1).

2.2. Exploring the Speedy menu.

    After connecting the clock to the antennas, you can plug the power supply into the antenna
    connector, and the red power light will illuminate (A).
    After the start-up initialisation you will see the following screen display on the Speedy.

                                           Date                                       Time

                          A

                                        Speedy
                                        Software
                                        Version

            Antenna
         Connection Box                 Speedy Display

    The Speedy is very easy to use having only four navigation buttons on the keypad which
    completely control the functionality of the clock. The four keys are as follows -

           < PREVIOUS >                                            < NEXT >

           This button is used                                     This button is used
           for returning or                                        for forwarding or to
           decrement.                                              increment.

                                                                  < OK >

                                                                  To confirm an action,
           To stop an action,                                     To continue an item or
           undo or to select “No”.                                to select “Yes”.

                                                                                             SPEEDY   6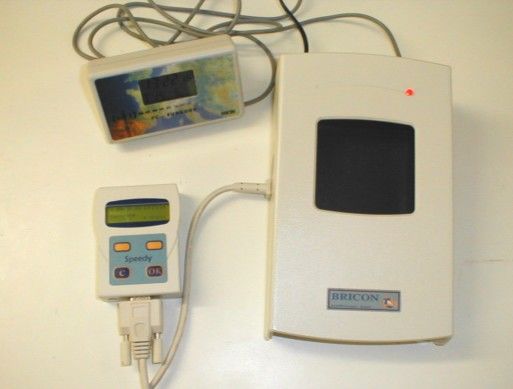
The Speedy is menu driven.

The complete functionality of Speedy is accessed through a menu-structure using 15 different items.
All items are graphically presented by an icon, which are set up in order of frequent use.
The icon that is required should be positioned in the centre of the Speedy display using the orange
navigational buttons  and  and then accessed by pressing the  button.

Listed below you will find each of the icons and its function.

                  Clocking                          Races                        Basketing

                  Read out                          Delete                       Antenna test

                  Antenna prog.                     Print clocking               Print overview

                  Linking birds                     Browse pigeons               Input/edit fancier

                  Set date - time                   Betting                      Racepoints

    Please Note : By holding in the  button you can see a text explanation of the icon.

2.3. Antenna testing

      To test the detection quality of the antennas select the
      ‘Antenna test’ icon and press  .

      The Speedy clock will then carry out a search for connected antenna pads.
      The top line of the Speedy display will indicate how many different antenna numbers were found.
      The second line will indicate the actual antenna pad numbers that were found in the search.

      When you then hold a Bricon electronic chip over the antenna pad the Speedy will start beeping.
      This allows you to confirm that the antenna installation has been carried out correctly and the
      registration quality of the electronic chip is good. The Speedy should beep repeatedly if the
      electronic chip is held above the antenna at a height of 5 to 7 cm (2 to 3 inches).

           The antenna pad numbers              Testing with 02 Ant.
                                                01 02                           The number of
           found in the search                                                  antenna pads
           Electronic chip number               C5A43E27                        found in the search.

                                                                                             SPEEDY     7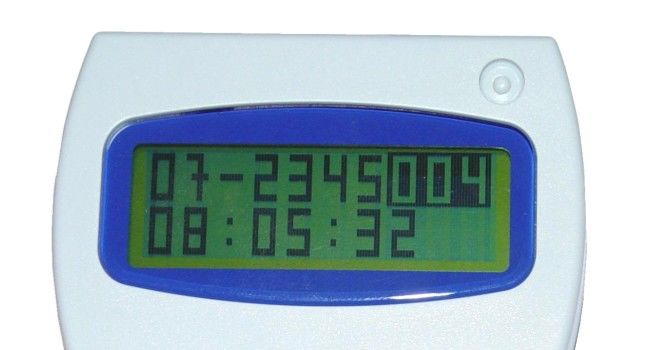
2.4. Installing the antennas.

            Very Important : Metal should not be situated near the antenna pad
                                                      (either underneath or above the pad).

     Metallic items, such as hinges or bars can give interference to the system, causing the system
     to malfunction. Interference can also be caused by electrical devices and electro-magnetic fields.
     As the signal will pass through most non-metallic materials, it is recommended to install the pad
     either above or beneath the loft entrance board (eg: plywood with a thickness of no more 15mm).
     It is important that air-flow is allowed to the pads to enable the cooling process to take place.
     The entrance hole to the loft must be at least 2 cm narrower than the width of the antenna pad.
     Bricon produce a range of antenna pads to meet the needs of any loft. There are four pad sizes
     available, the 1 field (163 mm wide), 2 field (282 mm), 4 field (482 mm) and 6 field (700 mm).
     Bricon antenna will record over the entire width of the pad and therefore tunnels are not needed.
     It is advisable however to slow down the bird before it steps onto the antenna. The base of the
     pad is the side bearing the label and pad number, and this should be installed face down.
     It is advised to install the pads at least 1 metre away from each other to avoid interference.
     NB: New generation pads (4 & 6 field - 2009 model onwards) can be placed next to one another.

         Antenna positioned under the landing board and before the bob wires

                                               Front view
                                                                                   Bob wires

                                                                                            Landing
                                                                                            board

                                                                Max. 11cm.                  Antenna
                                                                                            pad
                                                Clocking area

      Internal                                  Top view                              Bob wires

      Loft wall
                                                                                            Landing
      External                                                                              board

                                                                                            Antenna
                                                                                            pad

                                                                                            5 cm gap

     The integral cable
     from antenna                              Clocking area

    In this set-up, install the antenna pad with the integral cable leading to the outside of the loft.

                                                                                                  SPEEDY   8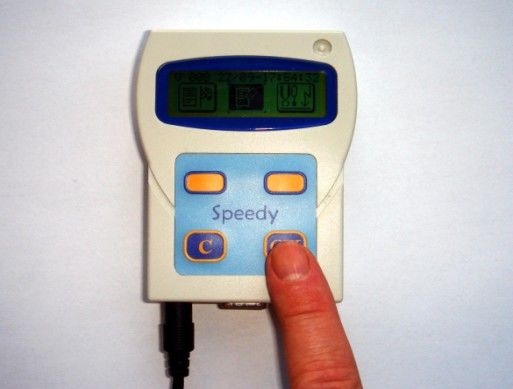
Antenna pad positioned inside of the loft entrance and behind the bob wire

                                           Top view
     The integral
     cable

                                                                                   5 cm gap

  Internal                                                                        Antenna pad

  Loft wall
                                                                                   Bob wires
  External
                                                                                   Landing board

                                           Clocking area

In this set-up, install the antenna pad with the integral cable leading to the inside of the loft.

               With tunnels                                       Without tunnels

                          Bob wires                                             Bob wires

  Tunnel                              Tunnel
   wall              Pigeon            wall                          Pigeon entrance
                    entrance

                                                      With Bricon antenna pads a tunnel over
                                                      the antenna pad is not necessary, this
                                                      being because of the unique way in
                                                      which the electro-magnetic fields within a
                                                      Bricon antenna overlap each other.

                                                      Having to place a tunnel over the pad
                                                      and entrance will in most circumstances
                     Pigeon                           prove to be a major disadvantage, with
                    entrance                          pigeons crowding into the entrance area
                                                      resulting in jams and delays in the timing
                                                      of the birds.

                                                                                               SPEEDY   9
Clocking many pigeons on one antenna

    If it is necessary to clock many pigeons on one antenna pad at the same time, it is advisable to
    install the antenna pad as follows.

                   Bob wires

                 Landing board
                                                                      open

                         Antenna
                                                     Min 15cm.

    On the landing board, you should build an area which is lower, under which the antenna pad is
    then installed. The pigeons then step onto the antenna pad one by one and not all at the same
    time and as a result the registration of the birds is optimised.

    Another method giving similar results is to build a raised area. This raised area is also needed if
    you have a landing board made from zinc, as metal causes interference to the antenna.
    The raised area should be a maximum 10cm higher than the base, and the board a maximum
    thickness of 15mm.

                                                                     Bob wires

               Max 10cm high                                     Landing board

                                                   Antenna

    You may find it more convenient to purchase a specially designed entrance.
    If you choose this solution we recommend the Futura (designed by Bricon and produced by the
    companies Demster and Haspeslagh in Belgium).

      Attention : It is recommended that care is taken to ensure that the positioning of the
      antenna complies fully with the rules and regulations of the relevant governing body.

                                                                                             SPEEDY       10
2.5. Connecting and testing the system.
After programming the antennas pads (see section 1.6) and installing the antenna system within
the loft (see section 1.3), the power supply can then be connected to the system.
The Speedy clock can be connected either prior to or after the connection of the power supply.
Each of the lights on the antenna connection boxes will illuminate red.
If this fails to occur than there is a problem with the power supply or the cable connections.
Speedy clock Connection cable Connection cable Antenna connection
(Female) (male) (female) (male)
Firmly push the Speedy into its wall holder.
The Speedy will be activated automatically provided there are
pigeons linked within its database.
On powering up, as part of its initialisation process the Speedy
carries out a search for the connection of antenna pads.
If the search successfully finds an antenna, then the Speedy
will start up in „Clocking mode‟ and is ready to record birds.
NB : If there are no antenna pads connected or if the search
indicates that the system is not ready to record birds then the
Speedy will start up showing its main icon menu.
To return to the main menu, simply press the button.
For security reasons and also to aid the fanciers ease of use,
if a race is basketed and active on the Speedy then it can not
be taken out of clocking mode.
NB : Care should be taken that the Speedy is fully pushed into
the wall holder to ensure a good connection.
Avoid having any debris sitting within the wall holder or over-
tightening the connection cable into the base of the holder.
SPEEDY 113. Speedy - a quick start
First of all it is important to read all of the instructions regarding installation and use before starting.
Once all hardware installations are completed, the Speedy will be activated from the moment that the
clock contains fancier and pigeon-data.
To enter pigeon and fancier data
please refer to the following sections Input/edit fancier - (section 3.3)
Linking birds - (section 3.1)
3.1. Linking birds.
There are two ways to enter birds into the Speedy:
- Using the Bricon Club-Master with the club-software „BRICON CLUB EDITOR‟.
(NB : This is the method that should be used by members of the NEHU).
- Using the Speedy and a loft antenna pad explained in the box below.
Navigate in the menu to the „Linking Birds‟ icon and press .
Hold the electronic-ring over the antenna. Upon reading the
chip-ring, the Speedy will beep and a blank life ring-number will
appear on the display. The first letter or number can be found
with the orange buttons or . When the
required letter/number appears under the ^ pointer, confirm by
pressing and move on to the next letter or number.
After entering the final number, the sex of the pigeon can be
entered using the orange button selecting „H‟ for a
hen and a blank space for a cock. Confirm with .
A second display will then appear, where four characters are
available in which to enter the colour of the pigeon.
On completion of the details, Speedy will request that the linkage
is confirmed by pressing or cancelled with .
By repeating the procedure the next pigeon can be entered.
This function is blocked when races are active on the Speedy.
Four characters are available for the country or union followed by the year of birth of the bird.
Nine characters are available for the letter and ring number of the pigeon and it is recommended
that the ring number is entered into the final character spaces, with the spaces used at the start.
For example : For GB rings the following ring format should be used : GB(space)(space)-09-
(space)(space)A(space)56789H NB: The space character can be found directly after the letter Z.
NB : Do not use the dash character (-) anywhere in the number except either side of the year.
3.2. Browse pigeons.
With this function you can browse through the database of
pigeon linkages and also delete any ring-number not required.
The button moves backwards through the
pigeon list whilst moves forward to find a pigeon.
To delete a selected pigeon, press and the Speedy will
ask for a confirmation before the pigeon can be deleted.
Press to confirm and to cancel the procedure.
This function is blocked when races are active on the Speedy.
SPEEDY 123.3. Input/Edit Fancier.
There are two ways to enter a fancier(s) into the Speedy :
- Through the Bricon Club-Master with the club-software ‟BRICON CLUB EDITOR‟.
(this enables you to enter the name, loft number and address).
- or directly onto the Speedy clock as explained below.
Move to „Input/edit fancier‟ and press to confirm.
With the buttons and you can scroll
through the fancier list. Press to confirm if you want to
modify or change the name of the fancier.
An empty field of 20 characters appears. Using
and a letter can be found. Continue pressing until you
find the correct letter and confirm with . The cursor
moves to the right and you can repeat the action for the next
letter. (NB : A space character can be found after the letter Z).
On the second line you can add your official loft number.
On completion of the details, Speedy will request confirmation
by pressing or cancelling the action with .
3.4. Clocking.
Speedy detects for itself in which mode it should start-up. This
will take a few seconds to initiate after power-up.
When no loft antennas are connected, the main menu will
appear after start-up.
If Speedy detects that an antenna is connected it will start in
clocking-mode with the display reading „Clocking with xx Ant.‟
unless previous clockings remain on the clock, in which case it
will show the last bird recorded.
For security reasons if there is an active race on the Speedy
then it is impossible to leave clocking-mode.
When there are no active races on the Speedy, pressing
deactivates „clocking-mode‟ and the main menu will appear.
The orange buttons and can then be
used to scroll through the menu. Position the required icon in
the centre of the display and confirm with .
To record birds from a training flight, it is necessary to first
delete the clockings of the previous training flight.
To Delete : Select the „Delete‟ icon and confirm with
and all clockings will be erased.
NB: The clockings of active races or unclosed races will not
be deleted.
Clocking : Select the „clocking‟ icon and confirm with
and Speedy will return to clocking mode for training flights.
SPEEDY 13 The orange navigation buttons and
allow you to scroll through the clocking-list, enabling you to
move backwards and forwards from the first to last pigeons.
When a pigeon arrives the display automatically shows the
latest clocking.
By pressing the
button the screen display
will alternate between a
large sized print display
and a smaller sized but
more detailed print display.
3.5. Racing in a club using a Bricon Club-Master.
Refer to the BRICON CLUB-MASTER user guide
for the instructions for basketing and read-out.
3.6. Racing in a club using an alternative brand of club system.
(eg. Benzing, Tauris, Unikon etc).
3.61. Basketing on an alternative club brand.
The Speedy can be used with any brand of club-master unit
that complies with the Unives 1.7 protocol.
A club-master unit is a club-basketing antenna and a time
signal master clock.
Basketing : A Bricon unives cable is needed to connect the
Speedy to the unives connection (or cable) of the master.
After the start-up, the Speedy will show the „Basketing‟ icon.
Confirm basketing by pressing the on the Speedy.
SPEEDY 14 The display of the Speedy shows „Choose Race:‟ followed by
a racepoint name or race number. (eg RA01).
Select the required racepoint (or RA nr) by pressing the
and and confirm with the .
A flight number „1‟ will then appear following the racepoint.
If more than one race is being flown from that racepoint,
select a higher flight number with & .
Press on the Speedy to confirm your choice.
The Speedy will then synchronised itself against the time
signal on the club basketing system and the first pigeon can
then be race marked.
Place the chip-ring of the pigeon to the club-antenna. You will
hear a beep and the light on the antenna will blink.
The ring-number of the pigeon will appear on the Speedy
display for checking. After confirming that the ring number of
the pigeon is correct, press to confirm its entry.
The pigeon can then be basketed for the race.
Repeat this process for each pigeon.
When a pigeon-ring number has not been linked to the chip,
the Speedy will indicate ‟Pigeon not found‟ and will request
that an „Emergency basket‟ is carried out.
Use and to select the required pigeon
ring number, pressing to confirm each letter or number.
After also adding the colour, press to confirm the link.
This action is explained in sect 3.1 on page 12 (Linking birds).
To end the basketing process, press on the Speedy and
two basketing lists will be printed.
The Speedy can then be disconnected from the club-unit.
If additional basketing lists are required, repeat the basketing
process for the race to re-activate the print command.
.
Speedy is now locked into clocking mode and is ready to time
birds. All other functions on the Speedy are now unavailable.
At the loft, simply fully push the Speedy into its wall holder.
The Speedy should automatically start-up in clocking mode.
Ensure that the Speedy shows „Clocking with xx Ant.‟ where xx
is the number of pads that are connected in your system.
NB : If the icon menu appears then in its search the Speedy
has failed to find any antenna pads and will not record birds.
SPEEDY 153.62. Read out on an alternative brand of club system.
When the race is over, you must disconnect the Speedy from
its wall holder.
Return to the club and connect the Speedy to the club-system
using the Bricon Unives cable.
Select the „Read out‟ icon from the Speedy main menu and
press .
The Speedy displays „Read Out‟ and the first race name.
Select this race or choose another race by pressing the
or and then confirm with .
Synchronisation is then carried out automatically with the time
signal on the club-antenna.
Two copies of the clocking-list are then printed.
Make sure that the necessary copies of the clocking list have
been printed with the required information.
After printing, the Speedy display shows : „Close race‟
If you wish to close the race then press and the race will
become a status 7 race, meaning that the race is now ready
and available for deletion.
By pressing the button, the race will become a status 3
meaning that the race remains open and active and the race
data will stay secured, meaning that the pigeons within this
race can not be entered into future races or training flights.
After the race has been closed, the race must also be deleted
from Speedy and the following routine should be used -
Connect the power supply directly into the base of the Speedy
with no antenna pads connected.
Using the button proceed to the „Delete‟ icon.
Press and all status 7 races will then be deleted.
NB : If a race is not closed and deleted then the birds within
that race will not be allowed to be basketed for any future race.
If after deleting you wish to return to clocking mode for a
training flight, proceed to the ‟Clocking‟ icon using the
button and press to confirm.
SPEEDY 164.0 Other functions
4.1. Printing.
The menu on the Speedy, gives two printout options -
(a) Clocking List.- A report giving the full list of all birds timed.
(b) Overview List. - A status report for each bird in the Speedy.
To print the clocking list or overview list, the Speedy should be
connected to the club system and any compatible printer.
4.2. Races.
The ‟Races‟ icon can be used to view the active races.
Navigate to the „Races‟ icon and press to view each of
the active races held within the Speedy.
The second line of each active race shows the club ID and
race point followed by the date and time when race marked.
For example: 1234EXET 2107 193019 indicates the race is
club ID 1234 from Exeter marked on 21st July at 19.30.19
Each of the active races is given a status number.
Status 1. The race has been basketed.
Status 3. The race has been read out but not closed.
Status 7. The race has been read out and closed.
Press to scroll through any other races on the Speedy.
Attention : Only active races showing status 7 can be deleted.
If an active race is showing as status 3 when it was intended
that it should have been showing as status 7, simply repeat
the read out procedure and carry out the instructions correctly
to close the race and turn it into a status 7 race.
If no races are held on the Speedy, then the icon will merely
blink for a split second before the menu is again displayed.
4.3. Set Date and Time.
This icon enables you to set the date and time on the Speedy.
Use the and buttons to change a
number and then the to confirm the selected number.
However when race basketing, the Speedy will automatically
synchronise with the time on the club master mother clock.
This function is de-activated if a race is active on the Speedy.
SPEEDY 174.4. Racepoints.
The Speedy can hold up to 25 racepoints.
The racepoints are numbered RA01 through to RA25.
Names can be given to these numbers, by navigating to the
racepoints icon with the and buttons.
Each racepoint can be given a name of up to 4 characters.
Racepoint names should be entered into the Speedy for when
race basketing on a non-Bricon brand of club system.
NB: When basketing with a Bricon Club-Master, the racepoint
is selected from those entered onto the Master.
5. Bricon Print Manager.
The Bricon Print Manager software package (including a USB cable) is an optional extra which enables
the information on the Speedy to be transferred and saved onto a home computer.
The full details of every clocking for each race or training flight on the Speedy will be saved, along with
the linkage data of each and every bird held on the Speedy. This information can then be viewed and
printed at any time. The package comprises of a Print Manager CD and a special USB cable.
6. Unives 1.7
The Speedy clock is fully compliant with the Unives 1.7 protocol.
Operating in Unives 1.7, the Speedy clock can be used with any other brand of master system that also
fully supports the Unives 1.7 protocol.
The Unives compatibility protocol declares that the Yamaichi connection socket is the universally
accepted connection between the ETS brands. To fully comply with the Unives protocol , Bricon will
make available from its dealers, a Bricon Yamaichi Unives connection cable consisting of a Bricon 9 pin
male connection plug at one end and a Yamaichi 4 pin male round connection plug at the other end.
This connection cable should be placed directly into the Speedy clock with the Yamaichi plug then
available for connecting to the unives socket of the variant brand of club master.
7. Maintenance and Service.
Always keep your Speedy clean and do not allow the clock to be immersed in water or other liquids.
Remove dirt from the Speedy with a lightly dampened cloth and do not use solvents.
Should the Speedy clock need any repair, this must be carried out by Bricon.
8. Technical data.
Maximum number of pigeons : 200
Maximum number of races : 8
Fanciers : 3
Maximum number of antennas : 4
Number of fields : 4 x 6 fields
With buffers added - max number of antennas : 64
Maximum cable length : 150 metres
SPEEDY 189. Frequently Asked Questions.
Q. Where can I look to check that I have correctly entered my name into the Speedy ?
A. When on the menu, if you hold down the , then both your name and icon name will appear.
Q. Is there another power source that I can use rather than mains electricity to power my system ?
A. Yes, as it uses 12 volt power you can also use a battery with a Bricon battery connection cable.
Q. At times I suffer from electricity power cuts. What can I do to give cover in these circumstances ?
A. Either obtain a battery cable and 12 volt battery as a reserve, or utilise a Bricon back-up battery
which will be charged-up from mains electricity but will take over if the mains power is disrupted.
Q. I plan to have an additional antenna pad in a loft quite a distance away from my existing loft.
A. It is advised to give this pad its own separate power supply, as when you send power along a
long cable (20 metres+) then the voltage levels may fall below that required for the pad.
Q. I plug in my Speedy and the clock lights up, but after the search it fails to go into clocking mode.
A. The Speedy may not have been pushed in all the way. The first part of the push only powers the
clock. Check that there isn’t something in the wall holder stopping the clock from going fully in.
Q. When linking birds directly onto the Speedy with the loft antenna, what ring format should I use ?
A. The number should be entered in the format of 4 characters for the country or union id, followed
by the year (eg. -09-) and then a further 9 characters for the letters and numbers (see sect 3.1).
Q. How can I find out how many birds are linked to electronic chip rings within the Speedy memory ?
A. During the start-up procedures of the Speedy the number will appear next to the word busy.
Q. After connecting my Speedy before the race birds return home, how can I test my system ?
A. Hold two un-linked chip rings over the antenna pad, one ring alternating on the pad with the other.
Q. Waiting for race birds to return, I have noticed that there are already birds recorded on the clock.
A. The clock will time any bird that has access to the pad, thus birds not raced will record as trainers.
Q. Of the birds timed on the clock, how can I find out how many are racers and how many trainers ?
A. When in detailed view, the bottom line of the Speedy display will show the numbers, with for
example T 15 R 12 indicates that there are a total of 15 birds timed, of which 12 are race birds.
Q. I wish to have more than 4 antenna pads connected together in my system. What do I need ?
A. When 5 or more antenna pads are required, then a Bricon antenna buffer must be fitted. A single
antenna buffer will enable up to 19 pads to be used. The power must also be given consideration.
Q. I need to be at two club headquarters at the same time. Can I use two Speedys to achieve this ?
A. Yes, two Speedy clocks can be used on the same antenna pad system using a Bricon split cable.
Each Speedy should hold the same ring data and each must be returned to the club that set it.
Q. How can I continue to record birds after having left for the club HQ with my Speedy clock ?
A. The Bricon Plus will take over from the Speedy and continue to record whilst the Speedy is away.
Q. Why is my Speedy clock showing a time variation against correct, when I basket for a race ?
A. An old race remains active on the clock for which the internal time is being maintained. Delete
all races from the Speedy and it will then be able to synchronise itself with the master time signal.
Q. I will be racing with my Speedy, with basketing taking place on an alternative brand of master.
A. You will need your Bricon unives cable and also have the racepoint pre-entered into the Speedy.
Q. How can I check that my club has deleted the race from my Speedy clock ?
A. Insert the power into the bottom of the Speedy, and go to the races icon (the 2nd icon ~ flag 1-2).
Press the and if there is a race on the clock, the screen will display it (see section 4.2).
For your own question answered - please contact Mark Palmer on 0121 358 1267 or bricon.ets@live.com
SPEEDY 19Declaration of conformity
Directive 1999//5/EC (R&TTE)
BRICON nv Loft antenna 1V-XXxxx
Europark Oost 15C, Loft antenna 2V-XXxxx
9100 Sint-Niklaas Loft antenna 4V-XXxxx
Belgium Loft antenna 6V-XXxxx
We declare on our own responsibility, that the product mentioned below to
which this declaration relates, conforms with the essential requirements and
with other relevant provisions of the R&TTE directive (1999/5/EC).
Article : Loft Antenna
BRICON 1V(163mm), 2V(282mm), 4V(482mm), 6V(700mm).
Type : Reader for transponders (125kHz).
In agreement with §3 of R&TTE- the directive.
Health and Safety §3 (1) a:
Applied standard:
EN 60950:1992+A1+A2:1993+A3:1997+A11:1997
EMC §3(1)b:
Applied standard:
EN 301 489-3/07.200
Radio frequency spectrum §3 (2)
Applied standard:
EN 300 330-2 V1.1/7.2000
Technical file is available at the offices of the manufacturer.
BRICON nv, Europark Oost 15C, Sint-Niklaas, Belgium.
Place and date of expenditure: Sint-Niklaas, 13-12-2005.
Responsible for the manufacturer:
Ivan Baetens Francis Nolmans
Delegated director. Delegated director.
SPEEDY 20You can also read