Remix Documentation Release 1 - yann300 - Read the Docs
←
→
Page content transcription
If your browser does not render page correctly, please read the page content below
Remix Documentation
             Release 1

             yann300

              Oct 16, 2018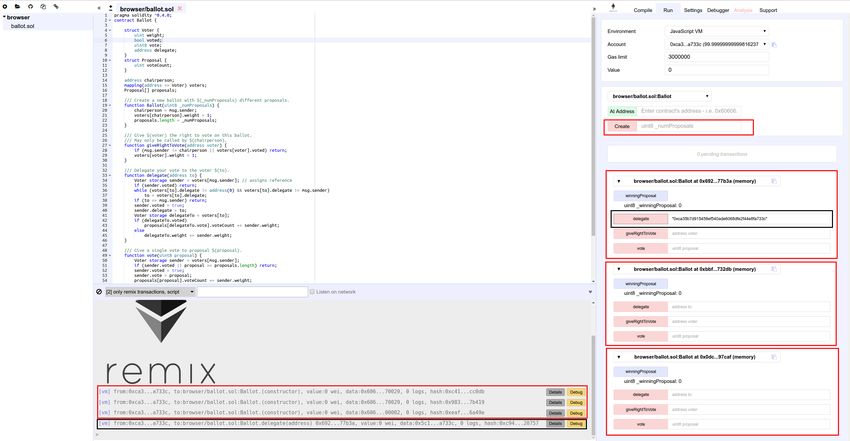
Quick start

1   Packages                                                                                                                                                                                                    3

2   Solidity Editor                                                                                                                                                                                             5

3   Compiling contracts                                                                                                                                                                                         7

4   Quick Start using the JavaScript VM                                                                                                                                                                         9
    4.1 Selecting the VM mode . . . . .                        .   .   .   .   .   .   .   .   .   .   .   .   .   .   .   .   .   .   .   .   .   .   .   .   .   .   .   .   .   .   .   .   .   .   .   .    9
    4.2 Sample contract . . . . . . . . .                      .   .   .   .   .   .   .   .   .   .   .   .   .   .   .   .   .   .   .   .   .   .   .   .   .   .   .   .   .   .   .   .   .   .   .   .    9
    4.3 Deploying an instance . . . . . .                      .   .   .   .   .   .   .   .   .   .   .   .   .   .   .   .   .   .   .   .   .   .   .   .   .   .   .   .   .   .   .   .   .   .   .   .   10
    4.4 Interacting with an instance . . .                     .   .   .   .   .   .   .   .   .   .   .   .   .   .   .   .   .   .   .   .   .   .   .   .   .   .   .   .   .   .   .   .   .   .   .   .   11

5   Settings                                                                                                                                                                                                   13

6   Running transactions                                                                                                                                                                                       15
    6.1 Run Setup . . . .      .   .   .   .   .   .   .   .   .   .   .   .   .   .   .   .   .   .   .   .   .   .   .   .   .   .   .   .   .   .   .   .   .   .   .   .   .   .   .   .   .   .   .   .   15
    6.2 Initiate Instance .    .   .   .   .   .   .   .   .   .   .   .   .   .   .   .   .   .   .   .   .   .   .   .   .   .   .   .   .   .   .   .   .   .   .   .   .   .   .   .   .   .   .   .   .   16
    6.3 Pending Instances      .   .   .   .   .   .   .   .   .   .   .   .   .   .   .   .   .   .   .   .   .   .   .   .   .   .   .   .   .   .   .   .   .   .   .   .   .   .   .   .   .   .   .   .   16
    6.4 Using the ABI . .      .   .   .   .   .   .   .   .   .   .   .   .   .   .   .   .   .   .   .   .   .   .   .   .   .   .   .   .   .   .   .   .   .   .   .   .   .   .   .   .   .   .   .   .   17
    6.5 Using the Recorder     .   .   .   .   .   .   .   .   .   .   .   .   .   .   .   .   .   .   .   .   .   .   .   .   .   .   .   .   .   .   .   .   .   .   .   .   .   .   .   .   .   .   .   .   17

7   Deployed contracts                                                                                                                                                                                         21

8   Build Artifact                                                                                                                                                                                             23
    8.1 Library Deployment . . . . . . . . . . . . . . . . . . . . . . . . . . . . . . . . . . . . . . . . . . .                                                                                               23

9   Unit Testing                                                                                                                                                                                               25
    9.1 Generate test File . . . . . . . . . . . . . . . . . . . . . . . . . . . . . . . . . . . . . . . . . . . . .                                                                                           27
    9.2 Run Tests . . . . . . . . . . . . . . . . . . . . . . . . . . . . . . . . . . . . . . . . . . . . . . . . .                                                                                            27
    9.3 Continuous integration . . . . . . . . . . . . . . . . . . . . . . . . . . . . . . . . . . . . . . . . . .                                                                                             27

10 File Explorer                                                                                                                                                                                               29
   10.1 Create new File . . . . . . . . . .                    .   .   .   .   .   .   .   .   .   .   .   .   .   .   .   .   .   .   .   .   .   .   .   .   .   .   .   .   .   .   .   .   .   .   .   .   30
   10.2 Add Local File . . . . . . . . . .                     .   .   .   .   .   .   .   .   .   .   .   .   .   .   .   .   .   .   .   .   .   .   .   .   .   .   .   .   .   .   .   .   .   .   .   .   30
   10.3 Publish to Gist . . . . . . . . . .                    .   .   .   .   .   .   .   .   .   .   .   .   .   .   .   .   .   .   .   .   .   .   .   .   .   .   .   .   .   .   .   .   .   .   .   .   30
   10.4 Copy to another Remix instance .                       .   .   .   .   .   .   .   .   .   .   .   .   .   .   .   .   .   .   .   .   .   .   .   .   .   .   .   .   .   .   .   .   .   .   .   .   30
   10.5 Connect your filesystem to Remix                       .   .   .   .   .   .   .   .   .   .   .   .   .   .   .   .   .   .   .   .   .   .   .   .   .   .   .   .   .   .   .   .   .   .   .   .   31

                                                                                                                                                                                                                i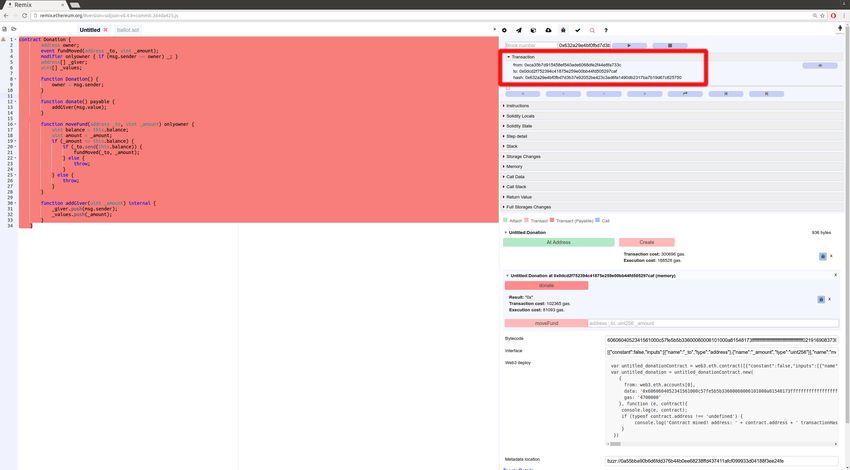
11 Debugging                                                                                                                                                                           33

12 Analysis                                                                                                                                                                            35

13 Terminal                                                                                                                                                                            37

14 Building Smart Contracts with Remix                                                                                                                                                 39
   14.1 Let’s get started . . . . . . . . . . . . . . . . . . . . . . . . . . . . . . . . . . . . . . . . . . . . . .                                                                  39

15 Eat the Block tutorials                                                                                                                                                             41

16 Access your local filesystem by using RemixD                                                                                                                                        43

17 Tutorial on debugging transactions with Remix                                                                                                                                       47
   17.1 Start debugging . . . . . . . . . . . . . . . . . . . . . . . . . . . . . . . . . . . . . . . . . . . . . .                                                                    47
   17.2 Using the debugger . . . . . . . . . . . . . . . . . . . . . . . . . . . . . . . . . . . . . . . . . . . .                                                                     51

18 Importing Source Files in Solidity                                                                                                                                                  57
   18.1 Importing a local file . . . . . . . . . . . . . . . . . . . . . . . . . . . . . . . . . . . . . . . . . . .                                                                   57
   18.2 Importing from GitHub . . . . . . . . . . . . . . . . . . . . . . . . . . . . . . . . . . . . . . . . .                                                                        57
   18.3 Importing from Swarm . . . . . . . . . . . . . . . . . . . . . . . . . . . . . . . . . . . . . . . . . .                                                                       58

19 Debugging a Dapp using Remix - Mist - Geth                                                                                                                                          59
   19.1 Install the environment . . . . . . . . . .    .   .   .   .   .   .   .   .   .   .   .   .   .   .   .   .   .   .   .   .   .   .   .   .   .   .   .   .   .   .   .   .   59
   19.2 Running the environment . . . . . . . .        .   .   .   .   .   .   .   .   .   .   .   .   .   .   .   .   .   .   .   .   .   .   .   .   .   .   .   .   .   .   .   .   60
   19.3 Developing contract / front end . . . . .      .   .   .   .   .   .   .   .   .   .   .   .   .   .   .   .   .   .   .   .   .   .   .   .   .   .   .   .   .   .   .   .   62
   19.4 Deploying . . . . . . . . . . . . . . . .      .   .   .   .   .   .   .   .   .   .   .   .   .   .   .   .   .   .   .   .   .   .   .   .   .   .   .   .   .   .   .   .   64
   19.5 Debugging . . . . . . . . . . . . . . . .      .   .   .   .   .   .   .   .   .   .   .   .   .   .   .   .   .   .   .   .   .   .   .   .   .   .   .   .   .   .   .   .   65

20 Code contribution guide                                                                                                                                                             67

21 Support tab in Remix                                                                                                                                                                69

ii
Remix Documentation, Release 1

Remix is a powerful, open source tool that helps you write Solidity contracts straight from the browser. Written in
JavaScript, Remix supports both usage in the browser and locally.
Remix also supports testing, debugging and deploying of smart contracts and much more.
Our Remix project with all its features is available at remix.ethereum.org and more information can be found in these
docs. Our IDE tool is available at our GitHub repository.
This set of documents covers instructions on how to use Remix and some tutorials to help you get started.
Useful links:
    • Solidity documentation
    • Remix alpha - The version where we test new Remix release (not stable!).
    • Ethereum StackExchange for Remix
    • Community support channel
    • Ðapp Developer resources (Ethereum wiki)

Quick start                                                                                                        1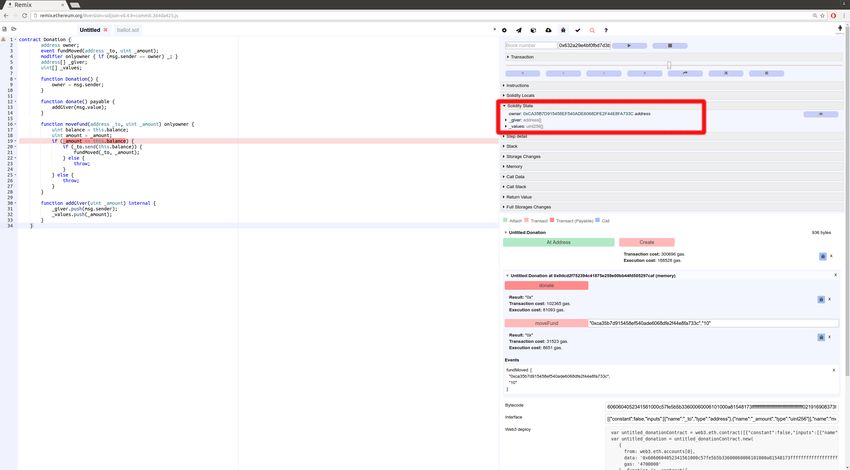
Remix Documentation, Release 1

2                                Quick start
CHAPTER            1

                                                                                                       Packages

This part focuses on using Remix IDE, which is a browser based smart contract IDE. We will basically answer the
question: Where can I use / download Remix IDE, and what is the difference between packages?
   • An online version is available at https://remix.ethereum.org. This version is stable and is updated at almost every
     release.
   • An alpha online version is available at https://remix-alpha.ethereum.org. This is not a stable version.
   • npm remix-ide package npm install remix-ide -g. remix-ide create a new instance of Remix
     IDE available at http://127.0.0.1:8080 and make the current folder available to Remix IDE by automatically
     starting remixd. see Connection to remixd for more information about sharing local file with Remix IDE.
   • Github release: https://github.com/ethereum/remix-ide/releases . The source code is packaged at every release
     but still need to be built using npm run build.
   • Mist: Remix IDE can be started and use the local geth node from Mist https://github.com/ethereum/mist/
     releases
   • Electron: Remix IDE wrapped as an Electron app is available at https://github.com/horizon-games/remix-app

                                                                                                                      3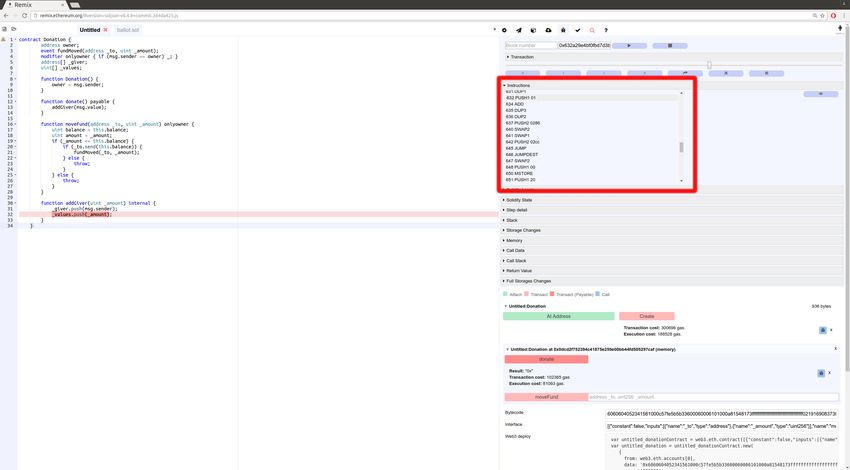
Remix Documentation, Release 1

4                                Chapter 1. Packages
CHAPTER            2

                                                                                                 Solidity Editor

The Remix editor recompiles the code each time the current file is changed or another file is selected. It also provides
syntax highlighting mapped to solidity keywords.

Here’s the list of some important features:
    • It display opened files as tabs.
    • Compilation Warning and Error are displayed in the gutter
    • Remix saves the current file continuously (5s after the last changes)
    • +/- on the top left corner enable you to increase/decrease the font size of the editor

                                                                                                                      5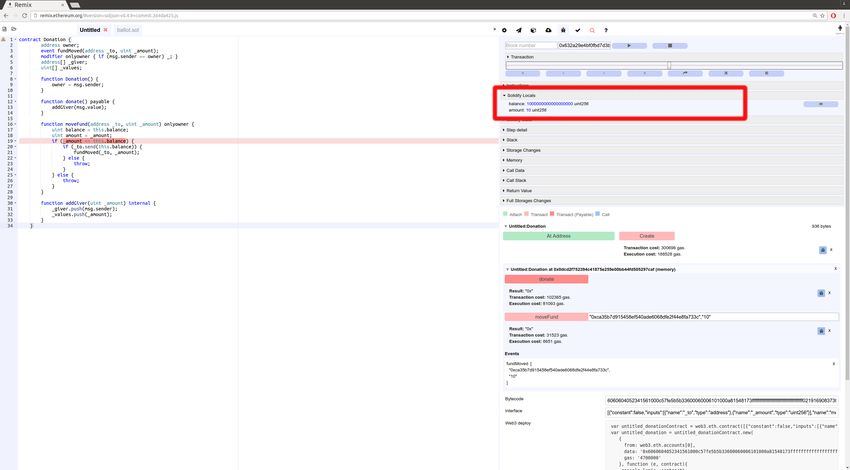
Remix Documentation, Release 1

6                                Chapter 2. Solidity Editor
CHAPTER            3

                                                                                         Compiling contracts

By default Remix triggers a compilation each time the current file is changed or another file is selected. If the contract
has a lot of dependencies and takes a long time to compile, it is possible to disable the autocompilation.

After each compilation, a list is updated with all the newly compiled contracts.
Details modal dialog displays detailed information about the current selected contract.
From this tab, you can also publish your contract to Swarm (only non abstract contracts can be published).
Published data notably contains the abi and solidity source code.
After a contract is published, you can find its metadata information using the bzz URL located in the details modal
dialog SWARM LOCATION.

                                                                                                                        7
Remix Documentation, Release 1 Compilation Errors and Warning are displayed below the contract section. At each compilation, the static analysis tab builds a report. It is very valuable when addressing reported issues even if the compiler doesn’t complain. (see more) 8 Chapter 3. Compiling contracts
CHAPTER              4

                                                            Quick Start using the JavaScript VM

There are 3 type of environments Remix can be plugged to: Javascript VM, Injected provider, or Web3
provider. (for details see Running transactions)
Both Web3 provider and Injected provider require the use of an external tool.
The external tool for Web3 provider is an Ethereum node the tools for Injected provider are Mist or
Metamask.
The JavaScript VM mode is convenient because each execution runs in your browser. Thus reloading the page
will restart Remix with an empty state.
So for performance purposes, it might also be better to use an external node.

4.1 Selecting the VM mode

Make sure the VM mode is selected. All accounts displayed in Accounts should have 100 ether.

4.2 Sample contract

pragma solidity ^0.4.16;

contract testContract {

     uint value;
     function testContract(uint _p) {
         value = _p;
     }

     function setP(uint _n) payable {
         value = _n;
     }
                                                                                           (continues on next page)

                                                                                                                 9
Remix Documentation, Release 1
(continued from previous page)
function setNP(uint _n) {
value = _n;
}
function get () constant returns (uint) {
return value;
}
}
This contract is very basic. The goal is to quickly start to create and to interact with a sample contract.
4.3 Deploying an instance
The Compile tab displays information related to the current contract (note that there can be more than one) (see
../compile_tab).
Moving on, in the Run tab select, JavaScript VM to specify that you are going to deploy an instance of the
contract in the JavaScript VM state.
The constructor of testContract needs a parameter (of type uint). Give any value and click on Create.
The transaction which deploys the instance of testContract is created.
In a “normal” blockchain, it can take several seconds to execute. This is the time for the transaction to be mined.
However, because we are using the JavaScript VM, our execution is immediate.
The terminal will inform you about the transaction. You can see details there and start debugging.
The newly created instance is displayed in the run tab.
10 Chapter 4. Quick Start using the JavaScript VMRemix Documentation, Release 1 4.4 Interacting with an instance This new instance contains 3 actions which corresponds to the 3 functions (setP, setPN, get). Clicking on SetP or SetPN will create a new transaction. Note that SetP is payable (red action) : it is possible to send value (Ether) to the contract. SetPN is not payable (light red action) : it is not possible to send value (Ether) to the contract. Clicking on get will not execute a transaction (blue action). It is not necessary to do so because get does not modify the state (variable value) of this instance. As get is constant you can see the return value just below the action. 4.4. Interacting with an instance 11
Remix Documentation, Release 1

12                               Chapter 4. Quick Start using the JavaScript VM
CHAPTER         5

                                                                                                        Settings

This section displays the current compiler version and allows one to change to another version.

Another important settings:
    • Text wrap: controls if the text in the editor should be wrapped.
    • Enable optimization: defines if the compiler should enable optimization during compilation. Enabling this
      option saves execution gas. It is useful to enable optimization for contracts ready to be deployed in production
      but could lead to some inconsistencies when debugging such a contract.

                                                                                                                   13
Remix Documentation, Release 1 14 Chapter 5. Settings
CHAPTER           6

                                                                                    Running transactions

The Run tab is an important section of Remix. It allows you to send transactions to the current environment.

6.1 Run Setup

The following settings allow you to directly influence the transaction execution:
Environment:
    • JavaScript VM: All the transactions will be executed in a sandbox blockchain in the browser. This means
      nothing will be persisted and a page reload will restart a new blockchain from scratch, the old one will not be

                                                                                                                  15
Remix Documentation, Release 1
saved.
• Injected Provider: Remix will connect to an injected web3 provider. Mist and Metamask are example
of providers that inject web3, thus can be used with this option.
• Web3 Provider: Remix will connect to a remote node. You will need to provide the URL address to the
selected provider: geth, parity or any Ethereum client.
• Account: the list of accounts associated with the current environment (and their associated balances).
• Gas Limit: the maximum amount of gas that can be set for all the transactions created in Remix.
• Value: the amount of value for the next created transaction (this value is always reset to 0 after each transaction
execution).
6.2 Initiate Instance
This section contains the list of compiled contracts and 2 actions:
• At Address assumes the given address is an instance of the selected contract. It is then possible to interact
with an already deployed contract. There’s no check at this point, so be careful when using this feature, and be
sure you trust the contract at that address.
• Create send a transaction that deploys the selected contract. When the transaction is mined, the newly created
instance will be added (this might take several seconds). Note that if the constructor has parameters, you
need to specify them.
6.3 Pending Instances
Validating a transaction take several seconds. During this time, the GUI shows it in a pending mode. When transaction
is mined the number of pending transactions is updated and the transaction is added to the log (see ../terminal)
16 Chapter 6. Running transactionsRemix Documentation, Release 1 6.4 Using the ABI Using Deploy or At Address is a classic use case of Remix. It is possible though to interact with a contract by using its ABI. The ABI is a JSON array which describe its interface. To interact with a contract using the ABI, create a new file in Remix with extension *.abi and copy the ABI content to it. Then in the input next to At Address, put the Address of the contract you want to interact with. Click on At Address, a new “connection” with the contract will popup below. 6.5 Using the Recorder The Recorder allows to save a bunch of transactions in a JSON file and rerun them later either in the same environment or in another. Saving to JSON allows to easily check the transaction list, tweak input parameters, change linked library, etc. . . We can find many use cases for the recorder, for instance: : - After having coded and tested contracts in a constrained environment (like the JavaScript VM), it could be interesting to redeploy them easily in a more persisted environment (like a Geth node) in order to check whether everything behaves normally in a classic environment. - Deploying contract does often require more than creating one transaction. - Working in a dev environment does often require to setup the state in a first place. Saving a record ends up with the creation of this type of content (see below): In that specific record, 3 transactions are executed: The first corresponds to the deployment of the lib testLib. The second corresponds to the deployment of the contract test, the first parameter of the constructor is set to 11. That contract depends on a library. The linkage is done using the property linkReferences. In that case we use 6.4. Using the ABI 17
Remix Documentation, Release 1

the addres of the previously created library : created{1512830014773}. the number is the id (timestamp) of the
transaction that leads to the creation of the library.
The third parameter corresponds to the call to the function                      set of the contract test
(the property to is set to:   created{1512830015080}) .                          Input parameters are 1 and
0xca35b7d915458ef540ade6068dfe2f44e8fa733c
all these transactions are created using the value of the accounts account{0}.

{
"accounts": {
     "account{0}": "0xca35b7d915458ef540ade6068dfe2f44e8fa733c"
},
"linkReferences": {
     "testLib": "created{1512830014773}"
},
"transactions": [
     {
     "timestamp": 1512830014773,
     "record": {
         "value": "0",
         "parameters": [],
         "abi": "0xbc36789e7a1e281436464229828f817d6612f7b477d66591ff96a9e064bcc98a",
         "contractName": "testLib",
         "bytecode":
 ˓→"60606040523415600e57600080fd5b60968061001c6000396000f300606060405260043610603f576000357c0100000000

 ˓→",

         "linkReferences": {},
         "type": "constructor",
         "from": "account{0}"
     }
     },
     {
     "timestamp": 1512830015080,
     "record": {
         "value": "100",
         "parameters": [
         11
         ],
         "abi": "0xc41589e7559804ea4a2080dad19d876a024ccb05117835447d72ce08c1d020ec",
         "contractName": "test",
         "bytecode":
 ˓→"60606040526040516020806102b183398101604052808051906020019091905050806000819055505061027a8061003760

 ˓→_browser/ballot.sol:testLib____________

 ˓→636d4ce63c6000604051602001526040518163ffffffff167c0100000000000000000000000000000000000000000000000

 ˓→",

         "linkReferences": {
         "browser/ballot.sol": {
             "testLib": [
             {
                 "length": 20,
                 "start": 511
             }
             ]
         }
         },
         "name": "",
         "type": "constructor",
                                                                                            (continues on next page)

18                                                                         Chapter 6. Running transactions
Remix Documentation, Release 1
(continued from previous page)
"from": "account{0}"
}
},
{
"timestamp": 1512830034180,
"record": {
"value": "1000000000000000000",
"parameters": [
1,
"0xca35b7d915458ef540ade6068dfe2f44e8fa733c"
],
"to": "created{1512830015080}",
"abi": "0xc41589e7559804ea4a2080dad19d876a024ccb05117835447d72ce08c1d020ec",
"name": "set",
"type": "function",
"from": "account{0}"
}
}
],
"abis": {
"0xbc36789e7a1e281436464229828f817d6612f7b477d66591ff96a9e064bcc98a": [
{
"constant": true,
"inputs": [],
"name": "get",
"outputs": [
{
"name": "",
"type": "uint256"
}
],
"payable": false,
"stateMutability": "view",
"type": "function"
}
],
"0xc41589e7559804ea4a2080dad19d876a024ccb05117835447d72ce08c1d020ec": [
{
"constant": true,
"inputs": [],
"name": "getInt",
"outputs": [
{
"name": "",
"type": "uint256"
}
],
"payable": false,
"stateMutability": "view",
"type": "function"
},
{
"constant": true,
"inputs": [],
"name": "getFromLib",
"outputs": [
{
(continues on next page)
6.5. Using the Recorder 19Remix Documentation, Release 1
(continued from previous page)
"name": "",
"type": "uint256"
}
],
"payable": false,
"stateMutability": "view",
"type": "function"
},
{
"constant": true,
"inputs": [],
"name": "getAddress",
"outputs": [
{
"name": "",
"type": "address"
}
],
"payable": false,
"stateMutability": "view",
"type": "function"
},
{
"constant": false,
"inputs": [
{
"name": "_t",
"type": "uint256"
},
{
"name": "_add",
"type": "address"
}
],
"name": "set",
"outputs": [],
"payable": true,
"stateMutability": "payable",
"type": "function"
},
{
"inputs": [
{
"name": "_r",
"type": "uint256"
}
],
"payable": true,
"stateMutability": "payable",
"type": "constructor"
}
]
}
}
20 Chapter 6. Running transactionsCHAPTER 7
Deployed contracts
This section in the Run tab contains a list of deployed contracts to interact with through autogenerated UI of the
deployed contract (also called udapp).
Several cases apply:
• The called function is declared as constant or pure in Solidity. The action has a blue background, clicking
it does not create a new transaction. Clicking it is not necessary because there are not state changes - but it will
update the return value of the function.
• The called function has no special keywords. The action has a light red background, clicking on does create a
new transaction. But this transaction cannot accept any amount of Ether.
• The called function is declared as payable in Solidity. The action has a red background, clicking it does create
a new transaction and this transaction can accept value.
For more information see more about Solidity modifier .
If a function requires input parameters, it is required to specify them.
21Remix Documentation, Release 1 22 Chapter 7. Deployed contracts
CHAPTER              8

                                                                                             Build Artifact

As compilation succeed Remix create a JSON file for each compiled contract. These JSON files contains several
metadata

8.1 Library Deployment

By default Remix automatically deploy needed libraries.
linkReferences contains a map representing libraries which depend on the current contract. Values are addresses
of libraries used for linking the contract.
autoDeployLib defines if the libraries should be auto deployed by Remix or if the contract should be linked with
libraries described in linkReferences
Note that Remix will resolve addresses corresponding to the current network. By default, a configuration key fol-
low the form: :, but it is also possible to define  or
 as keys.
{
     "VM:-": {
         "linkReferences": {
             "browser/Untitled.sol": {
                 "lib": "",
                 "lib2": ""
             }
         },
         "autoDeployLib": true
     },
     "main:1": {
         "linkReferences": {
             "browser/Untitled.sol": {
                 "lib": "",
                 "lib2": ""
             }
                                                                                              (continues on next page)

                                                                                                                  23
Remix Documentation, Release 1
(continued from previous page)
},
"autoDeployLib": true
},
"ropsten:3": {
"linkReferences": {
"browser/Untitled.sol": {
"lib": "",
"lib2": ""
}
},
"autoDeployLib": true
},
"rinkeby:4": {
"linkReferences": {
"browser/Untitled.sol": {
"lib": "",
"lib2": ""
}
},
"autoDeployLib": true
},
"kovan:42": {
"linkReferences": {
"browser/Untitled.sol": {
"lib": "",
"lib2": ""
}
},
"autoDeployLib": true
}
}
24 Chapter 8. Build ArtifactCHAPTER 9
Unit Testing
The unit testing tab allows to run unit testing.
25Remix Documentation, Release 1 26 Chapter 9. Unit Testing
Remix Documentation, Release 1

9.1 Generate test File

This create a new solidity file in the current folder suffixed with _test. This file contains the minimun you need for
running unit testing.

9.2 Run Tests

This execute tests. The execution is run in a separate environment and the result is displayed below.
| Available functions | Supported types | | ————- | ————- | | Assert.ok() | bool | | Assert.equal()
| uint, int, bool, address, bytes32, string | | Assert.notEqual() | uint, int, bool, address,
bytes32, string | | Assert.greaterThan() | uint, int | | Assert.lesserThan() | uint, int |

9.3 Continuous integration

remix-tests is also a CLI, it can be used in a continuous integration environement which support node.js. Please find
more information in the remix-test repository

9.1. Generate test File                                                                                            27
Remix Documentation, Release 1

28                               Chapter 9. Unit Testing
CHAPTER           10

                                                                                                   File Explorer

The file explorer lists by default all the files stored in your browser. You can see them in the browser folder. You can
always rename, remove or add new files to the file explorer.

Note that clearing the browser storage will permanently delete all the solidity files you wrote. To avoid this, you can
use Remixd, which enables you to store and sync files in the browser with your local computer (for more information
see ../tutorial_remixd_filesystem)

                                                                                                                     29
Remix Documentation, Release 1 We will start by reviewing at the icons at the top left - from left to the right: 10.1 Create new File Creates a new untitled.sol file in Remix. 10.2 Add Local File Allows you to select files from the local file system and import them to the Remix browser storage. 10.3 Publish to Gist Publishes all files from the browser folder to a gist. Gist API has changed in 2018 and it unfortunately requires users to be authenticated to be able to publish a gist. Click this link to Github tokens setup and select Generate new token. Then check only Create gists checkbox and generate a new token. Then paste it in Remix (right panel/Settings tab) and click Save. Now you should be able to use the feature. 10.4 Copy to another Remix instance Enables you to copy files from the browser storage to another instance (URL) of Remix. 30 Chapter 10. File Explorer
Remix Documentation, Release 1

10.5 Connect your filesystem to Remix

Allows to sync between Remix and your local file system (see more about RemixD).

10.5. Connect your filesystem to Remix                                                              31
Remix Documentation, Release 1

32                               Chapter 10. File Explorer
CHAPTER            11

                                                                                                   Debugging

This module allows you to debug the transaction. It can be used to deploy transactions created from Remix and already
mined transactions. (debugging works only if the current environment provides the necessary features).

For more information about debugging, see the Tutorial on debugging transactions with Remix

                                                                                                                  33
Remix Documentation, Release 1 34 Chapter 11. Debugging
CHAPTER 12
Analysis
This section gives information about the last compilation. By default, a new analysis is run at each compilation.
The analysis tab gives detailed information about the contract code. It can help you avoid code mistakes and to enforce
best practices.
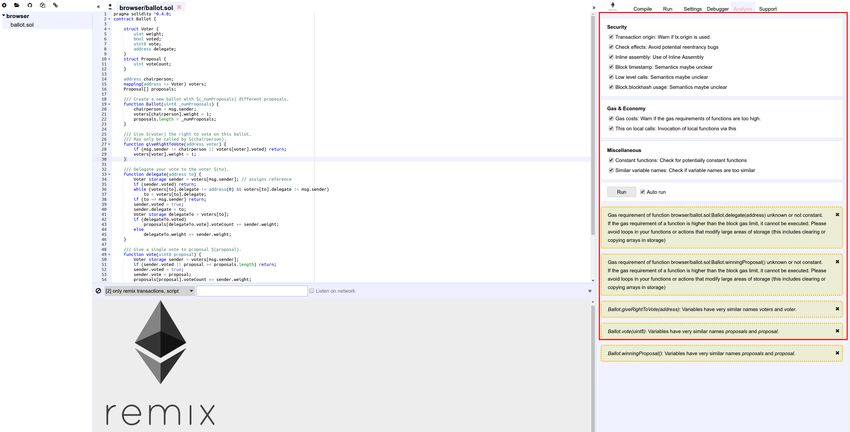
Here is the list of analyzers:
Security:
• Transaction origin: Warns if tx.origin is used
• Check effects: Avoid potential reentrancy bugs
• Inline assembly: Use of Inline Assembly
35Remix Documentation, Release 1
• Block timestamp: Semantics maybe unclear
• Low level calls: Semantics maybe unclear
• Block.blockhash usage: Semantics maybe unclear
Gas & Economy:
• Gas costs: Warns if the gas requirements of the functions are too high
• This on local calls: Invocation of local functions via this
Miscellaneous:
• Constant functions: Checks for potentially constant functions
• Similar variable names: Checks if variable names are too similar
36 Chapter 12. AnalysisCHAPTER 13
Terminal
Features, available in the terminal:
• It integrates a JavaScript interpreter and the web3 object. It enables the execution of the JavaScript script which
interacts with the current context. (note that web3 is only available if the web provider or injected
provider mode is selected).
• It displays important actions made while interacting with the Remix IDE (i.e. sending a new transaction).
• It displays transactions that are mined in the current context. You can choose to display all transactions or only
transactions that refers to the contracts Remix knows (e.g transaction created from the Remix IDE).
• It allows searching for the data and clearing the logs from the terminal.
37Remix Documentation, Release 1 38 Chapter 13. Terminal
CHAPTER         14

                                                           Building Smart Contracts with Remix

We prepared a tutorial that will help you build DApps with Remix. In this tutorial, you learn how to build smart
contracts, how to deploy them and how to interact with them. Then we show you how to connect your frontend with
the blockchain by using web3.js.

14.1 Let’s get started

This tutorial was used in workshops at ethCC, Edcon, and DappCon.
You can watch the Edcon presentation talk and here are the workshop slides. (May 3, 2018)
Here are the latest slides (hosted on swarm) and here are the latest slides (not on swarm). (Oct 16, 2018)

                                                                                                              39
Remix Documentation, Release 1 40 Chapter 14. Building Smart Contracts with Remix
CHAPTER     15

                                             Eat the Block tutorials

This section list Remix related tuturials:
Youtube channel
Introduction
Remix File explorer

                                                                  41
Remix Documentation, Release 1 42 Chapter 15. Eat the Block tutorials
CHAPTER          16

                                           Access your local filesystem by using RemixD

RemixD is an npm module. Its purpose is to give the remix web application access to a folder from your local
computer.
The code of RemixD can be checked out here .
Remixd can be globally installed using the following command: npm install -g remixd.
Then remixd -s  will start Remixd and share the given
folder.
The folder is shared using a websocket connection between Remix IDE and Remixd.
Be sure the user executing Remix has read/write permission on the folder.
Warning!
RemixD provides full read and write access to the given folder for any application that can access
the TCP port 65520 on your local host.
From Remix IDE, you will need to activate the connection.
Click on the localhost connection icon:

                                                                                                         43
Remix Documentation, Release 1 A modal dialog will ask confirmation Accepting this dialog will start a session. Once the connection is made, the status will update and the connection icon should shows up in green. Hovering the icon will give more connection status information. At this point if the connection is successful, the shared folder will be available in the file explorer. 44 Chapter 16. Access your local filesystem by using RemixD
Remix Documentation, Release 1

                           45
Remix Documentation, Release 1 46 Chapter 16. Access your local filesystem by using RemixD
CHAPTER             17

                                             Tutorial on debugging transactions with Remix

The goal of this tutorial is to explain how to debug transaction using Remix.

17.1 Start debugging

There are two different ways to start debugging, each way correspond to a different use case.

17.1.1 From the Transaction GUI

We will not explain in detail here how to write or deploy contract. Let us start with a basic contract (replace this one
by your’s):
contract Donation {
    address owner;
    event fundMoved(address _to, uint _amount);
    modifier onlyowner { if (msg.sender == owner) _; }
    address[] _giver;
    uint[] _values;

     function Donation() {
         owner = msg.sender;
     }

     function donate() payable {
         addGiver(msg.value);
     }

     function moveFund(address _to, uint _amount) onlyowner {
         uint balance = this.balance;
         uint amount = _amount;
         if (_amount
Remix Documentation, Release 1
(continued from previous page)
fundMoved(_to, _amount);
} else {
throw;
}
} else {
throw;
}
}
function addGiver(uint _amount) internal {
_giver.push(msg.sender);
_values.push(_amount);
}
}
For the purpose of this tutorial, we will run the JavaScript VM (that’s the default mode when you don’t use Remix
with Mist or Metamask). This simulates a custom blockchain. You could do the same using a proper backend node.
Now, let’s deploy the contract:
Right panel / Red button Create
Then we should call the Donate function (that will send Ether to the contract).
Let’s set the amount of Ether:
Right panel / second tab from the left - fill in the ´´value´´ input (´1 ether´ for instance)
48 Chapter 17. Tutorial on debugging transactions with RemixRemix Documentation, Release 1 Then click on Donate. As we are using the JavaScript VM, everything goes almost instantly. Remix displays also some information related to each transaction result. In the terminal, the transaction is logged and you can start debugging it. 17.1. Start debugging 49
Remix Documentation, Release 1

17.1.2 From the Debugger

The debugger can be found in the right panel / 5th tab from the left.
You can start a debug session by providing either a transaction hash or a block number and
transaction index.

50                                             Chapter 17. Tutorial on debugging transactions with Remix
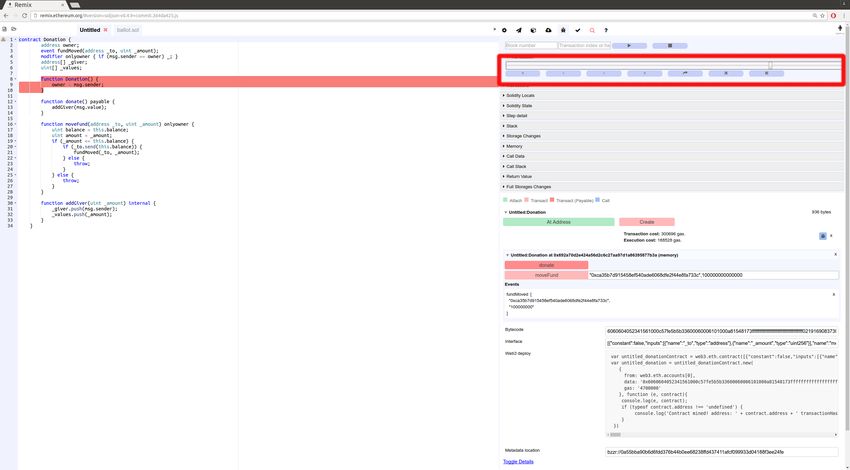
Remix Documentation, Release 1

Click the play button to start debugging.

17.2 Using the debugger

The debugger allows one to see detailed informations about the transaction’s execution. It uses the editor (left panel)
to display the location in the source code where the current execution is.
The transaction panel displays basic information about the current transaction.

The navigation part contains a slider and buttons that can be used to step through the transaction execution.

17.2. Using the debugger                                                                                            51
Remix Documentation, Release 1

From the left to the right:
step over back, step into back, step into forward, step over forward, jump out (jump out of the current call), jump to
the previous breakpoint, jump to the next breakpoint.

11 panels give detailed information about the execution:

17.2.1 Instructions

52                                            Chapter 17. Tutorial on debugging transactions with Remix
Remix Documentation, Release 1

The Instructions panel displays the bytecode of the current executing contract- with the current step highlighted.
Important note: When this panel is hidden, the slider will have a courser granularity and only stop at expression
boundaries, even if they are compiled into multiple EVM instructions. When the panel is displayed, it will be possible
to step over every instruction, even those that refers to the same expression.

17.2.2 Solidity Locals

The Solidity Locals panel displays local variables associated with the current context.

17.2. Using the debugger                                                                                             53
Remix Documentation, Release 1
17.2.3 Solidity State
The Solidity State panel displays state variables of the current executing contract.
17.2.4 Low level panels
These panels display low level informations about the execution:
• Stack
• Storages Changes
• Memory
• Call Data
• Call Stack
• Return Value (only if the current step is a RETURN opcode)
• Full Storages Changes (only at the end of the execution - display every storage change of every modified con-
tract)
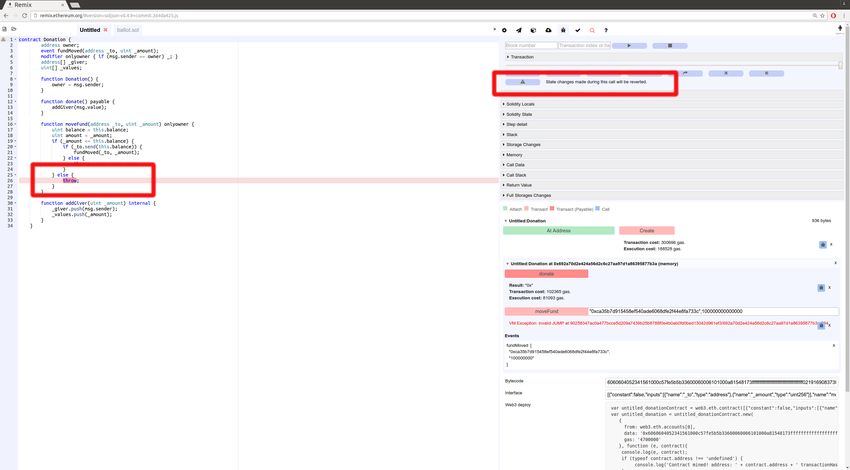
17.2.5 Reverted Transaction
A transaction could be reverted (either because of out of gas exception, Solidity throw or low level exception).
In that case it is important to be aware of the exception and to locate where the exception is in the source code.
Remix will warn you when the execution throws an exception. The warning button will jump to the last opcode
before the exception happened.
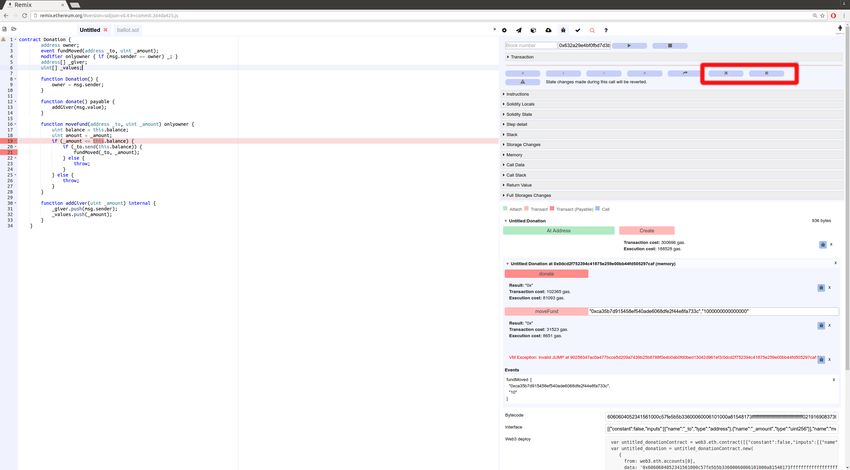
54 Chapter 17. Tutorial on debugging transactions with RemixRemix Documentation, Release 1 17.2.6 Breakpoints The two last buttons from the navigation area are used to jump either back to the previous breakpoint or forward to the next breakpoint. Breakpoints can be added and removed by clicking on the line number. When a debug session is started, the execution will jump to the first encountered breakpoint. 17.2. Using the debugger 55
Remix Documentation, Release 1

Important note: If you add a breakpoint to a line that declares a variable, it might be triggered twice: Once for
initializing the variable to zero and second time for assigning the actual value. As an example, assume you are
debugging the following contract:

contract ctr {
    function hid () {
        uint p = 45;
        uint m;
        m = 89;
        uint l = 34;
    }
}

And let’s says that breakpoints are set for the lines
uint p = 45;
m = 89;
uint l = 34;
then clicking on Jump to next breakpoint will stop at the following lines in the given order:
      uint p = 45; (declaration of p)
      uint l = 34; (declaration of l)
      uint p = 45; (45 assigned to p)
      m = 89; (89 assigned to m)
      uint l = 34; (34 assigned to l)

56                                               Chapter 17. Tutorial on debugging transactions with Remix
CHAPTER 18
Importing Source Files in Solidity
This tutorial will show you how to import local and external files.
The compilation result will also contain contracts implemented in the imported files.
For a detailed explanation of the import keyword see the Solidity documentation
18.1 Importing a local file
Other files in Remix can be imported just by specifying their path. Please use ./ for relative paths to increase portability.
18.2 Importing from GitHub
It is possible to import files directly from GitHub with URLs like https://github.com///
.
57Remix Documentation, Release 1 18.3 Importing from Swarm Files can be imported using all URLs supported by swarm. If you do not have a swarm node, swarm-gateways.net will be used instead. 58 Chapter 18. Importing Source Files in Solidity
CHAPTER      19

                                               Debugging a Dapp using Remix - Mist - Geth

The ultimate goal of this tutorial is to debug transactions that have been created by a dapp front end.
It is easy in Remix to debug a transaction created from its own GUI. However, setting up an environment that allows
you to debug transactions created outside of Remix, require a bit more of complexity.
We will need four tools for that :
    • Geth - this is the center piece and provides the blockchain environment. We will basically run geth in a dev
      mode.
    • Mist - this is the Ethereum dapp browser. We will use it to browse our front end.
    • Remix - this is the Ethereum IDE. We will use it to develop our Solidity contract.
    • Any code editor you want - in order to write your front end :)

19.1 Install the environment

19.1.1 Install Mist

Mist is the Ethereum browser and the entry point of a Dapp.
Please download the latest version (at least 0.8.9).
Basically we will always run our front end in Mist (note that it is also possible to use Metamask).

19.1.2 Install Geth

Geth is the official Ethereum client.

                                                                                                                59
Remix Documentation, Release 1 19.2 Running the environment 19.2.1 Run Geth We will run a test node. This node will have a new empty state and will not be synced to the main or ropsten network. geth --ipcpath /geth.ipc --datadir --dev ˓→console is the folder where keys and chain data will be stored. --ipcpath defines the end point that other apps (like Mist) use to talk to geth. --datadir specifies the data directory. --dev sets the node into private chain mode and adds some debugging flags. Then we need to create accounts and mine a bit to generate some Ether: // from the geth console : personal.newAccount() // You can execute this command several time if you need more ˓→than one account. miner.start() // generate some Ether. miner.stop() // stop mining after 30s-60s - we could also keep mining. Next time we run Geth, we will only need to mine transactions (no need to recreate account). 19.2.2 Run Mist If we run Mist without any argument, its internal Geth node will run. As we have our own we need to specify the ipc path of the node installed above. mist --rpc /geth.ipc (yes the option is –rpc) Once Mist is started, verify that it is connected to the test node (that’s very important!!). On the bottom left, check that the network is Private-net and that the block number is the same as reported by the test node we are currently running. Run the following command in the Geth Console to check: web3.eth.blockNumber. Clicking on Wallet will allow you to send transactions and check account balances (if you are currently mining you should see the balance increasing). 60 Chapter 19. Debugging a Dapp using Remix - Mist - Geth
Remix Documentation, Release 1

19.2.3 Starting Remix

In Mist click on Develop / Open Remix IDE
Remix will open in a new window. If this is the first time it is run, the Ballot contract will be loaded.
Now, we need to check if Remix is connected to Mist:
Right panel / third tab from the left, Injected Provider should be checked.

Right panel / second tab from the left, Transaction Origin should contain accounts we have previously created
in Geth.

19.2. Running the environment                                                                               61
Remix Documentation, Release 1

19.3 Developing contract / front end

19.3.1 Donation contract - Dapp Back end

Here is a sample solidity contract.
Copy and paste the following inside remix:
contract Donation {
    address owner;
    event fundMoved(address _to, uint _amount);
    modifier onlyowner { if (msg.sender == owner) _; }
    address[] _giver;
    uint[] _values;

     function Donation() {
         owner = msg.sender;
     }

     function donate() payable {
         addGiver(msg.value);
     }

     function moveFund(address _to, uint _amount) onlyowner {
         uint balance = this.balance;
         uint amount = _amount;
         if (_amount
Remix Documentation, Release 1
(continued from previous page)
}
} else {
throw;
}
}
function addGiver(uint _amount) internal {
_giver.push(msg.sender);
_values.push(_amount);
}
}
19.3.2 Dapp Front end
and here is the front end:
Donation Contract
give
moveFund
function donate () {
var donation = contractspec.at(document.getElementById('contractaddress').value)
donation.donate({
from: document.getElementById('fromGive').value,
value: document.getElementById('valueGive').value
}, function (error, txHash) {
tryTillResponse(txHash, function (error, receipt) {
alert('done ' + txHash)
})
})
}
function movefund () {
var donation = contractspec.at(document.getElementById('contractaddress').value)
(continues on next page)
19.3. Developing contract / front end 63Remix Documentation, Release 1
(continued from previous page)
donation.moveFund(
document.getElementById('moveFundTo').value,
document.getElementById('amountToMove').value,
function (error, txHash) {
tryTillResponse(txHash, function (error, receipt) {
alert('done ' + txHash)
})
})
}
var contractspec = web3.eth.contract([{"constant":false,"inputs":[{"name":"_to","type
˓→":"address"},{"name":"_amount","type":"uint256"}],"name":"moveFund","outputs":[],
˓→"payable":false,"type":"function"},{"constant":false,"inputs":[],"name":"donate",
˓→"outputs":[],"payable":true,"type":"function"},{"inputs":[],"payable":false,"type":
˓→"constructor"},{"anonymous":false,"inputs":[{"indexed":false,"name":"_to","type":
˓→"address"},{"indexed":false,"name":"_amount","type":"uint256"}],"name":"fundMoved",
˓→"type":"event"}]);
function tryTillResponse (txhash, done) {
document.getElementById('wait').innerHTML = 'waiting for the transaction to be
˓→mined ...'
web3.eth.getTransactionReceipt(txhash, function (err, result) {
if (!err && !result) {
// Try again with a bit of delay
setTimeout(function () { tryTillResponse(txhash, done) }, 500)
} else {
document.getElementById('wait').innerHTML = ''
var log = document.createElement("div")
log.innerHTML = JSON.stringify(result)
document.getElementById('log').appendChild(log)
done(err,result)
}
})
}
I would suggest serving this file using http-serve, but you can use any web server you like.
Example: Dapp Front End https://github.com/ltfschoen/dapp_front_end
19.3.3 Important notice !
The variable contractspec contains the abi of the donation contract. This means that if you change something
in the contract interface (function names, parameters, . . . ) you need to copy the new abi from remix to the front end.
19.4 Deploying
Right panel / Red button Create
64 Chapter 19. Debugging a Dapp using Remix - Mist - GethRemix Documentation, Release 1 This creates a new transaction that deploys the Donation contract (Mist will ask for the usual passphrase check). Wait for the transaction to be mined (don’t forget to activate mining miner.start()). Once this is done, you can use it by executing the moveFund and donate function. But this is not what we want to achieve. We want to run and debug those functions from the front end. Remix also display the address of the contract. Save it, we’ll need this address later. 19.5 Debugging From Mist, browse the above front end. In the first field, paste the address of the newly created contract. Now, let’s call the first function (label give). 19.5. Debugging 65
Remix Documentation, Release 1

You will need an account and a value.
The account could be any account that is declared in the Wallet section of Mist. This is the sender of the transaction
that we are going to create. The value should be no more than the actual balance of the account - the unit is in wei, so
just put 100 (100 wei), that should be fine.
Click on Give and wait for the transaction to be mined.
The HTML block with id log is filled by all the transactions created from the front end. It was easier for the purpose
of this tutorial to just log transactions in a div but you can have your own logging mechanism.
There is only one field that we need, this is the transactionHash.
Copy it and switch to Remix. On the right side, the fifth panel shows a small “bug” icon, that is the debugger.
Paste the hash into the transaction field and click on the play button.

You are now entering a debug session for the call to donate.
Debugging in Remix is easier than with common tools like gdb because you can freely move in time. Use the slider to
change the current step and click on the panels below to expand them and explore the curret state, local variables, etc.
There are also breakpoints to move between sections of the code quickly, but more on all that later.
At the time of this writing, there is an issue that could break the contract creation. The a workaround for that at
https://github.com/ethereum/go-ethereum/issues/3653 . Please follow the workaround or wait for this issue to be
closed.
Also, although retrieving a contract’s storage when Remix is using the JavaScript VM is working well, there is still
work to be done when Remix is using eth or geth as backend.

66                                                Chapter 19. Debugging a Dapp using Remix - Mist - Geth
CHAPTER           20

                                                                              Code contribution guide

Remix is an open source tool and we encourage anyone to help us improve our tool. You can do that by opening issues,
giving feedback or by contributing a pull request to our codebase.
The Remix application is built with JavaScript and it doesn’t use any framework. We only rely on selected set of npm
modules, like yo-yo, csjs-inject and others. Check out the package.json files in the Remix submodules to
learn more about the stack.
To learn more, please visit our GitHub page.

                                                                                                                 67
Remix Documentation, Release 1 68 Chapter 20. Code contribution guide
CHAPTER 21
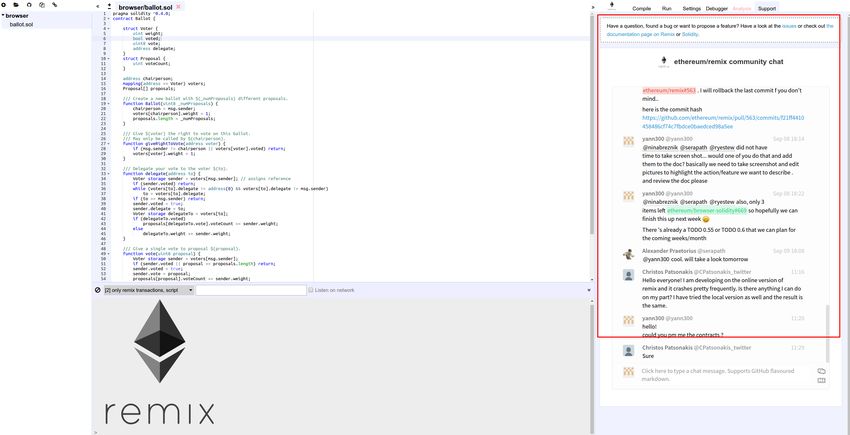
Support tab in Remix
This section provides a link to Remix Issues where users can report a bug or suggest a feature, as well as providing
other useful links. It also displays a Remix support channel
69You can also read