Autotrader BETA manual Table of Contents TBA I. Allocation Trees II. Trigger Complexes III. Trailing Strategies IV. Hotkeys V. Watchlist VI ...
←
→
Page content transcription
If your browser does not render page correctly, please read the page content below
Autotrader BETA manual

Table of Contents TBA

I. Allocation Trees

II. Trigger Complexes

III. Trailing Strategies

IV. Hotkeys

V. Watchlist

VI. Signal Trading

VII. Simulation
I. Allocation Trees
Breakout and Countertrend allocations are built as a tree structure with entry and exit
branches. Branches are allocated a percentage and operate independently of each other.
Counter-trend trades are designed to send passive limit orders to provide liquidity while
Breakout trades attempt to remove liquidity. Either can be used to long or short the market.
The distinction is in whether you plan to add or remove liquidity.

Allocation Tree Design
Select the icon labeled Allocation Trees to begin building a new allocation. This Icon
resembles a puzzle piece. To view a description of each icons function, highlight the toolbar,
and hover over any icon.

The Allocation Tree Manager provides a quick look at every allocation tree currently saved on
the system. Use this window to view, modify, or create new allocation trees.
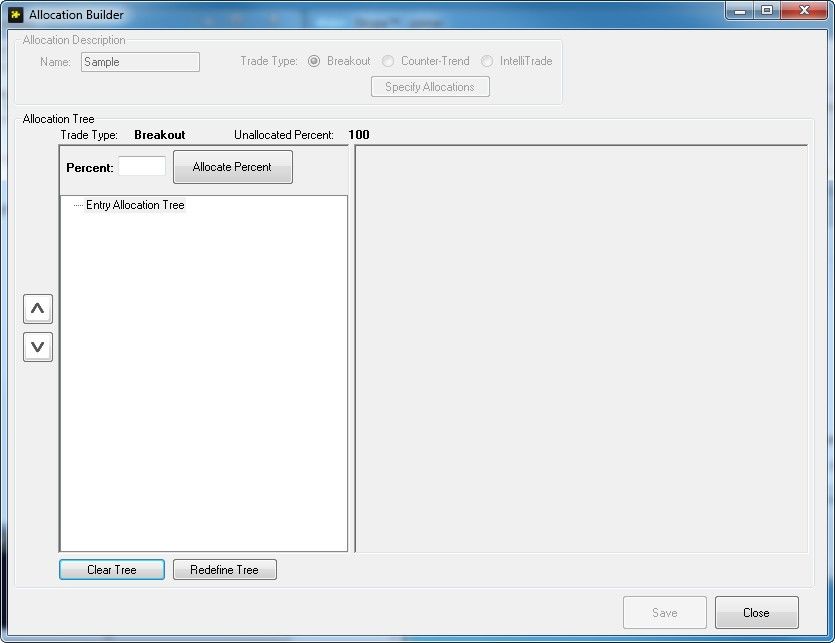
Allocation Description
Select New Tree to create an allocation and assign a name under allocation description.
Determine if the strategy will be a Breakout or Counter-Trend. Select Specify Allocations to
begin building the tree.

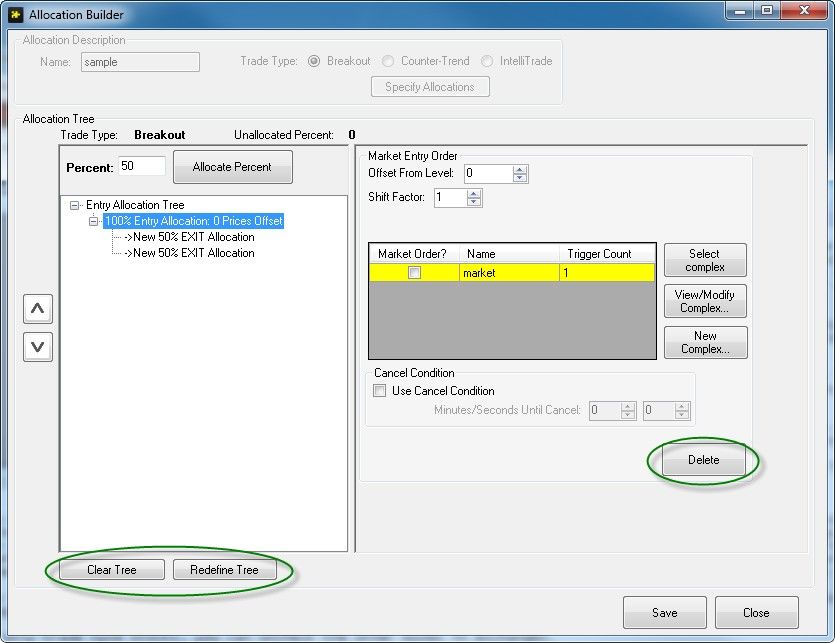
Entry Allocation
To create an entry allocation, select the Entry Allocation Tree label located below the percent
box. Enter an amount using the Allocate Percent button. An Autotrader allocation has a tree
structure with entry 'branches'. For example, if you allocate 100 percent, one single entry
branch will appear. If you allocate 50 percent twice, two entry branches will appear. Repeat
this process until 100 percent of the entry has been allocated. The amount of entry left to be
allocated is displayed next to the trade type. Once you have allocated 100%, select an entry
allocation to create an Entry Offset.
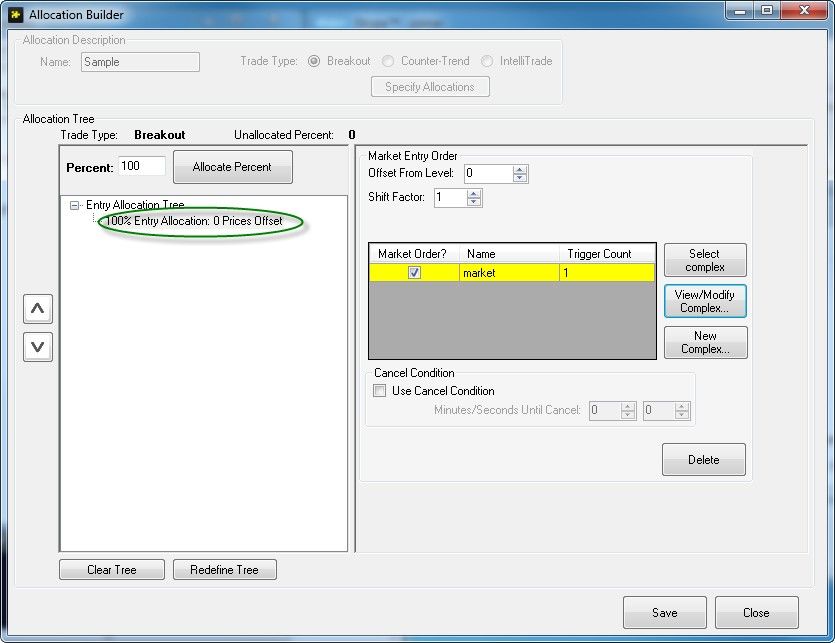
Entry Offsets
Entry offsets are used to determine what price to enter the market. When a strategy is
launched either manually or from a signal, it is launched at a specific price or level. If a
breakout entry has an offset of 0.00, and a signal to buy Citi at 5.00 is received, the breakout
allocation will be set to launch at 5.00. If the entry offset is set to 0.01, the buy allocation will
launch at 5.01. The same is true for Countertrends. If a signal to sell Citi at 5.00 is received
with a 0.00 entry offset, limit orders to sell will be placed at 5.00. If the Countertrend entry
offset is set to 0.01, the allocation will send limit orders to sell 5.01. Negative values for entry
offsets should only be used under the rarest circumstances; almost every scenario for new
and experienced traders can be created with a combination of a 0 or positive entry offset and
Trigger Complex with a limit order through the market. 1 Select a Trigger Complex to enter the

1 A Countertrend to buy that is launched at the NBBO with a positive 5 entry offset will place bids below the market 5
  cents.. A negative entry offset will place those bids 5 cents above the best bid, and may result in an immediate long
market using a Breakout allocation. Trigger complexes are discussed in full in the Trigger
Complexes chapter. For Countertrends, a Trigger Complex is not necessary as limit orders
will be sent to passively enter the market.

There is an option to cancel Countertrend limit order entries by selecting Use Cancel
Condition. Beta users will be able to specify a time in Minutes/Seconds until a limit order is
canceled for entry. The Trigger Complex Cancel option below is still in Beta and should not
be selected.

  position if the spread is less than or equal to 5 cents. This is only useful in minimizing the initial unrealized pnl of a
  long position entered manually due to the fact that the cost to exit once long will be a maximum of 5 cents as long as an
  inter-market sweep order type has not swept a single venue through the offer for greater than the NBBO spread.
  Madscan has a minimum spread general filter which eliminates this concern for signal based trades. Traders who
  manually launch and time long trades in thin and volatile stock like FSLR may find buying stock on the offer with a
  negative entry offset Countertrend allocation because the maximum unrealized pnl once long will be offset from the
  current bid price as opposed to a Breakout allocation which generates long position relative to the ask in combination
  with a limit order Trigger Complex.
Exit Allocation
Exit allocations are optional and consist of profits, stops, and timed exits. Each entry
allocation can have up to 100% of its exit managed by Autotrader. Select an entry allocation
to create an exit allocation. Type an amount into the percent field and select allocate percent.
A new Exit allocation will appear below your Entry allocation.

Profit Orders
If an exit allocation is clicked and highlighted, an area labeled Specify Exit Allocation becomes
displayed, with three tabs – Profit Order, Stop Order, and Timed Exit.

Profit Order Offset From Entry
To activate a profit order check the Activate Profit Order check box. The offset from entry will
indicate the distance from the entry price that a bid or offer will be placed. Only positive
values can be entered in terms of price/cents, percentage, or dollar value. Percentage and
dollar values can be expressed as a decimal and are based on your entry price.

Destination
Autotrader sends orders to any destination accessible on your front end trading platform.

TIF (Time in Force)
Time in Force will dictate how long a bid or offer will remain until being canceled by the
exchange. DAY orders will remain until the market closes. IOC (immediate or cancel) orders
will cancel if not instantly matched.

Order Display
The display size of a profit order can be manipulated using the use Iceberg\Hidden Order
check box. This allows a DAY order of any size to be hidden completely or advertised as only
100 shares or more.

Trailing Profit
A profit order can have trailing properties attached to it that will move it closer to the current
market price as the trade goes offside. The trailing strategy can be configured extensively
and the process is described in full in the chapter – Trailing Strategies.

Replenish
The replenish tool works by automatically resending an entry order after its associated profit
is filled. The number of cycles indicates how many times this event will occur. A replenish will
operate until the indicated number of cycles have completed, a stop is triggered, or a timer
goes off. A manual exit filled offside or at break-even will also stop the replenish cycle. The
replenish tool is only available with Counter-Trends. Entry orders will always be repopulated
at the fill price of the original entry and is designed to take advantage of market ranges.

Stop Orders
To attach a stop order to an entry, select the stop order tab under specify exit allocation and
check the box labeled activate stop order. Offset from entry indicates how far away from
entry the stop will execute. Trigger Complexes determine how a stop will behave. If you have
not created a Trigger Complex, you will need to select new complex. Reference the Trigger
Complexes chapter for more information.

Specify Stop Order Offset
To select the offset of the stop order click the up arrow on the up/down box labeled Offset
from entry (a specific number may also be typed into the box directly). Click on the desired
Trigger Complex and then click Select Complex to choose which Trigger Complex will be
assigned to the stop order (a complex may also be assigned by double clicking the desired
complex). Information about each complex is displayed in the complex selection box,
including how many triggers a complex has (including the Root Trigger) and whether the
complex includes a market order. To view or change the details of a highlighted complex
select View/Modify Complex. The complex that is currently assigned to the stop order is
highlighted in yellow.
Trailing Stop
A trailing stop can be attached to a stop order and the process is described in the Trailing
Strategies chapter.

Timed Exits
To attach a timed exit/stop to an entry, select the Timed Exit tab and check the box labeled
Activate Timed Exit.

Specify Timed Exit
Use the up\down boxes next to Minutes/Seconds Until Exit to specify the amount of time that
will pass before the stop is launched. The time period begins when the entry order is filled.
Every time an entry receives a partial fill the timer is reset. Therefore, the timer is
always based on last fill received at a price point. Select the complex that will activate
once the time has expired and the offset from best bid/offer. An offset of 0 will trigger the stop
at the inside price required to flatten your position.
Trailing Stop
To create a stop that trails the market, but initiates only after a specific period of time, check
the box labeled Activate Trailing Stop.

Modifying Allocation Priority

Entry/exit orders that are higher on the allocation tree receive priority. They will be filled and
managed before lower entries/exits. The up and down arrows to the left of the tree can be
used to change the priority of an entry/exit. Simply select the entry/exit, and use the up and
down arrows to the move branches higher/lower in the tree.

Redesigning Allocation Trees
To delete an entry/exit allocation, select the allocation and click the delete button. To clear all
the allocations but keep the same trade type, select clear tree. To clear all allocations and
choose a new trade type, select redefine tree. Allocations that are actively managing a
position must be stopped before editing.

Saving Tree
To save an allocation tree and make it available for use click the “Save” button. To discard a
new tree or reject the changes made to a previously created tree click the “Close” Button.
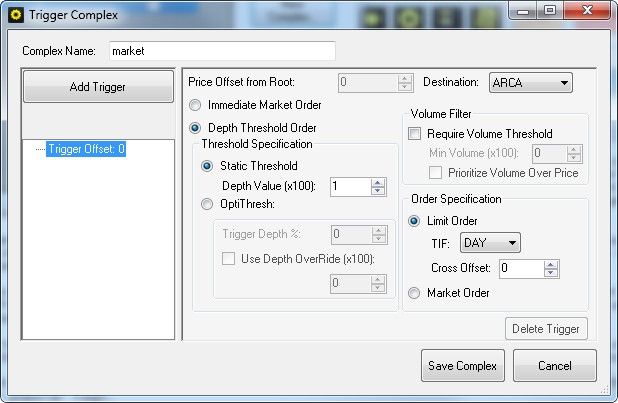
II. Trigger Complex
A Trigger Complex is used to remove liquidity to enter/exit a position. To begin creating a new
Trigger Complex select the Trigger Complexes icon from the Autotrader toolbar. The Trigger
Complexes Icon resembles a gear.

The Trigger Complex Manager lists any Trigger Complexes already created and can be used
to modify or create new complexes.

Complex Builder
To create a new complex select New Complex. The first step is to give the complex a name.
Once the complex is named click on the text that reads root Trigger. This represents your first
attempt to take liquidity in entering or exiting a position.
The text 'Root Trigger' changes to “Trigger Offset: 0” which represents the exact price of your
entry/stop determined by your allocation.
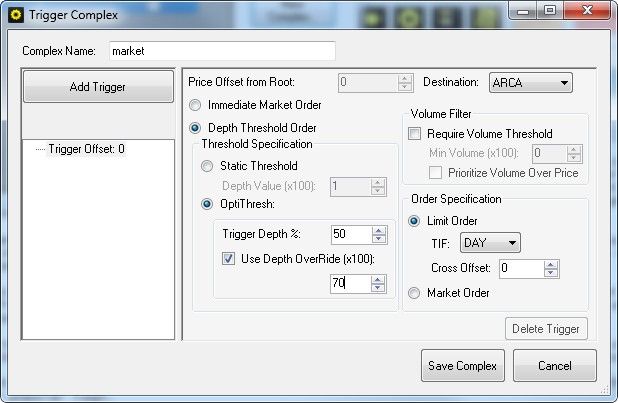
Immediate Market Order
An immediate market order can be selected. Once selected there is no need for further
triggers, or parameter changes.

Depth Threshold
Autotrader offers the option to set a threshold criteria, which means the trigger will wait until
the amount of top of book advertised liquidity at the price drops below a certain amount. This
value is defined by the user as a set number of shares or percentage.

Static Threshold
A Static Threshold depth value is calculated as a specific amount of top of book level 2 size.
This value is multiplied by 100. For example, a static threshold of 50 will not launch the
Trigger Complex until the associated price point's top of book level 2 size drops below 5000
shares.

OptiThresh
OptiThresh registers the amount of top of book liquidity when the trigger price is initially
reached and launches the Trigger Complex after a specified percent of the initial liquidity has
disappeared. For example, if OptiThresh is set to 50% and there was 100,000 shares
advertised when the trigger price first reached top of book, the Trigger Complex will launch
when the liquidity drops below 50,000 shares. The same Trigger Complex will launch when
1000 shares is broken if the top of book initially advertised 2000 shares. OptiThresh
recalculates a new value if the trigger price is no longer the NBBO and then returns.
Depth Override
Depth Override creates a static threshold that will override the OptiThresh in the event that
the override value is broken first. For example, lets say the top of book shows 10,000 shares.
If an OptiThresh of 50% is used the trigger would launch once the size dropped below 5,000
shares. But the same 50% OptiThresh used with a depth override of 7,000 shares will launch
once the size has dropped below 7,000 shares instead of 5,000 because the override value
is broken first and has priority.

Order Specification
Limit orders can cross the market but if not filled will continue as a DAY order which will stay
in the order book until filled or market close. An IOC (immediate or cancel) order will cancel if
the cross does not result in an immediate fill. The Cross Offset up/down box determines how
far through the market a limit order will cross and is represented in cents. For example, a
Cross Offset of 0.10 will automatically cross the market ten cents. A market order can be
issued when a threshold is crossed by selecting Market Order

Volume Filter
A volume filter with a Require Volume Threshold will prevent the trigger from initiating until all
other conditions are met and a specific volume quantity is printed at the price. The purpose of
the Require Volume Threshold is to prevent triggers from being launched when some, but not
all, liquidity is canceled AND the NBBO has not moved. Prioritize Volume Over Price is an
additional criteria and will not launch your trigger until the volume threshold has been crossed,
even if the market moves through your root Trigger price. If Prioritize Volume Over Price is
not checked then the complex will launch if the price moves through the trigger price
regardless of whether the volume threshold has been satisfied. Consider incorporating the
volume filter with the Prioritize Volume Over Price function selected when trading inactive
stocks with large spreads as the top of book price can routinely move well beyond a trigger
price and return without a volume print. The amount of volume required is customizable and
is also multiplied by 100 times. If the market depth at the root Trigger price point
increases to above the set threshold, or the top of book price is no longer the trigger
price, the volume threshold is reset.
Offset Triggers
Offset Triggers can be used with your Root Trigger by selecting Add Trigger. For example, if
your Root Trigger has a cross offset of .01, you may not receive a fill in a volatile market or a
stock with a wide spread. If the root Trigger does not fill immediately, it will remain as a DAY
order at the stop price. There is no guarantee that this order will be filled. Add an additional
offset Trigger with a bigger cross offset to increase your chance of a fill, or simple select
market. There is no limit to how many Offset Triggers you can add. Once an Offset Trigger is
activated, the Root Trigger is canceled. Each subsequent Offset Trigger will cancel the one
that precedes it. Once your Root or Offset Trigger is filled all other triggers are canceled.
Autotrader will automatically correct any overfills (with a market order), but to reduce
the likelihood of overfills from occurring simply ensure that subsequent triggers have
Offset From Root values beyond the Cross Offset of the trigger that precedes it.

For example, my root Trigger/first trigger will always have an offset from root value of 0. Lets
say I give it a 5 cent limit order cross offset. But what happens if this 5 cent limit order is not
enough to get out? I can add another offset Trigger and give it a 10 cent cross. But I need to
make sure that the 2nd trigger has an offset from root value of at least 5 to prevent an overfill.
If I am long C at 5.00 with a Breakout allocation that has a stop out at 4.98, my first trigger will
limit down to 4.93, 5 cents, to get out. If that trigger misses, the next trigger will cross down to
4.88. You can see that the 2nd trigger needs to have an offset from root value of at least 5
cents, because the first trigger will attempt to limit down 5 cents. If the 2 nd trigger's offset
from root value is only 1 cent, a potential overfill may happen. The 1 st trigger will attempt to
execute at 4.98 with a 5 cent cross, but if it misses 4.98 and 4.97 is bid, then the 2 nd trigger's
root from offset value of 1 will take effect at 4.97 and attempt to limit down as well. In this
scenario, the 2nd trigger's offset from root value is better off at 5 instead of 1, so that the first
trigger has the opportunity to limit down from 4.98 to 4.93 prior to the 2 nd trigger launching.

III. Trailing Stops and Profits

A trailing stop will move closer to your net position as your position goes onside to lock in
profits. A trailing profit will move closer to your net position as your trade goes offside. This
allows you to flatten a trade that has gone offside but has not hit your hard stop.

Design
Trailing strategies are designed from the Trailing Order Builder which can be accessed from
the Autotrader tool-bar

or under the Profit order and Stop Order tabs within the Allocation Builder.
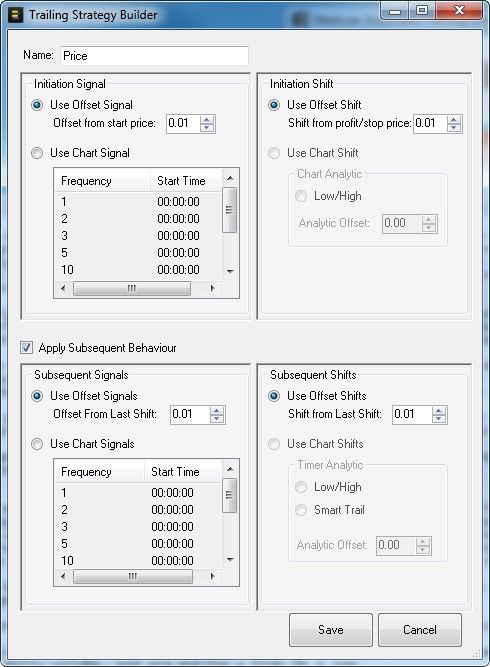
Trailing strategies operate on one of three criteria: price based, chart based, and
algorithmically based.

Price Based Trail
A trail is built from two components, the signal,and the shift. Initiation signal determines how
far a stock must move before activating the trail. Initiation shift determines how much a
trailing stop/profit will actually move and only happens once. Subsequent signals determine
how far a stock must move before activating additional trails. This behavior is repeated and is
option. Subsequent shifts determine how much a stop/profit will actually move after the
subsequent signal is triggered. This behavior is repeated until the position is closed.
For example, lets say I have a long position at 5.00 in C with a 5 cent trigger stop at 4.95. If I
want the stop to move up 1 cent, I can set my initiation shift to 1. But I must determine not
only how much I want the stop to move, but WHEN the stop will begin trailing. This is
determined by the initiation signal, not the initiation shift. If I set the initiation signal to 5, then
once C has moved 5 cents onside to 5.05, my stop will move from 4.95 to 4.96. To make my
trail a breakeven strategy, I would make my initiation shift and signal 5 cents. When C moves
5 cents up to 5.05, my stop will shift from 4.95 to 5.00. The initiation shift only happens once.
To repeat the trailing behavior I simply apply the same concepts to the subsequent
signals/shifts. Subsequent signal/shifts will continue to trail your stop until the position is
closed by your allocation's profit/stop specifications.

Chart Based Trail
Chart based trails of 1,2,3,5,10,15,30, and 60 minutes can be used. Autotrader will
automatically move your trailing order to the bottom of the corresponding candle if you are
long, and to the top of the corresponding candle if you are short. The chart signal trailing
order will always trigger at the close of the first bar of the time frame selected. For example, if
a 5 minute signal candle is selected as the initiation or subsequent signal and a trade is
entered 3 minutes into a candle (11:48 for instance) the signal will occur in two minutes, at the
close of the first 5 minute bar. Ensure that the system clock is synchronized with the
data feed to certify that Autotrader's charting analytics match the corresponding
charting package/front-end.
Analytic Offset
An Analytic Offset can be added to a chart based trailing strategy. Adding a positive number
to the Analytic Offset will place the trailing order inside the candle; each addition represents
one price increment/cent. A negative number will place the trailing order outside of the bar.
For example, to place a stop 1 cent below the bottom (long position) of each 5 minute candle,
use an initiation, and subsequent chart signal of 5 minutes and an Analytic Offset of -0.01.

  Chart Signal: High/Low (Long) – analytic offset: -0.01
This chart demonstrates how using high/low chart signals can maintain tight risk management
and yet take full advantage of a directional move. Employing an analytic of at least -0.01
allows for the market to test lows and continue the move without triggering the stop.
Smart Trail
Smart trail is an algorithmic chart-based trailing strategy that can only be utilized as a
subsequent behavior. Smart trail is designed exclusively for trailing stops and should
not be applied to trailing profits. Smart Trail is designed to find levels of support and move
your stop to these levels.
The following chart demonstrates how Smart Trail maintains reasonable risk and yet takes full
advantage of market trends. Employing an analytic offset of at least -0.01 allows for the
market to test supports and continue the trend without triggering the stop.
Chart Signal: Smart Trail (Long) – Analytic Offset: -0.01
If Autotrader is Smart Trailing a long position, as seen in the chart above, the algorithm will
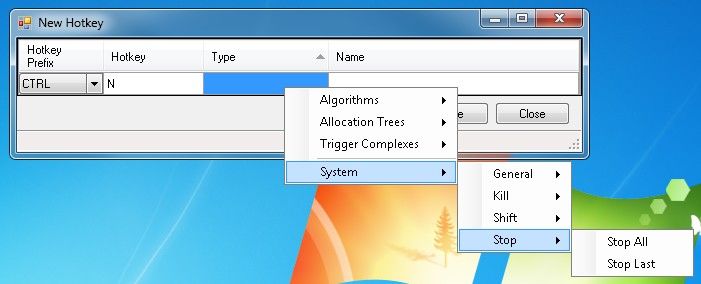
register the low of each bar. In order for a stop to shift, a bar with a lower, or equal low mustbe followed by a bar with a higher low. In the chart above this is represented by an LL bar followed by a HL bar. Several bars with lower or equal lows can be registered successively, but the stop will not move until a bar with a higher low closes. Once a bar with a higher low closes following a bar with a lower or equal low, the stop will be moved to the bottom of the previous candle. Stops are represented in the chart above by a white line. The stop is situated below the bar because in this example the smart trail employs an analytic offset of -0.01. It is encouraged to use a negative analytic offset when using Smart Trail in order to move the stop below the detected level of support. If Autotrader is Smart Trailing a short position the algorithm will register the high of each bar. The stop will move once a bar with a higher high, or equal high, is followed by a bar with a lower high. IV. Hotkeys Any allocation tree or Trigger Complex can be assigned a Hotkey. A hotkeyed Breakout, Counter-trend, or Trigger Complex can be launched directly from Autotrader's connecting front end platform. Assigning Hotkeys to allocations offers an alternative to launching trades automatically from signals since they are manually entered, and then managed by Autotrader. hotkeyed Trigger Complexes are often used as manual, smart stop-loss orders, but can also be used to enter trades in much the same way as a Breakout trade. Assigning Hotkeys to Strategies Select tools → Settings → Hotkeys tab to bring up the Hotkey Manager. Right click the Hotkey Manager Window and select “Add Hotkey” to create a new Hotkey.
Whichever Hotkey you choose to assign will lose its functionality in programs other
than Autotrader. For instance, if you chose to use ctrl-c as a Hotkey, ctrl-c can no
longer be used as “copy” while Autotrader is running. If a Hotkey is pressed, regardless
of which window is highlighted, the Autotrader tool bar and Watch list will display a message
informing that a Hotkey has been set, and the name of the corresponding Allocation Tree or
Trigger Complex.
If the same Hotkey is press, the tool bar will display a message informing that the Hotkey has
been reset to nothing.

Launching a Hotkey Breakout
Place an offer at the price you would like to launch the Breakout allocation for a long. The
offer will automatically be canceled by Autotrader and replaced with a Breakout allocation.
Place a bid at the price you would like to launch a Breakout allocation for a short. The bid will
automatically be canceled and replaced with your allocation. Crossing the market, placing a
bid on the offer for a Breakout allocation for a long, will result in an immediate execution and
should only be done if the NBBO is the price you intend to long at. For example, lets say the
market is 4.90 x 4.91 in C, If I want to buy 5.00 with a Breakout allocation, I would save a
Breakout allocation to a Hotkey and press the Hotkey. The allocation is now loaded, so I
place an offer at 5.00. That offer will cancel, and inform Autotrader to buy the level when the
NBBO is reached and has met all my Trigger Complex criteria. Placing a bid at 5.00 when the
market is trading 4.90 x 4.91 would result in an immediate execution as you are crossing the
market. The purpose of this is to allow flexibility in how trades are entered. Some traders will
want to have levels set ahead of time, so placing an offer to mark the level in Autotrader is
appropriate. Discretionary scalpers who prefer to have their trades entered manually, but
managed by Autotrader, will want to be able to cross the market on a seconds notice and may
find use in being able to launch instantly. There is a slight delay measured in micro seconds
for canceling any order through your front-end with or without Autotrader. To instruct
Autotrader to buy make sure you have placed your offer to buy within 500 ms of reaching the
NBBO where you wish to execute or simply market in by placing a bid on the offer. Signal
based traders do not need to worry about this as allocations will be launched automatically
when a signal is received.

Launching a Hotkey Countertrend
Activate your Hotkey and place a bid below the NBBO to buy a support level using a
Countertrend. For a short, place an offer above the NBBO to sell resistence. Autotrader will
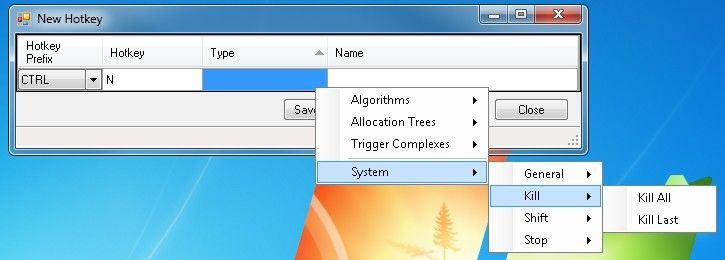
automatically cancel the bid/offer and replace it with your Countertrend allocation. Crossing
the market, placing a bid higher than the offer, will result in an immediate execution of your
allocation. Lets say GS is trading 160.50 x 160.57. I have built a Countertrend to buy GS at
160.00 with 2 entries. The first offset is set to 0, and the second offset is set to 10. I will load
my Countertrend Hotkey, and place a bid at 160. This bid will cancel, and instruct Autotrader
to launch the Countertrend at 160. New Autotrader bids will immediately be sent at 160, and
159.90. If I wanted to sell 161, I can use the same Hotkey. Simply place an offer on your
front-end at 161. This will cancel and immediately send out 2 Autotrader offers at 161 and
161.10.

System Hotkeys
There are 2 system Hotkeys available to Beta users. Kill last will cancel any open orders and
flatten the last allocation entered. Kill all applies to every allocation. Stop last will cancel any
open orders associated with the last allocation entered, but will keep your net position on and
unmanaged by Autotrader. Stop all applies to every allocation. Manually entered limit
order/positions on your front-end will not be affected by these system keys.
VI. Signal Trading
Autotrader allows Madscan users to launch allocations off signal scan alerts. Left-
click the Madscan icon to access the Autotrader manager.

A valid Madscan account is necessary to login to the manager. This is the same user name
and password that is used to log into the Madscan stand alone platform. Autotrader
automatically saves your user name and password. They only need to be entered on first
usage or after the system is reset.

Madscan Alert Manager
The Alert Manger window contains a list of the alerts that have been created. New alerts can
be created and preexisting alerts can be viewed, modified and deleted by right-clicking on the
manager.
New Alert
The top half of the new alert window behaves in the same manner as a new alert window in
the Madscan stand alone platform. The bottom half has an allocation manager where the
type, size, and side can be launched or stopped. Right-click on the upper half where signals
are streaming in to configure the signal, view columns, change execution filters, and reset
alert counters.
Configure Signal
The Alert manager contains the same features as the standalone Madscan signal scan: this
includes the signal, filters, news filters, list filters, and exchanges tabs. If you are unsure of
any of these functions, please visit www.madscan.com for more information.
View Columns
Right click on the Signal Scan Manager window and select View to select which columns to
include. Once you've selected your columns, drag and drop the column headers in you
manager to change the arrangement.
Execution Filters
Alert filters apply only to the alert window that they were set on. Setting filters on one alert
window will not effect another alert window.
Max Traded Alerts Per Window
The Max Traded Alerts Per Window function ensures that Autotrader will only execute the
indicated number of trades on the corresponding alert window. In the above configuration,
Autotrader will only execute 10 trades on the corresponding alert.

Max Traded Alerts Per Stock
The Max Traded Alerts Per Stock function ensures that Autotrader will only execute the
indicated number of trades on any particular stock for the corresponding alert window. For
instance, in the above configuration, Autotrader will only execute two trades on any one stock
for the corresponding alert window. A stock that has reached its maximum will no longer be
automatically executed; all other stocks that pass the filters will continue to be automatically
executed until their maximum is reached.

Trade Time Range
If Trade Time Range is enabled Autotrader will only execute trades during the indicated time
of day for the corresponding alert window. The time range is based on the CPU clock. In the
above configuration, Autotrader will only execute trades on the corresponding alert during the
first hour of the day as determined by the CPU clock, which is displayed on the taskbar.
Reset
Autotrader filters are reset automatically every night at midnight. To reset Alert Counters right
click on the upper half of the scan window and select Reset Alert Counters. Autotrader filters
are not reset by clicking launch/stop, closing and reopening the alert window, or by closing
and relaunching Autotrader.

Trade Specification
The bottom section of the alert window is used to select the side, allocation type, selected
allocation, size, and launch/stop functions for signal based trading.
Side
The side drop down box can be switched between Buy and Sell. If a new high signal in GS is
received and the side is set to buy for a Breakout allocation, Autotrader will buy according to
your allocation. If the side is set to sell for a Breakout allocation, Autotrader will sell according
to your allocation.2

Allocation Type
Right click the Allocation Type text box to select between Breakout and Counter-Trend
allocations.

Size
The size up/down box dictates how many shares Autotrader will execute on any alert. Choose
the amount of shares to be divided among the entry orders. To achieve the designed effect,
ensure that the trade size is sufficient to be divided according to the allocation tree structure.
For instance, an allocation tree with a 100% entry and five 20% exits could be executed with
1000 shares. The entry would be for 1000, and the profit orders would be 200 each. If you
entered only 200 shares, the profit orders will not be sent out as designed; you would only
have two 100 share orders go out for your first two exit allocations. The remaining 3 exit
branches would not go out as there are no more shares left to send. Only round lots will be
sent out, so make sure your quantity is set sufficiently.

2 This is assuming a 0 or positive entry offset value determined when building an allocation. Negative entry offsets
  should only be used in the rarest of circumstances as almost every signal trade can be executed with a combination of
  positive entry offsets, limit order Trigger Complexes, and scan configurations.
Launch/Stop
Select Launch to execute an allocation on a signal received in the scan window. Select Stop
to stop signals from launching allocations. Existing allocations in play will continue to function
unless Flatten all is selected from the main tool bar or an individual allocation is flattened from
the Watchlist.

Saving Alerts
Alert windows are saved as soon as they are closed.

VII. Autotrader Simulation
Autotrader offers a simulation engine that mirrors live trading using live market data, and
realistic fill parameters. All features can be used to test new strategies before going live.

Switching to Simulation
A new Autotrader account will automatically start in simulation mode. Switch between live
and simulation by selecting Tools from the Autotrader toolbar then Settings. Select the
account tab from the top of the settings window. Switching between live and simulation
mode requires a reboot of Autotrader and the corresponding front-end platform. Contact your
broker dealer or proprietary firm to ensure that you have been given access to your front-end
API before going live.
Simulation Blotter
The blotter will take the place of the connecting front-end platform's blotter and is sectioned
into four windows, each accessible by clicking the corresponding tab. Regardless of which
tab is selected the blotter will always display the total amount of shares traded on the day, the
current profit/loss amount, and the unreal profit/loss. The unreal profit/loss is based on the
best offer for longs and best bid for shorts. Profit/loss and total shares are designed to only
reset at midnight.

Open Positions/Orders

The Open Positions/Orders window displays information on open orders and positions. The
top section displays all stocks which have a net position. Long positions will be displayed as
green, and shorts will be displayed as red with a “-” in front of the number indicating a
negative position. The average price is updated every time the net position changes. The
unreal p&l is updated every time the top of book prices change in respective stock.
The bottom section displays current open orders. Once an open order is filled it will
disappear from the Open Position/Orders window. Filled order details on filled orders can be
found in the order log and the execution log. To cancel an open order click on the “X” icon.

Trade Summery

The trade summery window displays a breakdown of each stock. For each stock, particulars
of its current net position, the average price of that position, total profit and loss on that stock,
unreal profit and loss of the current position and the total shares bought and sold on that
stock for the day are displayed.
Order Log

The order log displays every order that has been placed since Autotrader's last boot. Orders
that have the red “X” next to them are open and can be canceled by clicking the “X”.
Canceled orders will still be visible in the order log. Once an order has been filled the “X” will
disappear indicating that it can no longer be canceled.

Execution Log
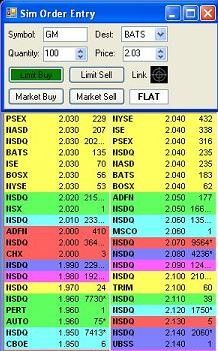
The execution log only displays orders that have been filled. Canceled orders and pending
orders will not be displayed in the execution log. The execution log will display the fill price of
orders, while the order log shows the price where orders were originally placed. This
distinction becomes important when liquidity removing orders are utilized as the price entered
can differ from the matched price.

Order Entry Window
Countertrend and Breakout trades can be entered in simulation mode from the Autotrader
Order Entry Window.

Creating an Order Entry Window
To create a new order entry window click on the text the reads new on the menu bar of the
Autotrader blotter, and select Order Entry Window from the resulting drop down menu.
Order Entry Window Information
The order entry window is designed to replace the order entry system of the connecting front
end platform. Autotrader's order entry window can never be covered by another window so it
can be placed on top of a level II without worry of accidentally covering it. The following is an
example of Autotrader's order entry window covering and replacing the order entry section of
a Sterling Trader Level II.

   1. The symbol box will dictate which stock an order will be placed on.
2. The Dest box will dictate which destination the order will utilize.
3. The Quanitity box will dictate the size of the order.
4. The Price box will instruct Autotrader at what price to place the order.
5. Clicking Limit Buy will place a bid at the price entered into the price box on the
   destination that is in the Dest box. If the price is above the market price the bid will
   cross and fill instantaneously.
   Clicking Limit Sell will place an offer at the price entered into the price box on the
   destination that is in the Dest box. If the price is lower then the market price the offer
   will cross and fill instantaneously.
   Clicking market buy will buy the best offer.
   Clicking Market Sell will sell the best bid.
6. The linking cross hair will allow the order entry window to join a link group. If an order
   entry window is linked to a level II then any stock added to the symbol box will change
   the linked level II to display the matching data. To link an order entry window to a level
   II, the level II must first be in a linking group. A level II that is linked to a group will
   display a bracketed number on the title bar.

   Left click on the linking cross hair icon and drag the mouse over the title bar of a level II
   and release. Once the order entry window is properly linked it will display the same
   bracketed number as the level II.

7. Displays the net position on the current symbol only. For details on net positions on all
   stocks see the open positions/orders section of the blotter.
Order Entry Hotkeys

Quantity
To set a default quantity change the quantity text box to the desired amount and right click it.
Select Set To Default from the resulting drop down box.

The default quantity will now automatically load anytime a limit or market Hotkey is pressed.
One exception is that the quantity will always offset the net position of the current symbol. If
the default quantity is set to 500, any buy Hotkeys will automatically populate 500 into the
quantity box. However, because there is a net position of 1000 long any sell keys will
automatically populate the covering quantity of 1000. If the symbol is changed to a stock with
no net position, all buy and sell keys will populate 500 into the quantity box.
You can also read