Integrations A Quick Start Guide - Outpost24
←
→
Page content transcription
If your browser does not render page correctly, please read the page content below
Overview

                                Integrations
                                   A Quick Start Guide

Version: 2.9
2019-07-01

      Outpost24 Vulnerability Management - made
      easy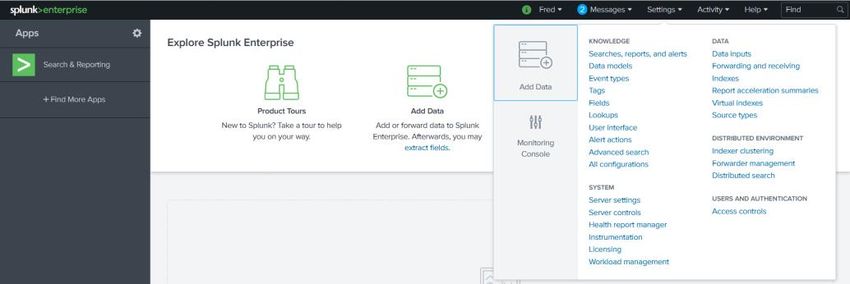
Table of Contents
               1     OVERVIEW ............................................................................................................................................ 5

                   1.1      INTEGRATIONS OVERVIEW ..................................................................................................................... 5

               2     GETTING STARTED ............................................................................................................................. 6

                   2.1      OUTSCAN ............................................................................................................................................. 6
                   2.2      HIAB ....................................................................................................................................................... 6

               3     IDENTITY PROVIDER ........................................................................................................................... 7

                   3.1      SET UP IDENTITY PROVIDER................................................................................................................... 7
                     3.1.1         Requirements ............................................................................................................................... 7
                     3.1.2         Set up Identity Provider Integration ........................................................................................... 7

               4     SPLUNK ................................................................................................................................................. 9

                   4.1      REQUIREMENTS ...................................................................................................................................... 9
                     4.1.1         Prerequisites ................................................................................................................................. 9
                   4.2      SPLUNK INTEGRATION - TCP ............................................................................................................... 10
                     4.2.1         Create Index ............................................................................................................................... 10
                     4.2.2         Create a Role .............................................................................................................................. 13
                     4.2.3         Create a User ............................................................................................................................. 15
                   4.3      SPLUNK INTEGRATION - HTTP EVENT COLLECTOR ............................................................................ 17
                     4.3.1         Create an HTTP Event Collector ............................................................................................. 17
                     4.3.2         Procedure in HIAB/OUTSCAN ................................................................................................. 20
                   4.4      EVENT NOTIFICATIONS FOR SPLUNK ................................................................................................... 21

               5     ATLASSIAN JIRA ............................................................................................................................... 22

                   5.1      SET UP JIRA INTEGRATION ................................................................................................................. 22
                     5.1.1         Prerequisites ............................................................................................................................... 22
                     5.1.2         Setting Up .................................................................................................................................... 22
                   5.2      CREATING A TICKET ............................................................................................................................. 24
                     5.2.1         Method 1: .................................................................................................................................... 24
                     5.2.2         Method 2: .................................................................................................................................... 24
                     5.2.3         Method 3: .................................................................................................................................... 24

               6     SERVICENOW ..................................................................................................................................... 25

                   6.1      SET UP SERVICENOW .......................................................................................................................... 25
                     6.1.1         Prerequisites ............................................................................................................................... 25
                     6.1.2         Method 1: .................................................................................................................................... 27
                     6.1.3         Method 2: .................................................................................................................................... 27
                     6.1.4         Method 3: .................................................................................................................................... 27
                     6.1.5         Incident ........................................................................................................................................ 28

               7     AMAZON .............................................................................................................................................. 29
                                                                                                                                                                                              2

Integrations                                                                        Q1 | 2018                                                                                        page 2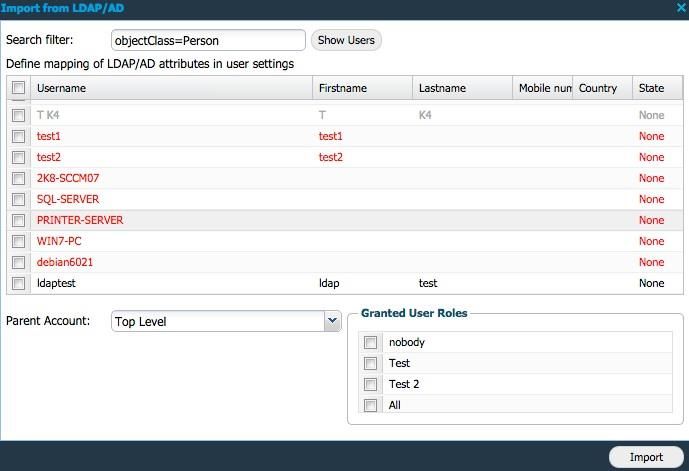
7.1       SET UP AMAZON INTEGRATION ............................................................................................................ 29

               8     CYBERARK ......................................................................................................................................... 31

                   8.1       DEFINE THE APPLICATION MANUALLY VIA CYBERARK ........................................................................ 31
                   8.2       SET UP CYBERARK IN OUTSCAN OR HIAB ...................................................................................... 31

               9     LDAP/AD (HIAB ONLY) ..................................................................................................................... 34

                   9.1       SET UP LDAP/AD INTEGRATION ......................................................................................................... 34
                   9.2       INTEGRATE USERS ............................................................................................................................... 38
                   9.3       VERIFY USERS ...................................................................................................................................... 39
                   9.4       INTEGRATE TARGETS ........................................................................................................................... 40

               10         SYSLOG (HIAB ONLY) ................................................................................................................... 42

                   10.1      SET UP SYSLOG ................................................................................................................................... 42

               11         ARCSIGHT (HIAB ONLY) ............................................................................................................... 44

                   11.1      SET UP ARCSIGHT ............................................................................................................................... 44
                   11.2      USING ARCSIGHT ................................................................................................................................. 44

               12         SNMP (HIAB ONLY)........................................................................................................................ 46

                   12.1      SET UP SNMP INTEGRATION ............................................................................................................... 46

               13         DATABASE CONNECTOR (HIAB ONLY) .................................................................................... 47

                   13.1      SET UP DATABASE INTEGRATION ........................................................................................................ 47

                                                                                                                                                                                       3

Integrations                                                                      Q1 | 2018                                                                                   page 3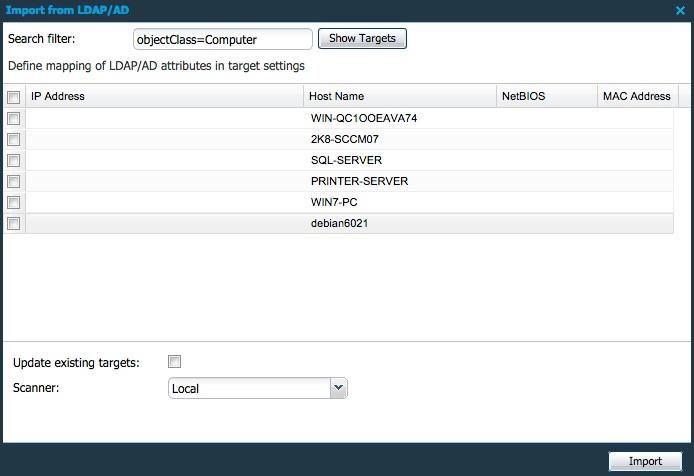
About This Guide
               The main purpose of this document is to provide users a comprehensive overview of how to setup
               and use Integrations module in OUTSCAN™ and HIAB™. This document has been elaborated under
               the assumption that the reader has access to the OUTSCAN /HIAB account and portal interface.

               For support information, visit https://www.outpost24.com/support.

               Copyright

               © 2020 Outpost24®. All rights reserved.
               This document may only be redistributed unedited and unaltered. This document may be cited and
               referenced only if clearly crediting Outpost24® and this document as the source. Any other
               reproduction and redistribution in print or electronically is strictly prohibited without explicit permission.

               Trademark

               Outpost24® and OUTSCAN™ are trademarks of Outpost24® in Sweden and other countries.

                                                                                                                                   4

Integrations                                                Q1 | 2018                                                     page 4
Overview

               1      Overview

               1.1    Integrations Overview
                                                                             API
                     INTEGRATION        DATA                SW Version               Platform   OUTSCAN   HIAB
                                                                           Version

                      IDENTITY                               SAML 2.0
                                    Authentication <                                              ✓        ✓
                      PROVIDER

                       SPLUNK           Events >         (not available)                          ✓        ✓

                      ATLASSIAN                             Tested with
                                        Events >                                                  ✓        ✓
                         JIRA                                  7.1.9

                                                                                     Istanbul
                                        Assets <
                     SERVICENOW                                                      Jakarta      ✓        ✓
                                       Findings >
                                                                                     Kingston

                                                                            AWS
                       AMAZON           Assets <                                                  ✓        ✓
                                                                           API V1

                      CYBERARK        Credentials <      Tested with 9.6                          ✓        ✓

                      SAML/SSO       Authentication                                               ✓        ✓

                                        Users <               LDAPv3
                       LDAP/AD                                                                             ✓
                                       Targets <

                      SYSLOG/                                (own
                                        Events >                                                           ✓
                     SYSLOG TLS                         implementation)

                      ARCSIGHT          Events >         (not available)                                   ✓

                        SNMP            Events >              2 and 3                                      ✓

                                                         All most recent
                                                           versions of
                      DATABASE          Events >        ►     MS SQL
                                                                                                           ✓
                     CONNECTOR         Findings >       ►     MySQL
                                                        ►     PostgreSQL

                      Note: The arrows represent if our platform takes the data from the integrated system as
                      an input or if it sends the data to the integrated system as an output.

                                                                                                                        5

Integrations                                          Q1 | 2018                                                page 5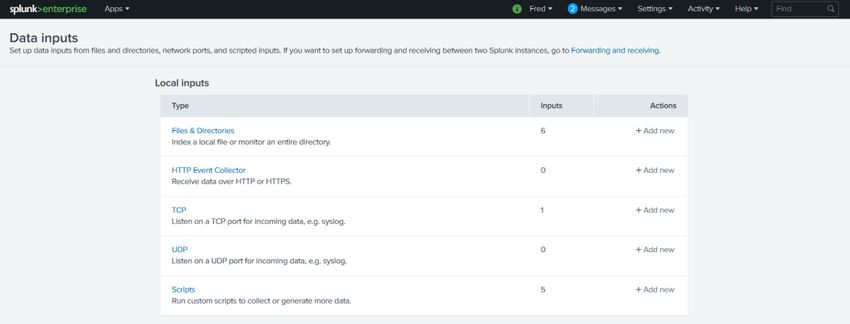
Getting Started

               2     Getting Started
                     There are two ways of launching your applications.
                         •   From OUTSCAN
                         •   From a HIAB

               2.1   OUTSCAN
                     To launch the OUTSCAN application, navigate to https://outscan.outpost24.com.
                     Note: Use HTTPS protocol.

                     Log in using your credentials.

               2.2   HIAB
                     To connect to a HIAB, use the assigned network address.
                     Note: Use HTTPS protocol.

                     Log in using your credentials.
                     Note: Make sure that the account you are using is a Main User/Super User account.

                                                                                                                  6

Integrations                                          Q1 | 2018                                          page 6
Identity Provider
3 Identity Provider
An Identity Provider (IDP) offers user authentication as a service. It is a trusted provider
that allows the use of single sign-on (SSO) to access other application. SSO enhances
usability by reducing password fatigue as passwords are maintained on your IDP.
3.1 Set up Identity Provider
3.1.1 Requirements
To enable SSO on HIAB/OUTSCAN you will have to import meta-data from your IDP into
HIAB/OUTSCAN. You will also need to export the service provider’s meta-data from
HIAB/OUTSCAN and import it to your IDP.
Note: While reading the response from IDP during signing into our portal, we accept
signed assertions with parameters. The parameters list which your IDP is returning in
response must include your username in a parameter named UID.
3.1.2 Set up Identity Provider Integration
To set up Identity Provider:
Go to Main Menu → Settings → Integrations → Identity Provider
Provide the below information to enable Identity Provider (IDP):
Enabled: Select the Enabled checkbox to enable the protocol for single sign-on
trusting another source to login.
Use one or both of the following option to provide metadata of IDP:
Get metadata1 from file: Select Identity provider’s metadata file by clicking the +
symbol beside the field. Metadata contains information such as how it works,
what type of login is acceptable and so on.
Get metadata from URL: Provide a URL from which the OUTSCAN or HIAB
(Service Provider) should fetch metadata from IDP.
1 Metadata contains information such as how it works, what type of login is acceptable etc.,
7
Integrations Q1 | 2018 page 7
Identity Provider
After enabling the required settings:
Click Save to save the current settings.
Click Reset to fully remove the current settings. This disables the integration.
IDP Metadata: Click this button to display the currently uploaded metadata of the
Identity Provider.
SP Metadata: Click on this button to display the service provider’s metadata.
8
Integrations Q1 | 2018 page 8Splunk
4 Splunk
Splunk is a software for searching, monitoring, and analyzing machine-generated big
data. Splunk captures, indexes, and correlates real-time data in a searchable repository
from which it can generate graphs, reports, alerts, dashboards, and visualizations.
A trial version of Splunk can be downloaded from the official Splunk website. It is
implemented in both OUTSCAN and HIAB and is mostly used in Event Notification
system and Audit Log.
Note: Splunk is integrated with both HIAB and OUTSCAN. This guide describes the
integration from a HIAB, but the procedure is the same for OUTSCAN.
There are two ways of integrating with Splunk:
► Create a User with a role for a TCP mode.
► Create an HTTP Event-Collector (HEC) for a HTTP Event-Collector mode that lets
send data and applications events to Splunk over the HTTP and secure HTTP
(HTTPS) protocols.
4.1 Requirements
To set up the HIAB/Splunk integration, it is recommended to create a new user with
limited access rights and a separate Splunk index for the data sent from the HIAB to
Splunk. A Splunk index is a repository for data in Splunk which reside in flat files on the
Splunk instance.
4.1.1 Prerequisites
To set up the HIAB/OUTSCAN-Splunk integration in TCP mode, it requires index, role,
and user be already set up in Splunk.
Tip: It is recommended to create a new user with limited access rights and a separate
Splunk index for the data sent from the HIAB to Splunk.
► It is important that the index exists before defining a role for the HIAB access.
Otherwise, the restricted access cannot be setup for the specific index. If an index
has already been setup, skip to section Create a Role.
► The HTTP Event-Collector does not require users and roles to be set up in Splunk
since it uses an access token. However, an index is required for the HTTP Event-
Collector. If an index has already been setup, skip to section Create an HTTP Event
Collector.
A Splunk index is a repository for data in Splunk which reside in flat files on the Splunk
instance.
9
Integrations Q1 | 2018 page 9Splunk
4.2 Splunk Integration - TCP
4.2.1 Create Index
Login with an existing Splunk account.
Go to Settings on the top left menu and then click on Indexes in the DATA group.
10
Integrations Q1 | 2018 page 10Splunk
Click New Index button in the top right corner.
11
Integrations Q1 | 2018 page 11Splunk
Complete these details. In the steps below, HIAB is used as example.
Click Save.
The new index has been added to the list.
12
Integrations Q1 | 2018 page 12Splunk
4.2.2 Create a Role
Go to Settings on the top left menu and then click on Access Controls in the USERS
AND AUTHENTICATION group.
Click Add new on the Roles row in the table.
Create a role in Splunk according to the HIAB Integration Mode you want to use.
a. Create a role in Splunk and specify the following parameter for a TCP
Integration. See Mode option in the HIAB Integrations Settings table.
Parameter Value
Name hiab-tcp-indexer
Capabilities edit_tcp
13
Integrations Q1 | 2018 page 13Splunk
Parameter Value
Indexes Searched
Hiab
by default
Indexes Hiab
Note: The role is only granted access to indexes defined here.
14
Integrations Q1 | 2018 page 14Splunk
4.2.3 Create a User
In this section we will add a new user (account) for the HIAB. This user will be given the
role that was created in the previous step, this effectively limits the capabilities of this
account to pushing data to the specified index.
Go to the Access Controls.
Click Add new in the Roles row of the table.
Click Add new on the user row:
Name: HIAB
Assignrole: hiab-indexer
15
Integrations Q1 | 2018 page 15Splunk
Procedure In HIAB/OUTSCAN
In the HIAB click the Main Menu → Settings → Integration
Select the Splunk tab in the Integrations Settings window.
Fill in the Integration settings as shown in the HIAB Integrations Settings table.
Click the Save button.
Click the Status button in the lower right corner to test the setup to Splunk.
The HIAB should now show pass, indicating a successful setup of the HIAB Integration
with Splunk.
Note: The newly setup account only has access through the API and is only able to
interact with the HIAB index, restricting its access.
16
Integrations Q1 | 2018 page 16Splunk
4.3 Splunk Integration - HTTP Event Collector
4.3.1 Create an HTTP Event Collector
Go to Settings on the top left menu.
Click on Data Inputs in the DATA group.
Click HTTP Event Collector in the HTTP Event Collector row of the table.
Click the Global Settings button on the top right of the menu.
17
Integrations Q1 | 2018 page 17Splunk
Click the Enabled button.
Select the Enable SSL checkbox.
Enter the HTTP port number.
Click the Save button.
Click the New Token button on the top right to create the token.
Select the HIAB index that was created in Creating Index section at the beginning of
the configuration.
18
Integrations Q1 | 2018 page 18Splunk
Review the configuration and then click on the Submit button.
Do not forget to register the Token Value given after submitting the configuration.
19
Integrations Q1 | 2018 page 19Splunk
4.3.2 Procedure in HIAB/OUTSCAN
In the HIAB or OUTSCAN click the Main Menu → Settings → Integration.
Select the Splunk tab in the Integrations Settings window.
Fill in the Integration settings as shown in the Integrations Settings table.
Integrations Settings
Option Value
Enabled Click on this field to enable the Splunk feature.
Mode
► HTTP Event Collector - When selected, username and password is
not available.
► TCP - When selected, username and password fields are enabled.
Host Provide your Splunk server name.
Port Provide the management port that Splunk is using to communicate.
Default: 8089
Username Provide username to authenticate against Splunk server
Password Provide password to authenticate against Splunk server.
Token HTTP Event Collector (HEC) tokens. HEC tokens are sent in the headers
of the sent data packets to authenticate them with Splunk.
Index If the user enters an index that does not exists, it will create a new one.
All events will be prefixed with the index name.
Send audit log Check this box to send audit log entries to Splunk.
(HIAB only)
Click the Save button.
Click the Status button in the lower right corner to test the setup to Splunk.
The HIAB should now show pass, indicating a successful setup of the HIAB Integration
with Splunk.
20
Integrations Q1 | 2018 page 20Splunk
Note: The newly setup account only has access through the API and is only able to
interact with the index, restricting its access.
4.4 Event Notifications for Splunk
Tip: You can now choose to send notifications related to Findings only in CIM format.
For settings, see Event Notifications.
21
Integrations Q1 | 2018 page 21Atlassian Jira
5 Atlassian Jira
Jira is a ticketing system which is implemented in both OUTSCAN and HIAB. It can be
used in many ways and has different projects to organize the various usages. Tickets
(issues) can be created with an assignee who is responsible for getting it done and a
reporter who created it. When Jira is enabled, it will be visible as a ticket system, both in
Assign Task and Event Notifications.
Note: A linked issue can be created between projects or sub-tasks if it is a bigger task.
The Jira instance must be running HTTPS.
5.1 Set Up JIRA Integration
5.1.1 Prerequisites
► HTTPS certificate from the Jira server.
► The user should have permission to read issues and to create new issues.
► It is required to have Jira set up to accept sub-tasks and priority fields, these must
also be set as required in Jira.
It is important that no custom fields are set up to be required, since nor the HIAB or
OUTSCAN does provide information for those fields.
5.1.2 Setting Up
To set up JIRA:
Download the HTTPS certificate from your Jira server.
Go to Main Menu > Settings > Integrations.
Select the Jira tab.
22
Integrations Q1 | 2018 page 22Atlassian Jira
Fill in the forms in the Integration Settings window for Jira.
Option Description
Enabled Select the Enable checkbox to enable Jira.
URI Provide the URI of Jira server (only https protocol is supported).
Project Key Provide the project key from the Jira instance to use.
Issue Type Jira can be used to track different types of issue. The common
Issue types used are Bug, Epic, and Story.
Finished Status Mention the status of the Jira issue.
Username Provide the username to authenticate against Jira server.
Password Provide the password to authenticate against Jira server.
Link old issues Enable this feature if you want to link old issues. It is useful when
you regenerate tickets for similar issue.
Note: When a ticket for a finding already exist in Jira but is
closed, a new ticket is created. If the Link old issues check box is
selected, the old closed ticket is linked to the new.
Certificate Upload the SSL certificate of the Jira instance.
Certificate uploaded Displays Yes if a certificate has been uploaded and No if there is
no certificate available.
Reset Click Reset to fully remove the current settings. It will disable the
integration and it does not have to be done after you have
disabled it since you might want to use the same settings again.
Save Click the Save button to save your current settings.
Note: The user should have permission to read issues and to create new issues.
If you scan a lot of targets, it is recommended to have a separate Jira project for these
tickets, since they can easily reach high in numbers. Every new finding can create one or
more new tickets in your Jira server.
There is no maintenance needed except synchronizing configuration if you re-configure
your Jira in any way. Synchronization between Jira and OUTSCAN/HIAB is periodic. This
may cause some delay in the update.
23
Integrations Q1 | 2018 page 23Atlassian Jira
5.2 Creating a Ticket
After enabling Jira, use any of the following ways to create a ticket:
5.2.1 Method 1:
Go to Main Reporting Tools → Findings.
Right click on any finding, select Assign task.
Select Jira in the ticket system drop-down menu.
Click Save to create a ticket.
5.2.2 Method 2:
Go to PCI scanning → Reports.
Right click on a finding, select Assign task.
Select Jira in the ticket system drop-down menu.
Click Save to create a ticket.
5.2.3 Method 3:
Go to Event Notifications.
Click +New.
Select Jira in the Action drop-down menu.
Note: This action is only available for Finding Information, Low Risk, Medium Risk
and High Risk.
Click Save to create tickets whenever a report is created with findings of the type of
the event.
24
Integrations Q1 | 2018 page 24ServiceNow
6 ServiceNow
ServiceNow is a cloud service that can handle many different needs within a company.
Some of its features are:
► Ticket system
► CMDB
► Discovery server
► Security management
When ServiceNow is enabled, it will be visible as a ticket system in Assign Task, and
Event Notifications. It also adds an option of importing targets from ServiceNow and
activating events and tools for adding tickets. If you disable ServiceNow, the targets will
no longer update or scan via ServiceNow until you enable it again.
Ticket system:
A ServiceNow ticket created for a finding will be added as an Incident with target and
script information and solution to the finding will be added as Problem. Synchronization
between ServiceNow and OUTSCAN/HIAB is periodic. This may cause some delay in
the update. With the ticket system, we recommend using old scans to add tickets that
you want to get started and then add the events you want for future scans.
6.1 Set up ServiceNow
6.1.1 Prerequisites
Note: The ServiceNow account used for the integration needs to have Can create and
Allow access to this table via web services for Incident and Problem tables selected for it
to succeed.
The ServiceNow service requires an external OAuth Setup to be configured.
To configure OAuth Setup:
Log in to ServiceNow using your credentials.
Go to System OAuth → Application Registry in the Service Now service.
Click New.
On the interceptor page, click Create an OAuth API endpoint for external clients.
Fill in the fields.
Click Submit.
When completed, fill in the Client ID and Client secret (if used) in the Integrations
window.
25
Integrations Q1 | 2018 page 25ServiceNow
Go to Main Menu → Settings → Integrations
Select the ServiceNow tab.
Follow the below procedure to enable ServiceNow:
Option Description
Enabled Click on this field to enable ServiceNow.
URI Provide the URI of ServiceNow server (only https protocol
is supported).
Username Provide the username to authenticate against ServiceNow
server.
Password Provide the password to authenticate against ServiceNow
server.
Client ID (If used) Provide your client ID which is generated using
OAuth module.
Client Secret (If used) Provide your client password.
Add finding solution Click on this field to view the finding solutions under
as problem Problems in ServiceNow.
Certificate Upload the SSL certificate of your ServiceNow instance.
Certificate uploaded Displays Yes if a certificate has been uploaded and No if
there is no certificate available.
App integration (If used) Click on this field to enable ServiceNow app
enabled integration.
App granted hosts (If used) Add an IP range to restrict the access.
Save Click on this button to save your current settings.
26
Integrations Q1 | 2018 page 26ServiceNow
After enabling ServiceNow, use any of the following ways to create a ticket:
6.1.2 Method 1:
Go to Main Menu → Netsec → Reporting Tools → Findings.
Right click on any finding, select Assign task.
Select ServiceNow in the ticket system drop-down menu.
Click Save to create a ticket.
6.1.3 Method 2:
Go to PCI scanning → Reports.
Right click on a finding, select Assign task.
Select ServiceNow in the ticket system drop-down menu.
Click Save to create a ticket.
6.1.4 Method 3:
Go to Event Notifications.
Click +New.
Select ServiceNow in the Action drop-down menu.
Note: This action is only available for Information, Low Risk, Medium Risk, and
High-Risk findings.
Click Save to create tickets whenever a report is created with findings of the type of
the event.
27
Integrations Q1 | 2018 page 27ServiceNow
6.1.5 Incident
In ServiceNow a ticket is called an incident, when a scan encounters a finding, it creates
a ticket that ends up in Incident → Open.
28
Integrations Q1 | 2018 page 28Amazon
7 Amazon
Here you can set up to run scans against instances in the Amazon cloud. It will also
enable the option to run discovery scans using ARNs added in this setup. Amazon
service is implemented in both OUTSCAN and HIAB.
Note: Amazon targets can only be added to OUTSCAN/HIAB via discovery scans. Only
OUTSCAN is Whitelisted by Amazon as an authorized scanner and scanning from HIAB
may require additional authorization from Amazon.
7.1 Set Up Amazon Integration
To setup Amazon
Go to Main Menu → Settings → Integrations to open the Integration Settings
window.
Select the Amazon tab.
Follow the below procedure to scan instances:
To enable this feature, select the Enabled box.
Create a new user role with the Account Id and External Id noted.
29
Integrations Q1 | 2018 page 29Amazon
Apply IAM policy given below for the role on Amazon cloud to grant access to the
targets.
{
"Version": "2012-10-17",
"Statement": [{
"Sid": "Stmt1400711494000",
"Effect": "Allow",
"Action": [
"ec2:DescribeInstances",
"ec2:DescribeRegions",
"elasticloadbalancing:DescribeLoadBalancers",
"elasticloadbalancing:DescribeTargetGroups",
"elasticloadbalancing:DescribeTargetHealth"
],
"Resource": ["*"]
}]
}
Note: Any role which gives you read-only access to the required Actions listed in the
policy will work.
Enter the Amazon Resource Name (ARN) for the newly created role in the table
using + New button.
Click Save to save the current settings.
30
Integrations Q1 | 2018 page 30CyberArk
8 CyberArk
Note: CyberArk is supported in HIAB and OUTSCAN for both internal and external IP
addresses.
CyberArk provides a privileged account security solution and password vault. It is
required to have the CyberArk AIM suite to use the integration.
Note: CyberArk authentication cannot be configured on the policy level, only on the
target level.
8.1 Define the Application Manually via CyberArk
To define the Application manually via CyberArk’s PVWA (Password Vault Web Access)
Interface:
Log in as user allowed to managed applications (it requires Manage Users
authorization)
Go to Applications tab, click Add Application; the Add Application page is
displayed.
Fill with the pre-defined APPID the customer should use, specified in the Name
field.
8.2 Set up CyberArk in OUTSCAN or HIAB
To set up CyberArk in OUTSCAN or HIAB:
Go to Main Menu → Settings → Integrations.
Select the CyberArk tab.
31
Integrations Q1 | 2018 page 31CyberArk
Provide the below information to use CyberArk:
Option Description
Enabled Click on this field to enable CyberArk.
Host Provide the hostname of the CyberArk server.
Port Provide the port number.
AppID Enter the application ID.
Default safe Provide a safe name in which you would like to store the password.
Default folder Folder is usually root by default.
Save Click on this button to save your current settings.
Click Save.
After enabling CyberArk:
Go to Main Menu → Netsec → Manage Targets.
Edit a target to setup the Authentication.
CyberArk SSH and CyberArk SMB are now visible as new options.
Click on any of the options to use the respective authentication.
32
Integrations Q1 | 2018 page 32CyberArk
Provide your Credentials:
Option Description
Provide your username to authenticate against CyberArk
Username
Server.
Check your CyberArk Vault administrator and provide the
Object name
object name.
Provide a different safe name in case you wish to override
Override safe
the existing safe name.
Provide a different folder name in case you wish to override
Override folder
the existing folder names.
Click Test to start a verification.
Click Save to enable the current settings.
33
Integrations Q1 | 2018 page 33LDAP/AD (HIAB only)
9 LDAP/AD (HIAB only)
The Lightweight Directory Access Protocol (LDAP) or an Active Directory (AD) integration
is used for several purposes, such as:
► Authentication against the system with the purpose of user management, allowing
organizational memberships or attributes from the AD dictate access in the HIAB.
► Discovery scanning, implying that devices added in the active directory can be added
as devices to the HIAB for scanning purposes.
9.1 Set up LDAP/AD Integration
To set up LDAP/Active Directory, follow the below procedure:
Go to Main Menu → Settings → Integrations.
Select LDAP/AD tab.
The elements of the LDAP/AD tab are described below:
► Select the Enabled checkbox to enable the use of LDAP/AD feature.
34
Integrations Q1 | 2018 page 34LDAP/AD (HIAB only)
Primary Server and Failover Server
The system allows you to define both Primary Server and a Failover Server.
The Failover Server will be accessed if the Primary Server is unavailable when
required. The following options are available for both Primary and Failover Server.
Option Description
Type Select if you want to use a LDAP or an Active Directory server to
authenticate user against, importing targets, and users into HIAB.
Server Define the network location of the LDAP or Active Directory server.
Port Displays the default port used by LDAP or AD server when TLS
encryption is enabled.
Note: Can be changed if required.
Use TLS Encryption Must be checked if the server use TLS (Transport Layer Security)
during the connection phase.
Base DN Enter the base domain name, ex: "dc=ad,dc=local"
Note: If you have an Active Directory server, then you should also
provide the Domain in a simple form like "ad.local". This will be used
when we supply the username in the authentication process against
the active directory server.
Connected Method Define if the connection should be Anonymous or Non-anonymous.
Note: Base DN is the domain where AD is located and Bind DN is
the account which the HIAB should use to access the AD.
Bind DN If the Connect Method is Non-anonymous, provide the domain name
to use when authenticating with the server.
Bind Password Supply the Bind Password for the above domain name.
Test LDAP/AD Once all the required settings are supplied, check the
configuration by pressing Test LDAP/AD button for respective
section.
Import and specific mapping settings for the user and target integration are located under
respective settings sections.
35
Integrations Q1 | 2018 page 35LDAP/AD (HIAB only)
Attribute Mapping Users
Provide the LDAP server attribute names that corresponds to the fields mentioned below.
Option Description
Username Your username.
Firstname Your first name.
Lastname Your last name.
Email Address Your email address.
Mobile number Your mobile number.
Country Your country name.
State Your state name.
Attribute Mapping Targets
Provide the LDAP server attribute names that corresponds to the fields mentioned below.
Option Description
IP Address Target IP address.
Host name Target hostname.
NetBIOS Target NetBIOS name.
MAC Address Target MAC address.
36
Integrations Q1 | 2018 page 36LDAP/AD (HIAB only)
LDAP/AD Configuration
Option Description
Enter the base domain name. This is used only when importing
Base DN (Users)
users.
Search filter user Provide any phrase to filter further.
Enter the base domain name. This is used to import user groups
Base DN (Groups)
when a user is authenticated.
Enter the base domain name. This is used only when importing
Base DN (Targets)
targets.
Search filter target Provide a phrase to filter further.
User Roles
The User Roles section allows you to define if roles should automatically be assigned to
imported user, based on already defined group belongings in the LDAP/AD tree. If
enabled, you can define a matching field on each user role in the HIAB. If they match,
that user role is then automatically assigned to the imported user. The matching field is
present in the Maintaining User Role section when you edit or create a new role.
Example:
In the above example, HIAB.Administrator is automatically assigned to users that
belong to the group admin in the LDAP/AD tree.
Click Save to save the current settings.
37
Integrations Q1 | 2018 page 37LDAP/AD (HIAB only)
9.2 Integrate Users
Once the LDAP/AD feature has been enabled:
Go to Main Menu → Settings → Manage Users.
Click on Import from LDAP/AD in the Manage User Accounts section to open a
window where you can filter which users to import into the system.
If the text is marked red as above, it implies that the user details either does not contain
all required fields or it has content which is not allowed to use. Grey text indicates that
the user already exists in the system.
A user is valid if the following criteria are fulfilled:
► Username must be longer than 1 character.
► First name must exist.
► Last name must exist.
► Email address must be valid.
Note: Do not use any comma sign in any of the above inputs as it is interpreted as a
comma separation.
Note: If the country is omitted or not available, then it is set to the country of the logged
in user. The country is used when selecting the time zone for the user so that the time is
reported correctly in the GUI.
38
Integrations Q1 | 2018 page 38LDAP/AD (HIAB only)
The Parent Account setting allows you to import users in different levels if required.
Note: Mapping can be changed in Main Menu → Settings → Integrations →
LDAP/AD.
9.3 Verify Users
Once the user is imported, you can verify the authentication and see the associated
groups for that user.
Go to Manage User Accounts, right click on the user and select LDAP/AD Lookup as
shown below.
This displays the LDAP/AD Lookup window:
Note: Only 10 groups are visible when doing the test authentication.
Here, you can view the different values for the user along with the defined groups
associated with him/her.
39
Integrations Q1 | 2018 page 39LDAP/AD (HIAB only)
Click on Test Authentication to verify the user's authentication.
9.4 Integrate Targets
Once the LDAP/AD feature has been enabled:
Go to Main Menu → Netsec → Manage Targets.
Click on Import from LDAP/AD while adding +New targets.
This opens a new window where you can filter which targets to import into the system. If
the line is marked red then the target details either does not contain all required fields, or
it has content that is not allowed to use.
40
Integrations Q1 | 2018 page 40LDAP/AD (HIAB only)
A target is valid if the following criteria is provided:
► IP address or hostname.
► MAC address is formatted correctly. If applicable.
If Update existing targets checkbox is ticked, the Import updates the available targets.
The Scanner option is only available if you have a distributed environment (multiple HIAB
instances connected) and it determines which scanner will execute the scans against
those targets associated with it.
Note: Mapping can be changed in Main Menu → Settings → Integrations →
LDAP/AD.
41
Integrations Q1 | 2018 page 41Syslog (HIAB only)
10 Syslog (HIAB only)
HIAB can pass logs and findings via Syslog events, which work with virtually any other
security solution in the market, custom implementation of this with a wide range of SIEMs
and event correlations systems among our existing MSSPs and partners already. For
example: ArcSight.
10.1 Set Up Syslog
To set up Syslog:
Go to Main Menu → Settings → Integrations
Select the Syslog tab.
Provide the below information to use Syslog:
Option Description
Host Provide the hostname.
Port Provide the port that Syslog is using to communicate.
Facility Choose a facility code from the drop-down menu.
Note: Facility code is used to specify the type of program that is
logging the message.
Prefix Enter any word that you want to add as a prefix for each line.
Protocol Select one of the protocols from the drop-down menu.
Send audit log Check this box to receive audit log.
Arcsight Click on this field to use the ArcSight format.
42
Integrations Q1 | 2018 page 42Syslog (HIAB only)
Option Description
TLS Click on this field to encrypt data. Use secure transport layer.
Certificate Upload the certificate for the syslog server. Only needed if TLS is
enabled.
Certificate Displays if any certificate has been uploaded.
uploaded
Status Click on this button to check the network connectivity.
Save Click on this button to save your current settings.
43
Integrations Q1 | 2018 page 43ArcSight (HIAB only)
11 ArcSight (HIAB only)
ArcSight is a Syslog service developed by HP and is available at the systems which offer
the Syslog feature. To date that is only HIAB.
Before enabling ArcSight in the HIAB, the ArcSight server need to be set up and
configured.
11.1 Set Up ArcSight
To enable ArcSight:
Go to Main Menu → Settings → Integrations
Select the Syslog tab.
Check the Arcsight: checkbox as shown in the figure.
Click Save.
When ArcSight is enabled, the Syslog message is built differently to fit into the ArcSight
protocol.
11.2 Using ArcSight
When a Syslog event is activated, an ArcSight message is built instead of the ordinary
Syslog message.
The Syslog message is sent to the ArcSight logger or the connector. When the logger
shows the message, it is divided into columns that is easier to work with than the raw
data.
Note: No ArcSight specific errors should occur. If the ArcSight server has errors it is due
to the Syslog implementation, not the ArcSight implementation.
44
Integrations Q1 | 2018 page 44ArcSight (HIAB only)
It is recommended that the customer uses ArcSight together with TLS. If the logger
cannot work with the TLS messages, a connector is recommended to be able to do so.
There is no maintenance needed for ArcSight, but the logger or the Syslog settings must
be updated if IP numbers or other information are switched.
Examples:
A Syslog Message
Risk: Script Name: "Unencrypted Remote Authentication Available -
POP3" Script Id: "219784" Target: "192.168.202.6" Port: "110"
BugTraq: "No bugtraq" CVSS: "6.8" New: "0" CVE: "No CVE" Family:
"pop3" First Seen: "2016-11-21 11:08" Last Seen: "2016-11-24
18:06" Product: "Unencrypted Remote Authentication" Has Exploits:
"false" – Medium
An ArcSight message
dvc=192.168.202.6 spt=110 cs1Label=Script Name cs1=Unencrypted
Remote Authentication Available - POP3 cs4Label=BugTraq cs4=No
bugtraq cs2Label=CVE cs2=No CVE deviceCustomDate1Label=First Seen
deviceCustomDate1=Nov 21 2016 11:08:00
deviceCustomDate2Label=Last Seen deviceCustomDate2=Nov 24 2016
18:08:00 msg=Script Id: 219784 New: 0 Family: pop3 Product:
Unencrypted Remote Authentication Has Exploits: false
45
Integrations Q1 | 2018 page 45SNMP (HIAB only)
12 SNMP (HIAB only)
HIABs can pass events via SNMP and integrate into SIEM/Log management solutions.
12.1 Set up SNMP Integration
To set up SNMP, go to Main Menu → Settings → Integrations
Select the SNMP tab.
Provide the below information to use SNMP:
Option Description
Version Select either 2 or 3 depending on the SNMP version you are using.
Host Provide the hostname.
Port Provide the port number SNMP is using to communicate.
Community Add a password that is shared by multiple SNMP agents.
Prefix Enter any word that you want to add as a prefix for each line.
Status Click on this button to check the network connectivity.
Save Click on this button to save the current settings.
46
Integrations Q1 | 2018 page 46Database Connector (HIAB only)
13 Database Connector (HIAB only)
There are other products which may require Outpost24 data to be available in a
database for selection. We do not grant access to the internal database used in HIAB
because it is subject to restructuring for performance and optimization, and as a security
measure.
However, HIAB can be configured to set up a database connector and export findings
data to external databases using Events or Report Schedules. Then, you may run your
analysis or integrate external products/solutions to the external database.
When connecting to the database, you must have permissions to create tables as well as
updating data.
Supported External Databases:
► MS SQL
► MySQL
► PostgreSQL
13.1 Set Up Database Integration
To set up Database integration:
Go to Main Menu → Settings → Integrations.
In the Integration Settings window, select the Database tab.
47
Integrations Q1 | 2018 page 47Database Connector (HIAB only)
Provide the below information to set up a Database connector:
Option Description
Host Provide your hostname of your external database server.
Port Provide the port number database connector is using to communicate.
Database Name Provide database name of external database server to which findings
data should be exported.
Type Select one of the types from the drop-down menu
► MS SQL
► MySQL
► PostgresSQL
Username Provide the username to authenticate against external database
server
Password Provide the password to authenticate against external database
server
Table Name Provide a valid name for table in the database. A new table is auto
created during HIAB - DB integration process.
You can use any special character supported by ascii, depending on
the type of database.
Save Click on the save button to save the current settings.
48
Integrations Q1 | 2018 page 48You can also read