Windows Authentication - March 28, 2019 - Qualys, Inc.
←
→
Page content transcription
If your browser does not render page correctly, please read the page content below

Windows Authentication

March 28, 2019

        Verity Confidential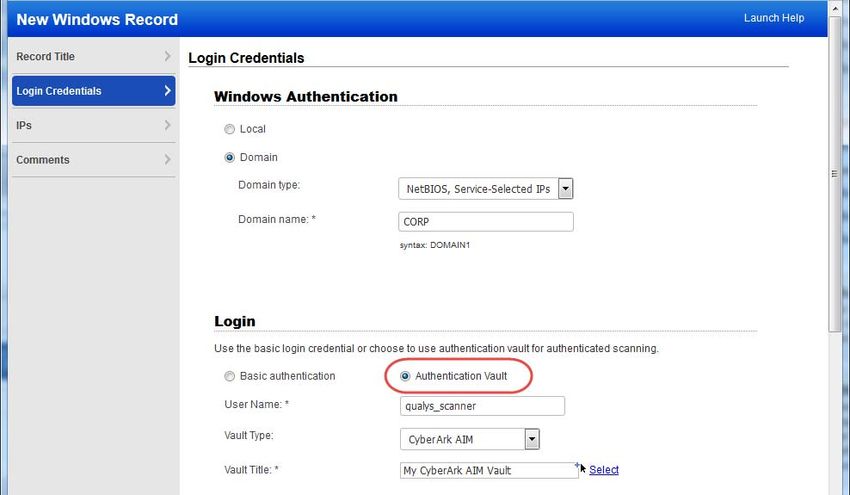
Copyright 2011-2019 by Qualys, Inc. All Rights Reserved.
Qualys and the Qualys logo are registered trademarks of Qualys, Inc. All other trademarks
are the property of their respective owners.

Qualys, Inc.
919 E Hillsdale Blvd
4th Floor
Foster City, CA 94404
1 (650) 801 6100
Contents
Get Started ........................................................................................................ 4
Windows Domain Account Setup................................................................ 6
Create an Administrator Account ......................................................................................... 6
Group Policy Settings .............................................................................................................. 6
Verify Functionality of the New Account (recommended) ................................................. 7

WMI Service Configuration ........................................................................... 8
How to increase WMI authentication level .......................................................................... 8
What happens when high level authentication is not provided? ...................................... 8

Manage Authentication Records.................................................................. 9
Create one or more Windows Records.................................................................................. 9
Windows Authentication Settings....................................................................................... 10
Login Credentials................................................................................................................... 14
Multiple Windows Records................................................................................................... 16

Appendix A - Non-Domain (Local) Scanning .......................................... 17
Windows 2000, 2003, XP ....................................................................................................... 17
Windows Vista, 2008, 2012 ................................................................................................... 18
Windows 7, 8.......................................................................................................................... 20

Appendix B - Windows NT Domains......................................................... 23
Option 1 – Using an Administrator Group .......................................................................... 23
Option 2 – Set ACL Remotely Using SetACL Command-Line Tool................................... 23

Appendix C - Windows Authentication QIDs ......................................... 25
Contact Support............................................................................................. 25

                                                                      iii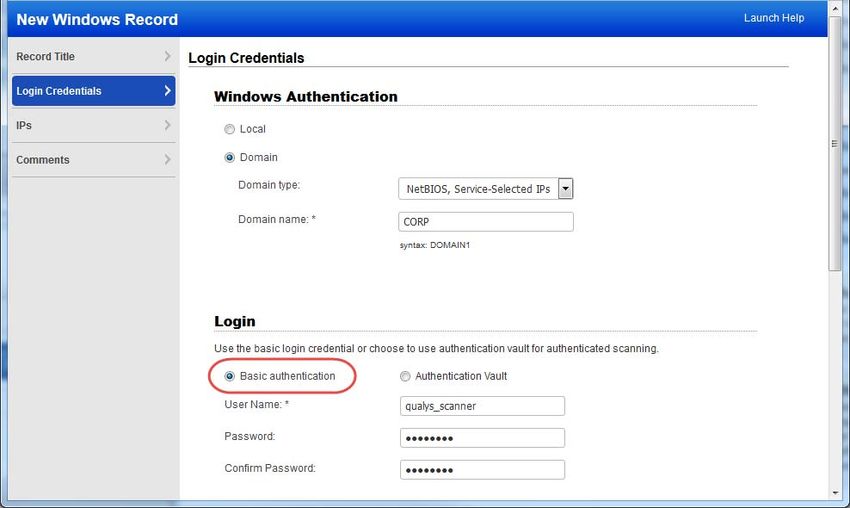
Get Started

Get Started
Using host authentication (trusted scanning) allows our service to log in to each target
system during scanning. For this reason we can perform in depth security assessment and
get better visibility into each system's security posture. Running authenticated scans gives
you the most accurate scan results with fewer false positives.

Do I have to use authentication?
For vulnerability scans, authentication is optional but recommended. For compliance
scans, authentication is required.

Are my credentials safe?
Credentials are securely handled by the service and are only used for the duration of the
scan.
In most cases, we do not modify or write to the device unless the user enables optional
scan features Dissolvable Agent and Agentless Tracking and accepts the agreement
regarding terms of use.
Dissolvable Agent: When enabled, we write the dissolvable agent file to the device and
remove it when the scan is finished.
Agentless Tracking: When enabled, we write a host ID file to the device at the time of the
first scan. Note - the Manager primary contact for the subscription can do a cleanup
action to remove the host ID file from hosts at any time.
Cleanup Issues: In rare cases, if a scan terminates before cleaning up temporary files or
the dissolvable agent, the files may persist. This generally should not occur.
Our security service uses credentials at scan time to log in with elevated privileges and
read security information from the target. Using the information collected, the scanner
runs the largest number of security tests, checking the most settings and configurations.
You’ll see this information gathered as part of your scan reports.

Administrator credentials are recommended
We recommend using administrator privileges since this will give you the most accurate
security assessment and recommended fixes for your system. Using an account with
administrator privileges allows us to collect information based on registry keys,
administrative file shares (such as C$) and running services. It’s possible to use an account
with less than administrator rights, however this limits scanning to fewer checks and
scans will return less accurate, less complete results.
Windows uses an ACL-based approach. Each object (file, registry key) can have it’s own
ACL listing the accounts that have specific types of access (read, write, etc.) to that object.
We must have access to a few objects or authentication will fail, including “IPC%$” pipe,
the registry API and others. Missing access rights will simply cause the corresponding
vulnerability checks (QIDs) and compliance checks (controls) to fail. Most security checks

                                               4
Get Started

require access to multiple objects and the detailed list can vary depending on operating
system version, patch level, configuration settings, etc. The only way to know whether
access is sufficient is by running a scan and reviewing the reported access failures.

What Authentication Schemes are used?
Our service will attempt to use authentication schemes on the target host from the most
secure scheme to the least secure scheme. We support the following authentication
schemes, from highest to lowest:
1) Kerberos with AES-128/256
2) Kerberos with RC4-128
3) NTLMv2
4) NTLMv1 (disabled by default, and you can enable it within a Windows authentication
record)

Steps for authenticated scans
The steps below describe how to set up Windows trusted scanning for a Qualys scan. For
vulnerability scans, authentication to the target host is optional but recommended. For
compliance scans, authentication is required.
Step 1 – Set up a Windows user account to be used by our security service for
authentication.
Step 2 – Using Qualys: 1) Create Windows authentication records. 2) Select an option
profile. For a vulnerability scan be sure to select “Windows” in the Authentication section.
3) Launch a scan. 4) Verify that authentication passed for each target host. Tip - Run the
Authentication Report to view the authentication status (Passed or Failed).

                                             5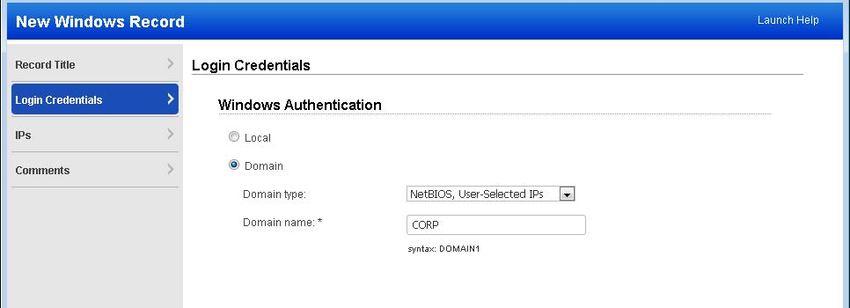
Windows Domain Account Setup
                                                                 Create an Administrator Account

Windows Domain Account Setup
This section describes how to create a domain account for authentication, how to add this
account to the Domain Administrators Group, and how to set group policy settings. It is
recommended that you verify the functionality of the account before using it for trusted
scanning. If possible, configure the user account so that the password does not expire.

Create an Administrator Account
1) Log into the Domain Controller with an account that has administrator rights.
2) Open the Active Directory Users and Computers MMC snap-in.
3) Create a new user called “qualys_scanner” (or something similar). Please do not use
“qualys” as this account is reserved for use by Qualys and may get locked out during
scanning.
4) Select the “qualys_scanner” user and go to Properties (Action > Properties).
5) In the Properties window, go to the “Member Of” tab. Click Add to add the
“qualys_scanner” user to the “Domain Admins” group. Click OK to save the change.

Group Policy Settings
Best practice Group Policy settings for authenticated scanning of Windows systems are
described below. Please consult your network administrator before making changes to
Group Policy as changes may have an adverse impact on your network operations,
depending on your network configuration and security policies in place. Note that detailed
descriptions for many Group Policy settings listed below is available online when using the
Group Policy Editor.
Important! We highly recommended that you discuss making changes to Group Policy
with your network administrator before implementation, as your local network
configuration may depend on certain settings being in place. Qualys does not verify that
these settings are appropriate for your network. If you do make any Group Policy changes,
it may take several hours before the changes take effect on the client.

Security Options
Computer Configuration > Windows Settings ?> Security Settings > Local Policies >
Security Options
Network access: Sharing and security   Classic
model for local accounts
Accounts: Guest account status         Disabled (recommended)
Network access: Let Everyone           Disabled (recommended)
permissions apply to anonymous users

                                                 6
Windows Domain Account Setup
Verify Functionality of the New Account (recommended)
System Services
Computer Configuration > Windows Settings > Security Settings > System Services
Remote registry Automatic
Server Automatic
Windows Firewall Automatic
Administrative Templates
Computer Configuration > Administrator Templates > Network > Network Connections >
Windows Firewall > Domain Profile
Windows Firewall: Protect all network Disabled (recommended) or Enabled. Your network
connections administrator should decide on the best option for
your environment. If Enabled, 3 settings are required
(below).
Windows Firewall: Allow remote Enabled (1)
administration exception
Windows Firewall: Allow file and Enabled (1)
printer sharing exception
Windows Firewall: Allow ICMP Enabled (2)
exceptions
(1) In the “Allows unsolicited messages from” field, enter “*” (do not enter quotes) or the IP
address assigned to your scanner appliance(s). (2) This is optional for a vulnerability scan, and
required for a compliance scan.
Verify Functionality of the New Account (recommended)
After configuring group policy settings, we recommend you verify the functionality of your
new Windows domain account to confirm it is suitable for Windows authenticated
scanning.
Select Run from the Start menu and enter cmd.exe and click OK. Use the commands
below to test administrative share access and registry access. Variables are enclosed in .
You need to replace variables with appropriate values. For example replace with a
username like jsmith (i.e. remove the brackets).
Run this command to test administrative share access:
net use Z: \\\C$ /PERSISTENT:no /USER:\
Run this command to test registry access:
runas /USER:\ "cmd /k reg.exe query \\\HKLM\Software"
Note: There’s a space after “query” and before \\
7WMI Service Configuration
How to increase WMI authentication level
WMI Service Configuration
Some of our compliance checks require secure access to WMI service to successfully
perform compliance assessment. For this reason we recommend you to set the WMI
service to run securely by increasing the authentication level to Packet Privacy.
We require high authentication level to scan the following namespaces and associated
controls:
Namespace: root\cimv2\security\microsofttpm
CID 11279 - Status of the 'Trusted Platform Module (TPM)' (Activated) on Windows
CID 11287 - Status of the 'Trusted Platform Module (TPM)' (Enabled) on Windows
CID 11288 - Status of the 'Trusted Platform Module (TPM)' (Owned) on Windows
Namespace: root\CIMV2\TerminalServices
CID 11478 - Current list of Groups and User Accounts granted the Remote Desktop
Connection privilege
How to increase WMI authentication level
You need to run the following command on each host that you’ll scan for the above
mentioned namespaces and controls.
winmgmt /standalonehost 6
Then restart the Winmgmt service
net stop winmgmt
net start winmgmt
For information on authentication levels see https://msdn.microsoft.com/en-
us/library/aa393972(v=vs.85).aspx
What happens when high level authentication is not provided?
You may see Insufficient Privileges or WMI query failures when scanning namespaces and
controls that require high level authentication.
Sample error from Windows Authentication Report:
8Manage Authentication Records
Create one or more Windows Records
Manage Authentication Records
Create Windows records to allow our service to authenticate to your Windows hosts at
scan time. Each record identifies the 1) credentials for logging in, and 2) the IP addresses
we’ll attempt to log in to using these credentials.
Create one or more Windows Records
Go to Scans > Authentication and select New > Windows Record.
Which users have permission to create records?
Managers can add authentication records. Unit Managers may be granted this permission.
Scanners may be granted this permission ONLY when the subscription is configured to
allow it.
Which credentials are used if I have multiple records?
When you have multiple records, we match each target host to one record at scan time.
See Login Credentials.
Can I edit my Windows record once it’s created?
Yes you can edit your record at any time to change the login credential, target hosts and
other settings. You can also make a copy of the record before making changes to keep your
original in place. Go to Scans > Authentication and find the Windows record you want to
edit. Hover over the record in the list and then select Edit from the Quick Actions menu.
Note for non-Manager users editing the record - You’ll only see the IPs in the record that
you have permission to view. The record may actually contain more IPs and any changes
you make will affect all hosts defined in the record including the ones you don't see.
9Manage Authentication Records
Windows Authentication Settings
Windows Authentication Settings
Local Authentication
If you select Local authentication, authentication will be performed locally on the hosts
you enter in the IPs section. Please see Appendix A - Non-Domain (Local) Scanning for
account requirements.
Domain Authentication
You’ll choose the domain type and enter the domain name.
NetBIOS, User-Selected IPs. When selected we’ll use NetBIOS to authenticate to IP
addresses in the domain configuration. You enter IPs in the IPs section of the record. A
single authentication record may be defined for an entire domain (tree) using this method.
NetBIOS, Service-Selected IPs. When selected we'll use NetBIOS to authenticate to hosts in
the domain using credentials stored on the domain. If trust relationships exist and the
account’s permissions are properly propagated, it’s possible for us to authenticate to hosts
which are not members of the same domain.
Active Directory. When selected we’ll use an Active Directory forest to authenticate to
hosts in a certain domain within the framework. You’ll need to enter a Fully Qualified
Domain Name (FQDN). If “Follow trust relationships” is selected and trust relationships
exist, we’ll authenticate to hosts in other domains having a trust relationship with the
domain you’ve defined in the record.
Trust Relationships
Support for trust relationships
We support trust relationships in Windows domain logins. In other words, you can use
credentials stored on one domain to authenticate to one or more hosts stored on another
domain when trust relationships are present. This is done by the scan targets
automatically, using pass-through authentication.
When to follow trust relationships
The “Follow trust relationships” setting (available with Active Directory domain type) is
only intended for Small to Midsize businesses that have all of their domains in a single
place (for example, a single office). This setting is NOT intended for Enterprise customers
with hundreds of domains spread over many locations with firewalls between them.
10Manage Authentication Records
Windows Authentication Settings
When this setting is enabled, the scanner needs access to ALL domain controllers of ALL
domains in the forest which have a trust relationship with the domain used in the
authentication record. If firewalls block the connections to those domain controllers or if
they block connections to the DNS servers resolving those domains then this can lead to
authentication failures.
NetBIOS vs. Active Directory - Common Use Cases
Not sure which option to pick in your record? Generally, Active Directory records are
preferred over NetBIOS because of the way cross-domain setups interact with name
mapping. With NetBIOS records there are more situations in which the Kerberos protocol
cannot be used. We support manually configured cross-domain setups with NetBIOS and
Active Directory.
Check out these use cases and the record settings you should make for each one.
IP-based authentication
Domain Type: NetBIOS, User-Selected IPs
Domain Name: DOMAIN
User Name: USER
Host-based authentication
Domain Type: NetBIOS, Service-Selected IPs
Domain Name: DOMAIN
User Name: USER
Service-based auth for NTLM (no Kerberos available)
no trust relationships
We’ll try to upgrade this to Kerberos if “DOMAIN” can be mapped to “domain.foo.com”.
Domain Type: NetBIOS, Service-Selected IPs
Domain Name: DOMAIN
User Name: USER
Service-based auth for NTLM (no Kerberos available)
with manually configured trusts
This cannot be upgraded to Kerberos.
Domain Type: NetBIOS, Service-Selected IPs
Domain Name: TARGETDOMAIN
User Name: USERDOMAIN\USER
Service-based auth for Kerberos
no trust relationships
This always tries Kerberos first.
Domain Type: Active Directory
Domain Name: domain.foo.com
User Name: USER
Follow trust relationships: OFF
11Manage Authentication Records
Windows Authentication Settings
Service-based auth for Kerberos
with manually configured trusts
This always tries Kerberos first.
Recommended for Enterprise organizations for cross-domain authentication.
Domain Type: Active Directory
Domain Name: targetdomain.foo.com
User Name: USER@userdomain.foo.com
Follow trust relationships: OFF
Service-based auth for Kerberos
with automatic trust discovery
ONLY recommended for Small to Midsize Businesses.
Domain Type: Active Directory
Domain Name: userdomain.foo.com
User Name: USER
Follow trust relationships: ON
Examples for NetBIOS, Service-Selected IPs
For the Windows domain authentication option with service-selected IPs, please review
how authentication occurs in these scenarios.
When Hosts Are Members of the Domain
Our security service will use NetBIOS to authenticate to hosts in a user-specified domain
using credentials stored on this domain. If trust relationships exist and the account’s
permissions are properly propagated, it's possible for our service to authenticate to hosts
which are not members of the same domain.
Example: CORP is a top-level domain. The account credentials are stored in domain CORP.
12Manage Authentication Records
Windows Authentication Settings
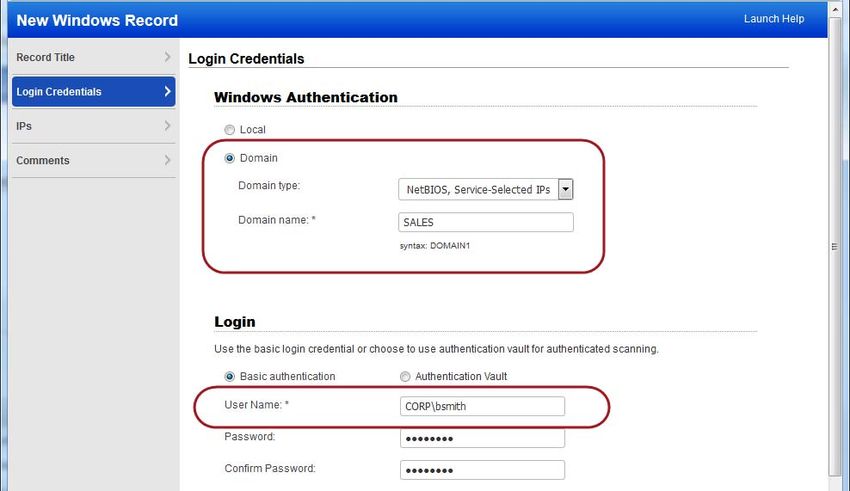
When Hosts Are Not Members of the Domain
This option may be used when a proper trust exists between the domain, on which the
account credentials reside, and a child domain on which the target hosts exist. The
account permissions must be properly propagated to the hosts’ domain.
Specify the format “domain\user” in the User Name field. Note: The format
“user@domain” is not supported. Using the “domain\user” format makes it possible to
create one Windows authentication record per trusted domain in the case where hosts to
be scanned are members of one domain and authentication credentials are stored on
another domain.
In the Domain Type drop-down, select “NetBIOS, Service-Selected IPs”. Enter the domain
name identifying the hosts to be scanned. In the User Name field, enter the value
“domain\user”, where “domain” is the domain containing the authentication credentials,
and “user” is the account name for these credentials stored on another domain.
Example: CORP is the top-level domain (forest root) where proper trust relationships exist.
Credentials for account “vsmith” are stored in the top-level domain “CORP”. Target hosts
are members of the child domain “SALES”. Enter “CORP\vsmith” in the User Name field
and “SALES” in the Domain Name field.
13Manage Authentication Records
Login Credentials
Login Credentials
If you choose Basic Authentication you’ll enter the user name and password to be used for
authentication at scan time.
If your organization stores passwords in a third party password manager we can access
these passwords. You just need to create a vault configuration in your account. The vault
configuration settings allow us to access the password manager application, and the
record settings tell us how to retrieve the password(s) for the hosts you want to scan.
Go to Scans > Authentication > Vaults to tell us about your vault system. Then choose
Authentication Vault in your record and select your vault name.
14Manage Authentication Records
Login Credentials
Authentication Protocols
Our scanners will attempt authentication to your target hosts using one of the
authentication protocols selected in your record, starting with the most secure protocol to
the least secure protocol. For domain level authentication, all three protocols are
supported. For local host authentication, NTLMv2 and NTLMv1 protocols are supported.
IPs
Select the Windows hosts (IPs) you want to authenticate to using the login credentials
defined for this record. Each IP may be included in one Windows record. For domain level
authentication, you only select IPs when domain type “NetBIOS, User-Selected IPs” is used.
All IPs specified in this section must be part of the domain configuration.
SMB Options
SMB signing required - This option is unchecked by default, meaning SMB signing is not
required. This is the recommended setting. When unchecked, we can authenticate to any
Windows version regardless of how SMB signing is configured on the target. You are not
protected, however, against man-in-the-middle (MITM) attacks.
When selected, we will require each Windows target to support SMB signing, whether
configured through Local Policy or Group Policy. If SMB signing is disabled on a target host,
authentication will fail and the host will not be scanned. This option protects against
MITM attacks but we won’t be able to authenticate to some hosts.
Minimum SMB version - Select a minimum SMB protocol version, such as version 1, 2.0.2,
2.1, etc, and we’ll require that each Windows target has that version or later. If the target
has an older version of the SMB protocol, authentication will fail and the host will not be
scanned.
Agentless Tracking
Agentless Tracking is a feature that allows customers to track hosts by host ID, instead of
relying on the IP address (or DNS name or NetBIOS name) to identify the host. This
provides a scan option for customers who would like to scan systems with multiple IP
addresses and parse the results in order to consolidate all vulnerability data for a unique
host ID.
Select the option “Enable agentless tracking” to track the hosts in the record by host ID.
During the scanning process, the service assigns a unique host ID to each target host.
The host ID is stored on the host’s local file system in the registry under:
Key: HKLM\SOFTWARE\Qualys
Value Name: HostID
You can read more about it in the Qualys online help.
15Manage Authentication Records
Multiple Windows Records
Multiple Windows Records
You can configure as many Windows authentication records as you like. We’ll always try
to match each Windows host to one Windows record. Once a match is found we’ll use the
matching record for authenticating to the host, and we’ll stop looking for other possible
matches.
Do you have multiple Windows records? The order used to match a host to a Windows
record depends on a couple of things.
Record types are evaluated in this order
1) Records set to NetBIOS, Service-Selected IPs
We’ll look at Windows records with service-selected IPs (records set to “Domain: NetBIOS,
Service-Selected IPs”) to see if the host is registered with a domain in one of those records.
If a match is found, the credentials in the record are used for authentication.
2) Records set to NetBIOS, User-Selected IPs
We’ll look at Windows records where users configure the target host IPs (records that
enable “Domain: NetBIOS: User- Selected IPs” and “Local”) to see if the host is included in
one of those records. We’ll attempt to match domain records first, then local records. In
the case where credentials in a service-selected IPs record were used for authentication to
the host and authentication failed, we’ll look to see if the host is included in a user-
selected IPs record for local authentication only. If a match is found, the credentials in the
record are used for authentication.
3) Records set to Active Directory
We’ll look at Windows records set to “Active Directory” and attempt to authenticate to
hosts found in the Fully Qualified Domain Name (FQDN) defined for each.
Administrator vs another account
Records with an Administrator account are attempted first
First we’ll attempt to match the host to a Windows record with an administrator account
in this order: 1) Records set to NetBIOS, Service-Selected IPs, 2) Records set to NetBIOS,
User-Selected IPs, and 3) Records set to Active Directory.
Records with another account
If we do not match the host to a record with an Administrator account, we’ll attempt to
match the host to a Windows record with another account in this order: 1) Records set to
NetBIOS, Service-Selected IPs, 2) Records set to NetBIOS, User-Selected IPs, and 3) Records
set to Active Directory.
16Appendix A - Non-Domain (Local) Scanning
Windows 2000, 2003, XP
Appendix A - Non-Domain (Local) Scanning
When preparing to run trusted scans on local systems, be sure that the following system
settings are enabled when the system is not joined to a domain. Without these settings
enabled, our security service cannot perform Windows trusted scanning on target hosts in
your network.
Windows 2000, 2003, XP | Windows Vista, 2008, 2012 | Windows 7, 8
Windows 2000, 2003, XP
Local Account
A local account which is in the Administrator’s group must be used.
Enable Server Service
The Server Service is typically enabled. If disabled, you can enable it via policies or scripts.
Note that File and Printer Sharing, which is required for trusted scanning, will function
only when the Server Service is enabled.
Enable File and Printer Sharing on Network Interface
File and Printer Sharing must be enabled on the network interface of all hosts to be
scanned (note that it is enabled by default). You can enable this manually via the Network
Interface properties, or using a script with a tool such as “netset.exe” or “netcfg.exe”.
Netset.exe is a Windows command-line tool that supports changing network interface
settings. Snetcfg.exe is a Microsoft Development Kit tool. Compiled versions of snetcfg are
available for Windows 2000 and XP.
Disable Simple File Sharing (SFS): Windows XP
Simple File Sharing (SFS) must be disabled on Windows XP systems to be scanned. SFS is
disabled by default when a Windows XP Pro system joins a domain, so no configuration
should be necessary to support trusted scanning on Windows XP Pro systems in an
enterprise network. It's possible for users to enable SFS so there may be a need to use a
Group Policy or other means to ensure that this is disabled.
If you wish to scan a Windows XP Home system or a Windows XP Pro system, which has
not been added to a domain, then SFS must be disabled on these systems.
It’s possible to disable this option manually per machine. To do this on the local machine,
open Windows Explorer and go to Tools > Folder Options > View. Under Advanced settings,
clear the setting “Use simple file sharing (Recommended)” and then click OK.
Enable Remote Registry Service
Our security service must access the system registry to perform Windows trusted
scanning. To allow this access, the Remote Registry service must be enabled. To check this,
go to Control Panel > Administrative Tools > Services and verify that the service is running
and set to start automatically.
17Allow Remote Administration on Windows Firewall: Windows 2003, XP
To allow access through Windows Firewall (if used), be sure to set the Remote
Administration Exception within the Windows Firewall. Using Group Policy, this setting
can be found under:
Computer Configuration\Administrative Templates\Network\Network
Connections\Windows Firewall\Standard Profile (Or replace Standard Profile with Domain
Profile if your computer is a member of a Windows domain.)
If you manage your firewall through the Control Panel, enable TCP ports 135 and 445.
Windows Vista, 2008, 2012
Windows Firewall Settings
For each target host, there are certain Windows Firewall settings that must be enabled.
Step 1: Allow “File and Print Sharing” traffic
Activate firewall rules that are relevant to non-domain profiles in order to allow traffic for
File and Print Sharing.
1) Go to the Control Panel Home window.
2) Using Vista and 2008, go to Security and click the link “Allow a program through
Windows Firewall”. Using 2012, go to System and Security > Windows Firewall and click
the link “Allow an app of feature through Windows Firewall”.
3) Select the “File and Print Sharing” check box. Then click OK.
Step 2: Allow scanner appliance traffic
By default, in a non-domain profile, a Windows system (Vista, 2008 or 2012) does not allow
traffic from outside its own local subnet even when a firewall rule has been activated. For
this reason, you must also provide the IP address or subnet of the scanner appliance.
1) Using Vista and 2008, go to the “Windows Firewall with Advanced Security” program.
Using 2012, go to Windows Firewall > Advanced Settings. (These resources are located in
Start > Control Panel > System and Maintenance > Administrative Tools.)
2) Click Inbound Rules.
3) For each entry in the “File and Printer Sharing” group with a green check mark (Vista,
2008 and 2012) and each entry in the “Remote Administration” group with a green check
mark (Vista and 2008) follow these steps: a) Right-click on the entry and select Properties,
b) Select the Scope tab, and c) Select “Any IP address” or click the Add button to add the IP
address (or subnet) for the scanner appliance that has been configured to scan the target
host. Then click OK.
18Appendix A - Non-Domain (Local) Scanning
Windows Vista, 2008, 2012
Enable File Sharing
File sharing must be turned on for each target host. Go to the Control Panel Home window
and follow these steps.
Using Vista and 2008: 1) Under Network and Internet, click the link “Set up file sharing”
and 2) In the Network and Sharing Center window, make sure these settings are correct:
File sharing is On and Public folder sharing is Off.
Using 2012: 1) Under Network and Sharing Center, click the link “Change advanced
sharing settings”, 2) Change sharing options for the current network profile, For a non-
domain target, select “Guest or Public”. For a domain target, select “Private”. Make sure
these settings are correct: turn on network discovery and turn on file and printer sharing,
and 3) For All Networks, turn off Public Folder Sharing and turn on Password Protected
Sharing.
Enable Remote Registry Service
Our service must access the system registry to perform Windows trusted scanning. To
allow this access, the Remote Registry service must be started. Go to Control Panel >
Control Panel Home > System And Maintenance > Administrative Tools > Services and
start the Remote Registry Service. You could set this to Automatic to make sure it starts
automatically at reboot.
Configure User Access Control (UAC)
Do I need to configure UAC? Yes. There are 2 methods you can use: 1) change Remote UAC
settings, or 2) disable UAC policy.
Method 1: Change Remote UAC settings
1) Launch Registry Editor (regedit.exe) in “Run as administrator” mode and grant Admin
Approval, if requested
2) Navigate to HKEY_LOCAL_MACHINE hive
3) Open SOFTWARE\Microsoft\Windows\CurrentVersion\Policies\System key
4) Create a new DWORD (32-bit) value with the following properties:
Name: LocalAccountTokenFilterPolicy
Value: 1
5) Close Registry Editor
Warning: The value data types of DWORD (32-bit) and QWORD (64-bit) are located next to
each other in the data type selection menu on 64-bit Windows versions. It may be easy to
mistake one for another and select the incorrect data type. The required value data type
must be DWORD (32-bit). Selecting QWORD (64-bit) and setting it to 1 will not enable
Remote UAC.
The requirement to reboot system or restart Server service is questionable. Despite what
some documents recommend, our tests have shown that disabling Remote UAC in the
registry takes effect immediately and remote access to ADMIN$ is granted during the
Qualys scan.
19Appendix A - Non-Domain (Local) Scanning
Windows 7, 8
Method 2: Disable UAC policy
Go to the Control Panel Home window and follow these steps.
Using Vista 2008: 1) Click “Add or remove user accounts”, 2) Select a user account, 3)
Under the account, click the link “Go to the main User Accounts Page”, 4) On the page
“Make changes to your user account”, click “Change security settings”, 5) On the page
“Turn on User Account Control (UAC) to make your computer more secure”, de-select
(clear) the check box “Use User Account Control (UAC) to help protect your computer” and
click OK, and 6) Reboot your computer.
Using 2012: 1) Click User Accounts, 2) Change User Account Control settings, 3) Set the tab
to “Notify me only when apps try to make changes to my computer (do not dim my
desktop)”, and 4) Reboot your computer.
Want more info about UAC?
Check out our document “Qualys Authenticated Scanning - Microsoft Windows User
Access Control (UAC)”. Just log in to your account and go to Help > Resources to download
the latest.
Windows 7, 8
Windows Firewall Settings
For each target host, there are certain Windows Firewall settings that must be enabled.
First activate firewall rules that are relevant to non-domain profiles in order to allow
traffic for File and Print Sharing. Then for each activated rule, add the scanner appliance
IP address or subnet so that the scanner appliance traffic can reach the host.
Allow “File and Print Sharing” traffic. Follow these steps: 1) Go to the Control Panel Home
window, 2) Under System and Security > Windows Firewall, click the link “Allow a program
through Windows Firewall”, 3) Select the “File and Print Sharing” check box and 4) Click
OK.
By default, a non-domain network profile system does not allow traffic from outside its
own local subnet even when a firewall rule has been activated. You must change the scope
of the firewall rule to include the IP address or subnet of the scanner appliance.
Follow these steps to allow scanner appliance traffic:
1) Go to the “Windows Firewall with Advanced Security” program located in Start >
Control Panel > System and Security > Administrative Tools.
2) Click Inbound Rules.
3) For each entry in the “File and Printer Sharing” group with a green check mark follow
these steps: a) Right-click on the entry and select Properties, b) Select the Scope tab, and c)
Select “Any IP address” or click the Add button to add the IP address (or subnet) for the
scanner appliance that has been configured to scan the target host. Then click OK.
20Appendix A - Non-Domain (Local) Scanning
Windows 7, 8
Enable File Sharing
File sharing must be turned on for each target host following these steps: 1) Go to the
Control Panel Home window, 2) Under Network and Internet > HomeGroup, click the link
“Change advanced sharing settings” and 3) Change sharing options for the current
network profile. For a non-domain target, select “Home or Work”. For a domain target,
select “Domain”. Make sure these settings are correct: File sharing is On and Public folder
sharing is Off.
Enable Remote Registry Service
Our security service must be able to access the system registry to perform Windows
trusted scanning. To allow the service access to the system registry, the Remote Registry
service must be started. Go to Control Panel > Control Panel Home > System And
Maintenance > Administrative Tools > Services and start the Remote Registry Service. You
could set it to Automatic to make sure it starts automatically at reboot.
Enable Server Service (Windows 8)
On Windows 8 systems, the Server Service must also be started. By default, this is started
and set to Automatic. Please verify that this true for your particular version and
configuration. You can check by going to Control Panel > Control Panel Home > System
And Maintenance > Administrative Tools > Services. Start the Server Service if it is not
already started.
Configure User Access Control (UAC)
Do I need to configure UAC? Yes. There are 2 methods you can use: 1) change Remote UAC
settings, or 2) disable UAC policy.
Method 1: Change Remote UAC settings
1) Launch Registry Editor (regedit.exe) in “Run as administrator” mode and grant Admin
Approval, if requested
2) Navigate to HKEY_LOCAL_MACHINE hive
3) Open SOFTWARE\Microsoft\Windows\CurrentVersion\Policies\System key
4) Create a new DWORD (32-bit) value with the following properties:
Name: LocalAccountTokenFilterPolicy
Value: 1
5) Close Registry Editor
Warning: The value data types of DWORD (32-bit) and QWORD (64-bit) are located next to
each other in the data type selection menu on 64-bit Windows versions. It may be easy to
mistake one for another and select the incorrect data type. The required value data type
must be DWORD (32-bit). Selecting QWORD (64-bit) and setting it to 1 will not enable
Remote UAC.
21Appendix A - Non-Domain (Local) Scanning
Windows 7, 8
The requirement to reboot system or restart Server service is questionable. Despite what
some documents recommend, our tests have shown that disabling Remote UAC in the
registry takes effect immediately and remote access to ADMIN$ is granted during the
Qualys scan.
Method 2: Disable UAC Policy
Follow these steps:
1) Open the Control Panel. Then click “Add or remove user accounts”.
2) Select a user account. Then, under the account, click the link “Go to the main User
Accounts Page”.
3) On the page “Make changes to your user account”, click “Change security settings”.
4) On the page “Turn on User Account Control (UAC) to make your computer more secure”,
de-select (clear) the check box “Use User Account Control (UAC) to help protect your
computer” and click OK.
5) Reboot your computer.
22Appendix B - Windows NT Domains
Option 1 – Using an Administrator Group
Appendix B - Windows NT Domains
When NT domains are used, you may use one of the options described below to create and
configure an account with privileges that allow read access to remote registries and
minimal domain access otherwise. After creating and configuring an account following
the steps provided, it’s best practice to make the Group Policy settings described earlier
(see Windows Domain Account Setup).
Option 1 – Using an Administrator Group
You can create a new user account in the Global administrator group. This option may be
used with Windows NT based domains.
Steps for account creation and configuration:
1) Log into the Domain Controller with an account that has administrator rights.
2) Create a new user account called “qualys_account”.
3) Make the “qualys_account” a member of the Global group called “Domain Admins”.
4) In the “Member of” section of the group properties, keep only the group “Domain
Admins” and remove any other groups.
The Global group “Domain Admins” should be used for access to remote systems as this
group is automatically added to the “Administrators” Local group on each system when it
becomes a member of the Windows NT domain.
Option 2 – Set ACL Remotely Using SetACL Command-Line Tool
It’s possible to automate the process of changing permissions of registry keys remotely
using a command-line tool such as SetACL. This option may be used with Windows NT
domains.
Note — In some environments with Windows Active Directory domains and workstations
running different versions of Windows, this method may be used to set registry keys
remotely on certain workstations. In this case if you set a domain-wide policy, as
described in Option 1, registry keys are set for Windows 2000/2003/XP workstations only.
For workstations running earlier versions of Windows, use the SetACL tool to change
registry keys on these systems.
The SetACL command-line tool is available for download from
http://setacl.sourceforge.net/.
Steps for account creation and configuration:
1) Log into the Domain Controller with an account that has administrator rights.
2) Create a new Global group called “qualys_scanners”.
3) In the group properties, be sure that there are no members of the group.
23Appendix B - Windows NT Domains
Option 2 – Set ACL Remotely Using SetACL Command-Line Tool
4) Create a new user account called “qualys_account” and put it in the “qualys_scanners”
group.
5) In the “Member of” section of the account properties, keep only the “Administrators”
group and remove any other entries.
6) At the command line, run SetACL to set the remote access registry key on a target host,
using the syntax shown below.
setacl on "\\NETBIOS_NAME\MACHINE\SYSTEM\CurrentControlSet\Control\
SecurePipeServers\winreg"
–ot reg –actn ace –ace "n:DOMAIN\GROUPNAME;p:read;m:grant;w:dacl;i:np"
where GROUPNAME is “qualys_scanners” group (the Global group you created).
24Appendix C - Windows Authentication QIDs
Appendix C - Windows Authentication QIDs
These vulnerability checks (QIDs) return valuable information useful for verifying
Windows trusted scanning and testing the user accounts used for login.
Windows Authentication Status
QID Severity Title
70053 Windows Authentication Method for User-
Provided Credentials
70028 Windows Authentication Method
105015 Windows Authentication Failed
105296 Windows Authentication Not Attempted
Windows Information — Registry and File Access
QID Severity Title
70038 File and Print Access Denied
90035 Missing AllowedPaths Registry Key
90331 Access to File Share is Enabled
90399 Windows File Access Denied
90194 Windows Registry Pipe Access Level
90195 Windows Registry Key Access Denied
105025 Windows Registry Access Level
105177 Microsoft Windows Registry Critical Checks
Security Policy
Contact Support
Qualys is committed to providing you with the most thorough support. Through online
documentation, telephone help, and direct email support, Qualys ensures that your
questions will be answered in the fastest time possible. We support you 7 days a week,
24 hours a day. Access online support information at www.qualys.com/support/.
25You can also read