Configure Cloud Hybrid Features in SharePoint Server 2019 and Office 365 - Priyaranjan K S
←
→
Page content transcription
If your browser does not render page correctly, please read the page content below
Configure Cloud Hybrid Features in
SharePoint Server 2019 and Office 365
Priyaranjan K S
About the Author

Priyaranjan KS is a Senior SharePoint Consultant who is engaged in architecting, designing
and developing solutions in SharePoint and Office 365.He has been working with SharePoint
over the past 9 years and has worked on SharePoint 2007 through SharePoint 2019. He is a
Certified Scrum Master as well as a Microsoft Certified Solutions Developer (SharePoint
Apps)

He is a Microsoft MVP and frequently collaborates in the field of SharePoint. In case you
need any SharePoint help, you can either find him here or drop a mail to him.

Target Audience
The users reading the book needn’t have an in-depth working knowledge in SharePoint. But
a basic working knowledge of Azure, Office 365 and SharePoint is considered ideal.
Contents
I.         Introduction .............................................................................................................................. 3
II.        SharePoint Farm Architecture .................................................................................................... 3
III.            SharePoint Hybrid Features.................................................................................................... 4
      A.        Cloud Hybrid Search............................................................................................................... 5
           1.      Get an Azure Subscription .................................................................................................. 6
           2.      Sign up for Office 365 account ............................................................................................ 9
           3.      Register a new Domain with Office 365 .............................................................................. 9
           4.      Assign a UPN domain suffix .............................................................................................. 17
           5.      Sync Azure AD .................................................................................................................. 26
           6.      Configure Cloud Hybrid Search ......................................................................................... 32
           7.      Create a content source to crawl for cloud hybrid search ................................................. 43
      B.        Configure Hybrid One Drive for Business in SharePoint Server 2019 ..................................... 46
           1.      Office 365 Prerequisite Configurations ............................................................................. 48
           2.      SharePoint Server 2019 Prerequisite Configurations......................................................... 48
           3.      Provision Managed Metadata Service Application ............................................................ 48
           4.      Setting up My Sites .......................................................................................................... 50
           5.      Setting up User Profile Service Application ....................................................................... 54
           6.      Provision App Management Service Application ............................................................... 56
           7.      Provision Subscription Settings Service Application .......................................................... 57
           8.      Configure Synchronization Connection ............................................................................. 59
           9.      Verify the User Properties before running Synchronization .............................................. 61
           10.         Start Profile Synchronization ........................................................................................ 64
      C.        Configure SharePoint Hybrid Team Sites .............................................................................. 72
           1.      Test Hybrid Site Features.................................................................................................. 72
      D Extensible App Launcher .......................................................................................................... 73
IV.             Summary ............................................................................................................................. 74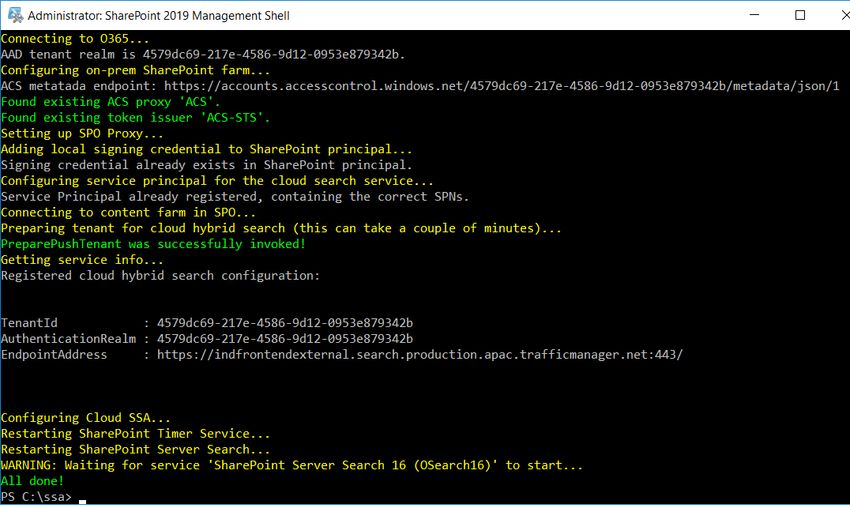
I. Introduction
SharePoint 2019 general availability was announced by Bill Baer on October 2018.It is
the latest iteration of SharePoint and is said to be the most scalable and stable product
in SharePoint line up. Lot of improvements have been made over its predecessor,
SharePoint 2016. The Notable improvements have happened in the Search Department.
With an improved Cloud Hybrid Search Services , SharePoint 2019 brings in a highly
scalable and mature Content Management Ecosystem.
SharePoint Cloud Hybrid Features
SharePoint hybrid is considered as the first step towards embracing the cloud
infrastructure. Hybrid helps the organization maintain the best of SharePoint On Premise
and Online functionalities. With SharePoint hybrid features, you can integrate the two
environments together in a variety of ways to provide a more productive user
experience.
Cloud Hybrid features in SharePoint includes the following:
Cloud Hybrid Search: It provides SharePoint On Premise search results in
SharePoint Online.
Cloud One Drive Redirection: It redirects the users to Office 365 One Drive for
business, upon clicking the On Premise One Drive button.
Cloud Hybrid Site Features: It provides an extensible app launcher in SharePoint
2019 which integrates tile in Office 365 to On Premise App Launcher. It also
redirects the users to Office 365 Team Sites upon clicking the SharePoint On
Premise Sites button in the suite bar.
II. SharePoint Farm Architecture
The SharePoint 2019 installation can be either done On Premise or in Azure VMs.This
E-Book assumes that you have a readily running SharePoint Farm in Place. In case you
want to quickly spin up a SharePoint 2019 VM, you can do that from Azure Portal. We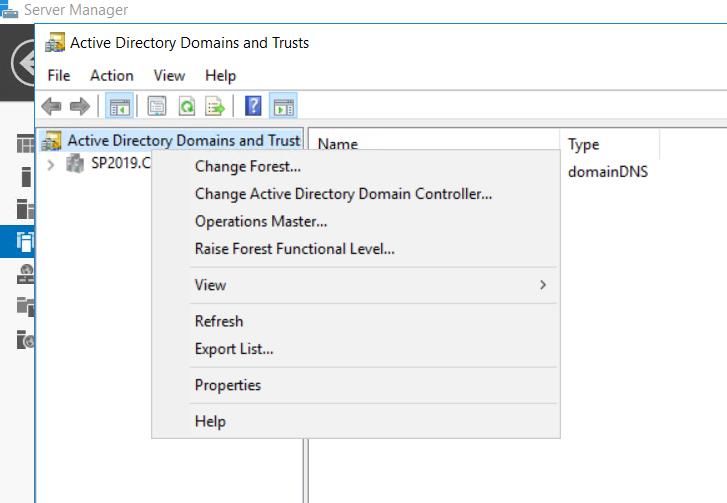
would be using a Single Server Farm SharePoint Installation to implement Hybrid
features in this book.

Now let’s head over to setting up SharePoint Hybrid Features.

III.   SharePoint Hybrid Features
SharePoint hybrid is considered as the first step towards embracing the cloud
infrastructure. Hybrid helps the organization maintain the best of SharePoint On Premise
and Online functionalities. With SharePoint hybrid features, you can integrate the two
environments together in a variety of ways to provide a more productive user
experience.
Cloud Hybrid features in SharePoint include the following:
Cloud Hybrid Search: It provides SharePoint On Premise search results in
SharePoint Online.
Cloud One Drive Redirection: It redirects the users to Office 365 One Drive for
business, upon clicking the On Premise One Drive button.
Cloud Hybrid Site Features: It provides an extensible app launcher in SharePoint
2019 which integrates tile in Office 365 to On Premise App Launcher. It also
redirects the users to Office 365 Team Sites upon clicking the SharePoint On
Premise Sites button in the suite bar.
My Site creation default to OneDrive in Office 365 : My Site creation experience
for end users will be redirected to Office 365 OneDrive experience.
Hybrid business to business (B2B) sites : You can now navigate across intranet
sites in on-premises and extranet sites in SharePoint Online by using the "Follow
gesture" in site pages. New hybrid B2B extranet sites can be created from
SharePoint Online Admin center, click “New” on the site collections page. This
site later can be shared with external users
We will see more about each of the Cloud Hybrid implementation in the coming sections
A. Cloud Hybrid Search
Cloud hybrid search facilitates the users to search for content, which exists in
SharePoint 2019 On Premise Server along with the content search in Office 365. This is
done by crawling the content in SharePoint 2019 Server and indexing it along with the
search index in Office 365.
Before setting up Cloud hybrid search, we need to configure some prerequisites in
SharePoint 2019 and Office 365 environment. Ensure the steps, mentioned below, are
done.
An Active Azure Subscription is available
Office 365 AD is manageable from Azure
A public domain has been registered with Office 365
A UPN prefix that matches the public domain has been added to the Local AD
Synchronize Local Active Directory with Office 365
1. Get an Azure Subscription
Azure provides multiple purchase options. You can either skip the free trial and get a
paid subscription directly from here . Else you can make use of the Visual Studio Dev
essentials program where you can make use of fixed credits per month.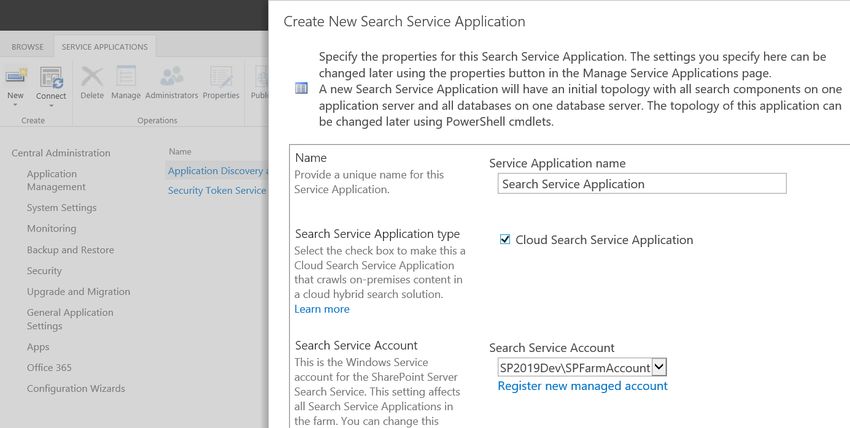
Visual Studio Dev essentials provide a lot of freebies for developers. This includes a 6
months PluralSight subscription as well as a $25/month Azure subscription. These are
real value adds to any developer who wants to get their hands dirty with some serious
learning. In this article we will see how to register for the free $25/month Azure
subscription.
Microsoft calls this freebie subscription as Developer benefit Program .In order to reap
these benefits you need to have a Hotmail or outlook account. Now let’s see how to get
the free azure credits using the developer benefit program.
Steps to activate Free Azure Subscription
After creating Hotmail/outlook account go to Visual Studio Essential Dev site.
Click on ‘Join or Access now’.
There are multiple free resources which can be utilized for learning and R&D
purposes. We will go with Azure $25 monthly Azure credit .Click on Activate.
This will take us to the Purchase page.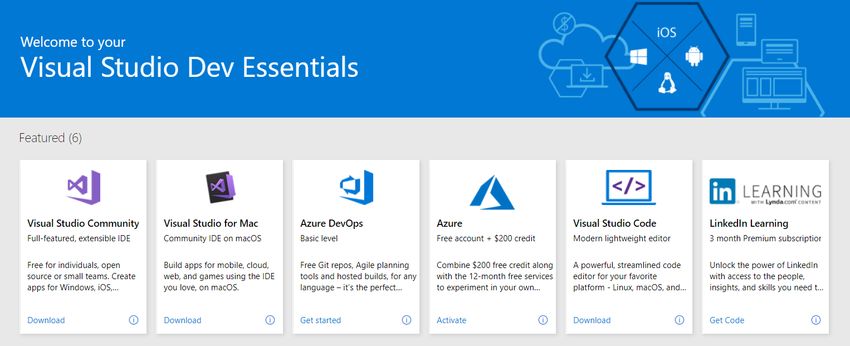
Here you will have to Enter Personal details and verify yourself via Text
Message/Phone Call. In addition to that you have to enter the credit card details.
You won’t be charged anything. Once the subscription is set up successfully,
there is an option called “Remove Spending Limit”, which when enabled allows
you to use the resources when 25$ limit is reached. When spending limit has
been removed credit card would be charged as per usage.
Click on ‘Sign up’.
The subscription has been created for you. You can add VMs and other resources to
this subscription and get some serious work done. Make sure you check the usage once
in a while from the Manage section of the Subscription.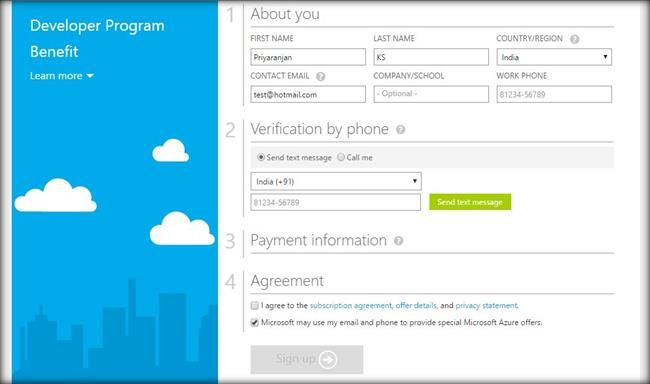
This will show the remaining credits available. Make sure to stop the VM after usage, if
needed, else the credit will be used up for every live minute.
Once the credit is used up for a particular month the VM or any other resources
subscribed under the Developer Benefit Program won’t be accessible anymore. You will
have to wait for the next month so that $25 credit will be added to your account. This will
restore access to the environments. However if you don’t want to wait till next month you
can click on Remove Spending Limit button in the above screen shot and you will be
charged on a usage basis until free credits are loaded to your account in the subsequent
month.
2. Sign up for Office 365 account
You can sign up for Office 365 account from here . Make sure you subscribe to an
Enterprise plan (Office 365 Enterprise E1/E3/E5)that houses SharePoint Online.
3. Register a new Domain with Office 365
When we sign up for Office 365, initially we get a default domain XXXX.onmicrosoft.com.
In my case it was sp2019hybrid.onmicrosoft.com.Microsoft suggests in getting a new
public domain of the form contoso.com to set up hybrid search. So I bought a new
domain and registered it with Office 365. Adding of a new domain has been explained in
this section.
When we sign up for Office 365, initially we get a default domain XXXX.onmicrosoft.com.
In order to spin up a trial version and do some testing of the environment this domain is
perfectly ok. However if we want to deploy the office 365 service to an organization we
will have to get a custom domain so that the customers and users can identify the
organization by the url.
We have two options when it comes to adding a new domain to Office 365
Buy a new domain from Office 365 Admin Centre
Use an existing owned domain and add it to Office 365
Let’s see how we can achieve both.
Buy a new domain
Office 365 Admin Center provides the global administrator to buy a new domain from
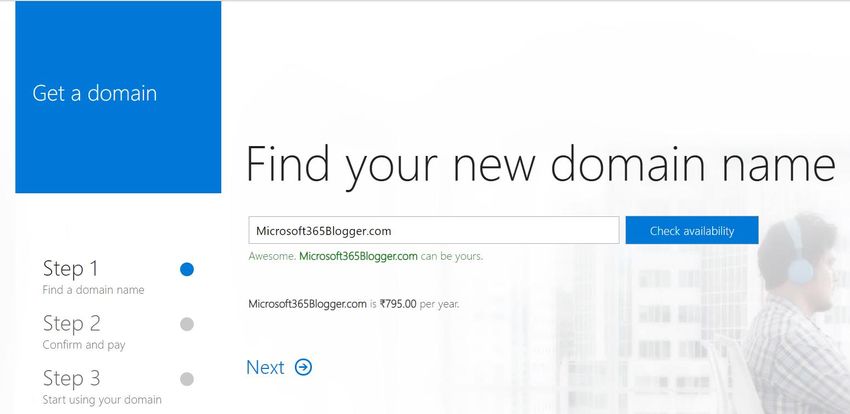
Settings -> Domains section. Here click on the “Buy domain” to navigate to the page
from where we can buy a new domain.It will take us to the page where we can search for a suitable and available domain name. Once we have found a suitable match, click on Buy which will take us to the GoDaddy site to complete the purchase. Or Else you can procure a domain directly by going to Go Daddy Site.
The total amount and the duration of ownership can be specified in the GoDaddy site.
Make the payment and procure the new domain.

Add an existing domain to Office 365

Once we have bought the new domain, we can add it to Office by going to the domains
page and click on ‘Add domain’.

Specify the name of the domain that you own in the text box as shown below.
Office 365 will now want to verify that you really own such a domain. You can either
choose ‘Sign in to GoDaddy’ so that tit automatically contacts the domain registrar and
do verification.
In order to automatically do the verification, a Go Daddy login screen will come up where
you have to authenticate to GoDaddy by entering the username and password.

Allow Office 365 to make changes to the domain at GoDaddy by clicking on Accept and
this will automatically verify the domain.

Update DNS Settings

Once we have verified the Domain, we have to update the DNS Settings. Similar to the
above step we can automate this step by selecting the first option ‘Add the DNS records
for me’.
Click on Next to add the DNS records in GoDaddy
Set Primary Domain

Heading over to the Domains page we can see that the new domain has been added
and successfully set up.

Click on the new domain and set it as default if we want to start using it.

Thus the newly added domain has been set as the default domain in Office 365.

As a final step we have to go to the list of users and edit their emails to start using the
new domain.
Click on Edit option against the user name.

Add the new domain email address and click on Save.
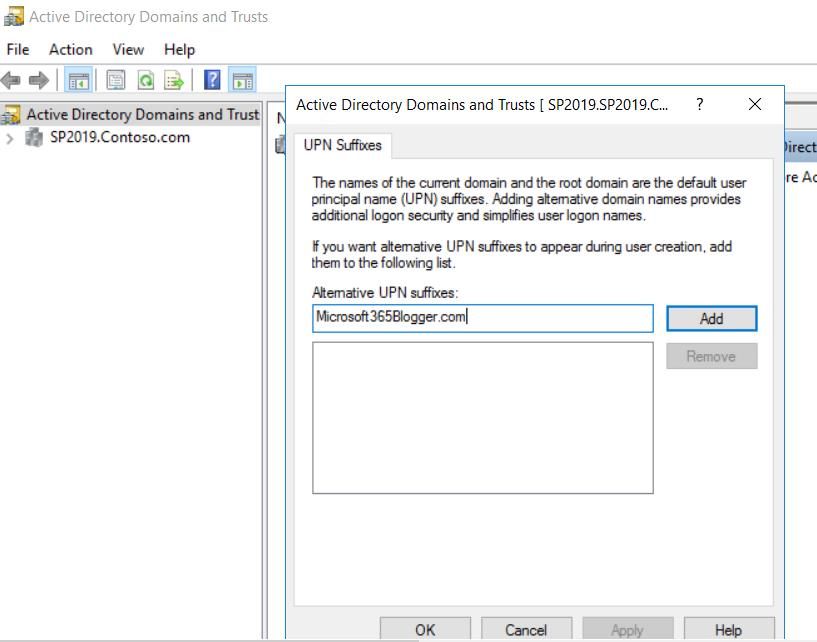
4.     Assign a UPN domain suffix

UPN stands for User Profile Name. Now we have to create a UPN domain suffix in the
Active Directory domain where Active Directory Services are configured in such a way
that it matches the public domain that was created and registered with Office 365 in the
previous step. The active directory can be in an On Premise Server or it can be in a
virtual machine hosted in azure.

In my existing configuration I have hosted SharePoint Services in Azure and I have set
up Azure Directory services in a virtual machine. In my case it is hosted in server
SP2019. Select Active directory domain and trusts from the server hosting active
directory.
Right click the root and select Properties.

This will open up the window where we can specify the UPN Suffix. Specify the Public
domain that we had registered earlier with Office 365 here. Click on Add.
Now head over to the Active Directory users and Computers.
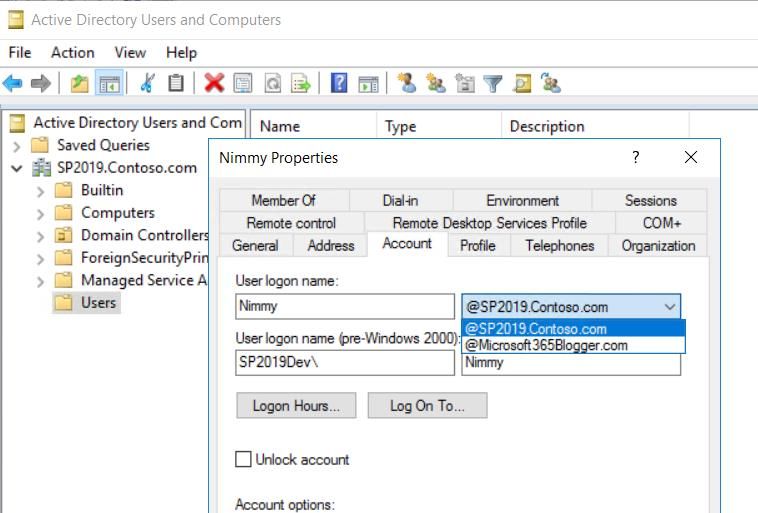
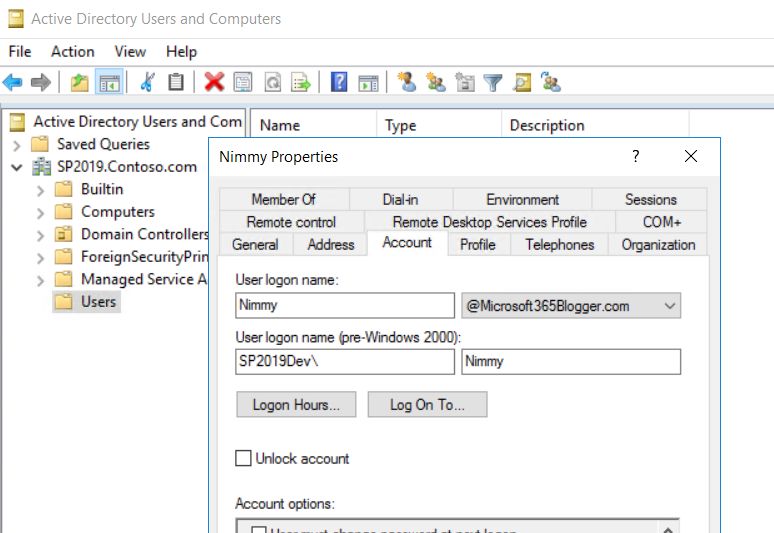
Update UPN for Single User

Select the user names that you would like to federate with cloud search. If the number
of accounts is small we can do it manually by editing the user logon name and updating
the new UPN. By default, as it opens up, it will show the existing local domain which is
SP2019.Contoso.com here

We have to change it to Microsoft365Blogger.com. Click on Apply.
Update UPN for Multiple users

However if there are multiple users, doing it manually for each user is cumbersome. In
such a case we can use PowerShell. Spin up PowerShell as administrator and run the
below command which will give us the users in the domain and their details

Get-ADUser -filter *

As you can see, the UPN of the AD Users are currently SP2019.Contoso.com.
Run the below script to get the distinguished name of the domain controller which we will
need to use in the PowerShell script.

Get-ADComputer $env:COMPUTERNAME | Get-ADPrincipalGroupMembership
Run the below script to change the existing UPN (SP2019.Contoso.com) to the new
UPN (Microsoft365Blogger.com). The below script will fetch each user from the current
domain and replace the UPN with a new value using the Set-ADUser command.

Import-Module ActiveDirectory

$existingUPNSuffix = "SP2019.Contoso.com"

$newUPNSuffix = "Microsoft365Blogger.com"

$DN = "DC=SP2019,DC=Contoso,DC=com"

$ADServer = "SP2019.SP2019.Contoso.com"

Get-ADUser -SearchBase $DN -filter * -properties UserPrincipalName | where
UserPrincipalName -ne $null | ForEach-Object {

$newUPN = $_.UserPrincipalName.Replace($existingUPNSuffix,$newUPNSuffix)

$user = $_

$user.UserPrincipalName = $newUPN

Set-ADUser -Instance $user

}
Post running of the above script, let’s see if the UPN has changed. Run the Get-ADUser command to retrieve the users in the domain. Get-ADComputer $env:COMPUTERNAME | Get-ADPrincipalGroupMembership After running the script, the UPN has changed from SP2019.Contoso.com to Microsoft365Blogger.com. Fix Active Directory issues. Before synchronizing the active directory we have to make sure that the active directory is devoid of errors like duplicates and formatting issues. IdFix is a tool that identifies issues with the active directory identity objects and provides remediation measures to
overcome it. It can be downloaded from Microsoft site . Once it is downloaded, unzip the
file and run the IdFix tool.

Click on ‘Query’ option to start scanning of the Active Directory identity objects. You can
see the number of objects scanned and errors returned in the bottom section of the tool.

In case of any errors, it will list out the errors and the remediation measures that need to
be done. We can also get a verbose log file of the scan done by the IdFix tool in the
location where IdFix is placed. The log file will give a detailed scan report.
5. Sync Azure AD
Once the Active Directory is in a healthy state and assured to be devoid of identity object
issue, we can plan to sync the on premise active directory with Office 365. Now we really
don’t have to manually recreate the on premise user accounts in Office 365 as it is not
only double the work but also adds up the risk of duplicating user accounts. It is here
Directory Synchronization comes into play as it mirrors the on premise directory in Office
365.
We have two types of Active Directory Sync.
Directory Synchronization along with password synchronization: In this
synchronization technique, the user accounts (Directory) are migrated to office
365 along with their passwords. This means the user will have the same
password for On Premise environment as well as for Office 365. However the
user will have to authenticate separately when logging into On Premise and
Office 365 by providing the same credentials.
Directory Synchronization with Single Sign On (SSO): In this synchronization
mechanism the user logs in to the On Premise environment and when they go to
office 365 they are automatically logged in.
Directory Synchronization with Password Sync is the most common Active Directory
synchronization used. We can use Azure Active Directory Connect to implement On
Premise and Office 365 directory synchronization. We can download the Azure AD
Connect from Microsoft Site.
Once it is downloaded, run the installer file.This will spin up Azure Active Directory Connect Wizard. Accept the agreement and
proceed.
Here we have two options:
We can continue with Express settings, if we want to user Azure AD Connect to
synchronize the directories (On Premise with Office 365 along with Password
Synchronization.
Click on Customize to set up Directory Synchronization with Single Sign On.
In this walkthrough we will continue with Express settings.
This will start installing the required components in the local machine.The Office 365 Tenant admin will be the Azure AD Global Administrator. Specify the credentials below
Here you can see that in order to perform an azure ad sign in the UPN prefixes which we had added to the on premise Active directory should match with the verified public domain in azure (Microsoft365Blogger.com) So we have to ensure two things here: The public domain is added as UPN in the local on premise directory The public domain is added and verified in azure Once we have a verified domain listed, Click on Next.
Click on Install to start the synchronization process once Azure AD Connect installation
completes.
Finally the configuration has completed.
Head over to office 365 to check the synchronization status. All the On Premise users
have been added to Office 365 as part of the synchronization process.
6. Configure Cloud Hybrid Search
As part of configuring the search Service Application we have to perform two steps:
Create a Cloud Hybrid Search Service Application
Set up Cloud Hybrid OnboardingMicrosoft has provided two scripts that automate both these steps. You can get the script from here. Two scripts will be downloaded as shown below: Let’s head over to the server where we will be configuring the search Create Search Service Application from UI From Manage Service Applications page we can create the cloud search service application through UI.
It is quite similar to the process of creating a normal search service application, except
that we have to select an extra checkbox ‘Cloud Search Service Application’ to make the
service application cater to cloud hybrid solution approach.
Though we can create the Service Application through UI, Search service creation and
management is more stable when done through PowerShell. This is mainly due to the
fact that, as per my personal experience, configuring search through UI sometimes takes
longer and may even get stuck and never ends.

Create Cloud Search Service Application through PowerShell

In order to create the Cloud Search Service Application, ensure that you have
downloaded the script CreateCloudSSA.ps1 from here. Once you have the script
downloaded to the server, spin up SharePoint 2019 Management Shell as administrator.

Navigate to the location where you have stored the CreateCLoudSSA.ps1 script and run
it.

It will ask for a few parameters that need to be supplied for the script to continue
execution:
SearchServerName : Specify the SharePoint 2019 server where you are configuring the
Search Service(SP2019,in my case)

SearchServiceAccount: The Search service account in the format Domain\UserName
that will be used to configure search service(I have created a search service account by
the name SPFarmAccount)

SearchServiceAppName : The name of the Cloud Search Service Application

DatabaseServerName : The name of the database server in the SharePoint 2019 farm.

In case the Search Service Account is not added as a managed account, it will be
automatically added as a managed account by the script. If prompted add the
credentials of the Search Service Account.

The Cloud Search Service Application creation has started and this will take a few
minutes to complete.Once the Cloud Search Service Application is created, the next
major step is to activate the topology which is a bit of time consuming step.
Finally we will get the success message indicating that the cloud search service
application has been created.

Now if we go to the list of Service Application page, we can see the newly created Cloud
Search Service Application.

Clicking on it will take you to the Cloud Search Administration page where we can create
content sources and configure other search related settings.
The cloud search topology will be listed down in the same page. VM04-MINIROLE is the server where Search has been configured and the various search service components are activated. It will also add 4 databases in the SharePoint Database Server(VM02- SQL2016) as part of the Search Service Application creation. Search Service Components. As shown in the above Search Configuration setup, SharePoint Search architecture is made up of the below components. Crawl and content processing Index Query processing Search administration Analytics A successfully configured Search Service will have all the above components working in unison. Each of the components will have a database created in the SQL Server. On a high level, the crawl component is responsible for crawling the SharePoint content and collects the crawl properties which will in turn be sent to the content processing component. The content processing component receives the crawled properties, processes it and sends it to the Index Component.
The index component receives the processed items from the content processing component and writes it to the search index. At the same time, it is responsible for returning the results for a search query from the search index. When the user inputs a search query and presses enter, the query is processed by the Query Component and is submitted to the Index Component for data retrieval from search index. Search administration component performs the overall administration of Search like instantiating search service instance and related components. Image Source: Microsoft MSDN Connect your cloud Search service application to your Office 365 tenant In order to complete the cloud hybrid search set up we have to connect the recently created Cloud Search Service Application to the Office 365 tenant. Microsoft has provided a the script to automate the onboarding of the Cloud Search Service Application and Office 365 to Cloud Hybrid Search. You can get the script named Onboard-CloudHybridSearch.ps1 from here. However in order to run the script we have some prerequisites that needs to be completed. Download and install the below modules: Microsoft Online Services Sign-In Assistant for IT Professionals RTW Azure Active Directory Module for Windows PowerShell
Install Microsoft Online Services Sign-In Assistant

Firstly download Microsoft Online Services Sign-In Assistant.

Select the 64 bit version.Accept the agreement and click on Install.

This would complete the setup of Microsoft Online Services Sign-in Assistant.
Install Azure Active Directory Module
Azure active directory module provides cmdlets for Azure AD administrative tasks like
user and domain management
Install the Microsoft Azure Active Directory Module for Windows PowerShell with these
steps:
Open an elevated Windows PowerShell command prompt (run Windows
PowerShell as an administrator).
Run the Install-Module MSOnline command.
If prompted to install the NuGet provider, type Y and press ENTER.
If prompted to install the module from PSGallery, type Y and press ENTER
Run the Onboarding Script
In order to complete the onboarding of Cloud Search Service Application and Office 365
on to Cloud Hybrid Search, let’s go ahead and run the Onboard-CloudHybridSearch.ps1
script.It will ask for few parameters that we will have to input: Portal URL: Specify the SharePoint Online URL of the organization. Administrator Credentials: It will also ask for the Office 365 global administrator credentials If asked, enter the Cloud Search Service Application name. This will complete the Onboarding process and will register the cloud hybrid search.
7.     Create a content source to crawl for cloud hybrid search

As a final step in configuring the Cloud Hybrid search we have to create a content
source and run a full crawl in SharePoint On Premise Server. Clicking on the Cloud
Search Service Application will open up the Search Administration page. Select Content
Source in the left pane of the Search Administration page.
Click on Create New Content Source. This will open up the page where we can add the
start address of the content source that has to be crawled.

We can also specify the crawl schedules. We can set the schedules when the
incremental and full crawls will take place in the server.

Now let’s go ahead and run a full crawl.
Since this is the first time we are running the crawl, even if we click on incremental crawl,
a full crawl will take place and the time taken will depend upon the amount of content
within the content source.

Once the crawl has completed lets test the hybrid search scenario by going to
SharePoint Online and search for IsExternalContent:1 .This has listed search results
from SharePoint On Premise Server indicating a successful Hybrid Search
Configuration.
If we search for some terms , we can see that it fetches results from both Office 365 and On Premise

Reference: https://technet.microsoft.com/en-us/library/dn720906(v=office.16).aspx

        B.      Configure Hybrid One Drive for Business in SharePoint Server 2019

One Drive for Business is the document library that is available within the My Sites in
SharePoint Server 2019. So as to centrally store documents for sharing and
collaboration this document library can be used. Thus One Drive provides a central
repository for document collaboration.
If we click on One Drive option in the Navigation Bar it will take us to the One Drive Location within My Sites. However as part of the Hybrid Features in SharePoint Server 2019, we can redirect users to OneDrive for Business in Office 365 when they click OneDrive on the SharePoint 2019 navigation bar.
In this section we will see how to set up Hybrid One Drive for Business in Office 365 and
SharePoint 2019.
Before setting up Hybrid One Drive for SharePoint Server 2019 we have to ensure that
Office 365 environment is configured for Hybrid setup.
Ensure that the required services are up and running in SharePoint Server.
1. Office 365 Prerequisite Configurations
The Configurations that has to be done in Office 365 side is already covered in previous
section(Cloud Hybrid Search) as shown below:
A public domain has been registered with Office 365 (Refer here for the
implementation).
A UPN prefix that matches the public domain has been added to the Local AD
(Refer here for implementation).
An Active Azure Subscription is available (Refer here to see how to get $25 free
Azure credits every month).
Office 365 AD is manageable from Azure
Synchronize Local Active Directory with Office 365
2. SharePoint Server 2019 Prerequisite Configurations
As part of setting up the prerequisites in SharePoint Server 2019 we will have to ensure
the successful provisioning of:
Managed Metadata service application
User Profile Service application
My Sites
App Management Service Application
Subscription Setting Service
Setup Synchronization connection with Active Directory Services
We will cover the SharePoint Side Configurations in this section.
3. Provision Managed Metadata Service Application
As the first step to configure SharePoint Server 2019 environment we have to create the
managed metadata service application from the Manage Service Applications page.Enter the service application name, Database Server, Database name and Application Poo that will be used with the Service Application. Clicking on OK will start provisioning the Managed Metadata Service Application
4.      Setting up My Sites

In order to set up My Sites we can create a new web application that will host the sites. It
can either use a separate application pool or use a stand-alone one. There are no extra
settings that have to be done during the web application creation. The default settings
are good enough. From the web application creation page, create a new web
application. Provide the IIS Site name, Port number, Application Pool, Database server
and Database name.
Click on OK. This will start provisioning the web application.

Once the Web Application is created, click on the ‘Create Site Collection’ option.
This will provide the option to create the site collection that will hold the My Sites.
Specify the site collection name and select the template “My Site Host” from Enterprise
tab.
This will complete the creation of the My Site, Site collection at http://vm03-
sp2016:25000/

Once you have the My Site Web Application and Site collection in place ensure that you
create a managed path for the sites. In order to do that head over to the web application
that was created recently and select Managed Paths

Add the managed path personal in the text box and select Wild card inclusion from the
type drop down. Click on OK. This will create a managed path in the web application
under which all the My Sites will be created in the future.
5.     Setting up User Profile Service Application

We can provision the user profile service application from the Manage Service
Applications Page.

Once the User Profile Service Application is selected, it will provide the page where we
can specify the Service Application Name, Application Pool, Application Pool Account,
Database Server and Database Name.

Specify the My Site Host URL that was created earlier and leave the My Site Managed
Path as /Personal. This is the managed path which we had created in the earlier step.
Click on OK. This will complete the provisioning of the user Profile Service Application.
6.     Provision App Management Service Application

The next service application that has to be set up is the App Management Service
Application. Head over to the Manage Service Applications page and from the New drop
down select App Management Service.

This will open up the page where we can specify the App Management Service
Application Name, Database server, Database Name, Application Pool and the
Application Pool account.
Click on OK to start the provisioning of the Service Application.

This will create the App Management Service Application.

              7.      Provision Subscription Settings Service Application

The last service application that has to be created is the Subscription Settings Service
Application. This cannot be created directly from the Central Administration and has to
be provisioned using PowerShell. To do that, spin up SharePoint 2019 Management
Shell as Administrator.

Ensure that you have a managed account in place. Run the below commands to
provision the Subscription settings service application.
$account = Get-SPManagedAccount "SP2019Dev\SPFarmAccount" $appPool = New-SPServiceApplicationPool -Name 'Subscription Service Application Pool' -Account $account $SubscriptionSvcApp = New-SPSubscriptionSettingsServiceApplication -ApplicationPool $appPool -Name 'Subscription Settings Service Application' -DatabaseName 'SubscriptionSettings_ServiceDB' $SubscriptionSvcproxy = New-SPSubscriptionSettingsServiceApplicationProxy - ServiceApplication $SubscriptionSvcApp This will provision the Subscription Settings Service Application. Now we have to enable the Subscription Settings Service. From System Settings select Manage Services in this farm.
This will list all the Services available within the farm. By default Microsoft SharePoint
Foundation Subscription Settings Service is disabled in the farm. Change it to Yes to
provision the service.

              8.      Configure Synchronization Connection

In order to set up Hybrid One Drive we have to create a synchronization connection with
Active Directory Domain Services for the User Profile Service Application. In order to do
that, head over to the Manage User Profile Service Application and select Configure
Synchronization Connections option.

Click on Create New Connection to set up a new Synchronization Connection.
Specify the connection name and Select the type as Active Directory Import. Mention the Connection string which will be the Full Qualified Domain Name. Leave the Authentication Provider Type as Windows Authentication. Account Name and Password has to be the credentials of the Domain Administrator.
Click on Populate Containers. This will populate the Domain Objects. Select the Users
node and click on OK. This will complete the setting up of the Synchronization
connection.

             9.     Verify the User Properties before running Synchronization

Now let’s head over to the Manage user Properties option from the People tab. We have
to verify the User Profile Properties before running the synchronization connection.
We will check for User Principal Name and Work Email. User Profile Name should be mapped to userPrincipalName and Work Email should be mapped to mail. However the mapping property is blank as shown below. So let’s add the mapping for User Principal Name. Select Edit. In the attribute text box specify the mapping “userPrincipalName” and click on Add. The new mapping has come up in the page.
Similarly the Work Email mapping is missing. So edit that property as well.

Add the mapping mail in the attribute text box and click on Add.

Thus we can see both the properties have been mapped.
10.    Start Profile Synchronization

The user profile property mappings have been verified. Now we have to synchronize the
UPN domain suffix and email address that we configured in Active Directory Domain
Services. In order to do that, select the Start Profile Synchronization option from the
Synchronization tab.
Select “Start Incremental Synchronization” and Click on OK.

To the right of the Manage Profile Service Page you can see the Synchronization
Settings summary.

Configure Hybrid One Drive
Click on Enable Hybrid Experience to launch the Hybrid configuration wizard

The wizard will connect Office 365 with On Premise SharePoint Server

Specify the credentials to make the connection with Office 365 and SharePoint Server.
Once Successfully validated, Click on next.
It will do a prerequisite check and proceed to the page where we can specify the hybrid features that
needs to be configured
For the time being, we will select the below features to be configured between Office 365 and
SharePoint Server
Hybrid One Drive
Hybrid Sit4es
Hybrid Business Sites
Hybrid App Launcher
Hybrid Self Service Site Creation will be done down the line after this configuration. Click on Next to
start with the configuration.It has started to configure the hybrid features.
Let’s test the One Drive for Business redirect by clicking on the One Drive link.

This will take us to the Office 365 Login page. Once authenticated, we can work on the
Office 365 One Drive.

References: https://technet.microsoft.com/en-us/library/mt147425(v=office.16).aspx

Thus we have successfully configured Hybrid features between Office 365 and
SharePoint Server. Now lets test the Hybrid Team Sites Feature
C.     Configure SharePoint Hybrid Team Sites

SharePoint Hybrid Team Sites provides an extensible app launcher in SharePoint 2019
which integrates tile in Office 365 to On Premise App Launcher. It also redirects the
users to Office 365 Team Sites upon clicking the SharePoint On Premise Sites button in
the suite bar.

This has been configured along with One Drive in the Previous section. So lets test how
it works.

              1.     Test Hybrid Site Features

Now let’s head over to the SharePoint Server site and test out the hybrid features. Click
on SharePoint to test the Hybrid Site functionality.

This will take you to the Office 365 Team sites page ensuring successful configuration.
D Extensible App Launcher In addition to that if you check the suite bar , if there are some customization like logo that were added to Office 365, it will also be synchronized with SharePoint Server. By default only Newsfeed, OneDrive and Sites tiles are present in SharePoint Server App Launcher.
But after hybrid configuration we get an extensible App Launcher with Delve and Video
Integration.

Reference: https://technet.microsoft.com/en-us/library/mt346110(v=office.16).aspx

IV.    Summary

Thus we had a walkthrough over the newly introduced/enhanced features of SharePoint
Server 2019.
You can also read