PowerShell Interface Description - UPDATED: 25 March 2019 - KEMP Technologies
←
→
Page content transcription
If your browser does not render page correctly, please read the page content below
PowerShell
Interface Description

UPDATED: 25 March 2019
PowerShell

     Copyright Notices

     Copyright © 2002-2019 Kemp Technologies, Inc. All rights reserved. Kemp Technologies and the
     Kemp Technologies logo are registered trademarks of Kemp Technologies, Inc.

     Kemp Technologies, Inc. reserves all ownership rights for the LoadMaster and Kemp 360 product
     line including software and documentation.

     Used, under license, U.S. Patent Nos. 6,473,802, 6,374,300, 8,392,563, 8,103,770, 7,831,712, 7,606,912,
     7,346,695, 7,287,084 and 6,970,933

     kemp.ax                                2         Copyright 2002-2019, Kemp Technologies, All Rights Reserved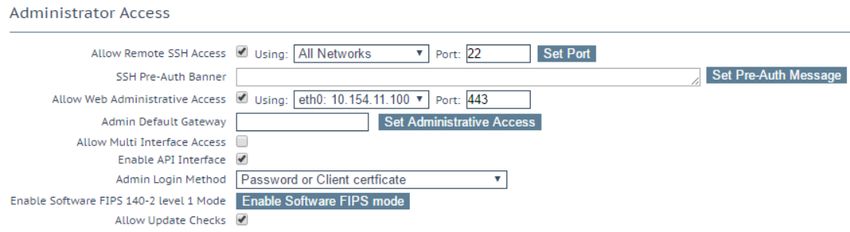
PowerShell

     Table of Contents
        1 Introduction                                                                                                  5

          1.1 Document Purpose                                                                                          5

          1.2 Intended Audience                                                                                         5

          1.3 Prerequisites                                                                                             5

        2 Windows PowerShell                                                                                            6

          2.1 Installing the Kemp PowerShell Module                                                                     6

          2.2 Importing the Certificate                                                                                 7

          2.3 Using the Get-Help Command                                                                                8

          2.4 Authenticating to the LoadMaster                                                                          8

               2.4.1 Configure Certificate-Based Authentication                                                         9

                 2.4.1.1 Enable Session Management                                                                      9

                 2.4.1.2 Create a User (If Needed)                                                                 10

                 2.4.1.3 Enable Client Certificate Authentication on the LoadMaster                                10

                 2.4.1.4 Generate and Download the Client Certificate                                              12

                 2.4.1.5 Create the PFX File                                                                       13

                 2.4.1.6 Import the PFX File into the Microsoft Management Console (if using Windows)              14

                 2.4.1.7 Specify the Certificate Details in the API                                                22

          2.5 Object Structure                                                                                     23

               2.5.1 Errors                                                                                        25

          2.6 Initially Configure a LoadMaster Using PowerShell API Commands                                       26

               2.6.1 Licensing Cloud LoadMasters                                                                   27

               2.6.2 Initial Configuration Commands List                                                           27

               2.6.3 Accept the EULAs                                                                              28

               2.6.4 Retreive the Available Licenses (optional)                                                    30

     kemp.ax                                   3          Copyright 2002-2019, Kemp Technologies, All Rights Reserved
PowerShell

                 2.6.4.1 Example without Specifying an Order ID                                                   31

                 2.6.4.2 Example with a Valid Order ID                                                            32

                 2.6.4.3 Example with an Invalid (Undefined) Kemp ID                                              33

                 2.6.4.4 Retreive License Types when using Local Licensing Functionality                          33

               2.6.5 License the LoadMaster                                                                       33

                 2.6.5.1 Online Licensing Example                                                                 34

                 2.6.5.2 Offline Licensing Example                                                                35

               2.6.6 Set the Initial Password for the LoadMaster                                                  35

               2.6.7 Retreive the License Details (optional)                                                      35

               2.6.8 Update a LoadMaster License                                                                  36

          2.7 Code Snippet Examples                                                                               36

               2.7.1 Initialize the LoadMaster Connection Parameters                                              36

               2.7.2 Enable the API                                                                               37

               2.7.3 Add a New Virtual Service                                                                    37

               2.7.4 Modify a Virtual Service                                                                     39

               2.7.5 Add a Real Server to a Virtual Service                                                       42

               2.7.6 Modify a Real Server and Retrieve Settings                                                   43

               2.7.7 Upload a Template                                                                            44

               2.7.8 Create a Virtual Service using a Template                                                    44

          2.8 Known Issues with Beta PowerShell Wrapper                                                           47

        References                                                                                                48

        Last Updated Date                                                                                         49

     kemp.ax                                    4        Copyright 2002-2019, Kemp Technologies, All Rights Reserved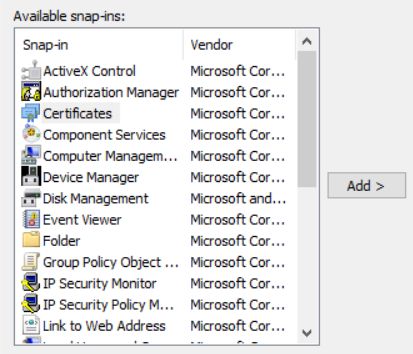
PowerShell
1 Introduction

       1 Introduction
       PowerShell is a scripting language developed by Microsoft to enable automation of administrative
       tasks. The LoadMaster PowerShell wrapper enables direct access to the LoadMaster Application
       Program Interface (API) from PowerShell to simplify automation of configuration, deployment and
       lifecycle management of LoadMaster instances.

       Kemp products optimize web and application infrastructure as defined by high-availability, high-
       performance, flexible scalability, security and ease of management. They minimize the total cost-
       of-ownership for web infrastructure, while enabling flexible and comprehensive deployment
       options.

       1.1 Document Purpose
       This document provides some information on how to import the Kemp PowerShell module, how to
       enable the API interface on the LoadMaster and how to use the Get-Help command to retrieve help
       text relating to the various commands and parameters that can be used.

       1.2 Intended Audience
       This document is intended to help anyone who wishes to configure or interface to the Kemp
       LoadMaster using Windows PowerShell commands.

       1.3 Prerequisites
       For the PowerShell API to work with the LoadMaster, the following prerequisites must be met:

            l    Either TLS1.1 or TLS1.2 must be enabled in the LoadMaster WUI Settings. These are enabled
                 by default. SSLv3 and TLS1.0 are unsupported with the PowerShell API. To set the Supported
                 TLS Protocols, go to Certificates & Security > Admin WUI Access and select the check boxes
                 provided.
            l    The API interface must be enabled on the LoadMaster. To enable it – go to Certificates &
                 Security > Remote Access and tick the Enable API Interface check box or enable the
                 API programmatically using the Enable-SecAPIAccess command. If you license the
                 LoadMaster using the API, the API interface gets automatically enabled.
            l    PowerShell version 5 or above is recommended.
            l    A WUI Cipher set other than Null_Ciphers must be selected in Certificates & Security > Admin
                 WUI Access.

       kemp.ax                                  5         Copyright 2002-2019, Kemp Technologies, All Rights Reserved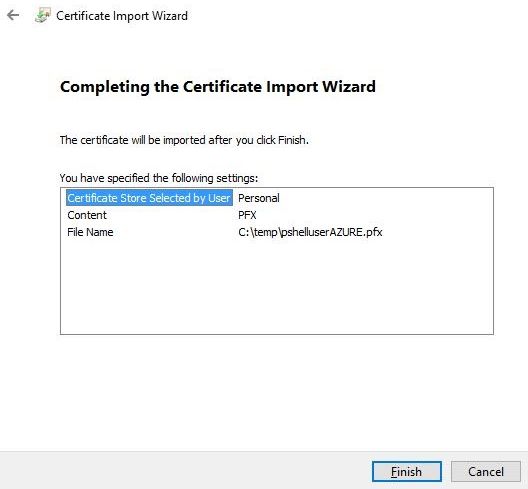
PowerShell
2 Windows PowerShell

       2 Windows PowerShell
       Companies are focusing on the internal changes necessary to enable their organization to scale
       efficiently in line with growth. Working more quickly and efficiently means managing and
       protecting a greater number of devices, applications, systems and identities. IT departments are
       using automation frameworks to meet that challenge.

       PowerShell is an automation platform and scripting language for Windows and Windows Server.
       Kemp have had a PowerShell module since 2013. It simplifies the management of systems and is
       key to enabling IT departments to adopt automation in dynamic environments. In PowerShell,
       administrative tasks are generally performed by cmdlets, which are specialized .NET classes
       implementing particular operations. Kemp’s PowerShell cmdlet improvements in our 7.2.39 release,
       are an enhancement for companies on an automation path, especially for automating your Kemp
       LoadMaster family of products.

       2.1 Installing the Kemp PowerShell Module
       Download the Kemp PowerShell module from the Kemp Documentation page,
       https://kemptechnologies.com/loadmaster-documentation/. Unzip the files.

       The module contains the following files within the Kemp.LoadBalancer.Powershell folder:

          Kemp.LoadBalancer.Powershell.psd1

          Kemp.LoadBalancer.Powershell.psm1

          deprecated.psm1

          Kemp.LoadBalancer.Powershell-Help.xml

       Copy the Kemp.LoadBalancer.Powershell folder to the relevant folder.

       Install the module in a folder that is available in PSModulePath ($Env:PSModulePath).

       If PSModulePath does not contain the module folder value, add the module path to the in
       PSModulePath environment variable. The module path can be for the current user only or for all
       users. Recommended values are:

          $home\Documents\WindowsPowerShell\Modules for the current User

          $Env:ProgramFiles\WindowsPowerShell\Modules for All Users

       For example, install the Kemp PowerShell module for the current user only:

      kemp.ax                               6         Copyright 2002-2019, Kemp Technologies, All Rights Reserved
PowerShell
2 Windows PowerShell
# Save the current value of PSModulePath
$mpath = [Environment]::GetEnvironmentVariable("PSModulePath")
# Add the new path to the $mpath variable
$ mpath +=
";$home\Documents\WindowsPowerShell\Modules\Kemp.LoadBalancer.Powershell"
# Add the paths in $currValue to the PSModulePath value.
[Environment]::SetEnvironmentVariable("PSModulePath", $currValue)
Import the module to start using it:
Import-Module Kemp.LoadBalancer.Powershell
Get-Module Kemp.LoadBalancer.Powershell
ModuleType Version Name ExportedCommands
---------- ------- ---- ----------------
Script 7.2.39.0 Kemp.LoadBalancer.Powershell {Add-BondedInterface, A...
For the PowerShell commands to work, the API interface must
be enabled on the LoadMaster. To enable it using the Web User
Interface (WUI), go to Certificates & Security > Remote Access
and select Enable API Interface.
You can test the connection to the load balancer by using the Test-LmServerConnection command,
for example:
Test-LmServerConnection –ComputerName 10.11.0.60 –Port 443 -Verbose
To retreive a list of available commands, run the following command:
Get-Command -Module Kemp.LoadBalancer.Powershell
To retrieve the build number of the PowerShell module, run the following command:
(Get-Module Kemp.LoadBalancer.Powershell).ReleaseNotes
2.2 Importing the Certificate
As of LoadMaster version 7.2.36 the PowerShell module is signed. Depending on your execution
policy, you may need to import the Kemp PowerShell certificate to allow execution. When you
download the module from the Kemp website to obtain the following files:
Kemp.LoadBalancer.Powershell-Help.xml
Kemp.LoadBalancer.Powershell.psd1
Kemp.LoadBalancer.Powershell.psm1
kemp-cert.cer
symantec-ca-cer
kemp.ax 7 Copyright 2002-2019, Kemp Technologies, All Rights ReservedPowerShell
2 Windows PowerShell
symantec-int.cer
Perform the following steps:
1. Double-click the symantec-ca.cer file and install it in Trusted Root Certification
Authorities.
2. Double the symantec-int.cer file and install it in Trusted Root Certification Authorities.
3. Confirm the installation by clicking OK when requested.
4. Double click the kemp-cert.cer and install it in Trusted Publishers.
5. Set the execution policy to AllSigned. For example, Set-ExecutionPolicy –ExecutionPolicy
AllSigned –Scope CurrentUser.
Alternatively, you could adjust your execution policy to one that is less restrictive.
2.3 Using the Get-Help Command
To retrieve help text for a particular command, run the Get-Help command, followed by a
command name, for example:
Get-Help Set-VirtualService
Different parameters can be specified to retrieve more detailed help text:
-Detailed: Provides further detailed help, including a list of parameters and their descriptions.
-Examples: Provides an example command and example output.
-Full: Provides all of the help text for the specified command.
For example:
Get-Help Set-VirtualService –Full
2.4 Authenticating to the LoadMaster
To run PowerShell API commands, you need to establish authentication with the LoadMaster.
There are two ways to establish authentication:
l Using credentials; a LoadMaster username (Credential) and password
l Using certificate-based authentication
Whichever option you use, you can either specify the parameters when running individual
commands, or using the Initialize-LmConnectionParameters command.
kemp.ax 8 Copyright 2002-2019, Kemp Technologies, All Rights ReservedPowerShell
2 Windows PowerShell
You can also globally set the Kemp LoadMaster IP address that you are directing the commands to
by using the Initialize-LmConnectionParameters command, for example:
Initialize-LmConnectionParameters -Address 10.11.0.60 -LBPort 443 -Credential bal -Verbose
You can either enter a username for the load balancer or provide a PSCredential object. When you
enter a username, a prompt appears asking for the password. You can override the globally-
provided LoadBalancer address and User Name on each individual command by using the
LoadBalancer or Credential parameter within the command.
Similarly, you can specify the details to use certificate-based authentication using the Initialize-
LmConnectionParameters command. For further information on the various steps involved to
configure certificate-based authentication, refer to the below section.
2.4.1 Configure Certificate-Based Authentication
Follow the steps in the sections below to configure certificate-based authentication.
2.4.1.1 Enable Session Management
You must enable Session Management before you can enable client certificate authentication. To
enable Session Management, follow the steps below:
1. In the main menu of the LoadMaster WUI, navigate to Certificates & Security > Admin
WUI Access.
2. Select the Enable Session Management check box.
Once this check box is selected, the user is required to log in to
continue using the LoadMaster.
3. Configure any other settings as needed.
The default state for the Require Basic Authentication check
box is disabled. When this option is disabled, both certificate
and credential-based remote access are available. If the check
box is enabled, only credentials are valid for remote access.
kemp.ax 9 Copyright 2002-2019, Kemp Technologies, All Rights ReservedPowerShell
2 Windows PowerShell
2.4.1.2 Create a User (If Needed)
It is not possible to use certificate-based authentication with the bal user. However, you can
create a non-bal user and grant it All Permissions, or whatever permissions you want. If you do not
already have another user created, you can add one by following these steps:
1. In the main menu of the LoadMaster WUI, expand System Configuration > System
Administration and click User Management.
2. At the bottom of the screen, enter a username in the User text box.
3. At this point, you can either set a Password for the new user, or select the No Local
Password check box.
For further information on the No Local Password option, and
on certificate authentication in general, refer to the User
Management, Feature Description.
4. Click Add User.
2.4.1.3 Enable Client Certificate Authentication on the LoadMaster
A number of different login methods are available to enable. For steps on how to set the Admin
Login Method, along with a description of each of the available methods, refer to the steps below:
1. In the main menu of the LoadMaster WUI, expand Certificates & Security and click
Remote Access.
2. Select the relevant Admin Login Method.
kemp.ax 10 Copyright 2002-2019, Kemp Technologies, All Rights ReservedPowerShell
2 Windows PowerShell
Using local certificates will only work with API authentication.
Because of this, it might be best to select the Password or
Client certificate option. This will allow API access using the
client certificate and WUI access using the username/password.
The following login methods are available:
Password Only Access (default): This option provides access using the username and password
only – there is no access using client certificates.
Password or Client certificate: The user can log in either using the username/password or using
a valid client certificate. If a valid client certificate is in place, the username and password is
not required.
The LoadMaster asks the client for a certificate. If a client certificate is available, the
LoadMaster checks for a match. The LoadMaster checks if the certificate is a match with one of
the local certificates, or checks if the Subject Alternative Name (SAN) or Common Name (CN) of
the certificate is a match. The SAN is used in preference to the CN when performing a match. If
there is a match, the user is granted access to the LoadMaster. This works both using the API
and user interface.
An invalid certificate will not allow access.
If no client certificate is supplied, the LoadMaster will expect that a username and password is
supplied (for the API) or will ask the user to enter a password using the standard WUI login
page.
Client certificate required: Access is only allowed using the use of a client certificate. It is not
possible to log in using the username and password. SSH access is not affected by this (only
the bal user can log in using SSH).
Client certificate required (Verify via OCSP): This is the same as the Client certificate required
option, but the client certificate is verified using an OCSP service. You must configure the OCSP
Server Settings for this to work. For further information on the OCSP Server Settings, refer to
the DoD Common Access Card Authentication, Feature Description.
Some points to note regarding the client certificate methods are below:
The bal user does not have a client certificate. Therefore, it is not possible to log into the
LoadMaster as bal using the Client certificate required methods. However, a non-bal user can
be created and granted All Permissions. This will allow the same functionality as the bal user.
There is no log out option for users that are logged in to the WUI using client certificates, as it
is not possible to log out (if the user did log out the next access would automatically log them
kemp.ax 11 Copyright 2002-2019, Kemp Technologies, All Rights ReservedPowerShell
2 Windows PowerShell
back in again). The session terminates when the page is closed, or when the browser is
restarted.
2.4.1.4 Generate and Download the Client Certificate
To generate a local certificate, follow the steps below:
Users with User Administration permissions are able to manage
local certificates for themselves and other users.
1. In the main menu of the LoadMaster WUI, navigate to System Configuration > System
Administration > User Management.
2. Click Modify on the relevant user.
3. Enter a Passphrase and click Generate.
Entering a passphrase is optional. If a passphrase is entered it
gets used to encrypt the private key.
kemp.ax 12 Copyright 2002-2019, Kemp Technologies, All Rights ReservedPowerShell
2 Windows PowerShell
4. Click OK to the pop-up message that appears.
5. Click Download.
You can also regenerate from this screen.
2.4.1.5 Create the PFX File
When you generate a certificate, as described in the section above, the LoadMaster creates a .pem
file. For certificate-based authentication to work with PowerShell, a .pfx file is required.
You can convert the .pem file to .pfx any way you like. For the purposes of this document, we have
provided steps on how to do it using OpenSSL. If you are using Windows, you may need to install
OpenSSL to run these steps.
To create a .pfx file using, follow the steps below:
1. Open the .pem certificate.
2. Copy from the start of the -----BEGIN CERTIFICATE----- section to the end of the -----END
CERTIFICATE----- section.
3. Paste this text into a new file.
4. Save the file as .cer.
5. Go to the .pem certificate file again.
6. Copy from the start of the -----BEGIN RSA PRIVATE KEY----- section to the end of the -----
END RSA PRIVATE KEY----- section.
7. Paste this text into a new file.
8. Save the file as .key.
9. Use the openssl command to create the .pfx file:
openssl pkcs12 -export -out .pfx -inkey .key -in
.cer
10. Import the certificate to the web browser.
kemp.ax 13 Copyright 2002-2019, Kemp Technologies, All Rights ReservedPowerShell
2 Windows PowerShell
2.4.1.6 Import the PFX File into the Microsoft Management Console (if using Windows)
If you are using Windows, follow the steps below to import the .pfx file into the Microsoft
Management Console:
11. Click Start and type mmc.exe.
12. Click mmc.exe to open the Microsoft Management Console.
13. Click File and select Add/Remove Snap-in.
kemp.ax 14 Copyright 2002-2019, Kemp Technologies, All Rights ReservedPowerShell
2 Windows PowerShell
14. Select Certificates on the left and click Add.
kemp.ax 15 Copyright 2002-2019, Kemp Technologies, All Rights ReservedPowerShell
2 Windows PowerShell
15. Ensure that My user account is selected and click Finish.
16. Click OK.
17. Double-click Certificates – Current User.
kemp.ax 16 Copyright 2002-2019, Kemp Technologies, All Rights ReservedPowerShell
2 Windows PowerShell
18. Double-click Personal.
19. Double-click Certificates.
20. Right-click on any white space in the middle panel, select All Tasks and click Import.
kemp.ax 17 Copyright 2002-2019, Kemp Technologies, All Rights ReservedPowerShell
2 Windows PowerShell
21. Click Next.
kemp.ax 18 Copyright 2002-2019, Kemp Technologies, All Rights ReservedPowerShell
2 Windows PowerShell
22. Click Browse.
23. Browse to the location of the .pfx file to be imported.
24. Select All Files in the drop-down menu in the bottom-right.
25. Double-click the .pfx file.
kemp.ax 19 Copyright 2002-2019, Kemp Technologies, All Rights ReservedPowerShell
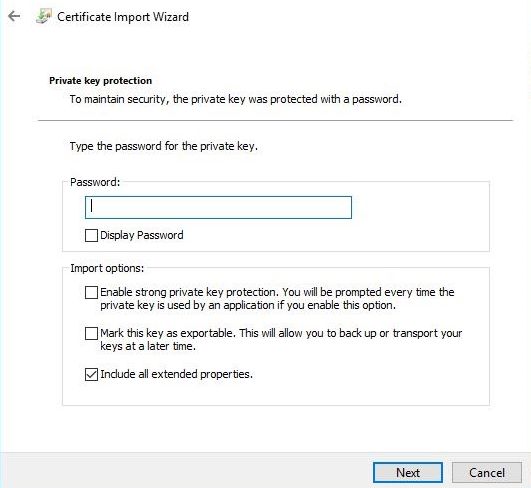
2 Windows PowerShell
26. Enter the Password (if necessary).
27. Click Next.
kemp.ax 20 Copyright 2002-2019, Kemp Technologies, All Rights ReservedPowerShell
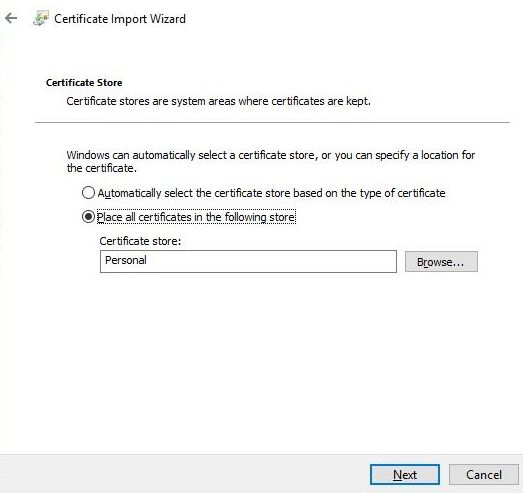
2 Windows PowerShell
28. Click Browse and select the Personal certificate store.
29. Click Next.
kemp.ax 21 Copyright 2002-2019, Kemp Technologies, All Rights ReservedPowerShell
2 Windows PowerShell
30. Review the settings and click Finish.
2.4.1.7 Specify the Certificate Details in the API
After configuring all of the options as outlined in the above sections, you need to specify the details
of the certificate to run the API commands successfully. You can either do this using the Initialize-
LmConnectionParameters command or in individual commands when they are run. The two
parameters related to certificate-based authentication are:
SubjectCN: This parameter is mandatory if you want to use certificate-based authentication.
This is the certificate Common Name (CN). This is the username of the LoadMaster user that the
certificate was generated for. If you do not specify the CertificateStoreLocation, the certificate
is searched for in the /My location.
CertificateStoreLocation: This parameter is optional. If you do not use it, the cmdlet searches
for the certificate in the /My location (default). If the CertificateStoreLocation
kemp.ax 22 Copyright 2002-2019, Kemp Technologies, All Rights ReservedPowerShell
2 Windows PowerShell
parameter is set, the API searches for the certificate in the specified location, for example
Cert:\\TrustedPeople
2.5 Object Structure
Before version 7.2.39.0.334 of the Kemp PowerShell wrapper, the output format did not have a
defined standard - each commandlet had variable structure and output.
In the 7.2.39.0.344 version of the wrapper, improvements were made to the output structure. All
commands (except Test-LmServerConnection) return a PowerShell object with the following
structure:
The Test-LmServerConnection command returns True if the
LoadMaster is reachable by the API, False if not (or if the API
interface is disabled on the LoadMaster).
ReturnCode (integer)
Response (string)
Data (PowerShell object, if any)
As a result of the new object structure, the current Kemp
PowerShell wrapper is not compatible with scripts written
based on an older version of the Kemp PowerShell wrapper
(before version 7.2.39.0.344).
The possible values for the ReturnCode field are:
200: The command completed successfully
4xx/500: The command ended with an error. The error code depends on the error type.
The possible values for the Response field are:
Command successfully executed
Description of the error when the command fails, for example Unknown parameter value
lmversion.
The Data field contains the response, if any. The structure of this field depends on the command.
The elements of this field can be accessed using the “dot” notation. If the command fails, this field
is empty.
Example 1: Retreive the installed LoadMaster firmware version:
kemp.ax 23 Copyright 2002-2019, Kemp Technologies, All Rights ReservedPowerShell
2 Windows PowerShell
$lma = Get-LmParameter -Param version -LoadBalancer 172.21.59.189 -SubjectCN
user1
$lma | Format-List
ReturnCode : 200
Response : Command successfully executed.
Data : @{version=7.2.39.0}
$lma.Data.version
7.2.39.0
Example 2: Retreive the available licenses for a specific Order ID:
$licDet = Get-LicenseType -KempId jbloggs@kemptechnologies.com -Password
ExamplePassword -LoadBalancer 172.21.59.85 -Credential bal -OrderId
Example20170517
$licDet | Format-List
ReturnCode : 200
Response : Command successfully executed.
Data : @{License=System.Object[]}
$licDet.Data.License
id : 0632b88b577c71591798268bcd4e01132f082309
name : VLM-5000 ESP GEO with Basic 2 Years
available : 1
description : VLM-5000 ESP GEO with Basic 2 Years
tethered : False
LicenseStatus : Permanent License
BuyMoreAt : https://www.kemptechnologies.com/buy-me-now?KempID=
jbloggs@kemptechnologies.com
id : fc488d991cffb7a5958625427d6bfb0b3edc008e
name : VLM-5000 WAF GEO with Basic 3 Years
available : 1
description : VLM-5000 WAF GEO with Basic 3 Years
tethered : False
LicenseStatus : Permanent License
BuyMoreAt : https://www.kemptechnologies.com/buy-me-now?KempID=
jbloggs@kemptechnologies.com
name : VLM-5000 with Enterprise Plus subscription
available : 1
tethered : 0
kemp.ax 24 Copyright 2002-2019, Kemp Technologies, All Rights ReservedPowerShell
2 Windows PowerShell
id : 3eb92178611573946b422cf8d0df69d04c07fede
LicenseStatus : Temp License
description : VLM-5000 with Enterprise Plus subscription
BuyMoreAt : https://www.kemptechnologies.com/buy-me-now?KempID=
jbloggs@kemptechnologies.com
In the above example, the $licDet.Data.License is an array and each single element of the array
can be accessed using the “[]” notation. For example, to access the field name of the second
element of the previous array we have to use the following notation: $licDet.Data.License[1].name.
The index of the array starts from 0. The NULL object is returned if we try to access a non-existing
element.
The benefits of the structure of the command answers are:
It is easy to check for success/error (ReturnCode)
There is a short description (Response)
The Data field returns a PowerShell object when successful and null when there is an error
2.5.1 Errors
If the error is a functional one (for example using the wrong credentials, parameter value or
LoadMaster IP address) the cmdlet returns a PowerShell object, as described, with a ReturnCode
containing the code of the error and with Response containing the description of the error that has
occurred.
For example: Try to get the firmware version installed on the LoadMaster using an invalid
certificate (installed in the Windows machine but not belonging to any user inside the LoadMaster):
$lma = Get-LmParameter -Param version -LoadBalancer 172.21.59.85 -SubjectCN
user1
$lma
ReturnCode Response Data
---------- -------- ----
401 The remote server returned an error: (401) Unauthorized.
If the error is due to a wrong/missing mandatory input, the cmdlet throws an exception. These
types of errors do not return a ReturnCode because an exception has been thrown. The execution
of the command is halted.
For example: Get the firmware version installed on the LoadMaster using a certificate not installed
in the Windows machine:
$lma = Get-LmParameter -Param version -LoadBalancer 172.21.59.189 `
-SubjectCN
invalidcertificate
kemp.ax 25 Copyright 2002-2019, Kemp Technologies, All Rights ReservedPowerShell
2 Windows PowerShell
ERROR: Can't find a certificate with "invalidcertificate" as CN in the default
Cert:\CurrentUser\My store.
At
C:\Users\ExampleUser\Work\Kemp.LoadBalancer.Powershell\Kemp.LoadBalancer.Powershell.psm1:
273 char:5
+ Throw $errStr
+ ~~~~~~~~~~~~~
+ CategoryInfo : OperationStopped: (ERROR: Can't fi...tUser\My
store.:String) [], RuntimeException
+ FullyQualifiedErrorId : ERROR: Can't find a certificate with "invalidcertificate"
as CN in the default Cert:\CurrentUser\My store.
For example: Get the firmware version installed on the LoadMaster without credentials/certificate:
$lma = Get-LmParameter -Param version -LoadBalancer 172.21.59.189
ERROR: login method param is empty. Credentials or SubjectCN must be specified.
At
C:\Users\ExampleUser\Work\Kemp.LoadBalancer.Powershell\Kemp.LoadBalancer.Powershell.psm1:
244 char:3
+ Throw $errStr
+ ~~~~~~~~~~~~~
+ CategoryInfo : OperationStopped: (ERROR: login me...t be
specified.:String) [], RuntimeException
+ FullyQualifiedErrorId : ERROR: login method param is empty. Credentials or
SubjectCN must be specified.
The connection drops if more than 30 calls are performed in
less than 3 seconds over all API interfaces.
2.6 Initially Configure a LoadMaster Using PowerShell API
Commands
Several steps are involved in initially deploying a LoadMaster, such as accepting the End User
License Agreement (EULA) and licensing the unit. Before the LoadMaster can be fully deployed, the
EULAs must be displayed and accepted. These initial configuration steps can either be performed
using the WUI or the API. The PowerShell API commands relating to initial configuration are in the
sections below.
These commands should be run in sequential order.
kemp.ax 26 Copyright 2002-2019, Kemp Technologies, All Rights ReservedPowerShell
2 Windows PowerShell
2.6.1 Licensing Cloud LoadMasters
The two main licensing models for cloud LoadMasters are pay-per-use and Bring Your Own License
(BYOL).
The Bring Your Own License (BYOL) model offers an alternative to the pay-per-use model. BYOL
licenses are perpetual licenses which can include feature subscriptions. To use BYOL licensing,
contact a Kemp representative to purchase a license. Then apply the license to the LoadMaster.
The pay-per-use licensing model enables you to pay for individual LoadMasters you need, for as
long as you need to use them. You only pay for the usage consumed, and once you stop using them
there are no additional costs or fees. Like BYOL subscription licenses, pay-per-use LoadMaster
instances offer many different options for bandwidth throughput and add-on services.
Pay-per-use cloud LoadMasters are “pre-licensed”. Therefore, the following commands are not
valid for pay-per-use LoadMasters: Read-LicenseEULA, Confirm-LicenseEULA, Confirm-LicenseEULA2
and Request-LicenseOnline. These commands are valid for BYOL cloud LoadMasters.
When deploying a pay-per-use LoadMaster, you can use the Set-LicenseInitialPassword command
to configure the administrator password. The LoadMaster is ready to use after that point.
2.6.2 Initial Configuration Commands List
The initial configuration commands are listed below:
EULA:
- Read-LicenseEULA (mandatory)
- Confirm-LicenseEULA (mandatory)
- Confirm-LicenseEULA2 (mandatory)
These EULA commands must be run in the above order.
License type:
- Get-LicenseType (optional)
- Get-AslLicenseType (optional)
These commands are optional when completing the licensing
process. The Get-LicenseType command contacts the Kemp
Licensing Server. The Get-AslLicenseType must be used with a
Kemp 360 Central local licensing server.
kemp.ax 27 Copyright 2002-2019, Kemp Technologies, All Rights ReservedPowerShell
2 Windows PowerShell
Licensing:
- Request-LicenseOnline
- Request-LicenseOffline
- Request-LicenseOnPremise
To install the license on the LoadMaster, one of the above
commands must be used:
- The online command is used when the LoadMaster can reach
the Kemp licensing server.
- Otherwise, the offline command must be used. If using
offline licensing, you must have the “BLOB” licensing text that
Kemp sent in an email.
- The Request-LicenseOnPremise command is used to license
a LoadMaster using a Kemp 360 Central acting as a “local
licensing server”.
Set password:
- Set-LicenseInitialPassword (mandatory)
This command must be used to set the LoadMaster
administrator (bal) password.
Get license details:
- Get-LicenseInfo (optional)
Upgrade license:
- Update-LicenseOnline (optional)
- Update-LicenseOffline (optional)
Legacy:
- Get-LicenseAccessKey
2.6.3 Accept the EULAs
To license a LoadMaster, you must acknowledge the EULA licenses. This step involves three
commands and they must be run in the following order:
kemp.ax 28 Copyright 2002-2019, Kemp Technologies, All Rights ReservedPowerShell
2 Windows PowerShell
1. Read-LicenseEULA
2. Confirm-LicenseEULA
3. Confirm-LicenseEULA2
For example:
$reula = Read-LicenseEULA -LoadBalancer 172.21.59.85 -Credential bal
$reula
ReturnCode Response Data
---------- -------- ----
200 Command successfully executed @{Eula=}
$reula.Data.Eula
MagicString Eula
----------- ----
d15981f0-ec48-4558-8a3e-796e2036300d ...
The MagicString parameter must be used as input for the Confirm-LicenseEULA command. The
Type parameter is optional. The default value for the Type parameter is Trial. The Free value must
only be used for the Free LoadMaster.
$ceula = Confirm-LicenseEULA -Magic $reula.Data.Eula.MagicString `
-LoadBalancer 172.21.59.85 -
Credential bal
$ceula
ReturnCode Response Data
---------- -------- ----
200 Command successfully executed @{Eula2=}
$ceula.Data.Eula2
MagicString Eula2
----------- -----
46181257-2f09-4094-a9cd-6af02f352180 ...
The last step is to run the Confirm-LicenseEULA2 command. The MagicString parameter is from the
Confirm-LicenseEULA output.
Setting the Accept parameter to yes when running the Confirm-LicenseEULA2 command means that
your LoadMaster sends data to Kemp anonymously to improve our product usage knowledge. If
this parameter is set to no, your LoadMaster does not send this data.
kemp.ax 29 Copyright 2002-2019, Kemp Technologies, All Rights ReservedPowerShell
2 Windows PowerShell
Setting the Accept parameter to no, disables notifications
regarding new releases in the LoadMaster WUI.
$ceula2 = Confirm-LicenseEULA2 -Magic $ceula.Data.Eula2.MagicString -Accept
yes `
-LoadBalancer 172.21.59.85 -Credential
bal
$ceula2
ReturnCode Response Data
---------- -------- ----
200 Command successfully executed.
2.6.4 Retreive the Available Licenses (optional)
Before running the command to license the LoadMaster (Request-LicenseOnline/Request-
LicenseOffline) it is possible to retrieve the available license(s) for a specific Kemp ID from the Kemp
Licensing Server using the Get-LicenseType command.
The parameters for this command are:
l KempId (mandatory)
l Password (mandatory)
l OrderId (optional)
The output of the command (when successful) has the following structure:
ReturnCode : 200
Response : Command successfully executed.
Data : @{License=}
The field Data.License contains details about the the license(s) and it always includes the
temporary license option. For example:
$licDet.Data.License
id : 0632b88b577c71591798268bcd4e01132f082309
name : VLM-5000 ESP GEO with Basic 2 Years
available : 1
description : VLM-5000 ESP GEO with Basic 2 Years
tethered : False
LicenseStatus : Permanent License
BuyMoreAt : https://www.kemptechnologies.com/buy-me-
now?KempID=jbloggs@kemptechnologies.com
id : fc488d991cffb7a5958625427d6bfb0b3edc008e
name : VLM-5000 WAF GEO with Basic 3 Years
available : 1
kemp.ax 30 Copyright 2002-2019, Kemp Technologies, All Rights ReservedPowerShell
2 Windows PowerShell
description : VLM-5000 WAF GEO with Basic 3 Years
tethered : False
LicenseStatus : Permanent License
BuyMoreAt : https://www.kemptechnologies.com/buy-me-now?KempID=
jbloggs@kemptechnologies.com
name : VLM-5000 with Enterprise Plus subscription
available : 1
tethered : 0
id : 3eb92178611573946b422cf8d0df69d04c07fede
LicenseStatus : Temp License
description : VLM-5000 with Enterprise Plus subscription
BuyMoreAt : https://www.kemptechnologies.com/buy-me-now?KempID=
jbloggs@kemptechnologies.com
In this example, the customer purchased two licenses. The third entry is the temporary license.
If the Kemp ID does not exist, the command returns the string “License type information not
available”.
2.6.4.1 Example without Specifying an Order ID
Without an Order ID, the command only returns the temporary license details:
$licDet = Get-LicenseType -KempId jbloggs@kemptechnologies.com -Password
supersecretpasswd `
-LoadBalancer 172.21.59.85 -
Credential bal
$licDet
ReturnCode Response Data
---------- -------- ----
200 Command successfully executed. @{License=System.Object[]}
$licDet.Data.License
name : VLM-5000 with Enterprise Plus subscription
available : 1
tethered : 0
id : 3eb92178611573946b422cf8d0df69d04c07fede
LicenseStatus : Temp License
description : VLM-5000 with Enterprise Plus subscription
BuyMoreAt : https://www.kemptechnologies.com/buy-me-
now?KempID=jbloggs@kemptechnologies.com
kemp.ax 31 Copyright 2002-2019, Kemp Technologies, All Rights ReservedPowerShell
2 Windows PowerShell
2.6.4.2 Example with a Valid Order ID
If a valid Order ID is provided, the command returns an array of licenses containing the purchased
license(s) and the temporary license details:
$licDet = Get-LicenseType -KempId jbloggs@kemptechnologies.com -Password
supersecretpasswd `
-LoadBalancer 172.21.59.85 -Credential bal -OrderId
Example20170517
$licDet | Format-List
ReturnCode : 200
Response : Command successfully executed.
Data : @{License=System.Object[]}
$licDet.Data.License
id : 0632b88b577c71591798268bcd4e01132f082309
name : VLM-5000 ESP GEO with Basic 2 Years
available : 1
description : VLM-5000 ESP GEO with Basic 2 Years
tethered : False
LicenseStatus : Permanent License
BuyMoreAt : https://www.kemptechnologies.com/buy-me-
now?KempID=jbloggs@kemptechnologies.com
id : fc488d991cffb7a5958625427d6bfb0b3edc008e
name : VLM-5000 WAF GEO with Basic 3 Years
available : 1
description : VLM-5000 WAF GEO with Basic 3 Years
tethered : False
LicenseStatus : Permanent License
BuyMoreAt : https://www.kemptechnologies.com/buy-me-now?KempID=
jbloggs@kemptechnologies.com
name : VLM-5000 with Enterprise Plus subscription
available : 1
tethered : 0
id : 3eb92178611573946b422cf8d0df69d04c07fede
LicenseStatus : Temp License
description : VLM-5000 with Enterprise Plus subscription
BuyMoreAt : https://www.kemptechnologies.com/buy-me-now?KempID=
jbloggs@kemptechnologies.com
The answer is an array and you can retrieve each element of the array by using the usual array
syntax, for example, to get the first element of the array:
kemp.ax 32 Copyright 2002-2019, Kemp Technologies, All Rights ReservedPowerShell
2 Windows PowerShell
$licDet.Data.License[0]
id : 0632b88b577c71591798268bcd4e01132f082309
name : VLM-5000 ESP GEO with Basic 2 Years
available : 1
description : VLM-5000 ESP GEO with Basic 2 Years
tethered : False
LicenseStatus : Permanent License
BuyMoreAt : https://www.kemptechnologies.com/buy-me-now?KempID=
jbloggs@kemptechnologies.com
2.6.4.3 Example with an Invalid (Undefined) Kemp ID
An example with an invalid (or non-existing) Kemp ID is below:
$err = Get-LicenseType -KempId invalid@invalid.co.uk -Password bla2017bla `
-LoadBalancer 172.21.59.85 -Credential
bal
ReturnCode : 200
Response : Command successfully executed.
Data : @{Licenses=License type information not available}
$err.Data.Licenses
License type information not available
2.6.4.4 Retreive License Types when using Local Licensing Functionality
If you are licensing the LoadMaster using Kemp 360 Central local licensing, a similar command
(Get-AslLicenseType) is used to retrieve the available licenses. The parameters for this command
are:
l aslipaddress (mandatory): IP address of the Kemp 360 Central server instance
l aslport (mandatory): The Kemp 360 Central listening port
l aslname (optional): The Kemp 360 Central Fully Qualified Domain Name (FQDN)
2.6.5 License the LoadMaster
The commands to license the LoadMaster (initially license the LoadMaster for the first time, not
updating an existing LoadMaster license) are Request-LicenseOnline and Request-LicenseOffline.
To use the Request-LicenseOnline command, the LoadMaster must be able to connect to the Kemp
Licensing Server. If this is not possible, the Request-LicenseOffline command can be used.
The Request-LicenseOnPremise command is used to license a LoadMaster using a Kemp 360 Central
as a “Local Licensing Server”.
kemp.ax 33 Copyright 2002-2019, Kemp Technologies, All Rights ReservedPowerShell
2 Windows PowerShell
The Request-LicenseOnline command interface contains the OrderId and LicenseTypeId
parameters. When you purchase a product from Kemp, Kemp provide you with the OrderId. The
OrderId is a unique string that is a pointer to the record that details what was purchased. The
OrderId is a container – there may be multiple license types for one OrderId. The LicenseTypeId is
the “license ID” that can be retrieved using the Get-LicenseType command, as shown in the above
examples.
If you specify the OrderId but not the LicenseTypeId, the first license in the list matching the
specified Order ID is used. This is the first license defined (the oldest) for that order ID.
If you specify both the OrderId and LicenseTypeId, the specific license matching both the Order ID
and License Type ID is used.
If you do not specify either an OrderId or LicenseTypeId, a temporary license is applied.
If you specify a LicenseTypeId but not an OrderId, an error message is returned. This is an invalid
combination – the Order ID must also be specified if using the License Type ID.
The following table summarizes the above text:
OrderId (not LicenseTypeId (not
License Given to the LoadMaster
mandatory) mandatory)
First license in the list matching the specified Order
Used Not used
ID
Used (value from Get- The specific license matching the Order ID and
Used
LicenseType) License Type ID
Not used Not used Temporary license
Used (value from Get- Invalid combination (error is returned). The Order ID
Not used
LicenseType) must also be specified.
2.6.5.1 Online Licensing Example
The below example uses online licensing and requests a specific license (both the OrderId and
LicenseTypeId must be used):
$lictype = Get-LicenseType -KempId jbloggs@kemptechnologies.com -Password
supersecretpassword `
-LoadBalancer 172.21.59.85 -Credential bal -OrderId
marvel20170511-01
$lictype | Format-List
ReturnCode : 200
Response : Command successfully executed.
Data : @{License=System.Object[]}
kemp.ax 34 Copyright 2002-2019, Kemp Technologies, All Rights ReservedPowerShell
2 Windows PowerShell
$lic = Request-LicenseOnline -LoadBalancer 172.21.59.85 -Credential bal `
-KempId jbloggs@kemptechnologies.com -Password
supersecretpassword `
-LicenseTypeId $lictype.Data.License[0].id -OrderId
marvel20170511-01
$lic | Format-List
ReturnCode : 200
Response : Command successfully executed.
Data :
2.6.5.2 Offline Licensing Example
An example using the offline licensing method is below:
$offline_lic = Request-LicenseOffline -Path .\blob-85.blob -LoadBalancer
172.21.59.85
$offline_lic
ReturnCode Response Data
---------- -------- ----
200 Command successfully executed.
2.6.6 Set the Initial Password for the LoadMaster
After licensing, you must set the administrator password before you can start using the
LoadMaster. Use the Set-LicenseInitialPassword command to do this, for example:
$setp = Set-LicenseInitialPassword -Passwd balsupersecretpassword -
LoadBalancer 172.21.59.85 `
-
Credential bal
$setp | Format-List
ReturnCode : 200
Response : Command successfully executed.
Data :
2.6.7 Retreive the License Details (optional)
You can use the Get-LicenseInfo command to retrieve the LoadMaster license details.
$license_details = Get-LicenseInfo -LoadBalancer 172.21.59.85 -Credential bal
$license_details
ReturnCode Response Data
---------- -------- ----
200 Command successfully executed. @{LicenseInfo=}
$license_details.Data.LicenseInfo
uuid : 941b6d65-1758-40a3-8a89-a9b45a8a8512
ActivationDate : Wed May 17 16:47:46 UTC 2017
LicensedUntil : unlimited
SupportLevel : Basic 2 years
SupportUntil : Fri May 17 04:00:00 UTC 2019
LicenseType : VLM-5000 ESP GEO
LicenseStatus : Single Perm
kemp.ax 35 Copyright 2002-2019, Kemp Technologies, All Rights ReservedPowerShell
2 Windows PowerShell
ApplianceModel : VLM-5000 ESP GEO
MaxVS : 0
MaxRS : 0
Bandwidth : 5000
TpsLimit : 10000
HA : no
FirstHA : no
ModSecurity : yes
AFE : yes
ViewAFE : yes
ESP : yes
IPSEC : 2
SingleCPU : no
VLM : yes
VlmPlatform : VMWARE
SKU : VLM_OVF_64
FreeLicense : no
Temporary : no
ASL : no
MandatoryTether : no
MultipleConnect : no
2.6.8 Update a LoadMaster License
The LoadMaster license can be updated using the Update-LicenseOnline or Update-LicenseOffline
command.
Here is an example using the online command:
$licupdate = Update-LicenseOnline -KempId jbloggs@kemptechnologies.com -
Password kempkemp `
-LoadBalancer 172.21.59.85 -
Credential bal
$licupdate
ReturnCode Response Data
---------- -------- ----
200 Command successfully executed.
You can check the updated license by running the Get-LicenseInfo command.
2.7 Code Snippet Examples
Refer to the sections below for some code snippet examples.
2.7.1 Initialize the LoadMaster Connection Parameters
In the above examples, the required parameters, LoadBalancer and Credential, can be initialized
before running the commands with the Initialize-LmConnectionParameters command. If you do
this, it is not necessary to specify these parameters in each command.
For example:
lma = Initialize-LmConnectionParameters -Address $LMIP -Credential $creds
$lma | Format-List
kemp.ax 36 Copyright 2002-2019, Kemp Technologies, All Rights ReservedPowerShell
2 Windows PowerShell
ReturnCode : 200
Response : Command successfully executed.
Data : @{Connection=; Login=}
After the initialization, for example, the command to create a vs will became:
$vs = New-AdcVirtualService -VirtualService $VSIP -VSPort $VSPORT `
-VSProtocol $VSPROTOCOL
if ($vs.ReturnCode -ne 200) {
# ERROR: exit
return $vs
}
2.7.2 Enable the API
You can enable the API using the command Enable-SecAPIAccess. The LoadMaster must be licensed
for this command to work.
$eapi = Enable-SecAPIAccess -LoadBalancer $LMIP -Credential $creds
$eapi | Format-List
ReturnCode : 200
Response : The API is enabled
Data :
If you license a LoadMaster using the API, the API is
automatically enabled.
2.7.3 Add a New Virtual Service
You can add a Virtual Service using the New-AdcVirtualService command. Example commands and
output are provided below.
$newvs = New-AdcVirtualService -VirtualService 10.154.11.124 -VSPort 80 -
VSProtocol tcp
$newvs | Format-List
ReturnCode : 200
Response : Command successfully executed.
Data : @{VS=}
$newvs.Data
VS
--
@{Status=Down; Index=15; VSAddress=10.154.11.124; VSPort=80; Layer=7; Enable=Y;
SSLReverse=N; SSLReencrypt=N; Intercept=N; InterceptOpts=; AlertThreshold=0;
Transactionlimit=0; Transparent...
$newvs.Data.VS
kemp.ax 37 Copyright 2002-2019, Kemp Technologies, All Rights ReservedPowerShell
2 Windows PowerShell
Status : Down
Index : 15
VSAddress : 10.154.11.124
VSPort : 80
Layer : 7
Enable : Y
SSLReverse : N
SSLReencrypt : N
Intercept : N
InterceptOpts : @{Opt=System.Object[]}
AlertThreshold : 0
Transactionlimit : 0
Transparent : N
SubnetOriginating : Y
ServerInit : 0
StartTLSMode : 0
Idletime : 660
Cache : N
Compress : N
Verify : 0
UseforSnat : N
ForceL4 : N
ForceL7 : Y
MultiConnect : N
ClientCert : 0
ErrorCode : 0
CheckUse1.1 : N
MatchLen : 0
CheckUseGet : 0
SSLRewrite : 0
VStype : http
FollowVSID : 0
Protocol : tcp
Schedule : rr
CheckType : http
PersistTimeout : 0
CheckPort : 0
kemp.ax 38 Copyright 2002-2019, Kemp Technologies, All Rights ReservedPowerShell
2 Windows PowerShell
NRules : 0
NRequestRules : 0
NResponseRules : 0
NMatchBodyRules : 0
NPreProcessRules : 0
EspEnabled : N
InputAuthMode : 0
OutputAuthMode : 0
MasterVS : 0
MasterVSID : 0
IsTransparent : 0
AddVia : 0
QoS : 0
TlsType : 0
NeedHostName : N
OCSPVerify : N
AllowHTTP2 : N
EnhancedHealthChecks : N
RsMinimum : 0
NumberOfRSs : 0
$newvs.Data.VS.InterceptOpts
Opt
---
{opnormal, auditrelevant, reqdatadisable, resdatadisable}
2.7.4 Modify a Virtual Service
You can modify an existing Virtual Service using the Set-AdcVirtualService command. An example
command (to enable transparency) with output is below.
$setvs = Set-AdcVirtualService -VirtualService 10.154.11.124 -VSPort 80 -
VSProtocol tcp -Transparent 1
$setvs | Format-List
ReturnCode : 200
Response : Command successfully executed.
kemp.ax 39 Copyright 2002-2019, Kemp Technologies, All Rights ReservedPowerShell
2 Windows PowerShell
Data : @{VS=}
$setvs.Data
VS
--
@{Status=Down; Index=5; VSAddress=10.154.11.124; VSPort=80; Layer=7; Enable=Y;
SSLReverse=N; SSLReencrypt=N; Intercept=N; InterceptOpts=; AlertThreshold=0;
Transactionlimit=0; Transparent=...
$setvs.Data.VS
Status : Down
Index : 5
VSAddress : 10.154.11.124
VSPort : 80
Layer : 7
Enable : Y
SSLReverse : N
SSLReencrypt : N
Intercept : N
InterceptOpts : @{Opt=System.Object[]}
AlertThreshold : 0
Transactionlimit : 0
Transparent : Y
SubnetOriginating : Y
ServerInit : 0
StartTLSMode : 0
Idletime : 660
Cache : N
Compress : N
Verify : 0
UseforSnat : N
ForceL4 : N
ForceL7 : Y
kemp.ax 40 Copyright 2002-2019, Kemp Technologies, All Rights ReservedPowerShell
2 Windows PowerShell
MultiConnect : N
ClientCert : 0
ErrorCode : 0
CheckUse1.1 : N
MatchLen : 0
CheckUseGet : 0
SSLRewrite : 0
VStype : http
FollowVSID : 0
Protocol : tcp
Schedule : rr
CheckType : http
PersistTimeout : 0
CheckPort : 0
NRules : 0
NRequestRules : 0
NResponseRules : 0
NMatchBodyRules : 0
NPreProcessRules : 0
EspEnabled : N
InputAuthMode : 0
OutputAuthMode : 0
MasterVS : 0
MasterVSID : 0
IsTransparent : 2
AddVia : 0
QoS : 0
TlsType : 0
NeedHostName : N
OCSPVerify : N
AllowHTTP2 : N
EnhancedHealthChecks : N
RsMinimum : 0
NumberOfRSs : 0
kemp.ax 41 Copyright 2002-2019, Kemp Technologies, All Rights ReservedPowerShell
2 Windows PowerShell
2.7.5 Add a Real Server to a Virtual Service
You can add a Real Server to an existing Virtual Service using the New-AdcRealServer command.
An example command with output is provided below.
$newrs = New-AdcRealServer -RealServer 10.154.11.15 -RealServerPort 80 -
VirtualService 10.154.11.124 -VSPort 80 -VSProtocol tcp
$newrs | Format-List
ReturnCode : 200
Response : Command successfully executed.
Data : @{RsSettings=}
$newrs.Data
RsSettings
----------
@{Status=Down; VSIndex=5; RsIndex=1; Addr=10.154.11.15; Port=80; DnsName=; Forward=nat;
Weight=1000; Limit=0; Follow=0; Enable=Y; Critical=N}
$newrs.Data.RsSettings
Status : Down
VSIndex : 5
RsIndex : 1
Addr : 10.154.11.15
Port : 80
DnsName :
Forward : nat
Weight : 1000
Limit : 0
Follow : 0
Enable : Y
Critical : N
kemp.ax 42 Copyright 2002-2019, Kemp Technologies, All Rights ReservedPowerShell
2 Windows PowerShell
2.7.6 Modify a Real Server and Retrieve Settings
You can modify an existing Real Server using the Set-AdcRealServer command. You can retreive the
Real Server settings using the Get-AdcRealServer command. Example commands with output are
provided below.
$setrs = Set-AdcRealServer -RealServer 10.154.11.15 -RealServerPort 80 -Weight
900 -VirtualService 10.154.11.124 -VSPort 80 -VSProtocol tcp
$setrs | Format-List
ReturnCode : 200
Response : Command successfully executed.
Data :
$getrs = Get-AdcRealServer -RealServer 10.154.11.15 -RSPort 80 -VirtualService
10.154.11.124 -VSPort 80 -VSProtocol tcp
$getrs | Format-List
ReturnCode : 200
Response : Command successfully executed.
Data : @{Rs=}
$getrs.Data
Rs
--
@{Status=Down; VSIndex=5; RsIndex=1; Addr=10.154.11.15; Port=80; DnsName=; Forward=nat;
Weight=900; Limit=0; Follow=0; Enable=Y; Critical=N}
$getrs.Data.Rs
Status : Down
VSIndex : 5
RsIndex : 1
kemp.ax 43 Copyright 2002-2019, Kemp Technologies, All Rights ReservedPowerShell
2 Windows PowerShell
Addr : 10.154.11.15
Port : 80
DnsName :
Forward : nat
Weight : 900
Limit : 0
Follow : 0
Enable : Y
Critical : N
2.7.7 Upload a Template
You can upload a template by using the Install-Template command. This does not create any
Virtual Services, but you can use the addvs command with the template parameter to do this.
Refer to the next section for an example. An example command with output is provided below.
$installtemplate = Install-Template -Path C:\Temp\Microsoft_Dynamics.tmpl
$installtemplate | Format-List
ReturnCode : 200
Response : Command successfully executed.
Data : @{TemplateData=Installed 3 new Kemp certified templates.}
2.7.8 Create a Virtual Service using a Template
You can create a Virtual Service using a template by using the New-AdcVirtualService command.
An example command with output is provided below. To retrieve the name of the template (which
is used as the value for the Template parameter), run the Get-Template command.
$newvs = New-AdcVirtualService -VirtualService 10.154.11.125 -VSPort 80 -
VSProtocol tcp -Template "Dynamics CRM HTTP"
$getvs = Get-AdcVirtualService -VirtualService 10.154.11.125 -VSPort 80 -
VSProtocol tcp
$getvs | Format-List
ReturnCode : 200
Response : Command successfully executed.
kemp.ax 44 Copyright 2002-2019, Kemp Technologies, All Rights ReservedPowerShell
2 Windows PowerShell
Data : @{VS=}
$getvs.Data
VS
--
@{Status=Down; Index=6; VSAddress=10.154.11.125; VSPort=80; Layer=7; NickName=Dynamics
CRM HTTP; Enable=Y; SSLReverse=N; SSLReencrypt=N; Intercept=N; InterceptOpts=;
AlertThreshold=0; Tran...
$getvs.Data.VS
Status : Down
Index : 6
VSAddress : 10.154.11.125
VSPort : 80
Layer : 7
NickName : Dynamics CRM HTTP
Enable : Y
SSLReverse : N
SSLReencrypt : N
Intercept : N
InterceptOpts : @{Opt=System.Object[]}
AlertThreshold : 0
Transactionlimit : 0
Transparent : N
SubnetOriginating : Y
ServerInit : 0
StartTLSMode : 0
Idletime : 660
Cache : N
Compress : N
Verify : 0
UseforSnat : N
ForceL4 : N
ForceL7 : Y
MultiConnect : N
kemp.ax 45 Copyright 2002-2019, Kemp Technologies, All Rights ReservedPowerShell
2 Windows PowerShell
ClientCert : 0
SecurityHeaderOptions : 0
ErrorCode : 0
CheckUrl : /
CheckUse1.1 : N
MatchLen : 0
CheckUseGet : 0
SSLRewrite : 0
VStype : http
FollowVSID : 0
Protocol : tcp
Schedule : lc
CheckType : http
Persist : super
PersistTimeout : 3600
CheckPort : 0
NRules : 0
NRequestRules : 0
NResponseRules : 0
NMatchBodyRules : 0
NPreProcessRules : 0
EspEnabled : N
InputAuthMode : 0
OutputAuthMode : 0
MasterVS : 0
MasterVSID : 0
IsTransparent : 2
AddVia : 0
QoS : 0
TlsType : 0
NeedHostName : N
OCSPVerify : N
AllowHTTP2 : N
EnhancedHealthChecks : N
RsMinimum : 0
NumberOfRSs : 0
kemp.ax 46 Copyright 2002-2019, Kemp Technologies, All Rights ReservedPowerShell
2 Windows PowerShell
2.8 Known Issues with Beta PowerShell Wrapper
The 7.2.39 version of the Kemp PowerShell wrapper has the following known issues:
The New-GeoCluster command fails if you try to add an already existing cluster.
GEO custom locations do not restore correctly.
The New-SdnController fails in a specific scenario: if you create an SDN controller or multiple
SDN controllers and delete all the SDN controllers, you cannot add a new SDN controller.
In the Set-GeoFQDN command, the parameter SiteFailureDelay is specified in minutes but the
returned value is in seconds.
A 200 success message is returned when the Get-GeoFQDN or Get-GeoCluster command is run
for a non-existing FQDN/cluster.
kemp.ax 47 Copyright 2002-2019, Kemp Technologies, All Rights ReservedPowerShell
References
References
Unless otherwise specified, the following documents can be found at
http://kemptechnologies.com/documentation.
User Management, Feature Description
DoD Common Access Card Authentication, Feature Description
kemp.ax 48 Copyright 2002-2019, Kemp Technologies, All Rights ReservedPowerShell
Last Updated Date
Last Updated Date
This document was last updated on 25 March 2019.
kemp.ax 49 Copyright 2002-2019, Kemp Technologies, All Rights ReservedYou can also read