Electronic Catch Certification System - User Guide - Chris Bothma 021 402 9716
←
→
Page content transcription
If your browser does not render page correctly, please read the page content below
User Guide

Electronic Catch Certification System

                        Chris Bothma
                        021 402 9716
                        chrisbo@ij.co.za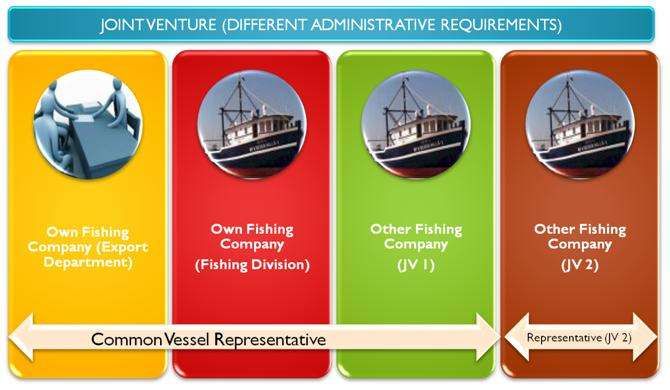
User Manual Electronic Catch Certification System

CONTENTS

GETTING STARTED                                                           3

GETTING ACCESS TO THE SYSTEM                                              4

1. REGISTER YOUR COMPANY                                                  4
2. CREATE YOUR COMPANY USERS                                              7
3. LOGGING IN TO THE SYSTEM                                               8

MANAGING YOUR VESSELS                                                     9

4.   EDITING VESSEL DATA                                                 10
5.   DELETING A VESSEL                                                   10
6.   UPDATING VESSEL LICENSE DETAILS                                     11
7.   TRANSFERRING A VESSEL                                               12

APPLYING FOR A CATCH CERTIFICATE                                         13

CONSIDERATIONS BEFORE APPLYING                                           13
YOUR APPLICATION – STEP BY STEP                                          14
1. CREATE NEW CERTIFICATE FOR PRODUCT LANDED BY OWN VESSELS              14
2. CREATE NEW CERTIFICATE FOR PROCURED PRODUCTS (FROM RSA VESSELS)       20
3. RETURNING TO A PREVIOUSLY VALIDATED CERTIFICATE                       29

VALIDATING AUTHORITY USER GUIDE                                          30

1.   LOGGING ONTO THE SYSTEM                                             30
2.   SETTING UP USER ACCOUNTS                                            30
3.   RELEASING VESSELS                                                   32
4.   SUSPENDING A VESSEL                                                 34
5.   DISPLAYING A CERTIFICATE                                            38
6.   REVIEWING VESSEL LICENSE HISTORY                                    40
7.   MAINTAINING VALIDATING AUTHORITY SECTION OF THE CATCH CERTIFICATE   41

APPENDIX 1 – HARMONISED SYSTEM TARIFF CODES                              42

APPENDIX 2 – SCENARIOS ON USING THE SYSTEM                               43

APPENDIX 3 – EXAMPLES - CORRECT USE OF VESSEL REPRESENTATIVES            45

                                               Page 2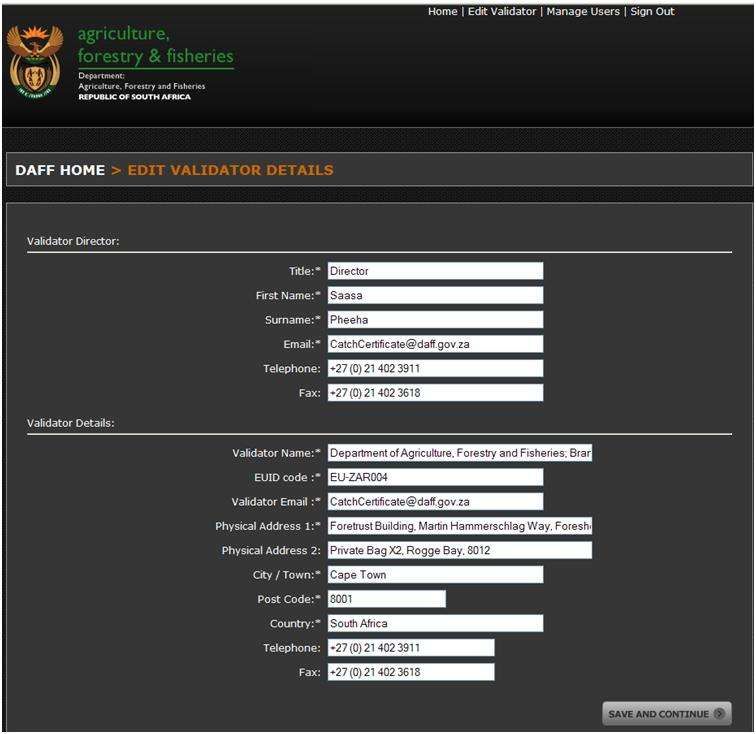
User Manual Electronic Catch Certification System

GETTING STARTED

IUU Regulation, Regulation EC 1005/2008 requires a ‘Catch Certificate’ generated by the flag
state of the catching vessel (i.e. the country in which the vessel is registered) to accompany
fishery product entering the EU, regardless of the exporting country.

For fish caught by a South African flag vessel or vessel registered in South Africa (such as the
charter vessels registered with DAFF), the Department of Agriculture, Forestry and Fisheries
is required to provide a Catch Certificate. This guide describes how to use the web based
system created for the South African industry to meet these requirements.

If you have a question about the system or your account that you can't find in this guide or if
you have a question not covered here or in the FAQ section on the site, or you encounter an
issue, please contact:

Chris Bothma

Mail:          chrisbo@ij.co.za

Telephone:     021 402 9716

                                           Page 3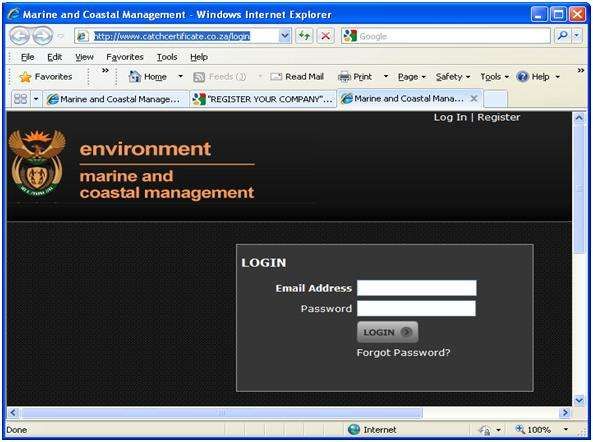
User Manual Electronic Catch Certification System

GETTING ACCESS TO THE SYSTEM

1. REGISTER YOUR COMPANY

       Identify the main user within your organisation responsible for:
 1
                 Registering your company on-line
                 Creating additional user accounts for your company
                 Maintaining company details as and when required

       Point your browser to the link http://www.catchcertificate.co.za. When the page
 2     loads select option Register from the top of the page

FIGURE 1 – INITIAL SCREEN

       The New Company registration screen consists of two sections. Note mandatory fields
 3
       are denoted with the asterisk (*) character.

       1. Applicant data. This section must be completed by or for the user identified in step
          1 above. This user will automatically be assigned Administrator rights which will
          enable him or her to create additional users.
       2. Company data including the default company e-mail address (routing address) that
          will be referenced by the system when sending workflow messages to your
          company

                                            Page 4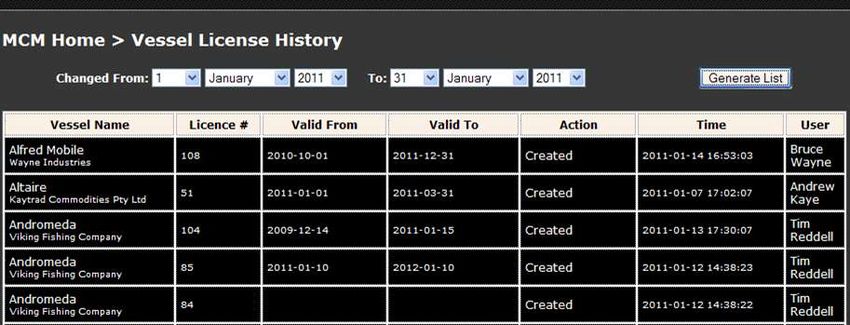
User Manual Electronic Catch Certification System

FIGURE 2 - NEW COMPANY REGISTRATION

       Most input fields are self-explanatory, but note the following:

       Company Email (Routing Address)

       By default system messages (workflow mails) will be sent to this address, for example:

               Notification from DAFF when a new vessel you registered is released
               In the case of fishing companies not handling their own exports, notification
               from the exporter requesting that you (the catcher) log on and verify (“sign”)
               the certificate

       Company Type

       You must select at least one or both check boxes, that is:

               If you own vessels, tick the checkbox Fishing Company
               If you are an exporter, tick the checkbox Exporter
               If you export product landed by your own vessels, tick both checkboxes

                                           Page 5
User Manual Electronic Catch Certification System

     Default Type of Processing Allowed Onboard Vessels

     Enter the default Type of Processing Authorised on board the majority of your vessels
     as described by domestic legislation; that is the purpose for which the vessels are
     approved, for example: Heading and Gutting. Enter Not Applicable if you do not own
     or represent any vessels

     You will receive verification of your registration by mail reflecting your user name (e-
     mail address) and password.

     Important: Exporters who need to forward an application for a catch certificate to
     another registered company (catcher) to “sign” the certificate should collaborate with
     those companies to ensure they too register within the system.

                                         Page 6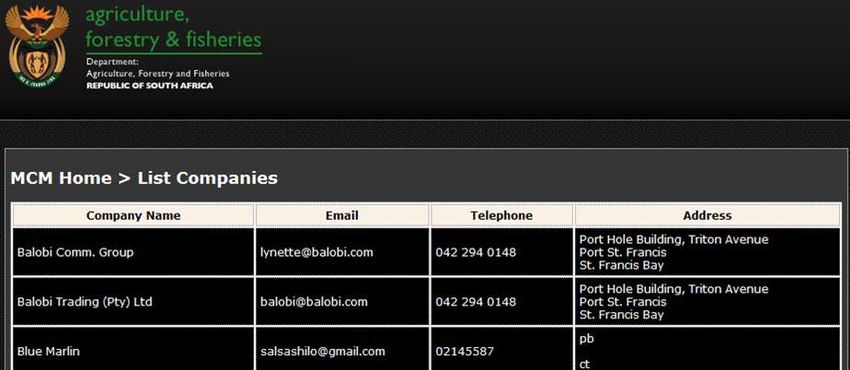
User Manual Electronic Catch Certification System

2. CREATE YOUR COMPANY USERS

     Additional users for your company can be created by the user identified above. The
     new user will be notified of his login details by e-mail.

     On the main page, select the link at the top of the page named Manage Users.
 1

     Clicking on the Add A New User link above will load the page below – please note
 2   mandatory fields are indicated with the asterisk (*) character:

     Explanation of fields:

     Most input fields are self-explanatory, but note the following:

     Checkbox Administrator: Only users with administrator rights will be able to maintain
     user accounts, update your company details or maintain vessel licenses. Leave
     unchecked for users that will only be generating or completing applications for catch
     certificates.

 Important: Do not create additional users by selecting the Register link on the Log On page.
 This link is used to register a new company.

                                         Page 7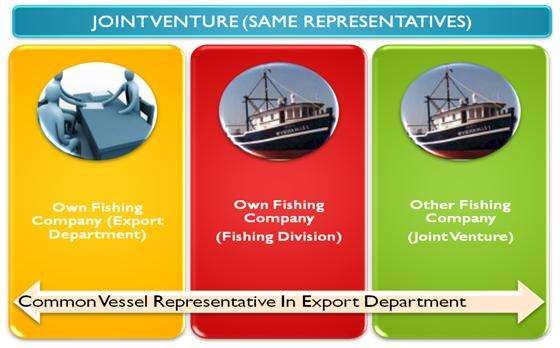
User Manual Electronic Catch Certification System

3. LOGGING IN TO THE SYSTEM

Before you can add or edit content, you need to log in. If you haven't already done so,
request that the main user (administrator) identified by your company registers you on the
system (refer section 2 above – Create your company users). Then on the main page of the
site look for a "User login" form (Figure 1 above). This will typically be in the centre of the
page. Enter your e-mail address and password and hit "Log In".

When the new page loads it will include a new block with your name and company name at
the top. Below is the screen you use to start viewing and editing content.

     Tip: If you can not remember your password, click on the link Forgot Password below the
     LOGIN button, enter your e-mail account (login name) and click RESET MY PASSWORD
     button. If you change your mind click your browser’s BACK button

                                          Page 8
User Manual Electronic Catch Certification System

MANAGING YOUR VESSELS
Fishing companies/vessel owners must ensure that they also register their vessels in the
system.

       Select the link Edit Vessels at the top of the page. This will display a list of your
 1     vessels already registered within the system.

       FIGURE 3 - MAINTAIN VESSEL LIST

       Selecting the link Add A New Vessel above will show the popup screen below,
 2     mandatory fields are marked with the asterisk (*) character:

       Complete the fields above and click the SAVE button to save your input, or the CLOSE
 3
       button to discard your changes.

                                         Page 9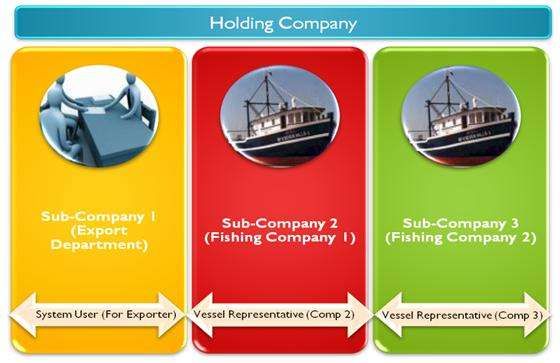
User Manual Electronic Catch Certification System

       The following are mandatory fields:

               Vessel Name – Unique vessel name
               Vessel registration number - The official number as it appears on the vessel
               registration form, and not the MCM area number
               Home Port - the port that is in the vessel register as the home port of the
               ship
               Vessel License Number – Current license number (please note not the fishing
               permit number)
               Valid To – Expiration date of above vessel license

       Where available, please list the following optional information:

               IMO (Loyd’s Number) - If the fishing vessel has an IMO number it must be
               included in the certificate. The IMO number is an identification number
               assigned by the International Maritime Organisation made up of the three
               letters "IMO" followed by a space and an unique, seven-digit number: please
               enter last 7 digits
               Inmarsat Number - nine character maximum – where available
               Vessel’s Inmarsat Phone Number – where available (usually the numeric part
               of the Inmarsat e-mail address)
               Call Sign - Main radio call sign assigned to the vessel – we have made this
               item optional to address some unique circumstances but it should be treated
               as compulsory where applicable saving the above-mentioned special
               circumstances

4. EDITING VESSEL DATA

Seldom will it be required to change your existing vessel details already in the system,
except for updating the vessel license data. Select menu option Vessel List. This will display a
list of all your vessels. In the first Action column select option Edit next to the vessel whose
details you want to change. Refer to step 3 above on completing the required fields.

5. DELETING A VESSEL

To delete a vessel, in the second Action column (refer Figure 4 above – Maintain Vessel List),
select the hyperlink Delete next to the vessel you want to delete. Important: If no Delete link
appears, this vessel already has catch certificates against it and can therefore no longer be
deleted.

                                           Page 10
User Manual Electronic Catch Certification System
6. UPDATING VESSEL LICENSE DETAILS
Select the link Edit Vessels at the top of the main page to display your vessels
1
Selecting the link Licenses in the column Manage Licensing next to the vessel whose
2 license data you want to update will display a list of licenses for that vessel:
a
To add a new license for this vessel, click the hyperlink Add A New License, to change
3 an existing license, select the link Edit next to the license you want to change.
Important: Any changes you make to a vessel’s license data will lock the vessel and will
require a DAFF official to release the vessel in order to make the vessel visible (available)
again. It is strongly recommended that you contact your Fisheries Manager at DAFF to
release the vessel after you add a new license or change or delete an existing licence
TIP: When adding a new vessel, enter the vessel’s license data immediately thereafter. This
will require DAFF to release the vessel once only and will speed up the process.
Page 11User Manual Electronic Catch Certification System
7. TRANSFERRING A VESSEL
A change in vessel ownership presents the following challenges:
1. The previous owner may sell fish landed by this vessel only after the vessel was sold.
2. The new owner may or may not change the vessel name; however, vessel names
must be unique within the system.
Steps:
Previous owner selects the link Edit Vessels at the top of the main page to display
1 his list of vessels
Click on the link Edit in column Action next the vessel being transferred
2
On the popup screen that follows, tick the checkbox Sold/Scrapped and select the
3
SAVE button to save your changes. Note the following:
You will not be able to add any new licenses against this vessel
The system will add the phrase “(Sold)” to the vessel name e.g. from Titanic
to Titanic (Sold) to allow the new owner to create a new vessel with the same
name.
The vessel will still be available for inclusion on a catch certificate (subject to
the catch period covered by an existing vessel license). The suffix “(Sold)” will
be trimmed out upon certificate generation.
The new owner creates a new vessel and enters his new vessel license data.
4
The vessel becomes available to the new owner upon release by DAFF
Page 12User Manual Electronic Catch Certification System
APPLYING FOR A CATCH CERTIFICATE
CONSIDERATIONS BEFORE APPLYING
One thing to bear in mind is that section 8 – Exporter Declaration will contain the details
linked to the user logging on and initiating the catch certificate. In other words, the name
and address of the company linked to the user who initiates the application will be used by
the system to populate this section.
To illustrate:
Company A, the fishing company, sells fish to company B (the exporter)
Company B must initiate and complete the application and forward it to the catcher. One of
Company A’s authorised vessel master representatives retrieves the application and
approves (“signs”) the certificate.
The certificate will reflect the following user names as “signatures”. Section 8 – Exporter
Declaration will display the user details of the user that logged on as Company B (the
Exporter), section 5 (REPRESENTATIVE OF MASTER OF FISHING VESSEL) will display the user
details that logged on as Company A (the catcher) i.e. the representative of company A’s
vessel(s).
Exporter Catcher Log On (Vessel
Completes Catch System Forwards To Representative)
Logs On
Certificate Catcher
(Signature for section 8) (Signature for section 5)
Exporter Approves (Signs) Catch
Exporter logs on System notifies exporter
prints certificate Certificate
Page 13User Manual Electronic Catch Certification System
YOUR APPLICATION – STEP BY STEP
There are two paths to generate a catch certificate, namely one for applicants who are
exporting their own catches, and another for candidates who export products procured
from a local fishing company. Note that a certificate is always initiated by the exporter.
1. CREATE NEW CERTIFICATE FOR PRODUCT LANDED BY OWN VESSELS
Log in to the system, select option New Certificate, then select option From Own
1 Vessels.
On the next screen you must as a minimum enter your export permit number. All
2 fields on this screen can be changed by clicking on the EDIT portion of the section
titles.
TIP: You will only be allowed to advance to the following screen once you have entered
your export permit number. Select the NEXT button at the bottom of the page to continue.
The NEXT button will not be visible until the export number field is completed
Page 14User Manual Electronic Catch Certification System
Enter your first product being exported by clicking on the ADD A PRODUCT button
3
The popup screen below will appear for every new product you add to the
4 certificate. Fill in the product details for all the product items being exported.
Supply the following product data:
I. HS Tariff Code - the national customs code based upon Harmonised
Commodity Description and Coding System (HS) of the World Customs
Organisation. Important: You must enter at least the first 6 digits
II. Species - The product is described by using the species name. Either enter the
scientific name or the description you use in other trade documentation, for
example Cape Hake or Merluccius Species
Page 15User Manual Electronic Catch Certification System
For each product entered indicate which vessels landed the fish used to produce this
5 product by selecting the link in the Edit Vessels column. The value in brackets
indicates the number of vessels currently assigned to a product item
Selecting the link Vessels(0) above will take you to the screen below. List the vessels
6 that contributed to this product item by selecting the button or link ADD VESSELS
Clicking on the Add Vessel button above will show the following popup screen:
7
Page 16User Manual Electronic Catch Certification System
Select the vessel, the start and end date during which the fish was caught, as well as
the weight in kilograms. Repeat steps 6 and 7 for each vessel used in landing the fish
used to produce the product item.
Tip: You do not need to record the catch date range for each trip if multiple trips – just the
first and last date across the range of individual trips
Important Note:
In the example below, the message Invalid catch dates appears, normally due to the catch
period entered not fully covered by a valid vessel license. You will not be able to continue
before the incorrect entry is corrected, either by clicking the Edit button to change, or the
Delete button to remove the invalid entry
Select the BACK TO PRODUCT LIST button below the vessel or vessels entered to
8 return to the screen under point 5 to add additional products, alternatively click the
NEXT button to enter the transport details
Important Note:
The NEXT button below the list of products (Point 5 above) will only be visible if:
a. At least one product is listed
b. Each product listed has at least one vessel listed against that product
(number of vessels landing that product is indicated in brackets)
Once all products are captured, and you have assigned each product item to at least
9 one vessel, you will navigate to the screen below where you can enter the transport
details
Page 17User Manual Electronic Catch Certification System
Complete the following fields:
Country of Exportation – defaults to South Africa
Place of Departure – Usually Port or Airport city
Date Shipped – or to be shipped
Shipped On – Either enter the name of transporting vessel if by sea, or
Flight No – Flight number if exported by air
Shipped To – EU port of arrival
Selecting the SAVE AND CONTINUE button will load the screen below where you
10
can enter the container or waybill number as well as seal numbers.
Note: To enable a user to partly complete the details for further completion at a
later time, some of the transport fields are optional. However, this information
should be completed where available to avoid delays at border posts.
Page 18User Manual Electronic Catch Certification System
Selecting the button SUBMIT FOR VALIDATION above will load the screen below if
11
system validation of your data is successful. Select the link Click here to download it.
Your generated catch certificate will appear as a PDF document in a new window.
You can now select to print and/or e-mail the document. To print at a later stage,
select the link Return Home. Refer section Editing your incomplete application on
how to reactivate and print a saved application
Tip: It is recommended that you click on the link Sign Out first before closing your
web browser once you have created and/or downloaded your certificate
Page 19User Manual Electronic Catch Certification System
2. CREATE NEW CERTIFICATE FOR PROCURED PRODUCTS (FROM RSA VESSELS)
If you are exporting products manufactured from fish landed by another company’s
vessels, you will require a catch certificate signed by this company. The system
provides for this scenario by routing your application to the company involved for
verification of the catch data
Note: For mixed consignments consisting of products produced from own landed
fish as well as procured from a third party, you will need to complete two
applications, one following the steps above, and another following the steps below.
Thus the consignment will be accompanied by two catch certificates.
Important:
Steps 1 to 9 is for the exporter’s use
From the main screen, select the tab New Certificate; then select the option
1 PROCURED FROM CATCHER.
Page 20User Manual Electronic Catch Certification System
Enter your export permit number by clicking on the EDIT portion of the section title
2 EXPORT PERMIT [EDIT]
Select the fishing company (catcher) that landed the fish used for the products you
are exporting
The field Forward To (E-Mail Address) will default to the mail address entered by the
catcher when he registered his company on the system. You can overwrite this with
another recipient representing the catcher.
Optionally you can enter the Importer details as well.
Enter any additional information you would like to communicate to the catcher in
3 the field Message For Supplier, then click SAVE AND CONTINUE.
For each product in your consignment, click the ADD A PRODUCT button
4
Page 21User Manual Electronic Catch Certification System
The popup screen below will appear.
5
I. HS Tariff Code - the national customs code based upon the Harmonised
Commodity Description and Coding System (HS) of the World Customs
Organisation. Note you must enter at least the first six digits
II. Species - Enter the scientific name or the description you use in other trade
documentation, for example Cape Hake or Merluccius Species
III. Reference Document Number – Optionally supply the catcher with the most
appropriate reference data e.g. purchase order, delivery note no etc. This will
assist the supplier (catcher) to verify the vessels and catch dates involved.
Select SAVE to add this product to your consignment, or select CLOSE to discard the
current input. Repeat for other products
For each product entered indicate which vessels landed the fish used to produce this
6 product by selecting the link in the Edit Vessels column. The value in brackets
indicates the number of vessels currently assigned to a product item
Page 22User Manual Electronic Catch Certification System
Selecting the link Vessels(0) above will take you to the screen below. List the vessels
7 that contributed to this product item by selecting the button or link ADD VESSELS
Clicking on the Add Vessel button above will show the following popup screen:
8
Select the vessel, the start and end date during which the fish was caught, as well as
the weight in kilograms and click SAVE. Repeat steps 7 and 8 for each vessel used in
landing the fish used to produce the product item.
Note: The vessels that are available for selection will depend on which catcher you
selected under point 2 above.
Page 23User Manual Electronic Catch Certification System
Select the BACK TO PRODUCT LIST button below the vessel or vessels entered to
9 return to the screen under point 6 to add additional products, alternatively click the
FORWARD TO CATCHER button to notify the catcher.
Important Note:
The FORWARD TO CATCHER button below the list of products (Point 6 above) will
only be visible if:
a. At least one product is listed
b. Each product listed has at least one vessel listed against that product
(number of vessels landing that product is indicated in brackets)
Important Note:
In the example below, the message Invalid catch dates appears, normally due to the catch
period entered not fully covered by a valid vessel license. You will not be able to continue
before the incorrect entry is corrected, either by clicking the Edit button to change, or the
Delete button to remove the invalid entry
If you select VIEW CERTIFICATES and then the link Pending Catcher, you will notice the new
application you have just created. This entry will remain listed here until the catcher returns
the application to you, at which time the application will move to the Pending Exporter
(your company) tab.
Page 24User Manual Electronic Catch Certification System
Note, the certificate will be allocated a Document Number only once validated by the
system, at which time the application will move to the Validated Certificates tab.
Important: Steps 10 to 11 is for the catcher’s use
Upon receipt of notification of a pending catch certificate, an authorised user
10
(representative of the master of the vessel) logs on and displays the list of pending
certificates for his company (link Pending Catcher).
Activate the required application for a catch certificate (created by the exporter in
11
steps 1 to 9 above) by clicking on the Edit link above. Review the data and click
APPROVE to “sign” the certificate, or IGNORE should you wish to return to it later
Page 25User Manual Electronic Catch Certification System
Important: Steps 12 to 18 is again for the exporter’s use
Upon receipt of notification of a completed catch certificate from the supplier
12
(catcher), an authorised user logs on and displays the list of pending certificates for
his or her company (tab Pending Exporters).
Activate the returned application (completed and returned by the supplier/catcher in
13 step 11 above) by clicking the Edit button in the Action column above.
14 Complete the transport details by clicking the TRANSPORT DETAILS [EDIT] link
Page 26User Manual Electronic Catch Certification System
On the screen below complete the following fields:
15
Country of Exportation – defaults to South Africa
Place of Departure – Usually Port or Airport city
Date Shipped – or to be shipped
Shipped On – Either name of transporting vessel if by sea, or
Flight No – Flight number if exported by air
Shipped To – EU port of arrival
Selecting the SAVE AND CONTINUE button above will load the screen below where
16
you can enter the container or waybill number as well as seal numbers. If required
you can enter multiple or seal numbers. Select the button Add Details or the link Add
New to add a waybill number or container number or numbers, as well as container
seal numbers (seal numbers are optional).
Page 27User Manual Electronic Catch Certification System
You are returned to the EDIT CONTAINER/WAYBILL DETAILS screen, but an additional
17
button SUBMIT FOR VALIDATION is now visible.
Select SAVE AND CONTINUE to validate and print your certificate at a later stage;
18
select SUBMIT FOR VALIDATION to validate and print your certificate straight away.
Your generated catch certificate will appear as a PDF document in a new window.
You can now select to print and/or e-mail the document.
Tip: It is recommended that you click on the link Sign Out first before closing your
web browser once you have created and/or downloaded your certificate
Page 28User Manual Electronic Catch Certification System
3. RETURNING TO A PREVIOUSLY VALIDATED CERTIFICATE
Follow these steps to re-activate a previously validated certificate, that is, to display it, re-
print it, update last minute changes to transport details etc.
On the main screen select the tab View Certificates then select the link Validated
1 Certificates.
In the Document Number field click on the document you want to open. Please
2 note, only validated certificates are issued a document number.
Select the GENERATE PDF button to display your certificate in Adobe Reader,
3 alternatively you can update your transport details with last minute transport
arrangements before you generate your certificate by clicking on the TRANSPORT
DETAILS [EDIT] link.
Page 29User Manual Electronic Catch Certification System
VALIDATING AUTHORITY USER GUIDE
1. LOGGING ONTO THE SYSTEM
On the main page of the site look for a "ADMIN LOGIN" form. Enter your e-mail address and
password and hit "Log In". Note the e-mail address and password used to create your
account will be mailed to you upon account creation.
2. SETTING UP USER ACCOUNTS
Prior to going live, one user with administrative rights will be identified and given access to
the system. This user will then be able to create additional user accounts for all DAFF
employees that need access to the system by following the steps below.
Once logged in, on the main page, select the link at the top of the page named
1 Manage Users. The screen below will appear.
Page 30User Manual Electronic Catch Certification System
Action the link Add A New User above and to the right of the list of users. To change
2 user details for an existing user, click the Edit link next to the user you want to
change, or select Delete to remove the user from the database
Complete the fields below and then action the SAVE AND CONTINUE button. Please
3 note mandatory fields are denoted by the asterisk (*) character. Tick the checkbox
Administrator if the user being created will be allowed to create additional user
accounts.
When you click on the SAVE AND CONTINUE button above you will be returned to
4 the screen below. Select the MCM Home part of the link MCM Home > MCM
Manage Users to return to the main menu.
Page 31User Manual Electronic Catch Certification System
3. RELEASING VESSELS
Fishing companies will not be able to select one of their vessels for inclusion on a catch
certificate unless the vessel is in a RELEASED status. Vessels will revert to status NOT
RELEASED under the following conditions:
When a new vessel is added to the system
When the fishing company (or legal representative) changes any of the vessel’s
details
When a vessel license is edited or a new license for the vessel is added to the system
Note: A vessel can not be released unless at least one license is on file for that vessel
Follow the steps below to release a vessel:
Once logged in, on the main page, select the link Release Vessels. The screen below
1 will appear listing all vessels currently in a NOT RELEASED status, sorted by vessel
name.
2
3
To return to the previous screen (home page), click on the MCM Home part of the link
2 MCM Home > Vessels Not Released
To release a vessel, find the vessel in the list of vessels not released, then action the
3 Edit link next to that vessel
Page 32User Manual Electronic Catch Certification System
The dialog window below will appear showing the vessel name in the dialog title as
4 well as the most recent license data for the vessel (up to a maximum of 15 records
sorted by newest to oldest)
Select the radio button Release then click the SAVE button. This will close the dialog
5 window and remove the vessel from the list of vessels not released
Should you choose not to release the vessel, you could return to the previous screen
6 by clicking on the CLOSE button, however it is better to select the radio button Don’t
Release, enter a reason why you do not want to release the vessel and then click the
Save button. This will ensure that the vessel owner is notified by the system as to the
reason for not releasing the vessel
Tip: Once you release a vessel, you will notice it no longer appears on the list Vessels Not
Released
Page 33User Manual Electronic Catch Certification System
4. SUSPENDING A VESSEL
The Validating Authority (DAFF) can block a vessel for a limited time or on a permanent
basis. Any catch periods entered for this vessel overlapping with a period of suspension will
result in the certificate not being validated. Multiple “blocked” periods can be entered for a
vessel. See example below: For the vessel Titanic only catches landed in the second half of
the year will be allowed on the catch certificate, whereas the vessel Bismarck is suspended
indefinitely:
Vessel Blocked From Blocked To
Titanic 1 Jan 2011 30 June 2011
Titanic 1 Jan 2010 30 June 2010
Bismarck 1 Jan 2011 30 Dec 2099
You can suspend a vessel following one of two available menu paths.
If you know the name of the fishing company or legal representative:
Point your browser to the link http://www.catchcertificate.co.za/mcm/. Then on the
1 main page of the site look for a "MCM ADMIN LOGIN" form. Enter your e-mail address
and password and hit "Log In"
Once logged in, on the main page, select the link View List Of Companies. The screen
2 below will appear listing all registered companies sorted by company name:
Page 34User Manual Electronic Catch Certification System
Navigate to the company you looking for, then click on the company name to display
3 the screen below showing the company details and the list of vessels registered
against that company
4
5
To return to the previous screen, that is the list of companies, click the COMPANIES
4
part of the COMPANIES >> COMPANY VIEW link
To suspend a vessel, or to remove a suspension period, select the Edit link next to the
5 vessel to process. The screen below will load in your browser listing all the vessels for
that vessel as well as any existing periods of suspension
6
8
7
Page 35User Manual Electronic Catch Certification System
To return to the previous screen, that is the list of vessels for the company you are
6 working with, click the Vessel List part of the Vessel List >> Vessel Details link
To delete (cancel) an existing suspension period, click the Delete link next to the
7 applicable period
Click on the Add a New Blocked Period to enter a new period of suspension. The
8 popup window below will appear:
Enter the suspension period. Any fish landed by the vessel within this date range will
9 not be validated by the system. Then enter the reason for the suspension (mandatory)
and click the SAVE button to return to the previous screen
If you know the name of the fishing vessel
Point your browser to the link http://www.catchcertificate.co.za/mcm/. Then on the
1 main page of the site look for a "MCM ADMIN LOGIN" form. Enter your e-mail address
and password and hit "Log In"
Page 36User Manual Electronic Catch Certification System
Once logged in, on the main page, select the link View List Of Vessels. The screen
2 below will appear listing all registered vessels sorted by vessel name.
Once logged in, on the main page, select the link View List Of Vessels. The screen
3 below will appear listing all registered vessels sorted by vessel name. You can select
the vessel you looking for by using one of the two menu paths listed below:
1. Navigate to the vessel you looking for and click on the company name below
the vessel. The system will display the company details and all the vessels
registered against the company. Click the Edit link next to the vessel you want
to process, or
2. Start typing the name of the vessel in the Vessel Search field. This will show a
drop down box showing all vessels matching the text you are typing, then
select the required vessel in the drop down list.
5
4
Page 37User Manual Electronic Catch Certification System
To delete (cancel) an existing suspension period, click the Delete link next to the
4 applicable period
Click on the Add a New Blocked Period to enter a new period of suspension. The
5 popup window below will appear:
Enter the suspension period. Any fish landed by the vessel within this date range will
9 not be validated by the system. Then enter the reason for the suspension (mandatory)
and click the SAVE button to return to the previous screen
5. DISPLAYING A CERTIFICATE
Point your browser to the link http://www.catchcertificate.co.za/mcm/. Then on the
1 main page of the site look for a "MCM ADMIN LOGIN" form. Enter your e-mail address
and password and hit "Log In"
Once logged in, on the main page, select the link View Certificates. The screen below
2 will appear listing certificates showing the most recent certificate first.
Page 38User Manual Electronic Catch Certification System
4
Enter a FROM and TO dates in the date fields provided then select Generate List
3
Tip: You can use this list to view the Export Permit number entered by the exporter when
the certificate was created
Click on the certificate number (Arrow# 4 above) to drill down to the certificate
4 details. The page below will load in your browser window:
Page 39User Manual Electronic Catch Certification System
To print a copy of the certificate, action the Generate PDF button. The certificate will
5 be generated as a PDF file.
Select your browser’s BACK button to return to the list of certificates. To return to the
6 main menu (Home Page), click on the MCM HOME part of the link MCM HOME >
CERTIFCATE DETAILS
6. REVIEWING VESSEL LICENSE HISTORY
To detect possible manipulation of vessel license data, the system provides a history of
changes to vessel licenses. To allow scrutiny of changes, data is displayed sorted by vessel,
then by license number showing the most recent change first.
Point your browser to the link http://www.catchcertificate.co.za/mcm/. Then on the
1 main page of the site look for a "MCM ADMIN LOGIN" form. Enter your e-mail address
and password and hit "Log In"
Once logged in, on the main page, select the link License Change History. The screen
2 below will appear:
Enter the period of changes to review in the CHANGED FROM and TO fields, for
3 example to show changes made to vessel licenses for the month of January enter the
dates as in the screenshot above, then click the GENERATE LIST button
Page 40User Manual Electronic Catch Certification System
7. MAINTAINING VALIDATING AUTHORITY SECTION OF THE CATCH CERTIFICATE
The data displayed under Section 1 – Validating Authority on the catch certificate can be
changed as follows:
Point your browser to the link http://www.catchcertificate.co.za/mcm/. Then on the
1 main page of the site look for a "DAFF ADMIN LOGIN" form. Enter your e-mail address
and password and hit "Log In".
2 Select the link Edit Validator at the top of the page. Please note the link will only be
visible to DAFF users with Admin rights
2
4
3
Fill in information required and select Save and Continue. Note mandatory fields are
3
denoted by the asterisk (*) character.
Click on the DAFF HOME section of the title DAFF HOME > EDIT VALIDATOR DETAILS to
4 return to the Home page
Page 41User Manual Electronic Catch Certification System
APPENDIX 1 – HARMONISED SYSTEM TARIFF CODES
The Harmonized Commodity Description and Coding System (HS) is an internationally
standardized system of names and numbers for classifying traded products developed and
maintained by the World Customs Organization
The HS is a six-digit nomenclature. The first two digits represent the chapter. All fishery
products for export will fall under either chapter three or sixteen. The first four digits are
referred to as the heading. The first six digits are known as a subheading.
Countries that have adopted the Harmonized System are not permitted to alter the
numerical codes at the four or six digit level. Individual countries may extend a Harmonized
System number to eight or ten digits for customs or export purposes.
These codes are used as a basis for (amongst other):
Customs tariffs
Collection of international trade statistics
Trade negotiations (e.g., the World Trade Organization schedules of tariff
concessions)
Transport tariffs and statistics
Monitoring of controlled goods (e.g. endangered species)
Example:
03 FISH, CRUSTACEANS, MOLLUSCS, OTHER AQUATIC INVERTEBRATES
03.02 FISH, FRESH OR CHILLED, EXCLUDING OTHER FISH FILLETS OR FISH MEAT OF SECTION 03.04
0302.06 OTHER FISH, EXCLUDING LIVERS & ROES
0302.64 MACKEREL
Although this example includes only six digits, some countries (South Africa included) have
categories with 8 or even 10 digits in total. It is recommended that for the sake of
consistency, all certificates reflect at least the first 6 to 8 digits, and not just the first 4 digits
as used on the South African Health Certificate
See URL below for a quick reference list of codes:
http://www.cargoinfo.co.za/customs/customstree.asp
Other reference sources will be the Customs Tariff book, as well as your other trade
documentation, e.g. the Certificate of Origin and Health Certificate.
Page 42User Manual Electronic Catch Certification System
APPENDIX 2 – SCENARIOS ON USING THE SYSTEM
Scenario A: Subsidiary Companies
Vessel representative in export department (or subsidiary company administrating
exports for the group)
Register a single company within the system; tick both options Exporter and Catcher, take
on all vessels belonging to the group. A registered user (normally within the export
department or division) uses option 1 – Create New Certificate - From Own Vessels
Each subsidiary fishing company appoints their own vessel representatives
Exporter registers as Exporter, fishing company 1 & 2 register individually as catchers, take
on their vessels and users. Use process 2 – Create New Certificate - From Procured Catches
(Exporter logs on and initiate application, forwards to fishing company, user in fishing
company logs on etc)
Page 43User Manual Electronic Catch Certification System
Scenario B: Joint Ventures
The same staff handles all exports (including sales from Joint Venture)
Create one company (Type both Exporter and Catcher), take on own vessels and joint
venture vessel(s), use process 1 – From Own Catches
Staff at JV company (JV2) in better position to complete vessel details
Company (JV2) registers independently and takes on his vessels and representatives. When
exporting fish from JV 1, use process 1, From Own catches (list JV vessels as own). When
exporting fish from JV 2, use process 2, From Procured Catches. If mixed consignment (from
JV1 and JV2 vessels – create two certificates)
Page 44User Manual Electronic Catch Certification System
APPENDIX 3 – EXAMPLES - CORRECT USE OF VESSEL REPRESENTATIVES
Page 45User Manual Electronic Catch Certification System
Page 46You can also read