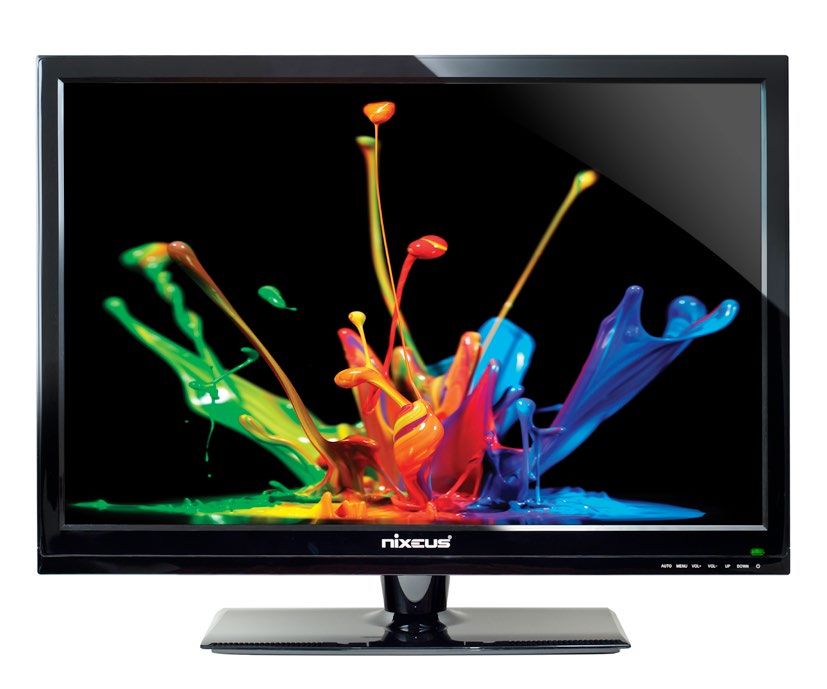
(NX-VUE30) - Nixeus Technology, Inc - Nixeus Vue 30 IPS 2560x1600 Monitor
←
→
Page content transcription
If your browser does not render page correctly, please read the page content below
Nixeus Technology, Inc

Nixeus Vue 30 IPS 2560x1600 Monitor
            (NX-VUE30)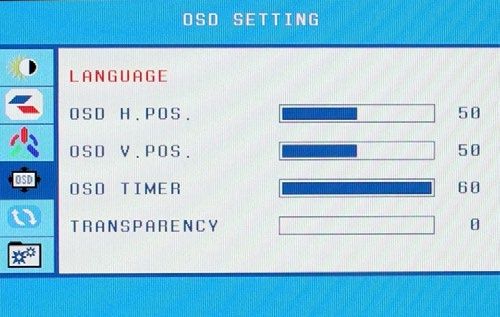
Table of Contents
    1.   Important Information          3

    2. Getting Started                  5

       Box Content                      5

       Installing Base Stand            5

        Input and Connection Ports      5

        Power Cable and Supply Switch   6

    3.   Settings                       8

        On screen Setting Display       8

       OSD SETTING Sub-menu             8

       Brightness                       11

       Image                            14

       Color Temp                       15

       Color Temperature Calibration    16

       MISC                             17

       Reset                            20

    4. Warranty                         21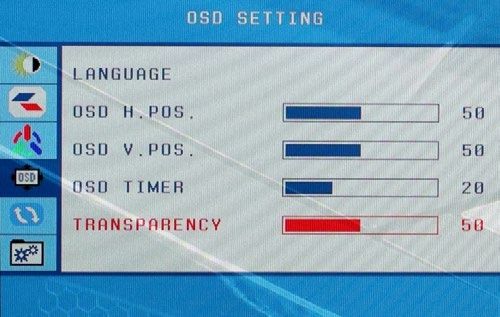
Important Information
Important Note:

Please make sure your computer hardware graphics card supports the Nixeus Vue 30” IPS Monitor. Some
devices and connections may not be able to support the full 2560x1600 resolution. If you are not sure, please
contact your computerhardware’s manufacturer. Please read this manual before using the Nixeus Vue 30” NX-
VUE30 with your computer. It contains important information regarding use and care of IPS Monitors.

Safety and Maintenance:

1) Do not expose the monitor to direct sunlight. Keep the monitor away from a stove or any other heat source.

2) Remove or secure any objects that may fall into the monitor’s vents. Do not obstruct or block the cooling
vents of the monitor.

3) Don’t jam the vents on the enclosure.

4) When setting up the monitor for use, please ensure the power plug and socket are easy to insert and extract.

5) When disconnecting the power cord or DC power line for the monitor, please wait for 6 seconds before
reconnecting the power cord or DC power line wires for normal operation.

6) Please use only approved power line and power adapters provided by Nixeus. If any power connections are
missing,please contact Nixeus for a replacement. Using un-authorized power connectors may damage your
monitor and void your warranty.

7) During operation, please do not throw objects and take care to avoid collision with the monitor. Do not over-
clock or modify the monitor’s decoder board. Please do not apply excessive force to the LCD panel or drop the
monitor. Warranty does not cover physical damages, over-clocking, and modifications to the monitor.

8) When monitor is not in use for a long period of time, please disconnect the power plug.

9) When using slightly wet cloth or LCD cleaners to clean the monitor, please disconnect the power adapter.
Do not use organic solvent, alcohol, or ammonia liquid to clean the monitor.

10) Do not store or use monitor in hot, direct sunlight, or in a cold environment. To avoid electrical shock and to
prevent monitor damage; do not use the monitor in dusty, rain, wet, and humid conditions. If monitor gets wet,
please wipe clean with soft dry cloth as soon as possible. If foreign objects or liquids get into the monitor, please
disconnect power adapter immediately. For service please contact Nixeus Technical support for service and repair
at techsupport@nixeus.com

11) To ensure long life and best performance of the monitor, please use the monitor in these safe and optimum
conditions: Temperature = 0-40 degrees Celsius (32-95 degrees Fahrenheit), Humidity = 20-80% RH

                                                          3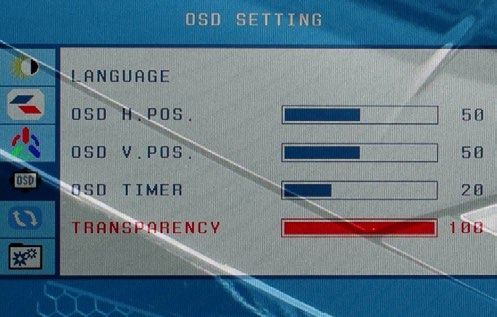
Avoiding Image Persistence, Incidental Image or After Image:

1) When the monitor is on and unattended, please use a moving screen saver. If there is a static (non moving
image) on the screen, please refresh regularly or start an application to start using the screen.

2) Long time continuous display of static images may case a “brand” on the screen; this is also cal “image
persistence” or “incidental image” or “after image.” “Brand,” “incidental image” or “after image” is a common
phenomenon of LCD Panel Technology. In most cases, after turning off the power supply for a certain amount
of time the “brand,” “incidental image” or “after image” will gradually disappear. Also by displaying a pure white
image for the entire screen for the same duration that you had the static image that caused the image persistence
may remove the image persistence. Please contact Nixeus if you need assistance in removing image persistence.

 CAUTION: Serious “brand,” “incidental image” or “after image” will not disappear and cannot be repaired. This
 type of damage is not covered by warranty. Please take good care of your monitor to prevent serious “brand,”
“incidental image” or “after image.”

If your monitor needs replacement parts, warranty service, and repairs please do not attempt to do it yourself !
Doing so may void the warranty. Please contact techsupport@nixeus.com for warranty support. For more
information please visit www.nixeus.com

                                                         4
Getting Started
Box Contents:
•   Nixeus Vue 30” IPS 2560x1600 Monitor (NX-VUE30)
•   Stand Base x 1 (with 4 screws)
•   Dual Link DVI-D Cable x 1
•   Power Adapter & Power Cable x 1
•   3.5mm Audio Auxiliary Cable x 1
•   NX-VUE30 Quick Start Guide

Installing Base Stand: (Tools needed – Philips Screw Driver)
Carefully lay the monitor on its’ back on a static free, clean, flat surface. Connect base to stand and line up
connectionholes. With the four connection screws provided, secure base to stand.

Input and Connection Ports:

                                                       1           1.      Audio Jack
                                                       2           2.      HDMI

                                                                   3.      Dual Link DVI
                                                        3
                                                                   4.      VGA

                                                       4           5.      DisplayPort

                                                                   Note: HDMI 1.4 and VGA do not support full
                                                        5          2560x1600 @ 60Hz

                                                            5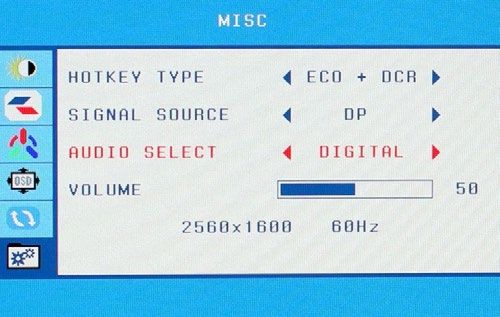
NX-VUE30 Power Cable and Power Supply Switch:
Only use the power cable included with the NX-VUE30. Using any other un-authorized power adapters may
damage your monitor and void your warranty.

1. Connect the power cable to internal power supply on the back of the monitor (make sure power switch is off
beforeconnecting the cable).

Next use the ON/OFF switch to turn on the internal power supply.

                        OFF Position                                    ON Position

To turn on the monitor press the “Power” Button shown here:

                                                      6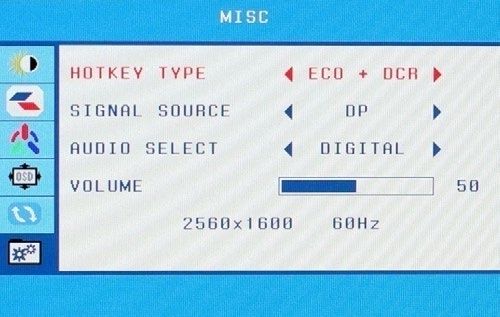
Monitor Swivel Left/Right:
Make sure the NX-VUE30 is on a stable level surface. Holding the left and right bezel with your hand, carefully
adjust monitor left or right to desired orientation.

Monitor Tilting Foward/Back:
Use both hands, hold the top and bottom or right and left to tilt the monitor as shown in the pictures.

                                                        7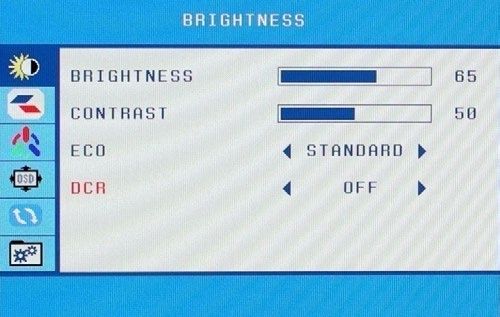
Settings
ON SCREEN DISPLAY (OSD):
For the On Screen Display to be visible on the monitor, a video signal must be transmited to the monitor from
your PC/MAC. The six buttons you will use to navigate the On Screen Display (OSD) are “AUTO,” “MENU,”
“VOL+,” “VOL-,” “UP,” and “DOWN.” These buttons can be found on the bottom right corner under the bezel
with their corosponding logos. The On Screen Display feature that allows the user to adjust monitor settings
without relying on a PC or Mac’s software.

NOTE: For On Screen Display (OSD) Navigation: The “MENU” button also functions as an “ENTER” or “OK” buttonand the “
AUTO” button functions as a “BACK” or “RETURN” button.

OSD SETTING Sub-Menu:
One of the first things you should do is to adjust the On Screen Display settings to your preference.

1) To bring up the OSD menu, first press the MENU button then press the DOWN button to navigate down
to OSD SETTING.

2) Next press the MENU button and you will highlight the word LANGUAGE in red. (NOTE: The MENU
button alsoacts like an “ENTER” or “OK” button)

                                                           8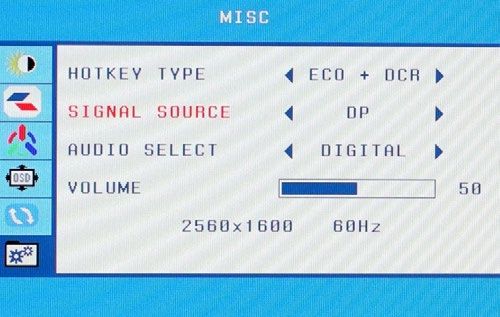
3) Next press the “MENU” button to access the Language selection.

4) Then press the UP or DOWN buttons to highlight your preferred language and press the MENU button to
select/activate your language.

If you want to adjust the horizontal placement of the OSD MENU on your monitor;

1) Press the DOWN or the UP button to navigate and highlight OSD H. POS then press MENU to highlight
the progress bar.

2) Use the VOL+ and VOL- buttons to adjust the value for your desired settings. Once you have customized
your selection, press the MENU or AUTO button.

                                                     9
The same steps can also be performed to adjust the vertical placement of the OSD MENU by navigating to the
OSD V. POS and adjusting the progress bar.

The default duration of the OSD MENU before it automatically disappears is 10 seconds.

1) To adjust this setting, in the OSD SETTING sub menu, use the UP or DOWN button to scroll down to
OSD TIMER and press menu to highlight the progress bar.

2) Then use the VOL+ or VOL- buttons to adjust the time for the OSD MENU. If you choose 60 seconds, but
you don’t need that much time, you don’t have to wait for the OSD to automatically disappear. You can always
just press the AUTO button to make the OSD menu disappear after you are finished with making adjustments.

You also can adjust the transparency of the OSD menu.

1) To do this, go to the OSD SETTING sub-menu and navigate down to TRANSPARENCY.

2) Press MENU to highlight the progress bar and use VOL+ and VOL- buttons to adjust your preferred set-
tings. Once you finish you may press the AUTO button twice to exit out of the OSD MENU.

                                                     10
BRIGHTNESS Sub-Menu:
To adjust the settings in the BRIGHTNESS Sub-Menu, first press the MENU button bring up the OSD, then
press MENU again to access the BRIGHTNESS Sub-Menu.
1) To adjust the monitor’s brightness, use the UP and DOWN buttons to navigate to BRIGHTNESS then
press the MENU button to highlight the progress bar.
2) Next use the VOL+ or VOL- buttons to adjust your preferred brightness settings.
3) Once you have selected your preferred brightness settings, press the MENU or AUTO button to exit out of
the progress bar.
111) To adjust the Contrast Ratio, in the BRIGHTNESS Sub-Menu, use the UP/DOWN buttons to navigate
to CONTRAST
2) Then press the MENU button to select CONTRAST to adjust the progress bar to your preferred contrast
ratio settings.
The ECO settings have 4 preset brightness/contrast settings - STANDARD, GAME, MOVIE, and TEXT.
1) In the BRIGHTNESS Sub-Menu, use the UP/DOWN buttons to navigate to ECO and press the
MENU button.
2) Then use the VOL+/VOL- buttons to cycle through and select either STANDARD, GAME, TEXT, and
MOVIE mode.Please note when you select GAME, TEXT, or MOVIE as the setting - you will not be able to
manually customize theBRIGHTNESS and CONTRAST settings (These settings are grayed out).
12Dynamic Contrast Ratio (DCR) can also be adjusted in the BRIGHTNESS Sub-MENU.
1) Use the UP/DOWN buttons to navigate to DCR and press the MENU button.
2) Using the VOL+/VOL- buttons you can turn DCR to ON or OFF. Pressing the AUTO button will exit
DCR.Please note if DCR is turned ON, you cannot adjust the BRIGHTNESS and CONTRAST settings.
You must adjust your BRIGHTNESS and CONTRAST settings prior to turning ON DCR.
NOTE: For professional calibration, DCR must always be set to OFF and the ECO settings must be set to
STANDARD to allow access or adjustments to BRIGHTNESS and CONTRAST settings in the
BRIGHTNESS Sub-Menu.
133) Once you are finished with your adjustments in the BRIGHTNESS Sub-Menu, press AUTO twice to exit
out of the OSD.
IMAGE Sub-Menu:
In the IMAGE Sub-MENU, you are only able to adjust the ASPECT Ratio of the monitor to either WIDE or
4:3. The recommended settings is to set the ASPECT ratio to WIDE.
1) First press the MENU button to bring up the OSD, then use the UP/DOWN buttons to browse to the IM-
AGE sub-menu and press MENU again.
2) With ASPECT highlighted in red, press the MENU button, then use the VOL+/- to choose either 4:3 or
WIDE aspect ratio. Once you select your preferred viewing preference, press the AUTO button twice to exit the
OSD to apply the new settings.
14COLOR TEMP Sub-Menu:
1) Press the MENU button to bring up the OSD.
2) Use the Up/Down buttons to navigate to COLOR TEMP, then press the MENU button.
3) Use the VOL+/VOL- to browse or select one of 3 preset color temperatures; Normal, Warm, or Cool. Once
selected, you may press the “AUTO Button twice to exit and apply the settings.
15Color Temperature Calibration in COLOR TEMP Sub-Menu:
NOTE: For accurate color calibration, we recommend using a hardware colorimeter
1) In the COLOR TEMP Sub-Menu, use the VOL+/VOL- button to select the “USER” preference and press
the MENU button.
2) Use the UP/DOWN button to select which color temperature to customize and press the MENU button to
highlight the progress bar.
3) Next, use the VOL+/VOL- to adjust the desired settings of the color’s temperature. Pressing the AUTO but-
ton will allow you to exist out of the color’s progress bar. You can next use the UP/DOWN button to go to the
next color and pressing the MENU button will allow you to access the color’s progress bar to adjust that color’s
temperature settings. This step may be needed to repeated several times on each color to obtain the desired color
temperature settings when you are using a hardware colorimeter.
4) Once you have adjusted your desired color temperature settings, pressing the AUTO twice will exit the OSD
and apply the settings.
16MISC Sub-Menu:
1) Press the MENU button to bring up the OSD.
2) Using the UP/DOWN buttons, browse to the MISC sub-menu and press the MENU button.
3) Using the UP/DOWN buttons navigate to either HOTKEY TYPE, SIGNAL SOURCE, AUDIO SE-
LECT or VOLUME that you wish to adjust or change then press the MENU button.
4) Use VOL+/VOL- to change the settings and press AUTO to exit out of that setting.
HOTKEY TYPE: With no On Screen Display present, the UP and DOWN button also functions as hot keys.
Changing this setting will change the function of the UP/DOWN hot keys.
ECO + DCR: ECO = The 4 Brightness/Contrast settings of Standard, Game, Movie, and Text. DCR = Toggles
DCR to ON or Off.
ASP+ECO: ASP = Aspect Ration of either 4:3 or WIDE. ECO = The 4 Brightness/Contrast settings of Stan-
dard, Game, Movie, and Text.
BRI+CON: Assigns the BRIGHTNESS and CONTRAST to the UP/DOWN hot keys. You can use VOL+/
VOL- to adjust brightness or contrast settings.
17SIGNAL SOURCE: This setting allows you to change the video signal source to either VGA, DVI, HDMI, or
DP. This function can also be accessed without the On Screen Display by simply just pressing the AUTO button.
18AUDIO SELECT: This setting allows you to choose which audio source to transmit sound to the monitors
speakers. Select DIGITAL only if you are using a HDMI or DP video signal source. Choose ANALOG is you
are using DVI or VGA connection cables with the 3.5mm audio cable.
19VOLUME: This setting allows you to adjust the volume setting of the monitors internal speakers.
RESET Sub-Menu:
1) Press the MENU button to bring up the OSD
2) Using the UP/DOWN buttons, browse to the RESET sub-menu and press the MENU button.
3) Pressing the MENU button again while the RESET is highlighted in red will reset ALL OSD settings to
the factory default settings.
If you need additional assistant, please contact Nixeus Technology toll free at 888-983-4128 or
e-mail techsupport@nixeus.com
20Nixeus Technology, Inc. (“Nixeus”) provides this Limited Warranty:
• Only to the person or entity that originally purchased the product from Nixeus or its authorized reseller or
distributor, and
• Only for products purchased and delivered within the the United States, the District of Columbia, U.S.
Possessions or Protectorates, U.S. Military Installations, or addresses with an APO or FPO, and Canada.
One Year Limited Warranty:
Nixeus warrants this product will be free from material defects in workmanship and materials under normal use
from the original date of purchase.
• Product (excluding power supplies): One (1) year
• Power supplies: One (1) year
• Spare parts and spare kits: Ninety (90) days
• Having up to 3 Bright or 3 Dark Pixel anomalies is considered normal and the monitor is not defective.
Warranty serviced monitors and RMA replacement parts may still consist of these allowed pixel anomalies.
Monitor is defective if it contains MORE than the above stated allowed pixel anomalies.
Under this Limited Warranty will be, at Nixeus’s option, to either repair or replace the defective Product during
the Warranty Period at no charge to the original owner excluding shipping and handling fees. The replacement
product needs not to be new nor have identical make, model or part. Nixeus may replace the defective Product
or any part thereof with any factory reconditioned product that Nixeus determines is equivalent in all material
respects to the defective Product. Replacement or repaired Product will be warranted for the remainder of the
original Warranty Period or ninety (90) days, whichever is longer.
Non-Applicability of Limited Warranty:
Limited Warranty of Nixeus’s products will not be applied to and does not cover any refurbished/reconditioned
product and any product purchased through clearance or liquidation sale or other sales in which Nixeus, the
sellers, or the liquidators expressly disclaim their warranty obligation, whereas the product is being sold “As-Is”
without any warranty.
RMA (Return Merchandise Authorization) Request:
The customer shall return the product with proof of purchase to Nixeus for RMA processing. In case the return
policy period has expired from the retailer or distributors and the product is within warranty, the customer shall
submit a RMA to Nixeus as described below:
• Customer (End User) must submit a RMA request with the product as part of the claim with a written detai
description of the Product issue allowing Nixues to confirm the same, along with proof of purchase of the
product (dated receipt).
• The customer must first contact technical support from Nixeus Technical Support at techsupport@nixeus.com,
who will attempt to assist and remedy the customer in resolving their issues and concern with the product. If the
product is considered defective or malfunctioning, the Customer (End User) must obtain a Return Material
Authorization (“RMA”) number by completing the RMA form and entering the assigned RMA Number
assigned by techsupport@nixeus.com.
21• After an RMA number is assigned, the defective/malfunctioning product must be packaged securely in the
original or other suitable shipping package to ensure that it will not be damaged in transit to Nixeus Technology,
Inc. The RMA number must be visibly and clearly marked on the outside of the package. Do not include any
manuals or accessories in the shipping package, Nixeus will only replace/repair the defective/malfunctioning
product and will not ship back any accessories.
• The Customer (End User) is responsible for all incoming shipping charges to Nixeus. RMA replacements need
be fully insured by the customer expense and shipped to Nixeus Technology, Inc., 4801 Little John Street, Suite
E, Baldwin Park, CA 91706. Nixeus will not be held responsible for lost packages shipped during transit to
Nixeus’s Office. Nixeus will ship back the repaired or replacement package any common carrier selected
by Nixeus. Return shipping fees shall be paid by Nixeus, if a United States address is used, otherwise the
product will be shipped to you using freight collect. Expedited shipment methods are available at Customers
(End Users) expense upon request. We “Nixeus” reserve the right to deny and reject any returned products if
guidelines/instructions and request are not met, return shipment will be charged to the Customers “End Users”
at their expense.
RMA (Return Merchandise Authorization) Request:
The Limited Warranty provided by Nixeus does not cover the following: Improper or incorrectly performed
service maintenance or repairs voids this Limited Warranty. Products that Nixeus’ judge to have been subjected
to abuse, accident, alteration, modification, tampering, negligence, misuse, faulty installation, repair or service
in any way that is not contemplated in the documentation for the product, or if the model or serial number has
been altered, tampered with, defaced or removed, product failures due to power outages, and cosmetic damage,
and does not limit damage that are caused by shipment, due to act of God. Any hardware, firmware or other
products or services provided by anyone other than Nixeus.
Limitation of Liability:
NIXEUS IS NOT LIABLE UNDER ANY CONTRACT, NEGLIGENCE, STRICT LIABILITY OR
OTHER LEGAL OR EQUITABLE THEORY FOR ANY LOSS OF USE OF THE PRODUCT,
INCONVENIENCE OR DAMAGES OF ANY CHARACTER, WHETHER DIRECT, SPECIAL,
INCIDENTAL OR CONSEQUENTIAL (INCLUDING, BUT NOT LIMITED TO, DAMAGES FOR
LOSS OF GOODWILL, LOSS OF REVENUE OR PROFIT, WORK STOPPAGE,
COMPUTER FAILURE OR MALFUNCTION, FAILURE OF OTHER EQUIPMENT OR
COMPUTER PROGRAMS TO WHICH NIXES’S PRODUCT IS CONNECTED WITH, LOSS
OF INFORMATION OR DATA CONTAINED IN, STORED ON, OR INTEGRATED WITH ANY
PRODUCT RETURNED TO NIXEUS FOR WARRANTY SERVICE) RESULTING FROM THE USE
OF THE PRODUCT, RELATING TO WARRANTY SERVICE, OR ARISING OUT OF
ANY BREACH OF THIS LIMITED WARRANTY, EVEN IF NIXEUS HAS BEEN ADVISED OF
THE POSSIBILITY OF SUCH DAMAGES TO THE MAXIMUM EXTENT PERMITTED BY
LAW,. THE SOLE REMEDY FOR A BREACH OF THE FOREGOING LIMITED WARRANTY
IS REPAIR, OR REPLACEMENT OF THE DEFECTIVE OR NONCONFORMING PRODUCT.
THE MAXIMUM LIABILITY OF NIXEUS UNDER THIS WARRANTY IS LIMITED TO THE
PURCHASE PRICE OF THE PRODUCT COVERED BY THE WARRANTY. THE FOREGOING
EXPRESS WRITTEN WARRANTIES AND REMEDIES ARE EXCLUSIVE AND ARE IN LIEU OF
ANY OTHER WARRANTIES OR REMEDIES, EXPRESS, IMPLIED OR STATUTORY.
22Warning: This product contains mercury, a chemical known to cause cancer in the State of California. Please
handle with care and dispose of properly.
Governing Law:
This Limited Warranty shall be governed by the laws of the State of California. Some states do not allow
exclusion or limitation of incidental or consequential damages, or limitations on how long an implied warranty
lasts, so the foregoing limitations and exclusions may not apply. This Limited Warranty provides specific legal
rights and you may also have other rights which vary from state to state.
Nixeus Technology, Inc
4801 Little John Street, Suite E
Baldwin Park, CA 91706
Toll Free: 888-983-4128,
Phone: 626-381-9584,
Fax: 626-381-9585
Tech Support & Warranty Service: techsupport@nixeus.com
Web Site: www.nixeus.com
23You can also read