Stream TV User Guide FOR FIRE STICKS & SET TOP BOXES - Stream from your computer at streamtv.gardonville.net
←
→
Page content transcription
If your browser does not render page correctly, please read the page content below
gardonville

        Stream TV User Guide
                FOR FIRE STICKS & SET TOP BOXES

           Stream from your computer
           at streamtv.gardonville.net

www.gctel.com/support | (320) 524-2211 | 24x7 Help Desk (320) 834-5155
Table of Contents
              Getting Started
              Account Set Up...................................................................................................................................... 2

              Identify Your Remote....................................................................................................................... 3

              Fire Stick Instructions
 Fire Stick
              Create a Free Amazon Account....................................................................................................... 4
              Fire Stick Remote & Functionality..............................................................................................5-6
              Stream TV App...................................................................................................................................7-8

              Set Top Box Instructions
Set Top Box
              Set Top Box at a Glance................................................................................................................9-10
              Set Top Box Remote & Functionality.................................................................................... 11-16

              Menu Navigation Tips
              Changing the Channel......................................................................................................................17
              Menu Button.........................................................................................................................................17
              Guide.......................................................................................................................................................18
              Shows......................................................................................................................................................18
              Movies.....................................................................................................................................................19
              Profiles..............................................................................................................................................19-20
              Search......................................................................................................................................................20

              How to Use Features
              Replay......................................................................................................................................................21
              Restart.....................................................................................................................................................21
              Closed Captions...................................................................................................................................22
              Parental Controls.................................................................................................................................22
              Profiles.....................................................................................................................................................23

              Cloud DVR (Digital Video Recorder)
              DVR Features........................................................................................................................................24
              Recording Programs..........................................................................................................................25
              Recording a Series..............................................................................................................................25
              Viewing Recorded Programs..........................................................................................................26
              Editing Series Recordings................................................................................................................27
              Deleting Recordings..........................................................................................................................28
              Cloud DVR Space................................................................................................................................28

              Troubleshooting Steps...................................................................................................................29
              Frequently Asked Questions.......................................................................................................29

  1
Getting Started
Account Set Up
To get started, please call our office at (320) 524-2211 to have our team create a Stream TV account for
you. You will be required to provide us with an email address.

Once we’ve created your account, you will receive an email
from streamtv@gardonville.net. Open the email and follow the in-
structions to complete your account set up. Please note the link within
the email expires within 24 hours.

        Usernames and Passwords
        Use this space below to help keep track of your Stream TV usernames and passwords!

           Stream TV Username (email address)                         Password

                  Network Name (SSID)                                 Password

            Amazon Username (email address)                       Amazon Password
                    Fire Stick Only                                Fire Stick Only

              Parental Controls Pin Number

                                                                                                           2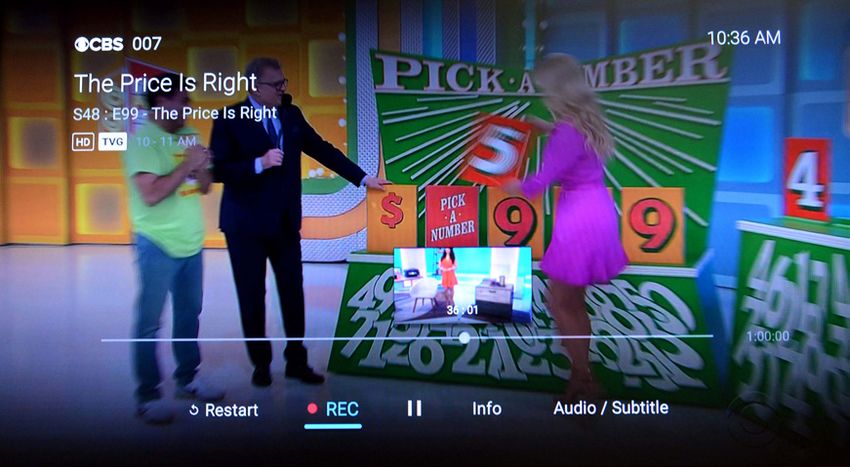
KSTB2020 | User / Installation Guide

                REMOTE
             Identify  CONTROL
                      Your     FUNCTIONALITY
                           Remote

                         Backlighting                     Hot Keys

                          The remote
                          control is
                          a motion
                                                 1
                          detecting
                          device and will
                          backlight when
                                                 2
                          the remote is
                          picked up or           3
                                                                               4
                          moved.

                          Backlighting
                          will remain on
                          for 3 seconds.
                                                 5                             6

                                                           KURV 2.0 Voice
                                                        Remote Control Shown
     Fire Stick Remote                           Set Top Box Remote
    Continue to Page
                   4 4                           Continue to Page 9

3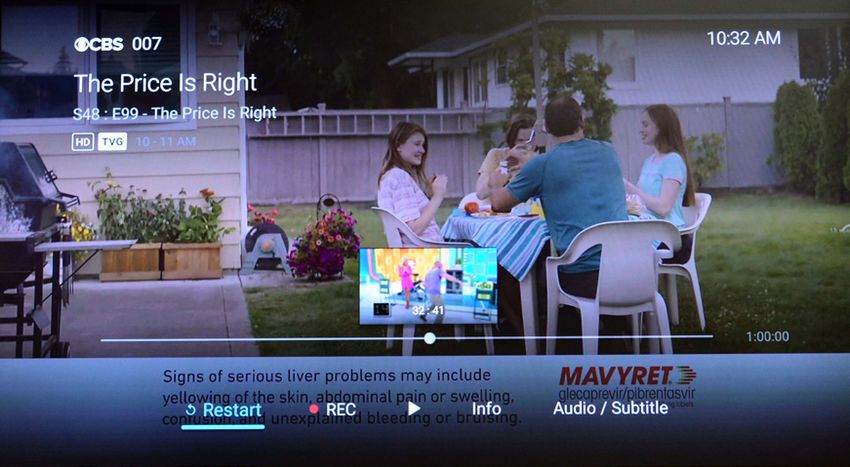
Fire Stick
                  3. Under the Sign in button, click Start here.

                       Create a Free AmazonSteps
                                             Account
                                                 to open an Amazon account:

                                                      (FOR FIRE STICK ONLY) 1.                                  Go to https://www.amazon.com
                                                                                                             2. Put the cursor on the Account & Lists tab
                                                                                                   Steps to open an Amazon account:

                                                                                                      1. Go to https://www.amazon.com
                                                                                                      2. Put the cursor on the Account & Lists tab

1. Go to amazon.com
                                                                                                      3. Under the Sign in button, click Start here.

2. Put the cursor on the Account & Lists tab                                                                 3. Under the Sign in button, click Start here.

3. Under the Sign in button, click Start here

4. Create an account
                  4. Create an account

                                                                                                      4. Create an account

5. Click Create your Amazon Account                                                                  How to set up an Amazon
                                                                                                     account without entering
6. Once      youyour
   5. Click Create have   created
                     Amazon account your Amazon account, you                                             credit card info:
   should see Hello, (insert your name here) directly
   above the Accounts & Lists tab.                                                                1. Go4.toCreate
                                                                                                            Amazon.com
                                                                                                                  an accountand click
   6. Once you have created your Amazon account, you should see Hello, (insert your name here)
      directly above the Accounts & Lists tab.
                                                                                                     create account.
                                                                                                  2. Enter in your account information.
                                                                                                  3. Go to your email to get the
                                                                                                     verification code to enter into
                                                                                                     Amazon.
                                                                                                  4. Click on Your Account.
                                                                                                  5. Select Your Addresses.
                                                                                                  6. Click Add Addresses.
                                                                                                  7. Enter your address information.
                                                                                                  8. On the address screen scroll down
                                                                                                  9. and select 1-click settings.
                                                                                                 10. Click on Make Default. It will open
                                                                                                     a payment pop up, you can click
                                                                                                     the “X” in the upper right corner.
                                                                                                     You can now set up the firestick
                                                                                                     and download free apps without
                                                                                                     entering credit card info.

                                                                                                                                                              4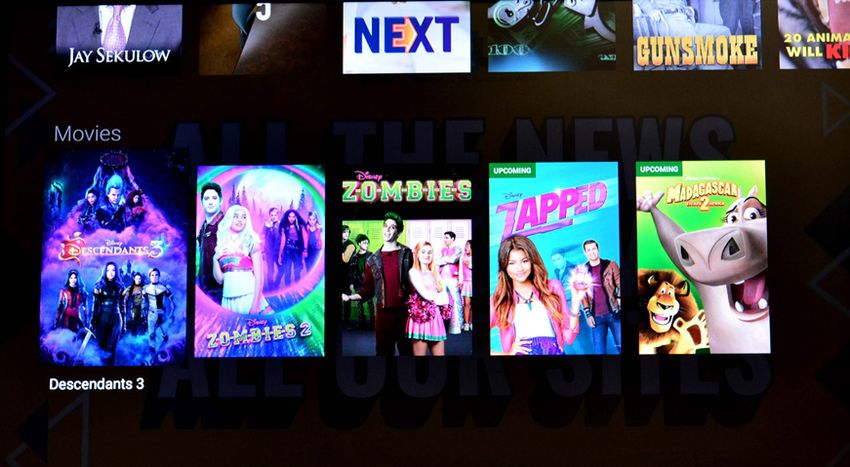
Fire Stick

                                       Fire Stick Remote

                                    Power             Microphone &
                  Turns your TV on and off.           Voice Button
                                                      The Microphone isn’t yet
                                                      compatible with Gardonville
                                                      Stream TV service, but it
                                                      will help you search the
                                                      Amazon App Store for
                             Navigation               apps. Just say “Gardonville.”
            Press up, down, left and right
             to move your cursor in those
         directions. The option you’re on             Select
           is highlighted by color or size.           Selects highlighted screen
                                                      options.

                                     Back
     Returns you to the previous screen.              Home
                                                      Returns you to the Fire
                                                      Stick Home menu.
                     Playback Controls
             Control live TV and your video
                recordings using the video            Menu
                            control buttons.          Gives you access to the
                                                      features of your Gardonville
                                                      Stream TV service.
                        Volume Control

                                                      Mute Audio

 5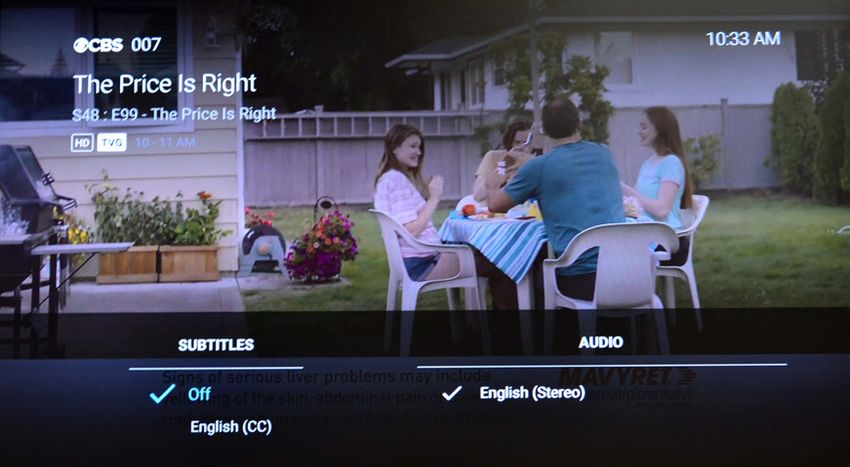
Fire Stick

                         Fire Stick Functionality
1. Turn on your TV using your Fire TV Stick remote
   control. You can also use this remote to adjust volume.
   (If your Fire TV Stick remote doesn’t have power and
   volume buttons, use your TV’s remote control to operate
   these functions.)

2. On the Fire TV Stick Home menu, press the Navigation
   button on the Fire Stick’s remote control to highlight the
   Stream TV app, press Select. (If your streaming device is
   not plugged in to HDMI port 1 on your TV, you will need to tune your TV to the correct input using
   the input or source button on your TV’s remote control.)

3. Choose the correct profile (if applicable), press Select.

4. Programming resumes on the last channel viewed.

To conserve bandwidth when not in use, press the Home button on the remote control to return to
the Fire TV Stick Home menu.

                                                                                                           6
Fire Stick

                  Downloading the Stream TV App
     Download the Gardonville Stream TV app from the app store of your device.
                                                                                              gardonville

     If you’re using a Fire TV Stick, look for the the magnifying glass icon (M) near the
     top left corner of the screen. Using the Navigation button, press over until you get
     to the M icon. Using the Navigation button, press down to begin typing in ‘Gar-
     donville Stream TV’. Next, press down using the Navigation button, to highlight
     ‘Gardonville Stream TV’. Press the Select button.

     You will then need to log in to the Gardonville Stream TV app using your username (email address) and
     password. See page 1.

     If you need assistance, please call (320) 524-2211.

                              Pin the Stream TV App
     To keep the Stream TV App front and center, pin it to the front of your app list.

     1. On the Fire TV Stick Home menu, press the
        Navigation button down to highlight the first app in
        the “Your Apps and Channels” section. The selected
        app will look larger than the others.

     2. Once there, press right on the Navigation button to
        scroll to the right until you reach the Stream TV app.
        Press the Select button.

     3. Press the Menu button.

     4. Using the Navigation button, press down to highlight .
        ‘Move to front’ and press the Select button.

     5. The Gardonville Stream TV app will now move to the
        front of all other apps.

 7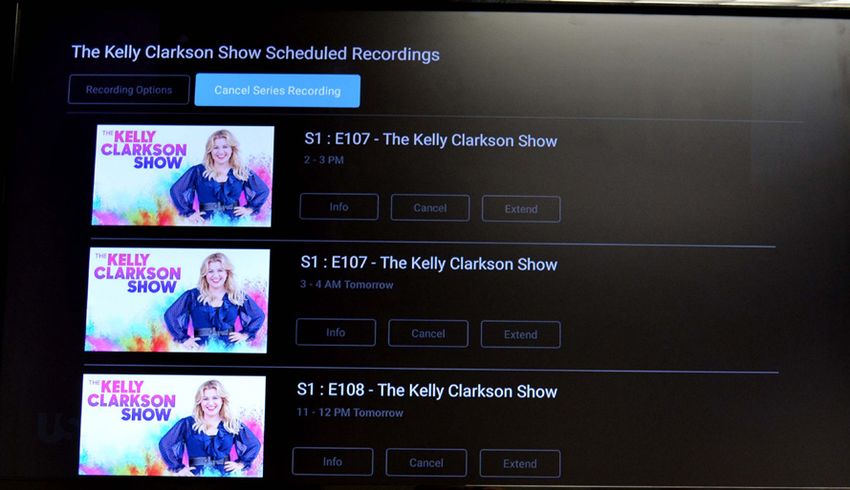
Fire Stick
Stream TV App: Sign In/Sign Out
When accessing the app the first time, or to sign in after signing out, please enter your username and
password. The username is the full email address you signed up with. If you’ve signed on previously, the
email address may be auto-filled.
1. On the sign-in screen, press Select to access the
on-screen keyboard.
2. Press left, right, up and down on the Navigation
button to highlight letters, numbers and symbols on
the on-screen keyboard and press the Select button to
enter the character.
To access capital letters and symbols, select those keys on
the keyboard. Some of the popular keys have remote control
shortcuts—see the image on the keys.
3. When done, press left, right, up and down on the
Navigation button to highlight the Next key and press .
Select.
4. Repeat steps 2 and 3 to enter your password.
To sign out of the Stream TV App:
1. On live TV, press the Menu button to access the TV
menus.
2. Press left or right on the remote’s Navigation button
to highlight Profile (smiley face ) and press Select.
3. Press up on the Navigation button to highlight the
Settings menu icon (cog wheel ) in the upper right
corner of the screen and press Select.
4. Press down on the Navigation button to highlight
Sign Out and press Select.
5. A popup window will appear asking, “Are you sure you
want to sign out?” Press Select to choose Yes.
8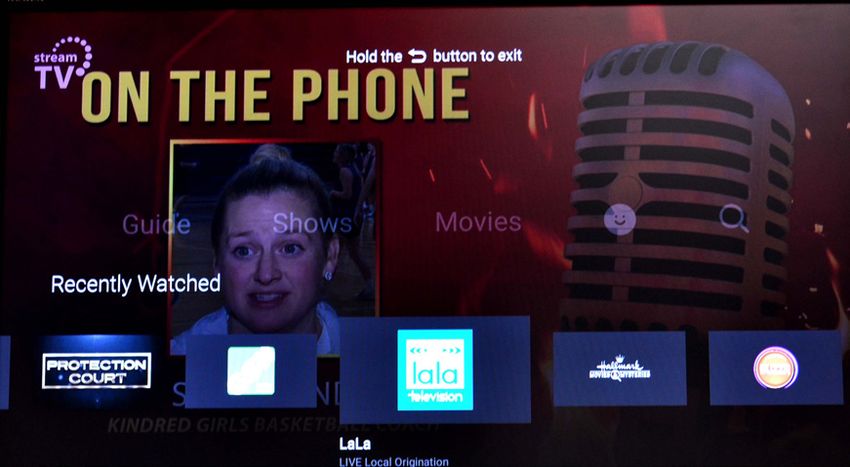
KSTB2020 | User / Installation Guide
Set Top Box

                     Set Top Box at a Glance
              SET-TOP BOX AT A GLANCE

                         Top View                            Front View

                                                             2          3

                                                     2 Status Indicator LED:
                                                        Indicates power status of STB
                                                        (Red = Off, Green = On).

                                         1           3 Infrared (IR) Sensor:
                                                        Used to communicate with the
              1 Power Button:                           KURV Remote Control.
                  Used to power the Kaon STB
                  On or Off.

              2

  9
KSTB2020 | User / Installation Guide Set Top Box
Set Top Box at a Glance
Rear View Side View
4 5 6 7 8 9
4 RJ45: 9 USB:
10/100 Ethernet port used to This port has an output
connect to a home router. power capability of 5V DC
5 HDMI: @ 1 amp.
Digital A/V output, used to
connect to a TV via HDMI cable.
6 AV Out:
SD Analog A/V output, used
to connect to older-style TVs
that do not support HDMI
connections. Ask your installer
for an RCA composite breakout
cable if one was not included.
7 S/PDIF:
Optical Audio output, used to
connect to external Sound bar
or Surround Sound system.
An optical cable with TOSLINK
connectors is required (not
included).
8 12V/1.5A In:
DC Power port, used to connect
via the power adapter. 3
10KSTB2020 | User / Installation Guide
Set Top Box
REMOTE CONTROLHot
FUNCTIONALITY
Keys
Set Top Box (STB) Remote
Hot Keys
The following Hot Keys are dedicated short cuts to return the user to
the video service regardless of the content or App being viewed.
Backlighting Hot Keys
1 MENU:
The remote Displays the Main Menu.
1 control is 2 LAST:
a motion Displays the last 15 items that have been watched.
1
detecting
device and will 3 HOME:
Displays the main Android TV menu including access to Apps.
2 backlight when
2
the remote is
4 GUIDE:
3 picked up or 3
4
Displays the Electronic Program Guide (EPG).
moved. 4
KSTB2020 | User / Installation Guide
5 SHOWS:
Backlighting Displays the shows that are presently available for viewing
will remain on On Demand (VOD).
for 3 seconds.
5 6
REMOTE
DisplaysCONTROL
6 MOVIES:
the movies that areFUNCTIONALITY
presently available for viewing
5 6 On Demand (VOD).
Backlighting Hot Keys
The remote control is a motion detecting device and will backlight when
the remote is picked up or moved.
The remote
Backlighting
control is will remain on for 30 seconds.
5
a motion
1
detecting
KURV 2.0 Voice
Remote Control
device Shown
and will
backlight when
4 2
the remote is
picked up or 3
4
moved.
KURV 2.0 Voice Backlighting
Remote Control Shown will remain on
Remote Control Battery Installation for 3 seconds.
5 6
The remote requires two AA batteries.
1. Hold the remote with keys facing the floor. Battery cover is the
entire back of the remote.
2. Using the ridges, slide the back cover towards the bottom of
the remote.
3. Remove the cover and insert batteries in the direction shown.
11Set Top Box
STB Remote Functionality
KSTB2020 | User / Installation Guide
Button Functionality
1 TV POWER:
2
Powers on or off TV if remote is
programmed with a TV infrared code.
3 2 TV INPUT:
1
Changes video input on TV if remote is
4
programmed with a TV infrared code.
5 6
3 POWER:
7
Switches STB power on or into standby
or off mode. Will also control TV power
8 9 and audio system after remote has
been programmed with a TV/Audio
10 11
Infrared code.
12 13
4 PAGE (Up or Down):
In the GUIDE or MENU screens, scrolls
one page up or down.
14 15
5 MENU:
Launches the MAIN MENU within the
16 17 App with Live Video or last viewed On-
Demand program.
18 6 LIVE TV:
19
Tunes to the last content viewed in the
20 21 App.
22 7 MUTE:
Mutes the audio on your audio device(s)
23 (TV, Audio System, or STB).
8 VOLUME (Up or Down):
Increases or decreases volume levels
24 on your audio device(s).
9 CHANNEL (Up or Down):
Selects the previous and next available
channels. (Hold for rapid advance.)
KURV 2.0 Voice
Within MENU or GUIDE acts the same
Remote Control Shown as Page Up/Page Down.
6
12Set Top Box
STB Remote Functionality
KSTB2020 | User / Installation Guide
10 GOOGLE HOME:
Launches AndroidTV main menu including access to Apps.
11 LAST:
Displays the last 15 items that have been watched.
12 BACK / EXIT:
Returns to previous menu or state within current App. From live video, this key
opens the Main Menu.
13 GUIDE:
Launches the Channel GUIDE (EPG) within the App.
14 ARROWS:
Moves to highlight items in respective direction.
15 OK / SELECT:
Short Press - Confirms a selection. When watching video in the App, info on
the current video playing appears, including the time shift bar.
Long Press - Invokes the App search menu. This is the same function as the
magnifying glass in the Main Menu.
16 SHOWS:
Launches the SHOWS play list in the App.
17 MOVIES:
Launches the MOVIES play list in the App.
18 SEARCH / VOICE:
Launches text-based Google Assistant search. Launches voice-
based Google Assistant search.
19 RECORD:
Begin recording selected content in the App.
20 REWIND:
Fast rewinds VOD, or live TV.
21 FAST FORWARD:
Fast forwards VOD, or live TV.
22 PAUSE / PLAY:
Play or Pause toggle of VOD, or live TV.
23 0-9:
Enters channel numbers in the GUIDE or full screen video.
24 SET:
Setup the remote to control the TV, and to program an audio device with
Infrared (IR) commands.
7
13Set Top Box
Pairing your Set Top Box with Your TV
The tech who is doing your install will make sure your TV is paired with your Set Top Box. The only
time you will need this is if you get a new TV, or if you move your TV.
TV Codes for Remote Pairing - Top 10 US TV Brands
For a full list of TV brands, please visit our website: www.gctel.com/support
14Set Top Box
TV Code Auto-Search Method
TV Code Auto-Search Method
If acannot
If you code cannot be TV
find your located
code,inuse
Appendix A or B,
this method to use
find this method
control to find control
programming:
programming:
• Press and hold the Set key for 3 seconds, until the LED turns green.
• On the remote Press 9 9 1 .
• Press the CH sequentially until the TV turns off.
• Press the OK / SELECT KSTB2020
key to | User /into
enter this control Installation Guide
the remote.
• Successful programming is indicated by two green blinks of the LED.
Volume and Mute Controlling Device Link
Remote Behavior
By default, the remote controls the Volume and Mute on the STB. To program the
If the remote
remote has been
to control programmed
Volume to the TV as
and Mute on described
follow on the previous
the instructions below:page, the
Remote’s
• Press TVand
power
holdbutton
the Set( TV key) until
will control the TV
the remote power
LED only.
turns green.
This
• will notthe
Press affect
VOLthe powered
key. state of the STB. The “all devices” power button
( ) will control the TV power as well as the STB power states if remote has been
• Successful programming is indicated by two green blinks of the LED.
fully programmed with TV and Audio system.
• Unsuccessful programming is indicated by two red blinks of the LED.
The “all devices” power button ( ) may be used in two ways while system is fully
powered on:
To return remote to default for Volume and Mute control on the STB, follow the
Short Press:
instructions below:Will turn off TV and put the STB into a standby mode.
• Long Press:
Press Userthe
and hold will be
Set prompted
key untilifthe
they want LED
remote STB turns
to be green.
powered down (non-
• standby) mode.
Press the VOLIf OK iskey.
selected, the TV and STB will all be powered down. The
STB will be fully powered down and not be in standby mode.
• Successful programming is indicated by two green blinks of the LED.
• Unsuccessful programming is indicated by two red blinks of the LED.
NOTE: To prevent the STB and the “all devices” power button ( ) user in-
put reactions from becoming unsynchronized (i.e. the “all devices” power button
( ) turns the TV Off while turning the STB On, or vice versa) it is recommended
to use only Short Presses of the “all devices” power button ( ).
If a Long Press of the “all devices” power button is used to Power Off the TV, it
MUST be followed by a Long press to turn the TV back On. If a Long Press to turn
the TV Off is followed by a Short Press to turn TV On, the TV and STB may become
10
unsynchronized with the respect to being On or Off at the same time.
If the TV and STB become unsynchronized with respect to power button presses,
power cycle (i.e. Remove power) to the STB, while the TV is On. This will re-syn-
chronize the TV and STB power.
15Set Top Box
Turning Your TV On and Off with a Set Top Box Remote
1. The TV and / or STB may be powered on using the power button on either .
your TV remote, or the KURV remote. If the KURV remote has been paired .
to control TV, STB, and audio sound bars, press the main power button to
turn everything on at once.
2. To view live TV using the Gardonville pre-installed app, you must be
signed in using your login credentials (see page 1)
Guide Display with the Set Top Box
To navigate, click on the menu button to show the menu components.
We will go through the menu options (Guide, Shows, Movies, User Profile &
Search) in more detail on additional pages.
16Menu Navigation Tips
Changing the Channel
To move up or down one channel on live TV, press up or
down on the remote’s Navigation button.
To input a specific channel number, on live TV press and
hold the Select button for about two seconds, then let up. .
A search box with a keyboard appears; press the Navigation
button to highlight numbers on the onscreen keyboard and
press the Select button to enter the character. Choose the
Next key when done. (Some of the popular keys have remote
control shortcuts—see the image on the keys.)
Menu Button
The Menu button gives you access to all the features of your
Gardonville Stream TV service, including searching, record-
ing, parental controls and more.
Before accessing your on-screen menus, it’s helpful to know
how to choose, select and exit from the menu screens.
1. On live TV, press the Menu button to access the TV
menus.
2. Press left or right on the remote’s Navigation button
to highlight items in the horizontal menu that appears
at the bottom of the screen. Or press down to view
and choose Recently Watched channels and programs.
3. Press Select to enter your desired menu.
4. Press Back to return to the last menu screen you viewed.
5. Press Back again to close the menu and return to live TV.
17Guide
See what’s currently playing and scheduled on TV using the
interactive Guide. With 2 1/2 hours of program listings for 8
channels at a glance, the Guide is easy to use and navigate.
Listings include content for one week in advance.
(Currently available on the TV platform only.)
1. On live TV, press the Menu button to access the TV
menus.
2. Press left or right on the remote’s Navigation button to highlight Guide and press Select.
3. The current program is highlighted in blue. Press left, right, up and down on the remote’s
Navigation button to move around the listings grid.
4. Press Select for more information, viewing options and a preview of the highlighted program
in the grid.
• If the program is currently playing, press Select to Play, or press right on the Navigation
button to Record or view Series Info.
• If the program is airing in the future, press Select to Record, or press right on the
Navigation button to view Series Info.
Shows
Channel surfing couldn’t be simpler! View television programs as a curated tile-view sorted by
genre—both live and upcoming.
1. On live TV, press the Menu button to access the TV
menus.
2. Press left or right on the remote’s Navigation button to
highlight Shows and press Select.
3. DVR recordings are shown first if available.
4. Press left, right, up and down on the Navigation button to move around the program choices.
The selected program will look slightly larger than the others and show program information
under it.
5. Currently playing programs are marked LIVE in the upper left corner of their image tile. Press
Select for more information, viewing options and a live preview of the highlighted program in the
grid.
6. If you select a program not currently playing, you will still be shown more information including
the date and time it is scheduled to air. If there is a different episode of the same program
currently playing, you have the option to Play Most Recent. You may also View All Episodes which
will provide information for all scheduled episodes.
18Movies
Each month, we deliver movies either live, upcoming or on
Replay. Browse available titles as a curated tile-view sorted
by genre.
1. On live TV, press the Menu button to access the TV
menus.
2. Press left or right on the remote’s Navigation button to .
highlight Movies and press Select.
3. Press left, right, up and down on the Navigation button to move around the title choices.
The selected movie will look slightly larger than the others and show its name under it.
4. Currently playing programs are marked LIVE in the upper left corner of their image tile.
UPCOMING titles are scheduled to air, and the remaining titles are on Replay.
5. Press Select on any for more information, viewing options and a preview image.
Profiles
Quickly see and watch your recordings and scheduled
recordings, and adjust settings for your profile.
1. On live TV, press the Menu button to access the TV
menus.
2. Press left or right on the remote’s Navigation button
to highlight Shows and press Select.
The screen will open on Recordings and also displays how much time you have used of your available
Cloud DVR in the upper right corner of the screen.
1. Press left, right, up and down on the Navigation button to move around the title choices. The
selected program will look slightly larger than the others and show its name under it.
2. Press Select on any for more information, viewing options and a preview image.
To view scheduled recordings, use the Navigation button and highlight Scheduled.
1. Press left, right, up and down on the Navigation button to move around the title choices. The
selected program will look slightly larger than the others and show its name under it.
2. Press Select on any for more information, viewing options and a preview image.
Press up on the Navigation button to highlight the Settings menu icon (cog wheel ) in the
upper right corner of the screen. In this menu, you’ll see:
19• Change Profiles (when multiple profiles have been created, see page 12)
• Parental Controls
• Manage Profiles
• Help
• Terms of Service
• Sign Out
Press up and down on the Navigation button to highlight the various options, then press Select to
choose one. Press Back to return to the last menu screen you viewed.
Search
Search programming by titles, channel name or channel
number. This feature also stores recent searches for quick
use in the future.
1. On live TV, press the Menu button to access the TV
menus.
2. Press left or right on the remote’s Navigation button
to highlight Shows and press Select.
3. Press left, right, up and down on the Navigation button to
Quick Search
highlight letters, numbers and symbols on the on-screen
keyboard and press the Select button to enter the character. on Firestick
To access capital letters and symbols, select those keys on the keyboard.
Some of the popular keys have remote control shortcuts—see the image
on the keys.
4. A list of results appear in the background as you type.
The more letters you enter, the more exact the results
will be.
5. When done, press left, right, up and down on the
Navigation button to select the Next key.
6. Press left, right, up and down on the Navigation
button to move around the title choices. The selected
program will look slightly larger than the others and show its name under it.
7. Press Select on any for more information, viewing options and a preview image.
20How To Use Features
Replay
Never miss another show. Watch up to the past 72 hours
of shows, movies, and sports across most of our channel
lineup.
1. On live TV, press the Menu
button to access the TV menus.
2. Press left or right on the remote’s Navigation
button to highlight Guide and press Select.
3. The current program is highlighted in lime green. Press left on the remote’s Navigation button to
access the Replay sidebar menu. Press Select to access all available titles, or press down then
Select to filter options by sports, news, movies or kids.
4. Browse available titles as a curated tile-view sorted by channel.
5. Press left, right, up and down on the Navigation button to move around the title choices. The
selected program will look slightly larger than the others and show its name under it.
6. Press Select on any for more information, viewing options and a preview image.
Replay content cannot be recorded and includes commercials, but you can fast forward through them.
7. To return to live TV, press right on the remote’s Navigation button repeatedly to access live
programs, press Select.
Replay TV is enabled/disabled on an individual show and/or network basis. This means that not all
shows or all networks allow this feature as part of our content agreements.
Restart
Missed the beginning of a program? Restart it!
1. On live TV, press the Pause button to access the
program menu.
2. Press down on the remote’s Navigation button to
highlight Restart (if available) and press Select.
Restart is not available on all channels and programs.
To record, the program will begin recording from the point of live TV and stop at the program’s sched-
uled end time.
21Closed Captions
To display the audio portion of a TV program as text
on the TV screen:
1. On live TV, press the Pause button to access
the program menu.
2. Press down, then right on the remote’s Navigation
button to highlight Audio and press Select.
3. Press Select again to choose ON.
4. Press the Back button twice to go back to live TV.
Closed captioning may not be available on all channels and programs.
Parental Controls
Each TV show and movie is assigned a maturity rating to
help customers make informed choices for themselves and
their children. You can use these maturity ratings
to decide on a PIN parental control setting for your account.
1. On live TV, press the Menu button to access
the TV menus.
2. Press left or right on the remote’s Navigation button
to highlight Profile and press Select.
3. The screen will open on Recorded programs. Press up on the Navigation button to highlight the
Settings menu icon (cog wheel ) in the upper right corner of the screen and press Select.
4. Press down on the Navigation button to highlight Parental Controls and press Select.
5. Press Select on Restrict Mature Content.
6. You will be prompted to Create Your New Pin to enable control on content with ratings of TV-MA,
R or NC-17. Once enabled, when choosing blocked programming, the user must enter the correct
PIN to view it.
If set, content will be blocked across all profiles on the account.
22Profiles
Profiles allow members of your household to have their
own personalized experience, built around the TV shows
and movies they enjoy. You can have up to five individual
profiles within a single account.
1. On live TV, press the Menu
button to access the TV menus.
2. Press left or right on the remote’s Navigation
button to highlight Guide and press Select.
3. Press up on the Profile button to highlight the Settings menu icon (cog wheel ) in the upper
right corner of the screen and press Select.
4. Press down on the Navigation button to highlight Manage Profiles and press Select.
5. Press Select again to Add New Profile, or press down on the Navigation button to highlight Edit
on another Profile and press Select.
Here, you may edit the name and image of each profile. When there is more than one profile on the
account, you will be asked to choose one upon each launch of WiFi TV.
To change Profiles while watching TV:
1. On live TV, press the Menu button to access the TV menus.
2. Press left or right on the remote’s Navigation button to highlight Profile and press Select.
3. Press up on the Navigation button to highlight the Settings menu icon (cog wheel ) in the
upper right corner of the screen and press Select.
4. Press Select to choose Change Profiles (Who’s Watching).
5. Press left or right on the remote’s Navigation button to highlight the appropriate Profile and
press Select.
All profiles share the same Cloud DVR space.
23Cloud DVR (Digital Video Recorder)
Controlling Live TV
With Cloud DVR, you can control live TV. When you tune
to a channel, Cloud DVR automatically begins making a
temporary recording of the program, which means you can
pause, rewind and fast-forward through the recording. The
live TV recording is not permanent unless you select REC in
the program menu.
Playback Controls
You can control live TV and your video recordings using
the video control buttons. Fast Forward
Play / Pause
Rewind
Play/Pause
You can pause live TV any time by pressing Play/Pause twice on your remote. A progress bar appears
on screen showing you how much time has elapsed since the program started, and how much time
is left. When you’re watching live, your DVR remains paused for up to 3 hours. Pressing Play/Pause
once more will resume the program.
Rewind
Press Rewind on your remote to rewind. A progress bar appears on screen showing how far back you
can go in time. Each time you press Rewind, the program jumps back 12 seconds. Press and hold the
button for quicker progress. Press Play to resume the program.
Fast Forward
You can activate Fast Forward for live TV if you have pressed Pause or Rewind. A progress bar ap-
pears on screen showing how far ahead you can go. Each time you press Fast Forward, the program
jumps ahead 12 seconds. Press and hold the button for quicker progress or until you return to live
action. Press Play to resume the program.
All profiles share the same Cloud DVR space.
24Recording Programs
With Cloud DVR, you can watch and record multiple different TV programs at the same time. You can
record programs in two ways:
• Choose REC in the program menu
• Choose Record from any program info screen in the Guide
You do not have the option to record a program when 5 minutes are remaining.
One-Touch Recording
On live TV, press the Play/Pause button to access the
program menu. Press down and right on the Navigation
button to highlight REC and press Select. The program
will begin recording from this time and stop at the
program’s scheduled end time.
Recording From a Program
Information Screen
From any program information screen, use the remote’s
Navigation button to highlight Record and press Select
to schedule a recording. Follow the on-screen prompts
for additional recording options. Recording of the
program will stop when the program is over.
Recording a Series
You can record multiple episodes of a program (series) in accordance with your preferences. To set up
a Series Recording, begin by selecting the program from the listings grid or from a search results list:
1. From the program info screen, highlight Record and
press Select.
A box pops up saying, “Recording Set! Would you like us
to record future episodes of your program?”
You have two options:
• Record this episode only
• Record all episodes
252. Record all episodes is highlighted, press Select.
This returns you to the program information screen,
where you now have the option to Manage Recording.
Choosing this option gives you access to advanced series
setup features.
3. Press Select to enter.
4. The screen will open on your Recordings for this
program. Press up on the Navigation button to access
the settings above the first recording:
• Recording Options - such as which types of episodes
to record, which channel to record them on and
recording extra time
• Cancel Series Recording - will cancel all future
recordings
• Delete All Recordings - will delete all recordings from this series
Your recordings appear in your Recordings list with the
show title as its label. Multiple recordings of the same
show have the same label and are listed beginning with
the most recent recordings first.
Viewing Recorded Programs
All of your recordings are stored together, and can be
quickly and easily found in the Profile TV menu.
1. On live TV, press the Menu button to access the TV menus.
2. Press left or right on the remote’s Navigation button to highlight Profile.
3. Press Select to enter. Recorded programs are shown if available.
4. Press down, then left and right on the Navigation button to move through the program choices.
The selected program will look slightly larger than the others and show its name under it.
5. Press Select on any for more information, viewing options and a preview image.
6. Use the playback controls to play, pause, fast forward and rewind your program. To stop the
program, you must play a different recording or go back to live TV.
Cloud DVR recordings can be viewed outside the home on an individual show and/or network basis. This
means that many recordings will be available outside your home, but some will not be available as per
our content agreements
26Editing Series Recordings
To edit the criteria for recording a program series with your
preferences:
1. On live TV, press the Menu button to access the TV
menus.
2. Press left or right on the remote’s Navigation button
to highlight Profile and press Select.
3. The screen will open on your Recordings. Press right on the Navigation button to access
Scheduled recordings.
4. Press down, then left and right on the Navigation button to choose the series you wish to edit.
The selected program will look slightly larger than the others and show its name under it.
5. Press Select to view the episodes scheduled to record.
6. Press up on the Navigation button to access the settings above the first scheduled recording:
• Recording Options - such as which types of episodes to record, which channel to record them
on and recording extra time
• Cancel Series Recording - will cancel all future recordings
7. Press Select on Recording Options. Here is where you’ll
specify if you want all episodes to record, or new
episodes only.
• Episodes - New and Reruns or New Only
• Channel - Record episodes from which channels?
• Extra Time - Choose how many extra minutes to
record, up to 60
6. Once you have set up your choices, press down on the Navigation button to highlight OK and
press Select.
Your current recordings (if any) and episodes scheduled to record are shown in your Scheduled
Recordings list.
This list shows all upcoming episodes even if they don’t fit the criteria you set up. Only the episodes that
fit the criteria will record.
27Deleting Recordings
A recorded program remains in your Recordings list until you
decide to delete it, or until Cloud DVR space is needed.
Older programs are erased automatically to make room for
new recordings when Cloud DVR storage limit is reached. 50
hours of storage is included for free. Please call our office if
you’d like to upgrade your plan!
1. On live TV, press the Menu button to access the
TV menus.
2. Press left or right on the remote’s Navigation button to highlight Profile.
3. Press Select to enter. Recorded programs are shown if available.
4. Press down, then left and right on the Navigation
button to move through the program choices. The
selected program will look slightly larger than the
others and show its name under it.
5. Press Select on any for more information, viewing
options and a preview image.
6. Press down on the Navigation button to the desired program, then press right to highlight
Delete.
7. Press the Select button. A box pops up to confirm, “Delete Recording?” Press Select to choose Yes.
8. To delete all recordings, press up, then right on the Navigation button to highlight Delete All
Recordings and press Select.
How much Cloud DVR space have I used?
Press Menu on the remote control, go to Profile and look
in the upper right corner of the screen. Time used and total
time subscribed to are shown in hours.
28Troubleshooting Steps
1 Verify the internet is working.
2 Verify the TV is turned on and is set to the correct input.
3 Power cycle the Fire TV Stick / STB by unplugging it from the wall outlet and plugging it back in.
4 If you are still experiencing issues, please call our office at (320) 524-2211.
Frequently Asked Questions
Can I set Cloud DVR recordings from any TV in my home?
You can set recordings from any TV, or other supported devices, that are connected to Stream TV.
How many programs can I record at once?
The Cloud DVR will record as many programs as are scheduled at once, however, it will store only as
many hours as you have available. Older programs are erased automatically to make room for new
recordings when Cloud DVR storage limit is reached.
Can you record to Cloud DVR and watch another channel at the same
time?
Yes, you can record multiple programs while watching live TV on other channels, or other recordings.
Why do some programs record an extra minute?
Due to processing delays, every recording will add a buffer so you don’t miss any of your program.
Does this minute buffer affect my recording hours?
Yes, time used will include the extra minutes of buffer time.
Are you experiencing a slow or weak WiFi connection?
We recommend a hardwired internet connection for the best performance. See your device’s operat-
ing instructions for details.
I lost the Stream TV app, how do I get back to watching TV?
For a STB, click on the “LIVE” TV button on the remote, and it will open the app back up.
29Notes
30Stream from your computer
at streamtv.gardonville.net
www.gctel.com/support | (320) 524-2211 | 24x7 Help Desk (320) 834-5155 2-26-21You can also read