WebMail User Guide - Vircom inc.
←
→
Page content transcription
If your browser does not render page correctly, please read the page content below
WebMail User Guide
Introduction

modusMail’s™ WebMail allows you to access and manage your email, quarantine contents and your
mailbox settings through the Internet.
This user guide will walk you through each of the tasks you can perform in WebMail. The tool bar at the
bottom of the reader enables you to show/hide the table of contents, create custom bookmarks on
select pages, print the document, and to select text from the document to copy/paste.

Logging in

To access the program:
1   Open your Internet browser and to go the WebMail website address (URL), provided by your email
    administrator.
2   Enter your Email Address and Password.
3   Optional: select a Language from the dropdown menu. The language you choose will apply to both the
    WebMail display and the Quarantine Reports (if used by your ISP or organization).
4   Click Login.
NOTE If your provider has customized the program, the screens depicted in this document might look
a little different.

COPYRIGHT © 2018 BY VIRCOM INC. ALL RIGHTS RESERVED.                                                  1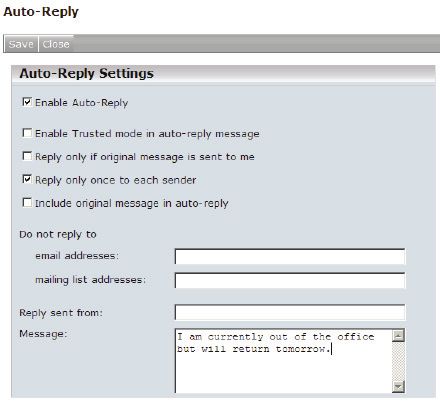
WebMail User Guide

The interface

Working with WebMail

Your Inbox contains email messages that have successfully passed all filtering for spam, viruses,
forbidden attachments and foreign languages, and messages that have been released from Quarantine.

Message Actions

The Inbox toolbar provides the following actions:

   Action                                      Description
 Compose       Click Compose to create and send a new message.
 Delete/       Clicking Delete/Undelete once will mark a message for deletion, but it is not
 Undelete      actually removed from view: it remains in the list but appears crossed out
               until you click Purge Deleted (see below). If a message is deleted in error,
               click Delete/Undelete again to return the message to an active state.
               You can select multiple messages by clicking the checkboxes next to the
               messages, or by using Shift-click or CTRL-click on your keyboard and then
               pressing Delete/Undelete.
 Purge         As stated above, deleted messages are not removed from view until you
 Deleted       click Purge Deleted. This function will permanently delete messages.
               Multiple messages can be selected for purging.
 Read/         This is a toggle button that allows you to set messages in either a Read or
 Unread        Unread state. Multiple messages can be selected.

COPYRIGHT © 2018 BY VIRCOM INC. ALL RIGHTS RESERVED.                                                 2
WebMail User Guide
Action Description
Move to Messages are kept in the Inbox folder unless or until you move them to
Folder another folder. Click Move to Folder to select a folder name that appears in
the My Folders panel (on the left).
See “Creating and managing folders” on page 7 for more details about
creating custom folders.
< Page > Page navigation: the forward and back buttons enable you to scroll through
multiple pages of messages. You can also enter a specific page number to
go to in the text box and click the arrow.
Sorting Messages are usually sorted chronologically by date and time, with the
Messages most recent at the top of the list. You can change the order by clicking on
a column heading (From, Subject, Date or Size). Your sort order will be
preserved the next time you access WebMail.
Navigating Your Mailbox
Check Mail: From the navigation bar, click Check Mail to check for new messages.
Search: Enter the search criteria in the text box and click on the magnifying glass. Messages can be
searched using the following criteria:
• Subject
• From
• To
• Cc
You cannot search the message body.
View a message:
Click once on a message to open it.:
COPYRIGHT © 2018 BY VIRCOM INC. ALL RIGHTS RESERVED. 3WebMail User Guide In the message view, you can perform these additional actions: Print: Prints the content of the message. Trusted: Enables you to add the sender’s email address or domain name to your Trusted Senders list (see “Trusted Senders” on page 17). Trusting an address will ensure that all future messages from this address will bypass the spam scanner and prevent it from getting quarantined. Note, however, that messages will continue to undergo virus and attachment scanning, so messages might be quarantined if the content is considered dangerous. Blocked: Enables you to add the sender’s email address or domain name to your Blocked Senders list (see “Blocked Senders” on page 16). Blocking an address will ensure that all future messages from this address will always be filtered and prevent them from appearing in your Inbox. Delete: This will mark the message for deletion. Note that you must also purge the message to completely remove it from your Inbox and the mail server. Reply, Reply to All and Forward: These are standard message actions, enabling you to reply to the sender, to reply to multiple addresses (if several addresses were included in the To: and Cc: fields), or to forward the message to another recipient. Previous / Next:: These are navigation options that enable you to see the content of the Next or Previous messages in the list without having to return to the Inbox view. Close: This will close the message view and return you to the Inbox view. Full Header: This is a toggle function that enables you to see the full message sending details. Click Full Header to see the expanded panel; click Partial Header to collapse the panel into the regular view. Composing new messages Composing email messages in WebMail is very similar to using Outlook or other mail clients: COPYRIGHT © 2018 BY VIRCOM INC. ALL RIGHTS RESERVED. 4
WebMail User Guide

•   From your Inbox, click Compose
•   Type the recipient’s email address(es) in the To: field
    –   Click in the To:, Cc: or Bcc: field and type in the name, or
    –   Select the name(s) from your Contacts list to add the name automatically (see Contacts for more
        details)
•   Enter the Subject
•   Type the content of your message
•   Click Send
    –   The messages you send are stored in the Sent Items folder

NOTE Your outgoing messages are temporarily stored in the Outbox folder until the delivery process
begins. Messages that remain in this folder could indicate a problem with your email account or mail
server. Should this occur, please contact your email administrator.

Adding Attachments
•   Click on Attachments
•   Click on Browse to locate and select the file you want to attach to the message
•   Click on Attach

Additional Features

Message Priority: by default, the priority is Normal but you may change it to Low or High
•   From the dropdown menu, select the priority

Spell Check:: can be used to scan the message body for spelling errors before sending
•   Use the dropdown menu to select additional available languages

Draft Messages: messages can be saved to a Draft folder
•   Click on Save to Draft
•   Open the Draft folder to access saved messages

Rich Text Formatting: by default, a new message is available in Plain Text. Click on Switch to Rich Text to take
advantage of rich text formatting.

COPYRIGHT © 2018 BY VIRCOM INC. ALL RIGHTS RESERVED.                                                           5
WebMail User Guide
Contacts
To make email sending easier, the Contact list (or address book) can be used to manage your contacts.
Contact lists can be imported from other email clients (e.g. Outlook) or contact management software
(e.g. ACT!), and exported from WebMail. The contact information is compiled in a *.csv (comma
separated values) file.
To access your contact list, click on Contacts in the navigation bar:
• Click on Add Contact to open the Contact Editor
• Both the Name and Email Address fields are required: if one item is missing, the contact address will not
function properly
– All other fields are optional
• Save and Close: will save the information and exit the Contact Editor
• Save and New: will save the current information and display a new blank screen so that you can create
another contact
Importing Contacts
• From Contacts, click Import Contacts
• Click Browse to locate and select your *.csv file
• Click Import to add the contacts to your list
COPYRIGHT © 2018 BY VIRCOM INC. ALL RIGHTS RESERVED. 6WebMail User Guide Exporting Contacts • From Contacts, click on Export Contacts • In the File Download dialog box, click Save • In the Save As dialog box, select a file name (*.csv) and location for your exported contact list My Folders panel The contents of your email account are located in the left-hand panel, under My Folders. This panel contains your folders: Inbox, Quarantine, Drafts, Outbox, Sent Items and any folders that you create. • Click on a folder to open it and view its contents Creating and managing folders You can create any number of folders (or sub-folders) for organizing and storing your messages. To create a new folder, click Folders on the Navigation bar (top of the screen): COPYRIGHT © 2018 BY VIRCOM INC. ALL RIGHTS RESERVED. 7
WebMail User Guide

Create a new folder: enter the folder name in the New Folder box and click Create
•   To create a sub-folder, at Place folder under, use the drop-down menu to select the folder under which
    to create the sub-folder and click Create

Rename an existing folder: use the Rename Folder drop-down menu to select a folder name and enter the new
name in the To: field. Click Rename to save the change.

Deleting Folders
In the Folder section, click the checkbox to select the folder(s) to be deleted and click Delete to save the
change.

Moving Messages to Folders
After creating your folders, you can move messages from the Inbox to a new folder, or move messages
from one folder to another:
In the Inbox view, select the message(s) to be moved by clicking the checkbox(es)
From the drop-down menu, select a destination folder

COPYRIGHT © 2018 BY VIRCOM INC. ALL RIGHTS RESERVED.                                                       8
WebMail User Guide
The Quarantine Folder
The Quarantine feature filters messages to determine if they are spam or if they contain forbidden
attachments or viruses. Quarantined messages are stored in the Quarantine folder, located under My
Folders.
Managing your quarantined mail
• You can open an email message by double-clicking it to view the contents
• You can see if the message contains an attachment, but you cannot view the attachment contents
• Messages in Quarantine can be released to your Inbox if you feel they were filtered in error (these
‘good’ messages are called false positives). To release a message, select one and click Select Action:
– Release Message: will release the message to your Inbox
– Release and Report messages as Legitimate email: will release the message to your Inbox and send a
copy to Vircom for analysis so that our filters can be modified, if necessary
– An additional option when releasing a message is to add the sender’s address to your Trusted
Senders lists (see “Trusted Senders” on page 17).
• You can also use the one-click Empty feature to delete all messages from your Quarantine folder
(only). The messages in your other folders will remain intact.
Quarantined spam is filtered into 8 categories which makes identifying their content easier. Additional
categories include Virus, Phishing and Forbidden Attachment. A forbidden attachment is a type of file that
your system administrator has identified as a possible threat.
COPYRIGHT © 2018 BY VIRCOM INC. ALL RIGHTS RESERVED. 9WebMail User Guide
Settings
The Settings menu, located in the Navigtion bar at the top, provides access to the WebMail configuration
options. Click on the following menu items to access their specific controls.
Options
This page enables you to set your account information and display preferences. Be sure to click Save to
apply any changes.
Account Information:you can modify your account information
• Full Name: enter your first and last names
• Password: change your password by entering both the old (current) password and the new one. You
will be asked to retype the new password to confirm it.
– The password strength bar is color-coded: a weak password is red, a strong password is green
• Click Save to apply the changes
Mail Forwarding: allows you to forward your email messages to another email account:
COPYRIGHT © 2018 BY VIRCOM INC. ALL RIGHTS RESERVED. 10WebMail User Guide
Forward mail to: enter the email address for the account which will receive your forwarded mail (e.g.
yourname@gmail.com)
– Make sure that the Forward mail to email address does not match your (current) WebMail address.
Using your current address will cause an email loop, preventing message delivery.
Do not leave a copy of a forwarded message in this mailbox: used when you do not want to keep copies of
incoming email in this WebMail account
– If this option is selected when there is no email address in the Forward mail to field, you will not
receive email. Email will automatically be deleted.
To Disable Forwarding
• Delete the email address in the Forward mail to field
• Remove the check mark from the Do not leave a copy of a forwarded message in this mailbox
Preferences:
• Language: sets the preferred language for both the WebMail interface and the Quarantine Reports.
• Time Zone: Sets the time zone to display message arrival according to your local time. If you travel, you
can change this setting so that your message time stamp reflects the new time zone.
• Number of messages displayed per page: enter the number of messages to be displayed per page (in the
Inbox and other folders)
• Number of contacts displayed per page: enter the number of contacts to be displayed per page
• Replying to messages: determines how your replies are formatted
– By default, this option is set to None
– If you select “>”, each line of text in your replies will be preceded by a “>”
• Your name: enter your name as you want it to appear when replying to email messages
• Reply to:
– Use this option if you want replies to go to a different email address than that of your WebMail
address (e.g. to an alias or external email account)
– If an email address is entered in this field (e.g. Sales@abc.com), whenever someone replies to your
email message, the To: field in the message will always be addressed to Sales@abc.com
• Signature: you can enter your email signature (e.g. name, title, phone number, etc.) which will be used
for all email messages
Email filtering
You can turn the email filters on or off and modify the scanning level used to check incoming email for
spam, viruses and forbidden attachments.
NOTE You might not have permission to change some settings; blocked items are indicated by a lock
icon.
COPYRIGHT © 2018 BY VIRCOM INC. ALL RIGHTS RESERVED. 11WebMail User Guide
Spam
Preferences: configure how WebMail handles email identified as spam:
• Delete message immediately: you will never be able to review messages identified as spam
• Block message into Quarantine: you will be able to view the content and, optionally, release the message
to your Inbox
• Tag and let message pass through: you will receive quarantined email with a message in the subject line
identifying it as possible spam
• Click Save if changes are made
Spam Filter Level:
• Disabled: spam filtering is turned off
• Normal: provides basic spam filtering; traps the most commonly-seen messages
• Strong: advanced spam filtering; is slightly more aggressive than the Normal level
• Extreme: will block the most messages, but can occasionally result in false positives
• Click Save if changes are made
COPYRIGHT © 2018 BY VIRCOM INC. ALL RIGHTS RESERVED. 12WebMail User Guide
Phishing
Messages with phishing content are treated like viruses: they can only be quarantined or deleted. Only
Administrators can release these messages.
Phishing Scanning Level:
• Disabled: filtering is turned off
• Normal: provides basic filtering; traps the most commonly-seen messages
• Strong: advanced filtering; is slightly more aggressive than the Normal level
• Extreme: will block the most messages, but can occasionally result in false positives
• Click Save if changes are made
Virus
Preferences: configure how WebMail handles email containing viruses ( these options may be blocked
by your system administrator):
When a message is filtered:
• Delete message immediately: you will never be able to review messages identified as spam
• Block message into Quarantine: you may be able to view the content (in text form only); links and other
dangerous content are not clickable
COPYRIGHT © 2018 BY VIRCOM INC. ALL RIGHTS RESERVED. 13WebMail User Guide
Virus Scanning Level:
• Normal: turns virus filtering on
• Disabled: turns virus filtering off
Notifications:
This feature will send notification messages when email contains a virus. Use this feature with caution
because viruses are spread by hijacking email addresses found in victims’ address books, so the sender
address listed in the From: field may not be the actual sender of the message. Due to this issue, the
notification features are often blocked.
• Senders receive notification: advises senders that they sent an email message containing a virus
• Recipients receive notification: advises recipients that they have an email message containing a virus in
their Quarantine
Forbidden Attachments
A forbidden attachment is a file type that could pose risks to the system. For example, a file with a “.vbs”
extension is commonly used to spread computer viruses via email. Forbidden Attachments are defined
by the email administrator.
Like viruses and phishing, messages containing dangerous attachments can only be quarantined or deleted.
Scanning Level:
• Disabled: filtering is turned off
• Normal: provides basic filtering; traps the most commonly-seen messages
• Strong: advanced filtering; is slightly more aggressive than the Normal level
• Extreme: will block the most messages, but can occasionally result in false positives
• Click Save if changes are made
NOTE You can change the scan level but you cannot define which file types are considered forbidden.
COPYRIGHT © 2018 BY VIRCOM INC. ALL RIGHTS RESERVED. 14WebMail User Guide
Language Filter
From the settings menu, select the foreign languages to block and configure what will happen to the
filtered email.
Preferences:
• Delete message immediately
• Block message into Quarantine
• Tag and let message pass through: messages are delivered to your Inbox with a tag or label in the subject
line identifying it as possible foreign language spam
Select language content to block:
• Click on >> to add language(s) to the Blocked Languages list
• Click onWebMail User Guide
Blocked Senders
You can add and manage email addresses and domains in your Blocked Senders List:
In Preferences, choose how you want messages from blocked senders to be handled:
• Delete message immediately
• Block message into Quarantine
• Tag and let message pass through: messages are delivered to your Inbox with a tag or label in the subject
line identifying it as coming from a blocked sender. This option is useful if you use rules in your email
client (e.g. Outlook, etc.) to filter messages based on subject contents.
• Save your changes
In Add a sender
• In the Email: field, enter an email address (e.g. Jeff@abc.com), or
• In the Domain: field, enter a domain name (e.g. abc.com)
• Click Add to enter the address
All email addresses from abc.com will always be blocked (unless you have specific email addresses from
this domain in your Trusted Senders List).
Use the Blocked Senders List to select and delete an entry: check the box for the address and click Delete.
NOTE It might take a few minutes for the changes to take effect.Your email administrator may also add
addresses to the system’s Blocked Senders List. These addresses will appear under the Server Blocked
Senders List and cannot be deleted.
COPYRIGHT © 2018 BY VIRCOM INC. ALL RIGHTS RESERVED. 16WebMail User Guide Trusted Senders This option is used to ensure that email from the addresses that you set as ‘trusted’ will always be delivered to your Inbox. Note that these messages will be able to bypass the spam filter, but they will still be checked for viruses and forbidden attachments. In Add a sender • In the Email: field, enter an email address (e.g. Jeff@abc.com), or • In the Domain: field, enter a domain name (e.g. abc.com) • Click Add to enter the address Use the Trusted Senders List to select and delete an entry: check the box for the address and click Delete. NOTE It might take a few minutes for the changes to take effect.Your email administrator may also add addresses to the system’s Trusted Senders List. These addresses will appear under the Server Trusted Senders List and cannot be deleted. Quarantine Reports WebMail can be configured to email you Quarantine Reports at regular intervals (typically, once a day). The Quarantine Report is delivered to your Inbox. You will only receive a Quarantine Report if you have messages in Quarantine at the time the system generates the reports. The settings here allow you to control how often the report is sent and what it contains : COPYRIGHT © 2018 BY VIRCOM INC. ALL RIGHTS RESERVED. 17
WebMail User Guide

Set Report Schedule:
•   Never send report: disables the report feature
•   Send every: use the dropdown menus to select the frequency of the report (in days)

Select Report:
•   If your administrator has created quarantine report themes, you can select them from this setting

Set Report Content:
•   Select to receive All quarantined items or Only new items since last report

Select items to be reported:
•   By default, all message types are reported: Spam, Phishing, Statistics, Viruses and Forbidden Attachments

Spam probability levels (used to help highlight messages that may likely be considered False Positives):
•   Low = messages need your attention (these are probably spam but may contain false positives)
•   Medium = good probability of spam
•   High = very high probability of spam

Show these message details in report (as column headings):
•   The selectec items will appear as column headings
•   Select from: File Types (e.g. spam types, phish, virus, attachment types), Date, From, Size and Expiry

The image below shows the Quarantine Report that gets sent to your email Inbox:
.

COPYRIGHT © 2018 BY VIRCOM INC. ALL RIGHTS RESERVED.                                                            18
WebMail User Guide

The report contains the same message controls as WebMail: Release, Release and Report, Trust or Block
Senders, Delete and Delete all (or Empty).

User Contact Information

This information can be used to keep your personal and professional contact information current for the
system administrator.
•   Enter your contact information and click on Save

Rules

You can create rules to automatically file or discard incoming messages based on subject, senders,
recipients or attachments.

COPYRIGHT © 2018 BY VIRCOM INC. ALL RIGHTS RESERVED.                                                 19
WebMail User Guide

Click on Add Rule to display the Rule Editor
•   Enter the Rule Name
•   Select Apply to all accounts if you have more than 1 email account and you want the rule to apply to all
    of them
•   Select Apply to name@account.com to apply the rule to the account you are currently using
•   Use the dropdown menu to select the filters you want to use and enter the filter text (e.g. Subject
    contains Business Analysis)
•   Click on More for additional filter options
•   Select Discard to automatically delete the message
•   Select Move to and use the drop-down menu to select the folder in which to store the filtered
    messages
•   Click on Save

Selecting the Order in Which Rules are Applied
•   Select the rule to be moved by clicking in the checkbox
•   Select Move Up to raise the priority of the rule above others
•   Select Move Down to lower the priority of the rule below others

Deleting Rules
•   Select the rule(s) you want to delete by clicking in the checkbox
•   Click Delete Rule and Save

Auto-Reply

You can create an email that will automatically be sent in response to any message you receive. This can
be useful when you are unable to check your messages for an extended period of time (e.g. vacation).
You can also restrict the auto-reply message to particular situations.

COPYRIGHT © 2018 BY VIRCOM INC. ALL RIGHTS RESERVED.                                                      20
WebMail User Guide
Enable Auto-Reply: click the checkbox to enable (or disable) the auto-reply feature and click Save
Reply only if original message is sent to me: use this option if you want to use auto-reply only when your email
address appears in the To: field of the original message
• Use this option if you do not want an auto-reply sent from an alias you created for your primary email
address
Reply only once to each sender: use this option if you want the auto-reply to be sent to each address only
once (i.e. a sender will receive the auto-reply only on the first message sent to you, subsequent messages
from the same sender will not generate an auto-reply).
• This option is highly recommended
Include original message in auto-reply: use this option if you want the sender’s original message to be included
in your auto-reply
Do not reply to:
Email addresses: enter the email addresses to whom an auto-reply message will never be sent
Mailing lists: enter the name of the mailing lists to which an auto-reply message will never be sent
• It is recommended that you use this if you are a member of a mailing list
Reply sent from: enter the email address you want to use to send the auto-reply (e.g. an alias)
• Leave this field blank if you want to use your WebMail address
• Do not use an external email account address in this field as mail may not be delivered
Message: enter the message text that will be used for every auto-reply; it will always appear in plain text
format
E.g. I am currently away from the office but will return on Monday.
External Accounts
You can configure WebMail to retrieve email from external accounts.
COPYRIGHT © 2018 BY VIRCOM INC. ALL RIGHTS RESERVED. 21WebMail User Guide Adding an External Email Account • Go to the Create a New Account menu • Account Name: enter the name for the new account (e.g. Home) • Server Address: enter the address for the external account • From the dropdown menu, select POP3 or IMAP • Login: enter your external account’s login ID (e.g. name@home.com) • Password: enter the password for the login ID • Click Create NOTE Please consult the documentation for your external email account or contact the service provider for your specific account information. Editing External Email Account Information • Select the account you want to edit by clicking in the checkbox • Click Edit and modify the account information • Click Save Deleting an External Email Account • Select the account(s) you want to delete by clicking in the checkbox • Click Delete Aliases You can create alternative names for your email account. For example, you can create a Sales alias for your email account and all mail addressed to Sales@abc.com will be delivered to your Inbox. Preferences: • Enter the name of the alias in the Alias field (e.g. Sales) • Click on Add Aliases: • Select the name(s) to delete and click Delete COPYRIGHT © 2018 BY VIRCOM INC. ALL RIGHTS RESERVED. 22
WebMail User Guide

Statistics

WebMail provides statistics for the email you have received. The information is broken down by day,
week and month and includes the amount of legitimate and spam email, and email with forbidden
attachments or viruses.

•   Email Traffic for the last: to access statistics for your quarantined messages, use the dropdown menu to
    select a period: 7 Days, 8 weeks or 12 months.
•   Spam detail for: once you have selected the period, select the specific day, week or month by using the
    dropdown menu.

COPYRIGHT © 2018 BY VIRCOM INC. ALL RIGHTS RESERVED.                                                      23
WebMail User Guide Glossary Alias An alternative name for a mailbox (not a forwarding address). Example: mail can be sent to John.Smith@abc.com or the alias Johnny@abc.com. Auto-Reply An email message that is automatically sent in response to email received. BCC Blind Carbon Copy: recipients in this list are not displayed and are not visible to the direct or carbon- copied recipient(s) of an email. Blacklists / Blocked List List of email addresses or domains from which messages are not accepted. Browser Application that allows you to access the Internet. Examples are Internet Explorer, Chrome, Firefox, Opera and Safari. CC (Carbon Copy) CCd recipients of an email message are not the primary recipients and their involvement is usually for informational purposes only. Content Filtering Email scanning of plain text for key phrases and the percent of HTML, images and other indications that the message is spam. Domain A group of computers on a network that share a common address (e.g. abc.com). False Negative Spam that has not been detected by a spam filter and is delivered to your Inbox as legitimate email. False Positive Occurs when legitimate mail is incorrectly identified by a spam solution and is not delivered to a mail inbox. COPYRIGHT © 2018 BY VIRCOM INC. ALL RIGHTS RESERVED. 24
WebMail User Guide

ISP
Internet Service Provider: a company that provides access to the Internet.

Phishing
A scam that uses spam to deceive people into disclosing their credit card numbers, bank account
information, passwords and other sensitive information. Phishers often masquerade as trustworthy or
well-known businesses.

Quarantine
Contains mail that has been blocked because of suspicious content, viruses or forbidden attachments.

Quarantine Report
A report of the email messages that have been quarantined because of suspicious content, viruses or
forbidden attachments.

Server
A computer that provides services to other computers. Examples include mail servers (access to email
software) and Web servers (access to the Internet).

Spam
Unsolicited, bulk email. Also known as junk mail.

Spoof
In the context of network security, a spoofing attack is a situation in which a person or program
successfully masquerades as another by falsifying data. An example is phishing, where phishers spoof
legitimate Web pages (such as a bank's).

Trusted Sender List
List of email addresses or domains from which all messages are accepted, unless the message contains
a virus threat.

URL
Universal or Uniform Resource Locator: an Internet address used by Web browsers to access a specific
site. Example: www.google.com.

COPYRIGHT © 2018 BY VIRCOM INC. ALL RIGHTS RESERVED.                                               25
WebMail User Guide

Virus
Any piece of code that replicates and executes itself. Viruses usually deliver a piece of malicious code
that carries out a destructive operation on the host machine.

Whitelists
See “Trusted Sender List” on page 25

COPYRIGHT © 2018 BY VIRCOM INC. ALL RIGHTS RESERVED.                                                  26
You can also read