Managing Submissions via ExpressO:
  A Guide for Law Review Editors
←
→
Page content transcription
If your browser does not render page correctly, please read the page content below
Managing Submissions via ExpressO: A Guide for Law Review Editors
Managing Submissions via ExpressO

Table of Contents
   List of Figures ...............................................................................................................................................................................3

   Welcome to ExpressO ...............................................................................................................................................................4

       Contacting bepress Consulting Services ......................................................................................................................4

   Accessing ExpressO ...................................................................................................................................................................5

       Editorial Privileges .................................................................................................................................................................5

       Editor Tools: Overview .........................................................................................................................................................5

   Getting Started: Quick Guide to Setting Up Your Review...........................................................................................6

       Step 1: Create Article Buckets ...........................................................................................................................................6

       Step 2: Set Editor Access .....................................................................................................................................................7

       Step 3: Set Expedite Preferences .....................................................................................................................................7

       Step 4: Customize Author Correspondence Templates .........................................................................................9

       Additional Review Configuration Features .................................................................................................................9

       Open/Close Review ...............................................................................................................................................................9

       Submission Attachments....................................................................................................................................................9

       Evaluation Template .......................................................................................................................................................... 10

   The Basics: Managing Submissions to Your Law Review ......................................................................................... 10

       Submitting Manuscripts................................................................................................................................................... 10

       Receiving and Assigning Manuscripts ........................................................................................................................ 11

       Author Correspondence .................................................................................................................................................. 15

       Expedite Requests .............................................................................................................................................................. 16

       Preliminary Review ............................................................................................................................................................. 16

       Editorial Decision ................................................................................................................................................................ 18

   Advanced Editorial Features ............................................................................................................................................... 21

       Revising Submissions ........................................................................................................................................................ 21

       Editor Report......................................................................................................................................................................... 22

       Mailing List ............................................................................................................................................................................ 22

Confidential. Not for use outside your institution.

                                                                                               2
Managing Submissions via ExpressO

List of Figures
FIGURE 1 My Account…………………………………………………………………………………...……5

FIGURE 2 Configuration…………………………………………………………………………………...…6

FIGURE 3 Manage Submissions…………………………………………………………………...………...12

FIGURE 4 Submission Details ……………………………………………………………………….……....12

FIGURE 5 Assign Editor……………………………………………………………………………….….......13

FIGURE 6 Email Authors ………………………………………………………...…………………………..15

FIGURE 7 Editor Comments and Evaluations………………………………………………………………17

FIGURE 8 Register Decision…………………………………………………………………………………18

Confidential. Not for use outside your institution.

                                                      3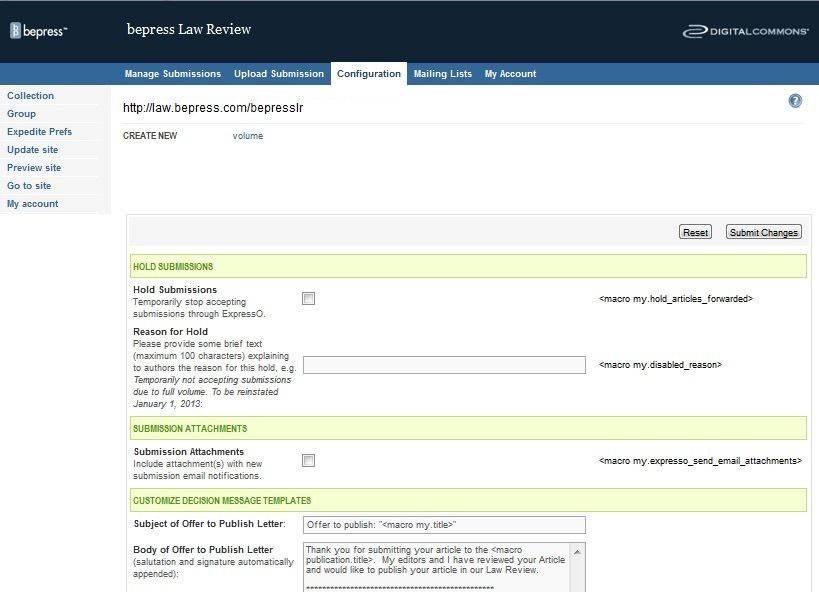
Managing Submissions via ExpressO

Welcome to ExpressO
ExpressO offers a fast, effective, and comprehensive professional submissions management system for
law review editors. Our editorial tools and new key features, including Expedite Preference, Integrated
Auto-Withdraw, and a Submission Rating Tool, allow you to easily track, assign, review, and rate articles.
The following instructional guide shows you how to configure and use these tools.

Contacting bepress Consulting Services
The bepress Consulting Services team is always happy to work with your law review to best
accommodate your needs. We support a wide variety of workflows so if you are not sure how to make
ExpressO work for your law review, please let us know. We will be more than happy to help you
optimize your account to meet your specific needs. If you have any questions or need any assistance,
feel free to contact us by phone at 510.665.1200 Ext. 2 or by email to support@law.bepress.com.

Thank you for using ExpressO!

Confidential. Not for use outside your institution.

                                                      4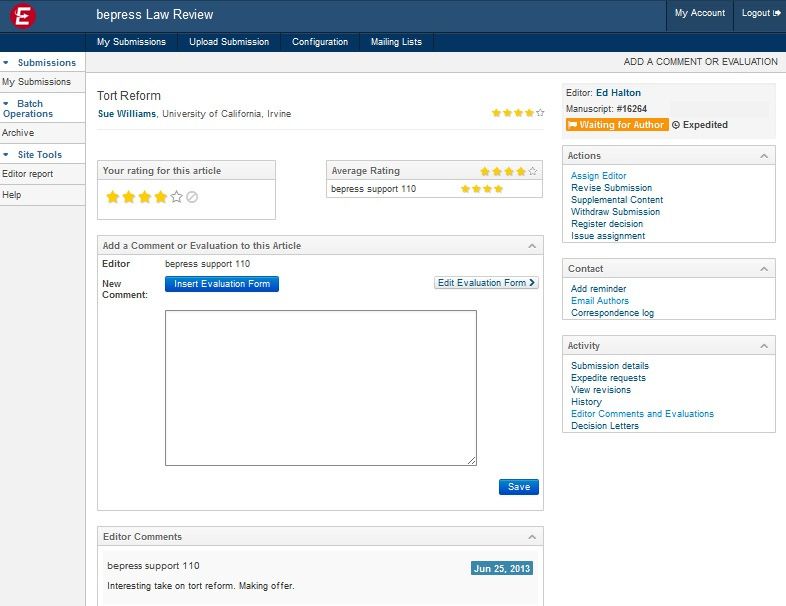
Managing Submissions via ExpressO

Accessing ExpressO
Editorial Privileges
You will need editorial privileges in order to get started. If you find you do not have editorial privileges
set up for your ExpressO account when you go to the My Account page (as described below), please
contact Consulting Services at support@law.bepress.com to request that your account be configured
with editor privileges. Be sure to include in your message your name and the name of your law review.

Once your editor privileges are set up, you can access all of your editor tools from the My Account page.

                                                  Figure 1: My Account Page

To access Editor Tools:

     1.    Navigate to http://law.bepress.com/expresso
     2.    Click on the Login link in the top navigation bar
     3.    Enter your ExpressO account information when prompted to log in with your email address
           and password, and click Login.

Editor Tools: Overview
The editor tools reflect the two main areas of ExpressO’s submission management system. Depending
on your particular editor privileges, you may or may not have access to some of these features:

           Configuration: Various parameters including expedite preferences, decision letters and author
           message templates, and editorial access permissions

            Manage Submissions: Access to all submissions. Depending on specific privileges, this
           includes editorial decisions

Confidential. Not for use outside your institution.

                                                             5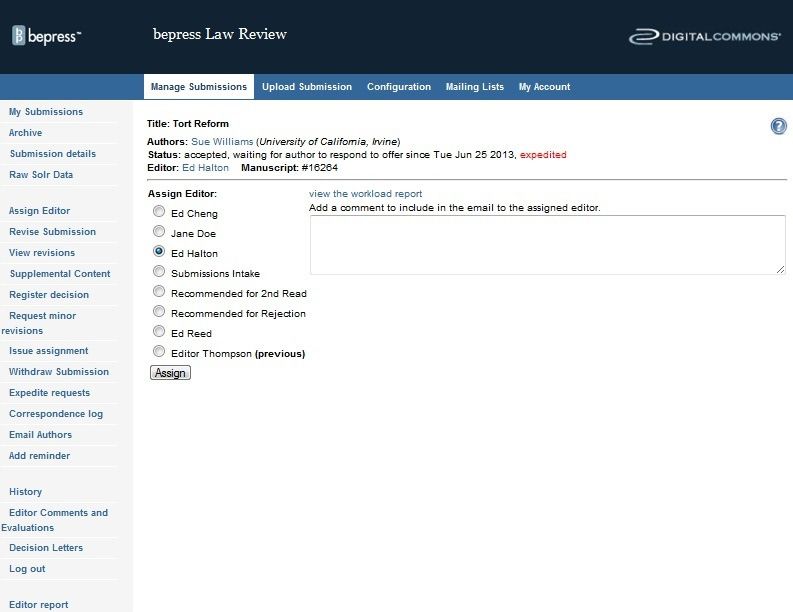
Managing Submissions via ExpressO

Getting Started: Quick Guide to Setting Up Your Review
The Configuration link on your My Account page is the access point for your law review’s settings. Be
sure to complete all four of the following steps.

                                                Figure 2: Configuration Screen

Step 1: Create Article Buckets
Set up two article buckets, one titled Recommend for 2nd Read and the other Recommend for Rejection:

           1.   Locate the Administrators section on the Configuration page (bottom of page)
           2.   Enter an email address in the field under Email
                Note: Each bucket you add requires its own email address. It can be an email you establish
                just for the purpose of creating a bucket (e.g., Gmail).
           3.   Enter the title of the article bucket under Last Name, e.g., “Recommend for 2nd Read.” (No
                First Name required.)
           4.   Click Submit Changes
           5.   Repeat for each new bucket

Why use buckets? Article buckets are similar to editor accounts, but they serve a different purpose. They
are essentially holding pens for articles at various stages of review. Adopting article buckets will enable
you to manage your submissions more effectively. Using article buckets means easy access to all articles
recommended for further consideration or recommended for rejection. If your workflow uses more than
two buckets, feel free to add as many as required.

Confidential. Not for use outside your institution.

                                                              6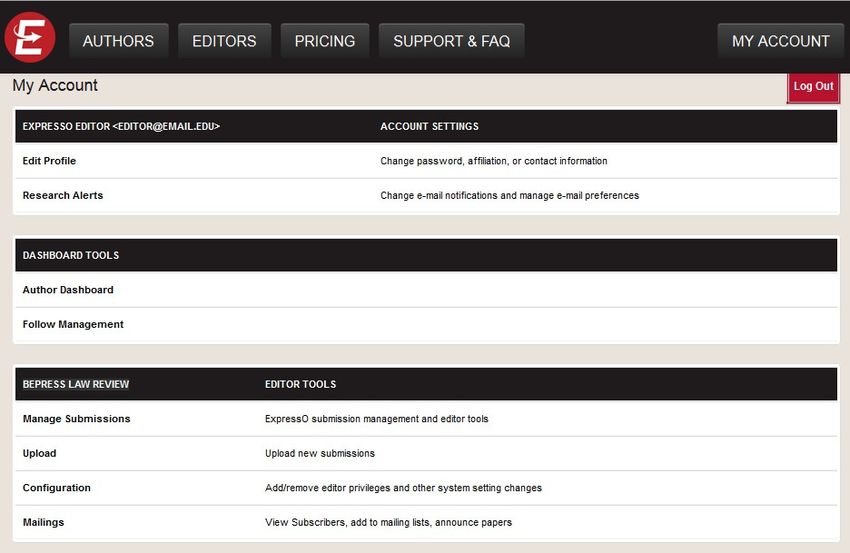
Managing Submissions via ExpressO

Step 2: Set Editor Access
Add all of your review’s editors to your law review:

           1.   Locate the Administrators section on the Configuration page (bottom of page)
           2.   Enter an email address of the editor under Email
           3.   Enter the editor’s first and last name under the appropriate fields
           4.   Click Submit Changes

It is not necessary to create an ExpressO account for each editor prior to adding them to your editor list.
The system will automatically create an ExpressO account for them (unless they already have an
account in the system). Once added, editors are set up with standard default editor privileges. If needed,
we can restrict access to Upload, Configuration, Mailing List, as well as the ability to register decisions.
Please contact Consulting Services to adjust editorial access.

You may remove editors as needed by removing the checkmark next to their name and clicking on
Submit Changes.

Step 3: Set Expedite Preferences
ExpressO now offers a Priority Expedited queue for expedited articles. We think you are going to like the
expedite preferences feature that is now available to you. While authors can still expedite to any reviews
they wish, we allow you to establish preferences that will help you to prioritize expedite requests based
upon criteria that you set.

You can change these preferences at any time so feel free to play around to see what happens as you
change your expedite preferences. For example, if you are nearing the end of the season and you are
only interested in that last special article, you can set your priority to be the most selective and then
loosen them up again at the beginning of the next season.

Criteria # 1: Number of Simultaneous Requests
How many simultaneous requests do you think an author should send out if they are serious about
asking your review to take a rushed look at their piece? 20? 50? 100? We let you decide and then we
share your preference with authors. Our goal is that some authors will be a little more selective about
how many law reviews they choose to ask to read their article at any one time. Of course, you will still
receive all expedite requests made to your review, even those from authors that exceed your
preferences; however, you will not receive email notifications of expedite requests that do not meet
your criteria and they will not make it onto your Priority Expedited queue.

Set Preferred Maximum Number of Simultaneous Expedite Requests:

           1.   On the Configuration page, click on the Expedite Prefs link located in the left sidebar
           2.   Under Expedite Preferences, choose your preferred number of simultaneous expedite
                requests (20, 50, 100, or Unlimited)
           3.   Click Save

Confidential. Not for use outside your institution.

                                                       7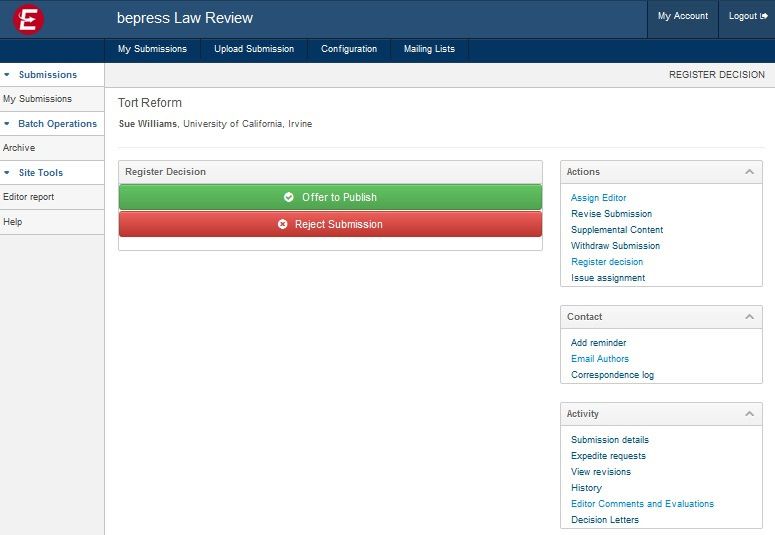
Managing Submissions via ExpressO

Criteria #2: Prioritize Law Review Peers
Do you ever find authors make expedite requests based upon offers from law reviews that are not even
in the same ball park as yours? Wish to be alerted to “serious” offers only? Now you can! Simply select
your peer reviews from our list participating law reviews, and only articles that have offers from your
peers will appear in your Priority Expedited queue. How you determine your “peers” is up to you; they
may be similarly ranked or share the same subject area, and you can change your selection at any time.
For example, you may want to know if an offer came from a more highly ranked review as this may help
you decide whether or not to make an offer.

Note: Your peer list is private to your review. Unlike your preferred number of submissions, information
about your peers is not shared with authors.

Select your Law Review Peers:

           1.   On the Configuration page, click on the Expedite Prefs link located in the left sidebar
           2.   Under Prioritize Law Review Peers, click the Edit button
           3.   Click on the checkbox beside the desired law reviews
                Note: You may search by name, or refine your search by the Top 100 or by subject
                category.
           4.   After you make your selection, click the Continue button. Your selections are saved
                automatically.

Criteria #3: Offer Certification
ExpressO automatically confirms the validity of any offer made by another law review using ExpressO,
and reflects this as a green checkmark on your Manage Submissions page (under the Expedite Due
column).

If you wish, you can also encourage authors to confirm offers made outside of our system, by enabling
the ExpressO Certification Preferred setting.

To enable ExpressO Certification:

           1.   On the Configuration page, click on the Expedite Prefs link located in the left sidebar
           2.   Under Certified Offers, click the checkbox beside ExpressO Certification Preferred
           3.   Click Save

This kind of transparency saves editors time since they will no longer have to follow up with authors on
incomplete expedite requests or with other law reviews to confirm the offer.

Confidential. Not for use outside your institution.

                                                        8
Managing Submissions via ExpressO
Step 4: Customize Author Correspondence Templates
Customize your responses to authors with convenient templates for submission decisions and other
messages to authors.
To edit your templates:
1. On the Configuration page, scroll down to Customize Decision Message Templates, and type
your preferred text into the boxes provided to set new default disposition letters to
authors
Note: The templates use system macros (e.g., “”) that are auto-
completed when your correspondence is sent.
2. Scroll down to Author Message Templates, and type your preferred text into the boxes
provided to modify additional default correspondence to authors
3. Scroll down to Email Signature, and type your preferred default signature for all templates
4. Click the Submit Changes button at top or bottom of the page to save your changes
Additional Review Configuration Features
Open/Close Review
Need to close your review from receiving author submissions? Place your review on temporary hold for
as long as you need.
To place your review on hold:
1. On the Configuration screen, click on the checkbox beside the option Hold Submissions
2. Next to Reason for Hold, provide brief text to let authors know why you are on hold and
how long the hold will last
3. Click Submit Changes (top or bottom of page)
Note: There is a maximum 100 character limit for the hold message. An example of the
standard message is provided on the Configuration page. It helps authors if you include the
date your law review will re-open.
Submission Attachments
Customize submission notifications to your review with the option to include or exclude submission
documents (i.e., author article, CV, and/or cover letter). Whichever option you choose, each notification
already includes a direct link for quick access to the submission so you can view and manage through
your review’s online account.
To set your review’s submission attachment option (attachments excluded by default):
1. On the Configuration screen, click on the checkbox beside the option Submission
Attachments
2. Click Submit Changes (top or bottom of page)
Confidential. Not for use outside your institution.
9Managing Submissions via ExpressO
Evaluation Template
Does your review use an evaluation form for editors to complete as part of the review process? Add
your review criteria to the Evaluation Template so editors can provide the feedback and comments you
need to help make a decision. Editors can add their comments via the Editor Comments and Evaluation
feature available for each article. Sample evaluation questions are already provided for your
convenience. See section Preliminary Review for more information.
To add/modify your evaluation template:
1. On the Configuration screen, under the Evaluation Template section, copy or type your
review questions into the box provided
2. Click Submit Changes (top or bottom of page)
Note: You may also access this template directly through the Editor Comments and Evaluations
form by clicking on the Edit Evaluation Form button.
The Basics: Managing Submissions to Your Law Review
While ExpressO is designed with the knowledge that each law review often has its own unique
workflow and allows you to customize it to fit your review’s needs, the following outline of ExpressO’s
features is represented as general workflow of the editorial process from beginning to end.
Submitting Manuscripts
There are two ways to upload manuscripts to your publication: the author submits his/her manuscript
through the ExpressO website; or, the author emails the manuscript to the editor who then uploads it
on behalf of the author. Both scenarios for submitting manuscripts are outlined below. Regardless of
the method used, submitted manuscripts are stored in the Not Yet Published (or, pending) queue in the
Manage Submissions screen within ExpressO.
Author Submits a Manuscript
The following is a summary of the author submission process:
1. From the ExpressO homepage, http://law.bepress.com/expresso, the author clicks the
Submit Now link and is prompted to log in with an email address and password. (If the
author doesn’t have a bepress ExpressO account, he/she will need to create one. This
ensures we have an accurate email address to contact the author regarding the
submission.)
2. The author selects the law review(s) to receive their manuscript. Authors can search for law
reviews by title, category, or browse by our alphabetized list.
3. The author enters the manuscript’s metadata and uploads the manuscript’s file (CV and
cover letter are optional).
4. The author reviews the metadata and any associated fees. Finally, the author must agree to
the ExpressO terms of service and the general bepress terms of service. When the
submission (metadata and file) is ready for delivery, the author must click Finish.
As soon as the process is completed, the submission is automatically uploaded to the online account of
each review selected by the author, and at least one designated editor is automatically notified via
email of the new submission.
Confidential. Not for use outside your institution.
10Managing Submissions via ExpressO
The email notification contains basic information about the submission, including author name, article
title, subject categories, as well as a direct link to the submission through the review’s online account.
Editors may opt to also include the submission documents attached to the notification as well. See the
Submission Attachments (Optional) for more information.
Thus, the editorial process begins. As an editor, you can view all pending Not Yet Published manuscripts
for your publication via the Manage Submissions link on your My Account page (see section Receiving
and Assigning Manuscripts in this document). Authors may view their submission and delivery
information via their My Account page.
Editor Uploads Manuscript for Author
To submit manuscripts for an author who may have submitted outside of the ExpressO system:
1. Navigate to your My Account page
2. In the Editor Tools section, click Upload
3. Enter the author’s information, including name and e-mail address. You can also add co-
authors by clicking the Add Author button as needed. When the author information has
been added, click Continue.
4. Review the author information and then enter the submission metadata. Follow the
prompts to upload the file of the manuscript. Click Submit.
Supplemental Content
Editors can also attach associated files to the submission using the Supplemental Content link in the left
sidebar of the Submission Details page. This may be helpful if the author sends your law review
additional files outside of the ExpressO system that should be included with their submission, such as a
data set or an appendix.
Receiving and Assigning Manuscripts
Whether manuscripts are submitted directly by authors or by the editors on behalf of authors, all
submissions appear in the Not Yet Published list on the Manage Submissions page until they are
accepted, withdrawn, or rejected. This section discusses the process of moving a manuscript from the
initial submission through to an editorial decision.
Viewing Submissions
To access current pending submissions:
1. Navigate to http://law.bepress.com/expresso
2. Click on Login in the top navigation bar to login
3. Click on Manage Submissions in the Editor Tools section
4. By default, the resulting screen (as seen below) shows a list of manuscripts assigned to you
as an editor. You may view all submissions, or specifically those assigned to other editors
by utilizing the search filters in the upper portion of the page.
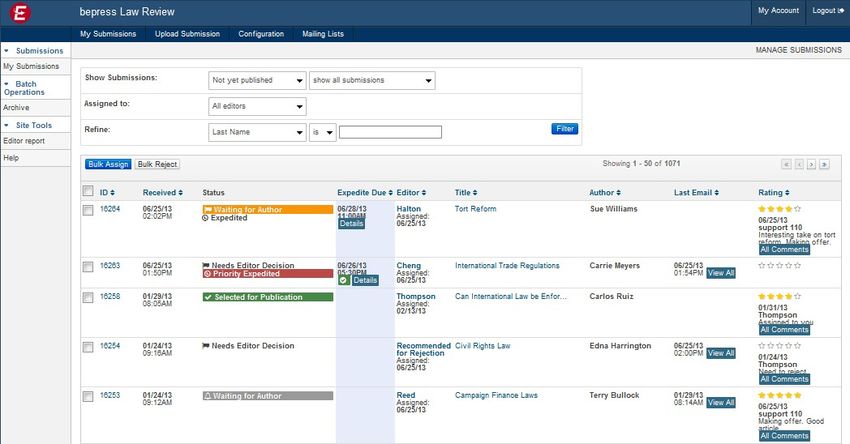
The Manage Submissions page serves as the central hub of all submissions received by your review, and
will be very helpful to you as manuscripts move through the editorial process. At a glance, you will see
the manuscript ID, author name, submission title, editorial status, expedite due dates, editor assigned,
and any reminder email dates associated with each article. You will also see recent author
correspondence as well as view editor comments including current submission ratings (average).
Confidential. Not for use outside your institution.
11Managing Submissions via ExpressO
Additional submission details, including author institution and subject categories, are also available on
the Article Details window that automatically appears when you hover your cursor over the article title.
This feature will be especially helpful if you assign articles to editors based on subject category.
Figure 3: Manage Submissions Page
To view an individual submission, click on either the manuscript number, title, or the blue View Article
button that appears on the Article Details window. The resulting screen displays the submission details
in neat sections: Editor Notes (if any), Files, Submissions Details, and Expedite Decision Requests. All of the
commands needed to manage the submission will be available conveniently on the right side of the
page in three main sections: Actions, Contact, and Activity (as shown in Figure 4).
Figure 4: Submission Details
Confidential. Not for use outside your institution.
12Managing Submissions via ExpressO
Assigning Editors to New Submissions
The first step in the editorial process is to assign an editor.
To assign an editor to a manuscript:
1. From your My Account page, click Manage Submissions in the Editor Tools section
2. Click on the title of the submission in the Not Yet Published submissions list
3. Under the Actions section on the right side of the screen, click Assign Editor
4. The corresponding page will display a list of available editor names. Click the button next
to the name of the editor you want to be responsible for this manuscript.
5. If you would like to include a comment with the assignment, enter it in the text box
provided
Note: Authors cannot see this text, but all editors can.
6. Click Assign. An email message will be sent to the newly assigned editor, informing
him/her of the assignment. Any comments will also be included in this email.
The manuscript will now list the last name of the editor in the Editor column in the Manage Submissions
screen. After a submission is assigned, all correspondence from the submission’s author(s) will be
directed to the assigned editor.
Figure 5: Assign Editor Screen
Tip:
Interested in seeing the workload of each editor before or after assigning submissions? On the
Assign Editor screen, click View the workload report. It will run a report that allows you to track
the number of submissions assigned to each editor. We also now track the date that a paper
has been assigned to an editor. It is visible next to the editor’s name on the Manage
Submissions screen.
Confidential. Not for use outside your institution.
13Managing Submissions via ExpressO
Mass Assigning Articles
Prefer to assign multiple articles to an editor at once? You can do so with the Bulk Assign feature.
To bulk assign articles:
1. On the Manage Submissions screen, click the checkboxes beside the articles that you would
like to assign
2. Click on the blue Bulk Assign button, which can be found just above the list of articles
3. On the resulting screen, click the button next to the name of the desired editor
4. Click Assign Articles. An email message will be sent to the newly assigned editor, informing
him/her of the assignment. Any comments will also be included in this email.
Adding Reminders
Need to remind an editor that an article needs to be reviewed or a decision made? Use Add Reminder,
and an email notification with your reminder message will be automatically sent to the assigned editor
on a date you select.
To set up a reminder:
1. Click on the Add Reminder link located in the Contact section the Submission Details page
2. Enter a subject and body of your message, and specify a date to send the reminder
3. Click Save
Withdrawing Submissions
ExpressO now features integrated auto-withdraw. When an author accepts an offer to be published
through ExpressO, editors of other law reviews will be notified immediately, and the submission will be
automatically withdrawn from each law review's submission queue.
Likewise, if an author accepts an offer from your review, the article is automatically withdrawn from the
queues of other law reviews. Outside of being published, when an author simply withdraws a paper, it
will also trigger the automatic withdraw from the pending submissions queue as well as notify the
assigned editor.
Remember, authors can only confirm your offer through ExpressO if you made the offer through your
ExpressO account (via the Register Decision link on the Submission Details screen). Therefore, we
encourage you to use always use ExpressO to make your offers.
ExpressO allows you to manually withdraw an article as well.
To withdraw an article from your submissions queue:
1. From the Manage Submissions page, click on the title of the submission you wish to
withdraw
2. On the Submission Details page, click Withdraw Submission in the Actions section
3. Select either Notify authors to send an email to the authors or Do not notify authors
4. Click Withdraw submission
Confidential. Not for use outside your institution.
14Managing Submissions via ExpressO
Author Correspondence
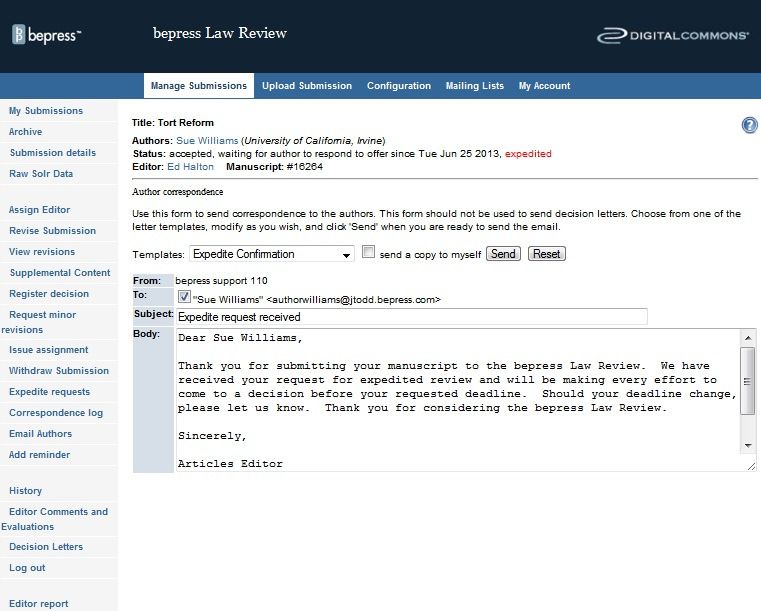
Sending Email to Authors
ExpressO provides both editors and authors the tools for direct communication. The Email Authors
feature allows editors to select from a list of templates to send to authors (already customized by you as
part of your law review set-up). Template options include a blank form, Confirmation (of delivery
receipt), Request for Electronic Copy, Student Rejection Form Letter, Expedite Confirmation, and Reject
Expedite Request.
Note: The Email Authors feature should not be used to send decision letters (use Register Decision, see
section Editorial Decisions in this document).
To send an email to an author:
1. Under the Contact section of an Submission Details page, click the Email Authors link
2. Select appropriate template from Templates drop-down menu. Feel free to edit the subject
and body text if needed. You can also send a copy of this email to yourself by selecting the
box send a copy to myself.
3. Click Send
Figure 6: Email Authors Screen
Confidential. Not for use outside your institution.
15Managing Submissions via ExpressO
Receiving Email from Authors
Authors may contact your law review using the ExpressO system via their My Account page. When an
author sends a message, you receive the email and may both view the correspondence at a glance on
your Manage Submissions page and from the Submission Details screen. A record of the author’s email
can also be found by clicking Correspondence Log under the Contact section.
Expedite Requests
When an author requests that their article be expedited due to a pending offer from another law review,
you will receive an email from the author with the request—as long as it meets your expedite
preferences. If it does not meet your preferences, you will not receive an email notification about the
expedite request. This applies to email notifications of expedite requests only. You will still be able to
view all requests, whether or not it meets your expedite criteria, on your default Manage Submissions
page under the Expedite Due column. You may also view the expedite request on the Submission Details
page, under the Expedite Decision Requests section. The dates of request and expiration are displayed, as
well as the title of the law review with the pending offer, if provided.
If the offer is “certified by ExpressO,” it means that we confirm that a law review has made that offer on
that article, and a checkmark will appear next to the Details link (in the Expedite Due column). This
certification creates transparency and will save editors time since they will no longer have to follow up
with authors on incomplete expedite requests or with other law reviews to confirm the offer.
Important: Remember, once you set your Expedite Preferences in Configuration, you can view your
preferred submissions by accessing your Priority Expedited queue.
To view your priority expedites:
1. On the Manage Submissions screen, make sure the Show Submissions drop-down menu is
set to Not Yet Published
2. Narrow the selection of Not Yet Published manuscripts by choosing Priority Expedited from
its sub-menu
3. Click on the blue Filter button
If the author has contacted your law review outside of the system, you can add an expedite request.
To add an expedite request on behalf of an author:
1. From the Manage Submissions screen, click on the title of the submission to view the
Submission Details page
2. Under the Expedite Decision Requests section, click the Add another expedite request button
3. Use the Offer from drop-down menu to select the review, offering publication
4. Select the date the offer will expire
5. Click Add. The expedite request will now display on the Submission Details page
Preliminary Review
Editor Comments and Evaluations
As you begin reviewing submissions, add your comments and/or use the customizable evaluation form
provided in the Editor Comments and Evaluations section. All editor comments are collected, and the
most recent comment will be visible on the Submission Details screen and conveniently on the Manage
Submissions for quick reference.
Confidential. Not for use outside your institution.
16Managing Submissions via ExpressO
To add a comment to a submission and/or view all existing comments:
1. On the Manage Submissions page, click on the stars or the blue All Comments button (if
available), or navigate to a Submission Details page
2. From the Submission Details page, click Editor Comments and Evaluations under the Activity
section. All editorial comments are listed here.
3. On the Editor Comments and Evaluations screen, expand the Add a Comment or Evaluation
to this Article by clicking on the down arrow.
4. Either enter your comments in the free-form field or click on the blue Insert Evaluation Form
button to use the sample evaluation form questions provided.
Note: Feel free to customize the evaluation form by clicking on the Edit Evaluation Form
button.
5. After adding your comments in the form, click Save.
Figure 7: Editor Comments and Evaluations Screen
Submission Rating Tool
After adding your comments, quickly summarize your submission review and let your fellow editors
know what you think by rating each article on a scale of 1 to 5 (1 = “Very Weak” and 5 = “Excellent”). As
an article moves onto the next stage of the review process, other editors can also add their ratings, and
an average is tallied automatically and displayed on the Manage Submissions page where it can be easily
sorted.
Confidential. Not for use outside your institution.
17Managing Submissions via ExpressO
To rate an article:
1. On the Manage Submissions page, click on the stars or navigate to a Submission Details
page
2. From the Submission Details page, click Editor Comments and Evaluations under the Activity
section. All editorial comments are listed here. Or, if comments are already added, click the
All Comments button under the Editor Comments section of the Submission Details page.
3. On the Editor Comments and Evaluations screen, hover your cursor over the stars in the Rate
this article box to choose your rating.
4. Select a rating by clicking on the appropriate star.
Once you rate the submission, your rating will be reflected in the Average Rating box (along with all
others), and the average rating will display on both the Manage Submissions and Submission Details
pages.
You can adjust your rating any time, or if you need to remove, simply click on the red circle next to the
last star.
Article Buckets
Once you review, provide your feedback, and rate your assigned articles, you can conveniently move
them onto the next stage of the editorial process by assigning them to the appropriate article buckets
Recommended for 2nd Read and Recommended for Rejection, created during the initial review set-up
phase. Remember, these buckets serve as a cue to the editorial board that an article is ready for the next
step of the process, but not yet ready for a final decision.
Editorial Decision
When it is time to register an editorial decision, you may notify the author via ExpressO.
Figure 8: Register Decision Screen
Confidential. Not for use outside your institution.
18Managing Submissions via ExpressO
To register a decision for an article:
1. Navigate to the Submission Details page, and click on the Register Decision link (in the
Actions section)
2. Click on either “Offer to Publish” or “Reject Submission” (shown in Figure 8)
Offer to Publish
You have the options to cc the review’s editors, set an Offer Expires date, and modify the subject and
body text if needed. Once you send an offer, the authors will receive an email notification that includes
a link to their submissions page so they can conveniently accept the offer directly from their account
(they will see a green Accept button next to their article title). In your Manage Submissions queue, the
status of this manuscript will change from Waiting for Editor Decision (in red) to Waiting for Author (in
orange.)
If the author does not accept the offer and it expires, the status will change from orange Waiting for
Author to gray. For the author, the Accept button will no longer appear on their account, and the author
will receive an email notification that the offer has expired and will be encouraged to withdraw the
submission.
If an author accepts, the status changes to Selected for Publication and is reflected in green on your
Manage Submissions queue.
Important: We understand you often contact authors directly with an invitation to publish, but we also
encourage you to confirm that verbal offer with a written offer by using the Register Decision feature.
This will ensure that your submissions queue reflects the most accurate status. Using ExpressO to make
your offers, in addition to direct contact, also benefits authors as it allows them to track the status of
their submission activity via their ExpressO account as well. Be sure to ask authors to do their part and
accept the offer through their account. Remember, when an author accepts your offer using ExpressO, the
status change will appear automatically in your Manage Submissions queue, and the article will
automatically be removed from the queues of other reviews. This integrated offer process keeps everyone
up-to-date and will help you from wasting time reviewing papers that have already been accepted
elsewhere.
Published Status
Once you select and finalize the articles you wish to publish, you can mark these submissions with the
status of Published. Moving submissions to this status removes them from the Not yet published queue,
and helps you maintain and organize your article selections.
Before moving submissions to the Published status, you must create a volume and issue. You can create
as many volumes/issues as you wish.
To create a new volume/issue:
1. Navigate to Configuration page to create a new a new volume and issue
2. At the top of the page, click volume next to Create New
3. Under Add New Volume, enter a number
4. Click Add Volume
5. From on Configuration page, click issue next to Create New
6. Under Add New Issue, enter a number
7. Click Add Issue
Confidential. Not for use outside your institution.
19Managing Submissions via ExpressO
To move articles to the Published status:
1. Navigate to the Manage Submissions queue
2. Click on either the article title or the article ID to access the Submission Details page
3. Under the Actions section, click on Publish
4. On the resulting screen, you will see all of the volume/issues you have created
5. Select which volume/issue you wish to publish the submission to by clicking the appropriate
radio button
6. Click Continue
7. Be sure to click the Update button to queue the site for update.
8. You will be notified via email once the update completes. Once updated, navigate to the
Manage Submissions page
9. On the search filter, select Published from the drop down box next to Show Submissions and
click on the blue Filter button
Note: You can close any issue you have created at any time by click on the Close Issue link located
on the left side bar under Site Tools on the Manage Submissions screen. You cannot reopen an issue
once you close it.
Reject Submission
You have the option to cc the review’s editors and modify the subject and body text if needed. Rejected
manuscripts are immediately removed from the Not Yet Published list on the Manage Submissions page.
(Rejected manuscripts can be found by filtering the Manage Submissions page to display manuscripts in
the Rejected state).
Note: Once you reject an author’s submission, the author will no longer be able to send through
ExpressO any correspondence regarding this manuscript.
Mass Rejecting Articles
Once you decide which articles are to be rejected, you can conveniently use Bulk Reject to reject
multiple articles at once with the option to notify the author(s) and editors. This is a powerful tool that
registers a final editorial decision on the articles selected.
To bulk reject articles:
1. On the Manage Submissions screen, set Show Submissions to Not Yet Published, and Assigned
to: to Recommended for Rejection (or the equivalent for your law review)
2. Click on the blue Filter button
3. Click on the top checkbox in the left-most column to select all articles
4. Click on the black Bulk Reject button
5. On the resulting screen, your selected articles are displayed. Confirm your selection by
clicking the checkbox beside the appropriate articles.
6. Use the checkboxes to indicate whether the author(s) and/or editor(s) should be notified
7. Click Reject Selected Articles
Note: Once an article has been rejected, editors cannot take further action on that article. If you reject
an article by mistake, please contact Consulting Services at support@law.bepress.com, and we can
revert the article to pending status.
Confidential. Not for use outside your institution.
20Managing Submissions via ExpressO
Archive Submissions
When you have made your publication selections and you want to clean out your Manage Submissions
queue, you can quickly remove all articles in the Not yet published queue by using the Archive feature.
To archive submissions:
1. From the Manage Submissions screen, click on the Archive link located on the left side bar
under Batch Operations
2. Click on the Archive # Submissions button to confirm
Important: Because the archive tool will move all articles that are in the Not yet published queue to the
Rejected queue, and the action is not reversible, we recommend that you first mark the submissions you
have selected for publication as Published (see above).
Advanced Editorial Features
Revising Submissions
If any part of the submission metadata needs to modified, or if you need to upload a new version,
simply navigate to the Submission Details screen and select Revise Submission under the Actions section.
You need only modify the necessary elements—other items in the form should be left untouched. It is
very helpful to include a brief but descriptive statement in the Reason for update field at the bottom of
the form so there is a clear record of how the different submission versions vary (e.g., “Adding co-
author”).
You can also view a list of all revisions to the article and select a “current version” of the submission
slated for publication. The “current version” is the one chosen for publication. The editor finalizes this
decision on the submission’s View Revisions page.
To view a revision and select the current version of a manuscript:
1. Navigate to the Submission Details page
2. Click View Revisions under the Activity section
3. The version history table will display all versions of the full-text and cover letter documents
submitted to date. If there are multiple versions, you should view the most recent
submission by clicking the associated view link
4. To select a version as the one to use for publication purposes, select the radio button next
to the desired version
5. Click Save Changes
Tip: You may also view all of the activity of any article by clicking on the History link under the Activity
section on the Submission Details screen. Major actions taken by author, editor or bepress support will
be logged on this page.
Confidential. Not for use outside your institution.
21Managing Submissions via ExpressO
Editor Report
Interested in learning more about submissions that have been reviewed by your editorial board? Want
to know the turnaround time for articles? You can answer these questions by clicking on Editor Report in
the left sidebar from your Manage Submissions page. Note: Depending on your editor privileges, you
may or may not have access to this tool.
To access the Editor Report feature for your law review:
1. Click on Manage Submissions in the Editor Tools section on your My Account page
2. Click on Editor Report in the left sidebar
3. You may customize the report by using the drop-down menu to choose which
article states should be included in the report
4. Click on Report, and a spreadsheet will be generated in an Excel format
Mailing List
Our Mailing List feature allows you to create custom messages to subscribers to your law review. You
may maintain your contact list and generate messages at any time. You can also view messages sent.
Access to this feature is available as a link on your My Account page as well as on the Manage
Submissions page. Note: Depending on your editorial privileges, you may not have this access.
To add subscribers to your mailing list:
1. Click on the Mailing List link on your My Account or Manage Submissions page
2. Click on the Subscribers link located on the left side bar. You may add one email address at
a time or upload a text file for multiple addresses.
3. Click Save Changes
To create a message to subscribers:
1. Click on the New Message link located on the left side bar
2. Fill out the Subject and Body fields and click Continue
3. Review the message to be sent (click Edit to revise if necessary)
4. To send a test message to yourself before sending, click on Send a test message to myself
5. To cancel the message, click Delete message from queue
6. When ready to send your message, click Approve message for sending
Note: Your message will be queued to be sent. It may take some time to send. Be sure to check
the status of your message by clicking on the Messages link located in the left sidebar.
Confidential. Not for use outside your institution.
22You can also read