User Manual Customer Interaction Express 3.4.2 Salesforce Connector - Edition: 1.0 05/22/2018 - Avaya Support
←
→
Page content transcription
If your browser does not render page correctly, please read the page content below

User Manual
Customer Interaction Express 3.4.2
Salesforce Connector

                                     Edition: 1.0
                                     05/22/2018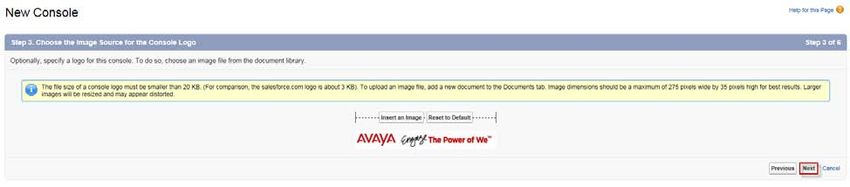
© 2018 Avaya Inc.
All Rights Reserved.

Notice
While reasonable efforts were made to ensure that the information in this
document was complete and accurate at the time of printing, Avaya Inc. can
assume no liability for any errors. Changes and corrections to the information
in this document may be incorporated in future releases.
For full legal page information, please see the complete document, Avaya
Legal Page for Software Documentation, Document number 03-600758.
To locate this document on the website, simply go to
http://www.avaya.com/support and search for the document number in
the search box.

Documentation disclaimer
Avaya Inc. is not responsible for any modifications, additions, or deletions to
the original published version of this documentation unless such modifications,
additions, or deletions were performed by Avaya. Customer and/or End User
agree to indemnify and hold harmless Avaya, Avaya's agents, servants and
employees against all claims, lawsuits, demands and judgments arising out of,
or in connection with, subsequent modifications, additions or deletions to this
documentation to the extent made by the Customer or End User.

Link disclaimer
Avaya Inc. is not responsible for the contents or reliability of any linked Web
sites referenced elsewhere within this documentation, and Avaya does not
necessarily endorse the products, services, or information described or offered
within them. We cannot guarantee that these links will work all of the time and
we have no control over the availability of the linked pages.

Warranty
Avaya Inc. provides a limited warranty on this product. Refer to your sales
agreement to establish the terms of the limited warranty. In addition, Avaya’s
standard warranty language, as well as information regarding support for this
product, while under warranty, is available through the following Web site:
http://www.avaya.com/support

Copyright
Except where expressly stated otherwise, the Product is protected by copyright
and other laws respecting proprietary rights. Unauthorized reproduction,
transfer, and or use can be a criminal, as well as a civil, offense under the
applicable law.

Avaya support
Avaya provides a telephone number for you to use to report problems or to ask
questions about your product. The support telephone number
is 1-800-242-2121 in the United States. For additional support telephone
numbers, see the Avaya Web site:
http://www.avaya.com/support
Contents
                Overview                                                                                                                                              5
                        Introduction ............................................................................................................................... 5
                        Prerequisites............................................................................................................................... 5
                        Supported Browsers ................................................................................................................... 6
                        Supported Features .................................................................................................................... 6

                Installing CRM Connector on CIE Server                                                                                                                7
                        Overview ................................................................................................................................... 7
                        Installation step by step.............................................................................................................. 7
                        Installing ISA ............................................................................................................................. 8
                        Configuring ISA ........................................................................................................................ 9
                                  Custom Console Component ....................................................................................... 9
                                  Creating Console App ................................................................................................. 9
                                  Configuring Contact Centre....................................................................................... 14
                                  Configuring Softphone Layout .................................................................................. 17
                                  Screen Pop Settings ................................................................................................... 19

                Using ISA                                                                                                                                          21
                        Accepting the CRM Connector Certificate prior to Logging into ISA .................................... 21
                        Login ........................................................................................................................................ 22
                                   Login to Salesforce using the Salesforce URL. ......................................................... 22
                                   Login to ISA .............................................................................................................. 22

                ISA UI Controls                                                                                                                                    25
                        Overview ................................................................................................................................. 25
                        Operation ................................................................................................................................. 26
                                Agent Group Sign-On/Off ......................................................................................... 26
                                Receiving Calls.......................................................................................................... 26
                                Hold/UnHold ............................................................................................................. 27
                                Drop Call ................................................................................................................... 28
                                Outbound Call ........................................................................................................... 28
                                Consult ...................................................................................................................... 30
                                Transfer ..................................................................................................................... 32
                                Conference................................................................................................................. 33
                                Job Codes .................................................................................................................. 34
                                Wrap-Up .................................................................................................................... 34
                                Logout ....................................................................................................................... 35

                Service                                                                                                                                            36
                        Call Log ................................................................................................................................... 36
                        Screen Pop ............................................................................................................................... 36
                        Uninstalling the ISA Application............................................................................................. 37
                        Troubleshooting the CRM Connector ...................................................................................... 40

CIE 3.4.2 Salesforce Connector                                                                                                                    Contents • 3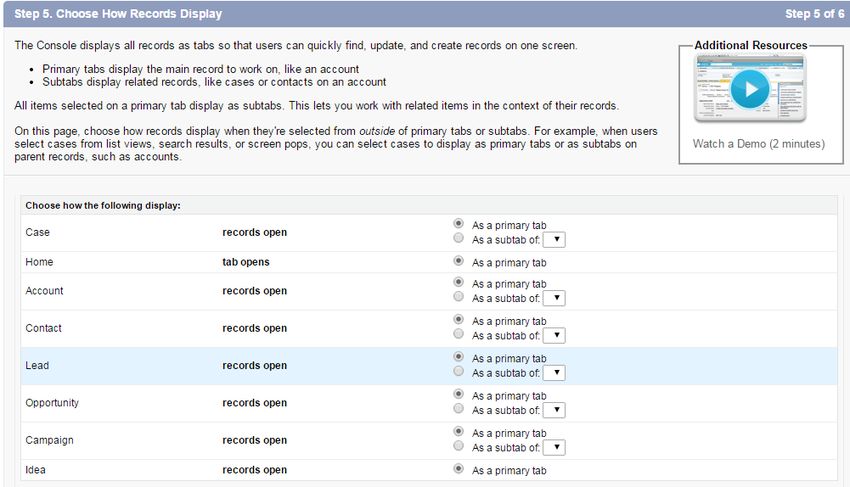
Overview

Introduction
                                 IPOCC Salesforce App(ISA) integrates Salesforce CRM Application with
                                 IPOCC or CIE. In CIE it can be used with PBX Type IP Office as well as Avaya
                                 Aura (CM).
                                 Using ISA contact center agents can use Salesforce CRM application as their
                                 primary user interface as agent desktop. Using ISA an agent can handle
                                 voice calls even if there is no CIE User Interface installed on the agent's
                                 desktop.
                                 ISA will be installed and configured on Salesforce, while CRM Connector is
                                 installed and configured on CIE Server. The agent will access the Salesforce
                                 CRM application via web browser. Some features like screen pop are not
                                 supported in Standard Mode. Additionally Standard app has limitations.
                                 Hence deploy ISA in console mode only.

                                 Term                  Description
                                 CRM                   Customer Relationship Management
                                 CIE                   Customer Interaction Express
                                 IPOCC                 IP Office Contact Center
                                 CTI                   Computer-Telephony Integration
                                 ISA                   IPOCC Salesforce Application
                                 WSC                   Web Services Collection

Prerequisites
                                 •     CIE Server (with working Web Service Collection and CRM Connector).
                                 •     A Salesforce login account is needed to access Salesforce. All Salesforce
                                       activities described in this document can be done only after login to
                                       Salesforce. Supported editions are Enterprise Edition, Unlimited Edition,
                                       Performance Edition and Developer Edition. “Service cloud” capability
                                       needs to be available for agents.
                                 •     "Checking SalesForce Service Cloud License" Check Under Administer ->
                                       Company Profile -> Company Information. Under section "Feature
                                       Licenses", there is "Service Cloud User" field. This shows how many
                                       service cloud licenses are available and consumed.

CIE 3.4.2 Salesforce Connector                                                                           Overview • 5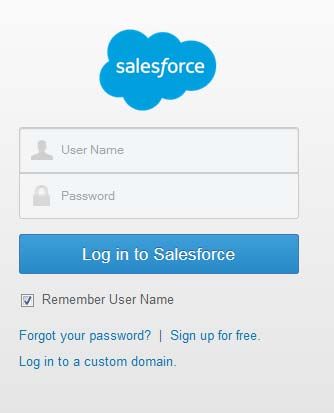
•   Whether Agents/Users have been granted that capability can be checked
                   under Administer -> Users. Click on any User. Check the "Service Cloud
                   User" checkbox.

Supported Browsers
               Firefox 32+ and Chrome 39+

Supported Features
               Following agent functionality (telephony call control) is provided in ISA
                   •    Login, Logout
                   •    Changing Agent State to Available/Not Available.
                   •    Sign-In/Sign-Out to Agent Groups
                   •    Answer Call
                   •    Release(Drop)
                   •    Hold/UnHold
                   •    Make Outbound Call
                   •    Consult
                   •    Transfer
                   •    Conference
                   •    Job Codes
                   •    Wrap-Up
               Following Salesforce functionality is provided in ISA
                   •    Call Log
                   •    Screen Pop
                   •    Click-To-Dial

6 • Contents                                                       CIE 3.4.2 Salesforce Connector
Installing CRM Connector on
CIE Server

Overview
                                 The following section describes the three main steps required to deploy the CRM
                                 Connector:
                                      •   Install WebService Collection and Tomcat_WWW
                                      •   Install the CRM Salesforce application onto the CIE Server
                                      •   Restart the IP Office Contact Center Watchdog

Installation step by step
                                 1.   Stop the watchdog.
                                 2.   Make sure that WebService Collection is installed. In case not installed, start
                                      SetupWizard and install in Expert Modus the WebService Collection and
                                      Tomcat_WWW.
                                 3.   CRM Connector is not included in the SetupWizard. On CIE-DVD the setup
                                      CRMConnector x64.msi is located in folder CRM. Double click
                                      CRMConnector x64.msi, accept End-User License Agreement, choose
                                      Setup Type Comlete and click on install button. The CRM connector gets
                                      installed under C:\Program Files (x86)\Avaya\Customer Interaction
                                      Express\Tomcat WWW\webapps\CRMConnector.
                                 4.   Check watchdog configuration: Tomcat_WSC and Tomcat_WWW must be
                                      included.
                                 5.   Restart the watchdog.

CIE 3.4.2 Salesforce Connector                                          Installing CRM Connector on CIE Server • 7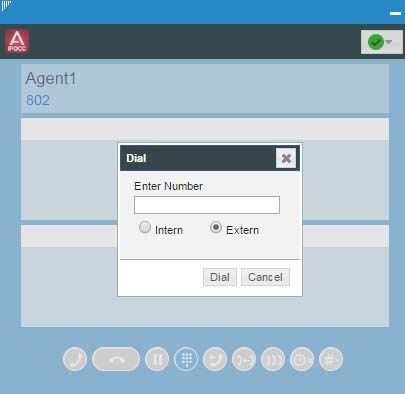
Installing ISA
                 Ensure you are logged in to Salesforce. And you have the requisite package link.
                 The ISA package link is provided in the Release notes, shipped with CIE
                 For CIE3.4 the link is:
                 https://login.salesforce.com/packaging/installPackage.apexp?p0=04t1
                 0000000kfOd
                     1.   Once you access the package URL, click on “Continue”
                     2.   Approve Package API Access
                     3.   Click on Next.
                     4.    Click Security Level. Select Grant access to all users. All internal
                          custom profiles get full access or select the option according to your
                          organization’s security policy.
                     5.   Install Package
                     6.   Click on Install. The package will get installed, and you will see below
                          screen

8 • Contents                                                          CIE 3.4.2 Salesforce Connector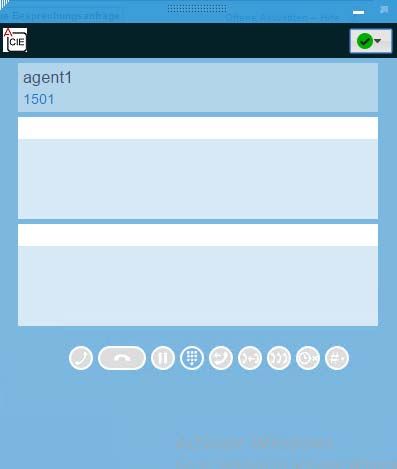
Configuring ISA
                                 Below steps are needed in the configuration of ISA
                                     •   configure a console app.
                                     •   "Call Center" configuration and assigning it to Agents
                                     •   Directory Numbers (optional)
                                     •   Configure Softphone layouts for screen pop

                                 Custom Console Component
                                 Salesforce Console is geared more towards a contact center agent. It provides a
                                 dashboard like interface, and eliminates the multiple tabs. Instead a navigation
                                 tab is provided. Switching between navigation tabs doesn’t reloads the app, due
                                 to which context is preserved. ISA window can be minimized and resized in this
                                 case. Clicking on the “Phone” icon, minimizes/restores the app. Step by Step
                                 information, on how to enable service console is given in the following link
                                 https://help.salesforce.com/apex/HTViewHelpDoc?id=console2_define_a
                                 pp.htm&language=en

                                 Creating Console App
                                 Under Setup, Navigate to Build -> Create -> Apps, as shown below

                                 After clicking on “Apps”, you will get below screen. Click on “New”

CIE 3.4.2 Salesforce Connector                                        Installing CRM Connector on CIE Server • 9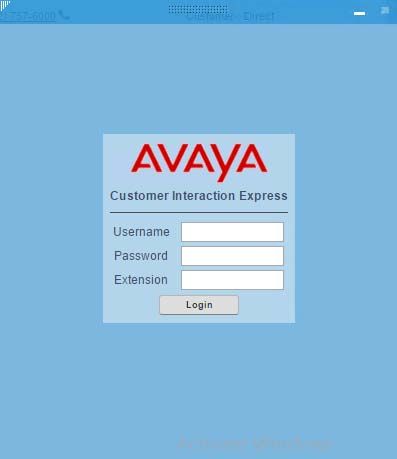
You will need to select “Console”, and click “Next”

                Enter an App Label and App Name for the Console App as per the
                conventions of your organization

                If you want, you can provide a logo for the app. This is not mandatory. Once
                done, click on “Next”

10 • Contents                                                         CIE 3.4.2 Salesforce Connector
Select the uploaded document for your logo. If the logo document is not
displayed, please recheck the format of your document
The logo is displayed. Click the Next button.
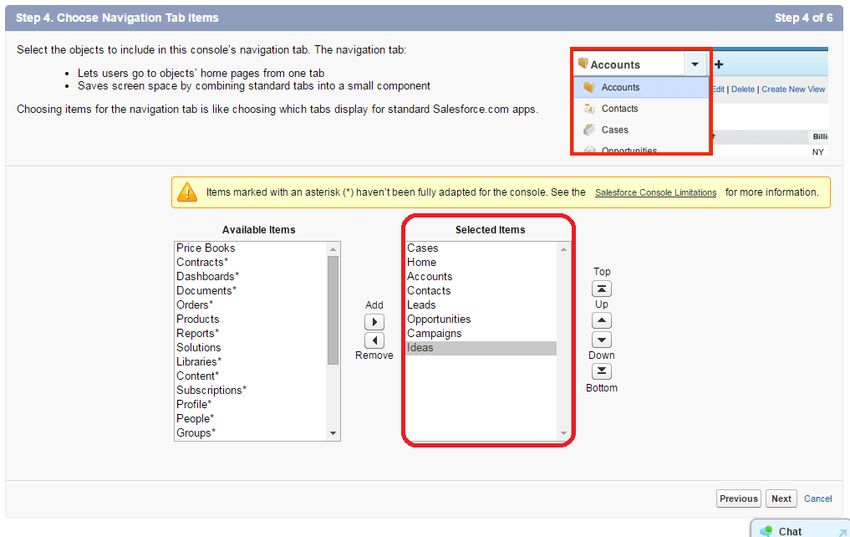
Click the Navigation Tab items to be displayed in console mode. Then select
the Next button.
CIE 3.4.2 Salesforce Connector Installing CRM Connector on CIE Server • 11Choose how records are displayed. 12 • Contents CIE 3.4.2 Salesforce Connector
Next assign to profiles. 13

                                  Click on “Save”. The App will get saved.
                                  The app can be selected by clicking on the Salesforce menu in the right hand
                                  side of the screen at the top.

                                  Once the console app (ISA Console in this case) is selected, your screen layout
                                  will change. The layout might change, if additional configurations are done.
                                  Observe the area at the bottom of right hand side.

                                  Click on “Phone”, the softphone will pop. If contact center is configured, the
                                  login screen will be seen as shown below

CIE 3.4.2 Salesforce Connector                                         Installing CRM Connector on CIE Server • 13
Configuring Contact Centre
Once ISA is installed, you will need to provide IP address and port of CIE
Server.
Click on Salesforce, under setup -> Build -> Call Center -> Call Centers
You might get a getting Started.. screen. If you get it, you may need to
click on "Continue" to get to the actual section unless you have
previously selected don't show this again.
The installed Call Center Application will be displayed. Click on Edit
In the first field Salesforce Application Name enter CIE.
In field Display Name you can adjust the name optional.
In the lower part “Server configuration” you have to enter the IP Address to that
of your CIE Server. Edit the port number, as provided in CRM Connector.
Default value is 28443. Refer below screen for fields.
14 • Contents CIE 3.4.2 Salesforce ConnectorRefresh Timeout (seconds) is the time in seconds, which defines for how long
during a page refresh, the connection with the server will be maintained. If the
page refresh takes longer than this timeout, Agent will be logged out. By Default
it will have a value of 60 seconds.
On Call Keepalive (seconds) is the interval time in seconds after which, ISA
will send a periodic keepalive message to CIE Server. This is intended to keep
the Agent session alive. By Default it will have a value of 30 seconds.
Be very careful while changing these default timeout values. Change these
values only if you understand the implications.
Use Directory for Contact Details If enabled, for internal calls, ISA will
display contact info, by searching the SF Directory. Directory Numbers need to
be populated for this to work.
Access code for external OutCC this code will be used for outbound dialing.
Digits to Trim for external incoming: This number is used to trim digits from
incoming external call. The trimmed number will be used for lookup in
salesforce database. For e.g. If this number is configured to be 1, and an external
incoming number is 9123456. ISA will do a lookup for "123456". i.e it will trim
the 1 digit from the beginning of the incoming number. If this number is
configured to be 2, and an external incoming number is say 77123456. ISA will
do a lookup for "123456" i.e. it will trim 2 digits from the beginning of the
incoming number. Note: this function is only available for new installation. In
CIE 3.4.2 Salesforce Connector Installing CRM Connector on CIE Server • 15case of upgrade from ISA version Manage Users -> Users. Edit the specified users
To make the application available to that user. In the user configuration
interface, edit the Call Center field, and select the Call Center look up button.
16 • Contents CIE 3.4.2 Salesforce ConnectorThe Adaptor is now added, click the Save button.
Configuring Softphone Layout
The Softphone Layout determines how screen pop functionality works. You can
configure what SF objects you want, what should be searched. Refer
https://help.salesforce.com/htviewhelpdoc?id=cti_admin_phonelayoutscr
eate.htm&siteLang=en_US Navigate to Setup -> Build -> Call Center ->
Softphone Layouts. By default, there will be no layout configured. Click on
New. You will see the below fields.
Check the “Is Default Layout” checkbox.
The Call Type is “Inbound”
You will need to edit these sections. The layout is of three sections. The first
section, “Display these call-related fields”, controls what items will be displayed
for a call, when the information is available. The next section contains what
Salesforce database objects will be displayed on a successful screen pop, what
fields in those objects will be displayed. The third section is to configure the
screen pop settings.
CIE 3.4.2 Salesforce Connector Installing CRM Connector on CIE Server • 17The basic call detail fields that are to always be displayed for a call are configure
d in the first section, “Display these call-related fields”. Click the options to be
displayed for a call from Caller ID, Dialed Number
Select which Salesforce database objects will be displayed on a successful screen
pop, along with the fields contained within the object to be displayed. Go to
Add/Remove objects to display Salesforce data objects
An Account look up only displays one account. If multiple matches are found
only the Account name is displayed. Account look up search parameters can be
added from the Available field to the Selections field.
18 • Contents CIE 3.4.2 Salesforce ConnectorA Contact look up only displays one contact. If multiple matches are found only
the contact Name is displayed. Contact look up search parameters can be added
from the Available field to the Selections field.
In this case, if a contact object is found, the Name will be displayed.
Screen Pop Settings
The Screen Pop Settings allow more definition in how screen pops are shown.
The first option determines where the screen pop will occur. It can pop within th
e existing browser window, or it can pop into a new browser tab. (If the browser
being used does not support tabs, it can pop into a new browser window instead.)
The second option determines what will be done if no matches are found. The ch
oices are to have no pop at all, to pop to a new Salesforce object (e.g. a new Cont
act)
The third option determines what to do with a unique match. The choices are to
not pop at all, pop into the detail page.
CIE 3.4.2 Salesforce Connector Installing CRM Connector on CIE Server • 19The last option determines what to do when multiple matches have been found.
The choices are to not pop at all, pop to a search page.
Please do not use the pop to a VisualForce page, unless you know, what you are
doing, and are very familiar with VisualForce pages.
Click on “Save” once you are done.
With the configuration changes done, ISA is now available to those agents.
20 • Contents CIE 3.4.2 Salesforce ConnectorUsing ISA
Accepting the CRM Connector Certificate prior to
Logging into ISA
Before agent can login to IPOCC Salesforce App (ISA), the certificate of the
CIE Server needs to be accepted.
In your browser, enter the URL at Fehler! Hyperlink-Referenz ungültig.
Ensure the port number is same as given in CRMConnector Installation section.
For e.g., in case of Chrome, if you access the URL, you will get the below
screen.
Click on “Advanced”. You will get below screen
Click on “Proceed to ….”. The certificate will be accepted.
Note: If the internet connection is via a proxy. An exception needs to be added
in the browser for IP Office Contact Center Server. Unexpected Connection
failures can occur over a proxy connection.
CIE 3.4.2 Salesforce Connector Using ISA • 21Login
Login to Salesforce using the Salesforce URL.
Agent needs to login to Salesforce
Login to ISA
Once the agent has logged into Salesforce, the IP Office Contact Center
Salesforce App(ISA) will be loaded in the bottom right side of browser, as
illustrated below.
The agent must click on the Phone button to pop ISA.
Note: Salesforce provides some default dummy data. So if you don't have any
data beforehand, do not be surprised to see default records.
Initially ISA login screen will be displayed. Agent needs to enter his username,
password and extension.
22 • Contents CIE 3.4.2 Salesforce ConnectorCIE Agent Name
CIE User Password
IPOffice Extension
The agent then enters his credentials, as shown (The actual values will differ)
If the credentials are valid, the login is successful, and the agent will get the
display of Telephony controls as shown below.
Note: Unsupported UI controls will not be displayed
Note: Click-to-dial is enabled on Salesforce.com once an Agent successfully
logs into the Application. Click-2-dial will be disabled on Agent log off.
Note: If an agent provides invalid credentials, an error message will be displayed
stating Invalid agent credentials. To login into the CRM App User Interface, the
user has to either click on the Login button or tab to the Login button and press
the Enter key or Space Bar to activate the login process. Pressing the Enter key
on any of the fields (Username, Password, Extension) is not supported, as each
field requires validation.
Note: If a user is logged into ISA and the network connection with CIE server is
broken and the user then performs an operation in the User Interface (for
example, dials a number), the user is automatically logged out of the User
Interface. After a period of time and the following message is displayed
Connection to Call Center Server was closed or lost unexpectedly.
CIE 3.4.2 Salesforce Connector Using ISA • 23Users will not be allowed to logout or change agent state from "Available" to
"Breaktime", when a call is in progress.
If user is logged into ISA and is logged off from the Telephony via Supervisor
console or Agent console of the IP Office Contact Center thick User Interface,
the user is automatically logged off from ISA. The following message is
displayed Agent was logged off via Supervisor console or via external endpoint.
Vice-versa of above point is also true, i.e. if a user is logged off from the ISA
App User Interface, then user is also logged off from the Telephony in the CC
UI.
24 • Contents CIE 3.4.2 Salesforce ConnectorISA UI Controls
Overview
The telephony UI buttons of ISA are shown below. The alignment of these
buttons may differ, if the app window is resized.
Agent Name
Agent Extension
Consult
Call Release/Drop Transfer
Conference
Answer
JobCode
Hold/UnHold
Dial
WrapUp
Note: The Agent State is visible on the top right, as a select option widget. The
green icon indicates that the agent is available. The red icon indicates that the
agent is on breaktime. The state of the agent can also be updated by the
Supervisor or the Agent them from CIE User Interface. The changes are
reflected in ISA.
CIE 3.4.2 Salesforce Connector ISA UI Controls • 25Operation
Agent Group Sign-On/Off
Click on Groups, a window will pop-up, showing the list of groups a shown
below. Agent can check, or uncheck the groups to sign-in/off.
Receiving Calls
After successful login, Agent can receive incoming calls. When an incoming call
arrives, the “Call Pickup” button becomes green, and blinks. Details about the
incoming call are also displayed, as shown below.
Topic Name
Call Direction
Call Type
Caller Name
Phone Number
Call Alert
Agent accepts the call, by clicking on the “Call Pickup” button. Once the call is
answered, the conversation starts, and the screen changes as below. The duration
of the call, direction of the call is shown along with incoming contact details.
The incoming Contact must be pre-configured in Salesforce, else the contact will
be shown as Unknown.
26 • Contents CIE 3.4.2 Salesforce ConnectorHold/UnHold
Call can be put on hold, by the agent, or the other party. Agent can put the call
on hold, by clicking on the “Hold” Button. Once the call goes on hold, the
“Hold” button is illuminated.. The call status will also be modified to reflect the
status.
The call can be taken off hold by once again clicking on the Hold. The status of
the call will change accordingly.
CIE 3.4.2 Salesforce Connector ISA UI Controls • 27Drop Call
To drop/release a call, click on the “Call Release” button. The button’s color will
change to Red, when it is clicked.
Outbound Call
To make an outbound call, click on the “Dial Pad” button. A dialog pops up.
Select whether an internal or external number is to be dialed. In the Dial dialog,
enter the number to be dialed, and then click on “Dial”.
Once the “Dial” button is hit, the dialog disappears, and the status of the call,
and the other party is shown.
28 • Contents CIE 3.4.2 Salesforce ConnectorCall Direction
Once the other party accepts the call, the call is connected, and the status is
updated to Conversation, as shown below
CIE 3.4.2 Salesforce Connector ISA UI Controls • 29Consult
In case of an ongoing call, if the agent wants to dial a consult call. The agent
needs to click on “Consult” button. On clicking the consult button, a dialog box
opens up.
The agent enters the number for consult, and clicks “Dial”. The current call goes
on Hold. The status of the consult call, is shown.
Original Call goes on Hold
Consult Call
Once the other agent accepts the call, the conversation starts, as shown below
30 • Contents CIE 3.4.2 Salesforce ConnectorConsult Call Started
During the consult call (or between any two calls), the agent can switch between
the calls, by clicking on the respective call area portion.
First Call Area
Second Call Area
After the ‘consult’ call is completed, the agent clicks on the Call Release button.
The ‘consult’ call is ended.
Note: Ensure that the consult call is the active call.
When the ‘consult call’ ends, the original call is still in a Hold state. Therefore to
“unhold” the call the agent must once again click the Hold button.
To end the call, click the Call Release button.
CIE 3.4.2 Salesforce Connector ISA UI Controls • 31Transfer
To Transfer an existing call, the agent clicks the Dial Pad button, enters the
number to which the call is to be transferred. The original call is automatically
placed on hold.
Once the other party has picked up the call, the call is connected. To complete
the transfer process, click the Transfer button.
Transfer
Once the transfer button is clicked, the call is transferred from the agent.
32 • Contents CIE 3.4.2 Salesforce ConnectorConference
In an ongoing call, if the agent wants to Conference in someone else. The agent
needs to click on the “Dial Pad” and dial the party, whom the agent wants to
conference-in. The original call goes on Hold.
Then the other party accepts the call, and the call between agent and the other
party is going on.
Conference
To join these two calls in a conference, the agent clicks on “Conference” button.
Once the conference is started, the two calls are merged into the conference.
If the agent wants to add another party into the conference. The agents needs to
follow the same process. i.e. dial the number, connect the call, and then click on
conference button.
To drop out of the conference, the agent needs to click on “Call Release”.
CIE 3.4.2 Salesforce Connector ISA UI Controls • 33Job Codes
Agent can send Job Codes, by clicking on the Job Code button. After clicking on
the button, the agent will see a pop-up as shown below.
The agent selects the Job Code, or can enter in the entry box below.
Wrap-Up
If wrap up is configured. Agent enters the wrap-up stage, after call ends. By
clicking on the wrap-up button, agent can end the Wrapup. When the agent is in
wrap-up, the timer shows the time left for wrap-up, as shown below.
34 • Contents CIE 3.4.2 Salesforce ConnectorLogout
To logout agent needs to click on “Logout” button.
CIE 3.4.2 Salesforce Connector ISA UI Controls • 35Service
Call Log
By default, completed calls are logged and saved in Salesforce, when the
corresponding contact object is available. If the incoming contact number is
present in multiple objects of same or different type, the call log will not be
saved. Calls logs for incomplete/abandoned calls will not be saved. Call logs are
saved to Salesforce “Task” object of the Contact.
The following fields are saved by ISA in Call logs.
• Contact id
• Subject (default value "CALL" will be stored)
• Status- will always be stored as “completed” state
• Phone and email id will automatically updated from contact
• Duration (in seconds)
• Call Type
Call Log will always be displayed in the activity history of the contact.
Note: Call Logs are not a replacement for IP Office Contact Center call related
reports. The two are independent of each other. Salesforce Call logs, saves or
updates the Task object in Salesforce. Salesforce will only have information
related to the current User/Agent.
Topic Call: An inbound topic call initiated from customer will be saved in call
log. The topic call will be visible in comments field and will be saved in
following format “Topic call - ”
Screen Pop
Configure the softphone layout option as given under the “Configuring
Softphone Layout” section. Once the configuration is in place, you will get a
screen pop on calls.
Note: Screen pop will occur on Inbound, and Outbound calls. The Phone
Number (Dialed or Incoming) will be used as the key to search for Salesforce
objects.
Note: Screen Pop is not supported in Standard mode.
36 • Contents CIE 3.4.2 Salesforce ConnectorUninstalling the ISA Application
To uninstall, click on “Setup”, and navigate to Build -> Installed Packages. Click
on “Installed Packages”
After clicking on “Installed Packages”, you will get a list of installed packages.
Identify the package that you want to delete. And click on “Uninstall”
You will get a confirmation screen, and options to save the data associated with
the package. Click on the checkbox, if you want to delete the package.
CIE 3.4.2 Salesforce Connector Service • 37After clicking on “Uninstall” the package would be uninstalled. You will get the
below progress screen.
The uninstall process can take a number of minutes to complete. The status of
the package is displayed in the Uninstalled Packages panel
38 • Contents CIE 3.4.2 Salesforce ConnectorTo completely remove the package, click the Del button. The package is deleted
from the SFDC a/c.
CIE 3.4.2 Salesforce Connector Service • 39Troubleshooting the CRM Connector
In case of unexpected behavior in the Salesforce Application, please supply the
log files listed below to Avaya support:
• CRM Connector logs in CIE TTrace
• Browser Console: This is a debugging display that is part of the user’s
browser.
To obtain the log from the Browser Console, the browser’s debugging tools will
have to be invoked. (This can be achieved in both Firefox and Chrome by
pressing “F12”.)
Once the debugging tools are displayed, use the tools to select the Console
display. Recreate the issue while the Console is displayed. When you have
finished recreating the issue, highlight the entire contents of the Console display
and send the log entries to Avaya Application Support.
Other Troubleshooting Considerations
• A User cannot logout or change their agent state from Available to
Break time, when a call is in progress.
• If a user is logged into the ISA App User Interface and is logged off
from the Telephony via Supervisor console or Agent console of the
Contact Center User Interface, the user will automatically be logged off
from ISA App User Interface. The following message is displayed:
"Agent was logged off via Supervisor console or via external endpoint."
• If a user is logged off from the ISA App User Interface, the user is also
logged off from the Telephony in the Contact Center User Interface.
40 • Contents CIE 3.4.2 Salesforce ConnectorYou can also read