EUROPEN UNIVERSITY CYRUS - BLACKBOARD LEARN - FACULTY MANUAL TITLE
←
→
Page content transcription
If your browser does not render page correctly, please read the page content below
TITLE
                           BLACKBOARD LEARN – FACULTY MANUAL

EUROPEN UNIVERSITY CYRUS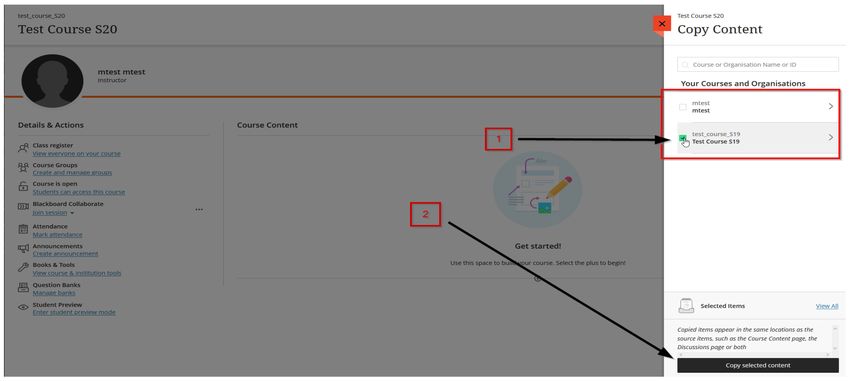
Table of Contents
How Do I Log in to Blackboard ................................................................................................................................................ 3
User Profile.............................................................................................................................................................................. 4
Activity Stream ........................................................................................................................................................................ 5
Courses.................................................................................................................................................................................... 6
Calendar .................................................................................................................................................................................. 7
Messages................................................................................................................................................................................. 8
Marks ...................................................................................................................................................................................... 9
Ultra Create Content ............................................................................................................................................................. 10
Create a link to a website...................................................................................................................................................... 13
Copy Content from an old course to a new one ................................................................................................................... 14
Copy all content .................................................................................................................................................................... 16
Copy Selected Content.......................................................................................................................................................... 17
How to Create a journal ........................................................................................................................................................ 18
Discussions ............................................................................................................................................................................ 22
How to create a Discussion ................................................................................................................................................... 23
Send Message or email ......................................................................................................................................................... 25
Create an announcement ..................................................................................................................................................... 27
Create course groups ............................................................................................................................................................ 29
Manage individual groups..................................................................................................................................................... 32
Access Attendance ................................................................................................................................................................ 33
Virtual Classroom .................................................................................................................................................................. 35
Creating a new session.......................................................................................................................................................... 36
Joining a Session ................................................................................................................................................................... 41
Navigating through Blackboard Collaborate Ultra’s Interface.............................................................................................. 43
Setting up Collaborate in Course Groups.............................................................................................................................. 51
Setting up Breakout Groups .................................................................................................................................................. 52
Select Breakout Groups from the menu ............................................................................................................................... 53
Randomly Assigning Participants to Groups ......................................................................................................................... 54
Manually Assigning Participants ........................................................................................................................................... 55
Polling.................................................................................................................................................................................... 56

                                                                                              1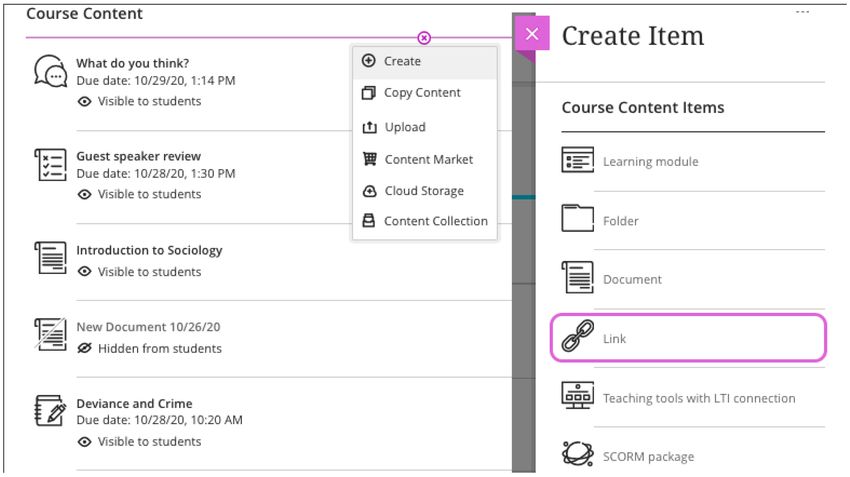
Setting up a Poll .................................................................................................................................................................... 57
Yes/No Polls .......................................................................................................................................................................... 60
Set up your camera and microphone ................................................................................................................................... 62
Viewing Recordings ............................................................................................................................................................... 67
Create an assignment ........................................................................................................................................................... 72
New Assignment page (settings)........................................................................................................................................... 73
Creating a Turnitin assignment ............................................................................................................................................. 74
Grade Assignments ............................................................................................................................................................... 80
Add Grade Item ..................................................................................................................................................................... 83
Announcement of Final Exam Grade .................................................................................................................................... 86

                                                                                            2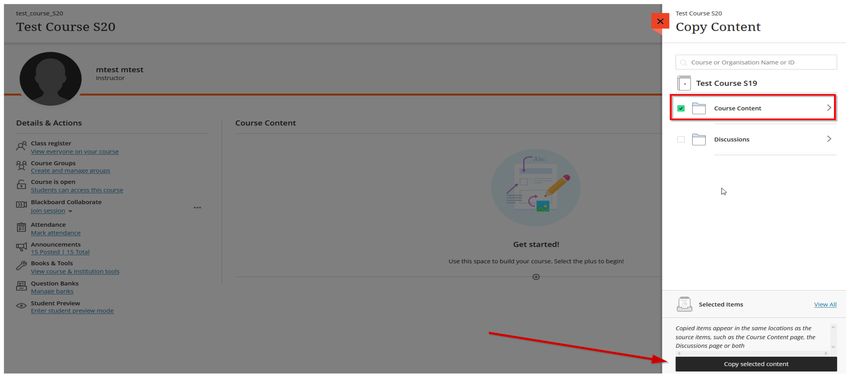
How Do I Log in to Blackboard
To log into Blackboard, you must have a valid University credentials
To login:
Go to https://gge-cyp.onelogin.com/

In the login page type your university email address and click continue, enter your password
Click continue. You will now see the Blackboard learn icon.

                                               3
User Profile
The first menu option you will see will contain your full name. All users have a profile page that
appears in the base navigation. Users select their names to access their personal information
and settings.

                                                4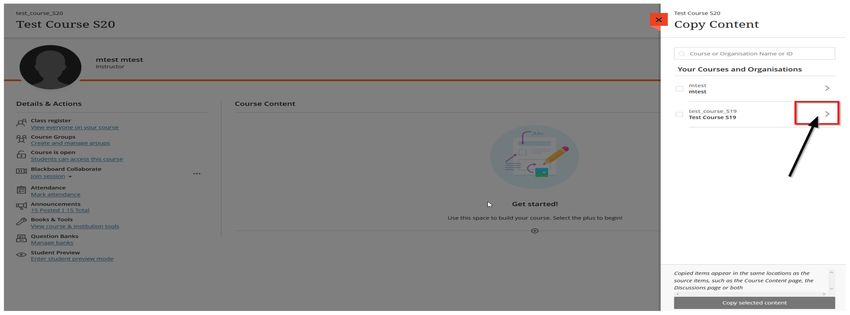
Activity Stream
You can see what's new in all your courses and jump directly into course activities from the
list! You don't need to dig through the system or miss submissions from students. You see a
prioritized list of what's relevant to you.

   o Follow student discussions as they happen, including the latest submissions.
   o Take note of how many submissions are ready to grade. You can also access new
     submissions from the stream.
   o Receive reminders about personal events and meetings

                                               5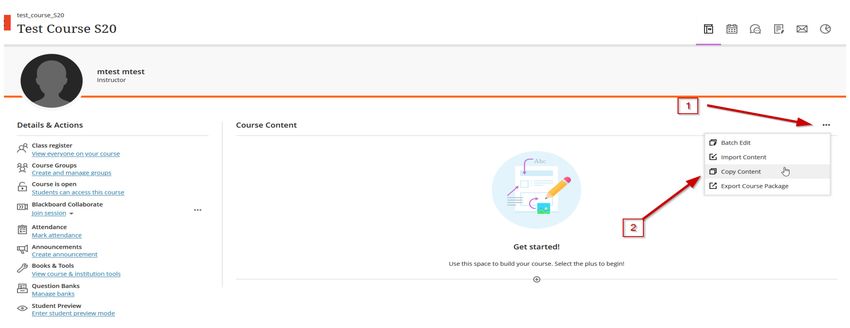
Courses
From the list where your name appears, you can view a list of your teaching courses. Filter or
search your list. Use the Filter menu to modify your view of the page.

Manage your courses. You can set your teaching courses to these states:
   o Open: You can open a course when you're ready for students to participate.
   o Private: You can make a course private while you add or experiment with content, and
     then open it to students when you're ready
   o Hide: You can choose to hide a course from your course list to organize your view. To
     show a hidden course, filter the list by Hidden from me > open a course's menu > select
     Show course.
   o Complete: You can choose to set your course to Complete when the course has ended.

You cannot reorder courses in the list. Courses are listed in alphabetical order and grouped by
term with the newest courses first. Change your view. You can view the Courses page as a list
or a grid. In grid view, you can customize the image on your course cards.

                                              6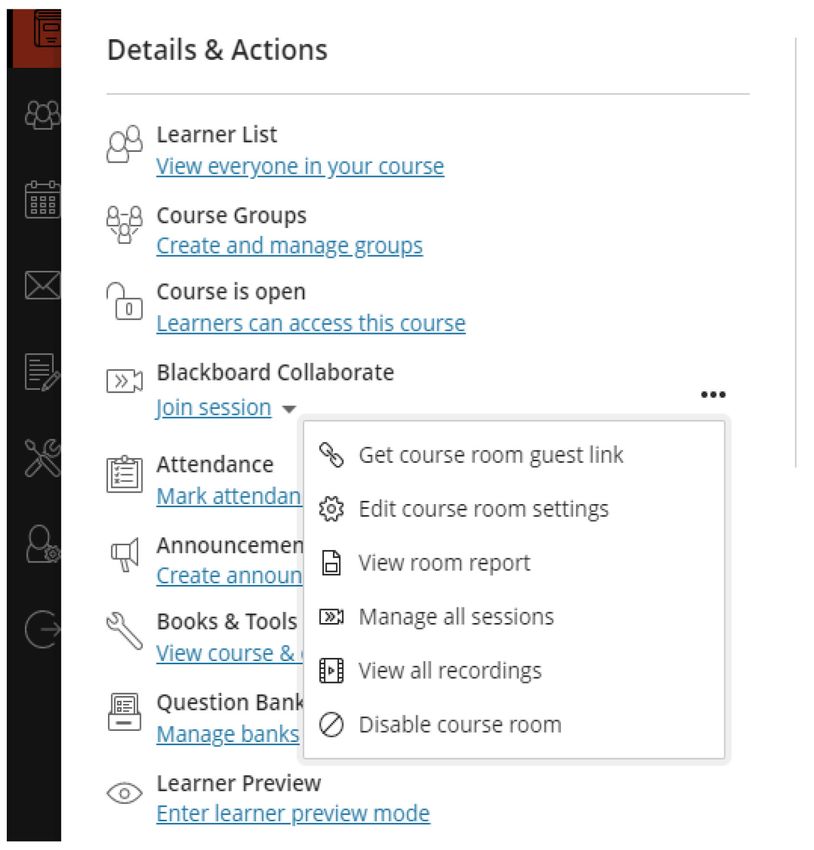
Calendar
As an Instructor, you can create Calendar events for your teaching course, which will then
display to your students. Instructors can set office hours for all courses at once, or set specific
times i.e course meetings for each course.

                                                7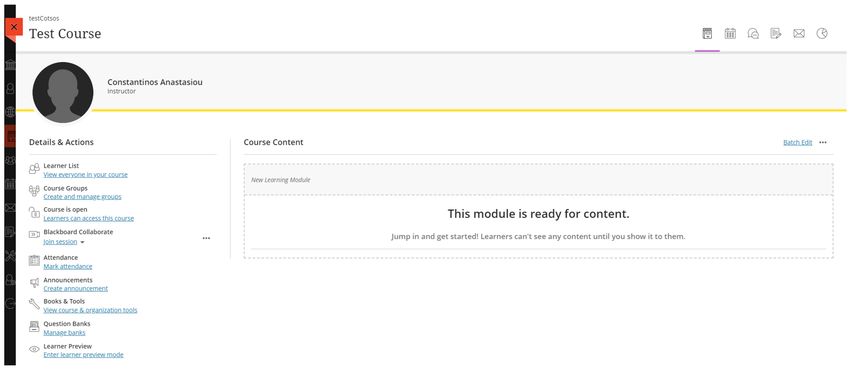
Messages
Course messages provide a quick and easy way to connect with your co-learners and students.
You can send and receive rich text messages, share media, and receive push notifications with
course messages. Your message activity remains inside your course environment and makes it
easier to tag or add recipients. You can access course messages from the course messages page.

Your message activity remains inside your course environment and makes it easier to tag or
add recipients. You can access course messages from the course messages page.

                                              8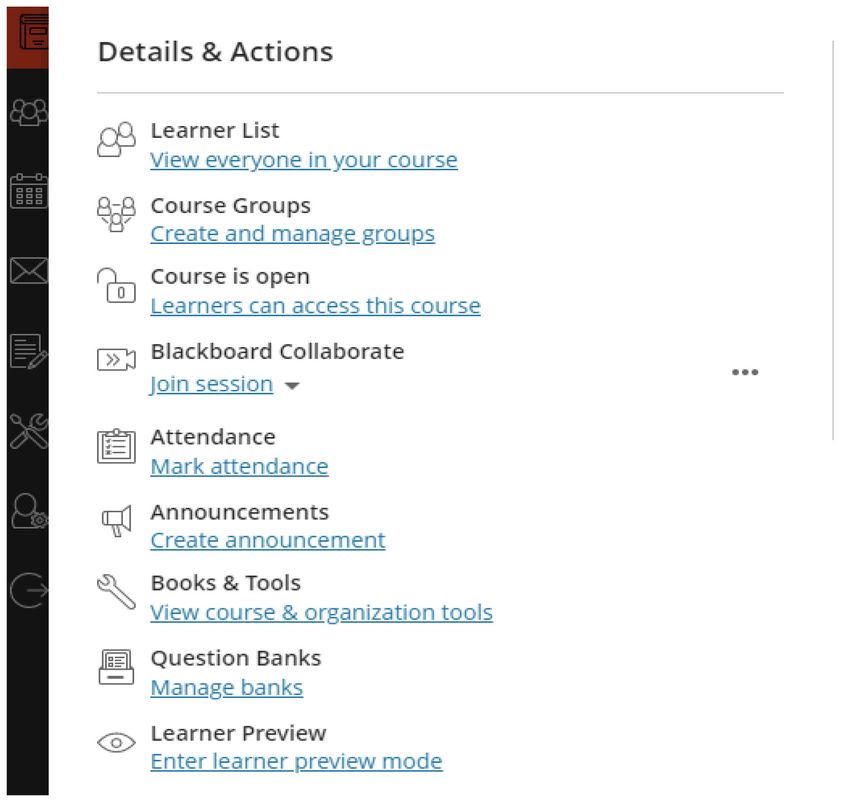
Marks
The Grade Center in Blackboard Learn is more than just a way to record students' grades. It is a
dynamic and interactive tool, allowing you to record data, calculate grades, and monitor student
progress. In the Grade Center, you can provide and manage your students' grades for
assignments, discussion posts, journals. You can also create grade columns for any activities or
requirements you want to grade, such as special projects, participation, or attendance. To
access the gradebook click on “view all coursework”

                                               9
Ultra Create Content
Your course creation starts on the Course Content page. You can create content that combines
a variety of materials to view together, such as text, multimedia, and attachments. For example,
in one content item, you can include introductory text for a lesson, an image for your students
to view and interact with, and links to web resources.
Create: Add learning modules, documents, links, folders, discussions, assignments, and tests. A
panel opens and you can choose the content type you want to add.
Copy Content: Copy an entire course or select items from the Ultra courses you teach
Upload: Browse for files on your computer. They will appear in the content list. Students select
a file title to download it. Supported file types include DOC, DOCX, HTM, HTML, MP3, MPG, PDF,
PPT, PPTX, XLS, XLSX, RTF, TXT, ZIP, and most image types.
Select the plus sign wherever you want to add a document. In the menu, select Create to open
the Create Item panel and select Document. The New Document page opens.
On the New Document page, use the options to add content. You can add as many text blocks
and files as you want.
10Add text blocks. Select Add Text to open the editor. You can also paste text from a Word doc.
Add files. Select Upload from Computer and browse for or drag files from your computer. such
as a Word doc and an audio file. You can't add a folder of items.
Show or hide the document. Students can't see a document until you choose to show it. You can
create all your content ahead of time and choose what you want students to see based on your
schedule.
11You can release an item or folder on an exact date, until a certain date, or during a defined
period of time.
12Create a link to a website
On the Course Content page, you can add a link to a website you want students to access
alongside other materials. For example, you can add a link to a website with the required reading
listed in your syllabus.
Select the plus sign wherever you want to add the website information. In the menu, select
Create to open the Create Item panel. Select Link. You can also expand or create a folder or
learning module and add the link.
In the New Link panel, type a name and optional description. If you don't add a name for the
link, New Link and the date appear to students on the Course Content page. Paste or type the
URL. The link is hidden from students until you decide to show it. Select the visibility to change
it. Select Save when you're finished.
13Copy Content from an old course to a new one
Scenario
We want to transfer content from an old course we taught, to a new one.
• Old Course: test_course_S19
• New Course: test_course_S20
Go to blackboard and click on the “Courses” link
Click on the New Course to enter its main page
14You will see an empty page
Click on the three dots within the course’s page, as seen in the picture down below, and then
on the “Copy Content” option.
15Copy all content
On the pop-up window on the right hand-side of the screen, you will see a list of the courses
you are enrolled in as an instructor.
Select the course (old course) you want to import content from (1) and then click on the “Copy
selected content” button (2). After a few minutes, the content is copied.
16Copy Selected Content
Click on the arrow next to the course you want to copy contents from
Select the content you want to copy and then click on “Copy selected content”
17How to Create a journal
Journals are personal spaces for students to communicate privately with you. Students can also
use journals as a self-reflective tool. They can post their opinions, ideas, and concerns about the
course, or discuss and analyze course-related materials.
You can create as many journal entries as you want. You can also comment on journal entries.
You can add a comment after your instructor comments on an entry to continue the
conversation. Instructors can edit or delete anyone's entries and comments. If you delete an
entry, all comments about the entry are also deleted.
On the Course Content page, select the plus sign wherever you want to add a journal. From the
drop down Select Create.
18Under Participation and Engagement, select Journal.
19A. Add a prompt to set expectations and guidelines. You can use the options in the editor to
format text, attach files, and embed multimedia. If you don’t add a prompt, students see
a message that you haven’t added instructions for this journal.
B. Show or hide the journal. New journals are hidden by default. Students can't see a journal
until you choose to show it. You can create all your content ahead of time and choose
what you want students to see based on your schedule.
20C. Journal Settings panel. When you choose to grade a journal, more options appear such as
the due date and maximum points.
On the journal page, students appear in alphabetical order in the Participants view. if edit any
content in the journal, students aren't notified that new content appears. You can change a
journal from graded to ungraded as long as there are no entries or comments. Once entries and
comments have been submitted, you can't change the journal type.
If you delete a graded journal, the journal is removed from the Course Content page and the
gradebook.
21Discussions
Discussions are a good way to encourage students to think critically about your coursework and
interact with each other’s ideas. You can create discussions around individual course lessons or
for your course in general. As the instructor, you own the discussions. After you start a
discussion, you can post comments of your own to guide students.
The discussion board is commonly accessed from the course menu. Create a discussion directly
on the Course Content page.
22How to create a Discussion
Click Create Discussion and you should see something like the capture below
Type a meaningful title to help students find the right discussion (arrow 1)
Add some content for discussion (arrow 2)
23You can show or hide the discussion from your students. You can edit this option at any time.
New discussions are hidden by default.
Select the Edit Discussion Settings icon (arrow 3) to open the settings panel. Select the options
that work best for your discussion
To add a new discussion topic select the plus sign (arrow 1) or the Discussions icon and from the
drop down menu select “add discussion” To edit a discussion topic select where (arrow 2) point
24Send Message or email
In the Ultra Course View, you can send a copy of a course message to the recipient's email inbox.
The Message is commonly accessed from the course menu. Sent a Message directly on the
Course Content page.
Click on Message icon and you should see something like the capture below
25To send a copy of your message through email, select “send an email copy to recipients” when
you compose and send your message. All recipients receive an email copy of the message.
Recipients can view your message in their email inbox, but any replies to the email won't be
sent back to Blackboard Learn. Users need to log in to respond to the course message.
26Create an announcement
Select Create announcement on the Course Content page to get started. The New
Announcement page appears.
Type a title and message text for the announcement. Select Save to save your announcement
draft. Select Post in the Status column of the Course Announcements page to post the
announcement immediately. You can also schedule announcements to start and end at certain
times.
27The Course Announcements page lists all announcements in your course, including each
announcement’s status and number of viewers. You can create, copy, edit, and delete
announcements on this page.
The Course Announcements page lists all announcements in your course, including each
announcement’s status and number of viewers. You can create (arrow 2), or copy, edit, and
delete announcements on this page. (arrow 1)
28Create course groups
When you create course groups for the first time or want to add a new group set, a partial list
of your students appears on the New Group Set page. Select Show All to view the entire list see
something like the capture below.
29You can create up to 99 groups in a group set. Add Students to a Group select the students from
the list and assigning him a specific group.
3031
Manage individual groups
After you create a group or a group set, you can add or delete individual groups and manage
student membership. You can also edit group names and send messages to your groups.

If you no longer need a group, access the group's menu and select Delete group. The students
in that group are unassigned automatically and appear at the top of the page. You can manually
assign these students to new groups.

                                              32
Access Attendance
When you access the attendance feature for the first time, you decide if you want to add
attendance to your gradebook. On the Attendance page, select Add Attendance and the Settings
panel opens.
You can change the default settings for the grade display and for Late in the grade schema. You
can't change the percentages for Present and Absent at this time. Save your settings or close
the panel if you don't want to make changes. An attendance column appears in the gradebook.
In the Meeting view, you can mark each student's attendance. As you mark students'
attendance, their attendance grades are posted automatically. If you change students'
attendance or clear marks, students see the changes immediately.
33The Meeting view scores are always percentages regardless of the schema you chose in the
Settings panel
34Virtual Classroom
Find your course
o On the left side menu click on “Courses”
o Click on your course
You will be greeted with the following webpage
35Creating a new session
o Go to your course in Blackboard
o On the left side menu click on the 3 dots that appear on the right of “Blackboard
Collaborate”
o
o Click on “Manage all sessions”
36You will be greeted with the following webpage
To create a new session, click on the “Create Session” button
37o A side panel will open on the right hand side of the screen on which you can define the
properties of the new session
o
o After you set up the necessary settings of the session, like the name, start time, and end
time, click on the “Save” button to create the teleconference room.
o The new session will be available for everyone in the “Blackboard Collaborate – Join
Session” menu.
38By clicking on the 3 dots that appear on the right of the newly created session, you can view and
edit the settings for that session.
You can also copy the link of the session and share it with external guests by clicking on the
“copy guest link”
3940
Joining a Session
         o Go to your course in Blackboard
         o On the left side menu click on the “Join Session” under “Blackboard Collaborate”
         o On the menu that appears click on the session you want to Join

A new window will open up which will show the loading screen

                                             41
After a few seconds, you will be greeted with a session welcome message from where you can
choose to start a tutorial by clicking the corresponding button or you can bypass it by choosing
the “Later” button.
42Navigating through Blackboard Collaborate Ultra’s Interface
After joining the session, you will be greeted with the following interface
By clicking the button on the top-left corner of the screen, a pop-up window will open from
where you can start the recording of the session by clicking on “Start Recording” option or leave
the session by clicking on “Leave Session” option. Return back to the session clicking on “X”
option.
43You can stop the recording by following the same button sequence.
On the bottom-right corner of the screen, you can see a purple button.
44When clicking on the button the following menu will show up from where you can find people
to chat, either publicly using the button (1) option or privately using the second button.
45Moreover, on the second (2) button, you can alter the role of a participant / student and give
that user a more active role on the session room.
This is achieved by clicking on the three dots on the right of the student’s name
You can also send a private message to that participant or even remove him from the session.
By clicking on the third (3) button you can share content with the participants.
46By clicking the “Share Blank Whiteboard” option you can share a blank whiteboard with the
students on where you can write or draw anything you like in order to aid the delivery of your
course.
4748
By clicking the “Share Files” option you can “drag & drop”, or select files that you want to share
with the participants on the teleconference window.

By clicking on the file you want to share and then on the “Share Now” button, you can share the
selected file on the session’s window.

                                               49
50
Setting up Collaborate in Course Groups

Breakout Groups allows as session leader to split session participants into small groups for
activities such as discussion, brainstorming, or problem solving.
Accessing the Collaborate Panel
To set up breakout rooms, you will need to open the Collaborate Panel. To open the Collaborate
Panel, click on the purple button in the bottom right corner.

                                              51
Setting up Breakout Groups
In the Collaborate Panel, click on the Share Content tab
52Select Breakout Groups from the menu
There are two methods of assigning participants to groups: Random assignment and manual
assignment.
• Randomly Assigning Participants to Groups
• Manually Assigning Participants
53Randomly Assigning Participants to Groups
1. Assign Groups: Select the Randomly Assign option from the dropdown menu. To include
moderators, check the option labeled Include moderators in group assignment.
2. Number of Groups: Use the dropdown menu to select the number of groups to create.
3. Allow participants to switch groups: Select this option to allow participants to change
groups.
4. Shuffle Participants: Check this option to change the random group assignment.
5. Group assignments will appear here. To rename a group, click on the group name. To
reassign participants, drag the participant you wish to reassign between groups.
6. To start Breakout Groups, click the Start button.
54Manually Assigning Participants
1. Assign Groups: Select the Custom Assignment button.
2. Allow participants to switch groups: Select this option to permit students to change their
enrolled group.
3. Main Room: Participants in the main room will be listed here. Click Show All to view all
participants.
4. Groups: Drag participants from the main room to the desired group. Click on the group
name to rename the group.
5. Add group: Click the + sign to add additional groups.
6. Delete group: Click on the trash can icon to delete the group.
7. When finished, click the Start button to start the breakout rooms.
55Polling
Accessing the Collaborate Panel. To distribute a poll, you will need to open the Collaborate
Panel. To open the Collaborate Panel, click on the purple button in the bottom right corner.
56Setting up a Poll
1. In the Collaborate Panel, click on the Share Content tab.
2. Select Polling from the menu
57Choosing a Poll Type
58Multiple Choice Polls
1. Ask a question: Type the question you wish to ask to participants in this space.
2. Answer choices: Type in your answer choices in the spaces provided
3. Add choice: Click on Add Choice to add additional choices (up to a total of five choices).
You can click the trash can icon next to an answer choice to delete it.
4. Click the Start button to start the poll.
59Yes/No Polls
1. Ask a Question: Enter the question you wish to ask in the space provided.
2. Click the Start button to start your poll.
60Distributing a Poll to Users
The poll will appear on screen similar to the poll shown in the image above.
1. Response counts will appear here for each option.
2. To prevent participants from changing their answers, click the Lock Poll button.
To end the poll, click the End Polling button in the upper
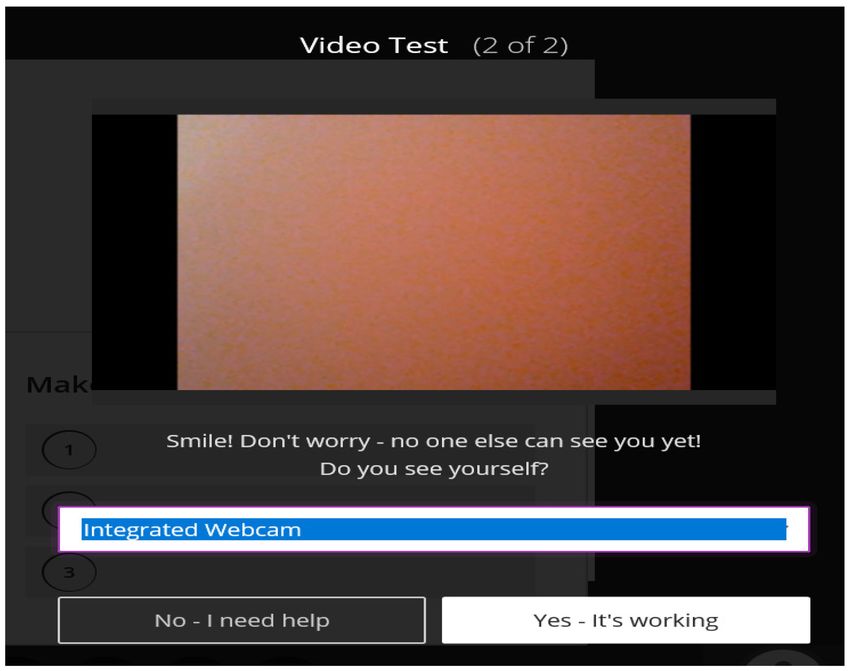
61Set up your camera and microphone
By clicking on the fourth (4) button you can set the various settings regarding your session
window. The most important one is the “Set up your camera and microphone” option where
you give the necessary permission to Blackboard Collaborate to access your microphone and
camera devices.
After clicking on that button, two small pop-up windows will open asking you to give permissions
to Blackboard Collaborate to access your input (microphone & camera) devices.
62Click on the “Allow” option.
You will then be asked to choose your preferred input devices, in case you happen to have
multiple microphone or camera devices, and also validate the quality of your devices.
The first check is for the microphone while the second one is for the camera.
If your devices are working properly, click on the “Yes – It’s Working” button and you will be
taken back to the session’s main window.
63At the bottom of the session’s main window, you can see four main buttons.
64By clicking on the first button, , the following pop-up menu will come up from where
you can change your status to “away” if you happen to have to leave momentarily from your PC
or you can choose to leave the session by clicking the corresponding button.
65You can even use the feedback buttons to give the presenter your immediate feedback on the
presentation.
The next two buttons, , are used for activating and deactivating your microphone
and camera accordingly, while the third one, , is used in case a participant wants to raise
his hand to tell something to the instructor.
66Viewing Recordings
o Go to your course in Blackboard
o On the left side menu click on the 3 dots that appear on the right of “Blackboard
Collaborate”
•
o From drop down menu Click on “View all Recordings”
67You will be greeted with the following webpage
You can filter the recordings according to a date by clicking on the “Recordings In A Range” as
seen in the picture down below.
68To view a recorded session, just click on the name of a recording and then click on the “Watch
Now” link as shown in the picture down below.
The video will open in a new browser window.
In case you want to add the link of a recorded session to a folder within your course, just click
on the symbol, which is to the right of session’s name, and then click on “Copy link”.
Then go to your course and in “Course Content” select the folder you want to add the link to and
click on the “Create” option.
69On the menu that appeared on the right hand side of the screen clink on the “Link” option
Give a name to the link in the “New Link …/…/…” field, paste the link of the recording in the “Link
URL” field and then click on the “Save” button which is at the bottom-right corner of the page.
7071
Create an assignment
On the Course Content page, select the plus sign wherever you want to add an assignment. In
the menu, select Create to open the Create Item panel and select Assignment. The New
Assignment page opens.

                                            72
New Assignment page (settings)
Provide a descriptive title so students can easily find the assignment among your course content.
On the Course Content page, the title appears as the link students select to view the materials.
Provide a due date. Due dates appear on the calendar and in the activity stream. Late
submissions appear with a late label in the course gradebook.
Show or hide the assignment. Students can't see an assignment until you choose to show it.
Set also the number of attempts that students allowed to submit.
On the Course Content page, the assignment title appears as a link to students.
When you create an assignment, a gradebook item is created automatically.
After you post assignment grades, students can view their scores on their grades pages or in the
activity stream. They can also access an assignment, their submissions, your feedback, and their
grades from the assignment link on the Course Content page.
73Creating a Turnitin assignment
To create a Turnitin assignment in Blackboard, go into your course and click on the purple plus
sign, and select Content Market.
Select the “Turnitin GGE” option
74To complete the assignment setup. Fill out the Turnitin assignment settings.
Assignment Title
Enter the assignment title that your students will see
Max grade
Set a point value for the assignment to allow a grade to be set by rubrics (if used) and be sent
to the grade book. For example, if you set the max grade as 100, this is the highest grade your
student can receive.
Start date
The start date is the date and time students can begin submitting to the assignment.
Due date
The due date is the date and time students' papers are due for the assignment.
75Feedback release date
The feedback release date is the date and time students can begin viewing the comments and
grades you have left on their papers. Feedback can only be released after the due date.
To complete the assignment setup, click on Optional Settings (Very Important)
76Submission settings
• Standard paper repository
Student papers will be checked against other institutions' student submissions.
• Institution paper repository
Student papers will only be checked against other student papers within your institution.
With this setting enabled, if a student from your institution submits a paper matching a
paper of a student from another institution, Turnitin will not identify this match.
• Do not store the submitted papers (MAKE SURE TO SELECT THIS ONE)
A similarity report will still be generated for paper submissions, but your students' papers
will not be stored in the Turnitin standard paper repository or the institution's paper
repository for future comparison.
Compare against
These search options allow you to select the repositories that students' submissions will be
checked against when processing Similarity Reports for papers. The similarity score may decrease
if a repository option is deselected.
Similarity Report
Report generation and resubmissions
• Generate reports immediately (resubmissions are not allowed)
Originality Reports for all submissions will be generated immediately. Students cannot
resubmit papers. If, for any reason, a resubmission is required when this setting is selected,
you must manually delete a student's submission from the assignment inbox to allow the
student to submit again.
77• Generate reports immediately (resubmissions are allowed until due date). After 3
resubmissions reports generate after 24 hours.
This option is typically used when students are self-reviewing and revising their
submissions and able to view the Similarity Report. Similarity Reports will be generated
immediately for each student's initial submission to this assignment.
o Students may resubmit as often as they wish until the assignment's due date.
o Similarity Reports for a second or subsequent submission will generate after 24
hours of submission.
o As all previous submissions are removed upon resubmission, only the latest
submission is available to both you and the student.
o Similarity Reports will regenerate within an hour of the due date and time to allow
student submissions to compare against one another within the assignment.
o This report regeneration may cause a change in a paper's similarity score. No
resubmissions are allowed after the due date and time of the assignment.
• Generate reports on due date (resubmissions are allowed until due date)
Originality Reports will not be generated for any submission until the due date and time of
the assignment is reached. Students may resubmit as many times as needed until the due
date and time, but will not receive reports during this period. No resubmissions are allowed
after the due date and time of the assignment.
Allow students to view Similarity Reports
Select the checkbox to allow your students to view their Similarity Reports for submissions to this
assignment. This option gives you more flexibility and control when creating assignments.
78Exclude bibliographic materials
Select the checkbox to exclude text appearing in the bibliography, works cited, or references
sections of student papers from being checked for matches when generating Originality Reports.
You can overwrite this setting in individual Similarity Reports.
Exclude quoted materials
Select the checkbox to exclude quotations from being checked for matches when generating
Similarity Reports. You can overwrite this setting in individual Similarity Reports.
Exclude small sources
Select the checkbox to exclude matches that are not of sufficient length (determined by you)
from being considered when generating Similarity Reports. A box will appear, where you can
exclude matches by word count or by percentage.
Don't Forget to Submit!
Scroll to the bottom of the settings page and click the Submit button to save your settings.
79Grade Assignments
a. Go to your course in Blackboard
b. On the right top menu click on “Gradebook”
You will be greeted with the following webpage
Click on the assignment you want to grade. You will be greeted with the following webpage
80In this webpage you can evaluate each student for the specific Assignment by clicking on the
oval option under “Evaluate”.
1
2
When you're ready to release grades to students, click on “Post all results” (button number 1).
All grades you have assigned for this assignment are posted for students to see. If you want to
post one at a time, click on “Post” (button number 2). On the pop up window click on “Post All
Results” or “Post Result”.
81Posted grades appear with a “Posted” message in the column.
82Add Grade Item
a. Go to your course in Blackboard
b. On the right top menu click on “Gradebook”
You will be greeted with the following webpage
All posted Assignments for the course are included by default in Gradebook list. However, if you
want to add an item in Gradebook like an exam or attendance grades you can do it by clicking
on the plus sign wherever you want to add something.
83If you want you can add an overall result by clicking on “Set it up” on the note appear at the
bottom of gradebook. Overall result is the overall grade that a student achieved for the class
and it calculated automatically by the system based on student grades.
When you click on “Set it up” to set up an overall result you will be greeted with the following
webpage to set the overall result by changing the relative weights for gradebook items or
categories. When you set the weights click on “Save” and then return to Gradebook.
8485
Announcement of Final Exam Grade
If you like to announce the final exam grade without make exam paper visible to students you
Must create a new column in grade book. You can do it by clicking on the plus sign and select
“Add item”

Give a name of the new column, set the maximum points, click save. Enter to the new column
and write the final grade (numerical) for each student.

                                               86
You can also read