Florence School District #1 - iPod touch
←
→
Page content transcription
If your browser does not render page correctly, please read the page content below
Florence School
            _   District #1

       iPod touch
          For iOS 5.0 Software

                  Page 1
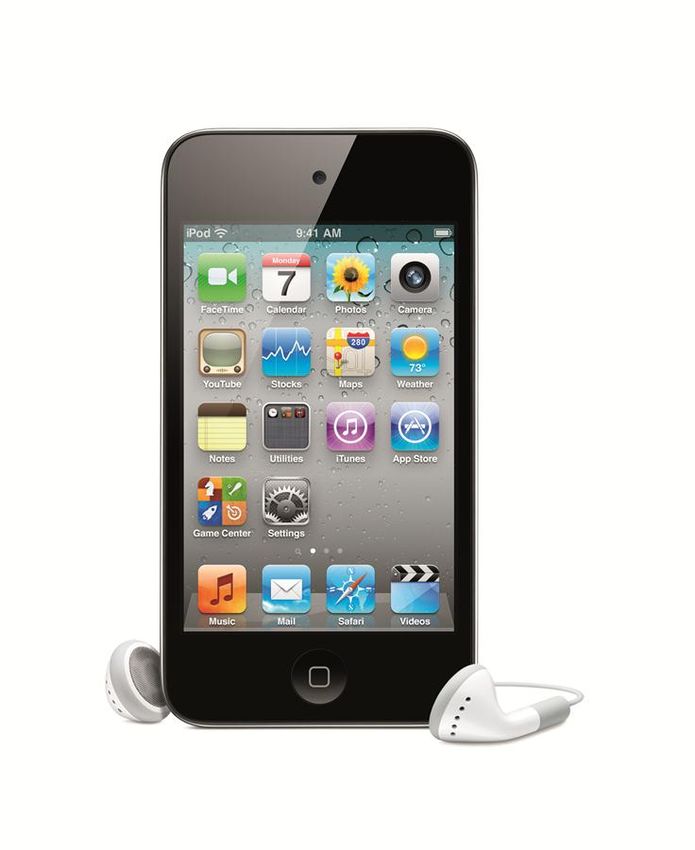
iPod touch at a Glance

Your Home screen may look different, depending on the model of iPod touch you have and whether you
have rearranged its icons.

            iPod touch 4th generation                                iPod touch 3rd generation

Accessories
The following accessories are included with iPod touch:

     Item                                      What you can do with it
                                               Listen to music and videos, FaceTime calls,
     Apple Earphones                           audiobooks, podcasts, and games.
                                               Use the cable to sync and charge, or to the USB
     Dock Connector to USB Cable               power adapter to charge. The cable can be used with
                                               the optional dock, or plugged directly into iPod touch.

                                                  Page 2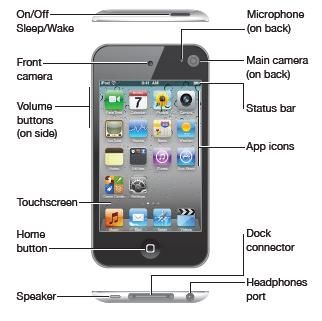
Buttons
A few simple buttons make it easy to turn iPod touch on or off, and adjust the volume.

On/Off Button
When you’re not actively using iPod touch, you can lock it to turn
off the display and save the battery.
When iPod touch is locked, nothing happens if you touch the
screen. You can still listen to music and, while listening to music,
adjust the volume using the buttons on the side of iPod touch.
By default, iPod touch locks if you don’t touch the screen for a
minute.

     Lock iPod touch                            Press the On/Off button.
     Unlock iPod touch                          Press the Home         button or the On/Off button, then
                                                drag the slider.
     Turn iPod touch completely off             Press and hold the On/Off button for a few seconds
                                                until the red slider appears, then drag the slider.
     Turn iPod touch on                         Press and hold the On/Off button until the Apple logo
                                                appears.

iPod touch locks automatically if you don’t touch the screen for a minute or two. To change this auto-lock
time, go to Settings > General > Auto-Lock. If you want to require a passcode to unlock iPod touch, go to
Settings > General > Passcode Lock.

Home Button
The Home button takes you to the Home screen, no matter what you’re doing. It also provides other
shortcuts. On the Home screen, tap any app to open it.

Go to the Home screen: Press the Home button         .

     See recently used apps (iPod 3rd           With iPod touch unlocked, double-press the Home
     generation or later)                       button .
     See the audio playback controls            Double-press the Home button         .
     while iPod touch is locked
     See the audio playback controls            Double-click the Home button , then flick to the left
     while using any app.                       end of the multitasking bar that appears at the bottom
                                                of the screen.

Volume Buttons
When you listen to songs, movies, or other media, the
buttons on the side of iPod touch adjust the audio
volume. Otherwise, the buttons control the volume for
alerts and other sound effects.

To set a volume limit for music and videos, go to

                                                         Page 3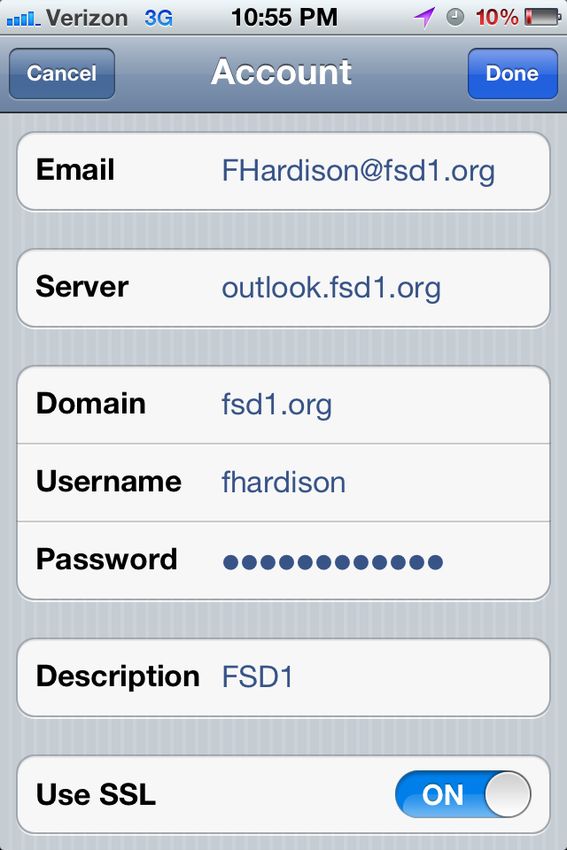
Settings > Music.
You can also use the volume up button to take a picture or record a video

                                       Setting Up iPod Touch

All set up of district iPods and iPads is done by District One Technology Department.

                          Connecting iPod touch to your computer
If you don’t have Wi-Fi access, you might need
to connect iPod touch to your computer to
complete setup. You can also connect iPod
touch to your computer to sync music, videos,
and other information with iTunes. You can also
sync your content wirelessly.

Connect iPod touch to your computer: Use
the provided Dock Connector to USB Cable.

Disconnect iPod touch from your computer:
Check to make sure a sync is not in progress,
then disconnect the cable. If a sync is in
progress, first drag the slider on iPod touch to cancel.

                                               Status Icons
The icons in the status bar at the top of the screen give information about iPod touch:

       Status     What it Means                Explanation
        Icon
                  Wi-Fi                        Shows that iPod touch is connected to the Internet over a Wi-Fi
                                               network. The more bars, the stronger the connection.
                  Network activity             Shows network activity. Some third-party apps may also use
                                               this icon to indicate an active process.
                  Syncing                      Shows that iPod touch is syncing with iTunes.
                  Airplane Mode                Shows that airplane is on – you cannot access the Internet or
                                               use Bluetooth devices. Non-wireless features are available.
                  VPN                          Shows that you are connected to a network using VPN.
                  (Virtual Private Network)
                  Lock                         Shows that iPod touch is locked.
                  Play                         Shows that a song, audiobook, or podcast is playing.
                  Portrait Orientation Lock    Shows that the iPod touch screen is locked in portrait
                                               orientation.

                                                     Page 4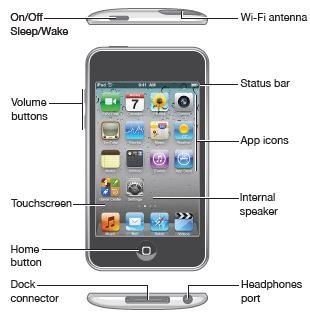
Alarm                         Shows that an alarm is set.
                 Location services             Shows that an app is using location services.
                 Bluetooth                     Blue or white icon: Bluetooth is on and a device, such as a
                                               headset, is connected. Gray icon: Bluetooth is on, but no
                                               device, is connected. No icon: Bluetooth is turned off.
                 Battery                       Shows battery level or charging status.

                                                        Connecting to the Internet

                                         iPod touch connects to the Internet via Wi-Fi    networks. iPod touch
                                         can join AirPort and other Wi-Fi networks at home, at work, or at Wi-Fi
                                         hotspots around the world. When joined to a Wi-Fi network that’s
                                         connected to the Internet, iPod touch connects to the Internet
                                         automatically whenever you use Mail, Safari, FaceTime, Maps,
                                         Weather, the App Store, and more.

                                         Joining a Wi-Fi Network
                                         The Wi-Fi settings let you turn on Wi-Fi and join Wi-Fi networks.

                                         Turn on Wi-Fi: Choose Settings > Wi-Fi and turn Wi-Fi on.

                                         Join a Wi-Fi network: Choose Settings > Wi-Fi, wait a moment as
                                         iPod touch detects networks in range, then select a network. If
                                         necessary, enter a password and tap Join (networks that require a
password appear with a lock     icon).

Once you join a Wi-Fi network manually, iPod touch automatically connects to it whenever the network is in
range. If more than one previously used network is in range, iPod touch joins the one last used.

When iPod touch is connected to a Wi-Fi network, the Wi-Fi icon    in the status bar at the top of the
screen shows the connection strength. The more bars you see, the stronger the connection.

VPN Access
VPN (virtual private network) provides secure access over the Internet to private networks, such as the
network at your company or school. Use Network settings to configure and turn on VPN.

                   Adding Mail, Contacts, and Calendar Accounts
iPod touch works with MobileMe, Microsoft Exchange, and many of the most popular Internet-based email,
contacts, and calendar service providers. If you don’t already have an email account, you can get a free
account online at www.yahoo.com, www.google.com, or www.aol.com.

                                                     Page 5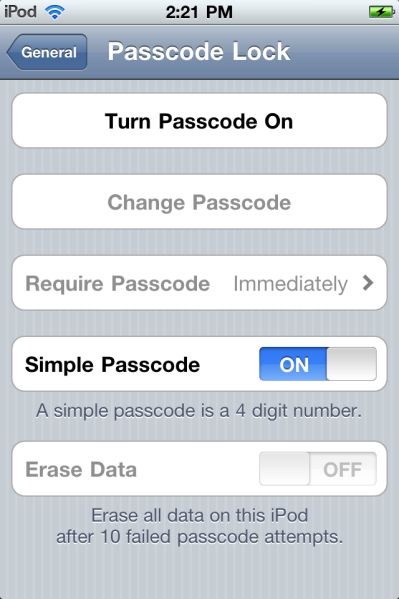
Setting Up Microsoft Exchange Accounts
                                                       To use Microsoft Exchange on iPod touch, you need
                                                       to add an account with your Microsoft Exchange
                                                       account settings.

                                                       Services you turn on are synced automatically over
                                                       the air without having to connect iPod touch to your
                                                       computer.
                                                       Set up an Exchange account:
                                                        1 In Settings, tap “Mail, Contacts, Calendars.”
                                                        2 Tap Add Account, then tap Microsoft Exchange.
                                                        3 Enter your complete email address, domain
                                                          (optional), user name, password, and a
                                                          description. The description can be whatever
                                                          you like.

                                                       iPod touch supports Microsoft’s Autodiscovery
                                                       service, which uses your user name and password
                                                       to determine the address of the Exchange server. If
                                                       the server’s address can’t be determined, you’re
                                                       asked to enter it. (Enter the complete address in the
                                                       Server field.) Once you connect to the Exchange
                                                       server, you may be prompted to change your
                                                       passcode to match the policies set on the server.

                                                       4 Tap the items you want to use on iPod touch (mail,
                                                       contacts, and calendars) and set how many days of
                                                       email you want to sync to iPod touch.

Setting Up Google, Yahoo!, and AOL Accounts
For many popular accounts (Google, Yahoo!, AOL), iPod touch enters most of the settings for you. When
setting up the account, you can choose which account services you want to use with iPod touch. Services
you turn on are synced automatically over the air without having to connect iPod touch to your computer.
Set up an account:
1 In Settings, tap “Mail, Contacts, Calendars.”
2 Tap Add Account, then tap Google, Yahoo!, or AOL.
3 Enter your name, complete email address, password, and a description. The description can be whatever
  you like.
4 Tap the items you want to use on iPod touch. Available items depend upon the service provider.

                                             Using Apps
The high-resolution Multi-Touch screen and simple finger gestures make
it easy to use iPod touch apps.

Opening and Switching Apps
Open an app: Tap it. Press the Home button      to see apps on the
Home screen.

Return to the Home screen: Press the Home button        .

                                                  Page 6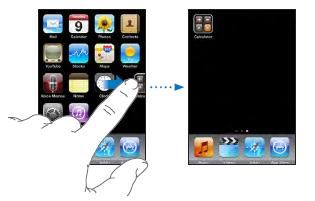
See another Home screen: Flick left or right, or tap to the
                                                left or right of the row of dots.

                                                Go to the first Home screen: Press the Home button        .

On iPod touch 3rd generation or later, you can quickly switch between the apps you’re using; multitasking
also allows certain apps to run in the background.

                        View the most recently used apps (iPod touch 3rd generation or later): Double-
                        press the Home button.
                        The four most recently used app are shown at the bottom of the screen. Flick left to
                        see more apps.

                        Switch to a recent app: Tap it in the multitasking bar.

                        Force an app to close: Touch and hold the app icon until it begins to jiggle, then tap
                        Removing an app from the recents list forces it to quit.

Scrolling
Drag up or down to scroll. On some screens such as webpages, you
can also scroll side to side.

Dragging your finger to scroll won’t choose or activate anything on the
screen.

                                          Flick to scroll quickly.

                                                    Page 7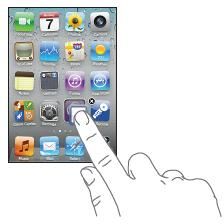
You can wait for the scrolling to come to a stop, or touch anywhere on the screen to stop it immediately.
Touching the screen to stop scrolling won’t choose or activate anything.
To quickly scroll to the top of a list, webpage, or email, just tap the status bar.
Find items in an indexed list: Tap a letter to jump to items starting with that letter. Drag your finger along
the index to scroll quickly through the list.
Choose an item: Tap an item in the list.
Depending on the list, tapping an item can do different things—for example, it may
open a new list, play a song, open an email, or show someone’s contact
information.
Return to a previous list: Tap the back button in the upper-left corner.
Zooming In or Out
When viewing photos, webpages, email, or maps, you can zoom
in and out. Pinch your fingers together or apart. For photos and
webpages, you can double-tap (tap twice quickly) to zoom in, then
double-tap again to zoom out. For maps, double-tap to zoom in
and tap once with two fingers to zoom out.
Viewing in Portrait or Landscape Orientation
Many iPod touch apps let you view the screen in either portrait or landscape orientation. Rotate iPod touch
and the display rotates too, adjusting automatically to fit the new screen orientation.
You may prefer landscape orientation for viewing webpages in Safari, or when entering text, for example. In
landscape orientation:
Webpages scale to the wider screen,
making the text and images larger.
The onscreen keyboard is larger, which
may help increase your typing speed and
accuracy.
The following apps support both portrait and
landscape orientation:
Music and Videos
Mail
Safari
Notes
Photos
Calculator
Page 8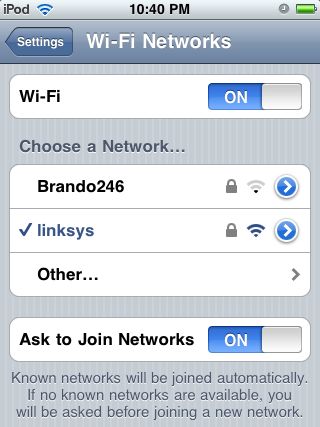
Movies viewed in Videos and YouTube appear only in landscape orientation. Street views in Maps also
appear only in landscape orientation.
Lock the screen in portrait orientation (iPod touch 3rd generation or later): Double-click the Home
button, flick the bottom of the screen from left to right, then tap
The portrait orientation lock   icon appears in the status bar when the screen orientation is locked.

                                Customizing the Home Screen
You can customize the layout of icons on the Home screen—including the Dock icons along the bottom of
the screen. If you want, arrange them over multiple Home screens. You can also organize apps by grouping
them in folders.

Rearranging Icons
You can arrange the icons on your Home screen in any order you want.
Rearrange icons:
1 Touch and hold any icon on the Home screen until it begins to jiggle.
2 Arrange the icons by dragging them.
3 Press the Home button to save your arrangement.

When iPod touch is connected to your computer, you can rearrange icons on the Home screen and the order
of the screens. In iTunes, select iPod touch in the Devices list, then click Apps at the top of the screen.

Move an icon to another screen: While arranging
icons, drag an icon to the side of the screen.

Create an additional Home screen: While arranging
icons, flick to the rightmost Home screen, then drag an
icon to the right edge of the screen until a new screen
appears.
You can create up to 11 screens. The number of dots
above the Dock shows the number of screens you have,
and which screen you’re viewing.
Reset your Home screen to the default layout:
Choose Settings > General > Reset and tap Reset Home
Screen Layout.
Resetting the Home screen removes any folders you’ve created and applies the default wallpaper to your
Home screen.

                                    Organizing with Folders
Folders let you organize icons on the Home screen. You can put up to 12 icons in a folder. iPod touch
automatically names a folder when you create it, based on the icons you use to create the folder, but you can
change the name anytime you want. Like icons, folders can be rearranged by dragging them around the
Home screen. You can move folders to a new Home screen or to the
Dock.

Create a folder: Touch and hold an icon until the Home screen icons
begin to jiggle, then drag the icon onto another icon.

                                                   Page 9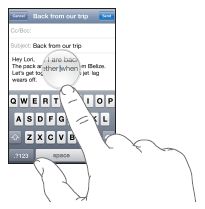
iPod touch creates a new folder that includes the two icons, and shows the
                                folder’s name. You can tap the name field and enter a different name.

                                You can also create folders within iTunes.

                                Create a folder using iTunes: With iPod touch connected to your
                                computer, select iPod touch in the Devices list in iTunes. Click Apps at the
                                top of the screen, and on the Home screen near the top of the window, drag
                                an app on top of another.

Add an icon to a folder              While arranging icons, drag the icon onto the folder.
Remove an icon from a folder         While arranging icons, tap to open the folder, then drag the icon out of
                                     the folder.
Open a folder                        Tap the folder. You can then tap an app icon to open that app.
Close a folder                       Tap outside the folder, or press the Home button.
Delete a folder                      Move all icons out of the folder. The folder is deleted automatically
                                     when empty.
Rename a folder                      While arranging icons, tap to open the folder, then tap the name at the
                                     top and use the keyboard to enter a new name. Press the Home
                                     button to save your changes.

When you finish organizing your Home screen, press the Home       button to save your changes.

            Some apps, such as Mail and the App Store, display a badge on their Home screen icon with a
            number (to indicate incoming items) or exclamation mark (to indicate a problem). If these apps
            are contained in a folder, the badge appears on the folder. A numbered badge shows the total
            number of items you haven’t attended to, such as incoming messages and updated apps to
            download. An alert badge indicates a problem with an app in the folder.

                                        Adding Wallpaper
                                 You can set an image or photo as wallpaper for the Lock screen. On iPod
                                 touch 3rd generation or later, you can also set wallpaper for your Home
                                 screen. You can choose an image that came with iPod touch, or a photo
                                 synced to iPod touch from your computer.

                                 Set wallpaper (iPod touch 3rd generation or later):
                                 1 In Settings, choose Wallpaper, tap the image of the Lock and Home
                                 screens, then tap Wallpaper or an album.
                                 2 Tap to choose an image or photo. If you choose a photo, drag to position
                                 it and pinch to zoom in or out, until it looks the way you want.
                                 3 Tap Set, then choose whether you want to use the photo as wallpaper for
                                 your Lock Screen, Home screen, or both.

                                                  Page 10
Typing
The onscreen keyboard appears anytime you need to type.
Entering Text
Use the keyboard to enter text, such as contact information, email, and web addresses. The keyboard
corrects misspellings, predicts what you're typing, and learns as you use it.
Depending on the app you’re using, the intelligent keyboard may suggest corrections as you type, to help
prevent mistyped words.
Enter text:
1 Tap a text field, such as in a note or new contact, to bring up the keyboard.
2 Tap keys on the keyboard.
Start by typing with just your index finger. As you get more proficient, you can type more quickly using two
thumbs.
As you type, each letter appears above your thumb or finger. If you touch the wrong key, you can slide your
finger to the correct key. The letter isn’t entered until you release your finger from the key.
Delete the last character typed Tap
Type uppercase Tap the Shift key before you tap a letter. Or touch and hold
the Shift key, then slide to a letter.
Quickly type a period and space Double-tap the space bar. (You can turn this feature on or off in
Settings > General > Keyboard.)
Turn caps lock on Double-tap the Shift key. The Shift key turns blue, and all
letters you type are uppercase. Tap the Shift key again to turn
caps lock off. (You can turn this feature on or off in Settings >
General > Keyboard.)
Enter numbers, punctuation, or Tap the Number key. Tap the Symbol key to see
symbols additional punctuation and symbols.
Set options for typing Go to Settings > General > Keyboard.
Page 11Dictionary
For many languages, iPod touch has dictionaries to help you type. The appropriate dictionary is activated
when you select a supported keyboard.
iPod touch uses the active dictionary to suggest corrections or complete the word you’re typing. You don’t
need to interrupt your typing to accept the suggested word.
Accept or reject dictionary suggestions:
To reject the suggested word, finish typing the word as you want it,
then tap the “x” to dismiss the suggestion before typing anything
else. Each time you reject a suggestion for the same word, iPod
touch becomes more likely to accept your word.
To use the suggested word, type a space, punctuation mark, or
return character.
iPod touch also underlines words you’ve already typed that might
be misspelled.
Use spell checking to replace a misspelled word: Tap the underlined word, then tap
one of the suggested corrections.
If none of the suggestions is correct, you can correct the spelling of the selected word
by retyping it. To leave the word unchanged, tap somewhere else in the message area.
Turn auto-correction on or off: Choose General > Keyboard, then turn Auto-
Correction on or off. Auto-Correction is on by default.
Turn spell checking on or off: Choose General > Keyboard, then turn Check Spelling
on or off. Spell checking is on by default.
Editing—Cut, Copy, and Paste
The touchscreen makes it easy to make changes to text you’ve entered.
An onscreen magnifying glass helps you position the insertion point
precisely where you need it. Grab points on selected text let you quickly
select more or less text. You can also cut, copy, and paste text and
photos within apps, or across multiple apps.
Position the insertion point: Touch and hold to bring up the magnifying
glass, then drag to position the insertion point.
Select text: Tap the insertion point to display the selection buttons. Tap
Select to select the adjacent word or tap Select All to select all text. You
can also double-tap to select a word. In read-only documents, such as
webpages or email you’ve received, touch and hold to select a word.
Drag the grab points to select more or less text.
Page 12Cut or copy text: Select text, then tap Cut or Copy.
Paste text: Tap the insertion point and tap Paste. The last text that you
cut or copied is inserted. Or select text and tap Paste to replace the text.
Undo the last edit: Shake iPod touch and tap Undo.
International Keyboards
International keyboards allow you to enter text in many different languages, including languages that are
written from right to left. If you want to enter text in other languages, you can use Settings to make additional
keyboards available when you type.
Add a keyboard:
1 In Settings, choose General > Keyboard > International Keyboards.
The number before the arrow indicates the number of keyboards currently enabled.
2 Tap Add New Keyboard, then choose a keyboard from the list.
Repeat to add more keyboards. Some languages have multiple keyboards available.
Switch keyboards when you’re typing: Tap .
When you tap the symbol, the name of the newly
activated keyboard appears briefly.
You can also touch and hold to display a list of
available keyboards. To choose a keyboard from the
list, slide your finger to the name of the keyboard, then
release.
Edit your keyboard list: Choose General > Keyboard > International Keyboards, then tap Edit and do one
of the following:
To delete a keyboard, tap , then tap Delete.
To reorder the list, drag next to a keyboard to a new place in the list.
Searching
You can search many apps on iPod touch, including Mail, Calendar, Music, Videos, Notes, and Contacts.
You can search an individual app, or search all apps at once using Search.
Go to Search: On the main Home screen, flick left to right or press the
Home button.
From the Search screen, press the Home button to return to the main
Home screen page.
Search iPod touch: On the Search screen, enter text in the Search field.
Search results appear as you type. Tap an item in the list to open it. Tap
Search to dismiss the keyboard and see more results.
Page 13Icons next to the search results show which app the results are from.
iPod touch may display a top hit for you at the top of the list, based on your previous searches. The Safari
search results include options to search the web or to search Wikipedia.
Application What’s Searched
Contacts First, last, and company names
Mail To, From, and Subject fields of all accounts (the text of
messages isn’t searched)
Calendar Event titles, invitees, and locations (notes aren’t searched)
Music and Video Music (names of songs, artists, and albums) and the titles of
podcasts, video, and audiobooks
Notes Text of notes
Search also searches the names of the native and installed apps on iPod touch, so if you have a lot of apps,
you may want to use Search to located and open apps.
Open apps from Search: Enter the app name, and then tap to open the app directly from the search results.
Notifications
Notification Center displays all your alerts in one place, including alerts about:
New email
New text messages
Reminders
Calendar events
Friend requests (Game Center)
Weather
Stocks
Alerts appear on the lock screen, or briefly at the top of the screen when
you’re using iPod touch. You can see all current alerts by revealing
Notification Center.
Reveal Notification Center: Swipe down from the top of the screen.
Many apps, such as Messages, Mail, and the App Store, can display an
alert badge on their Home screen icon with a number (to indicate incoming
items) or an exclamation mark (to indicate a problem). If these apps are in
a folder, the badge appears on the folder. A badge with a number shows
the total number of items you haven’t attended to, such as email
messages, text messages, and updated apps to download. A badge with an exclamation mark indicates a
problem with an app.
Page 14Respond to an alert Lock screen: Swipe the alert from left to right.
Notifications screen: Tap the alert.
Remove an alert from Tap then tap Clear.
Notification Center.
Set options for Notifications. Go to Settings > Notifications.
Battery
iPod touch has an internal rechargeable battery. The battery isn’t user accessible and should only be
replaced by an authorized service provider.
Charging the Battery
The battery icon in the upper-right corner shows the battery level or charging status.
Charge the battery and sync iPod touch: Connect iPod
touch to your computer using the included Dock Connector
to USB Cable.
Important: The iPod touch battery may drain instead of
charge if iPod touch is connected to a computer that’s
turned off or is in sleep or standby mode.
If you charge the battery while syncing or using iPod touch,
it may take longer to charge. You can also charge iPod touch using the Apple USB Power Adapter, available
separately.
Important: If iPod touch is very low on power, it may display one of the following images, indicating that iPod
touch needs to charge for up to ten minutes before you can use it. If iPod touch is extremely low on power,
the display may be blank for up to two minutes before one of the low-battery images appears.
Page 15Replacing the Battery
Rechargeable batteries have a limited number of charge cycles and may eventually need to be replaced.
The iPod touch battery isn’t user replaceable; it can only be replaced by an authorized service provider.
Security Features
Security features help protect the information on iPod touch from being accessed by others.
You can set up a passcode that you must enter each time you turn on or wake up iPod touch.
Set a passcode: Choose Settings>General > Passcode Lock and enter a 4-digit passcode, then enter the
passcode again to verify it. iPod touch then requires you to enter the passcode to unlock it or to display the
passcode lock settings.
Setting a passcode turns on data protection (iPod touch 3rd generation or
later). Data protection uses your passcode as the key for encrypting mail
messages and their attachments stored on iPod touch. (Data protection
may also be used by some apps available in the App Store.) A notice at
the bottom of the Passcode Lock screen in Settings indicates when data
protection is enabled.
To increase the security of iPod touch, turn off Simple Passcode and use a
longer passcode with a combination of numbers, letters, punctuation, and
special characters.
Cleaning iPod touch
Clean iPod touch immediately if it comes in contact with any contaminants that may cause stains, such as
ink, dyes, makeup, dirt, food, oils, or lotions. To clean iPod touch, disconnect all cables and turn off iPod
touch (press and hold the On/Off Sleep/Wake button, then slide the onscreen slider). Then use a soft, slightly
damp, lint-free cloth. Avoid getting moisture in openings. Don’t use window cleaners, household cleaners,
compressed air, aerosol sprays, solvents, alcohol, ammonia, or abrasives to clean iPod touch.
Restarting and Resetting iPod touch
If something isn’t working right, try restarting, force quitting an application, or resetting iPod touch.
Restart iPod touch: Press and hold the On/Off button until the red slider appears. Slide your finger across
the slider to turn off iPod touch. To turn iPod touch back on, press and hold the On/Off button until the Apple
logo appears.
If you can’t turn off iPod touch or if the problem continues, you may need to reset. A reset should be done
only if turning iPod touch off and on doesn’t resolve the problem.
Force quit an application: Press and hold the On/Off button on top of iPod touch for a few seconds until a
red slider appears, and then press and hold the Home button until the application quits.
Reset iPod touch: Press and hold the On/Off button and the Home button at the same time for at least ten
seconds, until the Apple logo appears.
Page 16You can also read