Introduction to the CSD Python API - (PYAPI-001) - The ...
←
→
Page content transcription
If your browser does not render page correctly, please read the page content below

Introduction to the CSD Python API
                                   (PYAPI-001)

                                    2020.3 CSD Release
                                CSD Python API version 3.0.4

CSD Python API scripts can be run from the command-line or from within Mercury to achieve a wide
         range of analyses, research applications and generation of automated reports.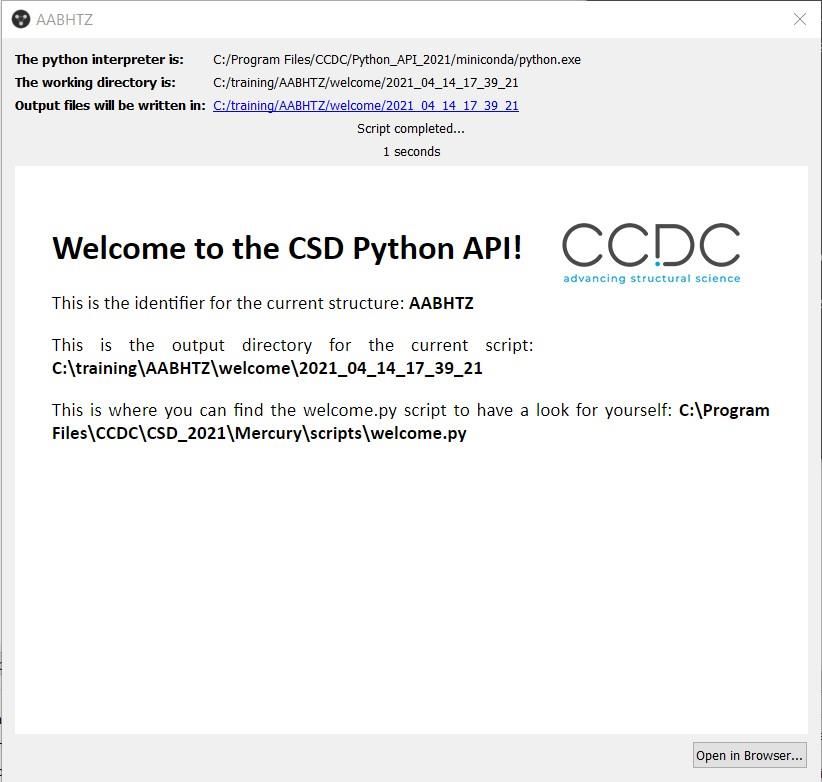
PYAPI-001

Table of Contents
Introduction ............................................................................................................................................ 3
   Objectives ........................................................................................................................................... 3
   Pre-required skills ............................................................................................................................... 3
   Materials ............................................................................................................................................. 3
Example 1: Demonstrating Input and Output......................................................................................... 4
   Aim ...................................................................................................................................................... 4
   Instructions ......................................................................................................................................... 4
   Conclusions ......................................................................................................................................... 7
Example 2: Introduction to searching with the CSD Python API. ........................................................... 9
   Aim ...................................................................................................................................................... 9
   Instructions ......................................................................................................................................... 9
   Conclusions ....................................................................................................................................... 12
Exercise 3: Customising a simple script for use in Mercury. ................................................................. 14
   Aim .................................................................................................................................................... 14
   Instructions ....................................................................................................................................... 14
   Conclusions ....................................................................................................................................... 18
Workshop Conclusions.......................................................................................................................... 19
Next Steps ............................................................................................................................................. 19
Feedback ............................................................................................................................................... 19
Glossary ................................................................................................................................................. 19

                                                                              2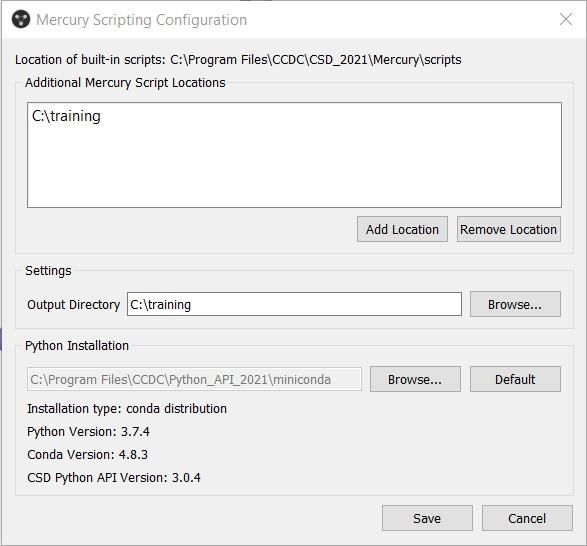
PYAPI-001

Introduction
The CSD Python API provides access to the full breadth of functionality that is available within the
various user interfaces (including Mercury, ConQuest, Mogul, IsoStar and WebCSD) as well as features
that have never been exposed within an interface. Through Python scripting it is possible to build
highly tailored custom applications to help you answer research questions, or to automate frequently
performed analysis steps.

This workshop is an introduction to the CSD Python API. The applications illustrated through these
case studies are just as easily applied to your own experimental structures as they are to the examples
shown here using entries in the Cambridge Structural Database (CSD).

Before beginning this workshop, ensure that you have a registered copy of CSD-Core or above installed
on your computer. Please contact your site administrator or workshop host for further information.

Objectives
In this workshop, you will learn how to:
     • Access CSD entries through the CSD Python API.
     • Read different file formats.
     • Conduct a text numeric search of the CSD.
     • Edit scripts and utilize the CSD Python API through Mercury

This workshop will take approximately 40 minutes to be completed.

Note: The Glossary at the end of this handout contains useful terminology.

Pre-required skills
The following exercises assume that you have a basic understanding of Python. For Example 3 you also
need familiarity with the program Mercury.

Materials
For this workshop you will need the file example.cif that you can download here.

A text editor is required for scripting during this workshop. If you have a preferred text editor, we
recommend sticking with that. If you do not have a preferred editor, we would recommend Notepad++
for Windows (https://notepad-plus-plus.org/) and BBEdit for macOS (available in the App Store). The
basic Notepad functionalities in Windows would also be enough. For more in-depth Python editing or
for interactive work, try looking at PyCharm (https://www.jetbrains.com/pycharm/) or Jupyter
(https://jupyter.org/). Visual Studio is available for all platforms and would be a suitable editor
(https://visualstudio.microsoft.com/downloads/).

                                                  3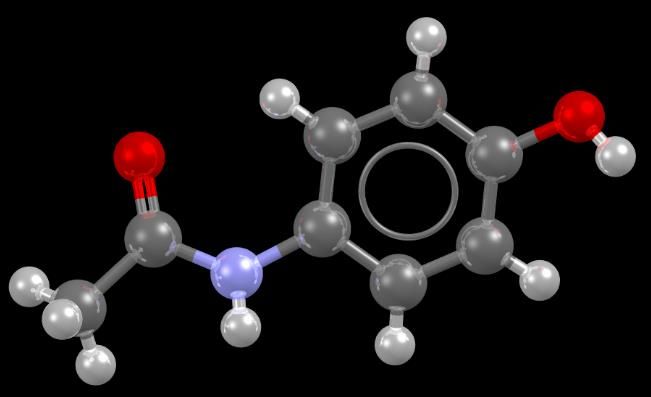
PYAPI-001

Example 1: Demonstrating Input and Output.
Aim
This example will focus on understanding the basic principles of using the CSD Python API. We will
write a script that will print the results out to the console. We will cover the concepts of Entries,
Molecules and Crystals.

Instructions
1. For this exercise we will be writing the script in a Python file that we can then run from a command
   prompt later. Start by creating a folder where you will save your Python files in a place where you
   have read and write access, for example C:\training\ for Windows, or something equivalent on
   macOS or Linux. We will continue to use our C:\training\ folder (or equivalent), through the
   tutorial.
2. Open the command prompt from this folder. In Windows you can type ‘cmd’ in the File Explorer
   tab and press ‘Enter’. In Linux you can right click on the folder and select Open in Terminal. In
   macOS, right click on the folder, select Services then click New Terminal at Folder.

The command prompt window should now appear.

3. To run your Python scripts from the command prompt, you will first need to activate your
   environment. The activation method will vary depending on the platform:

    •   Windows: Open a command prompt window and type (including the " marks):
        "C:\Program Files\CCDC\Python_API_2021\miniconda\Scripts\activate"
    •   MacOS/Linux: Open a terminal window and change directory to the CSD Python API bin folder:
        cd /Applications/CCDC/Python_API_2021/miniconda/bin
        Then activate the environment with:
        source activate

If the activation is successful, (base) will appear at the beginning of your command prompt:

                                                  4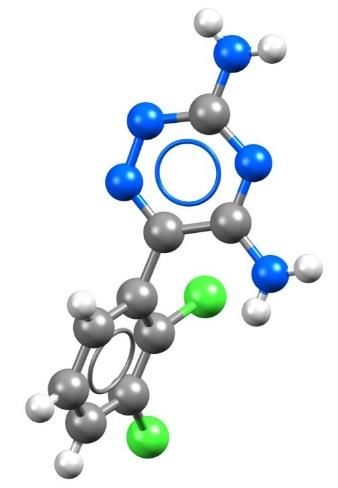
PYAPI-001

4. We can now start writing our script. In the folder you created, open your preferred text editor and
   create a new Python file called example_one.py. The following steps show the code that you
   should write in your Python file, along with explanations of what the code does.

5. The CSD Python API makes use of different modules to do different things. The ccdc.io module
   is used to read and write entries, molecules, and crystals. To make use of modules, we first need
   to import them.

    from ccdc import io

6. Entries, molecules, and crystals are different types of Python objects, and have different
   characteristics, although they do have a number of things in common. They each have readers
   and writers that allow for input and output respectively. We will start by setting up an entry reader
   and using it to access the CSD. From the CSD, we want to open the first entry.

    entry_reader = io.EntryReader('CSD')
    first_entry = entry_reader[0]
    print(f'First Refcode: {first_entry.identifier}')

    The 0 means that we want to access the first entry in the database (when we have multiple items
    in a list or a file, Python starts numbering them from zero). We are outputting the information as
    an f string, which is a way of formatting strings available in Python 3.6 and above. The expression
    inside the curly brackets {} will be replaced with the value of the expression when the print
    command is executed by Python. In this case first_entry.identifier will return the
    identifier (also known as a CSD Refcode) of the first entry in the CSD.

7. Make sure the changes to your file have been saved. We can now run the script in the command
   prompt – this can be done by typing the following in the command prompt and then pressing
   ‘Enter’:

    python example_one.py

    ‘python’ tells the command prompt to run Python and ‘example_one.py’ is the name of our
    Python script that Python will execute.

    You should see in the command prompt that “First Refcode: AABHTZ” is returned, which is the
    string included in our script and identifier of the first entry. Giving the 'CSD' argument to the
    EntryReader will open the installed CSD database. It is possible to open alternative or multiple
    databases in this way. Similar methods can be used to read molecules or crystals with a
    MoleculeReader or CrystalReader instance.

                                                   5
PYAPI-001

8. From an entry object, it is also possible to access the underlying molecular or crystal information
   for that CSD entry. We will explore this using paracetamol (CSD Refcode HXACAN). The code below
   is accessing the entry HXACAN directly from our EntryReader, then accessing the underlying
   molecule from this entry. Add these lines to your script:
                                                                            CSD Entry HXACAN
    hxacan_entry = entry_reader.entry('HXACAN')
    hxacan_molecule = hxacan_entry.molecule

9. We can also access information from inside the molecule class
   for this entry. The molecule class contains a list of atoms and
   bonds. This next line of code will return the number of atoms
   in the HXACAN molecule, by checking the length of the atom
   list.

    print(f'Number of atoms in HXACAN: {len(hxacan_molecule.atoms)}')

10. Save the changes to your script and run the script in the command prompt again using the same
    command as in Step 7. You should see the string printed out to your screen; “Number of atoms in
    HXACAN: 20”.

11. We can access information about the individual atoms within the atom list such as atom labels,
    coordinates and formal charges. Add these next lines to your script and save the file (Note: the
    four spaces before print are very important!):

    for atom in hxacan_molecule.atoms:
        print(f'Atom Label: {atom.label}')

12. Save and run your Python script in the command prompt again, as done for Step 7. You should
    see that the label for each atom in the paracetamol molecule is now returned. We have used a for
    loop to iterate through each atom in the molecule and print out its atom label. for loops are used
    to iterate through each item in a list of items – the atoms in the molecule in this case. for loops are
    useful and allow us to iterate through everything from the atoms in a molecule to entries in the
    CSD.

13. We can also read entries, molecules, and crystals from a number of supported file types. We are
    going to use an example .cif file to illustrate this. For this demonstration, we will use the provided
    example.cif (which you can access here) and place in the C:\training folder.

    We need to tell Python where to find this file, so add the following line to your script, making sure
    that the filepath is that which you have just used:

    filepath = r"C:\training\example.cif"

    Python does not like spaces or backslashes in file paths! The r and double quotes (" ") help us to
    get around this.

                                                    6
PYAPI-001
14. Now that Python knows where the .cif file is located we can access the crystal using a
CrystalReader, by adding these next lines to our script:
crystal_reader = io.CrystalReader(filepath)
tutorial_crystal = crystal_reader[0]
print(f'{tutorial_crystal.identifier} Space group :
{tutorial_crystal.spacegroup_symbol}')
Save the changes you have made to your file and run your Python script in the command prompt
again. The output should now also display the space group of our example crystal, P21/n.
15. It is good practice to close files when we are finished with them, but before we do that, we are
going to take the underlying molecule from our tutorial crystal for use later. Add the following
lines to your script:
tutorial_molecule = tutorial_crystal.molecule
crystal_reader.close()
16. The CSD Python API can also write entries, molecules, and crystals to a number of supported file
types. To do this, we need to tell Python where we want the file to be written. We will continue
to use our C:\training\ folder (or equivalent), and we will use this to set up our new file as a
variable. Add this line to your script:
f = r"C:\training\mymol.mol2"
17. With this new variable we can use the CSD Python API to create a .mol2 file that contains the
molecule from the example .cif file that we kept from earlier. To do this, add these lines to your
script:
with io.MoleculeWriter(f) as mol_writer:
mol_writer.write(tutorial_molecule)
Here, the with statement ensures that we automatically close the mol_writer and the file when
we have written our molecule.
18. Save the changes you have made to your file and then run the Python script in command prompt
once more. What we have done in this last step is to create a file mymol.mol2 in our folder, then
write the molecule we kept from earlier into it. In this way, we can write out molecules, crystals,
and entries that we have obtained or modified and use them for other tasks and with other
programs.
Conclusions
The CSD Python API was used to explore input and output of various objects and file types using the
ccdc.io module.
The concepts of entries, molecules and crystals were illustrated here along with some of the ways in
which these are related.
You should now know how to run Python scripts using the CSD Python API and have an appreciation
of how objects and files are read into and written out of the CSD Python API.
7PYAPI-001
Full Script
Note: if you copy and paste the script below, double check that the spacing is correct.
from ccdc import io
entry_reader = io.EntryReader('CSD')
first_entry = entry_reader[0]
print(f'First Refcode: {first_entry.identifier}')
hxacan_entry = entry_reader.entry('HXACAN')
hxacan_molecule = hxacan_entry.molecule
print(f'Number of atoms in HXACAN: {len(hxacan_molecule.atoms)}')
for atom in hxacan_molecule.atoms:
print(f'Atom Label: {atom.label}')
filepath = r"C:\training\example.cif"
crystal_reader = io.CrystalReader(filepath)
tutorial_crystal = crystal_reader[0]
print(f'{tutorial_crystal.identifier} Space group :
{tutorial_crystal.spacegroup_symbol}')
tutorial_molecule = tutorial_crystal.molecule
crystal_reader.close()
f = r"C:\training\mymol.mol2"
with io.MoleculeWriter(f) as mol_writer:
mol_writer.write(tutorial_molecule)
8PYAPI-001
Example 2: Introduction to searching with the CSD Python API.
Aim
This example will focus on using the CSD Python API to carry out a search across the CSD. We will
create a search query, add criteria to the search query and then save the resulting hits from the query
as a refcode list (or .gcd file).
Searches of the CSD can be performed using the CSD Python API. There are a number of different
search modules including text numeric searching, substructure searching, similarity searching, and
reduced cell searching. In this example, we will be using the text numeric search module which
searches text and numeric data associated with individual entries in the CSD.
Unlike the similarity and substructure search modules, the text numeric search module can only be
used to search the CSD because it searches fields that are specific to the database.
Note: If you have not tried Example 1, you will need to do Steps 1-3 of that exercise before continuing
with this exercise to set up the command prompt.
Instructions
1. In the same folder as in Example 1, open your preferred text editor and create a new Python file
called ‘text_numeric_search.py’. The following steps show the code that you should write in your
Python file, along with explanations of what the code does.
2. First, we need to import the Text Numeric Search module in our script.
from ccdc.search import TextNumericSearch
3. We then need to create our search query. This line of code creates an empty query called ‘query’.
query = TextNumericSearch()
4. We are going to use our query to look for entries that have ‘ferrocene’ in their chemical names in
the CSD. To do this we need to define the search parameters to find entries which contain the
word ‘ferrocene’ anywhere in the chemical name and synonyms field.
query.add_compound_name('ferrocene')
5. To search the CSD we will use the .search() function which will produce a list of ‘hits’ that are
entries which have met the defined criteria. This has been assigned to variable hit_list to save
the output of the search.
hit_list = query.search()
6. To see how many entries have been found in our search, we will add a line to print the length of
the hit list.
print(f'Number of hits : {len(hit_list)}')
7. We are now ready to search the CSD. Save the changes you have made to your script and then run
the Python script in your command prompt. To run your Python script, type the following in your
command prompt and then press ‘Enter’:
9PYAPI-001
python text_numeric_search.py
The script may take 10-20 seconds to run and should print out the resulting length of the hit list.
You should obtain at least 7472 hits (As of version 2020.3 of the CSD including Update 1 Feb.
2021).
8. We can add more criteria to our query. In this case we will look only for structures published in
the last 5 years by adding a search criterion based on the citation. We can add a range of when
the structure was published. We will then search the CSD again and print out the number of hits
we have obtained.
query.add_citation(year=[2016,2021])
hit_list = query.search()
print(f'Number of hits published between 2016 - 2021 : {len(hit_list)}')
Save the changes you have made to the script and then run your script again in the command
prompt. You should obtain at least 1997 entries published in the last 5 years.
9. We can check what search criteria has been used in the query. This line of code will print out the
components of the query in a human readable form. Add this line to your script and then save the
changes you have made.
print('Query search criteria: ')
print('\n'.join(q for q in query.queries))
Run your script in the command prompt. The output you should see printed in the console is:
This means that the word ‘ferrocene’ appears anywhere in the compound name and synonym
field and the entries have a journal year between 2016 and 2021.
10. If we want to find out the number of hits for each year in our five-year range, then we need to run
separate queries. We can do this by using a for loop to iterate through a range from 2016 to 2021
(+1 is added to 2021 in the range as the function is exclusive – meaning it does not contain the
final number in the result). For each search we need to clear our query – otherwise we would get
no results as the search criteria would be for an entry published in 2016 and published in 2017
etc. which is not possible in the CSD.
for i in range(2016,2021+1):
query.clear()
query.add_compound_name('ferrocene')
query.add_citation(year=i)
hit_list = query.search()
print(f'Number of hits in {i} : {len(hit_list)}')
11. Save your changes and then run the script in the command prompt. You should see the number
of hits containing ‘ferrocene’ for each year printed in the command prompt.
10PYAPI-001
(You can check the effect of clearing the query each time yourself: comment out the line with
query.clear() on by putting a # at the start of the line and then run your script again – you could
even add in the lines from Step 9 at the end of your script to see what information is in the query
– just remember to correct your script before moving on to the next step).
12. To further explore the search function, we are going to make one final query to look at structures
of ferrocene published in the year 2019. From our searches in Step 10, we have obtained at least
403 hits for entries with a chemical name containing ‘ferrocene’ that were published in 2019.
query.clear()
query.add_compound_name('ferrocene')
query.add_citation(year=2019)
13. The Search module also allows us to filter the hits of our search by various criteria. We are going
to restrict our search to identify only entries with an R factor of less than 2.0% (so we only obtain
a few entries). We can do this by revising our search settings. This is similar to the ‘Search Setup’
pop-up in ConQuest. There are other filters we can apply including structures with no disorder or
what elements the structure can or cannot contain. For other options and syntax, check out the
API documentation.
query.settings.max_r_factor = 2.0
hit_list = query.search()
14. Now we have got the hits from our search, we can extract information from them. In this simple
case we will extract the refcode of each hit, along with the R factor for the entry. To do this we
will use a for loop to iterate through each hit in our hit list. We can access the refcode directly
from the hit object by using hit.identifier. Further entry properties can be accessed via the
nested entry object. For example, hit.entry.r_factor provides the R factor for the structure.
This will print a list of information to the console. Note that the second print statement should be
all on one line.
print(f'Number of hits in 2019 with an R factor < 2% : {len(hit_list)}')
for hit in hit_list:
print(f' Ref : {hit.identifier} with R-factor :
{hit.entry.r_factor}')
15. Save the changes you have made to your script and then run the script from the command prompt.
You should obtain at least 12 hits with the refcode and R factor of each hit printed out.
11PYAPI-001
16. We could also output the refcodes from our hit list to a file. Refcode list files (or .gcd files) can be
used in Conquest, Mercury or the CSD Python API. To do this we will use the EntryWriter class,
which we need to import from the io module.
from ccdc.io import EntryWriter
17. We will write our file to the same training folder as before and call our output file
‘search_output.gcd’ (or equivalent).
f = r"C:\training\search_output.gcd"
18. Finally, we use a for loop to iterate through each hit and write it to the refcode list file.
with EntryWriter(f) as writer:
for hit in hit_list:
writer.write(hit)
19. Save the changes to your script and then run the file again in the command prompt. You should
now be able to see your .gcd file in the training folder. This file contains a list of the refcodes from
your search.
Conclusions
This exercise introduced the text numeric search module. You should now know how conduct a text
numeric search, access information from the entries in a hit list and create a refcode list file.
There are many other items that can be searched in the text numeric module including refcodes or
ccdc numbers, property fields (such as bioactivity, crystal colour, crystal habit), structures by specified
authors, the citation can be used to search for specific publications or journals. Further details can be
found in the documentation.
12PYAPI-001
Full script
Note: if you copy and paste the script below, double check that the spacing is correct.
from ccdc.search import TextNumericSearch
from ccdc.io import EntryWriter
query = TextNumericSearch()
query.add_compound_name('ferrocene')
hit_list = query.search()
print (f'Number of hits : {len(hit_list)} ')
query.add_citation(year=[2016,2021])
hit_list = query.search()
print (f'Number of hits published between 2016 - 2021 : {len(hit_list)}')
print ('Query search criteria: ')
print ('\n'.join(q for q in query.queries))
for i in range(2016,2021+1):
query.clear()
query.add_compound_name('ferrocene')
query.add_citation(year=i)
hit_list = query.search()
print(f'Number of hits in {i} : {len(hit_list)}')
query.clear()
query.add_compound_name('ferrocene')
query.add_citation(year=2019)
query.settings.max_r_factor = 2.0
hit_list = query.search()
print (f'Number of hits in 2019 with an R factor < 2% : {len(hit_list)}')
for hit in hit_list:
print(f' Ref : {hit.identifier} with R-factor : {hit.entry.r_factor}')
f = r"C:\training\search_output.gcd"
with EntryWriter(f) as writer:
for hit in hit_list:
writer.write(hit)
13PYAPI-001
Exercise 3: Customising a simple script for use in Mercury.
Aim
This example will be focussing on the basics of how Mercury interacts with the CSD Python API, where
scripts can be stored for use in Mercury and how to make small edits to an existing script. We will
make use of a published crystal structure and a supplied Python script, and then illustrate how to
report some useful information about the structure that is not normally accessible from within
Mercury.
Example system
The example system we will be looking at for this exercise is 4-acetoamido-3-(1-acetyl-2-(2,6-
dichlorobenzylidene)hydrazine)-1,2,4-triazole (shown below) which happens to be the compound
featured in the first entry of the Cambridge Structural Database with the CSD refcode AABHTZ.
Chemical diagram for CSD Entry AABHTZ
Instructions
1. Launch Mercury by clicking its icon . The current structure on screen should be AABHTZ;
however, if this is not the case, in the Structure Navigator toolbar, type AABHTZ to bring up the
first structure in the CSD.
2. From the top-level menu, choose CSD Python API, and then select welcome.py from the resulting
drop-down menu. This will run a simple Python script from within Mercury and illustrate the basics
of how Mercury interacts with CSD Python API scripts.
3. Once the script has finished running, a new window will pop-up displaying the output of the script
containing the CCDC logo and a few details about both the structure we are looking at and the
set-up of your system.
14PYAPI-001
4. The second line of text in the script output reports the identifier of the structure that we have
displayed in the Mercury visualiser – AABHTZ – this is generated by the Python script and would
change if we ran the script with another entry or other structural file displayed.
5. The third line of text in the script output reports exactly where the output file is located. The
contents of this output window that popped up are encoded in a simple HTML file. Browse to the
location shown using a file navigator on your computer (e.g., the File Explorer application on
Windows). Right-click on the HTML file in that folder and open it with a file editor such as notepad
– you should see that this file only contains a few lines of HTML text to produce the output you
observed.
6. The fourth line of text in the script output reports where the actual script that you just ran is
located – this will be contained within your Mercury installation directory. Browse to the folder
location as before using a file navigator. This folder contains all the scripts bundled with the
Mercury installation for immediate use upon installing the system.
7. Copy the welcome.py file in this folder and paste it into a location where you have write
permissions on the computer you are using such as the training folder you have created
previously. At the same time, also copy the file named mercury_interface.py from the Mercury
installation directory to your training folder. Note that the mercury_interface.py script will not
appear in the Mercury menu – this is intentional as this is a helper script that is not meant to be
run on its own, so it is automatically hidden.
8. Now we are going to configure a user-generated scripts location in Mercury. To do this, from the
top-level menu, choose CSD Python API, and then select Options from the resulting drop-down
menu. Click on the Add Location button, browse to the training folder where you just saved the
15PYAPI-001
copy of the welcome.py script and click on Select Folder. This will register the folder as an
additional source of scripts that Mercury will add to the CSD Python API menu.
9. Now go to the CSD Python API top-level menu and you should see that there is a new section in
the drop-down menu, listing user-generated scripts, with an item for your copy of the welcome.py
script. Click on the copy of the welcome.py script in your user scripts area of the menu. In the
output you will see that the location of the script now matches your user-generated scripts folder
location.
10. We are now going to make some edits to the Python script to display some additional information
about the structure on display. To edit the Python script, right-click on the copy of welcome.py in
your user folder and open it in your text editor.
11. Many of the lines in this script are comments (all those starting with # or surrounded by triple
quote marks ”””) to help explain how the script works and how the interaction between Mercury
and the CSD Python API works. You should see a number of references to a helper function called
MercuryInterface.
16PYAPI-001
12. Starting on Line 41 of the script there are a series of lines that provide the content to write to the
HTML output. Each of these lines uses a mixture of HTML and Python commands to write
formatted text to a given file’. Look for the line including the words helper.identifier – this writes
to the output file the identifier for the CSD entry, which in this case is ‘AABHTZ’.
13. Below this line we will add some more information to the content to be displayed when we run
the script. Edit the text as shown below – this will output some additional lines of text as well
reporting both the formula relating to the CSD entry and the chemical name.
'This is the identifier for the current structure: %s' % helper.identifier,
# Add the additional information in here
'This is the chemical formula of the current structure: %s' % entry.formula,
'And the chemical name of the current structure: %s' % entry.chemical_name,
14. In the welcome.py script, we have already accessed the entry object for our structure, in this case
the CSD entry AABHTZ. Here we are editing the script to simply read out some further attributes
of the entry, namely the chemical formula and the chemical name. If you want to see what other
attributes an entry object has, look at the CSD Python API on-line documentation by choosing CSD
Python API from the Mercury top-level menu, and then selecting CSD Python API Documentation
from the resulting drop-down menu.
15. Save and re-run the welcome.py script from the user-generated scripts section of the CSD Python
API top-level menu. You will see in the HTML output the additional text and variables relating to
the edits that we made to the script.
17PYAPI-001
Conclusions
The initial Python script that we ran was copied into a user-generated scripts location and edited to
add further functionality to it. Mercury allows multiple user-generated script locations and scripts
saved in these areas can be called directly from the menus in the program.
The concept of an entry was illustrated here along with some of the attributes that an entry has such
as identifier, formula, and chemical name. An entry also contains a crystal attribute, from which
further information can be extracted and analyses performed.
You should now know how to run a Python script from within Mercury as well as how to
customise a script and manage user-generated scripts in Mercury.
18PYAPI-001
Workshop Conclusions
This workshop introduced the CSD Python API. You should now be familiar with:
• Accessing CSD entries through the CSD Python API.
• Reading and printing information about the molecular structure and the crystallographic
information.
• Reading and writing different file formats, such as .cif, .mol2.
• Conducting text numeric searches of the CSD; specifically using compound name, publication
year, and R factor.
• Refining text numeric searches.
• Saving results hitlists in .gcd files, useful for running further analysis in the CSD Python API,
ConQuest or Mercury.
• Running python scripts from the Mercury interface.
Next Steps
Continue learning about searching the CSD with the CSD Python API with the advanced workshop on
how to search for specific interactions in the CSD. You can be find it in the CSD-Core section of the
workshop area on our website:
https://www.ccdc.cam.ac.uk/Community/educationalresources/workshop-materials/csd-core-
workshops/.
Feedback
We hope this workshop improved your understanding of the CSD Python API and you found it useful
for your work. As we aim at continuously improving our training materials, we would love to get your
feedback. Click on this link (https://www.surveymonkey.co.uk/r/CCDC-Online-Workshop) to a survey,
it will take less than 5 minutes to complete. The feedback is anonymous. You will be asked to insert
the workshop code, which for this self-guided workshop is PYAPI-001. Thank you!
Glossary
API – Application Programming Interface. This is a software intermediary that allows two
applications to communicate.
CSD Refcode - A database reference code, containing 6-8 characters and used to identify entries in
the CSD. Learn more about CSD Refcodes in the blog:
https://www.ccdc.cam.ac.uk/Community/blog/post-20/ .
f string – An f string is a way of formatting strings in Python available with version 3.6 and above.
The string begins with an f, the string is enclosed in quotation marks and any expressions in the
string are included within curly brackets {}. These expressions will be replaced with their values once
the script is run.
Refcode list or .gcd file – A file containing a list of CSD Refcodes. This file can be opened in various
CCDC applications.
19You can also read