FIRST 5 KERN
   GEMS
USER MANUAL
←
→
Page content transcription
If your browser does not render page correctly, please read the page content below
FIRST 5 KERN GEMS USER MANUAL

First 5 Kern GEMS User Manual

                                             TABLE OF CONTENTS

Accessing GEMS ........................................................................................................................... 4

   Accessing GEMS ........................................................................................................................ 4

   Login and User Information ......................................................................................................... 5

Basic Navigation ............................................................................................................................ 5

   GEMS Portal ............................................................................................................................... 5

   Data Organization and Management .......................................................................................... 6

   GEMS Database Toolbar .......................................................................................................... 12

   Advanced Operations in Database Toolbar .............................................................................. 14

Contract Administration ............................................................................................................. 17

   Agency and Contract Details Module ........................................................................................ 17

   Scope of Work and Evaluation Profile Module .......................................................................... 18

Clients, Services, and Outcomes ............................................................................................... 20

   Families (Including All Members) Module ................................................................................. 20

   Children 0-5 Module .................................................................................................................. 24

   Group/Aggregate Services Module ........................................................................................... 25

   Agency-Wide Milestones Module .............................................................................................. 29

   Agency-Wide R&Rs Module ...................................................................................................... 29

   Sustainability Module ................................................................................................................ 30

   QPR Summary Module ............................................................................................................. 32

Target Analysis & Data Completion........................................................................................... 36

   Comprehensive Target Report Module ..................................................................................... 37

Data Analysis and Reporting..................................................................................................... 41

   Quarterly Progress Report Module ........................................................................................... 41

   Quick System-Wide Reports Module ........................................................................................ 45

   Advanced Reports Module ........................................................................................................ 46

   GIS Reports Module .................................................................................................................. 47

©2011 Mosaic Network, Inc.
                                                                                                                                                   2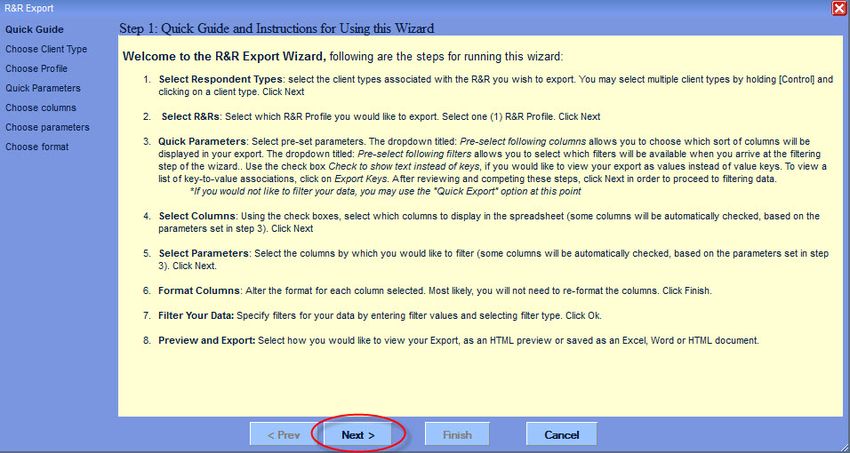
First 5 Kern GEMS User Manual

   R&R Export Wizard Module ...................................................................................................... 48

   R&R ANALYSIS Wizard Module ............................................................................................... 53

Budgets and Invoices ................................................................................................................. 57

   Budget/Invoice Module Overview.............................................................................................. 57

   Invoicing .................................................................................................................................... 59

   Budget Revisions ...................................................................................................................... 63

Administration and Communication.......................................................................................... 67

   Contract Information .................................................................................................................. 67

   Your GEMS User Account ........................................................................................................ 67

   Request GEMS Support ............................................................................................................ 68

©2011 Mosaic Network, Inc.
                                                                                                                                                       3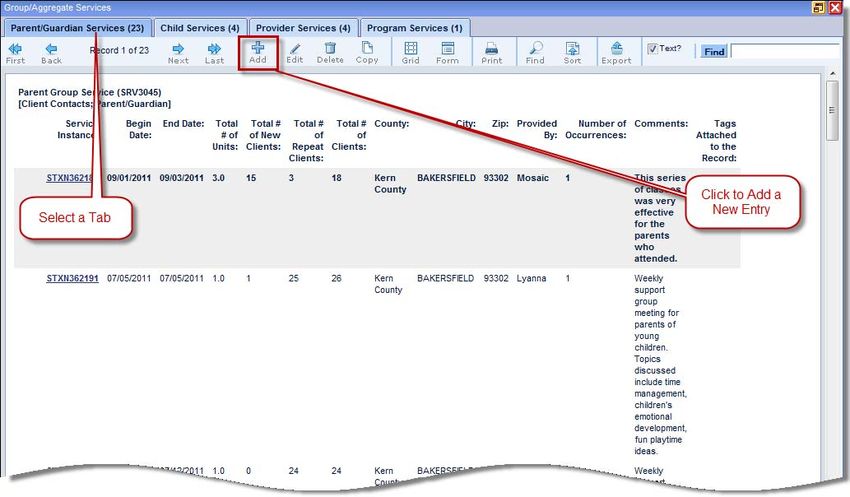
First 5 Kern GEMS User Manual

ACCESSING GEMS

ACCESSING GEMS

GEMS can be accessed at the following link:

http://www.mosaic-network.com/gemslive/KERN/

                                Figure 1: The GEMS Landing Page.

The link above will take you to a Landing page, from which you can log into GEMS. Use the
button in the center of the page to access the GEMS login screen. The links on the left of
the screen do not require a password, and allow you to access the following resource:

Contact GEMS support: this link provides information about how to contact GEMS
support: by phone, by email, or online.

©2011 Mosaic Network, Inc.
                                                                                         4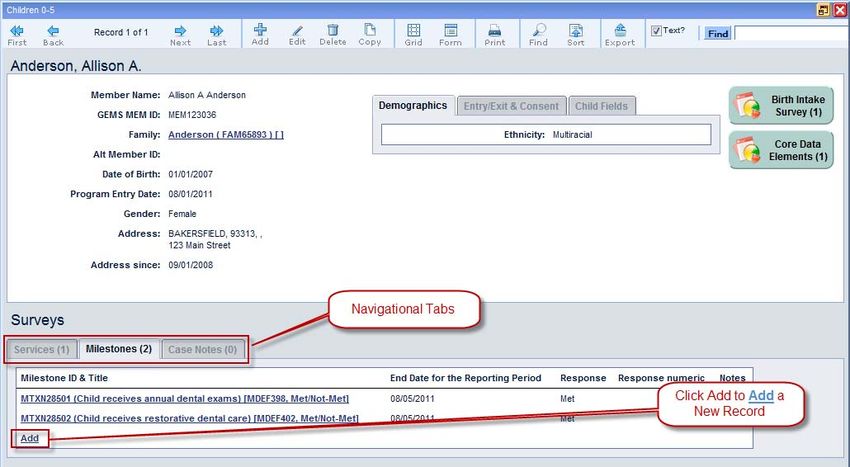
First 5 Kern GEMS User Manual

LOGIN AND USER INFORMATION

Logging in: From the Landing page shown above, select “Log into GEMS” in order to
proceed to the login page.

Enter your User Id and Password in the login dialogue box. Usernames and passwords
shall be distributed through email; contact GEMS technical support staff for more
information regarding your username and password.

                                  Figure 2: The GEMS “login” box

Access Levels: GEMS allows a variety of access privileges for users. Depending on
access levels, certain GEMS functionalities may or may not be available to each GEMS
user. For information on your allowed access, please contact GEMS technical support staff.

Inactivity: Please note that for security reasons, if a user is logged into the system and is
inactive for more than 20 minutes, GEMS will log the user out of the system. The system
will provide a message to inform the user that (s)he will be timed out. If s(he) is still using
the system (s)he may click “Ok” to stay logged into the system. If the user does not choose
to stay logged in or is away from the computer, the system will log him or her out. The user
will need to log back into the system if this occurs.

BASIC NAVIGATION

GEMS PORTAL

Once you have logged into GEMS, you will be directed to the main hub of the system, or
the GEMS portal. The GEMS portal provides an overview of the Kern County system and
its capabilities. Along the left side of the screen is the main menu, which will direct you to
different sections, or modules of the system. Clicking on one of these menu links will direct
you to that specific module. The center of the screen displays graphical statistics on
specific Kern County information, such as milestones, expenses and client demographics.

©2011 Mosaic Network, Inc.
                                                                                                 5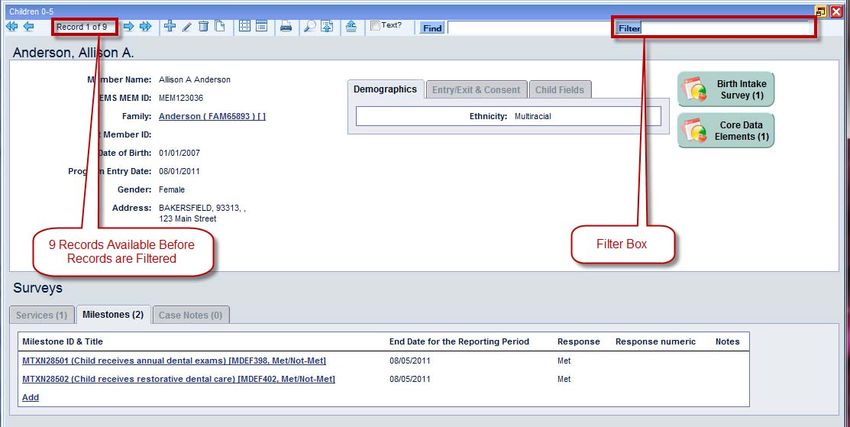
First 5 Kern GEMS User Manual

                                     Figure 3: GEMS Portal

DATA ORGANIZATION AND MANAGEMENT

Split Screen - Most GEMS screens include split screens, which contain both general and
specific information relating to the record you are viewing. The top section of this pane,
known as the Header Pane, contains the general information of the record, such as first
and last names and family ID. The Header Pane makes it easy for you to navigate through
a large number of records. The bottom section of this pane, known as the Details Pane, is
used for modifying data. Operations and reports can be accessed through either pane. To
access specific tables of data, click on the appropriate tab at the top of the Details Pane.
Each tab contains a different type of record, such as Child Details or Case Notes. Whereas
the Header Pane contains limited, general information about the client, the Details Pane
contains multiple tabs of data associated with that client.

Menu Bar - In addition to the main menu on the Landing Page, GEMS provides a menu bar
at the top of your screen that allows you to jump from one module to the next. The options
that appear in the top screen drop-down menus contain the same information as in the
main menu.

©2011 Mosaic Network, Inc.
                                                                                           6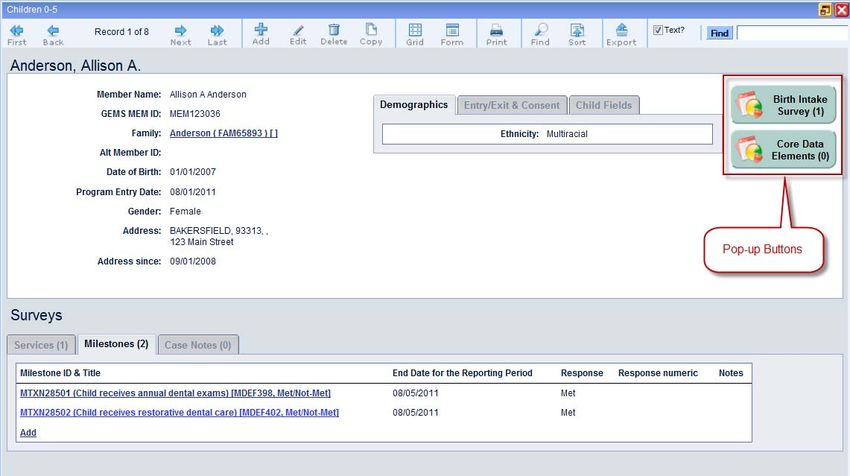
First 5 Kern GEMS User Manual

Getting Back to the Landing Page - If you need to close your current data screen and
return to the Landing Page, simply click on the red "X" inset in the top right corner of your
screen. Clicking on this will close your current data screen, so make sure to save any
changes you have made before closing the screen.

                                       Figure 4: Data Screen

Pop-out Screen - To access the Pop-out Screen option, simply click on the yellow button
located in the top right corner of your screen next to the red "X." By clicking on the Pop-out
button, your current data screen will become a separate movable screen, allowing you to
view multiple screens at once.

Pop-up Buttons - GEMS has included specialty buttons in different details panes that can
perform easy, 1-click reports. Clicking on a button will bring up a pop-up window containing
the information requested. Many Pop-up buttons are labeled "1 Click," which provides a
snapshot of the module or record you are working with.

©2011 Mosaic Network, Inc.
                                                                                                7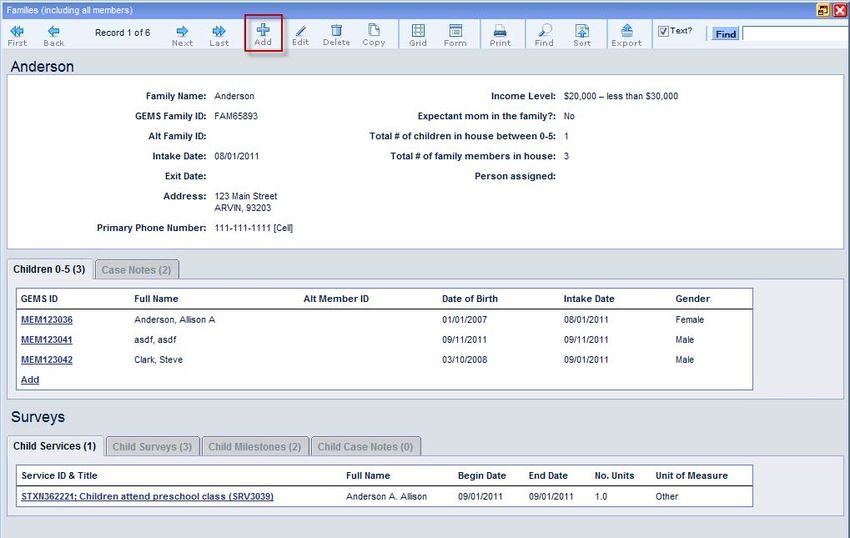
First 5 Kern GEMS User Manual

                                       Figure 5: Pop-up Buttons

Editing: To edit a record in a table, click “Edit”. This will switch the system into edit mode,
where you will be able to change or add information.

Saving Information: To save changes, click “Save”. This will exit you from edit mode and
will save all changes and new information added.

Removing Changes: To discard any changes, click “Cancel”. This will exit you from edit
mode and will disregard any changes that have been made.

Required Information: Some tables of data will have fields that must be filled in. These
fields are colored yellow. If all yellow fields are not filled in, you will be unable to save the
information you have entered. After you click "Ok", the unfilled, required fields will be
colored red. These are the fields that must be completed to continue.

©2011 Mosaic Network, Inc.
                                                                                                    8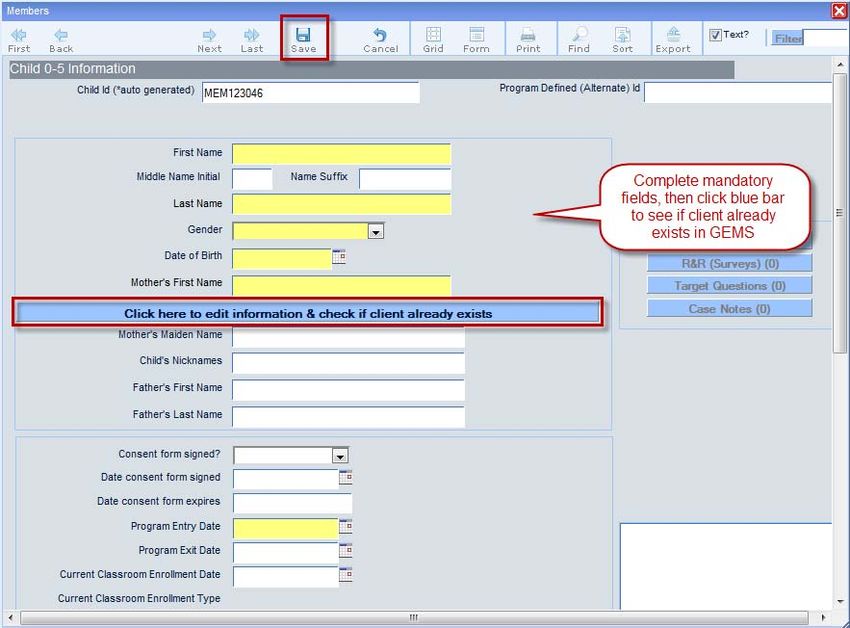
First 5 Kern GEMS User Manual

                             Figure 6: Required Fields and Save/Cancel Buttons

Find - The Find feature allows you to quickly and easily find records in a table. You should
simply type the search criteria in the field to the right of the blue "Find" button, then click
"Find" to fetch the data.

The system will navigate to the first record that matches the search term. A drop-down will
appear in the place of the text field, which will display all of the search results. Selecting a
record will automatically navigate the system to the record selected. To reset the search,
simply click "Reset" and type in a new search term.

Filter - The filter operation allows you to limit the dataset that is visible from the table that
appears in the module. This is a very useful tool when you want to view certain information
without seeing all available records. To use the Filter option, type a filter term in the text
field to the right of the blue "Filter" button. Once you click "Filter", the filtered records will
appear.

©2011 Mosaic Network, Inc.
                                                                                                     9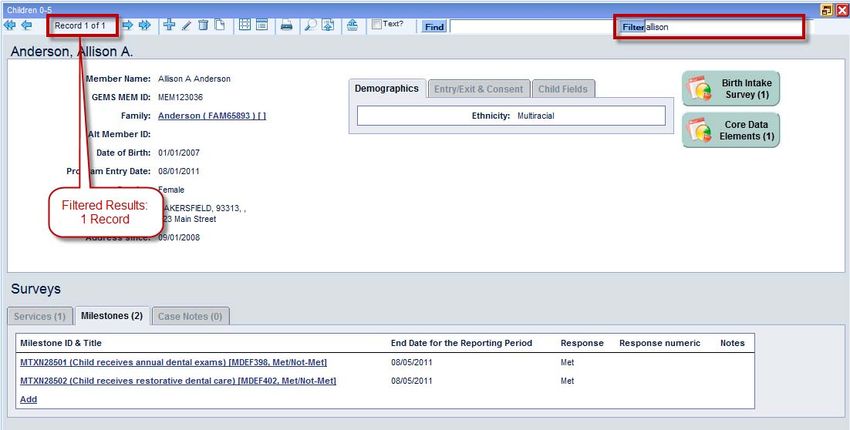
First 5 Kern GEMS User Manual

                                      Figure 7: Filter Operation

The dataset is shortened after you have selected the filter criteria. Rather than looking at all
available records, you have now narrowed your visible records to just one. The navigation
and operations will now treat the dataset as if it was just the filtered records.

                                       Figure 8: Filter Results

To remove the filter and return to all available records, you must remove all text from the
filter text field, and then click the "Filter" button again. This is important as the filter will
remain on the dataset even after you have logged out of the system. If this step is not
completed, you may find that your dataset is empty. If this occurs, reset the filter to return to
all available records.

©2011 Mosaic Network, Inc.
                                                                                              10
First 5 Kern GEMS User Manual
Figure 9: Reset Filter
Error Message: If you attempt to save your changes with at least one required field left
blank or with erroneous data, an error message will appear. This will indicate that there is
required information missing from the record that must be updated in order to proceed.
Figure 10: Example Error Message
Access Levels
Because GEMS allows various access levels for different users, certain GEMS
functionalities may or may not be available to each GEMS user. Access levels for First 5
Kern fall into the following three categories.
Level 1: System-wide read-only access with full report printing capacity – funder side
Level 2: With Specified Access Rights (funder side)
Research and Evaluation Staff: Full user rights to data access and exports
Finance Staff: Full user rights to fiscal access
Program Staff: Full user rights to program defined activities
Level 3: Full Functionality – funder side
©2011 Mosaic Network, Inc.
11First 5 Kern GEMS User Manual
GEMS DATABASE TOOLBAR
The table below provides a description of each Database Toolbar icon and its functions in
GEMS.
GEMS Data Toolbar Options
Database Toolbar Icon Appears Function
Toolbar When?
Option
Arrows take user to the first
record in the table (double
In left arrow), to the previous
Data
Browse record (single left arrow), to
Navigation
mode the next record (single right
arrow) or the last record
(double right arrow).
Adds a new record to the
existing table. In this case,
Data In
the Status Message reflects
Modification‐ Browse
the addition of the new
Add New mode
record by adding one to the
last value of the record.
Data
In
Modification‐ Allows user to edit the
Browse
Modify current record.
mode
Current
Data
In
Modification‐ Allows user to delete the
Browse
Delete current record.
mode
Current
©2011 Mosaic Network, Inc.
12First 5 Kern GEMS User Manual
GEMS Data Toolbar Options
Database Toolbar Icon Appears Function
Toolbar When?
Option
Copies the current record
Data In
and creates a new record
Modification‐ Browse
with the identical
Copy to New mode
information.
Data Save the information the
In Edit
Modification‐ user has entered into the
mode
Save data fields.
Data
In Edit Cancels the current action
Modification‐
mode that user is completing.
Cancel
In
Data View‐ Presents data fields as a
Browse
Form form (default view).
mode
In
Data View‐ Presents data fields as grid
Browse
Grid view.
mode
Data In Opens a window that
Printing‐ Browse provides a print preview of
Preview mode the current screen.
The button opens a wizard
Advanced In
that allows the user to find
Functions‐ Browse
the record that matches the
Find mode
criteria selected.
©2011 Mosaic Network, Inc.
13First 5 Kern GEMS User Manual
GEMS Data Toolbar Options
Database Toolbar Icon Appears Function
Toolbar When?
Option
This button reorders the
Advanced In
records in the database
Functions‐ Browse
according to the criteria
Sort mode
selected by the user.
This button opens a wizard
Advanced In
that allows the user to
Functions‐ Browse
export the records that
Export mode
match the selected criteria
Enter text into the blank box
Quick Find In beside the Find icon. This
Browse allows you to quickly search
mode through records in the
current module.
Checking this box causes
In all
Add Text explanatory text to appear
modes
beneath the toolbar icons.
ADVANCED OPERATIONS IN DATABASE TOOLBAR
The Database Toolbar, as introduced above, contains the following advanced operations:
1. Advanced Find allows you to find a specific record.
2. Advanced sort allows you to order your database on multiple criteria of your
choice.
3. Export allows you to export data based on the criteria you have chosen (filtered
report)
©2011 Mosaic Network, Inc.
14First 5 Kern GEMS User Manual
3
1
2
Figure 11: Advanced Data Function Tools (1) Find, (2) Sort, and (3) Export
Advanced Find
The button opens a wizard that allows you to find the record that matches the criteria
selected. This wizard takes you through the following steps:
1. Enter find parameter: You choose from the parameters available in a given panel.
For example, under the Family Details panel, Family ID is an available parameter. If
the field in the table is of type “LoV,” then the system displays a small button beside
the criteria box. Once you have chosen the desired criteria to search, proceed by
clicking “Next.” If you want to clear previously selected criteria, click “Clear All” to
start afresh. Clicking “Cancel” will close the wizard.
2. Find Results: The system then displays the records that match the criteria in a
spreadsheet view. You can click on the desired record and the system will display
the corresponding record in the background. Clicking “Finish” closes the wizard.
Figure 12: Step 1-Enter Find Parameters
©2011 Mosaic Network, Inc.
15First 5 Kern GEMS User Manual
Advanced Sort
This button reorders the records in the database according to the criteria you selected. This
wizard takes you through the following steps:
1. Select columns to sort on: You choose from the fields available in a given panel;
these fields will be the same as the fields listed in the records you are attempting to
sort.
2. Select sort order: In the next screen identify the specific order
(Ascending/Descending) for the records. You can also move the selected sort
criteria up and down in the list by selecting the field and pressing “Up” or “Down”.
This order determines the sorting preference. Clicking “Next” sorts the database in
the desired order and the wizard confirms the same.
Figure 13: Selecting sort order and preference
3. Click “Finish” to bring up the sorted database.
©2011 Mosaic Network, Inc.
16First 5 Kern GEMS User Manual
CONTRACT ADMINISTRATION
AGENCY AND CONTRACT DETAILS MODULE
The Agency and Contract Details module will display information about your program and
individual contract. This module will also provide information about the programs being
implemented and staff assigned to the contract. These details are established by the
Commission staff and are, therefore, read only. To access the Agency and Contract Details
module, simply click on the menu item as seen below.
Once you have selected Agency and Contract Details from the menu, you will be directed
to the module below. This module consists of recorded data in the upper portion and three
tabs in the lower portion. Each of these tabs of information is typically used as a reference
tool and contains information specific to your mission.
Figure 14: Agency and Contract Details Module
©2011 Mosaic Network, Inc.
17First 5 Kern GEMS User Manual
Agency Staff: This screen contains specific data on the employees appointed to the
program, including contact and demographic information. To navigate through the staff
record, simply click “Next” or “Back”.
Programs: The Programs tab lists all programs to which you are assigned. This allows you
to access information on the specific programs for which you are responsible. You are able
to navigate through the programs listed by using the “Next” or “Back” buttons.
Contract Details: This tab allows information on each contract to be viewed, including:
Contract Number, Begin and End dates, and the Involved Staff Members.
SCOPE OF WORK AND EVALUATION PROFILE MODULE
The Scope of Work and Evaluation Profile module will provide you with details on specific
services, targets, surveys and milestones involved in your assignments. These details are
established by the Commission staff and are, therefore, read only. To access the Scope of
Work and Evaluation Profile, simply click on the menu item as seen below.
Once you have selected Scope of Work and Evaluation Profile from the menu, you will be
directed to the screen displayed below. This module includes four tabs of information that
appear vertically, allowing you to view all the information in a single scrollable screen. The
first tab listed is labeled "Services."
Services: The Services tab includes a listing of all services the Program provides, such as
Developmental Screening and Community Outreach Events. Services are organized by
columns, the first of which is the Service ID. This is simply the reference number given to
the specific service. The second column, Assignment: Service Title, provides you with the
title of the service provided. By clicking on individual Service IDs or Service Titles, you can
access more detailed information. The third column indicates the method, or Modality of the
service. The Modality specifies the way the service is administered, such as in a Classroom
or through a Home Visit. The fourth column measures the units in which the service can be
measured, such as by number of classes, series of classes or number of days. The fifth
column, labeled Current, simply indicates whether the service is active. If the Current
column reads "true," then that service is currently active.
©2011 Mosaic Network, Inc.
18First 5 Kern GEMS User Manual
Figure 15: Services Tab
Surveys: The Surveys tab includes specific information on surveys that are part of your
assignment. Survey data is listed in three columns, the first of which is the Survey ID. This
is simply the identification number given to each survey. The second column, Assignment:
Survey Name, lists the Survey Assignment. By clicking on either a specific Survey ID or
Survey Name, you can access specific information about the survey. The third column,
Survey Title, provides you with the title of the survey if different than the Survey Name.
Figure 16: Surveys Tab
Targets: The Targets tab provides you with information on your targets, or general
objectives. Targets are typically broad, including goals that need to be reached through a
number of steps. An example of a target would be "Families will demonstrate an increased
positive parent/child interaction by reporting on a pre-test and post-test that they have
implemented (6) new parenting skills."
Targets are organized in a series of columns, the first of which is Target ID. This simply
refers to the reference number given to each specific target. The second column,
Assignment: Target Title, specifies the details of the target. You can access additional
information on each target by clicking on either the individual Target ID or the Target Title.
The third column, Projected Value, assigns a numeric goal to the target. In the above
example, the Projected Value would be 6, indicating that 6 new parenting skills are
©2011 Mosaic Network, Inc.
19First 5 Kern GEMS User Manual
projected. Beginning and end dates simply indicate the time period associated with the
target. The final column, labeled Current, specifies whether the service is active. If the
Current column reads "true," then that service is currently active.
Milestones: The Milestones tab provides you with information on your individual
Milestones, or specific goals. Milestones are typically very specific, outlining the steps
required to meet your Targets. The Milestones tab is divided by columns, the first of which
is labeled Definition: Milestone ID. This simply refers to the reference number given to each
specific milestone. The second column, Assignment: Milestone Title, specifies the details of
the milestone. You can access additional information on each milestone by clicking on
either the individual Milestone ID or the Milestone Title. The third column, Projection Type,
indicates the type of response required. For example, a response could be met/not met, or
expressed numerically. The final column, labeled Current, specifies whether the milestone
is active. If the Current column reads "true," then that milestone is currently active.
CLIENTS, SERVICES, AND OUTCOMES
FAMILIES (INCLUDING ALL MEMBERS) MODULE
To add a new child or client into GEMS, simply click on the menu item as seen below.
After clicking on the Families module link, you will be directed to the screen below. To add
a new child or family into GEMS, simply click “Add”.
©2011 Mosaic Network, Inc.
20First 5 Kern GEMS User Manual
Figure 17: Add Family to Records
This will direct you to the screen displayed below. The new family will automatically be
assigned a unique GEMS ID number. If you have an alternate ID number specific to your
Program, we suggest you enter this information in the Alternate ID field. This will help you
locate the record when you search for it later. Mandatory fields are colored yellow, meaning
you will be unable to save any information unless you complete all the required fields. If you
are adding a child into the system, you will need to assign them to a family in GEMS. This
does not require you to provide detailed information on the family, but simply a name with
which siblings can be connected. Although not all fields are required, you should strive to
complete as many as possible. This will provide the tools to produce more detailed reports
and statistics on the children in the system. To save the new entry, simply click “Save”.
Figure 18: Save New Family Data
©2011 Mosaic Network, Inc.
21First 5 Kern GEMS User Manual
Once you have saved your information, you will be directed to the screen below. The family
name, GEMS ID and any other information you have entered will appear in the top portion
of the screen. To add a child to the family, simply click “Add”.
Figure 19: Add New Child to Family Record
After clicking “Add,” you will be directed to the screen below. The new child will
automatically be assigned a unique GEMS ID number. If you have an alternate ID number
specific to your Program, we suggest you enter this information in the Alternate ID field.
This will help you locate the record when you search for it later. There are several required
fields when adding a new child that must be completed before saving. After you enter the
child's general information (name, gender, date of birth and mother's first name), GEMS will
ask you to check to see if this child has already been added into the system. Doing this will
avoid any duplication. Providing the child does not already exist in GEMS, simply complete
the form and click “Save.”
©2011 Mosaic Network, Inc.
22First 5 Kern GEMS User Manual
Figure 20: Save New Child Record After Mandatory Data Fields are Completed
Figure 21: Verify That the Entered Information Does Not Already Exist in the Database
After you have saved your information, you will arrive at the screen displayed below. From
here, you can enter Surveys, Milestones, and Case Notes to the child’s record by simply
clicking on the tabs located in the lower portion of the screen. To view or edit Entry/Exit
information, Demographics, or Child Fields, click on the tabs in the middle portion of the
screen. The Pop-out buttons on the right portion of the screen allow you quick access to
the Birth Intake Survey and the Core Data Elements form.
©2011 Mosaic Network, Inc.
23First 5 Kern GEMS User Manual
Figure 22: Child Record Screen Overview
CHILDREN 0-5 MODULE
The Children 0-5 module provides you with direct access to information on the children
enrolled in the system. This module is similar to the Families module in that it provides
access to several of the same fields. The Children 0-5 module, however, focuses primarily
on a specific child rather than the family as a whole. To access the Children 0-5 module,
simply click on the menu item as seen below.
Once you have selected the Children 0-5 module, you will be directed to the screen
displayed below. From here, you can add or edit information such as Core Data Elements,
Initial Outcomes, and Entry/Exit data. You can also add notes by clicking on the "Case
Notes" tab located at the bottom of the screen.
©2011 Mosaic Network, Inc.
24First 5 Kern GEMS User Manual
Figure 23: Use Navigational Tabs to Edit/Add Information on Services, Milestones, and Case Notes
GROUP/AGGREGATE SERVICES MODULE
The Group/Aggregate Services module allows you to add and modify aggregate service
transactions. To access the Group/Aggregate Services module, simply click on the menu
item as seen below.
Once you have selected the Group/Aggregate Services module from the menu, you will be
directed to the screen displayed below. The screen is comprised of tabs describing the
clients served such as Parent/Guardian Services or Child Services. To add a new entry,
select the appropriate tab and click “Add.”
©2011 Mosaic Network, Inc.
25First 5 Kern GEMS User Manual
Figure 24: Add New Entry to Group/Aggregate Services
After you click “Add,” you will be directed to the screen below. GEMS will automatically
assign a unique Transaction ID that can be seen in the upper portion of the screen. To
update your aggregate service, simply select the service from the drop box. Included in the
drop-down box will be all aggregate services and milestones that are assigned to your
contract. For each, simply enter the beginning and end dates of the service (typically, the
first and last day of the month) and fill in the total number of services provided. This number
will be related to the number of clients that attended each service. For example, one class
containing 20 students would be considered 20 services. When completing the number of
clients section, simply include the number of repeat clients (clients who have taken part in
the service previously) and the number of new clients (clients who have never taken part in
the service before). GEMS will automatically populate the total number of clients based on
the sum of these two boxes. If you have any case notes, simply enter them in the Case
Notes section. When you have completed the form, click “Save.”
©2011 Mosaic Network, Inc.
26First 5 Kern GEMS User Manual
Figure 25: Update Aggregate Service Data and Click Save
AGENCY-WIDE MILESTONES MODULE
From the main GEMS Portal, under the Clients, Services, and Outcomes module header,
find and click menu item displayed below.
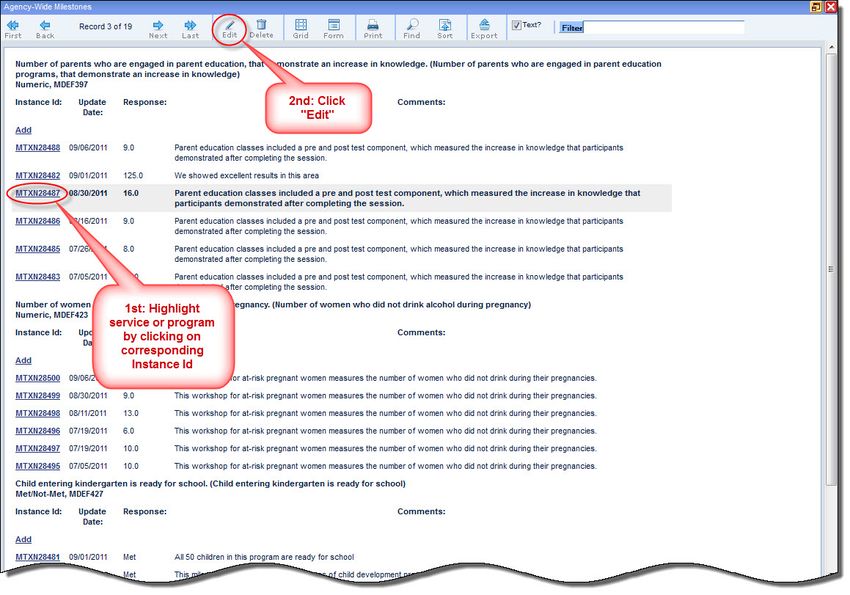
This module allows you view your Agency-Wide Milestones in an interactive and organized
format. Each individual milestone appears in bold followed by the various programs and
services that are working to accomplish that milestone.
©2011 Mosaic Network, Inc.
27First 5 Kern GEMS User Manual
To edit an existing service or program that is attached to a specific milestone, first locate
the milestone. Then locate the particular service or program attached to this milestone that
you would like to edit. Highlight the desired service or program by clicking on the dark blue
“Instance ID” number located on the left side of the window. Once the service or program is
highlighted, click “Edit” in the top GEMS Toolbar.
Figure 26: Select the Service or Program and Click Edit
Make the necessary modifications and click “Save” in the top GEMS Toolbar.
Figure 27: Once Modifications Have Been Made, Click Save
©2011 Mosaic Network, Inc.
28First 5 Kern GEMS User Manual
AGENCY-WIDE R&RS MODULE
The Agency-Wide R&Rs module provides you with a series of surveys that will be
conducted by or on behalf of the client. To access the Agency-Wide R&Rs module, simply
click on the menu item as seen below.
Once you have selected Agency-Wide R&Rs, you will be directed to the screen below. The
drop-down menu featured below allows the user to select the appropriate survey from the
list. Once you have chosen a survey, the applicable questions will appear. After checking
the appropriate checkboxes, you can click "Check" to verify that you have completed the
survey properly. To save the survey, simply click "Save."
Figure 28: Choose Survey from Drop Down Menu and Complete. Click Save When Complete.
©2011 Mosaic Network, Inc.
29First 5 Kern GEMS User Manual
SUSTAINABILITY MODULE
From the main GEMS Portal, under the Clients, Services, and Outcomes module header,
find and click on the menu item shown below.
To add a new Sustainability Record, click “Add” in the top GEMS Toolbar. A new window
will now appear containing several informational fields. Fill in the appropriate information
and click “Save” to complete the record.
Figure 29: Once Information Has Been Entered, Click Save
To add comments to a Sustainability Record in Form View, click “Add” found below the
displayed record information.
Figure 30: Add Comments to a Sustainability Record by Clicking Add
©2011 Mosaic Network, Inc.
30First 5 Kern GEMS User Manual
A new window will appear with a blank field for adding comments. Type your desired
comment and click “Save”.
Figure 31: Click Save Once Comments Have Been Entered
Your Sustainability Comment will now appear in a new window with the title R&R
Transactions at the top. If the Sustainability Comment is validated (indicated by a Validated
in green), then click the red “X” in the upper right to return to the Sustainability Record in
Form View.
Figure 32: Once Sustainability Comment Has Been Validated, Click Red X to Return to Sustainability Record
©2011 Mosaic Network, Inc.
31First 5 Kern GEMS User Manual
QPR SUMMARY MODULE
This module allows you to view and add Quarterly Progress Report Summaries.
From the main GEMS Portal, find and click on the menu item shown below.
You should be able to view existing QPR Reports in an organized, user friendly format.
Figure 33: Click the Add Button to Create a New QPR Summary
©2011 Mosaic Network, Inc.
32First 5 Kern GEMS User Manual
To add a QPR, click “Add” in the top GEMS Toolbar. A new window will now appear. Enter
a Sustainability ID, the desired quarter you would like a report on, and the Report Output.
Click “Save” in the GEMS Toolbar.
Figure 34: Once Appropriate Information is Entered, Click Save.
To add comments to a QPR, first select the QPR for which you would like to add
comments. Then click “Add” located below the QPR Table Display.
Figure 35: Click Add to Enter Comments
©2011 Mosaic Network, Inc.
33First 5 Kern GEMS User Manual
A new window will appear with a blank space provided for commentary. Type your
comments and click “Check” in the upper GEMS Toolbar.
Figure 36: Click on the Check Button to Verify Commentary
Once your response has been verified, click “Yes” to save this form now.
Figure 37: Click Yes to Save Commentary Form
©2011 Mosaic Network, Inc.
34First 5 Kern GEMS User Manual
Your validated QPR Comment will appear in a new window, press the small red “X” button
in the upper right to return to the QPR main screen.
Figure 38: Once QPR Comments Have Been Validated, Click Red X to Exit
©2011 Mosaic Network, Inc.
35First 5 Kern GEMS User Manual
TARGET ANALYSIS & DATA COMPLETION
QUICK REVIEW OF CONTRACT SOW MODULE
To view the Quick Review of Contract SOW report, simply click on the menu item as seen
below.
Once you have selected Quick Review of Contract SOW from the menu, you will be
directed to the screen below. A pop-up window will appear, allowing you to access a
general report based on your targets and transactions. You can view this report in a new
browser window by clicking the appropriate link. Alternatively, you also have the option of
exporting the report into a Word or Excel file. Simply select the preferred format from the
drop-down menu in the pop-up box. After selecting the format, you can view or print your
report.
Figure 39: Select Your Preferred Method for Viewing the Report and Click Export and Save
©2011 Mosaic Network, Inc.
36First 5 Kern GEMS User Manual
Figure 40: Sample Quick Review of Contract SOW Report
COMPREHENSIVE TARGET REPORT MODULE
The Comprehensive Target Report provides you with a detailed report on your targets,
services and transactions. To access the Comprehensive Target Report, simply click on the
menu link as seen below.
©2011 Mosaic Network, Inc.
37First 5 Kern GEMS User Manual
Once you have selected Comprehensive Target Report from the menu, you will be directed
to the screen below. You are then able to produce a report based on the specific
information that you would like to view. The Comprehensive Target Report can be
completed by following the three simple steps outlined in the pop-up window below. To
initiate the report, simply click "Next", or “Cancel” if the report has been requested in error.
Figure 41: Follow Report Wizard Steps to Generate Your Comprehensive Target Report
After you have selected "Next," you will be directed to the next screen, which allows you to
select your desired criteria from the three check boxes available; Data Required, Data
Entered and Contract Progress. Once you have selected the data you would like included
in the report, click "Next" to progress to the next screen.
©2011 Mosaic Network, Inc.
38First 5 Kern GEMS User Manual
Figure 42: Select the Type of Report and Click Next to Proceed
The next screen that appears will allow you to specify dates. GEMS allows you to select a
variety of dates or view reports without date restrictions. Once you have selected the
appropriate date range, simply click "Next."
Figure 43: Choose Desired Date Range and Click Next to Continue
©2011 Mosaic Network, Inc.
39First 5 Kern GEMS User Manual
The final screen that appears provides you with the option of viewing your report in a new
browser window by clicking the appropriate link. Alternatively, you also have the option of
exporting the report into a Word or Excel file. Simply select the preferred format from the
drop-down menu in the pop-up box.
Figure 44: Select Desired Viewing and Export Method
The final report will provide you with specific details on your milestone progress.
Figure 45: Sample Comprehensive Target Report
©2011 Mosaic Network, Inc.
40First 5 Kern GEMS User Manual
DATA ANALYSIS AND REPORTING
QUARTERLY PROGRESS REPORT MODULE
From the main GEMS Portal, under the Data Analysis and Reporting module header, find
and click on the menu item shown below.
A small window will appear prompting you to either Load an Existing Report or Generate a
New Report.
Figure 46: Quarterly Progress Report Initial Screen
©2011 Mosaic Network, Inc.
41First 5 Kern GEMS User Manual
To Load an Existing Report, click “Load Existing Report”. You are now presented with
Current Reports and Archived Reports in a Grid View. Select a report by clicking on its
corresponding row, and click “OK”.
Figure 47: Select Report By Click on its Row, Then Click OK to View QPR
©2011 Mosaic Network, Inc.
42First 5 Kern GEMS User Manual
If the existing report has already been submitted, then you will be able to view it in a read
only format. If the existing report has not been submitted, then you are able to view and edit
information on the selected report. Once all the information is determined to be accurate,
there are four options for continuing. You can either Preview/Print the QPR, Save for
Editing Later, Refresh Reports, or Submit. Preview/Print will allow you to view the print
version of the report and print it out. Save for Editing Later will simply save the data in the
report for later use. Refresh Reports will return with QPR to its original completed state.
Submit will allow you to submit the report; however, once the report is submitted you will
not be able to modify it further.
Figure 48: Decide Between the Following: Preview/Print, Save for Editing Later, Refresh Reports, or Submit.
©2011 Mosaic Network, Inc.
43First 5 Kern GEMS User Manual
To Generate a New Report, click the “Generate New Report” button.
Figure 49: Generate a New Report Button
You are now presented with a QPR template that is ready to be completed. Complete the
necessary parts of the QPR. When you reach the bottom of the report, you have the option
of viewing the completed report before submitting. Located below the Sustainability
Updates Narrative box, click on the blue underlined link entitled “Click Here to View
Complete Report.”
Figure 50: View Complete QPR Report by Clicking the Click Here to View Complete Report Button
©2011 Mosaic Network, Inc.
44First 5 Kern GEMS User Manual
The report will now appear in a separate web browser window. Once you have reviewed
the complete report, you can Preview/Print the report, Save for Editing Later, Refresh
Reports, or Submit the report. By clicking “Submit”, you will submit the QPR for further
review.
QUICK SYSTEM-WIDE REPORTS MODULE
The Data Analysis and Reporting category provides you with various reports based on the
data you have entered into GEMS. The first module in this category is Quick System-Wide
Reports. To access this module, simply click on the menu item as seen below.
The Quick System-Wide Reports option will provide you with a fast and easy way of
producing reports based on the system as a whole. When you click on the menu item, you
will be directed to the screen below.
Figure 51: Choose Desired Report Category and Click Next
©2011 Mosaic Network, Inc.
45First 5 Kern GEMS User Manual
You will then be directed to the next screen, where you can select the report you would like
to view. After clicking "Next," you will have the option of viewing the report in a new browser
window, or exporting the report into a variety of programs.
Figure 52: Choose Which Type of Report to Load And Click Next
ADVANCED REPORTS MODULE
The second reporting option in the Data Analysis and Reporting menu is Advanced
Reports. To access Advanced Reports, simply click on the menu item as seen below.
Once you have selected Advanced Reports from the menu, you will be directed to the
screen below. This screen is very similar to the Quick System-Wide Reports screen. GEMS
will ask you to select the category of report you would like to view. Reports can be
categorized as Demographic, GIS (geographical data) or Special Reports.This option
differs from the Quick System-Wide Reports module in that if offers you additional reporting
options. You are able to select parameters in this module as well as include graphs and
©2011 Mosaic Network, Inc.
46First 5 Kern GEMS User Manual
charts. By selecting the category of report and clicking "Next," you will be directed to select
the options that will determine the nature of the report.
Figure 53: Follow the Steps in the Report Wizard to Complete Your Advanced Report
GIS REPORTS MODULE
The fourth type of report available in the Data Analysis and Reporting menu is GIS Reports.
To access GIS Reports, simply click on the menu item as seen below.
©2011 Mosaic Network, Inc.
47First 5 Kern GEMS User Manual
Once you have selected GIS Reports from the menu, you will be directed to the screen
below. This screen is also very similar to both the Quick System-Wide Reports and the
Advanced Reports screens. The main difference in the GIS Reports option is that the
results of the report will be in the format of a map.
Figure 54: Follow the Steps in the Report Wizard to Complete Your GIS Report
R&R EXPORT WIZARD MODULE
To access the R&R Export Wizard, find and click on the menu item as shown below.
Once you have selected R&R Export Wizard from the menu, you will be directed to a
Report Wizard screen as shown below. Click “Next” to proceed.
©2011 Mosaic Network, Inc.
48First 5 Kern GEMS User Manual
Figure
55: Click Next to Proceed With Your R&R Export
Now you will be prompted to choose a Client Type. Select the desired Client Type and click
“Next” to proceed.
Figure 56: Choose Desired Client Type and Click Next to Continue
©2011 Mosaic Network, Inc.
49First 5 Kern GEMS User Manual
Next, choose a Profile Type and click “Next” to continue.
Figure 57: Choose Desired Profile Type and Click Next to Continue
The next screen allows you to choose Quick Parameters to specify your R&R Export.
Choose the desired parameters and click “Next” to proceed. You can also click the yellow
Quick Export button to view a less detailed report faster.
Figure 58: Choose Quick Parameters and Click Next. Click Quick Export to View a Less Detailed Report Faster
©2011 Mosaic Network, Inc.
50First 5 Kern GEMS User Manual
Now you are able to Choose Columns for your export. Check the boxes next to the desired
columns and click “Next” to proceed. You can also click on the “Select All” or “Select None”
to select all or none of the columns.
Figure 59: Choose Columns For Export and Click Next
The next screen will ask you to choose the parameters that you want to fill. Similar to the
previous step, select your parameters by clicking on the check boxes located next to each
parameter. You can also click “Select All” or “Select None” to choose all parameters for
export or choose none of the parameters for export, respectively. Click on “Next” to
continue.
The following step is to choose a format for the output. Specify the Visual Style, Format,
and Order for your data and then click “Finish” to continue.
\
©2011 Mosaic Network, Inc.
51First 5 Kern GEMS User Manual
Figure 60: Choose the Format of the Export and Click Finish to Continue
Before you can export and view your report, you must select the filter parameters for your
report. When you have selected the desired filter parameters, click “OK” to proceed to the
export window.
Figure 61: Choose Filter Parameters and Click Ok
©2011 Mosaic Network, Inc.
52First 5 Kern GEMS User Manual
You are now ready to export and view your report.
Figure 62: Export and View Your Report Using the Given Options
R&R ANALYSIS WIZARD MODULE
To access the R&R Analysis Wizard, simply click on the menu item as seen below.
Once you have selected R&R Analysis Wizard from the menu, you will be directed to a
Report Wizard screen as shown below. Click “Next” to proceed.
©2011 Mosaic Network, Inc.
53First 5 Kern GEMS User Manual
Figure 63: R&R Analysis Wizard Start Screen
Now you will be prompted to choose a Client Type. Select the desired Client Type and click
“Next” to proceed.
Figure 64: Choose Client Types and Click Next to Proceed
Next, choose a Profile Type and click “Next” to continue.
©2011 Mosaic Network, Inc.
54First 5 Kern GEMS User Manual
Figure 65: Choose Profile Types and Click Next to Proceed
The next screen will ask you to set a Profile Filter for your R&R Analysis. Once your Profile
Filter is set, click “Next” to continue.
Figure 66: Choose Profile Filter and Click Next to Continue
©2011 Mosaic Network, Inc.
55First 5 Kern GEMS User Manual
Your report is now ready to view. Choose your preferred viewing and export method from
the drop-down menu and click “Export and Save.”
Figure 67: Select Viewing and Export Method and Click Export and Save Button
©2011 Mosaic Network, Inc.
56First 5 Kern GEMS User Manual
Here is sample of what your R&R Analysis should look like.
Figure 68: Sample R&R Analysis Report
BUDGETS AND INVOICES
BUDGET/INVOICE MODULE OVERVIEW
The Budget and Invoices module allows you to view budgets allotted for your program. You
can also generate invoices through this module. To access the Budget and Invoices
module, simply click on the menu item as seen below.
©2011 Mosaic Network, Inc.
57First 5 Kern GEMS User Manual
Once Budget and Invoices has been selected from the menu, you will automatically be
directed to the screen below. This module consists of a number of different tabs and fields
of information. The Commission staff will input the specific budget amounts, so these
figures will be visible to the user when viewing the module. The Budget and Invoices
module is divided into two separate panes, the Header Pane and the Details Pane. The
Header Pane, or top section of the Budgets and Invoices module, displays general
information about the budget, such as Budget ID, Contract ID and Fiscal Year. You can
navigate from one budget to the next by clicking the “Next” and “Back” buttons. The Details
Pane, or bottom pane, includes specific data on each budget.
Figure 69: Budget and Invoices Module Overview
©2011 Mosaic Network, Inc.
58First 5 Kern GEMS User Manual
INVOICING
To create a new invoice, click on the Invoices tab, then click “Add.”
Figure 70: Add Button Locations
After you click “Add,” you will be directed to the screen below. You must complete the top
portion of the screen and save, as seen below. Until you save the top portion of the new
invoice, you will be unable to enter any further information.
Figure 71: Complete Information Fields in Upper Portion of Screen, Then Click Save
©2011 Mosaic Network, Inc.
59First 5 Kern GEMS User Manual
After you have saved the general invoice information, click “Edit” to enter specific
information in the screen below. If you do not click “Edit,” you will not be able to complete
the invoice.
Figure 72: Click on Edit to Complete the Invoice
After clicking “Edit,” you will be able to select the category of invoice you would like to
create. The invoice categories are listed along the right side of the screen in blue. To select
the invoice category, simply click on the appropriate blue button. If this is a Supplemental
Invoice, check the box as seen below.
©2011 Mosaic Network, Inc.
60First 5 Kern GEMS User Manual
Figure 73: Select Invoice Line Item Category by Clicking on Corresponding Blue Buttons
After you click on “Invoice Category”, the pop-up box below will appear. To enter
information into your invoice, click “Edit.”
Figure 74: Click Edit to Enter Information to Your Invoice
©2011 Mosaic Network, Inc.
61First 5 Kern GEMS User Manual
After you click “Edit,” the pop-up box will be in edit mode, allowing you to input the
necessary numbers. Required fields are colored yellow. However, if an amount of 0 applies
to one of the required fields, you will still be able to save the record with the existing
number 0 in the box. You do not need to input any additional numbers since 0 fulfills the
requirement of completing the required field. After you have completed your entry, click
“Save.”
Figure 75: Click Save After Required Information Has Been Entered
After you have saved your invoice, you will be directed to the screen below. Your invoice is
now complete and can be reviewed, printed or submitted. If you need to make changes to
your invoice, click “Edit.” You can make changes to your invoice until you submit it, at which
time it can no longer be edited.
Figure 76: Make Necessary Changes to Invoice, Then Submit, Review, or Print
©2011 Mosaic Network, Inc.
62First 5 Kern GEMS User Manual
BUDGET REVISIONS
This area allows you to revise an Agency Budget. In this screen you can add or remove
funds to or from a budget line item. To add a new revision, click “Add” shown below and
complete the related fields.
Figure 77: Add New Budget Revision
You will be directed to the screen below. First, you will need to enter information into the
Header Pane. This information includes Revision Date, Payment Period (Month), Payment
Period (FY). Then click “Save” to proceed.
Figure 78: Enter Budget Revision Information Then Click Save
Once the initial information is saved, you will be brought back to the Revisions window. To
enter revisions, click “Edit” as shown below.
©2011 Mosaic Network, Inc.
63First 5 Kern GEMS User Manual
Figure 79: Click Edit to Enter Revisions
You can now enter Revision Details in the Details Pane. To make a revision, simply click on
the blue box that corresponds with the budget area you are revising. You can make
revisions to Personnel, Services & Supplies, Indirect Cost, and Subcontractor fields. When
you click on the desired blue box, a new window will appear. The figure below shows a
revision to a Personnel Expense. To make a revision, click “Edit”.
Figure 80: Personnel Expense Revision Window
©2011 Mosaic Network, Inc.
64First 5 Kern GEMS User Manual
In this example, in order to move $1,000 from the Executive Director’s salary amount you
simply input “-1,000.00” into the Salary Amount field shown in the figure below. Then, click
“Save” to continue.
Figure 81: Personnel Expense Revision Window
You will now be directed back to the Revisions window, where the “-1,000.00” should be
displayed next to the blue box labeled Personnel. Now, say you want this $1,000 put
towards services and supplies. First, click on the blue box labeled Services & Supplies.
Figure 82: Budget Revision Window
©2011 Mosaic Network, Inc.
65First 5 Kern GEMS User Manual
A new window will appear. Click “Edit” in the upper toolbar to make the necessary changes.
You can now enter “1,000.00” into the informational field labeled Requested Amount as
shown below. Click “Save” to continue.
Figure 83: Update Requested Amount Field and Click Save
You will now be directed back to the Revisions window. Make sure that the Total Revision
Amount at the bottom is equal to zero. Then click “Save” to continue. You are now able to
Submit the revision by clicking the blue “Submit” button on the right side of the window.
Figure 84: Verify Total Revision Amount and Click Save
©2011 Mosaic Network, Inc.
66First 5 Kern GEMS User Manual
ADMINISTRATION AND COMMUNICATION
CONTRACT INFORMATION
To access contract information details, simply click on the Contract Information link in the
main GEMS menu. You will be directed to the screen below, wherre you can add, edit or
view general contract details.
Figure 85: Contract Information
YOUR GEMS USER ACCOUNT
You can change your GEMS password through the Administration and Communication
module. Click Your GEMS User Account to access the page below. After you click edit, the
Change button will be activated, allowing you to change your password.
Figure 86: Updating Your Password
©2011 Mosaic Network, Inc.
67First 5 Kern GEMS User Manual
REQUEST GEMS SUPPORT
You can contact GEMS support with any questions or concerns you may have. Simply click
the Request GEMS Support link on your desktop to access the page below.
Figure 87: GEMS Support
©2011 Mosaic Network, Inc.
68You can also read