HELMUT 4 - HFX ADMIN GUIDE - SOFTWARE DOCUMENTATION COPYRIGHT 2021 BY MOOVIT GMBH
←
→
Page content transcription
If your browser does not render page correctly, please read the page content below
Helmut 4 - HFX
    Admin Guide

     Software documentation
Copyright © 2021 by MoovIT GmbH

    Helmut4 - HFX - v. 4.0.4 - 04.01.2021
1. Helmut 4 -HFX - Project management for editing projects ..............................6
1.1. Helmut4 - Tech Specs ..............................................................................................................6
1.2. Helmut4 - Connect Client.......................................................................................................6
1.2. Login.............................................................................................................................................7
2. Side menu .........................................................................................................................8
2.1. Hover Icon:..................................................................................................................................9
2.2. Custom User Action Button ..................................................................................................9
2.3. Log Out Button .........................................................................................................................9
2.4. Projects Menu ...........................................................................................................................9
2.5. Dashboard Menu ....................................................................................................................10
2.5.1. Search Bar .............................................................................................................................................10
2.5.2. Kick All Button ....................................................................................................................................10
2.5.3. Send Message to All Button ............................................................................................................10
2.5.4. Online Status .......................................................................................................................................10
2.5.5. Username ..............................................................................................................................................10
2.5.6. User Role ...............................................................................................................................................10
2.5.7. Client Info .............................................................................................................................................11
2.5.8. Last Login .............................................................................................................................................11
2.5.9. License Usage ......................................................................................................................................11
2.5.10. Action Menu .........................................................................................................................................11
2.6. User/Group Menu ...................................................................................................................11
2.6.1. All Tab ....................................................................................................................................................11
2.6.2. By Group Tabs ......................................................................................................................................11
2.6.3. Group Action Button .........................................................................................................................11
2.6.4. Action Button Menu ..........................................................................................................................11
2.6.4.1. Manage Users......................................................................................................................................................12
2.6.4.2. Group Access .......................................................................................................................................................12
2.6.4.3. Delete Group .......................................................................................................................................................12
2.6.5. Search Bar .............................................................................................................................................13
2.6.6. Add Group Button ..............................................................................................................................13
2.6.7. Access Preset Button ........................................................................................................................14
2.6.7.1. User Preset Icon .................................................................................................................................................14
2.6.7.2. Group Preset Icon ..............................................................................................................................................14
2.6.7.3. Unfold Preset Icon .............................................................................................................................................14
2.6.7.4. Preset Action Menu ..........................................................................................................................................14
2.6.7.5. Add Preset Button .............................................................................................................................................14
Helmut4 - HFX - v. 4.0.4 - 04.01.20212.6.8. Import Users Button ..........................................................................................................................15
2.6.9. Add User Button .................................................................................................................................15
2.6.10. Role Button ..........................................................................................................................................16
2.6.11. User Action Button ............................................................................................................................16
2.6.11.1. OAuth ....................................................................................................................................................................16
2.6.12. Change Button.....................................................................................................................................17
2.6.13. Displayname.........................................................................................................................................17
2.6.14. Username ..............................................................................................................................................17
2.6.15. Product Selection Icon ......................................................................................................................17
2.6.16. Reserve License Button ....................................................................................................................17
2.7. Templates Menu .....................................................................................................................17
2.7.1. All Tab ....................................................................................................................................................18
2.7.2. Group Tab ..............................................................................................................................................18
2.7.3. Search Bar .............................................................................................................................................19
2.7.4. Add Category Button ........................................................................................................................19
2.7.5. Category Action Button ...................................................................................................................19
2.7.6. Blank Space to Click on.....................................................................................................................19
2.7.6.1. Upload Template Button ...................................................................................................................................19
2.7.6.2. Delete Template Button....................................................................................................................................19
2.7.6.3. Template Name ....................................................................................................................................................19
2.7.6.4. Template Type ......................................................................................................................................................19
2.8. Preferences Menu ..................................................................................................................20
2.8.1. General Tab ..........................................................................................................................................20
2.8.1.1. Search ....................................................................................................................................................................20
2.8.1.2. Backup...................................................................................................................................................................20
2.8.1.3. Restore..................................................................................................................................................................21
2.8.1.4. Projects .................................................................................................................................................................21
2.8.1.5. Templates.............................................................................................................................................................21
2.8.1.6. Profiles..................................................................................................................................................................21
2.8.1.7. Default Language ..............................................................................................................................................21
2.8.1.8. Path Mapping ......................................................................................................................................................21
2.8.1.9. Variables...............................................................................................................................................................22
2.8.1.10. Temporary project import directory ............................................................................................................22
2.8.2. Modules ................................................................................................................................................................22
2.8.2.1. Flow Module ........................................................................................................................................................22
2.8.2.2. Modules/QScan Modul Tab .............................................................................................................................22
2.8.2.3. Modules/AD Modul Tab ....................................................................................................................................22
2.8.2.4. Modules/MediaLoopster Modul Tab ............................................................................................................22
Helmut4 - HFX - v. 4.0.4 - 04.01.20212.8.2.5. Modules/Hue Lamp Modul Tab ......................................................................................................................22
2.8.2.6. Modules/Cat DV Module .................................................................................................................................23
2.8.2.7. Modules/SwatIO Module .................................................................................................................................23
2.8.2.8. Modules/Grass Valley Stratus Module ........................................................................................................23
2.8.2.9. Modules/Active Directory Auto Module .....................................................................................................23
2.8.2.10. Editshare Module ...............................................................................................................................................25
2.9. Languages ................................................................................................................................25
2.9.1. Languages Tab .....................................................................................................................................26
2.9.2. Exclamation Mark Sign .....................................................................................................................26
2.9.3. Languages Action Button ................................................................................................................26
2.9.4. Add Language ......................................................................................................................................26
2.9.5. Force English ........................................................................................................................................26
2.9.6. Debug Language .................................................................................................................................26
2.9.7. Unfold Arrow .......................................................................................................................................26
2.9.8. Already Translated .............................................................................................................................26
2.9.9. Not Yet Translated .............................................................................................................................26
2.10. Metadata Menu.......................................................................................................................27
2.10.1. All Tab ....................................................................................................................................................28
2.10.2. Group Tab ..............................................................................................................................................28
2.10.3. Add Metadata Button........................................................................................................................28
2.10.4. Search Bar .............................................................................................................................................28
2.10.5. Entry Name...........................................................................................................................................28
2.10.6. Read Only Toggle Switch ..................................................................................................................28
2.10.7. Mandatory Toggle Switch ................................................................................................................28
2.10.8. Hidden Toggle Switch ........................................................................................................................28
2.10.9. Disabled Toggle Switch.....................................................................................................................28
2.10.10.Filterable Toggle Switch ..................................................................................................................28
2.10.11.Entry Type Dropdown .......................................................................................................................28
2.10.12.Values Field ..........................................................................................................................................29
2.10.13.Default Value Field ............................................................................................................................29
2.10.14.Pre resolve Toggle Switch ...............................................................................................................29
2.10.15.Metadata Action Button ..................................................................................................................29
2.10.16.Arrows ...................................................................................................................................................29
2.10.17.Group Toggle Switch..........................................................................................................................29
2.11. Streams Menu .........................................................................................................................30
2.11.1. All Tab ....................................................................................................................................................30
2.11.2. Triggers Tab..........................................................................................................................................30
Helmut4 - HFX - v. 4.0.4 - 04.01.20212.11.3. Search Bar .............................................................................................................................................31
2.11.4. Debug Streams Button .....................................................................................................................31
2.11.4.1. Stream ...................................................................................................................................................................32
2.11.4.2. Nodes ....................................................................................................................................................................32
2.11.4.3. Clear Log Entries................................................................................................................................................32
2.11.4.4. Unfold Arrow .......................................................................................................................................................32
2.11.5. Add Stream Button ............................................................................................................................32
2.11.6. Enabled Toggle Switch ......................................................................................................................33
2.11.7. Stream Action Menu ..........................................................................................................................33
2.11.8. Stream Name .......................................................................................................................................33
2.11.9. Stream Icon ..........................................................................................................................................33
2.11.10.Order Arrows .......................................................................................................................................33
2.11.11.Export Streams ...................................................................................................................................33
2.11.12.Import Streams ...................................................................................................................................33
2.11.13.Group Filter for Custom_FX events ..............................................................................................34
2.12. License Menu ...........................................................................................................................34
2.12.1. Import License .....................................................................................................................................34
2.12.2. Show Hardware ID ..............................................................................................................................35
2.13. Client Version..........................................................................................................................35
2.14. Client Download .....................................................................................................................35
Helmut4 - HFX - v. 4.0.4 - 04.01.20211. Helmut 4 -HFX - Project management for editing projects
HelmutFX works in the background and organises search and administration processes of Premiere project
files. The program supports editors in their work through a customisable interface and personal settings of
the editing program. HelmutFX sorts, distributes and automatically saves the results. Users can concentrate
on their actual task. In a small production environment as well as in large networked projects. In contrast to
the traditional approach of adapting the workflow to the software, HelmutFX's approach is to adapt the
software to the workflow. Consciously, the core consists of a few functions that are needed in every
production environment and are completely customisable. Corresponding expansion modules are available
for specific and individual customer requirements. This leads to the greatest possible flexibility, since even
changes in the workflow are easy to process.
Virtually every function (button) in Helmut FX, such as: "Create project", "Edit project", "Delete project",
etc., merely represents a trigger point that is linked to a workflow via the supplied workflow builder
„Streams". After the server and client have been installed, a basic setup is available, which can be changed
at any time (see chapter Streams).
In the following, the core features of central functions of HelmutFX are presented in detail.
1.1. Helmut4 - Tech Specs
- A Linux machine with either Ubuntu 18.04. LTS or CentOS7 or Debian9/10.
- 4+ Cores, 8+GB Memory and 100GB Storage.
- Access to the repository server: repo.moovit24.de:443 (during updates)
- Access to the distribution repository servers and the python repository servers (during installation)
- Root Access on the server.
- Centralised Storage withe share that can be seen by the server and any client.
1.2. Helmut4 - Connect Client
Helmut4 connects to the server via an application on the workstation. This application has only the
possibility of being executed or closed again and does not provide any further functions. It has no graphical
interface and appears as a Menu Bar icon on Mac and a Task Bar icon on Window
Figure 1.1 Client Application Menu Bar Icon MAC
The Connect Client handles the communication with the server. The connector in turn is addressed by the
Web UI. As soon as a user logs on to the web interface, the client connector connects to the server and
shows the username and the server the user is logged into. This leads to a license being counted. The status
“Connected” is attached to the Streams trigger: Connected
Helmut4 - HFX - v. 4.0.4 - 04.01.2021If a user logs on to the web interface without the client connector running, it is not possible to access
projects. To ensure that an administrator can configure the system via the web interface, all menu items
required for the administrator are displayed, even without a connection via the connector. No license is
used here.
Clicking logs or command L (MAC) opens the location of the client's log files.
Via the web interface the Connect Client for Windows and MAC can be downloaded. The installer includes
the Connect Client, as well as the Premiere Pro and After Effects panel extension. Both will be installed
automatically. After successful installation the panel can be opened via Windows -> Extension -> Helmut
within Premiere Pro and After Effects.
In addition to the Helmut4 panel for Premiere and After Effects, 2 hidden panels are also installed. One for
Premiere and one for AME. Both start automatically and enable communication between streams and the
respective applications.
1.2. Login
Figure 2.1.1 shows the login page, which can be reached via the IP address of the server via any browser. For
this, the address must be entered in the browser search field.
Application Selector Icon
Application Selection Field
User Name Field
Password Field
Remember Me Toggle Switch
Figure 1.2.1 Login Screen
Login Button
- Application Selector Icon: By selecting an icon you can decide in which application you want to
log in. Depending on the existing core license (s) the icons will be displayed or not.
- Application Selection Field: Selecting a product lets you decide which application to sign up for.
Depending on the existing core licenses, products may or may not be listed.
Helmut4 - HFX - v. 4.0.4 - 04.01.2021- User Name Field: Input field for the user name. Displayname and Username can be used.
- Password Field: Input field for the user's password.
- Remember Me Toggle Switch: If the toggle switch is set to true, the credentials entered are saved.
- Login Button: Executes the login process with the selected and entered values
2. Side menu
After a successful login as an administrator the complete side menu view will be loaded. This contains the
following menu items:
Hover icon
Custom User Action Button
Log Out Button
Projects Menu
Dashboard Menu
User/Group Menu
Templates Menu
Preferences Menu
Languages
Metadata Menu
Streams Menu
License Menu
Client Version
Client Downloads
Figure 2.1 Side menu
Helmut4 - HFX - v. 4.0.4 - 04.01.20212.1. Hover Icon:
If the mouse pointer is moved over the product icon, the product icons of the other applications of Helmut4
appear. This depends on the respective user settings and the acquired licenses. Click on one of the
appearing icons to change to the respective application.
2.2. Custom User Action Button
If a custom user stream has been created under menu item 1.3.10 "Streams menu", the entry can be
reached via this button and the stream can be executed. Custom user actions are visible to all users. To
learn how to create a custom user action button, see chapter 1.3.10
Figure 2.2.1. Custom User Action Button - Example
2.3. Log Out Button
The user can log out via this button. The logout process closes the connection to the server, the client
connector and reirects to the log in page.
2.4. Projects Menu
The Projects menu displays all projects and is the main user interface. The administrator sees all projects in
the system. Users see only the projects in the groups to which they have been assigned. The Projects Menu
shows all projects. Complete Description:
See : Helmut4 - HFX User Guide.pdf
Helmut4 - HFX - v. 4.0.4 - 04.01.20212.5. Dashboard Menu
The Dashboard Menu displays all logged in users and the following informations are visible/accessible.
Search Bar Client Info Kick All Button Send Message To All Button
License Usage
Figure 2.5.1 Dashboard
Username Last Login
Online Status User Role Action Button
2.5.1. Search Bar
Free text search to search for a user name.
2.5.2. Kick All Button
Logs out all users from the current server.
2.5.3. Send Message to All Button
Opens a pop-up dialog for entering a message that is sent to all users and appears as an overlay for every
user in the web interface.
2.5.4. Online Status
Displays the status of the respective user. Green means that the user is online and logged in.
2.5.5. Username
Displays the display name of the user.
2.5.6. User Role
Displays the role of the user.
Helmut4 - HFX - v. 4.0.4 - 04.01.20212.5.7. Client Info
Displays the IP address of the workstation to which the user is logged on, the installed client version and
the computer name.
2.5.8. Last Login
Displays the date and time of the last login
2.5.9. License Usage
Displays the amount of used licenses and available licenses.
2.5.10. Action Menu
Via the action button it is possible to send the user a private message or to log the user out of the system.
Send message opens a pop-up dialog for entering a message that is sent to the user and appears as an
overlay for the user in the web interface.By clicking on Open Logs, it is also possible to set up a web session
to the web server of the client of the corresponding user in order to see the log files of the client live. Only
the logs that the client writes from the time the websession was opened are displayed.
2.6. User/Group Menu
The user / group menu can be used to manage users, their access rights and group assignments. It is divided
into a sidebar view and a list view .The following functions are available:
All Tab
Group Action Button
Group Tab
Action Button Menu
Figure 2.6.1 sidebar view
2.6.1. All Tab
Displays all users created in the system.
2.6.2. By Group Tabs
Displays all groups created in the system and filters the users displayed in the list view when selecting a
group.
2.6.3. Group Action Button
The Action Button opens the action menu which manages the selected group.
2.6.4. Action Button Menu
Use the Action button menu to delete groups, change their access rights and assign users.
Helmut4 - HFX - v. 4.0.4 - 04.01.2021Figure 2.6.2 Manage Users Dialog
2.6.4.1. Manage Users
Opens the Manage Users dialog via which user can be added to the selected group. It is possible to add
individual users, a selection of users or all users to the selected group .In the dialog on the left side under
"Available Users" the users present in the system are displayed. It is possible to search for users, to select
them and to add them to the group of users on the right side via the arrow keys which are display in the
middle of the dialog. Using the arrow keys, users can be removed from the group in the same way. A click on
"Close" ends the dialogue and saves the change.
2.6.4.2. Group Access
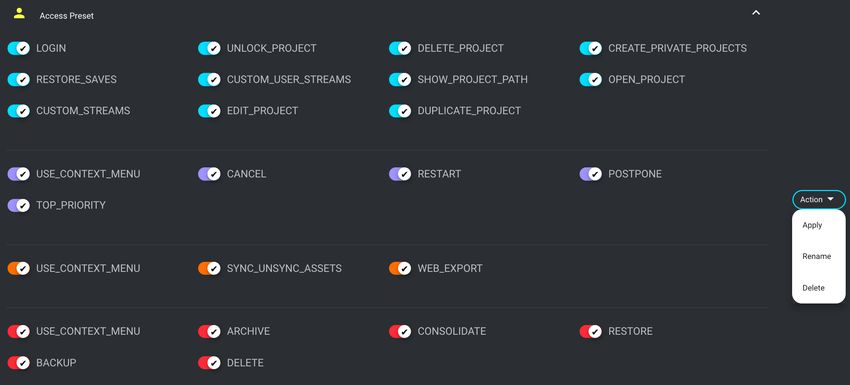
Opens the Manage Group Access dialog via which the access rights that apply to the group can be defined.
The following Toggle Switches are available:
- Unlock Project:
- Create Project:
- Use Context Menu:
- Delete Project:
- Open Project:
- Custom Streams:
- Edit project:
- Duplicate Project:
- Create Private Projects:
- Restore Saves:
2.6.4.3. Delete Group
Deletes the group as long as it does not contain any users.
Helmut4 - HFX - v. 4.0.4 - 04.01.2021Add Group Button Import Users Button
Access Preset Button
Search Bar Add Users Button
Role Button
User Action Button
Username
Product Selection Change Button
Reserve License Button
Displayname
2.6.5. Search Bar
Free text search to search for a user. It is possible to search by user name or display name.
2.6.6. Add Group Button
Opens a dialog for entering the name of the group to be created. By clicking on "Cancel" the dialog can be
ended and via "Save" the group is created. “Save” is attached to the Streams trigger: Create_Group
Add Preset Button
User Preset Icon
Figure 2.6.4 Manage Access Presets Dialog
Preset Action Menu
Group Preset Icon
Unfold Preset Icon
Helmut4 - HFX - v. 4.0.4 - 04.01.20212.6.7. Access Preset Button
Opens the Manage Access Presets dialog, which manages all User Access Presets and Group Access Presets.
2.6.7.1. User Preset Icon
Indicates that this is a user access preset.
2.6.7.2. Group Preset Icon
Indicates that this is a group access preset.
2.6.7.3. Unfold Preset Icon
Unfolds the preset and shows the appropriate access rights in the form of toggle switches. The colors of
the individual toggle switches indicate for which application the function applies.
HFX related functions HIO related functions
Figure 2.6.5 Manage Access Presets Dialog unfolded
HCO related functions
HHK related functions
2.6.7.4. Preset Action Menu
Use the Action button menu to delete presets and to apply them to users or groups, depending on the type
of preset. The Apply Access Preset dialog works just like the Manage Users dialog. See Figure 2.6.2
2.6.7.5. Add Preset Button
Opens a dialog via which the name and type of the preset to be created can be defined. A Click on “Cancel”
or “x" closes the dialog without saving the preset, while a click on “save" saves the preset.
Helmut4 - HFX - v. 4.0.4 - 04.01.20212.6.8. Import Users Button
Opens a dialog via which one or several users can be imported from an integrated third-party system. This
can be, for example, an Active Directory or a MAM / PAM system.
Within the dialog, under point 1, the source is selected from a dropdown (Choose source). Under point 2,
similar to the creation of a user, the corresponding users in the left-hand selection field are searched for
and selected, as well as added or removed via the arrow keys of the selection.
Under point 3, one or more teams and an access preset can optionally be added to the selection of users.
Point 4 shows the progress during the import. A successfully imported user is confirmed with a green tick. A
failed import will be indicated by a crossed-out red circle. If you move the mouse pointer over the symbol, a
tooltip appears and provides information about the error.
Figure 2.6.6 Import New Users Dialog
2.6.9. Add User Button
Opens the dialog via which a new user can be created. It is possible to define a user name, a display name, a
password and the user role (administrator or user). "X" or "Close" closes the dialog. “Add” saves the input
and creates the user. “Add” is attached to the Streams trigger: Create_User
Figure 2.6.7 Add New Users Dialog
Helmut4 - HFX - v. 4.0.4 - 04.01.20212.6.10. Role Button
The dropdown in the "Role" column in the user overview makes it possible to change the user role of the
selected user. The possible settings are: Administrator, User.
2.6.11. User Action Button
Users can be renamed, deleted and managed via the "Action" button. Furthermore, it is possible to edit the
access preset assigned to the user (user access) and assign the user to one or more teams (manage teams).
It bis possible to generate an autologin file that can be stored on a workstation within ~/MoovIT GmbH/
HelmutClient/helmut.auto.login to automatically login the user if the workstation is restarted. Additionally
you can assign an email address or change the assigned email address of the user.
OAuth
Figure 2.6.8 User Action Button
2.6.11.1. OAuth
OAuth token can be used to log in via APi with the corresponding user for whom a token was created. Can
be used for integrations where the admin should not always be the one who communicates with the API.
Clicking on the entry opens a dialog in which one or more tokens can be created. The name of the token
(Description) can be freely defined.
Figure 2.6.9 OAuth Token Dialog
Helmut4 - HFX - v. 4.0.4 - 04.01.20212.6.12. Change Button
Opens the Change Password dialog to change the password of the selected user.
2.6.13. Displayname
Displays the display name of the user.
2.6.14. Username
Displays the username of the user.
2.6.15. Product Selection Icon
The product selection icons indicate whether the selected user has access to the corresponding product or
not. This can be changed by clicking on one of the icons. Colored icons mean access allowed, greyed out
icons mean no access.
Greyed out Icon
Coloured Icon
Figure 2.6.10 Product Selection Icon
2.6.16. Reserve License Button
If a license is reserved for a user, it is no longer included in the pool of available licenses. The corresponding
user can be logged in and out and the license assigned to him cannot be used for another user. This
simplifies the handling of automatically controlled render nodes for IO.
2.7. Templates Menu
The Templates menu is used to manage categories and templates. It is divided into a sidebar menu, a list
view, and a hidden overlay. Categories and templates are not written to the database but represent an
image of the categories and templates on the working drives, which can be defined under the menu item
Preferences. This allows management on the drives or via the web interface and ensures that all templates
and categories can be changed without database access. A category is another order level for groups and
can be freely defined. A template is a Premiere Pro, After Effects, or Audition project that maps to and is
logically related to a category. Templates are used to create new projects. This makes it possible to
predefine projects in a variety of forms. If several project types are to be created simultaneously via the
"Add Project" dialog, these templates must have the same name. This does not apply to the same project
type. The following functions are available:
Helmut4 - HFX - v. 4.0.4 - 04.01.2021All Tab
Group Tab
Figure 2.7.1 sidebar menu
2.7.1. All Tab
Displays all categories created in the system.
2.7.2. Group Tab
Displays all groups created in the system and filters the categories displayed in the list view when selecting
a group.
Search Bar Add Category Button
Figure 2.7.2 list view
Blank Space to click on
Category Action Button
Helmut4 - HFX - v. 4.0.4 - 04.01.20212.7.3. Search Bar
Free text search to search for a category. It is possible to search by category name.
2.7.4. Add Category Button
Opens a dialog for entering the name of the category to be created. By clicking on "Cancel" the dialog can
be ended and via "Save" the category is created. “Save” is attached to the Streams trigger: Create_Category
2.7.5. Category Action Button
Via the category action button it is possible to delete a category
2.7.6. Blank Space to Click on
When the empty area of a category entry in the list is clicked, the hidden overlay for managing the
templates belonging to the category opens.
Upload Template Button
Delete Template Button
Template Type
Template Name
Figure 2.7.3 hidden overlay
2.7.6.1. Upload Template Button
Opens a dialog to upload project templates. These are stored in the folder of the category on the working
drive (defined under Preferences -> General -> Templates).
2.7.6.2. Delete Template Button
Deletes a template from the corresponding category and thus from the drive.
2.7.6.3. Template Name
Displays the name and extension of the template.
2.7.6.4. Template Type
Displays the template type in the form of an icon.
Helmut4 - HFX - v. 4.0.4 - 04.01.20212.8. Preferences Menu
The most important settings in the system can be made via the preference menu and backups of almost all
configurations can be created and restored.
2.8.1. General Tab
Search Backup Restore
Projects
Templates
Profiles
Default Language
Path Mapping
Variables
Figure 2.8.1 General Preferences
Temporary project import directory
2.8.1.1. Search
Free text search to search for preferences.
2.8.1.2. Backup
A click on Backup opens a dialog that allows you to create all relevant preferences and configurations of
the system individually, in groups, or all at once as a backup. Within the dialog it is possible to select via
toggle switch which information should be written to the backup. The following parts of the system can be
backed up:
- FX - Projects (all)
- FX - Access Presets (all)
- IO - Jobs
- IO - Wacholders
Helmut4 - HFX - v. 4.0.4 - 04.01.2021- IO - Profiles
- CO - Assets ( indexed projects)
- HK - Tasks
- Members - Users
- Members - Groups
- Members - Saved Search filter
- Members - OAuth Tokens
- Preferences - Streams
- Metadata - Metadata Entries
- Metadata - Metadata Sets
- Language - Language
- License - License
The backup is saved as a .zip file in the defined downloads folder of the browser used.
2.8.1.3. Restore
A click on Restore opens a dialog with which it is possible to restore all relevant preferences
and configurations of the system individually, in groups or all at once from a backup that has
been created previously.
2.8.1.4. Projects
Standard path for storing new projects. Will be resolved in streams as {helmut.projects} wildcard. Can be
any drive. The prerequisite is that the server as well as all clients can reach this path. The path must be
mounted server-side in the Docker container.
2.8.1.5. Templates
Standard path for storing new projects. Will be resolved in streams as {helmut.templates} wildcard. Can be
any drive. The prerequisite is that the server as well as all clients can reach this path. The path must be
mounted server-side in the Docker container.
2.8.1.6. Profiles
Standard path for storing new projects. Will be resolved in streams as {helmut.profiles} wildcard. Can be any
drive. The prerequisite is that the server as well as all clients can reach this path. The path must be mounted
server-side in the Docker container.
2.8.1.7. Default Language
Sets the default global language for the web interface.
2.8.1.8. Path Mapping
At this point, system-wide paths are defined. Under Pathmapping, new paths can be added via the green
button "+" on the right edge. You can specify a Windows as well as a UNIX path. These paths are used to
seamlessly edit projects between Windows and Mac, or to automatically set the path to the project object
within the client if a project has been created under Windows and edited under MAC. The same applies vice
versa.
Helmut4 - HFX - v. 4.0.4 - 04.01.20212.8.1.9. Variables
Variables can be used within the streams to dynamically replace a key with a value. Via the wildcard
{helmut.variable.?} the keys set here can be replaced by the set value. ? Needs to be replaced by the key.
Variables can be used for an infinite number of workflows.
Example:
- Key: Key
- Value: Value
- {helmut.variable.Key} leads to Value.
2.8.1.10. Temporary project import directory
If a project is imported via the "Add Project" dialog (See: Helmut4 - HFX User Guide.pdf), this project is first
loaded to a temporary destination before it is processed further via the stream triggered by the "import"
trigger. This target can be entered here. The path to the directory can consist of wildcards.
2.8.2. Modules
Under Module parameters are defined to configure all current and future integrated Third Party systems.
The parameters are used to carry out the communication of the corresponding Action Node in streams with
the API of the respective system.
2.8.2.1. Flow Module
Enables the communication between Streams and FLOW (Editshare). The IP address, the password of the
FLOW Admin user, the name of the Flow Admin user as well as the version number must be specified.
Helmut4 currently supports Flow4 Standalone. Via the button "Test" the input can be checked for
correctness by connecting to FLOW.
2.8.2.2. Modules/QScan Modul Tab
Enables the communication between Streams and QSCAN (Editshare). The IP address, the Port, the
password of the QSCAN Admin user and the name of the QSCAN Admin user must be specified. Helmut4
currently supports QSCAN 3. Via the button "Test" the input can be checked for correctness by connecting
to QSCAN.
2.8.2.3. Modules/AD Modul Tab
The Active Directory module allows users to be imported from an AD via LDAP. The users are imported with
name and display name. Authentication takes place in the login dialog opposite the AD, which checks at any
time whether this user still exists. The IP address, the password and the user of the AD must be entered. Via
the button "Test" the input can be checked for correctness by connecting to the AD.
2.8.2.4. Modules/MediaLoopster Modul Tab
Enables the communication between Streams and Medialoopster (Nachtblau). The URL, the username and
the password of the Medialoopster instance created must be specified. Via the button "Test" the input can
be checked for correctness by connecting to Medialoopster.
2.8.2.5. Modules/Hue Lamp Modul Tab
Enables the communication between Streams and the Hue Gateway (Philips). The HUE Lamp IP and the HUE
API Key pf the used Hue Bridge must be set.
Helmut4 - HFX - v. 4.0.4 - 04.01.20212.8.2.6. Modules/Cat DV Module
Enables the communication between Streams and CatDV. The CatDV server IP, the port, the installed
version, as well as the username and the password of the CatDV instance created must be specified. Via the
button "Test" the input can be checked for correctness by connecting to CatDV. It If the connection is
successful, Helmut should find users.
2.8.2.7. Modules/SwatIO Module
Enables the communication between Streams and SwatIO. The SwatIO Token needs to be add here.
2.8.2.8. Modules/Grass Valley Stratus Module
Enables the communication between Streams and GV Stratus. The server address, the user name that
communicates with the API and the users password must be specified here.
2.8.2.9. Modules/Active Directory Auto Module
The Active Directory Module allows to connect to an Active Directory and to synchronise groups including
subgroups with existing groups Helmut. Each group needs to be connected.
Enable Switch Active Directory Host
Active Directory Security
Figure 2.8.2 Active Directory Modul Part1
Active Directory Domain Active Directory Username
Active Directory Password
- Enable Switch: Enables/disables the module
- Active Directory Host: Hosts must be added here, separated by a comma
- Active Directory Security: Dropdown to select the type of security: PLAIN, SSL, TLS
- Active Directory Domain: The domain must be added here if the active directory toggle switch is
enabled.
Helmut4 - HFX - v. 4.0.4 - 04.01.2021- Active Directory Password: The active directory password must be added here if the active directory
toggle switch is enabled.
- Active Directory Username: The active directory username must be added here if the active directory
toggle switch is enabled.
Active Directory Groups
Helmut Products
Helmut Groups Helmut Access Preset
Test
Browse
Figure 2.8.3 Active Directory Modul Part 2
Add Group Button
Single Sign On
Remove Group Button
Synchronise Button
- Active Directory Groups: Displays the group within the Active Directory that will be synchronised with
the selected groups in HelmutFX.
- Helmut Groups: Dropdown to select one or multiple groups the synchronised users should be member
of.
- Helmut Products: Dropdown to select the products to which the synchronised users should be granted
access rights.
- Helmut Access Preset: Dropdown to select the access preset that the user should receive.
- Test Button: The test button can be used to check whether and how many users are found.
- Browse Button: The Active Directory can be searched via the Browse button and the group to be
synchronised can be selected.
- Single Sign On Switch: Enables Single Sign On for the Active Directory
- Synchronise Button: Synchronises the group
- Remove Group Button: Removes the link between the AD group and the Helmut group
- Add Group Button: Adds another set of parameters to link another AD group with another Helmut group
Helmut4 - HFX - v. 4.0.4 - 04.01.20212.8.2.10. Editshare Module
Enables the communication between Streams and Editshare Storage (Editshare). The IP address, the
password of the Editshare EFS Admin user and the name of the Editshare EFS Admin user must be specified.
2.9. Languages
The Languages menu is used to manage languages.It is possible to translate the entire web and panel
interface in Helmut4 and thus use the product in another language. Helmut4 is only delivered in English.
There is basically nothing to consider when translating the product, other than the fact that the stream
designer cannot be translated. Some of the terms used in English find their equivalent in the stream
designer and therefore it could become more difficult to support streams if these terms appear in another
language in the frontend.
Exclamation Mark Sign
Languages Tab
Languages Action Button
Figure 2.9.1 languages menu
Add Language Force English Debug Language
Unfold Arrow
Already Translated
Exclamation Mark
Sign
Figure 2.9.2 Translation Items
Not yet translated
Helmut4 - HFX - v. 4.0.4 - 04.01.20212.9.1. Languages Tab
Displays all Languages entries created in the system. If one of the entries is selected the translation items
will be shown. It is not possible to change the default English entry.
2.9.2. Exclamation Mark Sign
Indicates that some elements have not yet been translated.
2.9.3. Languages Action Button
Via the Languages Action Button it is possible to delete a language entry.
2.9.4. Add Language
Opens a dialog for entering a name for another language. Clicking on "Add" creates a new language entry
with the selected name.
2.9.5. Force English
If this checkbox is activated, English is forced for the current session.
2.9.6. Debug Language
Enabling this checkbox will replace alle language strings with the according keys to make it easier to find
the key to translate. This is only active for the current session.
2.9.7. Unfold Arrow
The items that can be translated are grouped into thematic units. These are collapsed by default and can be
opened using the unfold arrow.
2.9.8. Already Translated
If entries have already been translated, the associated key is shown in grey.
2.9.9. Not Yet Translated
If entries have not yet been translated, the associated key is displayed in red.
Helmut4 - HFX - v. 4.0.4 - 04.01.20212.10. Metadata Menu
The Metadata menu is used to manage metadata. It is divided into a sidebar menu, a list view, and a hidden
overlay. Entries are unique and can not be created multiple times with the same name. Metadata can be
created, edited and deleted, as well as assigned to groups. Metadata entries can be used in FX to assign
them to groups and thus to the projects created in the groups. Metadata can also be used in HIO, but are
organised in separate sets.
All Tab
Group Tab
Figure 2.10.1 sidebar menu
Ready only Toggle Switch Entry Type
Entry Value Add Metadata Button
Search Bar
Mandatory Toggle Switch
Entry Name
Arrows
Pre resolve Toggle Switch
Disabled Toggle Default Value
Action Button
Hidden Toggle Switch
FilterableToggle Switch
Helmut4 - HFX - v. 4.0.4 - 04.01.20212.10.1. All Tab
Displays all metadata entries created in the system.
2.10.2. Group Tab
Displays all groups created in the system and filters the metadata entries displayed in the list view when
selecting a group.
2.10.3. Add Metadata Button
Opens the dialog via which a new metadata entry can be created. It is possible to define a name. If an illegal
character is used, the dialog will inform tat the character is not allowed. ”X" or "Cancel" closes the dialog.
“Add” saves the input
2.10.4. Search Bar
Free text search to search for a metadata entry. It is possible to search by metadata name.
2.10.5. Entry Name
Displays the name of the respective entry
2.10.6. Read Only Toggle Switch
Sets the respective entry to Readonly so that the user sees the metadata in the Add Project dialog, but can
not change it.
2.10.7. Mandatory Toggle Switch
Sets the respective entry to Mandatory, so that the user has to change or set the metadata in the Add
Project dialog.
2.10.8. Hidden Toggle Switch
Sets the respective entry to Hidden so that the user does not see the metadata in the Add Project dialog.
However, these entries are still added to the project and can be filled via wildcards. In this case, the
wildcards in the respective stream must be mapped via the metadata Auto mapper Action Node.
2.10.9. Disabled Toggle Switch
Sets the respective entry to Disabled so that it is not used.
2.10.10.Filterable Toggle Switch
Setzt den jeweiligen Eintrag auf filtreable, damit er im Filterbereich verwendet werden kann.
2.10.11.Entry Type Dropdown
Dropdown for setting the type of the respective entry. The possible types are:
- String
- Integer
- Boolean
- Date
- Datetime
- Time
- Select
Helmut4 - HFX - v. 4.0.4 - 04.01.2021- Multiselect
- Typeahead
- Choose_Folder
2.10.12.Values Field
Field for defining the possible values. If multiple values are possible (multiselect for example), they must be
separated by commas, without adding blank space.When using a date field, it iOS possible tu use “+30” for
example. In combination with the pre resolve feature, the date will be 30 days in the future.
2.10.13.Default Value Field
Field for defining the possible default values. If multiple values are possible (multiselect for example), they
must be separated by commas, without adding blank space.
2.10.14.Pre resolve Toggle Switch
Wildcards that are used in the default value field are pre-resolved both in the web interface and in the
Helmut4 Panel Extension if this switch is activated.
2.10.15.Metadata Action Button
Via the Metadata Action button it is possible to delete a metadata entry.
2.10.16.Arrows
The order of the entries can be sorted using the arrows shown on the right. These arrows only appear if
entries have been assigned to a set or group and a set has been selected.
2.10.17.Group Toggle Switch
Allows you to assign a metadata entry to one or more groups through the hidden overlay. The hidden
overlay can be reached by clicking on an empty area of an entry.
Group Toggle
Figure 2.10.3. hidden overlay
Helmut4 - HFX - v. 4.0.4 - 04.01.20212.11. Streams Menu
The Streams menu is used to manage workflows via Streams.. It is divided into a sidebar menu and a list
view. In Helmut4, streams are workflows that are linked to a trigger event. These triggers are displayed
under the menu item in the side menu. The displayed triggers serve as filters for displaying the associated
streams in the list view. For more details see Helmut4 Streams Admin Guide.pdf
All Tab
Triggers
Figure 2.11.1. side menu
2.11.1. All Tab
Displays all HFX Streams created in the system.
2.11.2. Triggers Tab
Displays all HFX triggers created in the system and filters the streams displayed in the list view when
selecting a trigger.
Helmut4 - HFX - v. 4.0.4 - 04.01.2021Import Streams
Add Stream Button
Export Streams
Search Bar Debug Streams Button
Action Button
Stream Icon
Figure 2.11.2. list view
Enabled Toggle Switch
Stream Name
Order Arrows
2.11.3. Search Bar
Free text search to search for a stream. It is possible to search by stream name.
2.11.4. Debug Streams Button
Opens the Stream Debugger which allows you to check all streams running in the system live. By pressing
and holding command (MAC) or control (Windows) the debugger will be opened in a new browser tab.
When the stream debugger is open, any stream that is running in the system is displayed. The information is
live and is not saved. If you want to save this information, this must be done within the streams. For
example via the "Write file output action" node.
The main use of the debugger is to check the workflows created via streams. This is only partially possible
within the stream designer, since sometimes not all data records are available there.
Helmut4 - HFX - v. 4.0.4 - 04.01.2021Clear Log Entries
Stream
Unfold Arrow
Nodes
Figure 2.11.3. Stream debugger
2.11.4.1. Stream
Displays information about the stream being executed. This includes:
- Thumb: Shows wether the Stream was successful or not.
- Icon: Shows wether it is a server or a client stream
- Description: Shows the name of the stream as well as the start time and stream id.
- Description 2: Shows the ip dress of the client that has executed the stream as well as the trigger of the
stream. In this example: CUSTOM_USER.
2.11.4.2. Nodes
Displays information about each of the stream's running nodes. This includes:
- Status: Shows wether the Node was successful or not.
- Timestamp: Shows the date and time when the nodes was executed.
- Message: Shows Information about the executed node.
It is possible to click on any of the status icons to directly open up the corresponding stream in the stream
designer. This will additionally highlight the corresponding node for faster configuration.
2.11.4.3. Clear Log Entries
Will clear all logs.
2.11.4.4. Unfold Arrow
Opens or closes the information display for each stream.
2.11.5. Add Stream Button
Opens the Add New Stream dialog for entering the name, the host and the trigger of the stream to be
created. By clicking on "Cancel" the dialog can be ended and via "Save" the category is created.
Helmut4 - HFX - v. 4.0.4 - 04.01.20212.11.6. Enabled Toggle Switch
Turns the stream active or inactive
2.11.7. Stream Action Menu
Allows the stream to be edited, renamed and deleted. This can be done at any time. Changes to the stream
only take effect when it is saved. If a stream is deleted, it is no longer available.
2.11.8. Stream Name
Shows the assigned name of the stream. Clicking on the name opens the stream engine which can be used
to edit the stream.
2.11.9. Stream Icon
Indicates if the host of the stream is the server or the client. If it is the server, the server will perform all
operations in the stream. If it is the client, all operations are performed by the workstation over which the
stream was triggered.
2.11.10.Order Arrows
All streams associated with a trigger are executed in the order shown when the trigger is triggered. To
change the sort order, the arrow keys can be used.
2.11.11.Export Streams
Opens a dialog via which all streams can be exported. Within the dialog, you can decide which streams
should be exported for each application. The selected streams are exported to a text file, for which the
storage location can be define by yourself. This can be used to export a single or multiple streams to
another system. See figure 2.10.3
Figure 2.11.4. Export Streams Dialog
2.11.12.Import Streams
Opens a dialog via which a set of exported streams can be imported. Within the dialog you can decide which
streams should be imported for each application. If a stream already exists in the system, it is marked as
existing. See figure 2.10.4
Helmut4 - HFX - v. 4.0.4 - 04.01.2021Figure 2.11.5. Import Streams Dialog
2.11.13.Group Filter for Custom_FX events
Custom FX streams can be assigned to individual groups. This makes it possible to define which custom
streams appear in which project group (action menu) and should be executable accordingly. The hidden
overlay can be opened by clicking on a blank area of the corresponding stream.
Figure 2.11.6 Group Filter overlay
2.12. License Menu
The License Menu tab provides insight into various license information, such as number and expiration date.
The license transmitted by the manufacturer can be inserted via the button "Import License”. Every license
is a perpetual floating license. Therefore it is possible to install as much clients and create as much users as
desired. Each logged in user is counted. Once the license limit is reached, no other user is able to log in.
2.12.1. Import License
Opens the import license dialog via which the license can be imported. The license must be imported in the
form of the complete text of the license file. To do this, copy the text from the license file into the free-text
field of the dialog. By clicking on "Cancel" the dialog can be ended and via "Save" the license is imported.
Helmut4 - HFX - v. 4.0.4 - 04.01.20212.12.2. Show Hardware ID
If Helmut4 is installed on a piece of hardware and not on a VM, it is possible to generate a hardware ID
using this button. This is required to create the license.
2.13. Client Version
Shows which client version is available.
2.14. Client Download
Allows you to download the Helmut 4 Client Application for Mac and Windows.An uninstaller is available for
Windows after installation.
Helmut4 - HFX - v. 4.0.4 - 04.01.2021You can also read