Colligo Engage Outlook App 7.0 - Offline Mode - Administrator's Guide
←
→
Page content transcription
If your browser does not render page correctly, please read the page content below
Colligo Engage Outlook
        App 7.0
Offline Mode – Administrator’s Guide
Colligo Engage Outlook App – Offline Mode

Contents
Introduction .................................................................................................................... 3
   Target Audience .................................................................................................................................. 3
   Overview ............................................................................................................................................. 3
SharePoint Security & Privileges ..................................................................................... 3
Technical Requirements.................................................................................................. 4
   Software Requirements ....................................................................................................................... 4
   Server Software Requirements ............................................................................................................ 4
   Hardware Requirements...................................................................................................................... 4
Installing Colligo Engage Outlook App ............................................................................ 5
   EXE Installer......................................................................................................................................... 5
   Interactive EXE Install .......................................................................................................................... 5
   MSI Installer ........................................................................................................................................ 5
   Interactive MSI Install .......................................................................................................................... 5
   Silent Install or Uninstall ...................................................................................................................... 5
   Display Language ................................................................................................................................. 6
   Colligo Engage Console ........................................................................................................................ 6
Post-Install Configuration ............................................................................................... 7
   Overriding PST Policies ........................................................................................................................ 7
Editing the MSI ................................................................................................................ 7
   Installing the Orca MSI editor .............................................................................................................. 7
   Using Orca to Edit the MSI ................................................................................................................... 7
Editing the Registry ......................................................................................................... 8
Activation and Licensing ............................................................................................... 10
Communications ........................................................................................................... 10
White Labeling .............................................................................................................. 10
Support for AD FS.......................................................................................................... 10
   Federation with Office 365 Sites ........................................................................................................ 12
   Enabling Authentication Service Endpoint.......................................................................................... 13
   Server Requirements for AD FS 3.0 .................................................................................................... 14
   Distributed Identity Management...................................................................................................... 16
Upload-only Folders vs Offline Folders ......................................................................... 17

       15/10/2014                           Copyright 2014 Colligo Networks, Inc. All rights reserved.                                    Page 1 of 43
                                   Not to be reproduced without permission. Learn more at www.colligo.com.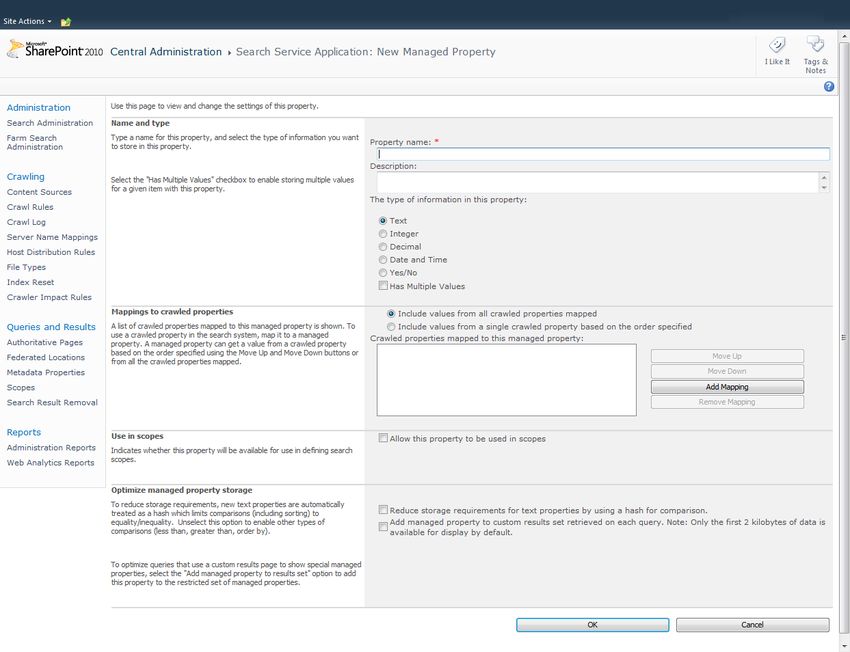
Colligo Engage Outlook App – Offline Mode

Metadata ...................................................................................................................... 18
   Hiding Metadata Fields ...................................................................................................................... 18
Configuring SharePoint Libraries for Email Metadata .................................................. 19
   Downloading the List Template ......................................................................................................... 19
   Installing the Sample List Template .................................................................................................... 19
   Creating a Site ................................................................................................................................... 20
   Manually Creating Content Types ...................................................................................................... 22
      Enabling Metadata Extraction ........................................................................................................ 22
      Adding a New Content Type to a Library ........................................................................................ 23
      Configuring a Content Type............................................................................................................ 25
      Hiding Columns.............................................................................................................................. 27
      Adding a New Content Type to Library ........................................................................................... 27
      Creating a Library Without Content Types ...................................................................................... 29
      Creating an Email View .................................................................................................................. 30
   Validating Metadata Extraction ......................................................................................................... 32
   Changing Column Mappings .............................................................................................................. 32
Configuring Search ........................................................................................................ 34
   Adding Columns to SharePoint .......................................................................................................... 34
   Adding a Content Source ................................................................................................................... 35
   Adding Managed Property Mappings ................................................................................................. 38
      Enabling the Attachment Property in Search .................................................................................. 41
   Enabling the IsDocument Property .................................................................................................... 42
   Configuring Local Machines ............................................................................................................... 43
Uninstalling Colligo Engage Outlook App...................................................................... 43

       15/10/2014                           Copyright 2014 Colligo Networks, Inc. All rights reserved.                                  Page 2 of 43
                                   Not to be reproduced without permission. Learn more at www.colligo.com.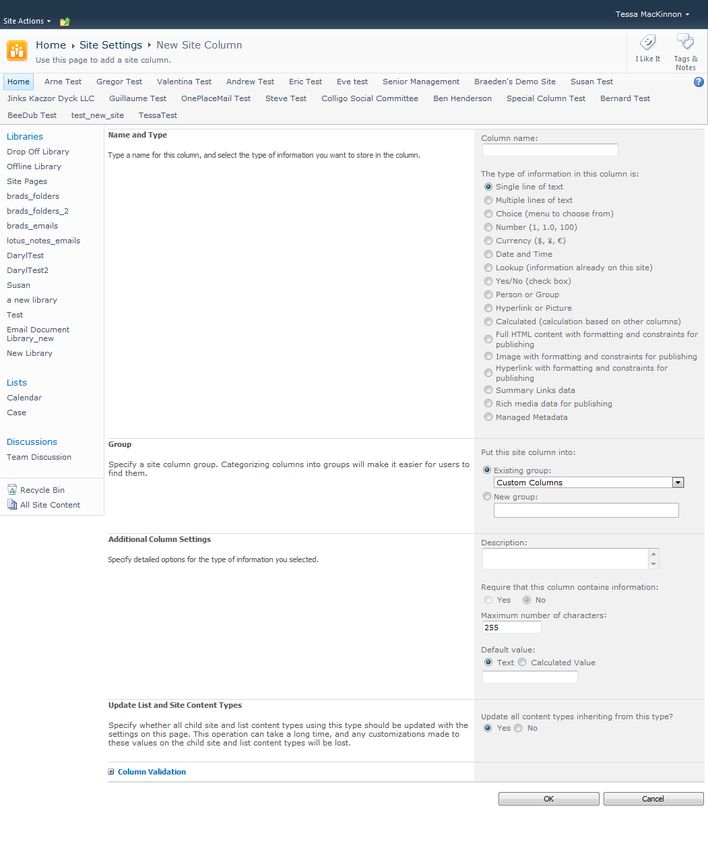
Colligo Engage Outlook App – Offline Mode
Introduction
This document provides guidance for your deployment of Colligo Engage Outlook App.
User documentation is available on the Colligo Engage support website:
http://www.colligo.com/support/.
For any further technical details, please contact Colligo Technical Support here, or for sales related
questions, please contact sales@colligo.com.
Target Audience
IT Administrators
Technical Evaluators
Deployment Managers
Overview
Colligo Enagage Outlook App is an easy-to-deploy .NET client-only application; no server modifications
are required. The installer package ranges from 40 – 60 MB in size. When installed, it consumes less than
20 MB of disk space, not including content. Colligo Engage supports customized installations and can be
deployed using your choice of deployment tools.
Colligo Engage Outlook App supports SharePoint 2010/2013 and SharePoint Online (Office365), and
Outlook 2007, 2010 and 2013.
Colligo Engage Outlook App provides the following functionality:
Filing of email and attachments to SharePoint sites through drag-and-drop or ribbon buttons
Full metadata support for tagging email and attachments as they are being filed
Simultaneous federated search of SharePoint sites and Outlook
Sending links to attachments from SharePoint
Browsing of SharePoint document libraries from within Outlook
SharePoint Security & Privileges
By using SharePoint’s web services to access SharePoint data, Colligo Engage respects all privileges
defined on the site. Colligo Engage supports most standard sign-on processes supported by SharePoint,
including support for default credentials and other specified credentials. Passwords are stored in a
secure manner using the Windows Cryptographic API.
The following standard Windows IIS authentication types are supported:
Forms based
Classic mode (SharePoint 2007/2010)
Claims based (SharePoint 2010/2013)
Office 365
ADFS 2.0 and 3.0
SharePoint by default does not provide web service permissions to anonymous users, so this permission
level cannot be used for uploading documents to SharePoint.
15/10/2014 Copyright 2014 Colligo Networks, Inc. All rights reserved. Page 3 of 43
Not to be reproduced without permission. Learn more at www.colligo.com.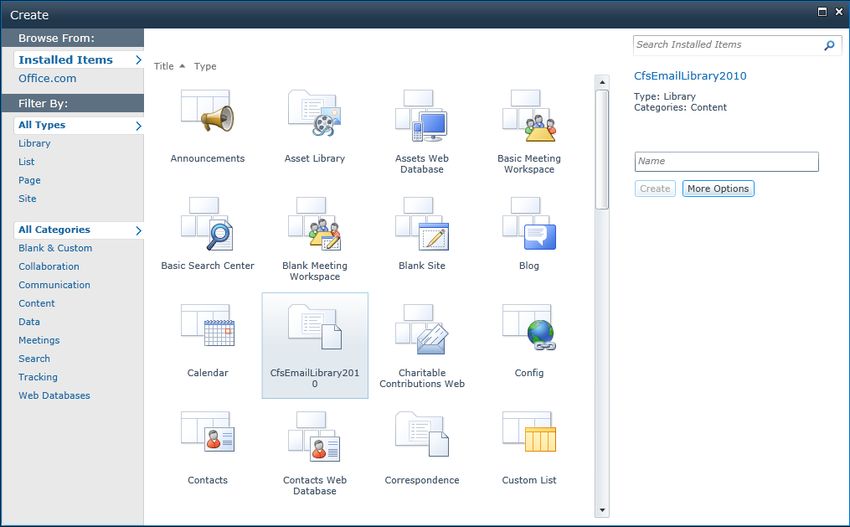
Colligo Engage Outlook App – Offline Mode
Technical Requirements
Software Requirements
Colligo Engage Outlook App requires the following software:
Microsoft Outlook 2007, 2010 SP1, or 2013 (32-bit or 64-bit edition)
Internet Explorer 7, 8, 9, or 10 (optional)
Windows Vista, Windows 7, or Windows 8
Windows 2008R2 Server (for Terminal Services)
Colligo Engage Outlook App also requires the following supporting software on the client machine:
Microsoft .NET framework 4.5.1 Runtime
o http://www.microsoft.com/en-ca/download/details.aspx?id=40779
Microsoft Visual C++ 2013 Redistributable Package
o http://www.microsoft.com/en-ca/download/details.aspx?id=40784
Visual Studio Tools for Office (VSTO) 2010
o http://www.microsoft.com/en-us/download/details.aspx?id=35594
Microsoft Office PIAs
o Office 2010: http://www.microsoft.com/download/en/details.aspx?id=3508
o Office 2007: http://www.microsoft.com/download/en/details.aspx?id=18346
Windows Identity Foundation: http://www.microsoft.com/en-ca/download/details.aspx?id=17331
NOTE: WIF is required to handle single sign on authentication through AD FS 2.0.
Server Software Requirements
Colligo Engage Outlook App requires at least one of the following:
Microsoft SharePoint Server 2013
Microsoft SharePoint Server 2010
Microsoft SharePoint Foundation 2010
SharePoint 2010 & 2013 Online (Office 365)
(Optional) Microsoft FAST Search Server 2010 for SharePoint
No additional server-side software is required from Colligo.
Contact Colligo Support (support@colligo.com) for compatibility questions regarding Cumulative
Updates and Service Packs for SharePoint.
Hardware Requirements
Colligo Engage Outlook App has the same client system requirements as Office, which you can find here:
http://technet.microsoft.com/en-us/library/ee624351.aspx#Overview
15/10/2014 Copyright 2014 Colligo Networks, Inc. All rights reserved. Page 4 of 43
Not to be reproduced without permission. Learn more at www.colligo.com.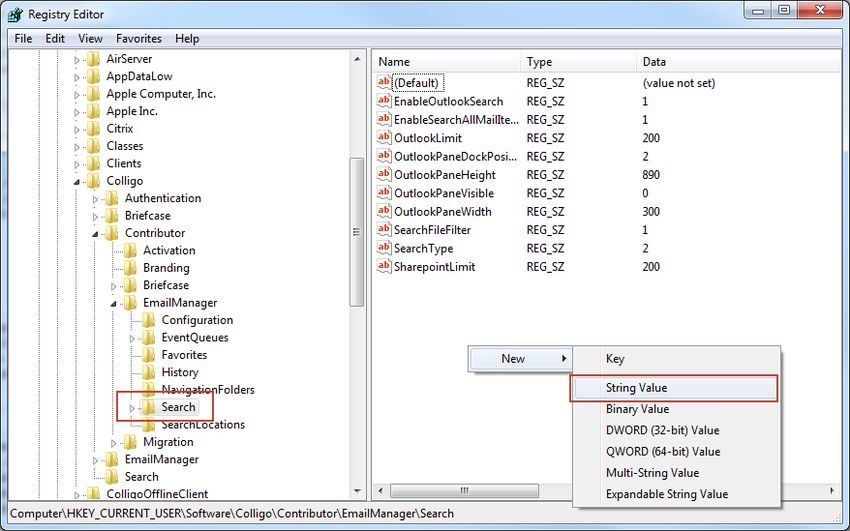
Colligo Engage Outlook App – Offline Mode
Installing Colligo Engage Outlook App
There are two installers for Colligo Engage Outlook App. These are a .exe installer and a .msi installer.
Additionally, the installer package you need is dependent on which Operating System you are running:
For a 32-bit operating system, use the x86 installer
For a 64-bit operating system, use the x64 installer
EXE Installer
This installer package is an executable file with the following key features:
Supports interactive install only (does not support silent install)
Automatically installs software prerequisites (downloaded from www.colligo.com)
Not customizable
Interactive EXE Install
NOTE: Microsoft Outlook must be closed for the installation to be successful.
1. Double-click the installation file.
2. Prerequisites are downloaded and installed.
3. Enter your license key.
Colligo Engage Outlook App can be set to launch at Windows Start Up. This enables the background
synchronization to start automatically.
MSI Installer
The MSI installer package has the following key features:
Supports silent and interactive installs
Does not install prerequisites - these must be downloaded and pre-installed
Customizable
Interactive MSI Install
NOTE: Microsoft Outlook must be closed for the installation to be successful.
1. Ensure prerequisites are installed.
2. Double-click the installation file.
3. Enter your license key.
Silent Install or Uninstall
You can use the msiexec utility to install or uninstall silently.
To perform a silent install, use the following command line:
msiexec /i /qn
For example:
msiexec /i ColligoEngage.msi /qn
To perform a silent uninstall, use the following command line:
msiexec /x /qn
You can install a customized version of Colligo Engage Outlook App using the msi installer. When using a
batch file to install a customized msi package, it is important to ensure the prerequisites are installed
before attempting to install Colligo Engage.
15/10/2014 Copyright 2014 Colligo Networks, Inc. All rights reserved. Page 5 of 43
Not to be reproduced without permission. Learn more at www.colligo.com.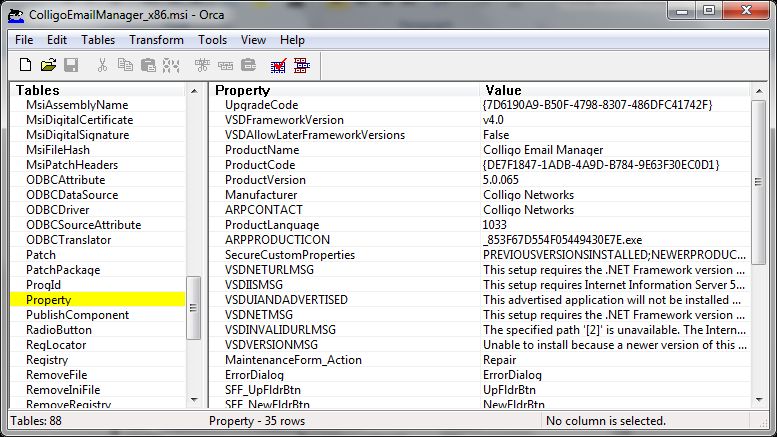
Colligo Engage Outlook App – Offline Mode

An example batch file is listed below:
        msiexec /i \\server\ColligoEngageInstall\PreReq\O2007PIA.MSI /qn
        \\server\ColligoEngageInstall\PreReq\vstor.exe /q
        msiexec /i \\server\ColligoEngage\CustomColligoEngage.msi /qn

Display Language
Colligo Engage Outlook App is available in English, French, German, and Spanish (Castilian and Latin
American). If users have a French/German/Spanish version of Microsoft Office installed, Colligo Engage
Outlook App displays in the same language; otherwise it displays in English.

Colligo Engage Console
If you are using the Colligo Engage Console during the installation you will enter in your license key and
select the option that you do have a Colligo Engage Account. After installation you will be prompted for
your Email Address and Password for Colligo Engage.

     15/10/2014                  Copyright 2014 Colligo Networks, Inc. All rights reserved.       Page 6 of 43
                        Not to be reproduced without permission. Learn more at www.colligo.com.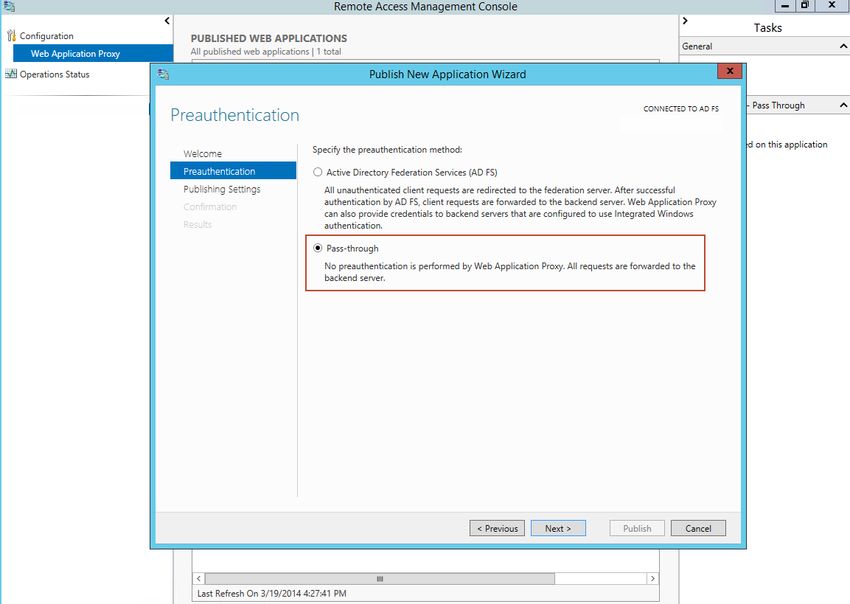
Colligo Engage Outlook App – Offline Mode

Post-Install Configuration
Colligo Engage Outlook App saves settings in the registry. Many settings can be configured post-install
by pushing out settings to the registry. A detailed list of settings is maintained on the Colligo website at
http://www.colligo.com/support/

Overriding PST Policies
Some organizations have a policy that does not allow users to create or modify PSTs. If this is the case,
the following key must be added to the registry in order to override the policy and allow users to file
emails and attachments to SharePoint locations through Colligo Engage Outlook App:

   Key             HKEY_CURRENT_USER\Software\Policies\Microsoft\Office\\Outlook\PST\
   Value Name      PSTDisableGrowAllowAuthenticodeOverrides
   Value Data      1
   Value Type      DWORD

For more information, please see: http://support.microsoft.com/kb/956070

Editing the MSI
To edit the MSI installer package you need an MSI database editor. Colligo recommends the Orca
database editor. Orca is a Microsoft utility for modifying and validating Windows Installer packages. It is
intended to allow setup authors and administrators to manipulate databases compatible with the
Windows Installer Service. This utility is a part of the Windows Installer SDK download, along with other
MSI related tools.
An introduction to Orca can be found on the Microsoft site:
http://support.microsoft.com/kb/255905/EN-US/

Installing the Orca MSI editor
Instead of downloading the entire Windows Installer SDK, you can download Orca from Colligo’s web
site: https://community.colligo.com/entries/23392635-How-can-I-use-Orca-MSI-editor-to-configure-a-
Colligo-installer

Using Orca to Edit the MSI
Once you have installed Orca, you can start editing the Colligo Engage Outlook App .msi file. Colligo
recommends copying the MSI file and working on the copy, because Save As in Orca does not save the
entire MSI package.
Editing an MSI file:
1. Open the MSI file in Orca.
2. Navigate to the Property table in the Tables list.

     15/10/2014                   Copyright 2014 Colligo Networks, Inc. All rights reserved.       Page 7 of 43
                         Not to be reproduced without permission. Learn more at www.colligo.com.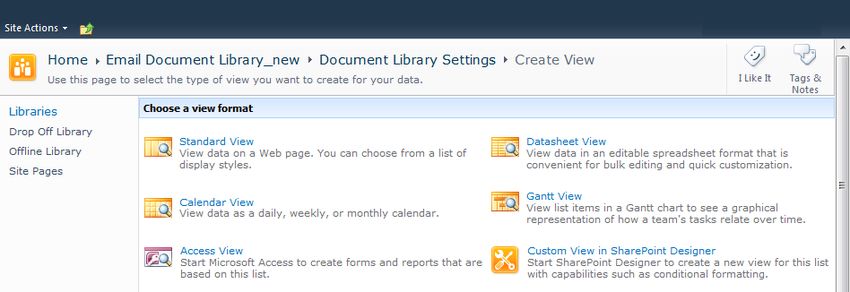
Colligo Engage Outlook App – Offline Mode
3. From the Tables menu, select Add Row.
The Add Row dialog displays:
4. Enter the Property name and Value.
5. Click OK.
The new property displays in the Property Table.
NOTE: Ensure you are using the exact same property names as specified in the Post-Install
Configuration section. The property names are case sensitive.
NOTE: When editing an MSI database using Orca, there are extra steps required if you perform a
Save As…. As a best practice, it is advisable to edit an MSI database and Save the file being edited.
Editing the Registry
Registry settings may be stored under HKEY_LOCAL_MACHINE or HKEY_CURRENT_USER. Values are
stored in:
HKEY_LOCAL_MACHINE\Software\Colligo\Contributor\
HKEY_LOCAL_MACHINE\Software\Wow6432Node\Colligo\Contributor\
HKEY_CURRENT_USER\Software\Colligo\Contributor\
Registry keys must be in the form of Key/String Value. To add a string value to a registry key:
1. Open the Registry Editor.
2. Navigate to the Key you want to add a new String Value to. For example, if the key is
EmailManager/Search/OutlookPaneVisible, Search is the key and OutlookPaneVisible is the string
value within the Outlook Key.
15/10/2014 Copyright 2014 Colligo Networks, Inc. All rights reserved. Page 8 of 43
Not to be reproduced without permission. Learn more at www.colligo.com.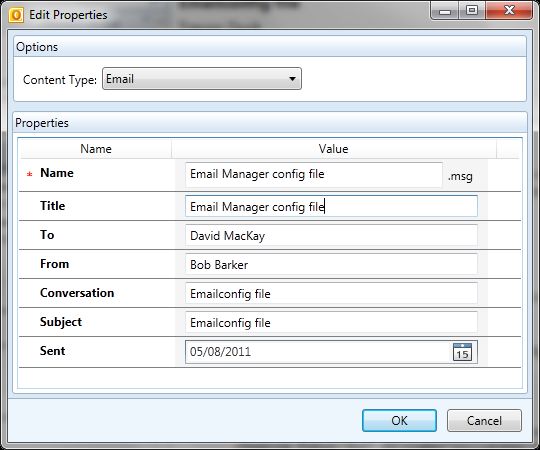
Colligo Engage Outlook App – Offline Mode

   NOTE: If the key doesn’t exist, you can create it by right clicking on the parent key and select New
   Key from the contextual menu.
3. Right-click on the right side and select New > String Value from the contextual menu:

   A new String Value appears in the Name list.
4. Enter the name of the String Value; in this example, it would be OutlookPaneVisible.
   To edit the name of the String Value, right click it and select Rename from the contextual menu:

5. Press Enter or right-click and select Modify from the contextual menu to display the Edit String
   dialog:

     15/10/2014                  Copyright 2014 Colligo Networks, Inc. All rights reserved.       Page 9 of 43
                        Not to be reproduced without permission. Learn more at www.colligo.com.
Colligo Engage Outlook App – Offline Mode
6. Enter the Value data and click OK.
Activation and Licensing
Colligo Engage Outlook App is normally licensed on a per-user basis and the activation system is used to
enable and authorize client installation. Each Colligo Engage client performs an activation request to the
Colligo Activation servers to gain the necessary authorization for execution. The results of this activation
are recorded in a special file that is stored in the installation area of Colligo Engage Outlook App.
In a remote desktop server environment, where the user profile and storage may be located on network
storage or may be created on demand, this activation file may not be maintained between sessions
leading to unnecessary and repeated activation requests.
There is special licensing and license keys available for use with a remote desktop server environment
that eliminates this activation request traffic. For further information contact Colligo Sales.
Communications
Colligo Engage Outlook App communicates with SharePoint through the web services, the details of
which are available on MSDN at: http://msdn2.microsoft.com/en-us/library/aa979690.aspx.
These web services calls are transmitted over HTTP (or HTTPS) using TCP. Colligo Engage Outlook App
also uses FrontPage RPC methods to communicate with the SharePoint server. FrontPage RPCs are also
transmitted over HTTP(S) and TCP.
Details of the FrontPage RPC protocols are available on MSDN at:
http://msdn2.microsoft.com/en-us/library/ms954084.aspx.
The services described above are installed and enabled on SharePoint by default. Because they are
layered on top of TCP/HTTP, communication works over most WAN/VPN and/or wireless connections,
as well as a standard LAN.
White Labeling
For information on white labeling, please contact Colligo. There are a number of MSI properties that you
can configure to reflect your own company name or branding in the interface. This feature requires an
additional license from Colligo.
Support for AD FS
Colligo Engage Outlook App supports AD FS 2.0 and 3.0 (Active Directory Federation Service)
authentication.
The infrastructure of the client machine, SharePoint Server, and AD FS 2.0 Server is illustrated below:
15/10/2014 Copyright 2014 Colligo Networks, Inc. All rights reserved. Page 10 of 43
Not to be reproduced without permission. Learn more at www.colligo.com.Colligo Engage Outlook App – Offline Mode
The workflow of the above infrastructure is as follows:
1. The user on client machine attempts to contact the SharePoint Server.
2. The SharePoint server denies the attempt, sending a message back to the client machine.
3. The client machine then attempts to connect to the AD FS 2.0 Server, which verifies the user’s
identity, and sends a token back to the client machine.
4. The token is then sent to the SharePoint Server, which has an inherent trust connection established
with the AD FS 2.0 Server (configured during set up).
5. The connection to the SharePoint Server is successful.
NOTE: Configuration settings for AD FS 2.0 or 3.0 can be found on our website:
http://www.colligo.com/support/setting/adfs/
15/10/2014 Copyright 2014 Colligo Networks, Inc. All rights reserved. Page 11 of 43
Not to be reproduced without permission. Learn more at www.colligo.com.Colligo Engage Outlook App – Offline Mode
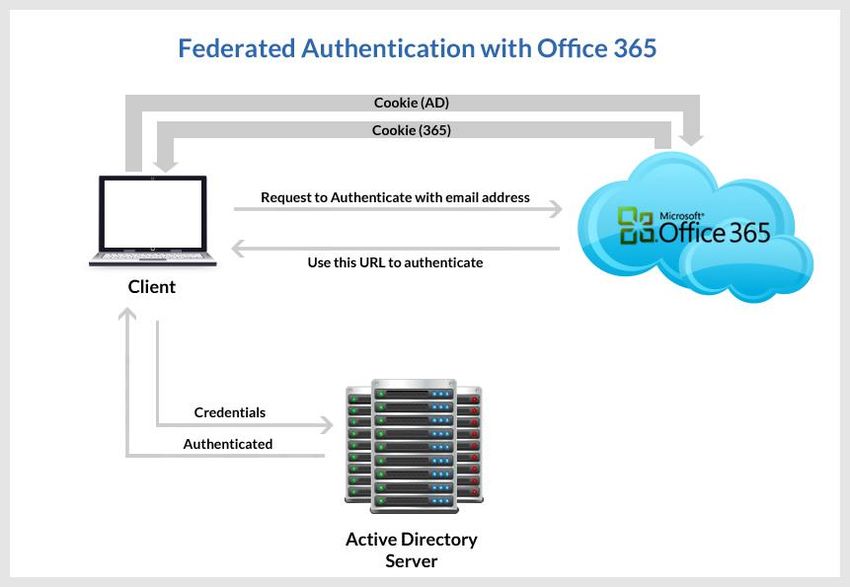
Federation with Office 365 Sites
Colligo Engage Outlook Apo supports federated authentication to Office 365 through AD FS 2.0.
The following diagram illustrates how Colligo Engage Outlook App federates with Office 365 sites:
The workflow of the above infrastructure is as follows:
1. User sends request to Office 365 site using an email address.
2. Depending on the email address used to log in, it either manages the login on Office 365 (Managed
Credentials) or re-direct back to the user with a URL (federated).
3. Colligo Engage Outlook App authenticates the redirected URL, which points to an Active Directory
server.
4. Active Directory returns a token to the user.
5. The user re-submits the token as the authentication to the Office365 site.
6. The token is accepted by Office 365 and the user receives a secondary token for future
communication with Office365.
15/10/2014 Copyright 2014 Colligo Networks, Inc. All rights reserved. Page 12 of 43
Not to be reproduced without permission. Learn more at www.colligo.com.Colligo Engage Outlook App – Offline Mode
Enabling Authentication Service Endpoint
To configure AD FS 2.0, you need to enable an authentication service endpoint:
https:///adfs/services/trust/2005/usernamemixed
https:///adfs/services/trust/13/windowstransport (for default credentials)
15/10/2014 Copyright 2014 Colligo Networks, Inc. All rights reserved. Page 13 of 43
Not to be reproduced without permission. Learn more at www.colligo.com.Colligo Engage Outlook App – Offline Mode
After your AD FS 2.0 server is configured, you need to deploy the following registry key to your users:
Key HKEY_CURRENT_USER\Software\ Colligo \Contributor\Authentication\Adfs
Value Name
Value Data
Value Type String
Server Requirements for AD FS 3.0
The following image is found on the ADFS Server located on the same domain as your SharePoint site.
15/10/2014 Copyright 2014 Colligo Networks, Inc. All rights reserved. Page 14 of 43
Not to be reproduced without permission. Learn more at www.colligo.com.Colligo Engage Outlook App – Offline Mode
When publishing your web application, for the Preauthentication method, choose Pass-through rather
than AD FS:
After your AD FS 3.0 server is configured, you need to deploy the following registry key to your users:
Key HKEY_CURRENT_USER\Software\ Colligo \Contributor\Authentication\Adfs
Value Name
Value Data “ > ”
See above
e.g. urn:sharepointsvradfs:sharepoint>
Value Type String
15/10/2014 Copyright 2014 Colligo Networks, Inc. All rights reserved. Page 15 of 43
Not to be reproduced without permission. Learn more at www.colligo.com.Colligo Engage Outlook App – Offline Mode
Distributed Identity Management
Colligo products support ADFS 3.0 distributed identity management infrastructure where SharePoint
authentication is provided through a trust relationship between two ADFS providers.
15/10/2014 Copyright 2014 Colligo Networks, Inc. All rights reserved. Page 16 of 43
Not to be reproduced without permission. Learn more at www.colligo.com.Colligo Engage Outlook App – Offline Mode
Upload-only Folders vs Offline Folders
Colliog Engage Outlook App allows your users to set folders as either upload-only or offline.
If you set a library/folder as upload-only, the contents of those locations are only available to you when
you are connected to your SharePoint server. If you are not connected, the content is not available to
you for viewing or editing.
If you set a library/folder as offline, the folder structure and the content of the offline location is
downloaded to your machine for offline viewing and editing purposes. The contents of those locations
are downloaded to your local machine and you are able to access the content at any time, regardless of
whether you are connected to your SharePoint server or not.
If you do not set a library/folder as either an upload-only location or offline location, you will not be able
to file any emails, attachments, and other content from Colligo Engage Outlook App to SharePoint.
These settings are applied at the folder level; you cannot apply this setting to an entire site or sub-site.
NOTE: a configuration setting allows you to disable the option to Set as Offline. If this setting is enabled,
the option is greyed out for the user. For more details
When a library/folder is being synchronized, the following icon displays during the process:
A library/folder set as offline is marked with the following icon:
A library/folder set as upload-only is marked with the following icon:
NOTE: If you have a large number of users setting large numbers of libraries/folders as offline, this can
create a high load on your server.
15/10/2014 Copyright 2014 Colligo Networks, Inc. All rights reserved. Page 17 of 43
Not to be reproduced without permission. Learn more at www.colligo.com.Colligo Engage Outlook App – Offline Mode
Metadata
Colligo Engage Outlook App prompts users to enter metadata when they upload content. The process
helps maintain SharePoint metadata and drives user adoption by simplifying the process of entering
metadata. You can enable or disable this functionality. (See Post-Install Configuration.)
Colligo Engage Outlook App automatically extracts 22 metadata properties from email messages that
are filed to SharePoint, and adds those properties to appropriate columns in SharePoint. This allows
filed email to be easily found at a later time.
Hiding Metadata Fields
When configuring your document libraries in SharePoint, you can choose to hide certain columns so
data can be extracted into them but not be seen by the user.
If you want to have a more flexible way to hide specific metadata fields in the Edit Properties dialog in
Colligo Engage Outlook App post-install, you can use the following registry key and values:
Key HKEY_LOCAL_MACHINE\Software\Colligo\Contributor\EmailManager\HiddenMetadataFields
Value Global
Name
Value Column name|Column name|Column name
Data
Value String
Type
NOTE: this feature hides the metadata fields in Colligo Engage Outlook App only; they are still visible in
SharePoint.
In the Value Data field, enter the name of the SharePoint column(s) you want to hide from users in the
metadata prompt. You can use either the display name or the internal name. If you want to enter
multiple column names, use the pipe character (|) to separate the fields.
NOTE: there can be no spaces between the pipe character (|) and the field name.
15/10/2014 Copyright 2014 Colligo Networks, Inc. All rights reserved. Page 18 of 43
Not to be reproduced without permission. Learn more at www.colligo.com.Colligo Engage Outlook App – Offline Mode
Configuring SharePoint Libraries for Email Metadata
Colligo provides a sample list template file that can be used to create a sample testing document library.
Download the template from the Colligo Engage Outlook App support site, install it to the List template
gallery, and use it to create a new document library in your site.
Downloading the List Template
You can download the list template from the following location:
https://community.colligo.com/entries/23002379-How-can-I-automatically-map-email-message-
properties-
Download the attachment CfsEmailLibrary2010.zip.
The zip file contains a site template named CfsEmailLibrary2010.stp.
Installing the Sample List Template
1. Extract the list templates to the preferred location.
2. Navigate to the site collection you want to add the list template to.
3. In your SharePoint site, navigate to Site Actions -> Site Settings.
4. On the Site Settings screen, in the Galleries section, select List Templates:
5. In the List Template Gallery, in the Library Tools > Documents ribbon, click Upload Document:
The Upload Document dialog displays.
6. Browse to the list template file (CfsEmailLibrary2010.stp) and click OK.
The List Template Gallery dialog displays:
15/10/2014 Copyright 2014 Colligo Networks, Inc. All rights reserved. Page 19 of 43
Not to be reproduced without permission. Learn more at www.colligo.com.Colligo Engage Outlook App – Offline Mode
7. Enter the following information:
a. Name: enter a name for the template gallery
b. Title: enter a title that reflects the use of the template gallery
c. Description: enter a description for the template gallery
8. Click Save.
The new list template displays in the List Template Gallery.
Creating a Site
After you have installed the list template, you can create a new library based on the template.
1. Navigate to the site collection you want to add the list template to.
2. Select Site Actions > More Options.
The Create dialog displays.
3. Select the name of the list template you added.
NOTE: the name of the list template displays with the title you entered in step 7.b of Installing the
Sample List Template:
4. In the right pane, enter a name for the library, and click Create.
15/10/2014 Copyright 2014 Colligo Networks, Inc. All rights reserved. Page 20 of 43
Not to be reproduced without permission. Learn more at www.colligo.com.Colligo Engage Outlook App – Offline Mode
5. Under the Library Tools > Documents ribbon, click the New Document drop-down arrow. The new
Document Library displays as an option:
15/10/2014 Copyright 2014 Colligo Networks, Inc. All rights reserved. Page 21 of 43
Not to be reproduced without permission. Learn more at www.colligo.com.Colligo Engage Outlook App – Offline Mode
Manually Creating Content Types
Colligo Engage Outlook App fully supports Content Types, and when working with email documents,
Colligo recommends you create a content type for your email documents.
Enabling Metadata Extraction
To enable metadata extraction to a document library, you need to create a document library with
columns that are defined to have metadata extracted into them. Columns can be created either directly,
or by adding an existing content type to the library.
Colligo Engage Outlook App extracts the following metadata properties from emails:
Email Metadata Default Column Name Type
(display name of SharePoint column)
Attachment Attachment Yes/No
Bcc Bcc Text
Bcc-Address Bcc-Address Text
Bcc-Type Bcc-Type Text
Categories Categories Text
Categories Email Categories
Cc Cc Text
Cc-Address Cc-Address Text
Cc-Type Cc-Type Text
Conversation Conversation Text
From From Text
From-Address From-Address Text
From-Type From-Type Text
Importance Importance Number
Received Received Date/Time
Received-UTC Received-UTC Date/Time
Sensitivity Sensitivity Number
Sent Sent Date/Time
Sent-UTC Sent-UTC Date/Time
Subject Subject Text
Subject Email Subject
To To Text
To-Address To-Address Text
To-Type To-Type Text
NOTE: Text fields can be Single Line of Text, or, Multiple Line of Text.
Addresses can be in exchange or SMTP format.
Metadata can be extracted into alternatively named columns. To extract metadata into non-default
column names, see Changing Column Mappings.
NOTE: if you are creating a library for your email metadata to be extracted into, and you want your
users to be able to search on field-specific metadata, you must then also configure each column to be
searchable. For information on configuring columns for search, see Adding Columns to SharePoint.
15/10/2014 Copyright 2014 Colligo Networks, Inc. All rights reserved. Page 22 of 43
Not to be reproduced without permission. Learn more at www.colligo.com.Colligo Engage Outlook App – Offline Mode
Adding a New Content Type to a Library
When creating an email content type, suitable SharePoint permissions are required. Typically, the email
content type is created in the top level site within a site collection, allowing inheritance and
customization in sub-sites.
1. In your document library, select Site Actions > Site Settings.
2. In the Galleries section, select Site content types:
3. In the Site Content Types page, click Create:
The New Site Content Type screen displays:
15/10/2014 Copyright 2014 Colligo Networks, Inc. All rights reserved. Page 23 of 43
Not to be reproduced without permission. Learn more at www.colligo.com.Colligo Engage Outlook App – Offline Mode
4. Enter the following information:
a. Name and Description
i. Name: enter a name for the content type
ii. Description: enter a description for the content type
iii. Parent Content Type: from the first drop-down list, select the parent content type
group; in the second drop-down list, select the parent content type.
b. Group: choose if the content type is put into either:
i. Existing group: choose an existing content group from the drop-down menu
ii. New group: enter a name for a new content group
5. Click OK.
The content type is added.
15/10/2014 Copyright 2014 Colligo Networks, Inc. All rights reserved. Page 24 of 43
Not to be reproduced without permission. Learn more at www.colligo.com.Colligo Engage Outlook App – Offline Mode
Configuring a Content Type
After adding a content type, you can add existing site columns as well as create new site columns.
1. On the new content type page, click either:
a. Add from existing site columns
b. Add from new site column
Add Columns to Content Type:
2. Enter the following information:
a. Select Columns: choose a group from the Select Columns from drop-down menu
b. Update List and Site Content Types: choose if you want to update all content types
inheriting from this type
15/10/2014 Copyright 2014 Colligo Networks, Inc. All rights reserved. Page 25 of 43
Not to be reproduced without permission. Learn more at www.colligo.com.Colligo Engage Outlook App – Offline Mode
New Site Column:
3. Enter the following information:
a. Name and Type
i. Column name: enter the column name
ii. Choose a type of information contained in the column
b. Group: choose if the column will belong to an existing group or a new one
c. Additional Column Settings
i. Description: enter a description for the column
ii. Require that this column contains information: choose Yes if you require this
column to be a mandatory field the user must fill out
15/10/2014 Copyright 2014 Colligo Networks, Inc. All rights reserved. Page 26 of 43
Not to be reproduced without permission. Learn more at www.colligo.com.Colligo Engage Outlook App – Offline Mode
iii. Maximum number of characters: enter the maximum number of characters you
want to have in this column
iv. Default Value: choose Text or Calculated Value
d. Update List and Site Content Types: choose if you want to update all content types
inheriting from this type
After adding the columns to the Email Content Type you may choose to re-order the columns and/or
make the columns hidden.
Hiding Columns
If you choose to make a column Hidden, the column is not displayed in the properties page of
SharePoint, or Colligo Engage Outlook App’s default metadata editor dialog box.
However, Colligo Engage Outlook App still extracts metadata into any hidden columns, and they can still
be displayed in views, or used for filters.
Adding a New Content Type to Library
1. In your document library, go to Library Tools > Library ribbon and click the Library Settings icon.
2. In the General Settings section, click the Advanced settings link:
3. In the Advanced Settings screen, ensure the Allow management of content types option is set to
Yes:
4. Click OK to save the changes and return to the Library Settings screen.
5. On the Document Library Settings screen, scroll down to the Content Types section:
15/10/2014 Copyright 2014 Colligo Networks, Inc. All rights reserved. Page 27 of 43
Not to be reproduced without permission. Learn more at www.colligo.com.Colligo Engage Outlook App – Offline Mode
6. Click the Add from existing site content types link.
7. In the Add Content Types screen, select a content type from the Available Site Content Types list,
and click Add:
8. Click OK to return to the Document Library Settings screen.
The new content type displays in the Content Types section:
15/10/2014 Copyright 2014 Colligo Networks, Inc. All rights reserved. Page 28 of 43
Not to be reproduced without permission. Learn more at www.colligo.com.Colligo Engage Outlook App – Offline Mode
Creating a Library Without Content Types
If you do not wish to use content types in your SharePoint library, you can add columns directly to the
library to enable email metadata mapping. See Enabling Metadata Extraction for the metadata fields
and default column names.
1. In your document library, go to Library Tools > Library ribbon and click the Library Settings icon.
2. In the Document Library Settings screen, scroll down to the Columns section and click Create
Column:
The Create Column screen displays:
3. Enter the following information:
a. Name and Type
i. Column name: enter the column name
15/10/2014 Copyright 2014 Colligo Networks, Inc. All rights reserved. Page 29 of 43
Not to be reproduced without permission. Learn more at www.colligo.com.Colligo Engage Outlook App – Offline Mode
ii. Choose a type of information contained in the column
b. Additional Column Settings
i. Description: enter a description for the column
ii. Require that this column contains information: choose Yes if you require this
column to be a mandatory field the user must fill out
iii. Enforce unique values: choose Yes if you want this column to have a unique value
iv. Maximum number of characters: enter the maximum number of characters you
want to have in this column
v. Default Value: choose Text or Calculated Value
vi. Add to default view: check this box if you want this column to display in the default
view
4. Click OK.
The new column displays in the Columns section in your Document Library Settings list.
Creating an Email View
After you have defined your content type and added it to your library, it is recommended that you
create an email view.
1. In your document library, go to Library Tools > Library ribbon and click the Create View icon:
The Create View screen displays:
2. Click the Standard View link.
The configuration options for the standard view display:
15/10/2014 Copyright 2014 Colligo Networks, Inc. All rights reserved. Page 30 of 43
Not to be reproduced without permission. Learn more at www.colligo.com.Colligo Engage Outlook App – Offline Mode
15/10/2014 Copyright 2014 Colligo Networks, Inc. All rights reserved. Page 31 of 43
Not to be reproduced without permission. Learn more at www.colligo.com.Colligo Engage Outlook App – Offline Mode
3. Enter the Name and Audience for your view.
4. Click OK. You can now select this view from your Current View list in your Library ribbon:
Validating Metadata Extraction
To validate that your metadata is being extracted correctly, drag-and-drop an email into a Favorite or
Folder location (see the Colligo Engage Outlook App User Guide), and check that the correct metadata is
being displayed and extracted in the Edit Properties dialog:
Changing Column Mappings
By default, the required SharePoint column display name matches the Outlook message field name
shown in the table in Manually Creating Content Types.
The email configuration file allows you to override the default mapping of the Outlook message field
name to the SharePoint column display name.
Name the file ColligoMappingConfig.xml and store it in one of the following locations:
Windows Vista/7:
C:\Users\%username%\AppData\Roaming\ColligoOfflineClient\Config\
C:\Users\%username%\AppData\Local\ColligoOfflineClient\Config\
15/10/2014 Copyright 2014 Colligo Networks, Inc. All rights reserved. Page 32 of 43
Not to be reproduced without permission. Learn more at www.colligo.com.Colligo Engage Outlook App – Offline Mode
Windows XP:
C:\Documents and Settings\%username%\Local Settings\Application
Data\ColligoOfflineClient\Config\
C:\Documents and Settings\%username%\ApplicationData\ColligoOfflineClient\Config\
To adjust the SharePoint metadata column name for a particular Outlook message field, the SPColumn
attribute of the appropriate Mapping element is changed. It is also possible to specify multiple mappings
for the same message field. That is, the same field can be mapped to multiple SharePoint metadata
columns.
The format of the ColligoMappingConfig.xml file is shown below:
15/10/2014 Copyright 2014 Colligo Networks, Inc. All rights reserved. Page 33 of 43
Not to be reproduced without permission. Learn more at www.colligo.com.Colligo Engage Outlook App – Offline Mode
Configuring Search
Colligo Engage Outlook App is compatible with SharePoint Foundation 2010, SharePoint Enterprise
2010, and SharePoint Enterprise 2010 with FAST Search Server 2010, SharePoint Foundation 2013, and
SharePoint Server 2013.
Depending on which version of SharePoint you are using, Colligo Engage Outlook App provides the
ability to search on SharePoint properties. For example, users may want to search on email properties
such as “To”, “From” and “Subject.” To enable this functionality, SharePoint must be configured to crawl
the columns that you would like to allow users to search on.
A keyword search means that your results could include results from the text of a document or
properties.
The following table details which versions of SharePoint support which aspects of search:
SharePoint Version Keyword Search Properties Search
SharePoint Foundation 2010
SharePoint Server 2010
SharePoint Server 2010 and FAST 2010
SharePoint Foundation 2013
SharePoint Server 2013
SharePoint Server 2010 & SharePoint 2013 Search
NOTE: If you are using SharePoint Foundation, you cannot search on specific SharePoint metadata such
as To or From. However, you may get results that include instances of your search term as a property
value in a column. To use property based search, use the syntax “property:value”, for example
“subject:colligo”.
To install FAST, follow the instructions at the following location:
http://technet.microsoft.com/en-us/library/ff381243.aspx
The following procedures comprise Colligo’s best practice approach for setting up search for your
SharePoint sites:
1. Add any SharePoint columns you want to be searched: see Adding Columns to SharePoint.
2. Add your content sources and crawl them: see Adding a Content Source.
3. Add managed property mappings: see Adding Managed Property Mappings.
4. Enable the isDocument property: see Enabling the IsDocument Property.
Adding Columns to SharePoint
You likely have already set up various columns for your document libraries in SharePoint. Ensure that
you have all the properties that you want to be searchable added as a column.
To add columns to SharePoint:
1. In an existing SharePoint site, go to Library Settings.
2. Under the Columns section, choose Create Column.
3. Add a column for every field that you want to be searchable.
NOTE: create columns with lower case names with no special characters or white spaces. This file
naming convention allows you to use the same FAST Search mapping property names as site column
names.
15/10/2014 Copyright 2014 Colligo Networks, Inc. All rights reserved. Page 34 of 43
Not to be reproduced without permission. Learn more at www.colligo.com.Colligo Engage Outlook App – Offline Mode
4. Upload at least one document to the library with each metadata column filled out in order for the
search crawler to register any new columns.
Adding a Content Source
A content source is a SharePoint site containing the document libraries that you want to search. You can
add multiple content sources if you have sites on different Farms.
To add a content source:
1. In SharePoint’s Central Administration, go to General Application Settings > Farm Search
Administration.
2. Depending on whether or not you are using FAST Search, choose one of the following options:
a. If you are using FAST Search, click FASTContent.
The FASTQuery: Search Administration page displays.
b. If you are not using FAST Search, click Search Service Application.
The Search Service Application: Search Administration page displays.
If you are using FAST Search, the FASTQuery: Search Administration page displays.
If you are not using FAST Search, the Search Service Application: Search Administration page
displays.
3. In the Crawling section, click Content Sources.
If you are using FAST Search, the FASTContent: Manage Content Sources page displays.
15/10/2014 Copyright 2014 Colligo Networks, Inc. All rights reserved. Page 35 of 43
Not to be reproduced without permission. Learn more at www.colligo.com.Colligo Engage Outlook App – Offline Mode
If you are not using FAST Search, the Search Service Application: Manage Content Sources page
displays.
4. If a content source is not configured, click New Content Source to configure one.
If you are using FAST Search, the FASTContent: Add Content Source page displays.
If you are not using FAST Search, the Search Service Application: Add Content Source page displays.
15/10/2014 Copyright 2014 Colligo Networks, Inc. All rights reserved. Page 36 of 43
Not to be reproduced without permission. Learn more at www.colligo.com.Colligo Engage Outlook App – Offline Mode
15/10/2014 Copyright 2014 Colligo Networks, Inc. All rights reserved. Page 37 of 43
Not to be reproduced without permission. Learn more at www.colligo.com.Colligo Engage Outlook App – Offline Mode
5. After you have added the new content source, return to the Manage Content Sources page, and
click Start All Crawls.
6. Wait until all crawls are completed.
7. Return to Central Administration and navigate to General Application Settings > Farm Search
Administration to add managed property mappings.
Adding Managed Property Mappings
A managed property mapping provides the link between the SharePoint column and the search term.
For example, if you want to search on the email property To, this is where you determine which
SharePoint columns are searched when you enter that search term. You could have multiple SharePoint
sites that each contain some form of a “To” column but they might be named slightly differently. This
mapping allows you to map the “To” search term to any or all of those columns.
To add a new managed property mapping:
1. In SharePoint’s Central Administration, go to General Application Settings > Farm Search
Administration.
2. If you are using FAST Search:
a. Click FastQuery.
The FASTQuery: Search Administration page displays.
b. In the Queries and Results section, click Metadata Properties.
The FASTQuery: Metadata Property Mappings page displays.
3. If you are not using FAST Search:
a. Click Search Service Application.
The Search Service Application: Search Administration page displays.
b. In the Queries and Results section, click Metadata Properties.
The Search Service Application: Metadata Property Mappings page displays.
4. Click New Managed Property.
15/10/2014 Copyright 2014 Colligo Networks, Inc. All rights reserved. Page 38 of 43
Not to be reproduced without permission. Learn more at www.colligo.com.Colligo Engage Outlook App – Offline Mode
The New Managed Property screen displays:
5. Fill out the following fields:
a. Property name: ensure the name is unique, has no spaces and is all lower case with no
spaces or special characters
b. Type: choose the appropriate type
c. Mappings to crawled properties: click Add Mapping
The Crawled property selection screen displays:
15/10/2014 Copyright 2014 Colligo Networks, Inc. All rights reserved. Page 39 of 43
Not to be reproduced without permission. Learn more at www.colligo.com.Colligo Engage Outlook App – Offline Mode
i. Use the Select a category drop-down to filter the available properties, or enter a
property in the Crawled property name field and click Find.
ii. Select a crawled property from the list and click OK to add it to the mapping.
iii. In the Available crawled properties list and click Add to move it to the Selected
crawled properties list in the New Managed Property page.
iv. Repeat for each column you want to make available on a search query.
6. Click OK.
15/10/2014 Copyright 2014 Colligo Networks, Inc. All rights reserved. Page 40 of 43
Not to be reproduced without permission. Learn more at www.colligo.com.Colligo Engage Outlook App – Offline Mode
Enabling the Attachment Property in Search
If an email has an attachment, you can configure a managed property mapping for the attachment icon
to display in the search results. Because this is not a property you can actually search on, the mapping is
slightly different for this field.
Below is the Property name and the mapping you need to add to your crawled properties for the
Attachment column:
NOTE: this property is not retroactive; ie. If the column and property mapping are added after emails
with attachments have been uploaded to the document library, the attachment icon will not display in
the search results. The column and property mapping must be present at the time of upload to be
applied.
15/10/2014 Copyright 2014 Colligo Networks, Inc. All rights reserved. Page 41 of 43
Not to be reproduced without permission. Learn more at www.colligo.com.Colligo Engage Outlook App – Offline Mode
Enabling the IsDocument Property
The IsDocument property is a SharePoint property that must be set to True for all document types that
you want to include in a search. If this property is not set to True, no results will be returned in your
search.
1. In SharePoint’s Central Administration, go to General Application Settings > Farm Search
Administration.
2. If you are using FAST Search:
a. Click FastQuery.
The FASTQuery: Search Administration page displays.
b. In the Queries and Results section, click Metadata Properties.
The FASTQuery: Metadata Property Mappings page displays.
3. If you are not using FAST Search:
a. Click Search Service Application.
The Search Service Application: Search Administration page displays.
b. In the Queries and Results section, click Metadata Properties.
The Search Service Application: Metadata Property Mappings page displays.
4. Set the Managed Property IsDocument to True.
5. Click OK.
15/10/2014 Copyright 2014 Colligo Networks, Inc. All rights reserved. Page 42 of 43
Not to be reproduced without permission. Learn more at www.colligo.com.Colligo Engage Outlook App – Offline Mode
Configuring Local Machines
1. Create the ColligoMappingConfig.xml file on a local machine in one of the following
directories:
Windows Vista/7:
C:\Users\%username%\AppData\Roaming\ColligoOfflineClient\Config\
C:\Users\%username%\AppData\Local\ColligoOfflineClient\Config\
Windows XP:
C:\Documents and Settings\%username%\Local Settings\Application
Data\ColligoOfflineClient\Config\
C:\Documents and Settings\%username%\ApplicationData\ColligoOfflineClient\Config\
2. Use the crawler mapping names to populate the configuration file.
NOTE: Columns are case sensitive
Uninstalling Colligo Engage Outlook App
To uninstall, Colligo Engage Outlook App, complete the following steps:
1) In your Control Panel, choose Uninstall a Program from the Programs group.
2) Select Colligo Engage Outlook App in the program list and click Uninstall.
15/10/2014 Copyright 2014 Colligo Networks, Inc. All rights reserved. Page 43 of 43
Not to be reproduced without permission. Learn more at www.colligo.com.You can also read