Digital Satellite Receiver - User Manual DishTV S7070 - Dish TV
←
→
Page content transcription
If your browser does not render page correctly, please read the page content below
Digital Satellite Receiver
       User Manual

                 DishTV S7070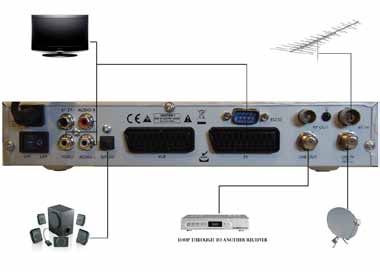
Safety Information

                                           CAUTION
                                       RISK OF ELECTRIC SHOCK
                                            DO NOT OPEN

The lightning flash with          Warning:                       The exclamation point arrowhead
arrow-head symbol, within         To reduce the risk of          within an equilateral
an equilateral triangle, is       electric shock, don't open     triangle is intended to alert
intended to alert the user        the cabinet. Refer             the user to important
to "dangerous voltage"            servicing to qualified         operating and
and to prevent from a risk        personnel only.                maintenance (servicing)
of electric shock.

1. Safety precautions

WARNING: Do not use this Satellite receiver where contact with or immersion in water is a
possibility. Do not use near a flower vase, washbowls, kitchen sinks, laundry tubs, swimming
pools, etc.

WARNING: Do not put a heat source, such as a lampstand or candle on the cabinet as this could
overheat the satellite receiver.

WARNING: The unit should be connected to a power supply only of the type described in the
Operating instructions or as marked on the unit. If you are not sure of the type of power supply
(for example, 120 or 230 V) to your home, consult your local dealer or local power company.

WARNING: This product operates on a dangerous voltage. Do not open the cabinet or touch any
parts inside. Consult your local dealer for technical service if a fault occurs.

Note: To ensure proper use of this product, please read this User manual carefully and retain
for further reference.

Unit Cleaning: After the unit power is turned off, you can clean the cabinet, panel and remote
control with a soft cloth lightly moistened with a mild detergent solution.

Attachments: Never add any attachments and/or equipment without the manufacturers
consent; as such additions may result in the risk of fire, electric shock, or other personal injury.

Locating: Slots and openings in the cabinet are provided for ventilation to protect it from
overheating. Do not block these openings or allow them to be blocked by placing the Satellite
receiver on a bed, sofa, or other similar surface, nor should it be placed over a radiator or heat
register.
Contents

Quick Setup Guide . . . . . . . . . . . . . . . . . . . . . . . . . . . . . . . . . . . . . . . . .             4
Main Menu . . . . . . . . . . . . . . . . . . . . . . . . . . . . . . . . . . . . . . . . . . . . . . . .       6
Channel Manager . . . . . . . . . . . . . . . . . . . . . . . . . . . . . . . . . . . . . . . . . .             7
- Channel Organizer . . . . . . . . . . . . . . . . . . . . . . . . . . . . . . . . . . . . . . . .             7
- New Channels . . . . . . . . . . . . . . . . . . . . . . . . . . . . . . . . . . . . . . . . . . . .         10
- Edit Channels . . . . . . . . . . . . . . . . . . . . . . . . . . . . . . . . . . . . . . . . . . . . .      11
Installation Menu . . . . . . . . . . . . . . . . . . . . . . . . . . . . . . . . . . . . . . . . . .          13
- Satellite Setup . . . . . . . . . . . . . . . . . . . . . . . . . . . . . . . . . . . . . . . . . . . .      14
- Blind Scan . . . . . . . . . . . . . . . . . . . . . . . . . . . . . . . . . . . . . . . . . . . . . . . .   16
- DiSEqC Motor Setup . . . . . . . . . . . . . . . . . . . . . . . . . . . . . . . . . . . . . .               19
- Factory Default . . . . . . . . . . . . . . . . . . . . . . . . . . . . . . . . . . . . . . . . . . .        27
- User Settings . . . . . . . . . . . . . . . . . . . . . . . . . . . . . . . . . . . . . . . . . . . . .      28
System Setup Menu . . . . . . . . . . . . . . . . . . . . . . . . . . . . . . . . . . . . . . . .              29
Accessories Menu . . . . . . . . . . . . . . . . . . . . . . . . . . . . . . . . . . . . . . . . . .           32
Remote Control . . . . . . . . . . . . . . . . . . . . . . . . . . . . . . . . . . . . . . . . . . . .         44
Quick Setup Guide

Step 1 - Connecting you Set Top Box

After unpacking your Set Top Box, Connect as shown in the diagram below.

Step 2 - Choose your location
Once you have the Set Top Box connected, turn the power on. The first screen that is displayed will
ask you to enter you location within New Zealand. The screen will look like the picture below.

              Select your location from the available City Name options and then choose OK

                                                                                                  Page 4
Step 3 - Tuning in Freeview Channels
Having selected your location, the Set Top Box will then commence automatic tuning for the
Freeview channels. A screen showing tuning progress will be displayed (see example below)
It will tell you that the Set Top Box is automatically tuning in the Freeview channels. Tuning can take a
few minutes. You do not need to take any action during the tuning process.
The Set Top Box screen will indicate when all the Freeview channels have been successfully tuned in.
Choose OK one or more times to progress through any remaining setup screens.
Step 4 - Enjoy the Freeview Channels
When OK has been pressed at the final set up screen, the Set Top Box will automaticly arrange the
channels.
And that’s it. You are now ready to enjoy the Freeview Experience.
Page 5Main Menu
This menu is the gateway for all other menus. All the settings and tuning menus
are selected from this menu. After tuning the box, user can access the main menu
by pressing the "MENU" key.
Main menu contains several options like
• Channel manager
• Installation
• System Setup
• Accessories
• Country Setup
• EPG
You can navigate between the options by using UP/DOWN keys and select the
option by OK key.
Page 6Channel Manager
You can operate the channel related functions by using this Channel Manager menu, like,
• Channel Organiser
• New Channel
• Edit Channel
• Delete All
You can navigate between the options by using UP/DOWN keys and select the option by OK key.
Channel Organizer
All the services of the current mode are listed in this menu. If
the current mode is TV then it will list the TV services, else it will
list the radio services. Channel related settings like Favourite,
Lock, Skip, Delete, Move, Rename & TV/Radio switch mode are
configured from this menu only.
All the color keys are mapped for each functionalities.
1. RED color key - Skip the specific channels.
2. GREEN color key - Lock the specific channels.
3. BLUE color key - Delete the specified channels.
4. Info key - Rename the specified channels.
5. TV/Radio key is used to switch the mode between TV and Radio.
6. Fav - Add the channel into Favorite list.
7. 0..9 numeric keys - Set focus to the specified channel number
8. Left/Right key - For multi channel selection to set the lock, Skip,
delete, FAV.
You can Lock or release the lock for any service, by pressing
Green color key. To set or release the lock, you have to enter
the password. If the entered password is correct then the
Lock gets set. There after if anyone want to watch that locked
channel, they have to enter password. The Lock symbol
denotes that the particular channel has been locked.
Page 7The Skip option is used to hide the channel during channel plus and minus operation. For example if STB has a total of 10 services and if you skipped services 3,4 and 5. After this process, if the you presses the channel plus - from the 2nd channel the receiver will switch to the 6th channel automati- cally instead of channel 3, 4 & 5. Same for channel minus navigation. How to Set and View SKIP channel? If you want to skip the channel, first select the desired channel and press the Red color key. The Skip icon will be placed adjacent to the selected channel. If you wants to unskip a channel, then select it and press the Red color key. The skip will be released for that channels. Skipped channel can be Viewed by pressing the direct channel number and browsing list like Channel list, Favourite list and etc. If you are in Favourite / Sorted groups then the channel organizer will list the corresponding favourite / sorted group service only. You cannot move in Sorted / Favourite mode. A channel can be selected as favourite, by pressing Fav key in the Channel Organiser menu and selecting from the displayed favourite grouping list. When you quit from the menu, the Favourite channels can be navigated by pressing the FAV Key, which will show the list of favorite channels from which you can browse and select the channel you want to watch. If you want to select any one of the group, press the corresponding number on the remote. Page 8
Channel names can be changed by selecting the rename
    option by pressing info key, the new name can be given by
    selecting the letters in the keypad. For example, to select the
    letter 'R' you have to the key 6 in three times.

    Blue color key - Used to insert the numbers.
    Red color key - Used to switch between Small / Caps. letter.
    Green color key - Used to insert & revert the option.
    Yellow color key - Used as backspace, that is to delete the last
    character.

    Channels are deleted from the database, by using Blue
    color key. When a channel is deleted, all the information
    about that channel is lost. Multiple channels can be
    selected and deleted by using Left/Right arrows keys.

    If the OK key is pressed you will be asked for
    confirmation. If you selects the Yes option, the
    "Successfully updated" message will be displayed.

    You can select any channel by pressing the
    corresponding channel number keys and then press
    OK key.

Page 9
New Channels
Although all new Freeview channels
are added automatically, you can add a
new channel manually, by specifying
the Audio, Video and PCR PIDs of that
channel. This is recommended only for
advance users.
Using the arrow keys on your remote
control, first select your satellite, then the
transponder number, frequency, symbol
rate and polarization
If you select Service name a keypad will be
displayed. To select the letters in the key
pad the arrow in the left corner should be
moved to the appropriate row and the
corresponding numeric key should be
pressed. For example, if user want to select
the letter Q, then the focus should be set to
the third row and the key 6 should be
pressed. Selecting Aa will cause toggling
between upper case (A..Z) and lower case
(a..z).
After entering the satellite details and the
Service name, you will need to enter the
PID values. Those are,
• Video PID
• Audio PID
• PCR PID
Page 10After giving all the necessary parameters,
add the new channel by pressing the OK
key.
Edit Channels
As all new Freeview channels are
automatically added, this section is for
advanced users only. Using the Edit Channel
option the PID values for existing channels
can be edited.
You can navigate in this menu using the
UP/DOWN keys to any channel and
LEFT/RIGHT to navigate to the PID
values. To edit a PID value, press any
numeric key. The edited value will be
saved only when the OK key is pressed.
After editing values, you store the new value by
pressing the OK key. If the EXIT key is pressed
then the changes are not saved and the old
value is restored. After pressing the OK key, you
will be asked for confirmation. If YES is selected,
"Successfully Updated" will be displayed.
Page 11The Delete all menu is useful to delete all the items
in a particular category in a single step.
• All TV Services
• All Radio Services
• All FTA Services
• All Scrambled
• All Transponders.
For every category deletion, you will
be asked for confirmation to
proceed further.
If you select the option Yes then all
the records of the selected category
will be deleted. The Successfully
Updated message will be displayed.
Page 12Installation Menu
Although the DishTV S7070 Freeview satellite receiver automatically tunes in the Freeview channels, you may at
times wish to add extra channels that are not from Freeview.
If you know that your satellite dish system can receive other free channels, the Installation Menu allows you to
tune in these channels easily. The various options are:
• Satellite Setup - Through this option, you can scan or rescan all the existing transponders in the database
according to the selected satellite
• Blind Scan - Using this option you can scan a wide range of frequencies to find all available channels. Please
note the wider the frequency range you select the longer the scan takes.
• Transponder Setup - In this option, you can add new transponders or edit existing transponders.
• DiSEqC Motor Setup - this setup contains the DiSEqC 1.2 & USALS functions. These are not normally used in a
Freeview system. They relate to dish mover motors.
• Factory Default - this reverts the satellite receiver back to the factory default, which is full removal of all
channels , ready to do a new scan for channels. If you move to a new house and can not get any channels, use
this option.
• User Settings - User Settings option used to restore only the user setting values.
Page 13Satellite Setup
This is satellite setup entry menu. By pressing OK key, user
can enter into satellite setup menu.
Here you select the satellite along with LNB No, 22kHz
and DiSEqC switch and motor. The Signal quality and
strength shown according to the satellite's first carrier
which taken from the database. Also you can set the
DiSEqC position for an satellite or select DiSEqC switch
for an satellite.
When you select satellite, you can rename the satellite
by pressing RED color key. Then the keypad dialog will
appear to edit the satellite name.
Page 14Here you can select the following DiSEqC options,
1. Toneburst
2. DiSEqC 1.0
3. DiSEqC 1.1
4. Motor [DiSEqC 1.2/USALS]
If you select DiSEqC type as Motor, RED color key help is displayed in the help banner. By
pressing RED key you can get into DiSEqC motor [DiSEqC 1.2/USALS] setup.
DiSEqC 1.2 and USALS functionalities are explained in the DiSEqC Motor setup menu.
By pressing OK key after entering all the parameters,
"Please wait" message will be displayed before tuning.
Following the "Please wait" message, user will be
asked for confirmation for entering into the tuning
menu.
If the option YES is selected, STB will enter into
tuning menu and collect the services for available
carriers in database.
Page 15Blind Scan
Blind scan detects all the carriers within the user specified start &
end frequency range. Blind Scan menu has the following options:
• Satellite name
• Range of Start & End Frequency
• Polarization
• Service type.
By pressing LEFT or RIGHT arrow key, user can
select the satellite from the Satellite list.
After selecting the satellite name, the
corresponding LNB Low Frequency and
High Frequency will be selected
automatically from the SDB.
You can set the start & end frequency by
pressing the [0..9] numeric keys as per your
preference.
Page 16By pressing, LEFT or RIGHT key, you can select the
polarization type:
• BOTH
• Horizontal
• Vertical
You can filter the service collection based on the below
listed service types,
• ALL - tune both FTA & Scrambled services.
• FTA - tune FTA type services only.
• Scrambled - tune Scrambled type services only.
By pressing OK key after entering all tuning parameters,
STB will get into tuning dialog.
You can view the below information in this menu,
• Collected carriers details - [Carrier name, Frequency,
Symbol rate & Polarization]
• Total number of TV & Radio services collected for each
carrier.
After the tuning is completed, STB saves the collected
carriers & services automatically and quits from the tuning
menu.
Page 17To perform Transponder Setup, click MENU key, select Transponder Setup option using arrow keys and
press OK. The above figure shows Transponder setup option in the main menu.
Transponder setup has three types of operations.
• Add - Allows the user to add new carrier into the selected satellite with the corresponding frequency,
symbol rate and polarization.
• Edit - Allows the user to edit or rescan the carriers which was available in database.
• Delete - Allows the user to delete the selected carrier or group of carriers.
Allows the user to perform the transponder scan [Add/Edit] based on the LNB frequency, LNB Power, 22kHz
& DiSEqC values stored in the satellite setup for that selected satellite.
By selecting the ADD option in the Transponder Setup menu pressing the OK key, the Add
transponder menu can be invoked.
In this menu, a new transponder can be added
under the selected satellite. If you entered
frequency, symbol rate and polarization already
existing in the database, then "Transponder
Already exists" message will be displayed.
If you press the Right/Left arrow key in satellite
name the list of satellites are displayed.
Page 18DiSEqC Motor Setup
Through this menu, you can select DiSEqC1.2 or
USALS option by toggle the LEFT or RIGHT key.
Through this menu, user can perform the DiSEqC
1.2 and USALS Motor related operation.
When you change & save the motor settings from
DiSEqC 1.2 to USALS or vice versa, STB asks
confirmation from user to set that selected motor
settings.
Here you select the satellite along with dish moving
type as User/Installer/GotoX/Advanced, dish
position, direction [East/West] and carrier. Also you
can select the frequency, symbol rate, and
polarization for an carrier.
Set the Dish moving type as USER. Press Left/Right key in Drive East/West
option to move the motor. Now motor will move slowly [step by step
movement]. Motor movement will be stop when you stop pressing the key.
Page 19Set the Dish moving type as INSTALLER. Press Left/Right key in Drive East/West option to move the motor.
Now motor will be move fast [Continuous movement]. Motor movement will be stop when you press the
LEFT/RIGHT key again.
GoTo X option is used to move the motor to specified Dish position. To perform this option, select Dish
moving type as GoTo X and enter the Dish position by pressing numeric keys. Then press OK key, Now dish
will move to specified dish position.
Page 20By pressing OK key, Advanced setup will be
invoked.
Through this setup you can perform the below listed Motor related settings :
• DiSEqC 1.2 Enable/Disable
• Enable /Disable limit
• Drive East/West
• Set EAST/WEST limit
• Recalculate Position
• Reset Position.
By pressing the Left/Right key you can select the DiSEqC1.2 Enable / Disable Option. You can
enable or disable the DiSEqC1.2 Motor related settings by pressing OK key. "Successfully
updated" message will be displayed when you press the OK key.
By pressing Left/Right key, you can select the Motor limits Enable / Disable Option. You can
enable or disable the Motor limits by pressing OK key.
Page 21You can drive the motor to East/West direction
by pressing the Left/Right key.
You can set the East or West limit of the motor through this option. Select the "Set East limit" or "Set
West limit" option and press OK key to set the East/West limit of the motor.
The Recalculate position option will replace the logical positions set by the user. By pressing OK
key, confirmation will be displayed. If you select YES option, then the position get replaced.
Page 22The motor position can be reset to its reference position [0°] by using the Reset Position option. Confirmation message will be displayed after pressing OK key. If you select the YES option, "Dish is Moving" message will be displayed. By pressing Left/Right key, Transponder list will be opened to select the transponder. You can change the transponder frequency by pressing numeric keys. Page 23
You can change the transponder symbol rate value by
   pressing numeric keys.

   You can change the polarization of the transponder
   by pressing Left/Right key.

    Press OK key, to save the changed settings. Saving confirma-
    tion banner will be displayed. By selecting YES option changed
    values will be stored.

    When saving the changes "Successfully
    updated" message will be displayed.

Page 24
By pressing OK key, USALS setup will be invoked. USALS is used to position the dish automatically without stress. By giving the input of satellite angle, your latitude & longitude angle, motor will be positioned automatically to the selected satellite. You can select the satellite from the satellite list by pressing the LEFT/RIGHT key. You can enter the satellite angle by pressing numeric keys. Also by pressing Left/Right key, you can choose the East/West direction. Page 25
You can enter the longitude and latitude angle by pressing numeric keys. Also by pressing Left/Right key,
you can choose the East/West or North/South direction.

                                                    You can change the transponder frequency by
                                                    pressing numeric keys.

                                                    You can change the transponder symbol rate value by
                                                    pressing numeric keys.

                                                    You can change the polarization of the transponder by
                                                    pressing Left/Right key.

                                        Page 26
Press OK key, to save the changed settings. Saving
confirmation banner will be displayed. By selecting
YES option changed values will be stored.
After saving the changes, motor will be positioned
automatically to the selected satellite.
Factory Default
Factory Default option aids to restore the
Factory setting.
Be careful when using this function, because it
will erase all the data and parameters that are
set earlier in the receiver. Once you have made
a factory default, you will have to re-install
your preferences.
For performing factory default operation
confirmation message will be asked of the
user.
Depending upon the option selected by the
user actions will be performed accordingly.
This option will bring back all the user given
settings to the default values. All the user set
carrier / services will be removed from the
database.
Page 27User Settings
The User Settings Menu will allow you to reset all the
System Settings (Language, OSD, Time etc) back to
the factory defaults without changing any Channel
settings.
Page 28System Setup Menu
System Setup menu consists of system related
options like,
• Language Setup
• OSD Setup
• TV Setup
• Time Setup
• Password setup
• Wakeup Timer
User can navigate between the options by using
UP/DOWN keys and select the option by OK key.
The Language option, on toggling shows the
various languages supported and on pressing OK
key the particular language will be selected.
After entering all these information the setting will
be saved by pressing OK key, which will be
followed by "Successfully Updated" message.
The position of the Channel and volume banner can be
changed by using the Banner Position field that may be
either TOP/BOTTOM position.
The "OSD Time Display[ON/OFF]" determines the presence
of the OSD time display in the right most corner of the
screen.
After entering all this information you can save the setting
by pressing OK key. Based on the option selected,the
confirmation banner operation will be performed
accordingly. If option YES is selected then the changes will
be saved. If the option NO is pressed then the changes
made will not be saved.
The Aspect Ratio option is provided to adjust the picture
format. Left/right arrow key is used to select the
appropriate picture format of the 4:3 Letter box/4:3Full
screen/16:9.
In Display Mode, PAL/NTSC/SECAM/AUTO option is
navigated using left/right arrow keys, this function is set
according to the user's TV type.
Video output function will allow the user to select the
video output as either RGB, CVBS or YUV according to
their TV set.
After entering all this information you can save the
setting by pressing OK key. "Saving information"
message will be displayed after press OK key.
Page 29The Time Setup menu aids to perform operations like
Manual/Auto time setting, GMT offset setting & Summer
Time setting.
The Timer mode can be either Manual or Auto. In case of
Auto the time is collected from the satellite signal. In case
of auto, you can set the GMT offset and Summer time.
In Auto mode you can set summer time[ON/OFF] to
increase the offset by 1 hour.
In Manual mode, you can set your own Time & Date.
The Parental Lock menu aids to modify the Password set
already, which is used for access control. Only an authorised
user will be allowed to view a locked service by providing the
correct password.
By default password will be stored as {0 0 0 0}
You can set the password either for System lock or Service
lock. System lock is applicable only for the below listed
menus.
• Installation
• Channel Manager
• Factory default
• User Settings
You can set service lock for the authentication for services.
Whenever you switch to a locked service, Password banner
will be popped up.
User can set the Password Lock option as [Once/ON/OFF].
1. Once - Password can be activated only one time
2. ON - Always Password will be activated
3. OFF - Password can't be activated
To modify the Password set already, you will be requested to
enter the old password.
Following the old password entry, you will be asked to enter
the New password which is to replace the old one.
To confirm the new password, you need to retype the new
password. On successful retyping, the new password will be
set for access control.
Page 30Wakeup timer is used to wakeup a service according to the user specified date and time.
The below listed timer mode are supported
1. Once - Only once the timer will wake up.
2. Daily - As per the user specified duration the timer will wake up daily.
3. Weekly - The timer will wake up only once in a week as per the user specified duration.
This application supports maximum of 8 timers. By
default all the timer records are disabled. Specified
timer will be invoked after the user presses the OK
key.
After entering all the options and the OK key is
pressed, "Timer Enabled" message will be
displayed.
All the stored timer information will be
displayed in the timer list.
Page 31Accessories Menu
Accessories Menu has the following options,
1. S/W upgrade,
2. Version,
3. Signal Monitoring.
Press the menu key in the remote and select the
Setup option. Select the “Software Upgrade”
option as shown. Press OK Key on the remote
button to start.
The Version menu displays the Hardware,
Software version, Loader Version & the last built
Date and Time of the application.
Page 32The Signal Level menu helps to check the availability of signal strength & signal quality with options to set several parameters. In the above menu, Signal strength and quality is shown for Default carrier 4000-28000 H. You can select the satellite from the satellite list by pressing LEFT or RIGHT arrow key. After selecting the satellite, the LNB Low & High frequency will be filled in automatically. You can also change the LNB Low & High frequency by pressing the numeric keys [0...9]. You can turn ON or OFF the LNB power by pressing the LEFT or RIGHT key. You can change the carrier's Frequency & Symbol rate by pressing the numeric keys [0...9]. You can change the carrier's polarization by pressing LEFT or RIGHT key. You can change the 22kHz Switch options pressing the LEFT or RIGHT key. Page 33
After doing the factory reset option, this country
   setup dialog will be invoked. Here you can select
   the city for installing the carriers. If you select the
   city, then the confirmation dialog is displayed.
   Select the YES option and the installation will be
   started and collect the selected city carriers only.

Page 34
This S/W supports EPG (Electronic Programme Guide) for the
current, next & weekly informations.

EPG displays the programme schedules with short &
extended description of the selected service.

EPG menu could be invoked by pressing the GUIDE key. EPG
of the selected service will be displayed in the EPG menu.
EPG menu contains all the current day event information of
the programmes. If the selected service has no EPG data
then the "No event description" message will be displayed.

To toggle within the service list UP/DOWN keys should
be used and for navigating within the events
LEFT/RIGHT keys should be used. For the selected event,
its short description will be displayed in the event
information screen.

User should press the INFO key to view the Extended
event description of the selected event in the event list.
On pressing INFO key, extended description information
will be displayed in a separate dialog.

When the Red color key is pressed, then the wakeup
timer menu will be invoked. Wakeup timer functional-
ities are explained in the System setup menu.

After set the timer for a event, that event will be
highlighted with Yellow color in the EPG dialog.

        Page 35
Quick Select menu list the services based on the selected satellite and service type. To invoke this menu OK Key should be pressed. In this menu, service list can be viewed based on: • Satellite • Mode - Service Type • Sort by - Sorting Sorting option is also supported in this menu to ease the user. For the selected service the presentation will be shown in the ZOOM window. To access the Satellite list RED color key should be pressed once. Then select the Satellite option, from the displayed satellite list you can select the preferred satellite for which the services will be displayed. To access the Service type mode option RED color key should be pressed twice. The service type can be classified as three modes, All, FTA and Scrambled. The services will be filtered based on the selection. To access the Sort option RED color key should be pressed three times. Various types of sorting order supported are, • None - Unsorted order • N-1 - To reverse the current order • A-Z By TP - To sort the services in Alphabetical order of carrier name(Ascending) • Z-A By TP - To sort the services in Alphabetical order of carrier name(Descending) • TP Freq Asc - To sort the services in Ascending order of carrier frequency • TP Freq Des - To sort the services in Descending order of carrier frequency • A-Z By Service - To sort the services in Alphabetical order of service name(Ascending) • Z-A By Service - To sort the services in Alphabetical order of service name(Descending) Page 36
Favourite list option allows you to browse the Favourite
      services quickly. This menu can be invoked by pressing
      Favourite key. You can group the services under 4
      favourite categories supported in this s/w,

      You can set favourite option for the preferred service in
      the Channel organizer menu.

      You can toggle within the favourite groups by using the
      Left/Right keys. Preferred favourite group should be
      selected and OK key should be pressed. For the selected
      favourite group, service list will be displayed. Presentation
      of the selected service will be displayed in the zoom
      window.

      You can view a list of All the services inside the FAV list
      dialog by selecting the "All Channel" option. By pressing
      OK key, All service list will be activated.

      Multi Audio menu can be invoked by pressing the
      AUDIO key. If the service contains multiple audio
      streams then the audio selection interface will be
      displayed from which user can select the desired audio.
      To toggle within this menu UP/DOWN arrow keys
      should be used.

      This menu allows you to set the preferred audio mode
      and audio language supported in the current channel.

Page 37
If your television set is not equipped with an integrated Teletext decoder, you can still View the Teletext pages via STB. Select and switch to the channel you would like to view the Teletext information for. Press the TTxt function key to switch on the Teletext. • Teletext Mode - Teletext/TTxT Subtitle. To select Teletext or TTxT Subtitle use Left/Right arrow keys if it is available in the current stream. • Language selection - To select the language for Teletext or TTxT Subtitle, if it is available in the current stream. • Switch ON/OFF subtitle display - To switch on/off the subtitle display. Use the numeric keys to view the required Teletext page. Your entry will be displayed in the upper left corner of the screen. Once you have entered the Teletext page required, the receiver will search for the appropriate page. As all the Teletext pages can't be transmitted simultaneously, it may take a few seconds to display the requested page. Page 100 is the Index/Home page for most Teletext providers. Color keys are used as a link pages. By pressing GUIDE key, focus will be moved to Subpage entry option. Use the numeric keys to enter the Teletext sub page required. Once you have entered the Teletext sub page required, the receiver will search for the appropriate page. By pressing FAV key, Teletext page "FREEZE" operation is activated. The current page will not refresh until you release the "FREEZE" action by press the FAV key again. By pressing PG Up/Down key, the page will increase/decrease by 5. Page 38
Teletext Subtitle:

Teletext Subtitle Selection menu, can be invoked by
pressing Text key when no dialog is active.
• Teletext/TTxT Subtitle - To select Teletext or TTxT Subtitle
by Left/Right arrow keys if available in the stream.

• Language selection - To select the language for Teletext or
TTxT Subtitle if available in the stream.

• Switch ON/OFF subtitle display - To switch on/off the
subtitle display.
Teletext

Teletext subtitle information is displayed on the screen.

DVB Subtitle:

DVB Subtitle Selection menu, can be invoked by pressing
Subtitle key when no dialog is active.

• Language selection - To select the language for DVB
Subtitle if available in the stream.

• Switch ON/OFF subtitle display - To switch ON/OFF the
subtitle display
Subtitle

DVB Subtitle information is displayed on the screen.

Page 39
If the current service contains an MHEG page and Subtitles are
         OFF, the MHEG page will be loaded automatically. MHEG will
         be invoked with the "TEXT" key.
         If you set the Subtitles ON then the MHEG Page will be loaded
         after pressing the TEXT key manually.

         Keys Used :

         • MHEG Key : To start the MHEG application.
         If you press the MHEG key again then the active MHEG page is
         quitted.

         • Exit key : To quit from MHEG page.
         • Up / Down & Left/Right : To navigate the MHEG pages.
         • OK : To enter into selected MHEG page.
         • Color keys : To select the options listed in MHEG page.

Keys Used :

If MHEG page is active, then you Press the EPG Key / Green color key
to start the MHEG EPG page. If you press the EPG key again in an
MHEG EPG page, it will switch to Now/Next information list.

Keys Used:

• Up / Down keys - Used to navigate the programme within the list.
• Left / Right keys - Used to navigate with in the services.
• Yellow / Blue color keys - Used to watch the Previous/Next day
informations.

You can navigate the Programme within the list by using Up/Down
keys.

You can invoked the Now/Next EPG information for current carrier by
again pressing the EPG key. Also you can navigate within the carrier
by using Up/Down + OK key.

     Page 40
This S/W supports ESG (Electronic service Guide) for the Now/Next information. ESG displays the programme schedules with short & extended description of the selected service. Calling up Electronic service Guide ESG menu can be invoked by pressing the INFO key. ESG of the selected service will be displayed in the ESG menu. ESG menu contains all the current day event information of the programmes. If the selected service has no EPG data then the "No event description" message will be displayed. To toggle within the service list UP/DOWN keys should be used and for navigating within the events LEFT/RIGHT keys should be used. For the selected event, its short description will be displayed in the event information screen. You should press the INFO key to view the Extended event description of the selected event in the event list. On pressing INFO key, extended description information will be displayed in a separate dialog. When the Right key is pressed the focus will move to Next Event. On pressing INFO key, extended description information will be displayed in a separate dialog for Next event. Page 41
If the "OSD Time" is set as ON in the OSD menu, then the
current time will be displayed in the top right part of the
screen in the format of hh:mm:ss, when no menu is active.

When no menu is active, you can switch or hop to a specific
channel directly by entering the channel index using the
numeric keys of the RCU. The numbers entered so far will be
displayed in the top left part of the screen.

During direct channel entry, if the number pressed by the
user exceeds the total number of current mode channels,
then "Invalid entry" message will be immediately shown and
further entries will be restricted.

To increase or decrease the volume levels, Vol +/- keys should
be pressed, when no other menu is active on the screen.
Volume level can be increased or decreased in the range
between 1 to 16 levels. The default volume level will be set as
08.

Mute means to temporarily cut off the sound from the receiver.
For this, you have to press the "MUTE" key in the RCU. To clear the
mute state i.e., unmute, once again "Mute" key can be pressed
anywhere. If no menu is active, then Vol +/- or AUDIO keys will
also unmute the sound.

   Page 42
When you presses CH+/CH- keys, in the absence of any other
menu channel hopping takes place and then the current
channel's quick information is displayed in the Channel
Banner. The information includes Channel index, Channel
name, Date & Time, Satellite name, Carrier name, Carrier
parameters, Multi Audio & Audio Mode.

The channel's additional information such as mode indication
(TV or Radio), preferred status, locked status, favourite group
status, Scrambled status, EPG availability & its Current/Next
event name and Teletext availability are displayed as icons.
The above channel banner shows the Icons FAV and
current/next event display.

If you are in the Fav group or sorting service navigation then
the service name will be displayed in yellow color in the
channel banner.

 When TV\Radio key is pressed in presence of TV mode, Radio
 service gets switched with radio service banner.

For Radio mode, the channel banner will be displayed always
with the still picture, whereas for TV mode it will be cleared
after a certain time duration.

 In this menu you can show the next event information by
 using the Left/Right key. Here Left key for Current event &
 Right key for Next event.

Page 43
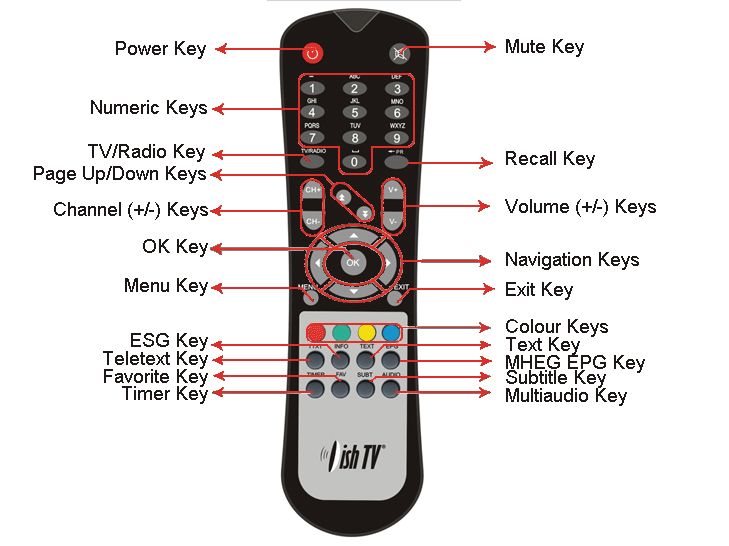
Page 44
You can also read