Picasa 2 for Windows - The Center for Teaching & Learning Luanne Fose, Ph.D - (Image Organizing & Editing Software)
←
→
Page content transcription
If your browser does not render page correctly, please read the page content below
Picasa 2 for Windows
   (Image Organizing & Editing Software)

The Center for Teaching & Learning
Luanne Fose, Ph.D.
Revised May 2, 2007

Table of Contents

FIRST THINGS FIRST: DOWNLOADING & INSTALLING PICASA ................... 1

SCANNING FOR IMAGE AND MOVIE FILES .................................................... 1

DECIDE WHERE YOU WILL STORE NEWLY IMPORTED FILES......................... 2

IMPORT NEW IMAGES ONTO YOUR COMPUTER WITH PICASA 2 ................... 3

ORGANIZATION ............................................................................................ 4
     Folders .....................................................................................................    4
     Albums .....................................................................................................     5
     Stars ........................................................................................................   5
     Keywords..................................................................................................       6
     Locating the File on Your Hard Drive(s).........................................................                 6
     Batch Processing........................................................................................         7
     Captioning ................................................................................................      7

EDITING – BASIC FIXES ............................................................................... 7
     Basic Fixes ................................................................................................ 8

EDITING – TUNING....................................................................................... 8

EDITING – EFFECTS ...................................................................................... 9

SHARING AND PUBLISHING YOUR PICTURES............................................. 10
     HTML Web Pages with Thumbnails ..............................................................10
     Placing the Exported HTML Web Page into Blackboard ...................................12

CREATE AN AVI MOVIE FROM YOUR STILL PHOTOS.................................... 13

EMAIL......................................................................................................... 14

SLIDESHOW ............................................................................................... 15

EXPORT PHOTOS TO A FOLDER ................................................................... 15

CREATE A GIFT CD ...................................................................................... 16

SAVING EDITED PHOTOS............................................................................ 17

BACKUP YOUR PHOTOS .............................................................................. 17
     Backup to a CD or DVD..............................................................................17
     Backup to Another Drive ............................................................................18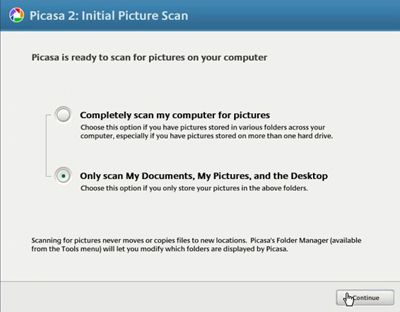
First Things First: Downloading & Installing Picasa
The Picasa 2 software is FREE and available for download from either:
http://picasa.google.com or from www.google.com/options/
Picasa takes up very little room on your computer (just over 3 MBs). It is a PC
product only (Macintosh users can use iPhoto instead, which Picasa designed its
program after).
After you install Picasa for the first time, a dialog box will appear (Figure 1) asking
you if Picasa can perform an initial scan. Choose to either scan your entire computer
for pictures or to only scan the My Documents, My Pictures, and the Desktop.
(We suggest the second choice). Click the Continue button and Picasa will
perform the scan for you and place the pictures in the Picasa Library.
Figure 1: Picasa 2: Initial Picture Scan
Scanning for Image and Movie Files
Once Picasa is installed you can use the Preferences menus to customize the
software. One of the most important things to start with is the Folder Manager.
1. At the top menu in Picasa, go to: Tools Folder Manager... to bring up
this dialog box (Figure 2). You can now decide which folders to scan only
once, which to ignore (remove from Picasa) and which folders to continue
watching for new image files.
The Center for Teaching & Learning 1
Luanne Fose, Ph.D.
Revised May 2, 2007Figure 2: Folder Manager
Decide Where You Will Store Newly Imported Files
You can have newly imported images saved in any location, including an external
hard drive. To set this location, go to:
1. Tools Options... to bring up the following dialog box (Figure 3):
Figure 3: Options
The Center for Teaching & Learning 2
Luanne Fose, Ph.D.
Revised May 2, 20072. Now you can use the Browse ... button to select any folder on any hard drive
connected to your computer.
NOTE: Picasa supports the following photo and movie file formats:
Images: .jpg, .bmp, .gif, .png, .psd, .tif
Movies: .avi, .mpg, .wmv, .asf, .mov (QuickTime)
RAW Data Files, including Canon, Nikon, Kodak, Minolta & Pentax cameras.
GIF and PNG are not shown by default so if you wish to see them, go into
the Options menu shown above and click on the File Types tab and select
them as well.
Tips & Tricks: Make sure that the folder you use to collect newly imported images is
also listed as a folder that Picasa is instructed to monitor. Refer to “Scanning for
Image and Movie Files” above.
Import New Images onto Your Computer with Picasa 2
1. If you hook up a camera, card reader, flash drive or scanner to your computer
that contains images, often times the following dialog box will appear asking
you what you wish to do with the media. If you wish to import the pictures
into Picasa, simply highlight the choice “Copy pictures to your computer
and view them using Picasa 2” and click OK. Picasa will open and you’ll
begin to see the pictures being imported.
Figure 4: Removable Disk
The Center for Teaching & Learning 3
Luanne Fose, Ph.D.
Revised May 2, 20072. Alternatively, if you already have a camera, card reader, flash drive or
scanner hooked to your computer, you can import new images onto your
computer by opening Picasa and clicking on the Import button at the top of
Picasa to open the following import dialog box.
Figure 5: Import Button
3. Picasa will list your connected devices. From the Select Device drop-down
menu, select the device or folder that contains your new images that you
wish to import. To import files off your hard drive(s) into Picasa, use:
Import Select Device Folder... and navigate to the files’ location.
4. In the Import Files/Folder dialog box, you can individually select one photo
and click on the Open button or click on the Import All button. Thumbnails
of your pictures will start to fill the Import Tray. You can click the Exclude
Duplicates check box at the bottom of the tray to prevent pulling in files
already on your computer. If the file is a duplicate, it will have a red “x” on it
when the Exclude Duplicates button is turned ON.
5. After the images have loaded into the Import Tray, click on the Import All or
Ctrl-click on the images you want to select and click the Import Selected
button.
Organization
Folders
Folders in Picasa represent the folders you see in Windows Explorer. Image files
deleted from a Picasa folder will be deleted from your system. Images moved from
one Picasa folder to another will move between the corresponding Windows folders
as well.
NOTE: if you edit a photo in Picasa, the original photo is kept in your
Windows folder.
The Center for Teaching & Learning 4
Luanne Fose, Ph.D.
Revised May 2, 2007Albums
Albums in Picasa have no counterparts outside of Picasa. They can be thought of as
“virtual folders” that can be created and deleted without actually affecting any
Windows folders. Pictures that are moved from one album to another never leave
their actual Windows folders.
Getting started with albums:
1. Select a picture (or pictures) using Ctrl-click or drag-select.
2. Click on the Add to pull-down menu at the bottom of the Picasa window and
select New Album.
3. A dialog box will appear asking you to name the album and provide a
description. Fill out the details as you desire and click OK.
NOTE: Any picture can be assigned to more than one album at a time. To
add more pictures to an existing album, select a picture, click on the Add to
drop-down menu, and then select the appropriate album from the list. You
can also just drag the image over into the appropriate album in the Library.
Tips & Tricks: Just as in most MS Windows applications, you can select multiple non-
adjacent images by clicking on a thumbnail and then holding down the Ctrl key while
clicking on subsequent thumbnails. Also, you can click on the first of a long list of
images and then, holding down the Shift key, click on the last of the files to select
the first, last and all the files in-between.
Stars
All of your favorite photos can be assigned a star to facilitate finding them in the
future.
1. To assign stars to your photos: Select a thumbnail (or thumbnails) and
click on the button. A star will be assigned to that picture or pictures. Now
that you have your favorite photos starred, you can access them very quickly.
2. To remove a star: Select the starred thumbnail and click on the button
again.
3. To search for starred photos: Click on the Show/Hide Search Options
drop-down arrow to reveal the search options.
The Center for Teaching & Learning 5
Luanne Fose, Ph.D.
Revised May 2, 2007Figure 6: Show/Hide Search Options
4. Click on the Starred button to bring all your starred pictures to the top of the
search results.
Click here to see
all the starred
images.
Enter Keywords Click here to get back
here. to folder view.
Figure 7: Starred Search Button
5. To get back to your Folders and Albums (Library View), click again on the
hide/show search options drop-down arrow.
Keywords
The advantage of assigning keywords to photos is if you ever need to locate
particular pictures, typing an appropriate keyword in the search box will bring those
photos to the top of the search area.
1. To assign keywords: Click on a photo and then from the top menu select
View Keywords... and type in a keyword to be associated with that
picture. Click Add and then type another keyword. Continue to click Add and
provide keywords until you feel you have enough keywords in the list. Click
OK.
2. To get back to your Folders and Albums (Library View), click again on the
hide/show search options drop-down arrow.
Locating the File on Your Hard Drive(s)
To figure out where an image is located on your hard drive(s), right-click on the
image and then select Locate on Disk.
The Center for Teaching & Learning 6
Luanne Fose, Ph.D.
Revised May 2, 2007Batch Processing
To apply a process to several pictures at once (including renaming them), select the
pictures to be adjusted and then from the top menu select Picture Batch Edit
and then select the process to be applied to all the selected images. Be very careful
with batch processing because many times batch processing cannot be undone!
WARNING: If you rename images with batch processing, you CANNOT undo
the process.
Captioning
1. Double-click on a thumbnail to open that photo in the editor. Click on the
words “Make a Caption.” You can now type a caption.
2. If you'd like to delete a caption, simply click the trash can icon to the right of
the caption text. To edit a caption, place your cursor at the beginning or end
of the caption and use your keyboard's arrow keys to change the cursor's
position. It's not possible to use your mouse to re-position the cursor to the
middle of the text. Use the Backspace key to erase and hit Enter.
3. Please note that captions will only be displayed in Picasa and other IPTC
compatible programs. Also, your captions won't be displayed when you print,
email your photos, or run the auto-slideshow; they are however, displayed
when you create HTML pages.
Editing – Basic Fixes
Double-click on a thumbnail to open that picture in the editor. You can now apply
various processes to improve the look of your image:
Rotate the Image by clicking on either the clockwise or counter-clockwise arrows.
Rotate the
image.
Figure 8: Rotate the Image
The Center for Teaching & Learning 7
Luanne Fose, Ph.D.
Revised May 2, 2007Basic Fixes Most of the work on the image starts with the processes available at the Basic Fixes tab. NOTE: Any of these changes can be undone by clicking on the Undo ___ button in the Basic Fixes window. I’m Feeling Lucky can be selected to allow the Picasa software to take its best shot at improving image quality. (This is similar to the Enhance button in iPhoto) Auto Contrast and Auto Color work similarly to I’m Feeling Lucky but only affect contract and color of the image. Redeye can be selected from the Basic Fixes to reduce excessive redness from eyes that were photographed using flash cameras. Select Redeye and then drag the mouse diagonally across the picture of the eye. Picasa will de-saturate the red color within the boundary of the selected area. Click the Apply button to finalize the process. NOTE: Unfortunately, unlike some other programs, you cannot use the zoom tool during the redeye process. Crop a photo by selecting the Crop button. Drag the mouse diagonally across the area you want to retain in the cropped photo. Click on Apply to complete the process. Straighten a photo by opening that photo in the editor. Click on the Straighten button. When the grid appears over your image, slide the lever left or right to get the desired leveling effect. Click on Apply. Editing – Tuning Clicking on the Tuning tab in the editor will make several sliders available that will “fine tune” your image. You are encouraged to experiment with the sliders to see how they affect an image. Sliders include: Fill Light, Highlights, Shadows, and Color Temperature. Neutral Color Picker is also available with the tuning adjustments in the editor but is a little less intuitive. Click on the eyedropper icon and then use the dropper to click on some spot in your image that you would expect to look white. This should remove unwanted color cast from the entire picture (e.g., the pale green caused by fluorescent lights). NOTE: Sometimes clicking the eye dropper on what you would expect to be black works just as well when no part of your picture is intended to be pure white. The Center for Teaching & Learning 8 Luanne Fose, Ph.D. Revised May 2, 2007
Editing – Effects

Clicking on the Effects tab in the editor will make a dozen special effects available.
Most of the effects are self-explanatory but we will address a few in detail here:

Graduated Tint is often used to enhance an otherwise lackluster sky.

   1. With your image open in the editor, click on the Graduated Tint button.
      Crosshairs will appear on your image. Use your mouse to move the crosshairs
      to a position at the horizon or just a bit above the horizon.

   2. Click on the Pick color icon located to the left of your image in the editor
      window.

   3. When the eyedropper appears, move it around the color palettes until you see
      an effect you like. Click your mouse. The Feather and Shade sliders can be
      adjusted now to fine tune the effect.

   4. Click the Apply button.

Filtered B&W will give you more control than the regular B&W filter. This is
especially true when skin tones are present in the photograph.

   1. With a full color picture open in the editor, click on the Filtered B&W effect
      button.

   2. Click on the Pick Color icon. Move the eyedropper around the color pallets
      while watching the image until you see an effect that pleases you.

   3. Click the mouse to stabilize the image.

   4. Click the Apply button to complete the conversion to black and white.

Sharpen is almost always useful as the last adjustment to a picture. Clicking the
Sharpen button will sharpen the image. Clicking it a 2nd time will sharpen the image
even more. However, a 2nd application of the Sharpen button often results in an
undesirable outline around all the objects in your image so use it sparingly.

Tips & Tricks: Even though the Sharpen effect is usually the last effect applied to an
image, it is often better to apply a Graduated Tint after the sharpening process to
avoid a grainy look to the tinted portion of the picture.

The Center for Teaching & Learning                                                       9
Luanne Fose, Ph.D.
Revised May 2, 2007
Sharing and Publishing Your Pictures
HTML Web Pages with Thumbnails
1. Start with a single click on an image. It will appear in the Image Tray.
Figure 9: Image Tray
2. Click on the Hold button to keep the image in place. Repeat this for all the
images you want to appear in your web photo gallery.
3. Click on the Add to Album button (to the immediate right of the image
tray).
4. Click on New Album. Fill in the blanks of the dialog box.
5. Click OK.
6. The new album containing your selected photos will appear at the top of the
Library view. All albums have a blue album icon displayed in the header area
to differentiate them from folders (which look similar to manila folders).
7. At this point, you may want to add captions because they will show up on the
photos in the HTML web album.
8. Click on the album header area and then from the top menu select Album
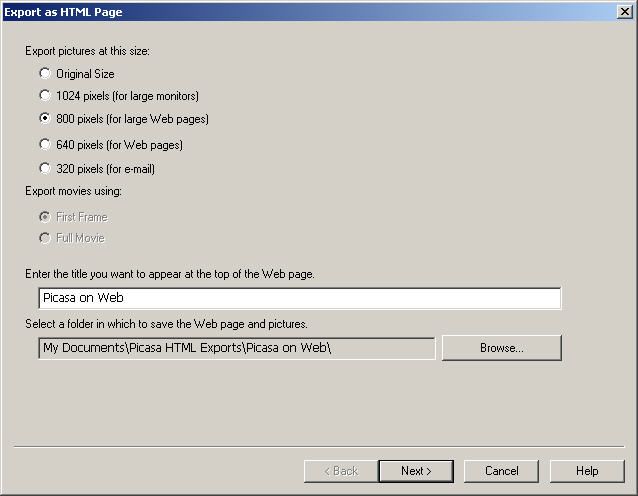
Export as HTML Page...
9. A dialog box will appear. Choose the size that you want to export the pictures
as. Click the Browse button to determine where all the resultant web files
will be saved.
The Center for Teaching & Learning 10
Luanne Fose, Ph.D.
Revised May 2, 2007Figure 10: Export as HTML Page
10. Click the Next> button.
11. Select a template.
12. Click the Finish button.
13. After viewing your new web photo gallery on your local PC, you can move the
entire new folder and all its contents to your web server for the world to see.
This can be done with an FTP program like WS_FTP or from within any web
authoring program, such as Dreamweaver, that has a built in file transfer
utility.
Tips & Tricks: To eliminate the Picasa logo from your web pages and move the rest
of the material closer to the top margin, do the following before uploading the web
pages to your web server:
1. Minimize the browser that previously displayed your HTML web album.
2. Find the file called Style.css and right-click upon it. Choose Open With
Notepad
The Center for Teaching & Learning 11
Luanne Fose, Ph.D.
Revised May 2, 20073. Now edit the file in the following way with any text editor (e.g. Word Pad or
Notepad):
4. Change the “MARGIN-TOP: 70px” to read “MARGINE-TOP: 10px”
5. Delete the entry that reads “BACKGROUND-IMAGE: url (‘logo.gif’);”
6. Save the newly edited style.css file as a .txt file in the same folder as before.
7. Maximize your browser page where the web album appeared previously and
hit the Refresh button on your browser.
When you drag the index.html page into any browser, you should notice that the
Picasa logo is gone from your web photo gallery and you can now upload the
resultant web files folder to your web server or into Blackboard.
Placing the Exported HTML Web Page into Blackboard
It is simple to place this exported HTML version for viewing from Blackboard. Here
are the steps:
1. Locate the Exported HTML folder on your computer and right-click on the
folder. Select Send to Compressed (zipped) file. This will create a
zipped version of your folder. The zipped version is the one you will use in
Blackboard.
2. Open the Blackboard course where you wish to place the web page.
3. Click on the Control Panel link.
4. Select the link for the area in which you wish to place the web page (e.g.,
Course Materials, Assignments, etc.)
5. Click on the Item button.
6. Type a “Name” for this item. Provide a description as well if you wish in the
“Text” box.
7. Scroll down to the “Content” section of the page. Next to attach local file,
select the Choose File or the Browse button and navigate to the zipped
version you created in Step 1 above.
8. Where it says “Name of Link to File,” type in a name for the link. This is the
link that students will click on to see the file.
9. Where it says “Special Action,” select Unpackage this file.
The Center for Teaching & Learning 12
Luanne Fose, Ph.D.
Revised May 2, 200710. Scroll down to the “Options” section of the page and select the following:
Make the content available – Yes
Track number of views – Yes
Choose date and time restrictions if you wish (Leaving this alone will
cause it to display from now until the time that the course is
unavailable to students)
11. Click on the Submit button.
12. Another page will follow asking you to select the starting point for the web
page. (If you don’t see this page it is because you didn’t choose “Unpackage
this file” in Step #9 above.) Scroll down the list until you find the
index.html file and highlight it by clicking upon it.
13. If you wish, select for it to Launch in a new window.
14. Click OK.
15. Follow the breadcrumbs at the top of your Blackboard window to return to
the student view of your course by clicking on the name of your course.
16. Navigate to the area where you placed the file and click on its link to test it.
If you were successful, you should see your web page with all the images
there.
Create an AVI Movie From Your Still Photos
1. Start with a single click on an image. It will appear in the Image Tray.
2. Click the Hold button to keep the image in place. Repeat this process for all
the images you want to appear in your web movie.
Figure 11: Image Tray with Hold Button
The Center for Teaching & Learning 13
Luanne Fose, Ph.D.
Revised May 2, 20073. Click on the Add to drop-down menu (to the immediate right of the image
tray).
4. Click on New Album from the menu. Fill in the blanks of the dialog box as
you desire. Click OK.
5. The new album containing your selected photos will appear at the top of the
Library view. All albums have an icon displayed in the header area to
differentiate them from folders.
6. Click on the album’s header to select that album. Now, click on the first
image in the album. From the top menu, select Edit Select All so that all
the images in your new album are selected.
7. Now from the top menu select Create Movie...
8. In the dialog box that appears, select the duration of display for each image
in seconds and select a resolution for the movie. Click OK.
9. The Video Compression dialog box will then appear. Select a video
compression codec from the drop-down menu in this dialog box. Experiment
with each to determine which works best in your situation. After you make
your selections, click OK. Picasa will then begin rendering the video. This will
take a few minutes depending upon the settings you selected above.
10. Find the resultant .avi file in:
C:\Documents and Settings\User Name\My Documents\My Pictures\
Tips & Tricks: If you choose “Full Frame (Uncompressed)” instead of one of the
listed codecs, the result will be a HUGE *.avi file, which your computer may struggle
to display smoothly unless you have a lot of RAM. However, a Full Frame
(Uncompressed) file can be useful if you wish to import the file into a video editing
application for exportation back to digital tape or DVD.
Email
You can email pictures directly from Picasa. Picasa will automatically convert
Photoshop or Camera RAW files to JPEGs before sending them by email.
1. Select a thumbnail to place a picture in the picture tray and then click the
Hold button.
2. Repeat this for all the shots you want to send out by email.
3. Click the Email button at the bottom of Picasa.
The Center for Teaching & Learning 14
Luanne Fose, Ph.D.
Revised May 2, 20074. Select your preferred email application from the list in the menu box:
• Your computer’s default email client (Outlook Express, Netscape, etc.)
• Gmail (this requires that you have a Gmail account)
• Picasa Mail (this requires that you have a Picasa Mail account)
Slideshow
Select a Folder or Album by clicking in the header area. At the top of the Picasa
window, click on the Slideshow window to create a slideshow of all the pictures in
the selected Folder or Album.
Export Photos to a Folder
You can use Picasa's Export feature to save copies of your edited photos. Unlike
Save, exporting allows you to choose a different location to export to, and allows
you to select the image size and quality of the exported copy.
1. Select the photos you want to export. Click Hold to select photos from
different folders.
2. Click the Export button at the bottom right of the screen.
3. In the Export to Folder screen, you'll see the option to change the folder
name and location of your exported photos, as well as the image size and
quality options.
4. Click OK.
Your exported images will now be saved on your hard drive and be visible in Picasa.
By default, the copied images will be in My Pictures\Picasa Exports\folder name
you chose on your computer. In Picasa, you can find the exported photos under
Exported Photos.
Be aware that if you use the Export feature to send a file to a folder on your hard
drive, any Photoshop files or Camera RAW files will first be converted into JPEGs.
However, any cropping or editing processes will remain intact. The same is true of
burning a CD using the Gift CD function discussed below.
The Center for Teaching & Learning 15
Luanne Fose, Ph.D.
Revised May 2, 2007Create a Gift CD
Creating a gift CD/DVD allows you to copy your photos to a CD or DVD that you can
give to friends or family. With a gift CD/DVD, you also have the option of including
auto running slideshow and a copy of the Picasa installer, so you can share the
software.
1. Select the photos you wish to copy to a gift CD/DVD.
2. Click the Gift CD button.
3. If you want to include the auto-running slideshow, check the Include
Slideshow box.
4. If you wish to include a copy of Picasa on the CD/DVD, check the Include
Picasa box.
5. You can add more photos to the gift CD by clicking the Add More button.
6. If you want to resize the photos, you can do so using the Picture Size drop-
down menu. If you do not wish to resize your photos, make sure to select
Original Size.
7. Enter a name or title for your gift CD.
8. When you are ready, click the Burn Disc button.
At this time, it's not possible to copy audio files or include music on your CD or DVD.
NOTE: If you want to include only photo files for your recipient, uncheck
both Include Slideshow and Include Picasa. This will burn only the folders of
your photos. This format might be a good idea if you want to take the CD to
a photo lab to have the photos printed.
When Picasa is creating the image to be burned to the CD or DVD, Picasa will show
"Calculating" in the blue bar above the "Burn Disc" button. Please wait until this
message goes away (it should state how many files and folders are ready to be
burned) before pressing the "Burn Disc" button.
The Center for Teaching & Learning 16
Luanne Fose, Ph.D.
Revised May 2, 2007Saving Edited Photos
Saving in Picasa works differently than in other applications because it is specifically
designed to keep your original photos safe. Here's a brief overview of the different
save options in Picasa.
Save - Select Save from the right-click menu when you want to save changes for
an individual picture (or a group of selected photos).
Save Changes - The Save Changes button appears for folders with edited photos.
Clicking Save Changes will save all the edits for a particular folder.
Save a Copy - This is the quickest way to create a copy of a photo. Picasa will
append the numeral “1” to the old file name to create a file name for the new file.
Subsequent copies will have 2, 3, 4, etc. appended to the original file name. The new
copy will be saved in the same Windows folder as the original file. To locate the file,
right-click on the thumbnail and then select Locate on Disc.
Save As - Click File Save as when you want to create a copy with a different file
name or save your copy to a different location.
Export - When you want to resize, and/or change the image quality of the photo
you're saving.
NOTE: Save Changes and Save both create copies of your originals in a folder
named Originals. Export creates an edited copy in a folder named Picasa Exports
within My Pictures.
Backup Your Photos
Backup to a CD or DVD
Using Picasa's backup feature, you can burn your photos to CD or DVD. This backup
set will allow you to install your photos as you have arranged them onto a new
computer.
Follow the steps below to create a backup:
1. Click the Tools menu and select Backup Pictures.
2. To backup all video files in Picasa, click on New Set in the Step 1 section,
click on Select All in the Step 2 section.
The Center for Teaching & Learning 17
Luanne Fose, Ph.D.
Revised May 2, 20073. If you wish to back up select files, click the empty boxes next to the folders
you wish to backup (on the left side of the backup screen). Only check-
marked folders will be included in the backup.
4. The blue bar above the "Burn" button will state how many blank CD or DVDs
will be needed to complete the backup. Insert your blank CD or DVD, wait 20
seconds for Windows to read the disk; then click the Burn button.
5. When you insert this backup into a new computer, you will be prompted to
restore your photos. You can choose to have the photos copied back to their
original locations or you can select a new location for your photos.
NOTE: The backup does not install Picasa. You will need to download and
install Picasa from the web site.
Backup to Another Drive
You can choose to run a Picasa backup to another drive instead of to a CD or DVD.
1. If you are copying your backup to a removable drive, hook it up first.
2. Select Backup Pictures from the Tools menu.
3. Click New Set.
4. Label the New Backup set.
5. Select Disk to Disk Backup.
6. Click Choose.
7. Select the Drive or Folder you wish to export the Backup to.
8. Make sure all the Folders and/or Albums you wish to include in the Backup
are selected.
9. Click Backup.
Your backup will be copied to your drive of choice.
ACKNOWLEDGEMENTS: A BIG THANK YOU SHOUT OUT to Walter Gajewski,
Media Lab Coordinator from CSU Long Beach for providing me with his initial
tutorial on Picasa, which greatly assisted me in creating this tutorial for Cal
Poly faculty and staff.
The Center for Teaching & Learning 18
Luanne Fose, Ph.D.
Revised May 2, 2007You can also read