Business Portal "YourGLS"
←
→
Page content transcription
If your browser does not render page correctly, please read the page content below

Business Portal „YourGLS“

Customer Presentation | April 2020 | Public
Content (1/2)

    1        YourGLS at a glance
    2        YourGLS registration
    3        General notes
    4        Overview of the YourGLS features
    5        User administration
    6        User settings
    7        Direct printing with QZ Tray
    8        User settings – Returns settings
    9        Returns based on returns settings
    10       Address book
    11       Shipper addresses
    12       Send parcels

2        Customer Presentation | April 2020 | Public
Content (2/2)

    13       Dispatch preparation
    14       Sporadic pickup
    15       Pickup/Return request
    16       Return parcels
    17       Parcel management
    18       End of day
    19       Parcel tracking
    20       Track & trace protocol
    21       Notification settings
    22       Invoices
    23       Sending parcels for suppliers
    24       Incoterms in international trade – Overview

3        Customer Presentation | April 2020 | Public
YourGLS at a glance
Sending parcels, managing consignee addresses, requesting pickups, sending invoices or using
advanced tracking and tracing - with your personal YourGLS account you have a user-friendly
web-based platform at your disposal around the clock with tools for fast and smooth dispatch
processing:
Full functionality from package creation to online invoicing
Access via all common Internet capable devices, responsive design
Easy to use, complete the desired action with just a few clicks
Protection of sensitive data, only available for registered users
Customization options
Comprehensive range of self services
Manage your shipping easily online.
You don't need any additional software.
gls-group.eu
4 Customer Presentation | April 2020 | Public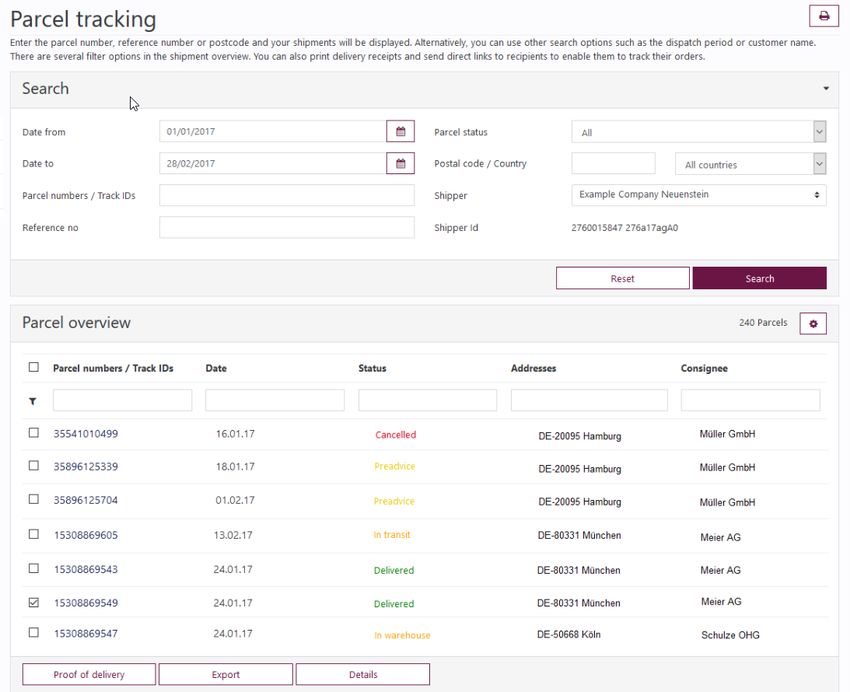
YourGLS at a glance
Short description
Password-protected web portal for business customers
No additional software required1
Objectives
Provide a user-friendly, state-of-the-art web-based platform
with tools for fast and smooth shipping processing
Comprehensive range of self services
Access via all common Internet-enabled devices2
Target group Companies that regularly or sporadically use web-based
shipping solutions, i.e. that also create parcels online.
Webshops for the simple handling of their shipment.
Customers who wish to ship via other systems and use the
additional features of YourGLS.
1 Exception: Direct printing QZ.io, if necessary PDF viewer 2 desktop PC, smartphone, tablet
5 Customer Presentation | April 2020 | Public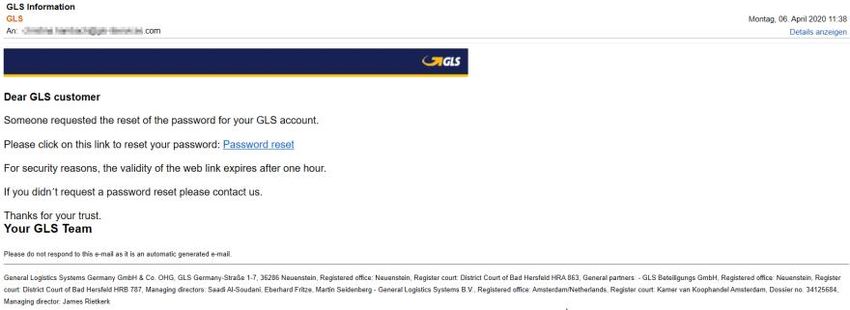
YourGLS registration
Registration
As a business customer, you will
receive your personal YourGLS
account on request.
You can reach your GLS team from
Monday to Friday from 8:00 am to
5:00 pm under the following
contact details:
Phone: 06677–646 90 70 30
Email: kundenservice@
gls-germany.com
Business customer contact form
on the GLS website
Login
You can then log in to the GLS
website with your personal access
data.
6 Customer Presentation | April 2020 | Public
YourGLS registration

    Your first login
    At the first login you will be
    asked to change your
    password.

    After entering the old password
    and creating the new password
    according to the rules below,
    resetting the password is
    successful and you can log in
    again and work in YourGLS.

      i Rules for creating your new
    password:
        •    Password length: 10 to 20 characters
        •    Must include at least:
             • 1 upper case letter (A-Z)
             • 1 lower case letter (a-z)
             • 1 number (0-9)
             • 1 special character: !#$%&()*+-/?@[]\^_{}~

7           Customer Presentation | April 2020 | Public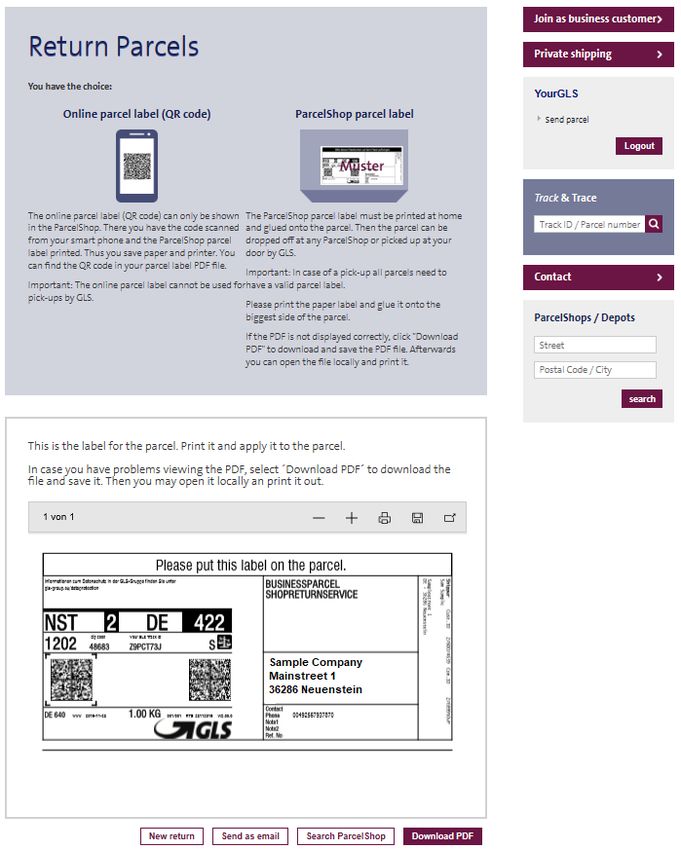
YourGLS registration

    Forgot password? I
    If you have forgotten your
    password, you can use the
    "Forgot password?" link in the
    login area to then have a link to
    reset your password sent to
    you by email.

    Enter your user name and
    email address and then click on
    "Send".

    A new window will open and
    you will receive an email.

    To reset your password, follow
    the “Password reset" link in the
    email.

8        Customer Presentation | April 2020 | Public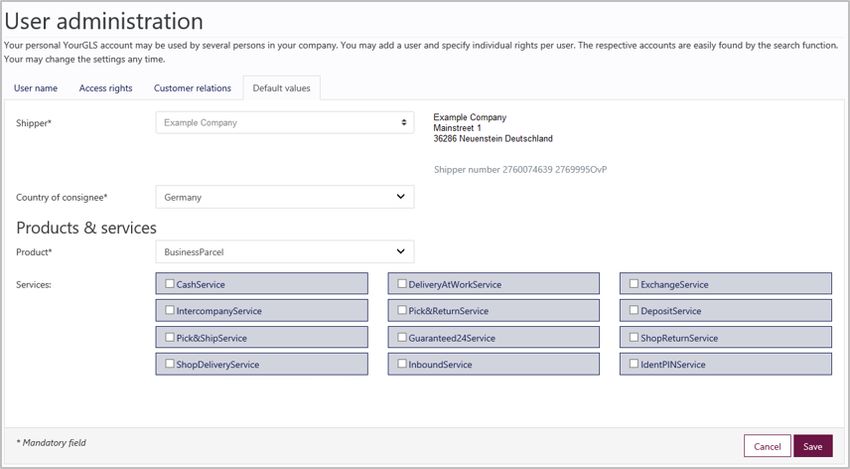
YourGLS registration

    Forgot password? II
    The "Password reset" web
    page opens. You can enter the
    new password taking into
    account the new rules, confirm
    it and then click on "Apply".
    Now you can log in with your
    newly created password.

    If the password has not been
    reset within an hour, the
    following message will appear
    after clicking on the link (see
    right):
    In this case you have to go
    through the process from the
    beginning.

9       Customer Presentation | April 2020 | Public
YourGLS registration

     Session expired
     If you have been inactive on the
     website for more than 20
     minutes, you will need to log in
     again.

10       Customer Presentation | April 2020 | Public
General notes
Please accept cookies and enable JavaScript in your Internet browser so that you can use
YourGLS to its full extent.
Internet browser recommendation:
Mozilla Firefox (ideal), Google Chrome (ideal), Opera, Safari
please always use the latest available version!
To use direct printing of parcel labels, the latest version of “QZ Tray 2.0” must be installed and
started. Further information can be found under:
https://qz.io/download/
https://qz.io/wiki/faq#java-versions
11 Customer Presentation | April 2020 | PublicOverview of the YourGLS features
Note: The available functionalities depend on the respective user rights.
12 Customer Presentation | April 2020 | PublicUser administration
In the user administration you
can create further YourGLS
users under your "main user".
Search for and/or add users
Enter your search criteria and
select "Search" to search for
already created users and edit
their individual settings.
Select "Add user" to create a
new user. You will be taken to a
new page and you can perform
individual settings for this user,
described on the following
pages.
13 Customer Presentation | April 2020 | PublicUser administration – User name
“User name” tab
Select an account type for the
new user:
Customer: Sub-account
Supplier: Supplier-account
Enter and/or edit data for the
(new) user:
User name
First and last name i Choose Sub-account, if you want to create another user
Email address for your main user within your company.
Also select for the user: Select Supplier-account, if you want to create a YourGLS
Language account for one of your suppliers so that they can send you
packages on your behalf.
Status (active or inactive)
Password (at least 10 A separate activation is required to use this function!
characters) Please contact your GLS sales department.
Please find on the following
page further information on
password assignment.
14 Customer Presentation | April 2020 | PublicUser administration – User name
Password assignment for the
i The rules for password assignment are displayed when
new user
you move the mouse over the Info button .
You can only create the new
sub-user if you follow the rules
for assigning the password.
For example, the following error
messages may appear if they
are not met:
The password is too short. It
needs to be at least 10 chars
long.
i Rules for creating your new
The new password is too long. password:
• Password length: 10 to 20 characters
The password does not • Must include at least:
contain enough special • 1 upper case letter (A-Z)
• 1 lower case letter (a-z)
characters. • 1 number (0-9)
• 1 special character: !#$%&()*+-/?@[]\^_{}~
The new and the confirmed
password do not match.
15 Customer Presentation | April 2020 | PublicUser administration – Access rights
“Access rights” tab
Assign (at least) one of the
YourGLS applications to the
user.
The user can then use the
selected applications in his
YourGLS Account.
16 Customer Presentation | April 2020 | PublicUser administration – Customer relations
“Customer relations” tab
In the “Customer relations” tab,
first the shipper is specified for
the user and after that the
access rights per shipper are
defined.
At least one customer relation
must be defined.
Only the access rights
previously assigned to the user
in the “Access rights” tab can
be assigned.
17 Customer Presentation | April 2020 | PublicUser administration – Default values
“Default values” tab
The default values are
automatically inserted when the
user creates a new parcel
label.
Select the following default
values for the user:
Shipper
Country of consignee
Product & services
Then click on „Save“ to create
the user.
18 Customer Presentation | April 2020 | PublicUser administration – Successful creation of the new user
Search result user administration
After successful creation, the
new user appears in the user
administration search result list.
Its status is "Active, password
change pending".
i Once created, the new user will be requested to change his password on his first login attempt.
He or she is also requested to do so if the main user has changed the password for him or her or
has changed the status from inactive to active. He will be directed to the “Password reset" page.
Only after entering the old password and creating the new password according to the rules
mentioned above, the password reset is successful and the user can log in again and work in
YourGLS 2.0.
19 Customer Presentation | April 2020 | PublicUser settings – Your account
In the user settings you can
make individual settings for
your YourGLS account:
“Your account” tab
Select a language.
Change your password if
necessary. Please refer to the
following page for further
information.
i What is the parcel status link?
Choose a password for the
parcel status link. You can send a web link to your consignee via email so that
they can follow the status of the shipment directly.
20 Customer Presentation | April 2020 | PublicUser settings – Your account – Password change
To change your password,
proceed as follows:
Click on the "Change" button
behind Password. A new
window "Change password"
opens.
Enter your old password.
Then create your new
password:
i Rules for creating your new
password:
• Password length: 10 to 20 characters
• Must include at least:
• 1 upper case letter (A-Z)
• 1 lower case letter (a-z)
• 1 number (0-9)
• 1 special character: !#$%&()*+-/?@[]\^_{}~
Click on "Apply" to save the
new password. i The password rules are displayed when you move the
mouse over the info button .
21 Customer Presentation | April 2020 | PublicUser settings – Default values
“Default values” tab
The default values are
inserted automatically when
you create a new parcel label.
Select the default values for
the
Shipper
Consignee country
Products & Services
22 Customer Presentation | April 2020 | PublicUser settings – Printer settings
“Printer settings” tab
Select a default printer setting for
printing your parcel labels:
Print Preview:
The parcel labels are
displayed in the browser
window and can then be
saved and printed.
Direct printing: i To use direct printing, the latest version of Java and QZ
The parcel labels are printed Tray 2.0 must be installed and started, see the following
directly on the assigned page.
printer.
Select a parcel label format: A4
(delivery note pocket format), A5
or A6
23 Customer Presentation | April 2020 | PublicDirect printing with QZ Tray
Download the latest version of
QZ Tray
Logout of YourGLS and close
your browser
Install the latest version of
Java
Install the latest version of QZ
Tray
Restart the browser i QZ Tray requires at least 512 MB free RAM.
Please delete older versions of Java and QZ Tray.
New login to YourGLS
If direct printing does not work after installing the latest version of
„Printer settings“ tab Java and QZ Tray, restart the computer.
In the „Administration“ tab,
select the “User settings” menu
item.
Select „Direct Printing“ in the
„Printer settings“ tab
Save your settings
24 Customer Presentation | April 2020 | PublicUser settings – Returns settings
“Returns settings” tab
Here you can personalise your
“Returns” page with your
company logo and name.
By selecting a shipper (= returns
address), entering any URL key
and then clicking on “Save”, you
can generate a link for your
consignees.
This link enables your
consignees to create their own
returns labels.
Save the link and send it to a
consignee if required (see next i The link can be used as often as you like. If required,
page). you can generate a new URL (Self-service link) as
described on the left. Old links that have already been sent
become invalid.
Currently, images can be saved in JPEG-format with a
maximum size of 60 pixels height / 300 pixels width.
25 Customer Presentation | April 2020 | PublicReturns based on returns settings (user settings) (1/2)
The link takes the consignee to
your “Return Parcels" page in the
open area of the GLS web portal.
The consignee address of the
returns parcel (the returns address
entered in the user settings under
returns settings) is displayed.
Example Company
Your consignee (now the shipper of
the returns package) enters his or Street
her shipper address for the returns
parcel (consignor information of
returns parcels).
Mustermann GmbH Max Mustermann
Click “Continue” to create the
0170 123456789
returns label. Musterstraße 1 info@mustermann.de
Germany
26 Customer Presentation | April 2020 | PublicReturns based on returns settings (user settings) (2/2)
Now the consignee or return parcel sender can
save and print the return parcel label via
“Download PDF”.
Via “Send as email” the returns label (including
mobile parcel label) can be forwarded to an email
address.
Via “Search ParcelShop” the
nearest ParcelShop including address, contact
details, and opening hours will be displayed.
Using “New return” the consignee or return
parcel shipper can generate another returns
label.
Alternatively, you can generate the returns label
yourself and make it available to the consignee.
You can find more information here.
i What is a mobile parcel label?
The customer can present his smartphone with the
mobile parcel label (QR-Code) in the ParcelShop.
There, the QR code is scanned from the smartphone
and a parcel label is printed out.
27 Customer Presentation | April 2020 | PublicAddress book – Add consignee addresses
Here you can edit consignee
addresses, add individual
consignee addresses and
import entire consignee lists.
Adding consignee addresses
Select "Add" and select a
shipper.
Enter all required data for the
new consignee address.
You can use numbers and
letters for the consignee ID.
You can then enter this
Mustermann GmbH
consignee directly by using his 0172 132456789
or her consignee ID during info@Mustermann.de
generating a parcel label. Muster Street
Max Mustermann
28 Customer Presentation | April 2020 | PublicAddress book – Edit consignee addresses
Editing consignee addresses
Enter your search criteria and
select “Search”.
Select a consignee address in
the search results (Consignee
list) and select “Edit”.
Edit the data.
29 Customer Presentation | April 2020 | PublicAddress book – Import consignee addresses (1/4)
Importing consignee addresses
Select “Import” to import
an address file containing
the data of your consignees.
The addresses of your
consignees will automatically
be available to you if you want
to generate a parcel label.
Define a delimiter. Use the
delimiter you defined in the file
you want to import, such as
comma (,), semicolon (;), colon
(:), and so on. Do not use
spaces.
30 Customer Presentation | April 2020 | PublicAddress book – Import consignee addresses (2/4)
Importing consignee addresses
Select your address file via
“Select file”. The file must be a
text file (ASCII coded). You can
use formats such as CSV or
TXT.
Then select the “Import” button.
The import status of the data
records is displayed. Please
make sure that the import was
processed without errors.
31 Customer Presentation | April 2020 | PublicAddress book – Import consignee addresses (3/4)
Information on the file format of the imported file
i The import file must not contain a
header line, but only the pure address
data.
i The address data must be specified
from left (Consignee-ID) to right
(BlockNo) separated by commas in the
import file. Examples can be found on
the following page.
1) Recommendation: “BlockNo” should be entered in a separate field, independent of “Street”.
2) ISO 3166-1 alpha-2 / alpha-3 / numeric [https://en.wikipedia.org/wiki/ISO_3166-1]
3) For Ireland, enter the Eircode (postal code in Ireland), the routing key (first three alphanumeric characters of the Eircode) or the location.
The Eircode consists of a three-digit routing key and a unique identifier consisting of 4 alphanumeric characters.
32 Customer Presentation | April 2020 | PublicAddress Book – Import Consignee Addresses (4/4)
Examples of imported files:
(1) All fields are filled in (separated by „,“ as delimiter):
4,Sample GmbH,sample trade,logistics,Main-Street,sample,DE,14469,Potsdam,Martina
Sample,+49301234567,martina.sample@test.de,comment,+49,172,1234,567,11
(2) Only mandatory fields are filled in + BlockNo [recommended] (separated by „;“ as
delimiter):
12;Sample GmbH;;;Main-Street;;DE;14469;Potsdam;;;;;;;;;3
33 Customer Presentation | April 2020 | PublicShipper addresses – Add and edit
Here you can add and edit
alternative shipper addresses for a
consignor.
These addresses are then printed
as the shipper address on the
parcel label.
Adding alternative addresses
Select “Add”.
Enter all required data for the new
address.
Editing the alternative addresses
Select an address in the list and
select “Edit”.
Edit all required data of the existing
address.
34 Customer Presentation | April 2020 | PublicSend Parcels – Step 1
Enter all the address data
required for parcel shipping.
Enter the consignee address.
Option 1: Enter the consignee
ID
Option 2: Use the “Search”
button
Option 3: Manual input
Select the shipper and, if
necessary, an alternative
shipper address.
i You can also use YourGLS
with the keyboard for quick
data entry:
To do this, enter the consignee
ID, select the TAB button, then
press the ENTER button to go
to step 2. Search in the address book
35 Customer Presentation | April 2020 | PublicSend Parcels – Step 2
Enter product and service-
related information and parcel
details:
Select a product and, if
necessary, one or more
service(s).
Depending on the service,
additional information may be
required (for example the cash
on delivery amount for the
CashService or the deposit
location for the DepositService).
Enter the shipping date, parcel
weight and reference numbers, if
applicable.
You can add further parcels to a
shipment via “Add parcel(s)” or
“Add parcel(s) with data”.
36 Customer Presentation | April 2020 | PublicSend Parcels – Step 3
Now you can print and save the
parcel labels.
With “Print preview” setting
Parcel labels are displayed
in the browser window. You can
now save and print them.
Via “Download PDF” you may
download the parcel labels as
PDF files.
Via “New order” you can
generate further parcel orders.
With “Direct printing” setting
A confirmation message is
displayed indicating that the
print job for the parcel label has
been sent to the printer.
37 Customer Presentation | April 2020 | PublicDispatch preparation
As before, you can create your parcel label via “Send parcel" and save them temporarily before
printing the parcel labels by clicking on "Add to dispatch preparation". Or you can import your
parcel and address data directly from your web shop via “Dispatch preparation", edit them as
required and print out the parcel labels individually or in batch printing.
YourGLS log-in
Option 1 Option 2
Select Select
“Dispatch preparation“ “Send parcel”
Parcel and address
Create parcel data
data import as file
If necessary: Click „Add to
Edit parcel information Dispatch preparation“
Print parcel labels Select
(individual or batch printing) “Dispatch preparation”
Print parcel labels
(individual or batch printing)
38 Customer Presentation | April 2020 | PublicDispatch preparation – Option 1: Import parcel data (1/8)
Select “Processing” “Dispatch preparation” and then click on “Import parcels”.
39 Customer Presentation | April 2020 | PublicDispatch preparation – Option 1: Import parcel data (2/8)
Before you can import your parcel data, you must first create a new import profile. To do this,
click on “”.
i You may edit or delete
previously created profiles at any
time by clicking on the symbols
“” and “”.
40 Customer Presentation | April 2020 | PublicDispatch preparation – Option 1: Import parcel data (3/8)
Enter the data for the profile: i With the Excel file
Profile name type, only files in xls und
xlsx format may be
Selection of file type: Excel or tabular data (text files) uploaded. CSV files and
Check "Ignore first line(s) x line(s)" and enter a number if you do not all other formats must
want the first line(s) of the import file to be taken into account. The be uploaded with the
number determines how many lines are not imported from the top. In tabular data file type.
this way, you can exclude the number of otherwise used rows (e.g.
labels) from the import. i For Excel files, the
name of the worksheet
must be entered.
i Empty lines are not
imported as a matter of
principle.
41 Customer Presentation | April 2020 | PublicDispatch preparation – Option 1: Import parcel data (4/8)
Enter the data for the profile:
Select a shipper or an alternative shipper
address from the list or determine the shipper
using mapping
i Specify the position
of the contact ID and
customer ID in the
import file or enter a
fixed value.
42 Customer Presentation | April 2020 | PublicDispatch preparation – Option 1: Import parcel data (5/8)
Enter the data for the profile:
Delivery address
i In the import file,
the following formats
are possible for
“country”, for example
for “Germany”:
- Germany
- DE
-D
- 276
i Specify the position
(table column): if, for
example, the street is
in the seventh column
of your import file, enter
7 as the position.
Alternatively, you can
enter a fixed value.
43 Customer Presentation | April 2020 | PublicDispatch preparation – Option 1: Import parcel data (6/8)
i Only the first parcel
Enter the data for the profile: receives the value for “Parcel
Parcel data References”, “Shipment
reference no.”, “Cash ref.
Click on “Save”.
no.” and “Cash amount”. If
several Cash amounts are
to be imported for the parcels
of the shipment, a semicolon
must be used as a separator.
Example: 2,50;7,00;3,99.
i Weights can be imported
as whole numbers or with a
comma as decimal
separator and two decimal
places. The value entered for
"Weight (kg)" is split evenly
across all packages.
Alternatively, you can enter
the weight for each package
i Parcel references, Shipment reference number and individually, separated by a
subject are customer-specific entries. semicolon.
i The date (also in the Excel import file) must be formatted as yyyymmdd.
44 Customer Presentation | April 2020 | PublicDispatch preparation – Option 1: Import parcel data (7/8)
You can then select your import file and click “Import parcels”.
i The screen can only import a maximum of 2,000 data records in one file. Header rows count as
well. Up to 99 parcels can be specified in the file per record (= same delivery address).
45 Customer Presentation | April 2020 | PublicDispatch preparation – Option 1: Import parcel data (8/8)
The imported parcel data is displayed in the “Parcel overview”.
i No parcel numbers are
assigned to the parcel data at this
time.
i Of a maximum of 2,000
imported data records, only a
maximum of 500 are
displayed on the screen. In
order to display the other data
records, you must first print or
delete them. If not all records
are to be printed at once, it is
therefore recommended to
import only 500 records with a
maximum of 1,000 parcels at
the same time. Because of the
file size, a maximum of 1,000
40
parcel labels can be created at
the same time.
46 Customer Presentation | April 2020 | PublicDispatch preparation – Option 2:
Create parcel data via “Send parcel” (1/3)
Select “Processing” “Send parcel” to create your parcel data.
47 Customer Presentation | April 2020 | PublicDispatch preparation – Option 2:
Create parcel information via “Send parcel”(2/3)
After entering the parcel data
you decide whether you want to
create the parcel labels directly
or whether you want to save the
parcel data in “Dispatch
preparation” (Parcel overview).
i Only parcels without
services or with the following
services can be saved in
“Dispatch preparation”
(Parcel overview):
- Guaranteed24Service
- FlexDeliveryService
- CashService
- DocumentReturnService
48 Customer Presentation | April 2020 | PublicDispatch preparation – Option 2:
Create parcel data via “Send parcel” (3/3)
Then select “Processing” “Dispatch preparation” to retrieve the saved parcel data.
i No alternative shipper
addresses can be used with the
“Dispatch preparation" function
(Add to parcel list).
i In the upper area, you can
search for shipments in the
parcel overview according to
various criteria.
49 Customer Presentation | April 2020 | PublicDispatch preparation – Edit parcel data
You can edit the parcel data at any time in the “Dispatch preparation”. Select the corresponding
shipment(s) and click on “Update". Alternatively, you can click directly on the respective item
number.
Select “Delete” to remove the desired parcel data from shipment preparation.
i Via settings you
can define which
columns should be
displayed in the parcel
overview.
50 Customer Presentation | April 2020 | PublicDispatch preparation – Generate parcel labels
To create parcel labels (as PDF) for the shipments i A PDF file may contain a maximum of
in “Dispatch preparation” please select the 1,000 parcel labels. Otherwise the PDF file will
relevant shipment(s) and click on “Generate be too large. If there are more than 1,000
label(s)”. parcel labels, an error message will be
displayed on the screen.
51 Customer Presentation | April 2020 | PublicDispatch preparation – Download/print parcel labels
If the PDF parcel labels were successfully generated, a PDF symbol is displayed in the
“State” column. Now, you can save or print the parcel labels.
Download labels = Download and save parcel labels
Print labels = Print parcel labels or display print preview (depending on whether
“Direct printing” or “Print preview” is enabled in the YourGLS “User
settings”).
i You have the
option of printing
parcel labels for
individual shipments
or simultaneously for
all shipments (batch
printing).
52 Customer Presentation | April 2020 | PublicSporadic pickup (1/2)
Here you can order a
sporadic pickup from your
responsible GLS depot.
Choose a pickup address,
the pickup date and the
quantity of parcels to be
picked up. You can optionally
add the comment.
Click the „Submit” button to i Pickups can be notified up to 30 days in advance.
order a sporadic pickup. In order to guarantee that the parcels can be picked up the
following day, they must be reported by 11 pm the evening
before.
53 Customer Presentation | April 2020 | PublicSporadic pickup (2/2)
With a click on the button „New
sporadic pickup request“ you
can enter further pickups.
With a click on the button
Musterfirma Alternativ GmbH, Musterstr. 3. 66778 Musterstadt
Musterfirma GmbH, Musterstr. 1. 66778 Musterstadt
“Cancel selected order(s)” you Musterfirma GmbH, Musterstr. 1. 66778 Musterstadt
can cancel selected pickup
orders until 11 pm of the day
before the planned pickup.
i Please note that each
parcel to be collected must be
provided with a valid parcel
label!
Pickups are carried out from
Monday to Friday.
54 Customer Presentation | April 2020 | PublicPickup / Return request – Step 1
Enter all required address data:
Enter the pickup address.
Choose between
Pick&ReturnService or
Pick&ShipService.
Select the shipper.
Only when using the
Pick&ShipService:
Enter the consignee address.
Pick&ReturnService
Parcel pickup from any address
in Europe and return to GLS
customer.
Pick&ShipService
Parcel collection and delivery
from / to any address all over
Europe.
55 Customer Presentation | April 2020 | PublicPickup / Return request – Step 2
Enter product and service-
related information as well as
the parcel data:
The product “BusinessParcel”
is displayed, select a service if
necessary.
Enter the pickup date, parcel
weight and, if necessary,
reference numbers.
You can enter additional
parcels by choosing “Add
parcel(s)” or “Add parcel(s) with
data)”.
DeliveryAtWorkService
Parcel delivery directly to the
consignee’s desk.
DocumentReturnService
Parcel delivery and return
of original documents.
56 Customer Presentation | April 2020 | PublicPickup / Return request – Step 3
Now you can print and save the
summary of your order.
If “Print preview” is selected
The summary is displayed in the
browser window. You can now
save and/or print the summary.
You can download the summary as
a PDF file via “Download PDF”.
Via “New order” you can generate
further orders.
If “Direct printing” is selected
A confirmation message appears
indicating that the print job has
been sent to the printer.
i The driver supplies the parcel labels
when picking up the parcels!
i Parcels with Pick&ShipService and
Pick&ReturnService cannot be cancelled
using parcel management. To do this,
contact your responsible depot.
57 Customer Presentation | April 2020 | PublicReturn parcels – Step 1
If you want to generate a returns
label (without a dispatch label) for
your consignee, first enter the
address data:
Select the consignee address for
the return parcel(s).
If a separate returns address has been
entered in the GLS system, this is
displayed. The fields are filled with your
standard customer address via “Use
shipper’s default address”.
If no separate returns address is stored
in the GLS system, your standard
customer address is displayed. The
button is then inactive.
Enter the shipper’s address
of the return parcel(s).
You can enter additional parcels by
choosing “Add parcel(s)”.
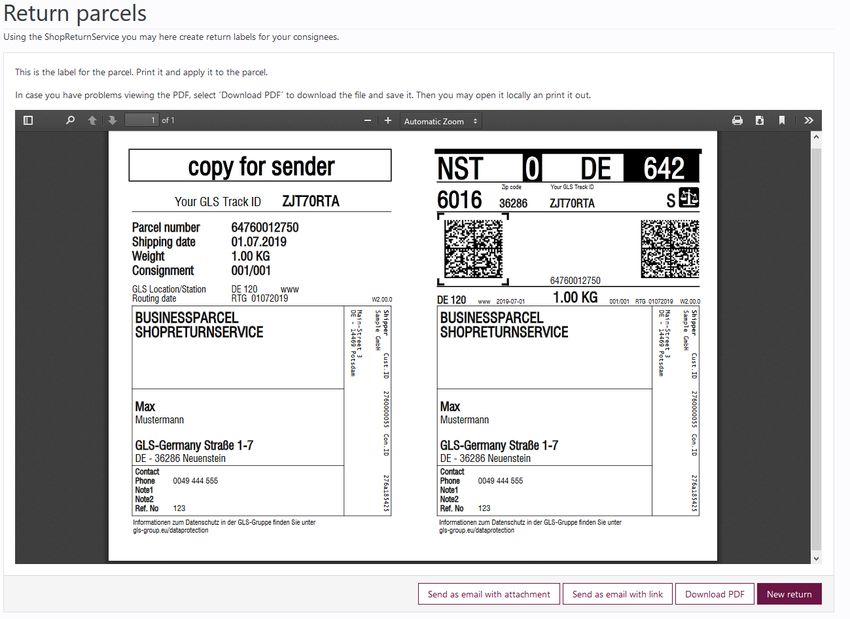
58 Customer Presentation | April 2020 | PublicReturn parcels – Step 2
You can now save the returns
labels and send them to your
consignee.
Via “Send as email with
attachment” you can make the
returns label available to the
consignee as a PDF file and
as a mobile parcel label (QR
code).
Via “Send as email with link”
you can send the consignee a
link to download the returns
parcel label.
“Download PDF" allows you to
download and save the
returns label.
You can create further return
labels via "New return".
59 Customer Presentation | April 2020 | PublicParcel management – Reprinting / Cancelling
Here you can reprint your
parcel labels or cancel parcels.
Enter your search criteria and
select “search”.
In the parcel overview, select one
or more parcels and select
“Cancel parcel(s)” or “Reprint
parcel label(s)”.
i You can only cancel parcel
labels before the daily closure
“end of day”!
If you have already completed an
end of day closing and still wish to
cancel a parcel label, please contact
your responsible depot.
Black = Default display
Green = Parcel label was reprinted (status appears when you click on "Reprint parcel label(s)" and click on "Back" in the parcel
label display)
Red = Parcel label was cancelled (status appears when you click on "Cancel parcel(s)" or after reprinting and re-running the
search, as the original parcel is cancelled after reprinting)
Blue = Reprint/Cancellation not possible
60 Customer Presentation | April 2020 | PublicEnd of day
Select a shipper and date to
generate the end of day report.
You can choose whether you
want to create a receipt (to be
signed by the driver) and / or a
detailed daily list of all parcels.
If you have already generated
a end of day report and then
created further parcel labels,
you can choose whether you
want to create the end of day
report again for all parcels or
only for the additional parcels.
Select “Create report”.
61 Customer Presentation | April 2020 | PublicParcel tracking – Overview
You can view the status of your
shipments at any time in parcel
tracking.
Enter your search criteria and
select “Search”.
In the parcel overview you can
filter the parcels according to
various criteria. Also, you may
sort the columns by clicking on
a column header, e.g. "Status"
or “Consignee".
Click "Details" to display the
shipment details of the selected
parcel. Alternatively, you can
click on the respective parcel
number.
If the search results in only one
parcel, the parcel details will be
displayed directly.
62 Customer Presentation | April 2020 | PublicParcel tracking – Details
Detailed view parcel tracking
Via “Proof of delivery” you can
open or save the proof of
delivery including all shipment
details and the consignee’s
signature as a PDF file. For up
to 200 parcel numbers the
proof of delivery can be opened
or saved simultaneously.
Click "Export“ to export the
data in txt, xml, pdf, xls or csv
format.
You can use the “Parcel status
link” function to send a web link
to the consignee via email so
that he or she can follow the
progress of the shipment
directly.
63 Customer Presentation | April 2020 | PublicTrack & Trace protocol
The Track & Trace protocol lists
all parcels sent to other EU
countries. The parcels are
displayed monthly and can also
be retrieved retrospectively. Example-Company
Example-Company
Via "Download“ you can Example-Company
download the Track & Trace
protocol for the selected
shipper.
By clicking on the PDF symbol
you can display the Track & i The Track & Trace protocol must be linked to the
Trace protocol in the browser commercial invoice and can be used together with the
window. framework agreement on the transportation of goods as
proof of shipments of goods to other EU countries. Only
those parcels are listed that have been delivered.
64 Customer Presentation | April 2020 | PublicNotification settings – Invoice settings
In the tab “Invoice settings”
you can manage the email
addresses of your colleagues
or employees for electronic
invoice dispatch.
Select a shipper and click on
“Add E-mail”.
You can store up to three email
addresses per shipper.
For each employee, you can
specify individually whether the
invoice is to be sent as a PDF
file attached to an email or
whether the employee is to
receive only an info email,
indicating that a new invoice is
available in the online archive.
65 Customer Presentation | April 2020 | PublicInvoices
Further information on “Online
Invoices” can be found under the
Here you will find the online
Help function (top right).
invoices, credit notes and customs
documents for the last six months.
To retrieve invoices, credit notes
and customs documents enter
your search criteria and select
“Search”.
Via “E-mail” you can send the
selected documents to several
employees by email.
Via “Download” you can download
the selected documents as a ZIP
file.
By clicking on the PDF symbol
or on the document number, the
respective file opens directly in the i If you would also like to receive the invoice
browser. attachments additionally as CSV files in your online archive,
please contact your GLS sales department.
i To display the online archive correctly, you must allow pop-ups in the browser.
66 Customer Presentation | April 2020 | PublicSending parcels for suppliers – Step 1
Here your suppliers can generate
parcels on your account being
picked up at the supplier’s site and
Müller OHG Hans Müller
delivered to your address.
0221 123456
Enter the address and parcel Hauptstraße 1
details:
Pickup address of the supplier 50660 Köln
Selection of a predefined
consignee address Meier GmbH Bonn
Pickup date and reference Meier GmbH 0228-123456
numbers if applicable. Bahnhofstraße 1
55123 Bonn
You can enter additional parcels by
selecting “Add parcel(s) or “Add
parcel(s) with data”. Abc123
i A separate activation is
required to use this function.
Please contact your GLS sales
representative.
i After activation, a supplier account must be created via user administration, click here.
67 Customer Presentation | April 2020 | PublicSending parcels for suppliers – Step 2
The supplier can now print and
save the summary of his order.
With “Print preview” setting
The summary is displayed in the
browser window. The supplier
can save and/or print the
summary.
The supplier can download the
summary as a PDF file via
“Download PDF”.
The supplier can generate
further parcels via “New order”.
With “Direct printing” setting
A confirmation message appears
indicating that the print job has
been sent to the printer.
i The driver supplies the parcel
labels when picking up the i A separate activation is required to use this function.
parcels! Please contact your GLS sales representative.
68 Customer Presentation | April 2020 | PublicIncoterms in international trade – Overview
10 Free house, duty paid, tax paid – Customs clearance costs, customs duties and
taxes are paid by exporter (DDP)
20 Free house, duty unpaid, untaxed – Customs clearance costs, customs duties
and taxes are paid by importer (DAP)
30 Free house, duty paid, untaxed – Customs clearance costs and customs duties
are paid by exporter, taxes are paid by importer (DDP, VAT unpaid)
40 Free house, no duty, no tax – Customs clearance costs are paid by exporter,
customs duties and taxes are paid by importer (DAP, cleared)
50 Free house, duty paid, free writing – Low value shipments which are not subject
to customs duties and taxes, customs clearance costs are paid by exporter
(DDP, low value)
60 Pick&ShipService, Pick&ReturnService: Customs clearance costs, customs
duties and taxes are paid by the client who issued the P&S/P&R
69 Customer Presentation | April 2020 | PublicYou can also read