INTRODUCTION TO IOT REVERSE ENGINEERING
←
→
Page content transcription
If your browser does not render page correctly, please read the page content below
Hack In Paris 2019

                     Introduction To IoT Reverse
                            Engineering
                      with an example on a home router

                                           Valerio Di Giampietro
                                            Linux enthusiast since 1993
                                                  http://va.ler.io
                                                     v@ler.io
                                                     @valerio

©Valerio Di Giampietro - This work is licensed under a Creative Commons Attribution 4.0 International License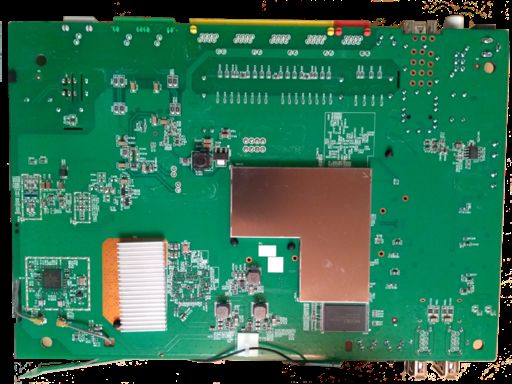
What we will talk about …

    •   Introduction
    •   Information gathering
    •   Emulation environment using QEMU
    •   Analyze how the device works
    •   Modify the firmware
                           Firenze, December 3rd 2018 – Pag. 2

● ○ ○ ○ ○ - Introduction                              Firenze, December  3rd 2018–– Pag. 2
                                                                http://va.ler.io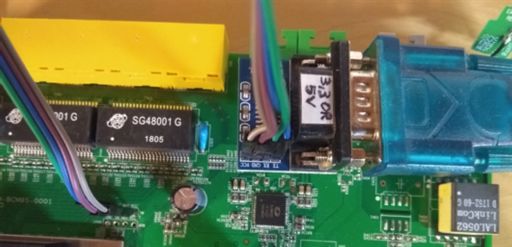
Engineering

    What is “engineering”? “the science of making
    things”
    • Define ”product requirements”
    • Design the product
    • Build or manufacture the product
         Requirements      Design Blueprint          Product

● ○ ○ ○ ○ - Introduction                      http://va.ler.io – Pag. 3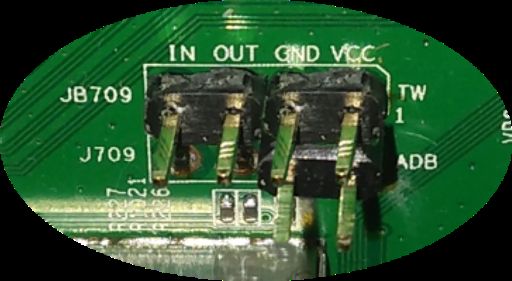
Reverse Engineering
    What is ”reverse engineering”?
    • It is the ”engineering” process done in reverse order
      and, usually, with limited scope
    What is this example project “limited scope”?
    • Understand how to modify the router firmware to
      add features and additional programs
            Product        Design Blueprint      Requirements

● ○ ○ ○ ○ - Introduction                       http://va.ler.io – Pag. 4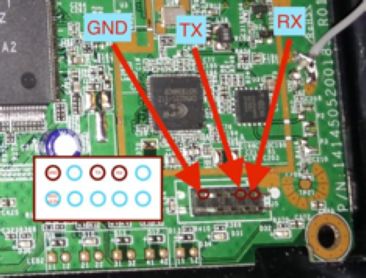
Information Gathering
                                              D-Link DVA 5592
     • Who makes the device?                 example home router

     • Is there an ODM (Original Design
       Manufacturer)?
     • Open the case
     • Identify main device components
     • Locate UART and possibly JTAG
       Interfaces
     • Get the firmware and the root file
       system

○ ● ○ ○ ○ - Information Gathering           http://va.ler.io – Pag. 5
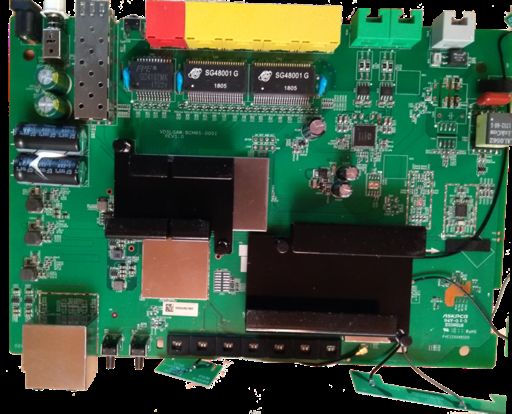
Mainboard Top
                                     ZL88801
                                    Telephone
                                     Module

       UART

                                                              BCM6303
                                                              XDSL CPE
                                                             Line Driver
                                    JTAG?

○ ● ○ ○ ○ - Information Gathering               http://va.ler.io – Pag. 6
Mainboard Bottom

                                    CPU?

  BCM43217
  WiFi Module
                                            MX30LF2G18AC
                                           Nand Flash 256Mb

○ ● ○ ○ ○ - Information Gathering           http://va.ler.io – Pag. 7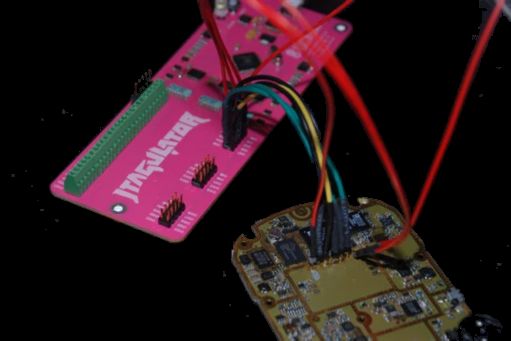
Locate the UART interface
                                                     UART on various boards

   • Search on Internet
   • Identify potential serial headers candidates
   • Sometimes marked in the PCB’s silkscreen
   • Usually 4 pins: Vcc, Gnd, Tx, Rx
   • Use a multimeter to find potential
     candidates
   • Locate pins on SOC and follow PCB traces
   • Use tools like Jtagulator
   • Oscilloscope or Logic Analyzer to locate Tx
     (a little overkill)

○ ● ○ ○ ○ - Information Gathering                   http://va.ler.io – Pag. 8
The JTAG interface
 • JTAG is an industry standard for testing printed circuit
   boards after manufacture
 • Allows access to read/write flash memory contents and
   can be used as a primary means for an in-circuit
   emulator
 • Multiple devices are daisy-chained together
 • Pins:
   TCK test clock
   TDI test data in
   TDO test data out
   TMS test mode sel.
   TRST test reset (opt.)

○ ● ○ ○ ○ - Information Gathering               http://va.ler.io – Pag. 9

Locate the JTAG interface
   • No standard pinout, but few popular
     pinouts: http://www.jtagtest.com/pinouts/
   • Search on the Internet
   • Look for headers labeled TCK, TDI, TDO, TMS
   • Look for 1x5/6, 2x5, 2x7, 2x10 pin headers
        – Look for GND and VCC with a multimeter and
          compare to popular pinouts
        – Often there are pullups (1-100k) for TMS, TDI
          and TRST, TRST can also be pulled low
        – TDO should be high impedance
   • Locate pins on SOC and follow PCB traces
   • Use tools like Jtagulator

○ ● ○ ○ ○ - Information Gathering                         http://va.ler.io – Pag. 10
Repopulate the interfaces
Connect the serial cable
○ ● ○ ○ ○ - Information Gathering http://va.ler.io – Pag. 11Why repopulate the interfaces?
• UART (Serial Interface)
– Watch what is printed on the serial console during the boot cycle
and find bootloader and OS version
– Watch the firmware upgrade cycle
– Use a USB TTL serial adapter and a terminal emulator on the PC
• JTAG
– Be able to read the firmware out of the flash eeprom
– Be able to break into the boot cycle and use JTAG as a means to
do ”in circuit debugging”
– Attach an interface board, like Bus Pirate, to the JTAG interface
– Use software, as OpenOCD, to dump flash eeprom and to do ”in
circuit debugging”
○ ● ○ ○ ○ - Information Gathering http://va.ler.io – Pag. 12Getting the firmware file
• Follow the easiest path first
• If the supplier has a website with firmware updates
go and download the firmware file
• If the firmware update can be downloaded directly
only by the device, sniff the communication with
wireshark and get the firmware file
• If the above steps are not available, download the
eeprom image through the JTAG connector using Bus
Pirate and OpenOCD
○ ● ○ ○ ○ - Information Gathering http://va.ler.io – Pag. 13Get info from the firmware
• Get basic info from the firmware file
$ file DVA-5592_A1_WI_20180405.sig
DVA-5592_A1_WI_20180405.sig: data
$ binwalk DVA-5592_A1_WI_20180405.sig
DECIMAL HEXADECIMAL DESCRIPTION
---------------------------------------------------
512 0x200 JFFS2 filesystem, little endian
24379992 0x1740258 gzip compressed data, from
Unix, last modified:
2018-04-11 10:40:16
○ ● ○ ○ ○ - Information Gathering http://va.ler.io – Pag. 14Extract content from firmware
• Install Jefferson to extract files from JFFS2 file system
• Use binwalk to extract content from firmware
$ binwalk -e DVA-5592_A1_WI_20180405.sig
$ ls -lh _DVA-5592_A1_WI_20180405.sig.extracted
-rw-rw-r-- 1 val val 30K ott 21 13:28 1740258
-rw-rw-r-- 1 val val 24M ott 21 13:27 200.jffs2
drwxrwxr-x 5 val val 4,0K ott 21 13:28 jffs2-root
$ file 1740258
1740258: POSIX tar archive (GNU)
$ tar -tvf 1740258
drwxr-xr-x l.fornalczyk/adb boards/
drwxr-xr-x l.fornalczyk/adb boards/963138_VD5….ipk
○ ● ○ ○ ○ - Information Gathering http://va.ler.io – Pag. 15Looking at the extracted files
• Looking at the extracted files
$ ls jffs2-root/
fs_1 fs_2 fs_3
• It seems we have 3 file systems here: “/boot” and “/”
splitted in two parts
$ ls -lh fs_1
-rw-r--r-- 1 val val 0 ott 21 13:28 a
-rw-r--r-- 1 val val 260K ott 21 13:28 cferam.000
-rw-r--r-- 1 val val 1,2M ott 21 13:28 vmlinux.lz
• cferam.000 is the boot loader image based on Broadcom
CFE (Common Firmware Environment)
• vmlinux.lz is the kernel, in an unusual CFE compressed
format
○ ● ○ ○ ○ - Information Gathering http://va.ler.io – Pag. 16Looking at other files • /sbin/init is missing (but it’s not true), busybox is there $ ls -lh fs_2/bin/busybox -rwsr-sr-x 1 val val 382K fs_2/bin/busybox $ strings fs_2/bin/busybox … BusyBox v1.17.3 (2018-04-11 12:29:54 CEST) … $ arm-linux-readelf -a fs_2/bin/busybox … … program interpreter: /lib/ld-uClibc.so.0] $ ls -lh fs_2/lib/ld-uClibc* -rwxr-xr-x ld-uClibc-0.9.33.2.so lrwxrwxrwx ld-uClibc.so.0 -> ld-uClibc-0.9.33.2.so $ ls -l fs_3/lib/libgcrypt.so.11* lrwxrwxrwx libgcrypt.so.11 -> libgcrypt.so.11.5.3 -rwxr-xr-x libgcrypt.so.11.5.3 ○ ● ○ ○ ○ - Information Gathering http://va.ler.io – Pag. 17
Boot output on serial console
 • Output on serial console during boot
     ...
     CFE version 1.0.38-118.3-S for BCM963138 (32bit,SP,LE)
     generic
     ...
     Chip ID: BCM63136B0, ARM Cortex A9 Dual Core: 1000MHz
     Total Memory: 268435456 bytes (256MB)
     NAND ECC BCH-4, page size 0x800 bytes, spare size 64 bytes
     NAND flash device: , id 0xc2da block 128KB size 262144KB
     ...
     Linux version 3.4.11-rt19 (l.fornalczyk@quelo) (gcc version
     4.5.4 20120306 (prerelease) (Linaro GCC 4.5-2012.03) )
     ...
     CPU: ARMv7 Processor [414fc091] revision 1 (ARMv7)
     ...
     jffs2: version 2.2 (NAND) (SUMMARY) (ZLIB) (LZMA) (RTIME)
     ...

○ ● ○ ○ ○ - Information Gathering                http://va.ler.io – Pag. 18
Boot output on serial console
• Output on serial console during boot (part 2)
...
[2.502000] Found YAPS PartitionSplit Marker at 0x080FFF00
[2.503000] Creating 8 MTD partitions on "brcmnand.0":
[2.504000] 0x000000000000-0x000000020000 : "CFE”
/etc/inittab
[2.506000] 0x000007f00000-0x000008100000 : "bootfs_1”
[2.508000] 0x000008100000-0x00000fbc0000
::sysinit:/etc/init.d/rcS S boot : "rootfs_1”
[2.510000] 0x000000020000-0x000007ce0000
::shutdown:/etc/init.d/rcS K shutdown : "upgrade”
[2.512000] 0x00000fbc0000-0x00000fdc0000 : "conf_fs”
tts/0::askfirst:/bin/login
[2.513000] 0x00000fdc0000-0x00000fe00000 : "conf_factory”
ttyS0::askfirst:/bin/login
[2.515000] 0x00000fe00000-0x000010000000 : "bbt”
[2.517000] 0x000000000000-0x000010000000 : "flash”
...
Init started: BusyBox v1.17.3 (2018-04-11 12:29:54 CEST)
starting pid 235, tty '': '/etc/init.d/rcS S boot’
Starting boot.sh ...
Restore passwd ....
Restore group ....
Starting /etc/rc.d/S11services.sh ...
Starting Configuration Manager (B)
○ ● ○ ○ ○ - Information Gathering http://va.ler.io – Pag. 19Boot output on serial console
• Output on serial console during boot (part 3)
...
CM TR-181 ready
CM TR-98 ready
Epicentro Software Version: DVA-5592_A1_WI_20180405
Epicentro Platform Version: 6.0.0.0028
...
Starting /etc/rc.d/S13acsd.sh ...
Starting /etc/rc.d/S20voip.sh ...
Starting /etc/rc.d/S60ipsec.sh ...
Starting /etc/rc.d/S70vpn.sh ...
Starting /etc/rc.d/S94printkd.sh ...
Searching «Epicentro Software» on Internet
gives the ODM (Original Design
Manufacturer): ADB www.adbglobal.com
○ ● ○ ○ ○ - Information Gathering http://va.ler.io – Pag. 20What was found
• Processor ARMv7 Cortex-A9 Multicore
• 256Mb NAND Flash
• Linux version 3.4.11-rt19 (September 2012)
• uClibc version 0.9.33.2 (May 2012)
• BusyBox version 1.17.3 (October 2010)
• Libgcrypt version 1.4.5 (December 2009)
• Epicentro software by ADB (adbglobal.com)
○ ● ○ ○ ○ - Information Gathering http://va.ler.io – Pag. 21QEMU Emulation
• Choosing Board and CPU emulation in QEMU
$ qemu-system-arm -M help|egrep Cortex-A9
realview-pbx-a9 ARM RealView Platform for Cortex-A9
vexpress-a9 ARM Versatile Express for Cortex-A9
xilinx-zynq-a9 Xilinx Zynq Platform for Cortex-A9
$ qemu-system-arm -M vexpress-a9 -cpu help
...
cortex-a9
...
○ ○ ● ○ ○ - Emulation Environment using QEMU http://va.ler.io – Pag. 22Choosing a Build System
• The Yocto Project
very powerful, builds a root file system and create a
custom Linux distribution. It's main drawback is that it
has a steep learning curve
• Buildroot
builds the root file system and the kernel, easy and fast to
learn, very good user manual
• Openwrt/LEDE Build System
tailored to build a replacement router firmware,
documentation scattered in the web site, requires more
time to learn compared to Buildroot
○ ○ ● ○ ○ - Emulation Environment using QEMU http://va.ler.io – Pag. 23Choosing a Buildroot version
• Based on uClibc 0.9.33.2
• Gnu libgcrypt crypto library compatible with
version 1.5 (with library file: libgcrypt.so.11)
• With custom kernel version 3.4.1-rt19
• Other libraries with compatible versions
• The version to use is: buildroot-2014.02
• This version doesn’t run on Ubuntu 16.04 or
Ubuntu 18.04
• Use Debian Wheezy (released in 2013) in a
docker Container
○ ○ ● ○ ○ - Emulation Environment using QEMU http://va.ler.io – Pag. 24The Dockerfile
• The Dockerfile builds a minimal Debian Wheezy
container to run Buildroot
FROM debian:wheezy
...
RUN apt-get update
RUN apt-get upgrade
RUN apt-get install -y -q \
bash \
...
RUN mkdir -p /src/misc
ADD startup.sh /src/misc/startup.sh
RUN chmod a+x /src/misc/startup.sh
ENTRYPOINT cd /src/misc ; ./startup.sh
• Available at: https://github.com/digiampietro/buildroot-armv7
○ ○ ● ○ ○ - Emulation Environment using QEMU http://va.ler.io – Pag. 25The Docker run command
• The Docker run maps user and user’s home
directory in the Docker Container
docker run -h BRHOST \
--rm \
-v /tmp/.X11-unix:/tmp/.X11-unix \
-v $HOME:$HOME \
-e DISPLAY=$GDISPLAY \
-e GUSERNAME=$GUSERNAME \
-e GUID=$GUID \
-e GGROUP=$GGROUP \
-e GGID=$GGID \
-e GHOME=$GHOME \
-e GSHELL=$SHELL \
-e GRUNXTERM=$GRUNXTERM \
-e GPWD=$GPWD \
-it digiampietro/buildroot-armv7
○ ○ ● ○ ○ - Emulation Environment using QEMU http://va.ler.io – Pag. 26Docker run in action valerio@ubuntu-hp:~$ ls -ld br drwxrwxr-x 6 valerio valerio 4096 ott 26 22:30 br valerio@ubuntu-hp:~$ grep VERSION /etc/os-release VERSION="18.04.1 LTS (Bionic Beaver)" VERSION_ID="18.04" VERSION_CODENAME=bionic valerio@ubuntu-hp:~$ br/..../docker/dockrun.sh valerio@BRHOST:~$ ls -ld br drwxrwxr-x 6 valerio valerio 4096 Oct 26 20:30 br valerio@BRHOST:~$ grep VERSION /etc/os-release VERSION_ID="7" VERSION="7 (wheezy)" ○ ○ ● ○ ○ - Emulation Environment using QEMU http://va.ler.io – Pag. 27
Buildroot configuration
    • Based on “qemu_arm_vexpress_defconfig”
    • With the following main modifications
         – Build packages and libraries with debugging
           symbols, don’t strip binaries, no gcc optimization
         – Build gdb, gdbserver, ltrace, strace and cross gdb
           for the host
         – Include mtd and jffs2 file system and tools also for
           the host
         – Include main libraries used in the router
           (libgcrypt, expat, roxml, libxml2, Mini-XML)

○ ○ ● ○ ○ - Emulation Environment using QEMU      http://va.ler.io – Pag. 28
Linux kernel configuration
• With the following additional settings
– Versatile Express platform type with Device Tree
support
– Preemptible Kernel
– NAND Device Support and Support for NAND
Flash Simulator
– JFFS2 file system with LZMA compression
○ ○ ● ○ ○ - Emulation Environment using QEMU http://va.ler.io – Pag. 29uClibc configuration
• Minor modifications to be compatible with the
router's binaries (like native POSIX threading etc.)
• To include debugging symbols, uClibc don't obey
to the general option included in the Buildroot
configuration, has his own flag for this purpose;
the problem is that enabling his own flag the
compilation gives impossible to fix errors
• in Compiler Warnings add the string "-ggdb", this
is the work around to compile the uClibc with
debugging symbols
○ ○ ● ○ ○ - Emulation Environment using QEMU http://va.ler.io – Pag. 30The upgrade process
• Analyzing the upgrade process on the UART output (1 of 2)
Start pid 4 /usr/sbin/upgrade-prepare.sh cwmp
... FIRMWARE FILE
/usr/sbin/upgrade.sh 514 * 256
Signature OK Boot and
... Root file
/usr/sbin/flash_eraseall \ system
-j -p 0 -l 8 /dev/mtd3
... (514+94720)*256
Writing boot & root filesystems...
dd if=/tmp/upgrade/fw.bin bs=256 skip=514 count=94720
| /usr/sbin/nandwrite -s 524288 /dev/mtd3 –
...
[…] Found YAPS PartitionSplit Marker at 0x080FFF00
[…] Creating 2 MTD partitions on "brcmnand.0":
[…] 0x000007f00000-0x000008100000 : "bootfs_2”
[…] 0x000008100000-0x00000fcc0000 : "rootfs_2"
○ ○ ○ ● ○ - Analyze how the device works http://va.ler.io – Pag. 31The upgrade process • Analyzing the upgrade process on the UART output (2 of 2) Installing packages... opkg … -f /tmp/new_rootfs/etc/opkg.conf -o /tmp/new_rootfs install … Umount /tmp/new_rootfs ... Writing first block of cferam... dd if=/tmp/upgrade/fw.bin bs=256 skip=2 count=512 | /usr/sbin/nandwrite /dev/mtd8 - ... rebooting... ○ ○ ○ ● ○ - Analyze how the device works http://va.ler.io – Pag. 32
The upgrade process - summary
    • The upgrade script to analyze is /usr/sbin/upgrade.sh
    • The firmware is signed, signature is checked with
      sig_verify $file 2> /dev/null
    • Boot and root file systems are written in a single nandwrite
      operation
    • A JFFS2 partition splitter proprietary kernel module is used to
      create the two partitions on the fly
    • A JFFS2 end marker open source kernel module is used to
      delimit the end of the root file system partition
    • Some additional packages are added, based on board type
    • The cferam boot loader is written with another nandwrite
      operation

○ ○ ○ ● ○ - Analyze how the device works              http://va.ler.io – Pag. 33
Reverse engineering sig_verify
sig_verify is a stripped binary, but calls library functions. We
put breakpoints on these calls in the emulation environment
$ arm-linux-readelf --sym -D sig_verify
Symbol table for image:
Num Buc: Value Size Type Bind Vis Ndx Name
16 0: 00008928 0 FUNC GLOBAL DEFAULT UND fseek
29 1: 00008994 0 FUNC GLOBAL DEFAULT UND strcmp
40 3: 000089dc 0 FUNC GLOBAL DEFAULT UND gcry_md_ctl
38 11: 000089d0 0 FUNC GLOBAL DEFAULT UND fputs
23 14: 00008964 0 FUNC GLOBAL DEFAULT UND fread
1 15: 00008898 0 FUNC GLOBAL DEFAULT UND printf
44 16: 00008a0c 0 FUNC GLOBAL DEFAULT UND gcry_md_get_algo…
41 16: 000089e8 0 FUNC GLOBAL DEFAULT UND close
9 17: 000088e0 0 FUNC GLOBAL DEFAULT UND lseek
7 19: 000088c8 0 FUNC GLOBAL DEFAULT UND gcry_md_open
6 19: 000088bc 0 FUNC GLOBAL DEFAULT UND gcry_md_write
3 20: 000088a4 0 FUNC GLOBAL DEFAULT UND gcry_check_version
...
○ ○ ○ ● ○ - Analyze how the device works http://va.ler.io – Pag. 34Running sig_verify in GDB
Start gdb server in the emulation environment
# gdbserver :9000 sig_verify --readonly \
DVA-5592_A1_WI_20180405.sig
Start gdb in the host machine
$ arm-linux-gdb --ex="target remote :9000" \
--ex="set sysroot $SYSROOT"\
--ex="directory $MYDIR" \
--ex="directory $TOOLBIN" \
-x sv.gdb
○ ○ ○ ● ○ - Analyze how the device works http://va.ler.io – Pag. 35Running sig_verify in GDB
• Reads the last 256 bytes from the file (signature)
• Calls gcry_md_open,gcry_md_write,
gcry_md_ctl to calculate SHA1 checksum
• Calls gcry_sexp_build 3 times to build the
3 s-expressions and then gcry_pk_verify to
verify the signature with the following
parameters
– SHA1 message digest
– Signature (the firmware file last 256 bytes)
– The public key (embedded in the sig_verify binary)
○ ○ ○ ● ○ - Analyze how the device works http://va.ler.io – Pag. 36Running sig_verify in GDB
• The public key (MPI modulus and
exponent) can be dumped from memory
to recover the public key in the standard
.pem format
• Unfortunately the private key remains
unknown, it is not included in router’s
certificates files in the folder /etc/certs
○ ○ ○ ● ○ - Analyze how the device works http://va.ler.io – Pag. 37Restricted shell
• Firmware modification through the upgrade process
seems impossible
• The router allows telnet/ssh but present a Cisco-like
restricted shell
$ telnet 192.168.1.1
Connected to 192.168.1.1.
Escape character is '^]'.
Login: admin
Password:
********************************************
* D-Link *
* WARNING: Authorised Access Only *
********************************************
Welcome
DLINK#
○ ○ ○ ● ○ - Analyze how the device works Firenze, December 3rd 2018 – Pag. 38Escaping the restricted shell
• /etc/shells suggests that the restricted shell is a Clish
(or Klish), open source, shell
• /bin/clish is a script:
#!/bin/sh
...
exec /bin/clish.elf -l -x /tmp/clish
• In /etc/init.d/services.sh:
#in factory mode
ln -s /etc/clish/prod /tmp/clish
#in normal mode
ln -s /etc/clish /tmp/clash
• clish xml startup files are:
/etc/clish/prod/startup.xml
/etc/clish/startup.xml
○ ○ ○ ● ○ - Analyze how the device works http://va.ler.io – Pag. 39Escaping the restricted shell
• In /etc/clish/startup.xml:
cmclient DUMPDM FactoryData
/tmp/cfg/FactoryData.xml > /dev/null
nvramUpdate Feature 0x2 > /dev/null
cmclient REBOOT > /dev/null
• ”factory-mode” is an hidden, not auto-completed command: it
is a command to try:
DLINK# factory
DLINK(factory)# factory-mode
DLINK(factory)#
DLINK(factory)# Connection closed by foreign
host.
○ ○ ○ ● ○ - Analyze how the device works http://va.ler.io – Pag. 40Escaping the restricted shell
• Factory mode is special mode: no normal WiFi, no
Internet connection, no DHCP server, but it allows a
non privileged shell login:
Login: admin
• Password:
• ********************************************
• * D-Link *
• * *
• * WARNING: Authorised Access Only *
• ********************************************
• Welcome
DLINK# system shell
BusyBox v1.17.3 built-in shell (ash)
Enter 'help' for a list of built-in commands.
/root $
○ ○ ○ ● ○ - Analyze how the device works http://va.ler.io – Pag. 41The Quest for Root
• Looking for processes running with root privileges
/root $ ps -ef
PID USER VSZ STAT COMMAND
1 0 1184 S init
261 0 724 S < /sbin/udevd --daemon
274 1001 1328 S /bin/clish.elf -l -x /tmp/clish
326 0 2332 S cm
365 0 1800 S logd
368 0 704 S ec
2383 0 820 S dns
2630 0 2480 S cwmp
2631 0 1204 S inetd -f
2633 0 736 S yamp -c /tmp/yamp.conf -p /tmp/…
2658 0 664 S wpspbc
3089 0 2316 S hostapd -B /tmp/wlan/config/ho…
3090 65534 3560 S httpd -u nobody
3647 0 1068 S chronyd -n -f /tmp/chrony.conf
4191 0 696 S /sbin/rngd -r /dev/urandom -W 4000
4211 0 7136 S voip
4404 1001 1176 S /bin/ash
○ ○ ○ ● ○ - Analyze how the device works http://va.ler.io – Pag. 42The Quest for Root - 1
• Identify each process and executable
version using “strings” and/or running the
executable with parameters
“-v -V –version -h -h –help”
• Identify open source executables
• Search the internet for known
vulnerabilities for the specific executable
version
• Check if the vulnerability is exploitable in
the specific IoT device configuration
○ ○ ○ ● ○ - Analyze how the device works http://va.ler.io – Pag. 43The Quest for Root - 2
• If no exploitable vulnerability has found
select a process candidate to reverse
engineer to find vulnerabilities
• Operating system binaries with no known
vulnerabilities are hard to crack
• Lower level binaries (dns, voip …) are
more difficult to crack
• Higher level executables with bigger
configuration files are less difficult to
crack
○ ○ ○ ● ○ - Analyze how the device works http://va.ler.io – Pag. 44The Quest for Root - 3
• The most interesting process is “cm”: router
configuration with root privileges is done by
the “cm” process (add users, configure dhcp
server, set ip address etc.)
• “cm” uses shell scripts to carry out his duties
• The “cmclient” command, running as normal
user, is used by restricted shell and web
interface to talk to the “cm” process to
configure the router
• “cmclient” is used, in startup scripts, to
configure the “cm” process
○ ○ ○ ● ○ - Analyze how the device works http://va.ler.io – Pag. 45The Quest for Root - 4
– In a startup script there is:
cmclient DOM Device /etc/cm/tr181/dom/
– This loads all the xml file in that directory to configure
the cm process, including
/etc/cm/tr181/dom/Management.xml
– That has the following snippet
○ ○ ○ ● ○ - Analyze how the device works http://va.ler.io – Pag. 46The Quest for Root - 5
– To trigger an execution of our script:
cmclient DOM Device /tmp/fakeManagement.xml
– It has the following snippet
– Trigger the execution of the «fakeUsers.sh» script with
– cmclient ADD Device.Users.User
○ ○ ○ ● ○ - Analyze how the device works http://va.ler.io – Pag. 47The Quest for Root - 7
/root $ cat > /tmp/hack-script.sh
do a copy and paste of the script
press CTRL-D to terminate the copy
/root $ chmod a+x /tmp/hack-script.sh
/root $ /tmp/hack-script.sh
...
/root $ su -
BusyBox v1.17.3 (2018-04-11) built-in shell (ash)
Enter 'help' for a list of built-in commands.
r41358.07b1b3a7
.........................................................
yet another solution by Advanced Digital Broadcast SA
.........................................................
root@localhost:~# id
uid=0(root) gid=0(root)
groups=0(root),19(remoteaccess),20(localaccess)
○ ○ ○ ● ○ - Analyze how the device works http://va.ler.io – Pag. 48Firmware Modification Kit - 1
• Based on firmware upgrade script analysis the
firmware file has the following structure:
ORIGINAL FIRMWARE
MD5 CHECKSUM
BOOT FILE SYSTEM
PARTITION SPLITTER
ROOT
FILE
SYSTEM
END OF PARTITION MARKER
SIGNATURE
○ ○ ○ ○ ● - Create a Firmware Modification Kit http://va.ler.io – Pag. 49Firmware Modification Kit - 2
• Extract the root file system, modify it
• Create the new root file system image
• Pad the file system image to the same size as the
original root file system image (the USB key will
be used for additional software)
• Reassemble the firmware file putting together all
the pieces, excluding the signature, using the
”dd” command
• The unsigned firmware file is ready
○ ○ ○ ○ ● - Create a Firmware Modification Kit http://va.ler.io – Pag. 50Loading the unsigned firmware
• The upgrade script checks the firmware signature:
sig_verify $file 2> /dev/null
ret_code=$?
• As root copy the upgrade script in /tmp
• Modify it:
sig_verify $file 2> /dev/null
ret_code=0
• Temporary replace it with mount:
mount --bind /tmp/upgrade.sh \
/usr/sbin/upgrade.sh
• Do the upgrade through the web interface
○ ○ ○ ○ ● - Create a Firmware Modification Kit http://va.ler.io – Pag. 51Summary
• Reverse engineering can be really challenging
• Clearly define the limited scope of your reverse
engineering project
• Start gathering information following the easiest
path first
• If some information is missing or difficult to get
move forward, go back only if absolutely needed
• Search on Internet for known vulnerabilities
• Select to hack processes running as root and
with a large attack surface
○ ○ ○ ○ ○ - Summary http://va.ler.io – Pag. 52Useful Links & Documentation
GitHub repositories related to the Home Router Example
• Adbtools2, Tools for hacking ADB Epicentro routers, including firmware
modification: https://github.com/digiampietro/adbtools2
• Buildroot-armv7: a set of scripts, configuration files and Buildroot external tree
to setup a Qemu emulation environment to run and reverse engineer the
Netgear DVA 5592 executables: https://github.com/digiampietro/buildroot-
armv7
Reverse engineering and physical disassembly
• Introduction to reverse engineering, Mike Anderson, Embedded Linux
Conference 2018, slides and videos:
https://elinux.org/images/c/c5/IntroductionToReverseEngineering_Anderson.pdf
https://www.youtube.com/watch?v=7v7UaMsgg_c
Recommended Books
• Chris Simmonds - Mastering Embedded Linux Programming - Second Edition -
Packt Publishing 2017
• Norman Matloff , Peter Jay Salzman - The Art of Debugging with GDB , DDD and
Eclipse - NO STARCH PRESS 2008
○○○○○ http://va.ler.io – Pag. 53Useful Links & Documentation Hardware tools • Bus Pirate: http://dangerousprototypes.com/docs/Bus_Pirate • Jtagulator: http://www.grandideastudio.com/jtagulator/ • J-Link debug probes: https://www.segger.com/products/debug-probes/j-link/ JTAG and UART interfaces • Popular pinouts: http://www.jtagtest.com/pinouts/ Software • Buildroot: https://buildroot.org/ • Putty terminal emulator: https://www.putty.org/ • OpenOCD (Open On-Chip Debugger) provides debugging, in-system programming and boundary-scan testing for embedded target devices: http://openocd.org/ • Wireshark, network protocol analyzer: https://www.wireshark.org/ • Binwalk, firmware analysis tool: https://github.com/ReFirmLabs/binwalk • Jefferson, JFFS2 filesystem extraction tool: https://github.com/sviehb/jefferson ○○○○○ http://va.ler.io – Pag. 54
Question Time

                ?
    Question Time
○○○○○               http://va.ler.io – Pag. 55
The End
Thank You
Valerio Di Giampietro
http://va.ler.io
v@ler.io
@valerio
○○○○○ http://va.ler.io – Pag. 56You can also read