Red Hat build of Quarkus 1.11 - Developing and compiling your Quarkus applications with Apache Maven
←
→
Page content transcription
If your browser does not render page correctly, please read the page content below
Red Hat build of Quarkus 1.11

Developing and compiling your Quarkus
   applications with Apache Maven

                            Last Updated: 2021-06-28
Red Hat build of Quarkus 1.11 Developing and compiling your Quarkus
applications with Apache Maven
Legal Notice
Copyright © 2021 Red Hat, Inc.

The text of and illustrations in this document are licensed by Red Hat under a Creative Commons
Attribution–Share Alike 3.0 Unported license ("CC-BY-SA"). An explanation of CC-BY-SA is
available at
http://creativecommons.org/licenses/by-sa/3.0/
. In accordance with CC-BY-SA, if you distribute this document or an adaptation of it, you must
provide the URL for the original version.

Red Hat, as the licensor of this document, waives the right to enforce, and agrees not to assert,
Section 4d of CC-BY-SA to the fullest extent permitted by applicable law.

Red Hat, Red Hat Enterprise Linux, the Shadowman logo, the Red Hat logo, JBoss, OpenShift,
Fedora, the Infinity logo, and RHCE are trademarks of Red Hat, Inc., registered in the United States
and other countries.

Linux ® is the registered trademark of Linus Torvalds in the United States and other countries.

Java ® is a registered trademark of Oracle and/or its affiliates.

XFS ® is a trademark of Silicon Graphics International Corp. or its subsidiaries in the United States
and/or other countries.

MySQL ® is a registered trademark of MySQL AB in the United States, the European Union and
other countries.

Node.js ® is an official trademark of Joyent. Red Hat is not formally related to or endorsed by the
official Joyent Node.js open source or commercial project.

The OpenStack ® Word Mark and OpenStack logo are either registered trademarks/service marks
or trademarks/service marks of the OpenStack Foundation, in the United States and other
countries and are used with the OpenStack Foundation's permission. We are not affiliated with,
endorsed or sponsored by the OpenStack Foundation, or the OpenStack community.

All other trademarks are the property of their respective owners.

Abstract
This guide describes how to create Quarkus applications with the Apache Maven framework.
Table of Contents
Table of Contents
. . . . . . . . . . . . . . . . . . . . . . . . . . . . . . . . . . . . . . . . . . . . . . . . . . . . . . . . . . . . . . . . . . . . . . . . . . . . . . . . . . . . . . . . . . . . . . . . . . . . . . . . . . . . . 3. . . . . . . . . . . . .
PREFACE
. . . . . . . . . . . . . FEEDBACK
PROVIDING . . . . . . . . . . . . ON
. . . .RED
. . . . .HAT
. . . . .DOCUMENTATION
. . . . . . . . . . . . . . . . . . . . . . . . . . . . . . . . . . . . . . . . . . . . . . . . . . . . . . . . . . . . . . . . . . . . . .4. . . . . . . . . . . . .
. . . . . . . . . .OPEN
MAKING . . . . . . SOURCE
. . . . . . . . . .MORE
. . . . . . .INCLUSIVE
. . . . . . . . . . . . . . . . . . . . . . . . . . . . . . . . . . . . . . . . . . . . . . . . . . . . . . . . . . . . . . . . . . . . . . . . . . . . 5. . . . . . . . . . . . .
. . . . . . . . . . . 1.. .RED
CHAPTER . . . . .HAT
. . . . .BUILD
. . . . . . .OF
. . . QUARKUS
. . . . . . . . . . . . . . . . . . . . . . . . . . . . . . . . . . . . . . . . . . . . . . . . . . . . . . . . . . . . . . . . . . . . . . . . . . . . 6. . . . . . . . . . . . .
.CHAPTER
. . . . . . . . . . 2.
. . APACHE
. . . . . . . . . .MAVEN
. . . . . . . . AND
. . . . . QUARKUS
. . . . . . . . . . . . . . . . . . . . . . . . . . . . . . . . . . . . . . . . . . . . . . . . . . . . . . . . . . . . . . . . . . . . . . . . . 7. . . . . . . . . . . . .
2.1. CONFIGURING THE MAVEN SETTINGS.XML FILE FOR THE ONLINE REPOSITORY 7
2.2. DOWNLOADING AND CONFIGURING THE QUARKUS MAVEN REPOSITORY 8
. . . . . . . . . . . 3.
CHAPTER . . CREATING
. . . . . . . . . . . . A. .QUARKUS
. . . . . . . . . . .PROJECT
. . . . . . . . . . .ON
. . . .THE
. . . . COMMAND
. . . . . . . . . . . . .LINE
. . . . . . . . . . . . . . . . . . . . . . . . . . . . . . . . . . . . . . .11. . . . . . . . . . . . .
. . . . . . . . . . . 4.
CHAPTER . . .CREATING
. . . . . . . . . . .A
. . QUARKUS
. . . . . . . . . . . PROJECT
. . . . . . . . . . .BY
. . . CONFIGURING
. . . . . . . . . . . . . . . . THE
. . . . .POM.XML
. . . . . . . . . . .FILE
. . . . . . . . . . . . . . . . . . . . . . . . 14
..............
. . . . . . . . . . . 5.
CHAPTER . . CREATING
. . . . . . . . . . . .A. .QUARKUS
. . . . . . . . . . .MAVEN
. . . . . . . . PROJECT
. . . . . . . . . . .USING
. . . . . . . CODE.QUARKUS.REDHAT.COM
. . . . . . . . . . . . . . . . . . . . . . . . . . . . . . . . . . . . . . . . . . . . 16
..............
. . . . . . . . . . . 6.
CHAPTER . . .CONFIGURING
. . . . . . . . . . . . . . . THE
. . . . . JAVA
. . . . . . .COMPILER
. . . . . . . . . . . . . . . . . . . . . . . . . . . . . . . . . . . . . . . . . . . . . . . . . . . . . . . . . . . . . . . . . . .20
..............
. . . . . . . . . . . 7.
CHAPTER . . INSTALLING
. . . . . . . . . . . . . .AND
. . . . . MANAGING
. . . . . . . . . . . . .JAVA
. . . . . .EXTENSIONS
. . . . . . . . . . . . . . WITH
. . . . . . QUARKUS
. . . . . . . . . . . APPLICATIONS
. . . . . . . . . . . . . . . . . . . . . . . . . . 21
..............
. . . . . . . . . . . 8.
CHAPTER . . .IMPORTING
. . . . . . . . . . . . YOUR
. . . . . . .QUARKUS
. . . . . . . . . . .PROJECT
. . . . . . . . . . .INTO
. . . . . .AN
. . . IDE
. . . . . . . . . . . . . . . . . . . . . . . . . . . . . . . . . . . . . . . . . . . .22
..............
. . . . . . . . . . . 9.
CHAPTER . . .CONFIGURING
. . . . . . . . . . . . . . . THE
. . . . . QUARKUS
. . . . . . . . . . . PROJECT
. . . . . . . . . . .OUTPUT
. . . . . . . . . . . . . . . . . . . . . . . . . . . . . . . . . . . . . . . . . . . . . . . . . . . .24
..............
. . . . . . . . . . . 10.
CHAPTER . . . TESTING
. . . . . . . . . . YOUR
. . . . . . .QUARKUS
. . . . . . . . . . .APPLICATION
. . . . . . . . . . . . . . . . . . . . . . . . . . . . . . . . . . . . . . . . . . . . . . . . . . . . . . . . . . . . . . . . . .25
..............
. . . . . . . . . . . 11.
CHAPTER . . .LOGGING
. . . . . . . . . . .THE
. . . . QUARKUS
. . . . . . . . . . . APPLICATION
. . . . . . . . . . . . . . . BUILD
. . . . . . . CLASSPATH
. . . . . . . . . . . . . .TREE
. . . . . . . . . . . . . . . . . . . . . . . . . . . . . . . .26
..............
. . . . . . . . . . . 12.
CHAPTER . . . PRODUCING
. . . . . . . . . . . . . .A. .NATIVE
. . . . . . . . EXECUTABLE
. . . . . . . . . . . . . . . . . . . . . . . . . . . . . . . . . . . . . . . . . . . . . . . . . . . . . . . . . . . . . . . . . . . . . .27
..............
12.1. CREATING A CONTAINER MANUALLY 28
. . . . . . . . . . . 13.
CHAPTER . . . TESTING
. . . . . . . . . .THE
. . . . .NATIVE
. . . . . . . . EXECUTABLE
. . . . . . . . . . . . . . . . . . . . . . . . . . . . . . . . . . . . . . . . . . . . . . . . . . . . . . . . . . . . . . . . . . . . . . .30
..............
. . . . . . . . . . . 14.
CHAPTER . . . USING
. . . . . . . .QUARKUS
. . . . . . . . . . .DEVELOPMENT
. . . . . . . . . . . . . . . . .MODE
. . . . . . . . . . . . . . . . . . . . . . . . . . . . . . . . . . . . . . . . . . . . . . . . . . . . . . . . . .32
..............
. . . . . . . . . . . 15.
CHAPTER . . . DEBUGGING
. . . . . . . . . . . . . .YOUR
. . . . . . .QUARKUS
. . . . . . . . . . .PROJECT
. . . . . . . . . . . . . . . . . . . . . . . . . . . . . . . . . . . . . . . . . . . . . . . . . . . . . . . . . . . . . .33
..............
. . . . . . . . . . . 16.
CHAPTER . . . ADDITIONAL
. . . . . . . . . . . . . . RESOURCES
. . . . . . . . . . . . . . . . . . . . . . . . . . . . . . . . . . . . . . . . . . . . . . . . . . . . . . . . . . . . . . . . . . . . . . . . . . . . . . . .34
..............
1Red Hat build of Quarkus 1.11 Developing and compiling your Quarkus applications with Apache Maven 2
PREFACE

                                            PREFACE
As an application developer, you can use Red Hat build of Quarkus to create microservices-based
applications written in Java that run on OpenShift and serverless environments. Applications compiled
to native executables have small memory footprints and fast startup times.

This guide describes how to create a Quarkus project using the Apache Maven plug-in.

Prerequisites

        OpenJDK (JDK) 11 is installed and the JAVA_HOME environment variable specifies the location
        of the Java SDK.

            Log in to the Red Hat Customer Portal to download Red Hat build of Open JDK from the
            Software Downloads page.

        Apache Maven 3.6.2 or higher is installed.

            Download Maven from the Apache Maven Project website.

                                                                                                        3
Red Hat build of Quarkus 1.11 Developing and compiling your Quarkus applications with Apache Maven
PROVIDING FEEDBACK ON RED HAT DOCUMENTATION
We appreciate your feedback on our technical content and encourage you to tell us what you think. If
you’d like to add comments, provide insights, correct a typo, or even ask a question, you can do so
directly in the documentation.
NOTE
You must have a Red Hat account and be logged in to the customer portal.
To submit documentation feedback from the customer portal, do the following:
1. Select the Multi-page HTML format.
2. Click the Feedback button at the top-right of the document.
3. Highlight the section of text where you want to provide feedback.
4. Click the Add Feedback dialog next to your highlighted text.
5. Enter your feedback in the text box on the right of the page and then click Submit.
We automatically create a tracking issue each time you submit feedback. Open the link that is displayed
after you click Submit and start watching the issue or add more comments.
Thank you for the valuable feedback.
4MAKING OPEN SOURCE MORE INCLUSIVE
MAKING OPEN SOURCE MORE INCLUSIVE
Red Hat is committed to replacing problematic language in our code, documentation, and web
properties. We are beginning with these four terms: master, slave, blacklist, and whitelist. Because of the
enormity of this endeavor, these changes will be implemented gradually over several upcoming releases.
For more details, see our CTO Chris Wright’s message .
5Red Hat build of Quarkus 1.11 Developing and compiling your Quarkus applications with Apache Maven
CHAPTER 1. RED HAT BUILD OF QUARKUS
Red Hat build of Quarkus is a Kubernetes-native Java stack that is optimized for use with containers and
Red Hat OpenShift Container Platform. Quarkus is designed to work with popular Java standards,
frameworks, and libraries such as Eclipse MicroProfile, Apache Kafka, RESTEasy (JAX-RS), Hibernate
ORM (JPA), Spring, Infinispan, and Apache Camel.
The Quarkus dependency injection solution is based on CDI (contexts and dependency injection) and
includes an extension framework to expand functionality and to configure, boot, and integrate a
framework into your application.
Quarkus provides a container-first approach to building Java applications. This approach makes it much
easier to build microservices-based applications written in Java as well as enabling those applications to
invoke functions running on serverless computing frameworks. For this reason, Quarkus applications
have small memory footprints and fast startup times.
6CHAPTER 2. APACHE MAVEN AND QUARKUS
CHAPTER 2. APACHE MAVEN AND QUARKUS
Apache Maven is a distributed build automation tool used in Java application development to create,
manage, and build software projects. Maven uses standard configuration files called Project Object
Model (POM) files to define projects and manage the build process. POM files describe the module and
component dependencies, build order, and targets for the resulting project packaging and output using
an XML file. This ensures that the project is built in a correct and uniform manner.
Maven repositories
A Maven repository stores Java libraries, plug-ins, and other build artifacts. The default public
repository is the Maven 2 Central Repository, but repositories can be private and internal within a
company to share common artifacts among development teams. Repositories are also available from
third-parties.
You can use the online Maven repository with your Quarkus projects or you can download the Red Hat
build of Quarkus Maven repository.
Maven plug-ins
Maven plug-ins are defined parts of a POM file that achieve one or more goals. Quarkus applications use
the following Maven plug-ins:
Quarkus Maven plug-in (quarkus-maven-plugin): Enables Maven to create Quarkus projects,
supports the generation of uber-JAR files, and provides a development mode.
Maven Surefire plug-in (maven-surefire-plugin): Used during the test phase of the build life
cycle to execute unit tests on your application. The plug-in generates text and XML files that
contain the test reports.
2.1. CONFIGURING THE MAVEN SETTINGS.XML FILE FOR THE ONLINE
REPOSITORY
You can use the online Quarkus repository with your Quarkus Maven project by configuring your user
settings.xml file. This is the recommended approach. Maven settings used with a repository manager or
repository on a shared server provide better control and manageability of projects.
NOTE
When you configure the repository by modifying the Maven settings.xml file, the
changes apply to all of your Maven projects.
Procedure
1. Open the Maven ~/.m2/settings.xml file in a text editor or integrated development
environment (IDE).
NOTE
If there is not a settings.xml file in the ~/.m2/ directory, copy the settings.xml
file from the $MAVEN_HOME/.m2/conf/ directory into the ~/.m2/ directory.
2. Add the following lines to the element of the settings.xml file:
7Red Hat build of Quarkus 1.11 Developing and compiling your Quarkus applications with Apache Maven
red-hat-enterprise-maven-repository
red-hat-enterprise-maven-repository
https://maven.repository.redhat.com/ga/
true
false
red-hat-enterprise-maven-repository
https://maven.repository.redhat.com/ga/
true
false
3. Add the following lines to the element of the settings.xml file and save the
file.
red-hat-enterprise-maven-repository
2.2. DOWNLOADING AND CONFIGURING THE QUARKUS MAVEN
REPOSITORY
If you do not want to use the online Maven repository, you can download and configure the Quarkus
Maven repository to create a Quarkus application with Maven. The Quarkus Maven repository contains
many of the requirements that Java developers typically use to build their applications. This procedure
describes how to edit the settings.xml file to configure the Quarkus Maven repository.
NOTE
When you configure the repository by modifying the Maven settings.xml file, the
changes apply to all of your Maven projects.
Procedure
1. Download the Quarkus Maven repository ZIP file from the Software Downloads page of the Red
Hat Customer Portal (login required).
2. Expand the downloaded archive.
8CHAPTER 2. APACHE MAVEN AND QUARKUS
3. Change directory to the ~/.m2/ directory and open the Maven settings.xml file in a text editor
or integrated development environment (IDE).
4. Add the path of the Quarkus Maven repository that you downloaded to the element
of the settings.xml file. The format of the path of the Quarkus Maven repository must be
file://$PATH, for example file:///home/userX/rh-quarkus-1.11.7.GA-maven-
repository/maven-repository.
red-hat-enterprise-maven-repository
red-hat-enterprise-maven-repository
file:///path/to/Quarkus/Maven/repository/
true
false
red-hat-enterprise-maven-repository
file:///path/to/Quarkus/Maven/repository/
true
false
5. Add the following lines to the element of the settings.xml file and save the
file.
red-hat-enterprise-maven-repository
IMPORTANT
9Red Hat build of Quarkus 1.11 Developing and compiling your Quarkus applications with Apache Maven
IMPORTANT
If your Maven repository contains outdated artifacts, you might encounter one of the
following Maven error messages when you build or deploy your project, where
is the name of a missing artifact and is the name of
the project you are trying to build:
Missing artifact
[ERROR] Failed to execute goal on project ; Could not
resolve dependencies for
To resolve the issue, delete the cached version of your local repository located in the
~/.m2/repository directory to force a download of the latest Maven artifacts.
10CHAPTER 3. CREATING A QUARKUS PROJECT ON THE COMMAND LINE
CHAPTER 3. CREATING A QUARKUS PROJECT ON THE
COMMAND LINE
You can use the Quarkus Maven plug-in on the command line to create a Quarkus project by providing
attributes and values on the command line or by using the plug-in in interactive mode. The resulting
project will contain the following elements:
The Maven structure
An associated unit test
A landing page that is accessible on http://localhost:8080 after you start the application
Example Dockerfile files for JVM and native mode in src/main/docker
The application configuration file
Procedure
1. In a command terminal, enter the following command to verify that Maven is using JDK 11 and
that the Maven version is 3.6.2 or higher:
mvn --version
2. If the preceding command does not return JDK 11, add the path to JDK 11 to the PATH
environment variable and enter the preceding command again.
3. To use the Quarkus Maven plug-in to create a new project, use one of the following methods:
Enter the following command:
mvn io.quarkus:quarkus-maven-plugin:1.11.7.Final-redhat-00009:create \
-DprojectGroupId= \
-DprojectArtifactId= \
-DplatformGroupId=com.redhat.quarkus \
-DplatformArtifactId=quarkus-universe-bom \
-DplatformVersion=1.11.7.Final-redhat-00009 \
-DclassName=""
In this command, replace the following values:
: A unique identifier of your project
: The name of your project and your project directory
: The fully qualified name of the generated resource, for example
org.acme.quarkus.sample.HelloResource
Create the project in interactive mode:
mvn io.quarkus:quarkus-maven-plugin:1.11.7.Final-redhat-00009:create
When prompted, enter the required attribute values.
NOTE
11Red Hat build of Quarkus 1.11 Developing and compiling your Quarkus applications with Apache Maven
NOTE
Alternatively, you can create your project using the default values for the
project attributes by entering the following command:
mvn io.quarkus:quarkus-maven-plugin:1.11.7.Final-redhat-00009:create
-B
The following table lists the attributes that you can define with the create command:
Attribute Default Value Description
projectGroupId org.acme.sample A unique identifier of your
project.
projectArtifactId none The name of your project and
your project directory. If you
do not specify the
projectArtifactId, the
Maven plug-in starts the
interactive mode. If the
directory already exists, the
generation fails.
projectVersion 1.0-SNAPSHOT The version of your project.
platformGroupId io.quarkus The group id of your
platform. All the existing
platforms are provided by
io.quarkus . However, you
can change the default value.
platformArtifactId quarkus-universe-bom The artifact id of your
platform BOM. To use the
locally built Quarkus add
quarkus-universe-bom to
your pom.xml file.
platformVersion The latest platform version The version of the platform
you want to use for your
project. You can provide a
version range and the Maven
plug-in uses the latest
version.
12CHAPTER 3. CREATING A QUARKUS PROJECT ON THE COMMAND LINE
Attribute Default Value Description
className None The fully qualified name of
the generated resource.
After the application is
created, the REST endpoint is
exposed at the following
URL:
http://localhost:8080/$pat
h
If you use the default path,
the URL is
http://localhost:8080/hell
o.
path /hello The resource path, only if you
set the className.
extensions [] The list of extensions you
want to add to your project
separated by comma.
NOTE
By default, the Quarkus Maven plug-in uses the latest quarkus-universe-bom file. This
BOM aggregates extensions so you can reference them from your applications to align
the dependency versions. If you are offline, the Quarkus Maven plug-in uses the latest
locally available version of the quarkus-universe-bom. If Maven finds the quarkus-
universe-bom version 2.0 or earlier, it will use the platform based on the quarkus-
universe-bom.
13Red Hat build of Quarkus 1.11 Developing and compiling your Quarkus applications with Apache Maven
CHAPTER 4. CREATING A QUARKUS PROJECT BY
CONFIGURING THE POM.XML FILE
You can create a Quarkus project by configuring the Maven POM XML file.
Procedure
1. Open the pom.xml file in a text editor.
2. Add the configuration properties that contain:
the version of the Quarkus Maven plugin
the groupID, artifactID and version of the Quarkus BOM
the version of the Maven Surefire plugin
1.11.7.Final-redhat-00009
quarkus-universe-bom
com.redhat.quarkus
1.11.7.Final-redhat-00009
3.0.0-M5
3. Add the Quarkus GAV (group, artifact, version) and use the quarkus-universe-bom file to omit
the versions of the different Quarkus dependencies:
${quarkus.platform.group-id}
${quarkus.platform.artifact-id}
${quarkus.platform.version}
pom
import
4. Add the Quarkus Maven plug-in:
io.quarkus
quarkus-maven-plugin
${quarkus.platform.version}
build
14CHAPTER 4. CREATING A QUARKUS PROJECT BY CONFIGURING THE POM.XML FILE
5. Optional: To build a native application, add a specific native profile that includes the Maven
Surefire and Maven Failsafe plug-ins and enable the native package type:
native
native
org.apache.maven.plugins
maven-failsafe-plugin
${surefire-plugin.version}
integration-test
verify
${project.build.directory}/${project.build.finalName}-
runner
Tests that include IT in their names are annotated @NativeImageTest are run against the
native executable.
15Red Hat build of Quarkus 1.11 Developing and compiling your Quarkus applications with Apache Maven
CHAPTER 5. CREATING A QUARKUS MAVEN PROJECT USING
CODE.QUARKUS.REDHAT.COM
As an application developer, you can use code.quarkus.redhat.com to generate a Quarkus Maven project
and automatically add and configure the extensions that you want to use in your application. In addition,
code.quarkus.redhat.com automatically manages the configuration parameters required to compile your
project into a native executable.
This section walks you through the process of generating a Quarkus Maven project including:
Specifying basic details about your application.
Choosing the extensions that you want to include in your project.
Generating a downloadable archive with your project files.
Using the custom commands for compiling and starting your application.
Prerequisites
Have a web browser.
Procedure
1. Navigate to https://code.quarkus.redhat.com using a web browser.
2. Specify basic details about your project:
a. Enter a group name for your project. The format of the name follows the Java package
naming convention, for example, org.acme.
b. Enter a name that you want to use for Maven artifacts generated from your project, for
example code-with-quarkus.
c. Select the build tool that you want to use to compile and start your application. The build
tool that you choose determines:
the directory structure of your generated project.
the format of configuration files used in your generated project.
the custom build script and command for compiling and starting your application that
code.quarkus.redhat.com displays for you after you generate your project.
NOTE
Red Hat provides support for using code.quarkus.redhat.com to create
Quarkus Maven projects only. Generating Gradle projects is not
supported by Red Hat.
16CHAPTER 5. CREATING A QUARKUS MAVEN PROJECT USING CODE.QUARKUS.REDHAT.COM
3. Specify additional details about your application project:
a. Select Configure more options to display the fields that contain additional application
details.
b. Enter a version that is used in artifacts generated from your project. The default value of
this field is 1.0.0-SNAPSHOT. Using semantic versioning is recommended, but you can use
a different type of versioning, if you prefer.
c. Select whether you want code.quarkus.redhat.com to add example code to your project.
When you add extensions that are marked with the icon to your project from the list of
extensions, you can enable this option to automatically create example class files and
resource files for those extensions when you generate your project. When you do not add
any extensions that provide example code, this option does not affect your generated
project.
NOTE
code.quarkus.redhat.com automatically uses the latest release of Red Hat
build of Quarkus. You can manually change the BOM version in the pom.xml
file after you generate your project.
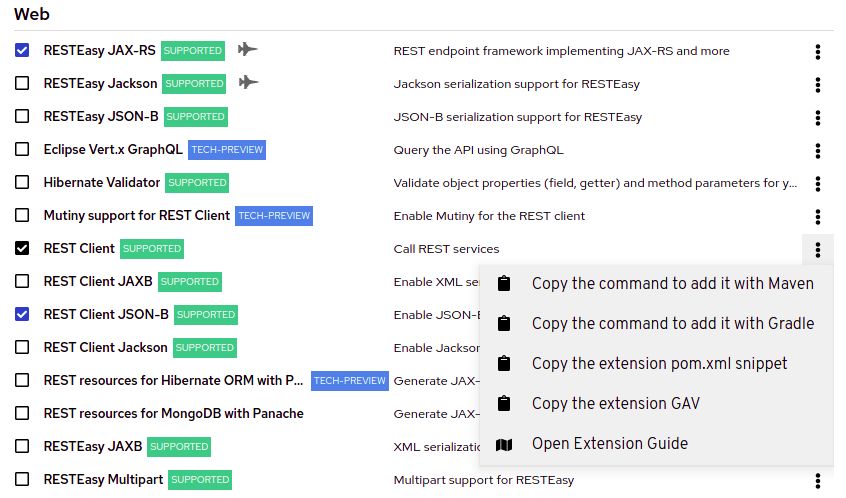
4. Select the extensions that you want to use in your application from the list of extensions. The
selected extensions are included as dependencies of your Quarkus application with their
versions being managed by the Quarkus platform to ensure their compatibility.
You can enable the option to automatically generate example code for extensions that are
marked with the icon.
17Red Hat build of Quarkus 1.11 Developing and compiling your Quarkus applications with Apache Maven
Note, that Red Hat provides different levels of support for individual extensions on the list,
which are indicated by labels next to the name of each extension:
SUPPORTED extensions are fully supported by Red Hat for use in enterprise application in
production environments.
TECH-PREVIEW extensions are subject to limited support by Red Hat in production
environments under the Technology Preview Features Support Scope .
DEV-SUPPORT extensions are not supported by Red Hat for use in production
environments, but the core functionalities that they provide are supported by Red Hat
developers for use in developing new applications.
Unlabeled extensions are not supported by Red Hat for use in production environments.
DEPRECATED extension are planned to be replaced by a newer technology or
implementation that provides the same functionality.
You can expand the overflow menu (⋮) next to each of the extensions to access additional
options that you can use to:
add the extension to an existing project using the Quarkus maven plugin on the
command line.
copy an XML snippet to add the the extension to the pom.xml file of a project.
obtain the groupId, artifactId and version of each extension.
open the extension guide.
5. Select Generate your application to confirm your choices and display the overlay screen with the
download link for the archive that contains your generated project. The overlay screen also
shows the custom command that you can use to compile and start your application.
6. Select Download the ZIP to save the archive with the generated project files to your machine.
7. Extract the contents of the archive.
8. Navigate to the directory that contains your extracted project files:
18CHAPTER 5. CREATING A QUARKUS MAVEN PROJECT USING CODE.QUARKUS.REDHAT.COM
cd
9. Compile and start your application in development mode:
./mvnw compile quarkus:dev
19Red Hat build of Quarkus 1.11 Developing and compiling your Quarkus applications with Apache Maven
CHAPTER 6. CONFIGURING THE JAVA COMPILER
By default, the Quarkus Maven plug-in passes compiler flags to the javac command from the maven-
compiler-plugin plug-in.
Procedure
To customize the compiler flags used in development mode, add a configuration section to the
plugin block and set the compilerArgs property. You can also set source, target, and
jvmArgs. For example, to pass --enable-preview to both the JVM and javac add the following
lines:
io.quarkus
quarkus-maven-plugin
${quarkus-plugin.version}
${maven.compiler.source}
${maven.compiler.target}
--enable-preview
--enable-preview
...
20CHAPTER 7. INSTALLING AND MANAGING JAVA EXTENSIONS WITH QUARKUS APPLICATIONS
CHAPTER 7. INSTALLING AND MANAGING JAVA
EXTENSIONS WITH QUARKUS APPLICATIONS
You can use Java extensions to expand the functionality of your application and to configure, boot, and
integrate a framework into your application. This procedure shows you how to find and add extensions
to your Quarkus project.
Prerequisites
You have a Quarkus Maven project.
Procedure
1. Navigate to your Quarkus project directory.
2. To list the available extensions, enter the following command:
./mvnw quarkus:list-extensions
3. To add an extension to your project, enter the following command where is the
group, artifact, version (GAV) of the extension that you want to add:
./mvnw quarkus:add-extension -Dextensions=""
For example, to add the Agroal extension, enter the following command:
./mvnw quarkus:add-extension -Dextensions="io.quarkus:quarkus-agroal"
4. To search for a specific extension, enter the extension name or partial name after -
Dextensions=. The following example searches for extensions that contain the text jdbc,
agroal, and non-exist-ent in the name:
./mvnw quarkus:add-extension -Dextensions=jdbc,agroal,non-exist-ent
This command returns the following result:
Multiple extensions matching 'jdbc'
* io.quarkus:quarkus-jdbc-h2
* io.quarkus:quarkus-jdbc-mariadb
* io.quarkus:quarkus-jdbc-postgresql
Be more specific e.g using the exact name or the full gav.
Adding extension io.quarkus:quarkus-agroal
Cannot find a dependency matching 'non-exist-ent', maybe a typo?
[...]
5. To install all extensions that a specific text string returns, enter the extension name or partial
name after -Dextensions=. The following example searches for and installs all extensions that
begin with hibernate-:
./mvnw quarkus:add-extension -Dextensions="hibernate-*"
21Red Hat build of Quarkus 1.11 Developing and compiling your Quarkus applications with Apache Maven
CHAPTER 8. IMPORTING YOUR QUARKUS PROJECT INTO AN
IDE
Although it is possible to develop your Quarkus project in a text editor, you might find it easier to use an
integrated development environment (IDE) to work on your project. The following instructions show you
how to import your Quarkus project into specific IDEs.
Prerequisites
You have a Quarkus Maven project.
Procedure
Complete the steps in one of the following sections:
CodeReady Studio or Eclipse
1. In CodeReady Studio or Eclipse, click File → Import.
2. Select Maven → Existing Maven Project.
3. On the next screen, select the root location of the project. A list of the found modules appears.
4. Select the generated project and click Finish.
5. To start your application, enter the following command in a new terminal window:
./mvnw compile quarkus:dev
IntelliJ
1. In IntelliJ, complete one of the following tasks:
Select File → New → Project From Existing Sources.
On the Welcome page, select Import project.
2. Select the project root directory.
3. Select Import project from external model and then select Maven.
4. Review the options and then click Next.
5. Click Finish.
6. To start your application, enter the following command in a new terminal window:
./mvnw compile quarkus:dev
Apache NetBeans
1. Select File → Open Project.
2. Select the project root directory.
22CHAPTER 8. IMPORTING YOUR QUARKUS PROJECT INTO AN IDE
3. Click Open Project.
4. To start your application, enter the following command in a new terminal window:
./mvnw compile quarkus:dev
Visual Studio Code
1. Install the Java Extension Pack.
2. In Visual Studio Code, open your project directory. The project loads as a Maven project.
23Red Hat build of Quarkus 1.11 Developing and compiling your Quarkus applications with Apache Maven
CHAPTER 9. CONFIGURING THE QUARKUS PROJECT
OUTPUT
Before you build your application, you can control the output of the build command by changing the
default values of application properties in the application.properties file.
Prerequisites
You have a Quarkus Maven project.
Procedure
1. Open the application.properties file in a text editor.
2. Edit the values of properties that you want to change and save the file.
The following table list the properties that you can change:
Property Description Type Default
quarkus.package.main- The entry point of the string io.quarku
class application. In most cases, you s.runner.
should change this value. Generate
dMain
quarkus.package.type The requested output type. string jar
quarkus.package.uber-jar Whether or not the Java runner boolean false
should be packed as an uber-
JAR.
quarkus.package.manifest.a Whether or not the boolean true
dd-implementation-entries implementation information
should be included in the runner
JAR file’s MANIFEST.MF file.
quarkus.package.user- Files that should not be copied string (list)
configured-ignored-entries to the output artifact.
quarkus.package.runner- The suffix that is applied to the string -runner
suffix runner JAR file.
quarkus.package.output- The output folder for the string
directory application build. This is resolved
relative to the build system
target directory.
quarkus.package.output- The name of the final artifact. string
name
24CHAPTER 10. TESTING YOUR QUARKUS APPLICATION
CHAPTER 10. TESTING YOUR QUARKUS APPLICATION
By default, when you test your Quarkus application, Maven uses the test configuration profile. However,
you can create a custom configuration profile for your tests using the Maven Surefire plug-in.
Prerequisites
You have a Quarkus project created with Apache Maven.
Procedure
Edit the following example to meet your testing requirements, where is a name
for your test profile:
[...]
org.apache.maven.plugins
maven-surefire-plugin
${surefire-plugin.version}
${project.build.directory}
[...]
[...]
NOTE
You cannot use a custom test configuration profile in native mode. Native tests always
run using the prod profile.
25Red Hat build of Quarkus 1.11 Developing and compiling your Quarkus applications with Apache Maven
CHAPTER 11. LOGGING THE QUARKUS APPLICATION BUILD
CLASSPATH TREE
The Quarkus build process adds deployment dependencies of the extensions that you use in the
application to the original application classpath. You can see which dependencies and versions are
included in the build classpath. The quarkus-bootstrap Maven plug-in includes the build-tree goal
which displays the build dependency tree for the application.
Prerequisites
You have a Quarkus Maven application.
Procedure
1. Add the plug-in configuration to the pom.xml file:
[...]
io.quarkus
quarkus-bootstrap-maven-plugin
${quarkus-plugin.version}
[...]
2. To list the build dependency tree of your application, enter the following command:
./mvnw quarkus-bootstrap:build-tree
3. The output of this command should be similar to the following example:
[INFO] --- quarkus-bootstrap-maven-plugin:1.11:build-tree (default-cli) @ getting-started ---
[INFO] org.acme:getting-started:jar:1.0-SNAPSHOT
[INFO] └─ io.quarkus:quarkus-resteasy-deployment:jar:1.11 (compile)
[INFO] ├─ io.quarkus:quarkus-resteasy-server-common-deployment:jar:1.11 (compile)
[INFO] │ ├─ io.quarkus:quarkus-core-deployment:jar:1.11 (compile)
[INFO] │ │ ├─ commons-beanutils:commons-beanutils:jar:1.9.3 (compile)
[INFO] │ │ │ ├─ commons-logging:commons-logging:jar:1.2 (compile)
[INFO] │ │ │ └─ commons-collections:commons-collections:jar:3.2.2 (compile)
...
NOTE
The mvn dependency:tree command displays only the runtime dependencies of your
application
26CHAPTER 12. PRODUCING A NATIVE EXECUTABLE
CHAPTER 12. PRODUCING A NATIVE EXECUTABLE
You can produce a native executable from your Quarkus application using a container runtime such as
Podman or Docker. Quarkus produces a binary executable using a builder image, which you can use
together with the Red Hat Universal Base Images RHEL8-UBI and RHEL8-UBI minimal. Red Hat build of
Quarkus 1.11 uses registry.access.redhat.com/quarkus/mandrel-20-rhel8:20.3 as a default for the
quarkus.native.builder-image property.
The native executable for your application contains the application code, required libraries, Java APIs,
and a reduced version of a virtual machine (VM). The smaller VM base improves the startup time of the
application and produces a minimal disk footprint.
Procedure
1. Open the Getting Started project pom.xml file and verify that it includes the native profile:
native
native
NOTE
Using Quarkus native profile allows you to run both the native executable and
the native image tests.
2. Build a native executable using one of the following methods:
a. Build a native executable with Docker:
./mvnw package -Pnative -Dquarkus.native.container-build=true
b. Build a native executable with Podman:
./mvnw package -Pnative -Dquarkus.native.container-build=true -
Dquarkus.native.container-runtime=podman
These commands create the getting-started-*-runner binary in the target directory.
IMPORTANT
Compiling a Quarkus application to a native executable consumes a lot of
memory during analysis and optimization. You can limit the amount of
memory used during native compilation by setting the
quarkus.native.native-image-xmx configuration property. Setting low
memory limits might increase the build time. For more details, refer to Native
executable configuration properties.
3. Run the native executable:
27Red Hat build of Quarkus 1.11 Developing and compiling your Quarkus applications with Apache Maven
./target/getting-started-*-runner
When you build the native executable the prod profile is enabled and the Quarkus native tests
run using the prod profile. You can change this using the quarkus.test.native-image-profile
property.
12.1. CREATING A CONTAINER MANUALLY
This section shows you how to manually create a container image with your application for Linux
X86_64. When you produce a native image using the Quarkus Native container it creates an executable
that targets the Linux X86_64 operating system. If your host operating system is different from this, you
will not be able to run the binary directly and you will need to create a container manually.
Your Quarkus Getting Started project includes a Dockerfile.native in the src/main/docker directory
with the following content:
FROM registry.access.redhat.com/ubi8/ubi-minimal:8.3
WORKDIR /work/
RUN chown 1001 /work \
&& chmod "g+rwX" /work \
&& chown 1001:root /work
COPY --chown=1001:root target/*-runner /work/application
EXPOSE 8080
USER 1001
CMD ["./application", "-Dquarkus.http.host=0.0.0.0"]
UNIVERSAL BASE IMAGE (UBI)
The Dockerfiles use UBI as a base image. This base image was designed to work in
containers. The Dockerfiles use the minimal version of the base image to reduce the size
of the produced image.
Procedure
1. Build a native Linux executable using one of the following methods:
a. Build a native executable with Docker:
./mvnw package -Pnative -Dquarkus.native.container-build=true
b. Build a native executable with Podman:
./mvnw package -Pnative -Dquarkus.native.container-build=true -
Dquarkus.native.container-runtime=podman
2. Build the container image using one of the following methods:
a. Build the container image with Docker:
docker build -f src/main/docker/Dockerfile.native -t quarkus-quickstart/getting-started .
28CHAPTER 12. PRODUCING A NATIVE EXECUTABLE
b. Build the container image with Podman
podman build -f src/main/docker/Dockerfile.native -t quarkus-quickstart/getting-started .
3. Run the container:
a. Run the container with Docker:
docker run -i --rm -p 8080:8080 quarkus-quickstart/getting-started
b. Run the container with Podman:
podman run -i --rm -p 8080:8080 quarkus-quickstart/getting-started
29Red Hat build of Quarkus 1.11 Developing and compiling your Quarkus applications with Apache Maven
CHAPTER 13. TESTING THE NATIVE EXECUTABLE
Test the application running in the native mode to test the functionality of the native executable. Use
@NativeImageTest annotation to build the native executable and run test against the http endpoints.
Procedure
1. Open the pom.xml file and verify that the native profile contains the following elements:
org.apache.maven.plugins
maven-failsafe-plugin
${surefire-plugin.version}
integration-test
verify
${project.build.directory}/${project.build.finalName}-
runner
org.jboss.logmanager.LogManager
${maven.home}
The failsafe-maven-plugin runs integration test and indicates the location of the produced
native executable.
2. Open the src/test/java/org/acme/quickstart/NativeGreetingResourceIT.java file and verify
that it includes the following content:
package org.acme.quickstart;
import io.quarkus.test.junit.NativeImageTest;
@NativeImageTest 1
public class NativeGreetingResourceIT extends GreetingResourceTest { 2
// Run the same tests
}
1 Use another test runner that starts the application from the native file before the tests.
The executable is retrieved using the native.image.path system property configured in
the Failsafe Maven Plugin .
2 This example extends the GreetingResourceTest, but you can also create a new test.
30CHAPTER 13. TESTING THE NATIVE EXECUTABLE
3. Run the test:
./mvnw verify -Pnative
The following example shows the output of this command:
./mvnw verify -Pnative
...
[getting-started-1.0-SNAPSHOT-runner:18820] universe: 587.26 ms
[getting-started-1.0-SNAPSHOT-runner:18820] (parse): 2,247.59 ms
[getting-started-1.0-SNAPSHOT-runner:18820] (inline): 1,985.70 ms
[getting-started-1.0-SNAPSHOT-runner:18820] (compile): 14,922.77 ms
[getting-started-1.0-SNAPSHOT-runner:18820] compile: 20,361.28 ms
[getting-started-1.0-SNAPSHOT-runner:18820] image: 2,228.30 ms
[getting-started-1.0-SNAPSHOT-runner:18820] write: 364.35 ms
[getting-started-1.0-SNAPSHOT-runner:18820] [total]: 52,777.76 ms
[INFO]
[INFO] --- maven-failsafe-plugin:2.22.1:integration-test (default) @ getting-started ---
[INFO]
[INFO] -------------------------------------------------------
[INFO] T E S T S
[INFO] -------------------------------------------------------
[INFO] Running org.acme.quickstart.NativeGreetingResourceIT
Executing [/data/home/gsmet/git/quarkus-quickstarts/getting-started/target/getting-started-
1.0-SNAPSHOT-runner, -Dquarkus.http.port=8081, -Dtest.url=http://localhost:8081, -
Dquarkus.log.file.path=build/quarkus.log]
2019-04-15 11:33:20,348 INFO [io.quarkus] (main) Quarkus 999-SNAPSHOT started in
0.002s. Listening on: http://[::]:8081
2019-04-15 11:33:20,348 INFO [io.quarkus] (main) Installed features: [cdi, resteasy]
[INFO] Tests run: 2, Failures: 0, Errors: 0, Skipped: 0, Time elapsed: 1.387 s - in
org.acme.quickstart.NativeGreetingResourceIT
...
NOTE
Quarkus waits for 60 seconds for the native image to start before automatically
failing the native tests. You can change this duration using the
quarkus.test.native-image-wait-time system property.
You can extend the wait time using the following command where is
the wait time in seconds:
./mvnw verify -Pnative -Dquarkus.test.native-image-wait-time=
31Red Hat build of Quarkus 1.11 Developing and compiling your Quarkus applications with Apache Maven
CHAPTER 14. USING QUARKUS DEVELOPMENT MODE
Development mode enables hot deployment with background compilation, which means that when you
modify your Java files or your resource files and then refresh your browser, the changes automatically
take effect. This also works for resource files such as the configuration property file.
Prerequisites
You have a Quarkus Maven application.
Procedure
1. To start Quarkus in development mode, enter the following command in the directory that
contains your Quarkus application pom.xml file:
./mvnw quarkus:dev
2. Make changes to your application and save the files.
3. Refresh the browser to trigger a scan of the workspace.
If any changes are detected, the Java files are recompiled and the application is redeployed.
Your request is then serviced by the redeployed application. If there are any issues with
compilation or deployment, an error page appears.
In development mode, the debugger is activated and listens on port 5005.
4. Optional: To wait for the debugger to attach before running the application, include -
Dsuspend:
./mvnw quarkus:dev -Dsuspend
5. Optional: To prevent the debugger from running, include -Ddebug=false:
./mvnw quarkus:dev -Ddebug=false
32CHAPTER 15. DEBUGGING YOUR QUARKUS PROJECT
CHAPTER 15. DEBUGGING YOUR QUARKUS PROJECT
When Quarkus starts in development mode, debugging is enabled by default. The debugger listens on
port 5005 without suspending the JVM.
Prerequisites
You have a Quarkus Maven project.
Procedure
Use one of the following methods to control debugging:
Controlling the debugger through system properties
1. Change one of the following values of the debug system property where PORT is the port that
the debugger is listening on:
false: The JVM starts with debug mode disabled.
true: The JVM starts in debug mode and is listening on port 5005.
client: The JVM starts in client mode and tries to connect to localhost:5005.
PORT: The JVM starts in debug mode and is listening on PORT.
2. Change the value of the suspend system property. This property is used when Quarkus starts in
debug mode.
y or true: The debug mode JVM launch suspends.
n or false: The debug mode JVM starts without suspending.
Controlling the debugger from the command line
To start your Quarkus application in debug mode with JVM, enter the following command:
./mvnw compile quarkus:dev -Ddebug
Enabling the debugger for a specific host domain
In development mode, the debugger is only enabled for applications that you execute on localhost. You
must manually enable debugging on other hosts.
Use the debugHost option to enable debugging on a specific host. You must replace with the IP adress of the host for which you want to enable debugging.
./mvnw compile quarkus:dev -DdebugHost=
To enable debugging on all hosts, replace with 0.0.0.:
./mvnw compile quarkus:dev -DdebugHost=0.0.0.0
33Red Hat build of Quarkus 1.11 Developing and compiling your Quarkus applications with Apache Maven
CHAPTER 16. ADDITIONAL RESOURCES
Deploying your Quarkus applications to OpenShift
Compiling your Quarkus applications to native executables
Testing your Quarkus applications
Apache Maven project
Revised on 2021-06-28 20:09:22 UTC
34You can also read