ACTIVPANEL NICKEL GETTING STARTED GUIDE - LEARN PROMETHEAN
←
→
Page content transcription
If your browser does not render page correctly, please read the page content below
ActivPanel Nickel
Getting Started Guide
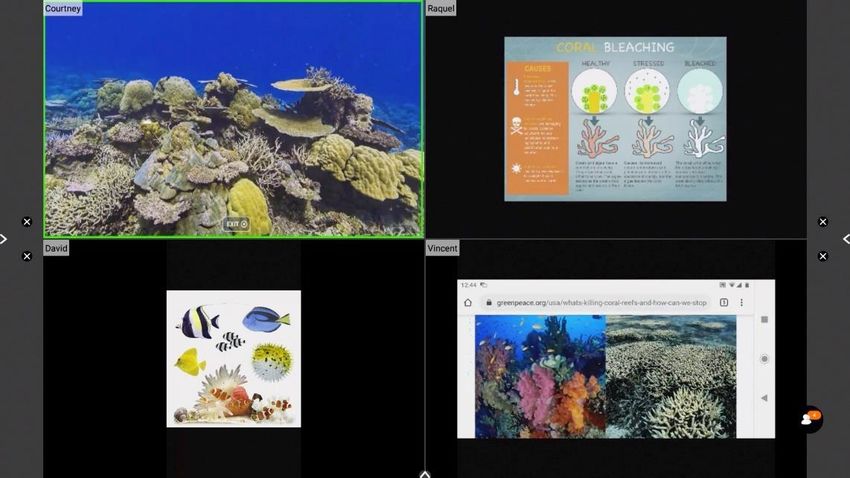
Table of Contents

Introduction to Your ActivPanel Nickel .................................................................................4
Remote ..........................................................................................................................................6
Connecting to the Internet .......................................................................................................7
Unified Menu................................................................................................................................8
Adjusting Brightness .................................................................................................................9
Adjusting Volume .................................................................................................................... 10
Large Mode ............................................................................................................................... 11
More Settings ........................................................................................................................... 12
Turning Panel Speakers On or Off ...................................................................................... 13
Changing Your Wallpaper ..................................................................................................... 14
Locker ......................................................................................................................................... 15
User Profiles: Creating New Profiles................................................................................... 16
User Profiles: Adding Security ............................................................................................. 17
User Profiles: Guest Profile ................................................................................................... 18
Promethean Cloud Connect: Google Drive ........................................................................ 19
Promethean Cloud Connect: Microsoft OneDrive ............................................................ 21
Introduction to the Promethean Whiteboard App Toolbar ........................................... 23
Promethean Capture App ...................................................................................................... 24
Promethean Annotate App ................................................................................................... 25
Switching Sources................................................................................................................... 26
Power On Default Source ...................................................................................................... 27
Promethean Timer App .......................................................................................................... 28
Promethean Spinner App ...................................................................................................... 29
myPromethean Portal............................................................................................................. 30
Promethean Screen Share App: Connecting Devices ..................................................... 31
Promethean Screen Share App: Waiting Room ............................................................... 34
Promethean Screen Share App: Touchback ...................................................................... 36
Promethean Activities Player................................................................................................ 38
Recent Apps ............................................................................................................................. 39
Managing Apps ........................................................................................................................ 40
Locating Apps .......................................................................................................................... 41
Rearranging Apps ................................................................................................................... 42
Closing Apps ............................................................................................................................ 43
Uninstalling Apps .................................................................................................................... 44
Accessing Content from Your USB and Downloading Files .......................................... 45
Creating Bookmarks in the Chromium Browser ............................................................... 46
Connecting a Laptop to Your ActivPanel ........................................................................... 47
Connecting an ActivConnect OPS-G to Your ActivPanel............................................... 49
Connecting a Promethean Chromebox to Your ActivPanel ........................................... 51
Help and Support .................................................................................................................... 53

Introduction to Your ActivPanel Nickel
The ActivPanel Nickel is designed to provide you with everything you need, right out of the box. It is Internet-
ready and preloaded with teaching tools.

The front of your ActivPanel Nickel features menu options to adjust the volume, access the Unified Menu, and
switch sources.

Your ActivPanel Nickel has a preinstalled Unified Menu that contains the most commonly used tools right at
your fingertips. These tools include our beloved Whiteboard and Annotate apps, the ability to capture
anything on your screen, easily switch sources to connected devices, and Screen Share for mirroring.

Best of all, the Unified Menu is accessible from the bottom, left, and right sides of the ActivPanel, to allow you
seamless mobility and plenty of access for your students.

To locate all of your favorite apps, tools, files, and settings, in one location, select the Locker icon from the
Unified Menu.

Our Classroom Essential Apps are also preinstalled, and it is full of all the perfect supplements to your lessons,
regardless of grade level or content area, including the Timer, Spinner, Annotate, Screen Share, and
Whiteboard. These apps were developed specifically from in response to teacher feedback, and they are
accessible from the Unified Menu and the Locker.

Additional features of your ActivPanel Nickel include Wi-Fi, 15 points of touch, powerful audio, front-facing
ports, and an onboard Android 8 operating system.
Remote
The Promethean remote allows you to navigate your ActivPanel from anywhere in the classroom.

                                                                   1

                                        2

                                       4                          3
                                                                  5
                                        6
                                                                   7

1. INSTANT POWER ON: Turn your ActivPanel on.

2. NAVIGATE AND SELECT: Use the arrows to navigate to the option of your choice. Press the checkmark to
   select your option.

3. VOLUME: Use + to increase and – to decrease your ActivPanel’s volume.

4. UNIFIED MENU: Use to access your Locker and Classroom Essential apps.

5. SOURCE: Use to switch to any device connected to your ActivPanel.

6. BLANK SCREEN: Use to instantly have nothing visible on the ActivPanel.

7. FREEZE: Use to freeze the current image on the screen.
Connecting to the Internet
To connect your ActivPanel to the internet, select the Unified Menu, then tap Locker.

Select the Settings icon. Tap More Settings.

Select Network & Internet. If you have an Ethernet cable connected, this is where you can complete the
process.

To connect to a wireless network, toggle the Wi-Fi switch on. Select your desired wireless network and input
a password if necessary.

Once you have successfully connected, you will see a confirmation below the network name.

Unified Menu
The Unified Menu is preinstalled and easily accessible from the bottom, left and right sides of the ActivPanel’s
screen. The Unified Menu provides quick access to Classroom Essential apps, the Locker and Sources.

                                         1      2     3      4     5      6      7     8      9    10     11

1. BACK: The Back button returns you to the previous screen.

2. LOCKER: The Locker is a personal space for you to access Apps and Settings.

3. USER: User allows you to access, create, modify, and add security to user profile settings.

4. HOME: The Home button returns you to the home screen from any application.

5. WHITEBOARD: The Whiteboard app is an instant whiteboard with several annotation tools, math tools,
   concept maps, infinite space, and the ability to turn any content into a collaborative activity with our multi-
   user mode.

6. CAPTURE: Capture takes a snapshot of the current screen. Use it in its entirety, or crop it to best meet
   your needs. The image opens in Whiteboard for interaction with all of the Whiteboard tools.

7. ANNOTATE: The Annotate app floats on top of any device connected to your ActivPanel, providing you
   the ability to annotate on top of anything.

8. SOURCE: Source allows you to quickly access devices that are connected to your ActivPanel.

9. SCREEN SHARE: Screen Share allows any device (iPad, Chromebook, smart phone, laptop, etc.) to mirror
   to your ActivPanel.

10. RECENT APPS: Navigating between most recently used apps is simple. Select Recent Apps and choose
    the app you would like to interact with.

11. HELP APP: The Help app provides resources and support to assist you with getting started with your
    ActivPanel.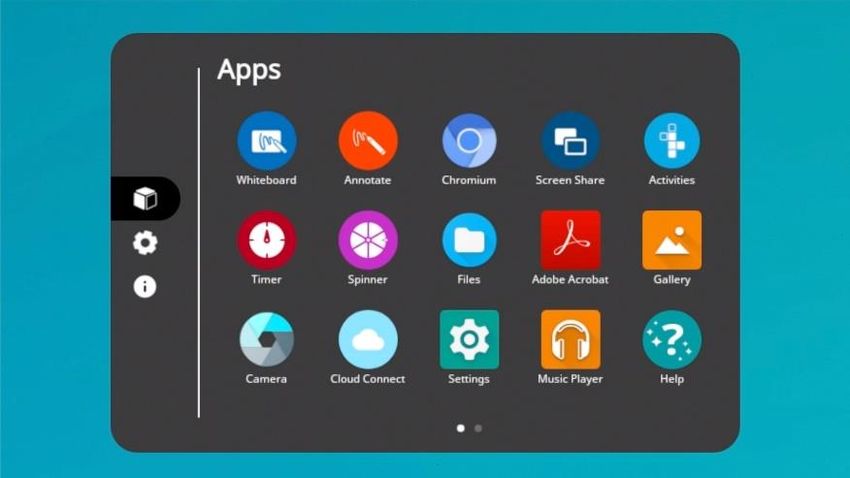
Adjusting Brightness
To adjust the brightness on your ActivPanel, select the Unified Menu, then tap Locker.

Choose the gear icon to access Settings. Press and slide the brightness bar forward or backwards until you
achieve the desired brightness.

Adjusting Volume
To adjust the volume on your ActivPanel, select the Unified Menu, then tap Locker.

Choose the gear icon to access Settings. Press and slide the volume bar forward or backwards until you
achieve the desired level.
Large Mode
Large Mode increases the size of the icons on the Unified Menu. To enable Large Mode, select the Unified
Menu, then tap Locker.

Choose the gear icon to access Settings. Tap Large Mode.

Now you may enjoy larger icons, no matter where you choose to access the Unified Menu.
More Settings

To access network connections, find information about your apps, and to fully customize your ActivPanel
experience, you will want to visit More Settings. To access More Settings, select the Unified Menu, then tap
Locker.

Choose the gear icon to access Settings. Tap More Settings.
Turning Panel Speakers On or Off
There may be instances in which you wish to disable your ActivPanel’s speakers. To change this setting, begin
by accessing your Unified Menu, then tap Locker.

Next, select the gear icon on the left to go to the Settings tab within your Locker. Choose More Settings.

Within More Settings, select Audio.

Toggle the panel speakers off or on to best meet your instructional needs. You may return to this setting at
any time.
Changing Your Wallpaper
There may be instances in which you wish to change the wallpaper on your ActivPanel’s home screen. To do
this, begin by accessing your Unified Menu, then tap Locker.

Next, select the gear icon on the left to go to the Settings tab within your Locker. Choose More Settings.

Within More Settings, select Display.

Choose Wallpapers. Tap My Photos in the bottom left corner to locate the image you wish to use for your
new wallpaper. This could be an image saved to your panel or from a connected USB drive.

Once you have chosen a new image, tap Set Wallpaper in the upper left corner. Next, choose Home Screen.
The wallpaper is updated immediately. You may change it again at any time.
Locker
The Locker is a personal space for you to access apps, files, and settings. You can access your Locker from
any of the three Unified Menu locations.

There are three icons on the left side of the Locker: Apps, Settings, and About this panel.

Apps allows you to access preinstalled Classroom Essential apps such as Activities, Annotate, Screen Share,
Spinner, Timer, and Whiteboard, as well as any apps you have installed on connected devices such as an
ActivConnect OPS-G or Promethean Chromebox.

Tap the gear icon to access Settings. In Settings, you may quickly change ActivPanel settings such as
brightness or volume, and access more settings.

The About this panel icon will provide you details about your ActivPanel. This information may come in handy
when communicating with your IT Administrator or Promethean Support.
User Profiles: Creating New Profiles

Your ActivPanel Nickel allows the panel owner to create new user profiles. This feature improves the workflow and
enables more secure multi-user functionality on the panel. This can be handy if you are sharing your ActivPanel
with colleagues, or for instances in which you have a guest teacher or substitute.

To access user accounts, select the Unified Menu, then tap User. In this case, it says Owner underneath, but
different users may be created.

Select the settings gear icon. Select You (Owner) to change the Owner’s name. Select the avatar to change the
Owner’s picture.

To add a new user, tap +Add user. You will be prompted with a short message. Tap OK. Each new user will need
to set up their profile by selecting Set Up Now.

The New User is now signed in. The Owner icon in the Unified Menu now reads “New User.” Select New User, then
tap the settings gear icon. You may modify the name and image.

To switch profiles, select the Unified Menu, tap User, then select Sign Out. This returns you to the Sign-In Screen.
Within the Owner’s profile, select the Unified Menu, tap User, then the settings gear icon to manage user profiles,
including adding new users or deleting users.
User Profiles: Adding Security
Your ActivPanel Nickel has User Profiles that enable multiple educators to make the most of a single ActivPanel. To
create a PIN or password for a user profile, select the Unified Menu, then tap User, which in this case reads
Owner. Next, select the lock icon.

To lock your user profile, select Screen lock.

Choose between creating a PIN or a password. A PIN is numeric code between 4 to 16 digits, whereas a
password can be a combination of alphanumeric characters between 4 to 16 digits. Depending on your
selection, input your PIN or password. Select Continue. You will be prompted to confirm your PIN or password.
Tap OK.

When you're returned to the Security & Location screen, your form of security now displays under Screen lock.

To sign out, select the Unified Menu, then User, and sign out. You will be returned to the Sign-in screen. When you
select your profile again to sign back in, you will be prompted to enter your PIN or password.

To change or remove your PIN or password, sign in to your user profile. From the Unified Menu, tap Locker. Select
the Settings tab, then More Settings. Tap Security & Location. Select Screen Lock. You will be prompted to enter
your existing PIN or password once more. From here, select None to remove security altogether, or tap PIN or
password to change your pin or password.
User Profiles: Guest Profile
Your ActivPanel Nickel has User Profiles that enable multiple educators to make the most of a single ActivPanel.
The Guest Profile is ideal for instances in which a guest instructor or substitute is using your classroom.

To begin, select Guest from the Sign-In screen.

As a Guest, you will be able to utilize Classroom Essential Apps, access the web, and more. When your Guest
session is complete, select the Unified Menu, then tap User. In this case, it is labeled Guest.

Select Sign Out.

You will be prompted to delete your session’s information or save it for later. Guest session information includes local
web data, local app data, and locally stored files.

Regardless of your choice, you will be returned to the Sign-In screen.
Promethean Cloud Connect: Google Drive

Within a user profile, you have the ability to connect your Google Drive account to your ActivPanel Nickel
using Promethean Cloud Connect. This allows you to easily access and save files and improves your workflow
in the classroom.

                                    To begin, select the Unified Menu, then tap User. Select the cloud icon.

                                    Next, choose between Google Drive or Microsoft One Drive. You may
                                    connect both if you wish.

                                    You’ll be prompted with a sign-in screen. Enter your email, then tap Next.

                                    Enter your password, then tap Next.

Finally, to provide your ActivPanel with access to your Google Drive, select Allow.
You will see a small window displaying your connected Google Drive.

To manage your connected Google Drive, simply return to the cloud icon. Tap the gear icon to remove your
account. Or tap Add Account for more options.

You may access files by selecting the Unified Menu, then tapping Locker. Within your Locker, locate and
select the Files app. You may also access Promethean Cloud Connect from within your Locker.

                                                 Your Google Drive now displays on the left side of the window.
                                                 Access images, PDFs, Promethean Whiteboard files, and more.

Easily save Promethean Whiteboard files to your connected Google Drive by selecting the Menu, then Save
As.
To change the save location, you may need to select the three horizontal lines in the top left
corner.
Then, select Google Drive.
Give your Whiteboard file a name, then tap the green
checkmark on the keyboard.Promethean Cloud Connect: Microsoft OneDrive
Within a user profile, you have the ability to connect your Microsoft OneDrive account to your ActivPanel
Nickel using Promethean Cloud Connect. This allows you to easily access and save files and improves your
workflow in the classroom.
To begin, select the Unified Menu, then tap User. Select the cloud icon.
Next, choose between Google Drive or Microsoft One Drive. You may
connect both if you wish.
You’ll be prompted with a sign-in screen. Enter your email, then tap Next.
Enter your password, then tap Sign In.
Finally, to provide your ActivPanel with access to your OneDrive, select Yes.
You will see a small window displaying your connected OneDrive.
To manage your connected OneDrive, simply return to the cloud icon. Tap the gear icon to remove your
account. Or tap Add Account for more options.
You may access files by selecting the Unified Menu, then tapping Locker. Within your Locker, locate and
select the Files app. You may also access Promethean Cloud Connect from within your Locker.
Your OneDrive now displays on the left side of the window.
Access images, PDFs, Promethean Whiteboard files, and more.
Easily save Promethean Whiteboard files to your connected Google Drive by selecting the Menu, then Save
As.To change the save location, you may need to select the three horizontal lines in the top left
corner.
Then, select OneDrive.
Give your Whiteboard file a name, then tap the
green checkmark on the keyboard.Introduction to the Promethean Whiteboard App Toolbar
Access the Promethean Whiteboard App from your Unified Menu or Locker. The Whiteboard toolbar resides
on the left side of the window by default.
Menu
Save
Multi User Mode
Backgrounds
Insert Image
Selector Tool
Pen Tool*
Highlighter Tool*
Ink Colors
Color Palette
Eraser*
Clear All Annotations
Math Tools
Redo
Undo
*Tap once to select the tool and twice to access additional widths.Promethean Capture App The Promethean Capture app allows you to capture and crop anything displayed on your panel’s screen, enabling you to organically create lessons and activities. To use Capture, access the Unified Menu, then tap Capture. You will see two options: Open in Whiteboard or Close. To use the entire image, select Open in Whiteboard. You may move, resize, and rotate the image in Whiteboard as you wish. Add annotations, interact with math tools, and more. To crop a captured image, access the Unified Menu, tap Capture, then use the sizing handles to modify the image as you wish. Tap Done to finalize cropping. You will once again have the options to Open in Whiteboard, or Close. You may wish to save this new Promethean Whiteboard file.
Promethean Annotate App
The Promethean Annotate App is perfect for adding annotations over anything displaying on your panel’s
screen, empowering you to make the most of teachable moments. You may also use it over top of connected
devices.

To access, tap the Unified Menu, then the Annotate app. It is also accessible from your Locker.

The toolbar appears. Drag to move it anywhere on your screen. Choose between a Pen and a Highlighter. Tap
the Pen or Highlighter button once more to change its width. Choose from five ink colors.

Use the Eraser to erase a bit of an annotation, or use Clear All Annotations to start fresh.

Tap the Eye button to exit annotate mode and interact with apps on your screen. Tap the Eye button once
more to return to annotate mode and continue annotating.

Use the Undo and Redo buttons to make quick corrections.

Tap the X to exit the app. All annotations will disappear on closing the app.
Switching Sources
To access devices connected to your ActivPanel, including a laptop, you may need to switch sources. To switch to
another source, tap the Unified Menu, then the Source button.

Source options will appear. The source currently in use will be highlighted. Tap whichever source you would like
switch to.

You may still access the Unified Menu and Classroom Essential Apps over top of connected devices.

To return to your ActivPanel home screen, either tap the Source button and select Home, or select Home from the
Unified Menu.
Power On Default Source

If you frequently use connected devices in tandem with your Elements Series ActivPanel, such as a Promethean
Chromebox, ActivConnect OPS-G or OPS-M, or even your laptop, you may wish for your panel to automatically
launch to that environment. In this case, changing your Power On Default Source will save you valuable time.

To begin, select the Unified Menu, then tap Locker. Within the Locker, tap the gear icon for Settings. Then select
More Settings.

Next, select Display.

Within Display settings, select Power On Default Source.

This will display the locations of currently connected devices. Select whichever source you wish for your ActivPanel
to default to when powering on. You may change this setting at any time.
Promethean Timer App
The Promethean Timer App is perfect for managing activities, assessments, and more within your classroom.
To access, tap the Unified Menu, then Locker.
Select Timer from the Apps tab.
The Timer app opens. There are three modes: Clock, Timer, and Stopwatch. Tap whichever title is currently
displaying to toggle between the three modes. Tap the gear to access more options in any mode.
Within each mode exists two viewing options: full screen and floating. Tap the Expand/Collapse arrows to
toggle between full screen and floating.
Within the Timer mode, choose between presets or use the up and down arrows to customize your own
Timer. Press the Start button to initiate. Use the Pause and Reset buttons as needed.
Tap the plus sign to create a new Clock, Timer, or Stopwatch. You can create and use any combination of up
to four at the same time. This applies to both full screen and floating modes. From within full screen mode, tap
the pencil to edit the Clock, Timer, or Stopwatch name.
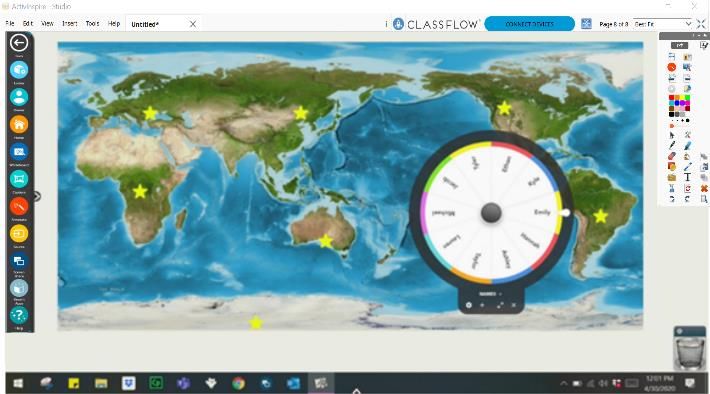
Tap the X to close each Clock, Timer, or Stopwatch.Promethean Spinner App
The Promethean Spinner App is perfect for quickly and easily randomizing elements for your class all in one
place.
To access, tap the Unified Menu, then Locker.
Select Spinner from the Apps tab.
The Spinner app opens. There are three modes—full screen, floating, and
condensed. Tap the Expand/Collapse arrows to toggle between full screen
and floating. To toggle between floating and condensed, tap any segment of
the Spinner.
Tap and hold the outer edge to move the floating or condensed spinner
anywhere on your screen.
To access six default lists, or to create new lists, select the list title directly
below the Spinner in either full screen or floating mode.
Tap Create New at the top to generate a new list. A list can contain up to 44
items. Be sure to Save your list. There is no limit to the number of lists that
can exist in the Spinner app.
Within the library of lists, tap the pencil icon to the right of a list title to edit
an existing list. You can add or remove items, rearrange items, change an
item’s color, and more.
Tap the gear icon to access more options.
Tap the plus sign to add an additional spinner. You can use up to four spinners in full screen, floating, or
condensed modes.
To use the Spinner, just drag any segment of the Spinner in a clockwise or counterclockwise direction.
Tap the X to exit the Spinner app.myPromethean Portal
The myPromethean portal offers new and exciting tools and resources to engage your students. To access
myPromethean, visit: portal.mypromethean.com.
From the myPromethean portal, you can easily
download Screen Share and share devices to your
Elements Series ActivPanel.
Within the myPromethean portal, you have access to
thousands of ready-made flipcharts. Select the Apps
button in the upper right, then Resource Library.
Within the Resource Library, you may search for and
preview flipcharts, and share them with your
colleagues. By creating a free account and logging
into myPromethean, you can easily save flipcharts to
your organized collections, open the flipchart
immediately in ActivInspire, or download the
flipchart to your computer.
To extend your learning, explore Learn Promethean
resources and video tutorials from within
myPromethean.Promethean Screen Share App: Connecting Devices The Promethean Screen Share app allows you to quickly connect and mirror student devices and lends itself perfectly to classroom collaboration and student-driven learning. To begin, please be sure you are using an Elements Series ActivPanel and are running firmware version 3.2 or higher. To update your ActivPanel Titanium’s firmware, please visit support.prometheanworld.com/article/1742/. There are three types of devices you may use to connect. To download the sender for your device, visit share.mypromethean.com. To begin connecting devices, access your Unified Menu, then tap Screen Share. A floating window appears. You may move this anywhere on your screen. You may name your panel, tap the reset button to generate a new 6-digit panel ID, or tap the people icon to enter the waiting room.
To connect from a computer with the Share Screen Sender, enter the panel ID. Next, enter your name, and be
sure to enable touchback. Then select Enter Waiting Room.

Students will enter the panel ID and their name within the Chrome extension or the mobile app. Then select
Start Screen Share.
Connected devices will display within the Waiting Room. Tap a student’s name to share a single screen or
select up to four students to share simultaneously. Once you have selected their names, tap the orange Share
button at the bottom of the waiting room window.
Promethean Screen Share App: Waiting Room
The Promethean Screen Share app allows you to quickly connect and mirror student devices – and lends itself
perfectly to classroom collaboration and student-driven learning.

To access the Screen Share waiting room, begin by opening your Unified Menu, then tap Screen Share.

When the floating window appears on your panel’s screen, tap the people icon.

As students connect their devices, you will see them appear in your Waiting Room. You may have up to 39
devices in your waiting room.

Select any name from the Waiting Room list to mirror this student’s device to your ActivPanel. Or tick the
boxes next to students’ names to mirror up to 4 devices simultaneously. Once you have selected their names,
tap the orange Share button at the bottom of the Waiting Room window.
A green dot next to a student’s name denotes that they have enabled Touchback. Please note: Touchback is
currently only available for Windows and Mac devices.

To remove a student, simply tap the X next to their name. You will be prompted to confirm their removal.

Within the Waiting room, you also may sort students by position or alphabetically.

                                                               1    2    3    4

1. Tap the gear for Settings. We recommend Good Quality for environments with low bandwidth and Best
   Quality for those with high bandwidth. You may also adjust name display settings.

2. Tap the circular arrows to refresh your Panel ID. This will also disconnect currently connected devices.
   This may come in handy if you have a new class of students entering the classroom or if you share your
   classroom with another teacher.

3. Tap the diagonal arrows to minimize the Waiting Room and return to the floating Screen Share window.
   Tap the people icon to return to the Waiting Room.

4. Finally, tapping the X will result in closing Screen Share and ending the casting session. You will be
   prompted to confirm your choice.
Promethean Screen Share App: Touchback Promethean users have been asking for Touchback capabilities and we’ve heard you! The Promethean Screen Share app now allows for Touchback on connected Windows and Mac devices, allowing you to interact with and navigate these devices in real time. When students connect using Windows or Mac, they will have the opportunity to enable Touchback. In the Waiting Room, a green dot next to a student’s name denotes that they have enabled Touchback.
When a student mirrors their screen with Touchback enabled, their device’s screen will be framed in bright
green. This is an example of the student’s computer screen:

Likewise, when mirroring a student device with Touchback enabled, this screen will also be framed in bright
green on your panel, as shown below for the screen in the top left quadrant:

With Touchback enabled, you may navigate connected devices in real time. Possible classroom examples
include becoming untethered, sharing applications or programs, allowing students to display work and
demonstrate learning, and more.
Promethean Activities Player
The Promethean Activities Player provides an easy way to access your pre-created ActivInspire activities and
engage your students on your Elements Series ActivPanel.

Begin by saving the ActivInspire Activity to a USB, then plug the USB into your Elements Series ActivPanel.

To access your activity on your ActivPanel, tap the Unified Menu, then Locker.

           Select Activities from the Apps Menu.

The Activity Player opens. Recently opened activities will display on the Recent tab. Tap the diagonal arrows
to maximize or minimize the Activity Player.

                                      Tap Open to access an activity from your USB.

       Tap the three horizonal lines in the top left corner and locate your USB. Next, select an Activity.

Two activities may be open at once for a multi-user experience. Tap the plus sign to open a second activity. It
could be the same activity, or a different one. Multiple students can practice skills and concepts
simultaneously.

Tap the X to close an activity. Once you close the final activity, you’ll be returned to the main window. Tap the
X once more to return to the home screen.
Recent Apps The Recent Apps button within the Locker allows you to easily toggle between various apps on your ActivPanel. To access Recent Apps, select the Unified Menu, then tap Recent Apps. This displays all of your recently opened applications, including apps from connected devices such as an ActivConnect OPS-G. Depending on how many apps you currently have open, there may be multiple pages, denoted by small white dots at the bottom of the Recent Apps window. Swipe to the right or left to navigate between pages. To return to any of these open apps, simply select the app. To close apps, much like you do on your smart phone, simply tap the little x to the bottom right of an app.
Managing Apps
              To manage apps installed on your Elements
              Series ActivPanel, for instance changing
              notification settings, select the Unified Menu,
              then tap Locker.

    Select the gear icon to access Settings. Tap More
    Settings.

     Select Apps from the Settings menu.

     Your apps are listed alphabetically. Scroll to the desired
     app you wish to view in more detail and tap its title.

     On the App Info screen, you may need to scroll down to
     view all of the app’s information.

     Tap the back arrow in the top left corner to return to
     your list of apps. Alternatively, you can tap the Home
     button from the Unified Menu to return to the home
     screen.
Locating Apps The Locker houses all of your apps, including those from connected devices such as a Promethean Chromebox or ActivConnect OPS-G. To locate apps, access the Unified Menu and tap Locker. The Locker will automatically open to the Apps tab, but you also can access it by tapping the cube icon to access Apps. Depending on the number of apps you have installed, there may be more than one page. Pages are denoted by small white dots at the bottom of the Locker window. Swipe right or left to navigate between these pages.
Rearranging Apps
You may rearrange your installed apps within the Locker for quick access and to best accommodate your
teaching.

To rearrange apps, access the Unified Menu and tap Locker.

The Locker will automatically open to the Apps tab, but you also can access it by tapping the cube icon to
access Apps.

Depending on the number of apps you have installed, there may be more than one page. Pages are denoted
by small white dots at the bottom of the Locker window. Swipe right or left to navigate between these pages.

To rearrange your apps, much as you do with your smart phone, simply press and hold the app while you drag
it to the desired location. You may move an app to a new location within a page, or to another page.

To create a new page within the Apps tab of your Locker, simply drag an app icon onto a page that is fully
populated. Organize your apps by function, subject area, apps for student use, and more!
Closing Apps
To close apps on your Elements Series ActivPanel, select the Unified Menu, then tap Recent Apps.

Depending on how many apps you currently have open, there may be multiple pages, denoted by small white
dots at the bottom of the Recent Apps window. Swipe to the right or left to navigate between pages.

To close apps, much like you do on your smart phone, simply tap the little x to the bottom right of an app.
Uninstalling Apps

                 To uninstall apps from your Elements Series
                 ActivPanel, select the Unified Menu, then tap
                 Locker.

 Select the gear icon to access Settings. Tap More Settings.

            Select Apps from the Settings menu.

            Your apps are listed alphabetically. Scroll to the
            desired app you wish to uninstall and tap its title.

            Tap the Uninstall button to begin the uninstallation
            process.

            You may be prompted once more to confirm your
            choice to uninstall.

            Once uninstallation is complete, you will briefly
            receive a small confirmation at the bottom of your
            screen and will be returned to the app list.
Accessing Content from Your USB and Downloading Files
There are a few ways to access files on your ActivPanel. This method describes accessing content from a USB
by using the Files app from the Apps tab in the Locker, then copying, or downloading, that content to the
ActivPanel.
First, insert your USB into one of the USB ports on your
ActivPanel. Next, go the Unified Menu and tap Locker. In the
Locker on the Apps tab, you will see an app titled Files. Select
it.
This takes you to a Downloads window. Access your USB by
selecting it on the left.
You will see the content from your USB listed here. Press
any file for two seconds to select it. Once one file is selected,
you may select additional files simply by tapping them.
Once one or more files is selected, tap the three vertical dots
in the top right corner. To download these selected files to
your ActivPanel, choose Copy to… from the menu that
appears.
The Downloads screen reappears, this time with options in the bottom right corner.
Select the blue Copy button.
You will be returned to your USB. To confirm that your files were downloaded successfully, select Downloads.Creating Bookmarks in the Chromium Browser To bookmark your favorite websites for easy access in the preinstalled Chromium browser, begin by selecting the Unified Menu, then tap Locker. In the Locker, select the Chromium app. Enter or search for the URL you wish to bookmark. Select the star icon to the right of the URL you entered. This bookmarks your page. You will receive a brief confirmation at the bottom of the screen that the website has been bookmarked and the star will turn blue. Tap the three vertical dots in the top right, then select Bookmarks to modify your existing bookmarks. You may edit bookmarks, move them into folders, and delete them. To visit a bookmarked website, tap the website that appears. Then, tap the three vertical dots on the blue header to reveal options.
Connecting a Laptop to Your ActivPanel
To connect your laptop to your ActivPanel, begin with either a VGA or HDMI cable and a USB cable. The VGA
or HDMI enables a visual connection, while the USB cable enables touch.

                        VGA                          HDMI                     USB

Ports on your ActivPanel are clearly labeled.

If you are connecting a Mac to your ActivPanel using a VGA cable, you may need an additional adapter or
dongle. You may also require an audio cable.
You will find additional ports on the back of your ActivPanel. When facing the panel, they are on the left side. Once you have connected, access the Unified Menu and tap Source to toggle over to your computer. On an ActivPanel Titanium, you may also use the Source button on your Center Console. Remember, you always have access to the Unified Menu, even over connected devices. This means you will also have access to the Classroom Essential Apps. Use the Home button from the Unified Menu to return Home at any time. For more information or to receive assistance, please visit support.prometheanworld.com.
Connecting an ActivConnect OPS-G to Your ActivPanel

Your district may have chosen additional connected devices for your ActivPanel Nickel.

To connect your ActivConnect OPS-G to your ActivPanel, begin by ensuring you are running the most up-to-
date firmware. Please visit support.prometheanworld.com/update and/or
support.prometheanworld.com/article/1744/ for more information.

Install the ActivConnect OPS-G in the OPS slot on the side of the ActivPanel. Next, ensure your ActivConnect
OPS-G is ready to connect to your ActivPanel. Visit support.prometheanworld.com/article/1753 for more
information.

Access the Unified Menu and tap Source. Select OPS to switch over to your ActivConnect OPS-G.

You will want to ensure your ActivPanel and ActivConnect OPS-G are connected to the same internet
network.

Next, locate your ActivPanel’s serial number by opening the Unified Menu, then the Locker. Select the Update
icon from the apps tab in the locker. Make note of the serial number which is found at the bottom left corner of
the Update window.
Open the Unified Menu once more and tap Source, then select OPS to return to the ActivConnect OPS-G.

Swipe down from the top of the screen to display notifications, and tap on the notification that reads “Cannot
find Panel Serial number in…”

Enter the ActivPanel’s serial number and tap OK. The serial number is not case sensitive.

The ActivConnect OPS-G screen will update. The app bubbles and the pink menu button on the home page
will disappear.

You can confirm that the integration is complete by swiping down from the top of the screen and the
notification will now read “Connected IP…”

From now on, all apps installed on the OPS-G can now be found within the Locker for easy access.

For more information or to receive assistance, please visit support.prometheanworld.com.
Connecting a Promethean Chromebox to Your ActivPanel

Your district may have chosen additional connected devices for your ActivPanel Nickel.

To connect your Promethean Chromebox to your ActivPanel Elements Series, begin by ensuring you are
running the most up-to-date firmware. Please visit support.prometheanworld.com/update and/or
support.prometheanworld.com/article/1744/ for more information.

Connect your HDMI and USB cables to the HDMI 2 and USB 2 ports.

Plug in the power cable and power your Chromebox on. You will also need a Google account.

Access the Unified Menu and tap Source. Select HDMI2 to switch over to your Chromebox.
Tap in the bottom right of the Chromebox desktop to access some basic settings. You will want to ensure
your ActivPanel and Chromebox are connected to the same internet network.
Help and Support

To contact Promethean Support, visit support.prometheanworld.com.

                      To learn more about the Elements Series and other Promethean solutions:
                      • Follow us on Twitter @LearnPromethean
                      • Subscribe to our YouTube channel, PrometheanVideo
                      • Visit our Learn Promethean website to explore courses, video tutorials, resources,
                         and more

With the latest version 5.0 firmware release, a new animated onboarding tour of your ActivPanel will display
upon initial start and successful update of the ActivPanel. Access the Help App at anytime from the Unified
Menu or Locker.

                                              The Help App provides resources to assist you on getting
                                              started with your ActivPanel. View videos and tutorials, take a
                                              quick onboarding tour, or contact our Support team for
                                              personalized assistance.
You can also read