SignoSign/Universal User Manual - Signotec
←
→
Page content transcription
If your browser does not render page correctly, please read the page content below
signoSign/Universal
User Manual
Use in a browser and mobile apps

signotec GmbH
Am Gierath 20 b
40885 Ratingen, Germany

(+49-2102) 53575-10
www.signotec.com
info@signotec.de

Version 3.0 as of 07.07.2021
Contents
1.      USE IN A BROWSER ........................................................................................................................................................ 4
     1.1.       SHORT DESCRIPTION............................................................................................................................................................. 4
2.      USE IN A BROWSER ........................................................................................................................................................ 4
     2.1.       REQUIREMENTS .................................................................................................................................................................. 4
     2.2.       CONFIGURATION ................................................................................................................................................................. 4
     2.3.       SIGNATURE CAPTURE USING A SIGNATURE PAD .......................................................................................................................... 4
3.      INSTALLATION AND CONFIGURATION OF APPLE IOS APP ............................................................................................... 5
     3.1.       REQUIREMENTS .................................................................................................................................................................. 5
     3.2.       INSTALLATION ..................................................................................................................................................................... 5
     3.3.       CONNECTION DATA .............................................................................................................................................................. 5
     3.4.       USER DATA......................................................................................................................................................................... 6
     3.5.       APP PERMISSIONS ................................................................................................................................................................ 6
     3.6.       SHOW USERNAME ............................................................................................................................................................... 6
     3.7.       PEN SUPPORT ..................................................................................................................................................................... 7
     3.8.       APP INFORMATION .............................................................................................................................................................. 7
4.      INSTALLATION AND CONFIGURATION OF ANDROID APP ............................................................................................... 7
     4.1.       REQUIREMENTS .................................................................................................................................................................. 7
     4.2.       INSTALLATION ..................................................................................................................................................................... 7
     4.3.       CONNECTION DATA .............................................................................................................................................................. 7
     4.4.       USER DATA......................................................................................................................................................................... 8
     4.5.       ADDITIONAL SETTINGS .......................................................................................................................................................... 8
     4.6.       APP PERMISSIONS ................................................................................................................................................................ 9
     4.7.       APP INFORMATION .............................................................................................................................................................. 9
5.      USE OF THE APP FOR A CUSTOM WEB APPLICATION ...................................................................................................... 9
6.      USING THE APP WITH THE ‘OPEN WITH...’ FUNCTION .................................................................................................... 9
7.      ‘DOCUMENT POOL’ FUNCTIONS ................................................................................................................................... 10
     7.1. LOGIN ............................................................................................................................................................................. 10
     7.2. DASHBOARD ..................................................................................................................................................................... 11
     7.3. TEMPLATES ...................................................................................................................................................................... 11
     7.4. DOCUMENTS .................................................................................................................................................................... 11
     7.5. SHARED ACCESSES ............................................................................................................................................................. 11
     7.6. WORKFLOWS.................................................................................................................................................................... 11
     7.7. OPEN AND EDIT DOCUMENTS ............................................................................................................................................... 12
     7.8. SEARCH, FILTER AND GROUP ................................................................................................................................................ 12
     7.9. UPLOAD DOCUMENTS......................................................................................................................................................... 13
     7.10.    PROPERTIES OF A DOCUMENT .......................................................................................................................................... 13
     7.11.    SHARING DOCUMENT ACCESSES ........................................................................................................................................ 14
       7.11.1. Description of the Shared accesses ....................................................................................................................... 14
       7.11.2. Sharing a document from the document pool ...................................................................................................... 14
       7.11.3. Shared accesses in the document list ................................................................................................................... 15
     7.12.    CREATE AND MANAGE WORKFLOWS .................................................................................................................................. 16
       7.12.1. Creating a workflow ............................................................................................................................................. 16
       7.12.2. Manage workflows ............................................................................................................................................... 18
     7.13.    OVERVIEW OF ALL TOOLS IN THE DOCUMENT POOL ............................................................................................................... 19
       7.13.1. Templates and documents ................................................................................................................................... 20
       7.13.2. Shared accesses .................................................................................................................................................... 20
     7.14.    LOGOUT FROM THE DOCUMENT POOL................................................................................................................................ 21
8.      SIGNOSIGN/UNIVERSAL VIEWER FUNCTIONS ............................................................................................................... 21

 © 2000–2021 signotec GmbH                                                      signoSign/Universal User Manual                                                                 Page 2 of 25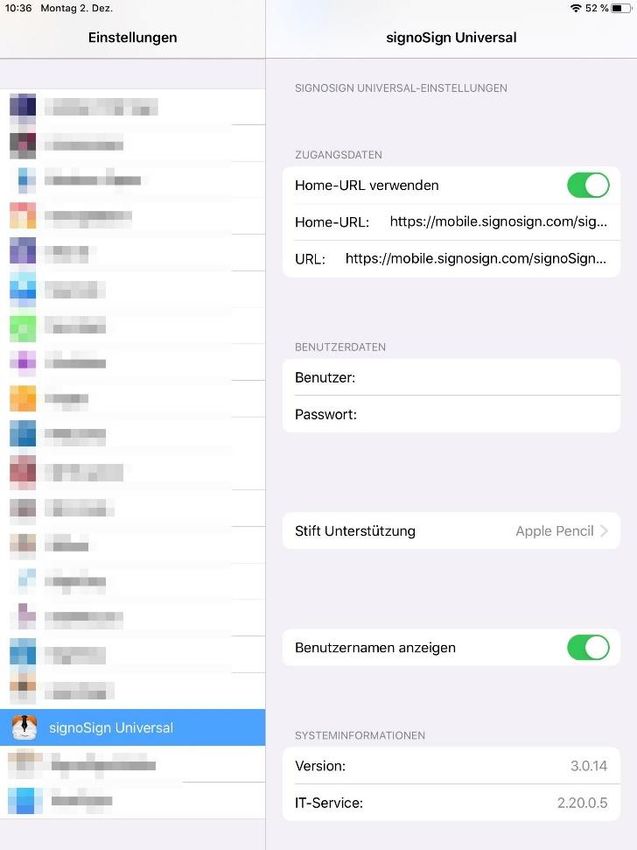
8.1. TOOLBAR ......................................................................................................................................................................... 21
    8.1.1.  Back button .......................................................................................................................................................... 21
    8.1.2.  signotec logo ........................................................................................................................................................ 21
    8.1.3.  Scale page view .................................................................................................................................................... 22
    8.1.4.  Share document.................................................................................................................................................... 22
    8.1.5.  Save ...................................................................................................................................................................... 22
    8.1.6.  Show signature fields............................................................................................................................................ 22
    8.1.7.  Insert note ............................................................................................................................................................ 22
    8.1.8.  Search ................................................................................................................................................................... 22
    8.1.9.  Create signature field ........................................................................................................................................... 23
    8.1.10. Sign ....................................................................................................................................................................... 23
    8.1.11. Export ................................................................................................................................................................... 23
  8.2. PAGE NAVIGATION (FOOTER) ............................................................................................................................................... 23
  8.3. SIGNATURE CAPTURE .......................................................................................................................................................... 24
    8.3.1.  Capturing a signature ........................................................................................................................................... 24
    8.3.2.  Signature dialog box ............................................................................................................................................. 24
    8.3.3.  Date and time (time stamp) ................................................................................................................................. 25
  8.4. FORM FIELDS .................................................................................................................................................................... 25
  8.5. NAVIGATION USING GESTURE COMMANDS.............................................................................................................................. 25
    8.5.1.  Zoom in and zoom out .......................................................................................................................................... 25
    8.5.2.  Page forward and page back ................................................................................................................................ 25
    8.5.3.  Page scrollbar ....................................................................................................................................................... 25

Copyright
Copyright © 2000 – 2021 signotec GmbH

All rights reserved. This document and the components it describes are products copyrighted by
signotec GmbH, based in Ratingen, Germany. Reproduction of this documentation, in part or in whole,
is subject to prior written approval from signotec GmbH. All hardware and software names used are
trade names and/or trademarks of their respective manufacturers/owners. Subject to change at any
time without notice. We assume no liability for any errors that may appear in this documentation.

 © 2000–2021 signotec GmbH                                                 signoSign/Universal User Manual                                                              Page 3 of 25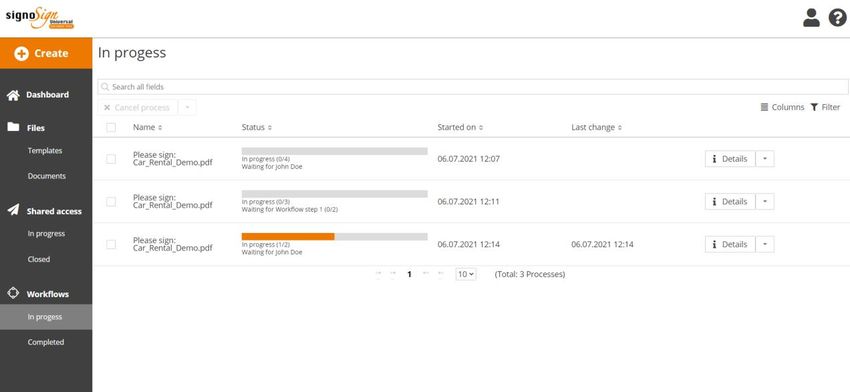
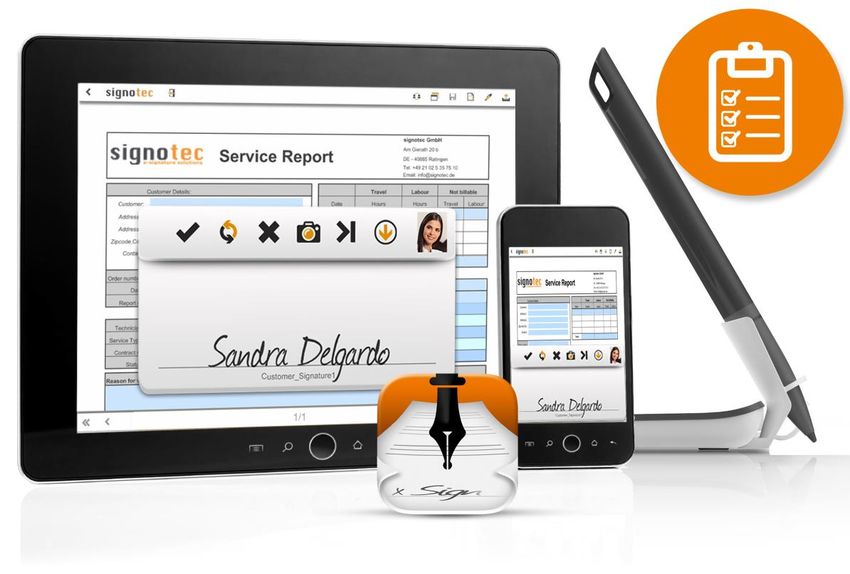
1. Use in a browser

  1.1. Short description

  The signoSign/Universal application is a web-based software to display, edit and capture
  handwritten signatures on PDF documents. It can be used via any HTML5-capable browser as well
  as the signotec apps.

  Furthermore, the application offers the possibility to share documents individually or as part of a
  workflow with external persons. Access to individual documents is controlled via a link here. The
  special feature is that the external user does not need any login data for the application.

  In addition to these functions, the application can also be integrated into your company's own
  systems and processes via various APIs.

2. Use in a browser

  2.1. Requirements

  signoSign/Universal requires an HTML5-capable web browser for connection, such as Microsoft
  Internet Explorer, Mozilla Firefox, Google Chrome, Opera, (etc.). Both desktop and mobile
  browsers are supported.

  You will need unlocked access or a custom installation of signoSign/Universal.

  2.2. Configuration

  signoSign/Universal can be used in a browser without additional installation or configuration.

  The signoSign/Universal system hosted by signotec can be reached at the following address:

  https://universal.signosign.com/signoSignUniversalPool

  Please note: If signoSign/Universal is run on an individual server, an appropriately customised URL
  must be used.

  2.3. Signature capture using a signature pad

  If you are using signoSign/Universal in a browser on a Windows or Linux PC, signatures can also
  be captured using a signotec signature pad.

  signotec signoPAD-API/Web (formerly WebSocket Pad Server) (min. version 1.4.0.0) must be
  installed for this purpose. This software acts as a ‘bridge’ between browser and signature pad.

  More information can be found at https://en.signotec.com/signopad-api-web-en.

  Please also refer to the Signature capture section for more information.

© 2000–2021 signotec GmbH               signoSign/Universal User Manual                   Page 4 of 25
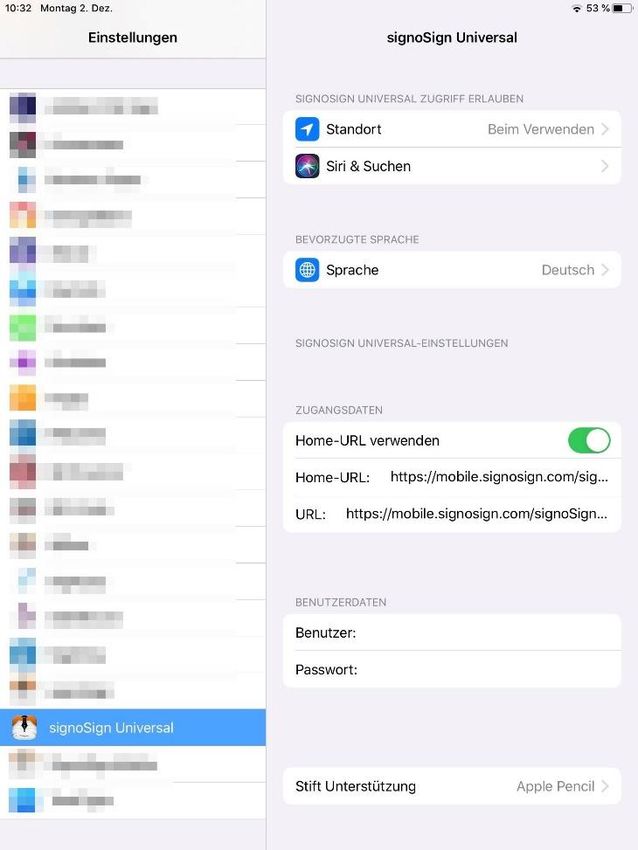
3. Installation and configuration of Apple iOS app

  3.1. Requirements

  A device with an active Internet connection and iOS version 9.1 or higher is required for installation
  and use.

  You will need unlocked access or a custom installation of signoSign/Universal.

  3.2. Installation

  The signoSign/Universal iOS app can be downloaded free of charge from the Apple App Store.
  Following successful installation, the signoSign/Universal app for Apple iOS can be opened on your
  home screen. You should, however, configure the app before use.

  Link to the app: https://apps.apple.com/us/app/signosign-universal/id1211315240

  3.3. Connection data

  The app settings are available through Apple iOS Settings. After opening Settings, you will find a
  list of all installed apps. signoSign/Universal also appears there.

  To establish a connection between signoSign/Universal and the app, two connection values need
  to be entered in the app settings: The home URL and the application URL.

  The home URL describes the storage location or the application providing the documents to be
  signed. The default setting is signoSign/Universal Document Pool.

  Default:             https://universal.signosign.com/signoSignUniversalPool
  Schema:              /signoSignUniversalPool

  If you disable ‘Use home URL’, the app will run without a releasing application. In this case, the
  import function can then only be used via ‘Open with...’.

  The application URL refers to the actual signoSign/Universal application.

  Default:             https://universal.signosign.com/signoSignUniversal
  Schema:              /signoSignUniversalPool

  Note: If you are using the app with the server provided by signotec GmbH, these connection values
  can also remain blank (empty).

© 2000–2021 signotec GmbH                 signoSign/Universal User Manual                    Page 5 of 25
3.4. User data

  The access data for signoSign/Universal must also be stored in Settings. These access data are
  used for automatic login when the app starts.

  If signoSign/Universal is provided by signotec, these access data will be sent to the user’s e-mail
  address following successful registration.

  If you run signoSign/Universal on an internal server, please ask your system administrator for
  access data.

  3.5. App permissions

  Different permissions are required depending on how the app is used.

       - Access to location information
       If you enable this option, signoSign/Universal can take the GPS data of your iOS device into
       account when a signature is provided. The digital signature will be expanded to include the
       location data.

       - Access to camera
       If you enable this function, signoSign/Universal can access the integrated camera. The digital
       signature can be expanded to include recorded image data.

  3.6. Show username

  If you enable this option, the username can be displayed when logging in to signoSign/Universal.

© 2000–2021 signotec GmbH                signoSign/Universal User Manual                   Page 6 of 25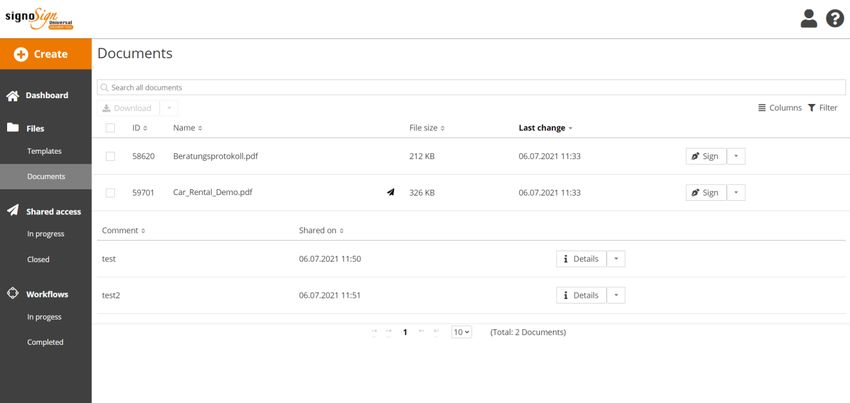
3.7. Pen support

  If you enable pen support, the signing method will be configured in the app such that a signature
  can only be captured using the selected pen. It is then no longer possible to sign with a finger.

  Pen support means that higher-value signature data can be recorded. If your device has pen input
  of this kind, we recommend that you use it.

  3.8. App information

  ‘System information’ displays information about the app and IT service in use.

  The current version of the app is shown under ‘Version’.

  You can find the version number of the server components that the app has used to connect under
  ‘IT service’. If no connection to a server has been established, this field remains blank.

4. Installation and configuration of Android app

  4.1. Requirements

  A device with an active Internet connection and Android version 5.0 or higher is required for
  installation and use.

  You will need unlocked access or a custom installation of signoSign/Universal.

  4.2. Installation

  The signoSign/Universal Android app can be downloaded free of charge from the Google Play Store.

  Link to the app: https://play.google.com/store/apps/details?id=de.signotec.signosignuniversal

  Note: An APK file of the app can also be provided on request.
  4.3. Connection data

  You can open Settings directly in the app.

  To establish a connection between signoSign/Universal and the app, two connection values need
  to be entered in the app settings: The home URL and the application URL.

  The home URL describes the storage location or the application providing the documents to be
  signed. The default setting is signoSign/Universal Document Pool.

  Default:             https://universal.signosign.com/signoSignUniversalPool
  Schema:              /signoSignUniversalPool

  If you disable ‘Use home URL’, the app will run without a releasing application. In this case, the
  import function can then only be used via ‘Open with...’.

  The application URL refers to the actual signoSign/Universal application.

  Default:             https://universal.signosign.com/signoSignUniversal
  Schema:              /signoSignUniversalPool

© 2000–2021 signotec GmbH                 signoSign/Universal User Manual                Page 7 of 25
Note: If you are using the app with the server provided by signotec GmbH, these connection values
  can also remain blank (empty).

  4.4. User data

  Username and password can be stored for an automatic login to signoSign/Universal. If these are
  not entered in the configuration, the user has to log in again each time the app is restarted.

  If signoSign/Universal is provided by signotec, these access data will be sent to the user’s e-mail
  address following successful registration.

  If you run signoSign/Universal on an internal server, please ask your system administrator for
  access data.

  4.5. Additional settings

  You can find additional settings for the app under ‘Settings’.

       -   Using S-Pen for signing

       If you enable the ‘Use sPen for signing’ option, signatures can only be captured in the app us-
       ing a Samsung S-Pen; signing by touch will be disabled.

       Pen input means that higher-value signature data can be recorded. If your device has pen
       input of this kind, we recommend that you use it.

       -   Setup max pressure

       If you select this function, a window will open for checking the pressure levels that can be
       recorded by the mobile device display.

© 2000–2021 signotec GmbH                signoSign/Universal User Manual                    Page 8 of 25
4.6. App permissions

   You can view and change the permissions for the app, such as location and camera, in the system
   settings for the app.

   4.7. App information

   Information about the app and IT service in use can be found under ‘Info’.

   The current version of the app is shown under ‘Version’.

   You can find the version number of the server components that the app has used to connect under
   ‘IT service’. If no connection to a server has been established, this field remains blank.

5. Use of the app for a custom web application

The signoSign/Universal app offers a unique function that allows you to store an individual website as
a home URL and thus process PDF documents on the website without having to undertake any direct
integration with the corresponding programming effort. In this case, the app works as a PDF viewer
for all available PDF documents on the website. As soon as a PDF download is started, the PDF
document opens in signoSign/Universal and can be edited there and subsequently downloaded or
sent.

If you store https://www.signotec.com as your home URL, for example, you can open, edit, send and
save all PDF documents, such as data sheets, brochures, etc. in the signoSign/Universal viewer.

This can of course also be done with other websites and web applications in which you generate and
manage PDF documents.

Note: signoSign/Universal offers numerous programming interfaces for deepest possible and seamless
integration (even without an app, if necessary).

6. Using the app with the ‘Open with...’ function

After installing the mobile app, the standard ‘Open with...’ function will be available for PDF
documents. You can use this function to open PDFs from the file system or from another app with
signoSign/Universal.

You can find the same function in signoSign/Universal to open the document from within
signoSign/Universal again using another app.

 © 2000–2021 signotec GmbH               signoSign/Universal User Manual                   Page 9 of 25
You can therefore load a document into the app and then save it again in another app without having
to use ‘Document Pool’.

If you want to use the app exclusively in this way and explicitly not Document Pool, you can also
disable the home URL in Settings. In this case, documents cannot be accidentally saved on the server,
but are only available temporarily for the duration of the runtime.

7. ‘Document Pool’ functions

With signoSign/Universal, signotec simultaneously provides a web application ("Document Pool") for
managing templates, documents and workflows. The application offers users the possibility, even
without programming effort, to upload and manage documents and to share them with external users
individually or as part of a workflow.

Nevertheless, the application can also be seen as a "placeholder" for your own application because it
can be replaced by your own integrations in your own applications.

To use the Document Pool with the mobile apps, the home URL must point to this application.

Note: The Document Pool is programmed "responsively" and is displayed adapted to different end
devices for better usability.

   7.1. Login

   Apps

   If you use the mobile apps and have stored your user data, you will be automatically logged into
   the Document Pool when you start the app.

   Browser

   If you use the application in the browser, you will first be shown a login page where you can enter
   your login information. The login usually consists of your e-mail address and your personal
   password, which you defined during registration.

 © 2000–2021 signotec GmbH               signoSign/Universal User Manual                  Page 10 of 25
After you have successfully logged in to the application, you will find various sections described in the following chapters. 7.2. Dashboard In the "Dashboard" tab, you will find a selection of quick-start functions, such as uploading or opening a document and also an option to create a workflow. In addition, you get links to the individual areas and processes. 7.3. Templates In the "Templates" tab, you can store documents that you wish to reuse statically as "blank" documents. Documents that you open for editing from this area will be saved as a new document in the "Documents" tab when you save. The template itself remains unchanged. Note: It is not possible to edit a template. If you want to make changes to the template, first save the template as a document and then convert it back into a template. This is easily done using the Move function. 7.4. Documents The Documents area contains individual documents. In contrast to the templates, these documents are overwritten by changes to the content or by capturing signatures. If a document has been shared, an icon ( ) is displayed next to the file name. Clicking on this icon will open a list that allows you to view and manage the shared accesses to the document. More information can be found in the chapter "Sharing a document". 7.5. Shared accesses In the "Shared accesses" area, all the tasks created via the "Share access" or "Share document" function are displayed. The tasks that have not yet been edited are displayed under "In progress". All processed tasks can be found under "Completed". From both sections, you can see which documents were shared and when, and whether the shared document has already been edited. From there you can delete these processes again, so that the created link becomes invalid. You can find more information in the chapter "Share document". 7.6. Workflows All created workflows are displayed in the "Workflows" area. The area is divided into "In progress" and "Completed", equivalent to the shared accesses. All workflows that have not yet been finalized are listed in the "In progress" area. In this area, the status can be seen by means of a progress bar. In addition, further information on the workflows can be called up here. All completed or cancelled workflows can be found in the "Completed" area. More information can be found in the chapter "Creating and managing workflows". © 2000–2021 signotec GmbH signoSign/Universal User Manual Page 11 of 25
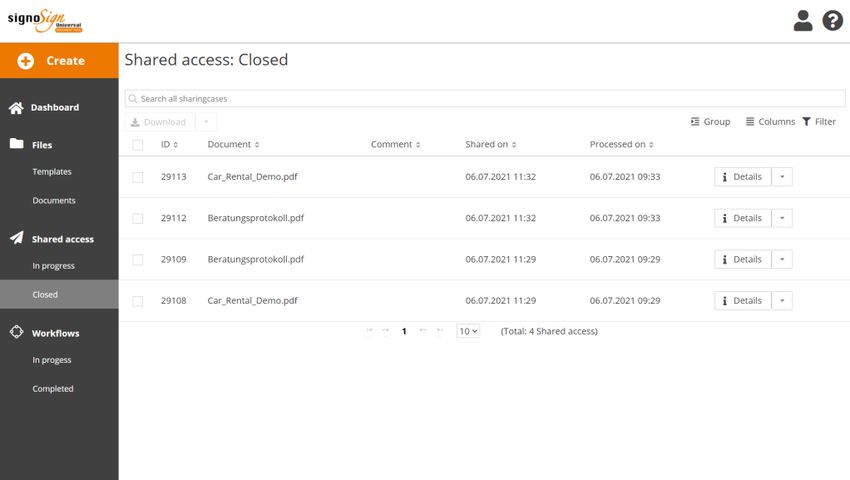
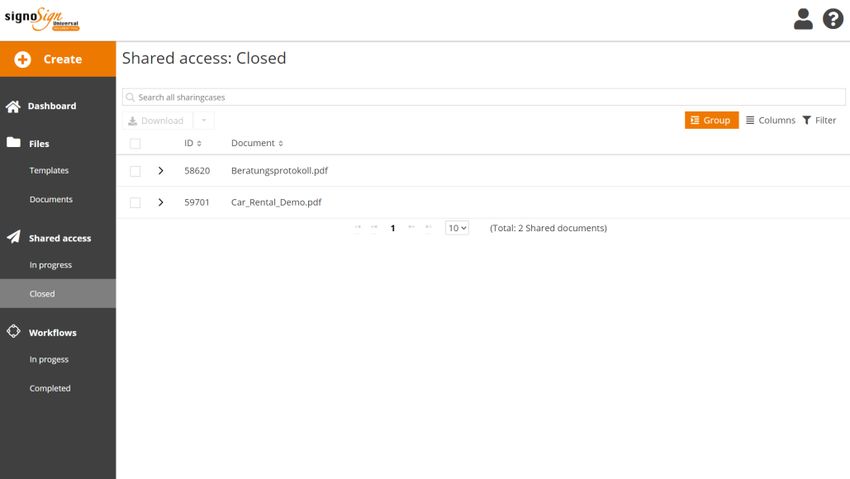
7.7. Open and edit documents

  To open a document, simply click the "Sign" button next to the document. The selected document
  will then open in full screen in the signoSign/Universal Viewer. All functions of the viewer can be
  found in the chapter "signoSign/Universal Viewer".

  7.8. Search, filter and group

  The columns can be sorted by clicking on the column title.

  All lists can also be searched using the search bar above them. The "Columns" and "Filter" buttons
  can be used to show or hide columns or to specifically filter individual columns by content.

  In addition to the normal search and filter options, a "Group" function is also available in    the
  "Shared Access" area. This function groups the shared accesses per document. Accordingly,       not
  all accesses are displayed one below the other, but the file names. The shared accesses to      the
  document can then be expanded via an arrow. The accesses are grouped in relation to             the
  respective document. The two following screenshots illustrate the function.

  WITHOUT grouping:

  WITH grouping:

© 2000–2021 signotec GmbH               signoSign/Universal User Manual                  Page 12 of 25
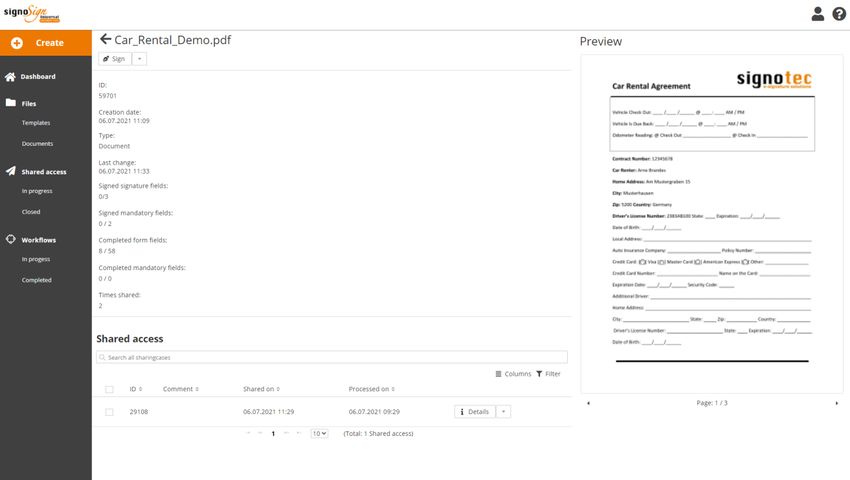
7.9. Upload documents

  PDF documents can be saved as templates or documents via the dashboard, or the orange "Cre-
  ate" button (top left), or they can be opened directly. After selecting the Create button, a selec-
  tion is displayed for this purpose.

  As an alternative to the buttons, documents can also be uploaded via "Drag and Drop" in the
  "Templates" and "Documents" area.

  Dashboard:

  Create-button:

  7.10. Properties of a document

  In the Properties page of a document, you can find more information, such as a preview, creation
  and modification dates, number of signature and form fields, and information about how often the
  document has been shared.

  The bottom section of the Properties page also shows you information about the shared accesses.
  Here you can see if the document has already been edited by the recipient, and you can also
  change or delete the external access if necessary.

© 2000–2021 signotec GmbH               signoSign/Universal User Manual                   Page 13 of 25
7.11. Sharing document accesses

       7.11.1.    Description of the Shared accesses

       signoSign/Universal offers you the possibility to share documents with an external person us-
       ing a link. The special feature is that this person does not need any login data to open and
       sign the document. Such a process is also called a "Sharing Case" in signoSign/Universal.

       A document can be shared as often as desired. Each sharing creates a unique link that points
       directly to the selected document. If the document is edited via a link, the changes are im-
       mediately visible in your repository. For security reasons, the links lose their validity after be-
       ing edited by the recipient.

       ATTENTION: The generated link can be opened by anyone. As long as the link is not pro-
       tected with a password, anyone who knows the link can open the document.

       7.11.2.    Sharing a document from the document pool

       To share a document, simply use the "Share access" or "Share document" function. A window
       will be displayed where you can optionally enter a password and a comment. In addition, an
       automatic sending of the access via e-mail or SMS is possible.

© 2000–2021 signotec GmbH                  signoSign/Universal User Manual                    Page 14 of 25
After you click on "Share access", you will see the details and a QR code. In this window you
can reset the password for access or also edit the comment.
Via "Copy link" you can copy the access link directly to the clipboard and paste it e.g. into
your own e-mail. Via "Send again" you can send the access link to the document again via
SMS or e-mail.
You can call up this dialog with the information and QR code again in many places via the
"Details" button, e.g. via the "Shared accesses" area.
7.11.3. Shared accesses in the document list
Once a document has been shared, an icon ( ) is displayed next to the file name in the doc-
ument list. By clicking this icon, you can see the shared accesses to the document.
© 2000–2021 signotec GmbH signoSign/Universal User Manual Page 15 of 25For more information on sharing cases, see the shared access detail view, the document de-
tail view, or the Shared Documents section.
7.12. Create and manage workflows
In addition to shared access, users have the option of creating more complex operations as a
workflow. A workflow differs from simple sharing in that multiple documents can be sent to multiple
individuals or groups in a specific order. In this case, the system sends automated prompts by e-
mail to the recipients as soon as it is their turn.
CAUTION: In contrast to shared access, workflows are a kind of "black box". The selected
documents are copied to the workflow in the background. Newly uploaded documents are not
stored in the "Documents" area and are exclusively part of the workflow. Changes are therefore
also NOT made in the documents in the folder, but exclusively in the workflow and must also be
downloaded there after completion of the workflow.
7.12.1. Creating a workflow
A new workflow can be created via the orange Create button (top left) or the Dashboard. Af-
terward a wizard opens that guides you through the creation of the workflow.
Select documents:
First, you select the documents that are to be provided in the workflow. The documents can
either be selected from the clipboard ("Templates" or "Documents" area) or newly uploaded.
© 2000–2021 signotec GmbH signoSign/Universal User Manual Page 16 of 25Configure recipients:
Next, you configure the recipients. A distinction is made here between "workflow step" and
"workflow step recipient".
Via "Add step", any workflow steps can be created in the upper area. By clicking on a work-
flow step, the recipients of the selected workflow step are displayed in the area below.
Basically, the logic in the process is such that all recipients of a workflow step are requested
to process at the same time. Only when all recipients of a step have completed processing is
the next workflow step prompted for processing. So, for example, if you want to share a doc-
ument first with one and then with two other people, you need two workflow steps, with the
first workflow step containing only one recipient and the second workflow step containing the
two other recipients.
Configure message:
Next, you can configure the subject and message for the email that will be sent to the recipi-
ents.
© 2000–2021 signotec GmbH signoSign/Universal User Manual Page 17 of 25Summary / Review:
In the last step to create the workflow, you will again get an overview of the selected docu-
ments, the configured message as well as the workflow steps and included recipients.
Clicking on "Done" creates the workflow. All recipients of the first workflow step are then also
immediately prompted for processing.
7.12.2. Manage workflows
In the Workflows menu, you will find all workflows that have not yet been completed under
"In progress".
© 2000–2021 signotec GmbH signoSign/Universal User Manual Page 18 of 25The progress bar shows you how far the workflow has been processed. Below the bar you can
also see how many recipients have already processed the document and how many workflow
steps are still pending.
Using the drop-down button next to the workflow, you can open the details of the workflow
or pause (or continue), rename or even cancel the selected workflow.
In addition, a reminder can be sent to all recipients whose turn it currently is via "Send re-
minder".
Completed workflows:
A completed or cancelled workflow is displayed in the "Completed" area. From there, the
workflow can also be deleted, or the contained documents can be downloaded.
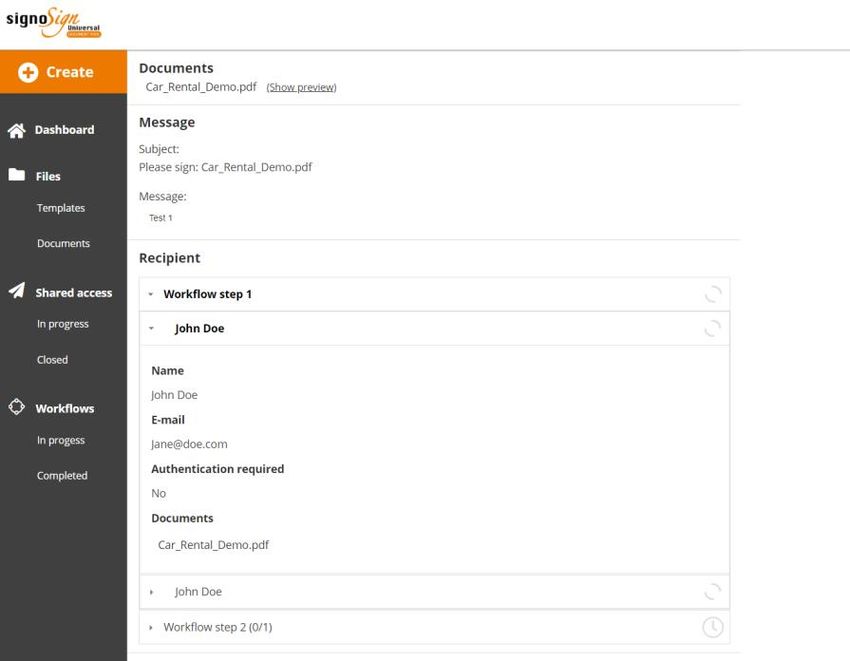
Workflow detail page:
On the detail page of a workflow, you can view the selected docu-
ments, the configured message, and the workflow steps and recipients.
The workflow steps and recipients can be expanded so that you can see
exactly which recipient has already processed which documents.
7.13. Overview of all tools in the document pool
The Document Pool provides some functions for managing your PDF documents, which are
described in more detail below. The functions are displayed as dropdown buttons directly next to
the respective document.
© 2000–2021 signotec GmbH signoSign/Universal User Manual Page 19 of 257.13.1. Templates and documents
In the "Templates" and "Documents" area, the following functions are available in the drop-
down button.
Sign
This function can be used to open selected documents for editing and signing in the
signoSign/Universal viewer.
Rename
This function can be used to give selected documents a new
name.
Share access
With this function, documents can be shared via link, e-mail or
QR code and password. No user access to signoSign/Universal is
required to sign a shared document.
Move to template / Move to documents
With this function the document can be moved to the respective
other area (template/documents).
Properties
This function opens a detail view of the document. More
information can be found in the chapter "Detail view".
Download
With this function selected documents can be downloaded.
Delete
With this function selected documents can be deleted.
7.13.2. Shared accesses
In the "Shared access" area, the following functions are available in the drop-down button.
Details
This function allows you to view the details, such as QR code and comment, of the sharing
case. You can also copy or resend the link in the opened dialog. You can also change the
password or the comment.
Open document
Use this function to open the shared document.
Properties
Use this function to open the properties page of the shared document.
Download
Use this function to download the shared document.
End operation
Use this function to block external access to the document. The document can thus no longer
be opened via the generated link.
© 2000–2021 signotec GmbH signoSign/Universal User Manual Page 20 of 257.14. Logout from the document pool
If you want to log out of the Document Pool, simply click on the user icon displayed in the upper
right corner. After successful logout the login page will be displayed again.
8. signoSign/Universal viewer functions
When you open a document for editing, it is shown in the signoSign/Universal viewer. The viewer
allows you to navigate through the document, fill in form fields, share the document and of course
capture signatures.
8.1. Toolbar
The toolbar, which is located above an open document, shows all the functions that are currently
available. The availability of functions depends on several factors, such as
- whether iOS or Android app is in use
- the browser used
- server settings
- document is already signed
Generally speaking, however, you should see the following toolbar:
Note: On mobile devices, the buttons will be moved to a ‘hamburger menu’ depending on the
space available. The behaviour can be customised in the case of a custom deployment.
8.1.1. Back button
The Back button can be found on the far left of the menu bar. It will take you back to
Document Pool.
Note: In a custom integration, the destination of the button can be configured via a referrer
URL.
8.1.2. signotec logo
Click the signotec logo to show contact information and the signoSign/Universal version in use.
© 2000–2021 signotec GmbH signoSign/Universal User Manual Page 21 of 258.1.3. Scale page view
The current page can be scaled using the three buttons in the menu bar. The options
purpose.
Note: These buttons are only shown in the desktop view. The standard gesture
commands are available for scaling on mobile devices.
8.1.4. Share document
The "Share Document" button can be used to create a sharing case to share the
document with a link with an external person. This function is also available via the
Document Pool.
Note: Currently it is not possible to send the document automatically from signoSign/Universal
via e-mail or SMS from the viewer. Please use the Document Pool functions for this purpose.
8.1.5. Save
Click the floppy disk icon to save changes in a document. These will be stored in
Document Pool (database) by default.
8.1.6. Show signature fields
This icon opens an overview of all the signature fields in a document. A signature field
can be opened directly for signing from this overview.
8.1.7. Insert note
Click this icon to start recording notes. The toolbar will change after clicking on the icon.
Handwritten notes can be recorded, marks made and text and frames inserted. Unsaved
changes can be undone or restored using the arrow icons.
8.1.8. Search
Click this icon to search for text in a document. An input field for the search term will
open after you have clicked the icon. Use the respective arrow icons to jump to the next
or previous position where the text was found. This position will also be highlighted in
the document.
© 2000–2021 signotec GmbH signoSign/Universal User Manual Page 22 of 258.1.9. Create signature field
Click this icon to insert signature fields in a document. A field for
positioning on the document will be displayed after you have
clicked the icon. It can be moved to any position and resized.
Once the field has been placed in the desired position, confirm to
insert it in the document. The empty field can also be saved (in a
template, for example).
8.1.10. Sign
Click this icon to start the signature process. In this case, the signature fields will be
skipped one after the other without having to select them individually. Please refer to
the ‘Signature capture’ section for more information.
8.1.11. Export
The Export function allows a document to be downloaded or, if you are using a mobile
app, forwarded to another mobile app.
Desktop view
Click this icon to download the current document in desktop view.
App view
The Export function offers more options in the app view. You can choose
between ‘Email’, ‘Open with...’ and ‘Print’.
Select ‘Email’ to send a document using an email app. In this case, the
document will be sent as an attachment.
Select ‘Open with...’ to choose other apps in which to open the document,
for example another PDF app.
Select ‘Print’ to print the document using Google Cloud Print or Apple
AirPrint.
8.2. Page navigation (footer)
You will see another bar at the bottom of the viewer. This will show you the page you are on. You
can scroll through pages using the arrows on the right and left and the scroll bar.
You will also see a book icon to the right of the bar. This opens a thumbnail view of the
pages and allows you to jump quickly to a specific page.
© 2000–2021 signotec GmbH signoSign/Universal User Manual Page 23 of 258.3. Signature capture
As soon as signature capture has been started by clicking the signing icon or an empty signature
field, a dialog box will open for capturing and displaying the signature in real time.
8.3.1. Capturing a signature
A signature can be provided using the connected signature pad or the pen or touch input of
your device. Once the entry has been confirmed, the signature will be inserted into the
document and shown there.
Capturing a signature using a signotec signature pad or a digitizer pen guarantees the recording
of high-quality signature data.
8.3.2. Signature dialog box
When signature capture is started, various functions are displayed in the signature dialog box.
© 2000–2021 signotec GmbH signoSign/Universal User Manual Page 24 of 25Click this icon to cancel capture.
Click this icon to repeat signature capture. This will restore the previous entry.
Click this icon to confirm the captured signature.
8.3.3. Date and time (time stamp)
Display of a time stamp with date and time will be disabled in a document by default. It can be
displayed as required via the signature information. If you are running a customised system,
the time stamp can be configured flexibly on the server.
8.4. Form fields
You can also complete PDF forms in the signoSign/Universal viewer. The standard field types for
text input, checkboxes, multiple selection and drop-down are supported. Form field entries can be
inserted into a document using the Save icon or by capturing a signature. These fields can also be
filled using a mouse and keyboard or touch.
8.5. Navigation using gesture commands
The Scale page view buttons are not available in iOS and Android mobile apps. A free scaling of
content can be achieved here using standard gestures.
8.5.1. Zoom in and zoom out
To zoom in or out, move two fingers apart or together until the desired size is achieved.
8.5.2. Page forward and page back
To go back or forward one page, use one finger to swipe from left to right or vice
versa.
8.5.3. Page scrollbar
Use the navigation bar at the bottom to quickly switch between pages by moving the
bar to the left or right. Alternatively, use the Thumbnail view.
© 2000–2021 signotec GmbH signoSign/Universal User Manual Page 25 of 25You can also read