VAC12W - VAC-PO-0012-E06W - Instruction manual Instrukcja obsługi Bedienungsanleitung
←
→
Page content transcription
If your browser does not render page correctly, please read the page content below
VAC12W
Instruction manual
Instrukcja obsługi
Bedienungsanleitung

                      VAC-PO-0012-E06W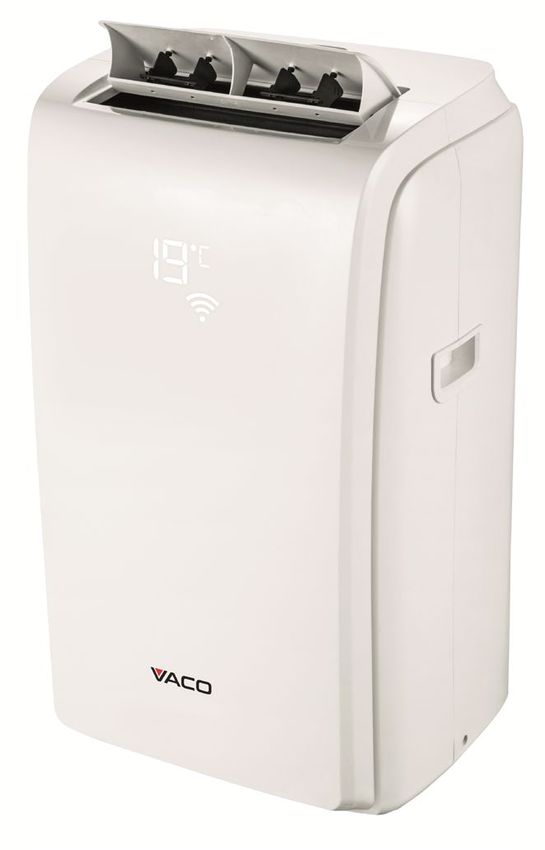
Contents
QUICK GUIDE WI-FI CONNECTION ............................................................................................................................................4

                                                                    Spis treści
SKRÓCONA INSTRUKCJA ŁĄCZENIA Z SIECIĄ WI-FI....................................................................................................30

                                                                           Inhalt
KURZANLEITUNG ZUR KONFIGURATION EINER WLAN-VERBINDUNG ..........................................................56

                                                                                                                                                                       2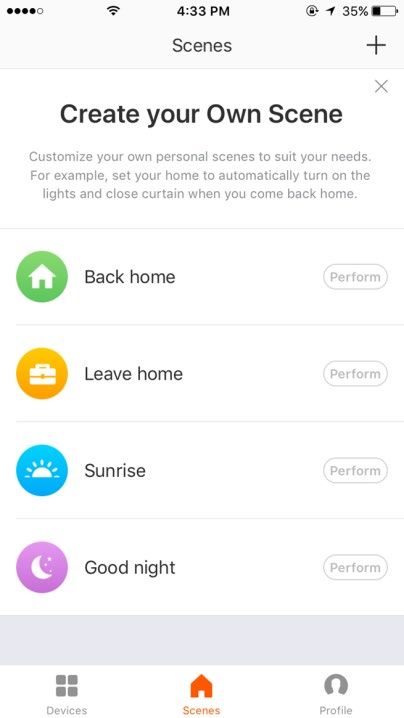
Portable Air conditioner

         VAC12W
      VAC-PO-0012-E06W

Quick guide Wi-Fi connection

                               3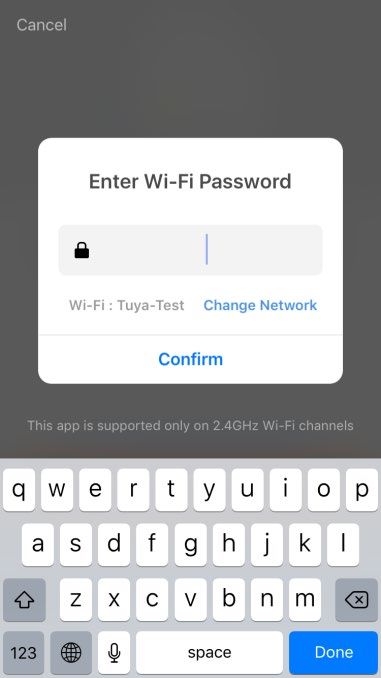
QUICK GUIDE WI-FI CONNECTION
WELCOME

Thank you for choosing the VACO VAC12W Wi-Fi Air Conditioner.

This quick guide is to help get you connected and comfortable as fast as possible.

Full user instructions and troubleshooting is included in the owner's manual.

BEFORE YOU START:

Important:

•    In offices or workspaces there can be difficulty in connecting the air conditioner to the
     Wi-Fi due to firewalls and other security.

•    Make sure the VACO VAC12W Air Conditioner is in the room you intend to use the air
     conditioner with normal set up considerations - dedicated outlet and close to a window
     for venting the hot air out through the included window kit.

•    To establish a connection between your appliance and the Air conditioner, verify that
     your “WLAN” (Wireless Local Area Network) is on and that the internet access is available.

Product and software update periodically, the number and app interface in this manual are
only for example. No extra notification on further changes.

Notes: Check there are no obstacles to the internet access, such as Firewall, Proxy,
authentications, etc. A “Home WLAN” shall consist at least in a wireless router with an
available internet access.

                                                                                                 4
No.0 Download and Install APP
•   IPhone

•   Use your IPhone to scan the QR code, or search “Tuya Smart” or “Smart Life-Smart Living”
    App in App Store to install.

•   Android

•   Use your Mobile phone with Android system to scan the QR code, or search “Tuya Smart”
    or “Smart Life-Smart Living” APP in Google Play store to install.

                                                                                           5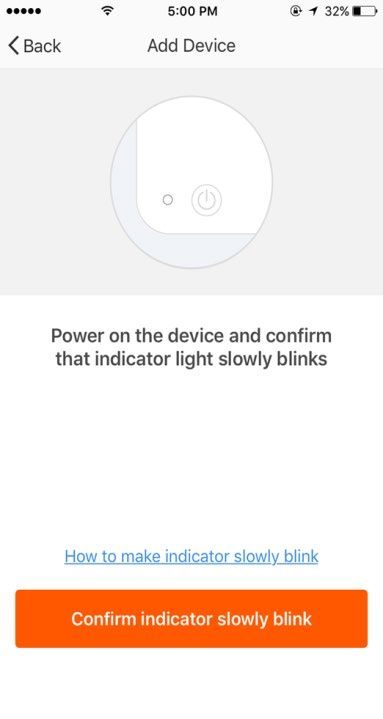
No.1

Register/Login/Forgot password
Register
If you don't have an App account, register an account or sign in with verification code by SMS.
This page describes the registration process.
1.   Tap to enter registration page.
2.   The system automatically recognizes your country/area. You can also select your country
     code. Enter the mobile number/E-mail and tap “Next”, as shown in the picture 2.
3.   If you enter the mobile number, then enter the verification code in the message, as
     shown in the picture 2, and enter the password, tap “Confirm” to finish your registration.
4.   If you enter the E-mail, enter the password as shown in the picture 3, and, tap “Confirm”
     to finish your registration.

         Picture 1                        Picture 2                        Picture 3

                                                                                                  6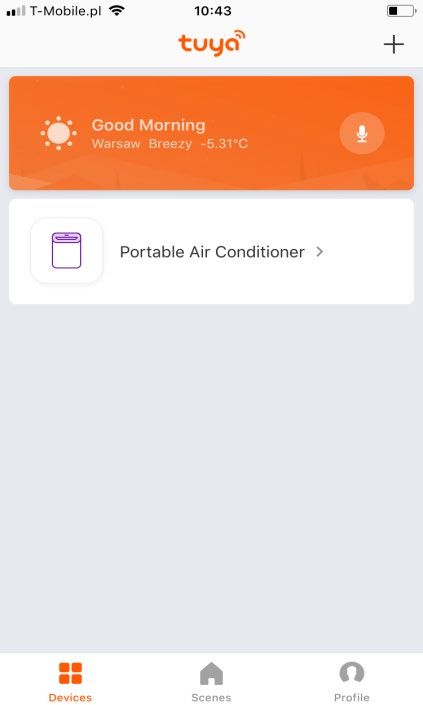
Sign in with username and password

1.   The system automatically recognizes your country/area. You can also select your country
     code. Enter the mobile number/E-mail and tap “Next”.

2.   Enter your registered mobile number or Email, and password to login.

Sign in with social media account

If you have installed Twitter in your smartphone, tap the corresponding icons and then sign in
the App after social network authentication.

                                                                                             7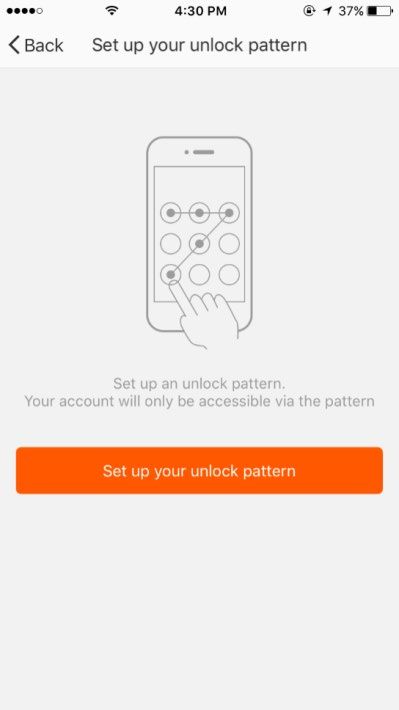
Sign in with verification code via SMS

1.   Tap “Sign in with SMS verification”, to new page.

2.   The system automatically recognizes your country/area. You can also select your country
     code by yourself.

3.   Enter the mobile number and tap “Get” to get a message.

4.   Enter the verification code in the message and tap “Login” to login the App.

                                                                                           8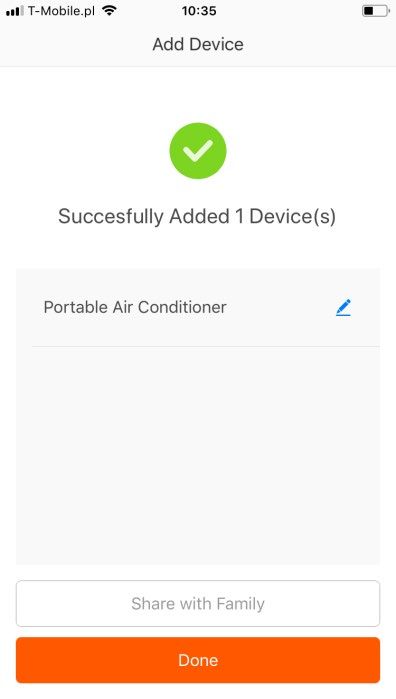
Forgot password

To find your password back, please follow the procedures:

1.   Tap “Forgot password”, as shown in the picture 1

2.   The system automatically recognizes your country/area. You can also select your country
     code by yourself. Enter the mobile number/E-mail and tap “Next”, as shown in the
     picture 2.

3.   Enter the verification code in the message/E-mail, as shown in the picture 3, and enter
     the new password, tap “Confirm” to finish.

          Picture 1                       Picture 2                        Picture 3

                                                                                               9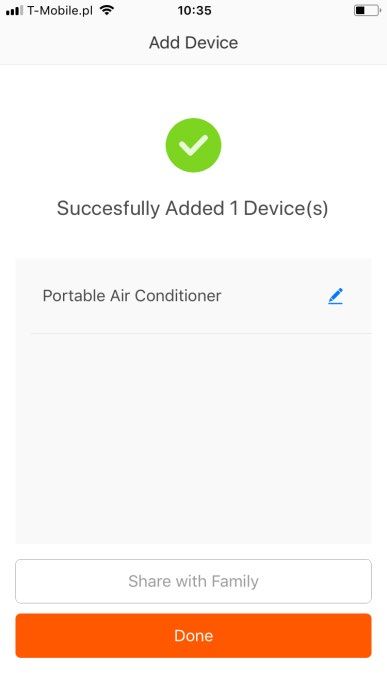
NO.2

Add device-CF mode

1.   Enter the App, tap “+” in the upper right of the page to enter network connection page,
     and select “Air conditioner” from device type list, as shown in the picture.

2.   There are two network connection methods (CF mode and AP mode). CF mode is default.
     Users could tap the upper right corner to switch the connection method to AP mode.

3.   For CF mode, please make sure “CF” is displayed on the control panel of air conditioner.

                                                                                                10
How to display CF on control panel of air conditioner
• Push 6 times FAN Button on control panel of air conditioner (“CF” appears on the device
display).
• Tap “confirm indicator rapidly blink” on smartphone when “CF” is displayed on the air
conditioner.
11NO.2
Add device-AP mode
1. For AP mode, please make sure “AP” is displayed on the control panel of the air
conditioner.
2. Push 6 times FAN Button on the control panel, “CF” will appear on the device display.
3. Push 6 times FAN Button on the control panel, “AP” will appear on the device display.
4. Tap ”Confirm indicator slowly blink” on smartphone when “AP” appears on the device
display.
12No.2
Add device-Enter Wi-Fi password
Select the Wi-Fi under which device is working, enter password and tap “Confirm” to enter
network connection process, as shown in the picture below.
13No.2
Add device-Network connection process
If you select CF mode to connect device to the network, the App goes through the processes
as shown in the picture 1. After the network connection is successfully, the App page will be
shown in the picture 2.
Picture 1 Picture 2
14For AP mode, connect to the Wi-Fi hotspot named “SmartLife”, as shown in the picture.
Notes: Some devices might have different hotspot names.
15After connecting with the hotspot, back to the network connection page to enter network
connection process. The App goes through as shown in the picture 1. Picture 2 shows the
App page when the network connection is successful.
16No.2
Add device-Adding failed
If your App interface is shown as in the picture, it means that the network connection failed.
You could try by connecting again or view help.
17No.3
Control device
After successfully configuring the devices, the smart device will be shown on the home page.
Tap to enter its control page.
Note:
1. When device is online, it supports short-cut operations.
2. When device is offline, it displays “Offline”.
18No.4
Smart life scenario
Smart life scenario supports that devices perform corresponding actions under various
conditions. The main conditions include:
1. Temperature
2. Humidity
3. Weather
4. Air quality
5. Sunrise & sunset time
6. Device’s actions (such as turn on/off)
19No.5
Profile
“Profile” page is where users could manage personal information. The key information is as
follows:
1. Personal information
2. Smart life scenario
3. Device Sharing: display the information of shared devices
4. Message center
5. F.A.Q
6. Entry to submit feedback
7. About
20Profile” page is for displaying personal account information. You can change login password,
binding mobile number, set pattern unlock on this page.
21No.5
Profile-Pattern Unlock
Tap “Pattern unlock” to set your pattern. After setup, you have to enter your pattern to use the
App.
22No.5
Profile-Device Sharing
Add sharing: As shown in the picture, users could input a new member’s mobile number and
share the device with him. The new member could then control the shared device
23Send sharing: The list shows all members who are added by your account.
You can delete the member and delete the sharing by swiping left.
Receive sharing: The list shows all devices that your account has received.
You can delete the sharing by swiping left.
24No.5
Profile-Message center
Message center: Including notifications of new device and new sharing.
25How to control your VACO VAC12W via Amazon Alexa Echo *
Step 1: Add Device
Make sure, there’s air conditioner is in device list
Step 2: Modify device name
Modify device name that Alexa could easily recognize. Such as: aircon, bedroom aircon, living
room aircon.
Step 3: Set up Amazon Alexa
Download Amazon Alexa App from Google Play, iOS App Store or Amazon App Market and
configure your Amazon Echo with Alexa App.
Step 4: Add Skill
Add Tuya Smart Skill in Alexa App if you use Tuya Smart App.
Add Smart Life Skill in Alexa App if you use Smart Life – Smart Living App.
Step 5: Control Device
Ask Alexa to discover devices. After 20 seconds discovery Alexa will tell you “I found x devices”
Then you can control your VACO VAC12W through Amazon Alexa Echo.
The following voice commands are supported (if name of your VACO VAC12W is “aircon”):
Alexa, turn on aircon
Alexa, turn off aircon
Alexa, set aircon to X degrees
Alexa, decrease aircon by X degrees
Alexa, increase aircon by X degrees
* In selected languages in countries where Amazon Alexa Echo is available and supported.
26How to control your VACO VAC12W via Google Home**
Step 1: Add Device
Make sure, there’s air conditioner is in device list.
Step 2: Modify device name
Modify device name that Google Home could easily recognize. Such as: aircon, bedroom
aircon, living room aircon.
Step 3: Set up Google Home
Make sure phone system language is English. Download Google Home App from Google Play
or iOS App Store. Then use Google Home App to set up Google Home.
Step 4: Add Home Control Action
Add device in Home Control of the Google Home App. Select “Smart Life”, or “Tuya Smart”
then fill in the correct login info of your App account to finish the account linking. Your device
should be listed in Home Control device list now.
Step 5: Control Device
Now you can control your VACO VAC12W through Google Home.
The following voice commands are supported (if name of your VACO VAC12W is “aircon”):
OK Google, turn on aircon
OK Google, turn off aircon
OK Google, set aircon to X degrees
OK Google, decrease aircon by X degrees
OK Google, increase aircon by X degrees
** In selected languages in countries where Google Home is available and supported.
27Thank You
Remark:
1) The pictures used in this manual are iOS app interface, Android version is a bit different.
2) Product and software update periodically, the number and app interface in this manual
are only for example. No extra notification on further changes.
28Klimatyzator przenośny
VAC12W
VAC-PO-0012-E06W
Skrócona instrukcja łączenia z siecią Wi-Fi
29SKRÓCONA INSTRUKCJA ŁĄCZENIA Z SIECIĄ WI-FI
WITAMY
Dziękujemy za wybranie klimatyzatora VACO VAC12W Wi-Fi.
Zadaniem niniejszej instrukcji jest pomoc w szybkim i bezproblemowym podłączeniu
urządzenia.
Kompletne instrukcje dotyczące obsługi urządzenia i rozwiązywania problemów znajdują się
w instrukcji użytkownika.
ZANIM ROZPOCZNIESZ:
Ważne:
• W biurach i innych miejscach pracy mogą występować problemy z połączeniem
klimatyzatora z siecią Wi-Fi z powodu działania firewalli i innych zabezpieczeń.
• Upewnij się, że klimatyzator VACO VAC12W znajduje się w pomieszczeniu, w którym
zamierzasz z niego korzystać, oraz że spełnione zostały wymogi instalacji – dedykowane
przyłącze zasilania i umieszczenie klimatyzatora w pobliżu okna, aby możliwe było
usuwanie gorącego powietrza przez dołączony zestaw okienny.
• Aby nawiązać połączenie pomiędzy urządzeniem przenośnym a klimatyzatorem,
upewnij się, że sieć „WLAN” (Wireless Local Area Network) jest włączona oraz że dostępne
jest połączenie z internetem.
Od czasu do czasu produkt i oprogramowanie są aktualizowane. Numer wersji i interfejs
aplikacji przedstawione w niniejszej instrukcji są jedynie poglądowe. Zmiany wprowadzane są
bez uprzedzenia.
Uwagi: Upewnij się, że dostęp do internetu nie jest zablokowany, na przykład przez
firewall, serwer proxy, autoryzację itp. Sieć „Home WLAN” powinna składać się
przynajmniej z routera bezprzewodowego z dostępem do internetu.
30KROK 0: pobierz i zainstaluj aplikację
• iPhone
• Zeskanuj iPhone kod QR lub wyszukaj aplikację „Tuya Smart” lub „Smart Life-Smart Living”
w App Store. Zainstaluj aplikację.
• Android
• Za pomocą telefonu z systemem Android zeskanuj kod QR lub wyszukaj aplikację „Tuya
Smart” lub „Smart Life-Smart Living” w sklepie Google Play. Zainstaluj aplikację.
31KROK 1
Rejestracja/logowanie/zapomniane hasło
Rejestracja
Jeśli nie posiadasz konta umożliwiającego pobieranie aplikacji, zarejestruj konto lub utwórz
konto za pomocą kodu weryfikacyjnego SMS.
Na niniejszej stronie opisujemy proces rejestracji.
1. Dotknij, aby przejść do strony rejestracji.
2. System automatycznie rozpozna Twój kraj/region. Możesz również wybrać numer
kierunkowy kraju. Wprowadź numer telefonu komórkowego/e-mail i dotknij opcji „Next”
– patrz ilustracja 2.
3. Jeśli wprowadziłeś numer telefonu, podaj kod weryfikacyjny przesłany w wiadomości
tekstowej – patrz ilustracja 2, a następnie wprowadź hasło. Aby zakończyć rejestrację
dotknij przycisku „Confirm”.
4. Jeśli wprowadziłeś adres e-mail, wprowadź hasło, korzystając z ilustracji 3 i dotknij
przycisku „Confirm”, aby zakończyć rejestrację.
Ilustracja 1 Ilustracja 2 Ilustracja 3
32Zaloguj się za pomocą nazwy użytkownika i hasła
1. System automatycznie rozpozna Twój kraj/region. Możesz również wybrać numer
kierunkowy kraju. Wprowadź numer telefonu komórkowego/e-mail i dotknij „Next”.
2. Wprowadź zarejestrowany numer telefonu komórkowego lub email oraz hasło, aby się
zalogować.
Zaloguj się przez portal społecznościowy
Jeżeli zainstalowałeś na smartfonie aplikację Twitter, dotknij odpowiedniej ikony, a następnie
zaloguj się w aplikacji po przejściu autoryzacji w portalu społecznościowym.
33Zaloguj się za pomocą kodu weryfikacyjnego z SMS
1. Dotknij „Sign in with SMS verification”, aby otworzyć nową stronę.
2. System automatycznie rozpozna Twój kraj/region. Możesz również samodzielnie wybrać
numer kierunkowy kraju.
3. Wprowadź numer telefonu komórkowego i dotknij przycisku „Get”, aby otrzymać
wiadomość.
4. Wprowadź kod weryfikacyjny z wiadomości i dotknij przycisku „Login”, aby zalogować się
w aplikacji.
34Zapomniane hasło
Aby odzyskać hasło, wykonaj poniższą procedurę:
1. Wybierz „Forgot password” – patrz ilustracja 1.
2. System automatycznie rozpozna Twój kraj/region. Możesz również samodzielnie wybrać
numer kierunkowy kraju. Wprowadź numer telefonu komórkowego/e-mail i dotknij opcji
„Next” – patrz ilustracja 2.
3. Wprowadź kod weryfikacyjny z wiadomości tekstowej/E-mail, jak pokazano na ilustracji 3,
a następnie wprowadź nowe hasło. Wybierz „Confirm”, aby zakończyć.
Ilustracja 1 Ilustracja 2 Ilustracja 3
35KROK 2
Dodawanie urządzenia – tryb CF
1. Uruchom aplikację, dotknij przycisku „+” w prawym, górnym rogu ekranu, aby przejść do
ekranu połączeń sieciowych i z listy typów urządzeń wybierz „Air conditioner”, jak
przedstawiono na ilustracji.
2. Istnieją dwa sposoby nawiązywania połączenia sieciowego: tryb CF i tryb AP.
Ustawieniem domyślnym jest tryb CF. Aby zmienić tryb na AP, należy dotknąć przycisku w
prawym, górnym rogu.
3. W przypadku wybrania trybu CF należy sprawdzić, czy na wyświetlaczu klimatyzatora
wyświetlane jest wskazanie „CF”.
36Wyświetlanie wskazania CF na wyświetlaczu klimatyzatora
• Na panelu sterowania klimatyzatora 6 razy naciśnij przycisk FAN (na wyświetlaczu
urządzenia pojawi się wskazanie CF).
• Na smartfonie dotknij przycisku „Confirm indicator rapidly blink”, gdy na wyświetlaczu
klimatyzatora wyświetlane jest wskazanie CF.
37KROK 2
Dodawanie urządzenia – tryb AP
1. W przypadku wybrania trybu AP należy sprawdzić, czy na wyświetlaczu klimatyzatora
wyświetlane jest wskazanie „AP”.
2. Na panelu sterowania klimatyzatora 6 razy naciśnij przycisk FAN – na wyświetlaczu
urządzenia pojawi się wskazanie „CF”.
3. Na panelu sterowania klimatyzatora 6 razy naciśnij przycisk FAN – na wyświetlaczu
urządzenia pojawi się wskazanie „AP”.
4. Na smartfonie dotknij przycisku „Confirm indicator slowly blink”, gdy na wyświetlaczu
klimatyzatora wyświetlane jest wskazanie „AP”.
38KROK 2
Dodawanie urządzenia – wprowadzanie hasła Wi-Fi
Wybierz sieć Wi-Fi do której podłączone jest urządzenie, wprowadź hasło i dotknij przycisku
„Confirm”, aby połączyć się z siecią, jak pokazano na ilustracji.
39KROK 2
Dodawanie urządzenia – łączenie z siecią
Jeśli wybrano tryb CF łączenia z siecią, aplikacja zainicjuje proces widoczny na ilustracji 1. Po
nawiązaniu połączenia aplikacja wyświetli ekran widoczny na ilustracji 2.
Ilustracja 1 Ilustracja 2
40W trybie AP połącz się z punktem dostępowym Wi-Fi o nazwie „SmartLife” – patrz ilustracja.
Uwagi: Nazwa punktu dostępowego może być inna, w zależności od modelu.
41Po połączeniu się z punktem dostępowym wróć do strony połączeń sieciowych, aby
uruchomić proces łączenia z siecią. Aplikacja wykona procedurę widoczną na ilustracji 1. Na
ilustracji 2 widoczny jest ekran aplikacji wyświetlany po nawiązaniu połączenia.
Ilustracja 1 Ilustracja 2
42KROK 2
Dodawanie urządzenia – urządzenie nie zostało dodane
Jeżeli aplikacja wyświetli ekran widoczny na ilustracji, oznacza to brak połączenia z siecią.
Spróbuj połączyć się ponownie lub zajrzyj do pomocy.
43KROK 3
Sterowanie urządzeniem
Po konfiguracji urządzenie będzie widoczne na ekranie głównym. Wybierz urządzenie, aby
przejść do ekranu sterowania.
Uwaga!
1. Gdy urządzenie jest online, możliwe jest korzystanie ze skrótów.
2. Gdy urządzenie jest offline, widoczne jest wskazanie „Offline”.
44KROK 4
Ustawienia Smart Life
Aplikacja Smart Life pozwala na zaprogramowanie funkcji w zależności od szeregu warunków.
Najważniejsze warunki to:
1. Temperatura
2. Wilgotność
3. Pogoda
4. Jakość powietrza
5. Godzina wschodu i zachodu słońca
6. Sterowanie urządzeniem (na przykład włączanie/wyłączanie)
45KROK 5
Profile
Ekran „Profile” umożliwia zarządzanie osobistymi informacjami o użytkowniku. Najważniejsze
dane to:
1. Informacje osobiste
2. Ustawienia Smart Life
3. Udostępnianie urządzeń: wyświetlanie informacji o udostępnionych urządzeniach
4. Centrum powiadomień
5. F.A.Q
6. Wprowadzanie informacji zwrotnych
7. Informacje o aplikacji
46Ekran “Profile” umożliwia wyświetlanie osobistych informacji o koncie. Możesz tutaj zmienić
hasło logowania, numer powiązanego telefonu, wzór odblokowywania.
47KROK 5
Profile – wzór odblokowywania
Wybierz „Pattern unlock”, aby skonfigurować wzór odblokowywania. Po skonfigurowaniu
wzoru korzystanie z aplikacji będzie wymagało wprowadzenia wzoru odblokowywania.
48KROK 5
Profile – udostępnianie urządzeń
Dodawanie do udostępnionych: jak pokazano na ilustracji użytkownik może dodać numer
telefonu osoby, której chce udostępnić urządzenie. Po udostępnieniu urządzenia nowy
użytkownik może sterować urządzeniem.
49Udostępnienia, opcja „Sent”: lista zawiera osoby, które zostały dodane do Twojego konta.
Możesz usunąć wybraną osobę i udostępnienie przesunięciem w lewo.
Udostępnienia, opcja „Received”: na liście znajdują się wszystkie urządzenia udostępnione dla
Twojego konta.
Możesz usunąć udostępnienie przesunięciem w lewo.
50KROK 5
Profile – centrum powiadomień
Centrum powiadomień: znajdziesz tutaj informacje na temat nowych urządzeń i nowych
udostępnień.
51Sterowanie VACO VAC12W za pomocą Alexa Echo* firmy Amazon
Krok 1: Dodawania urządzenia
Upewnij się, że klimatyzator znajduje się na liście urządzeń.
Krok 2: Zmiana nazwy urządzenia
Zmień nazwę urządzenia na taką, która będzie zrozumiała dla Alexy. Na przykład: aircon,
bedroom aircon, living room aircon.
Krok 3: Konfiguracja Amazon Alexa
Upewnij się, że językiem systemowym Twojego telefonu jest angielski (English). Pobierz
aplikację Amazon Alexa z Google Play, iOS App Store lub Amazon i skonfiguruj asystenta
Amazon Echo za pomocą aplikacji Alexa.
Krok 4: Dodawanie umiejętności (skill)
Dodaj Tuya Smart do aplikacji Alexa, jeśli korzystasz z aplikacji Tuya Smart.
Dodaj Smart Life do aplikacji Alexa, jeśli korzystasz z aplikacji Smart Life – Smart Living.
Krok 5: Sterowanie urządzeniem
Poproś Alexę, aby wyszukała urządzenia. Po 20 sekundach wyszukiwania Alexa powie: „I found
x devices”. Od tego momentu możesz sterować klimatyzatorem VACO VAC12W głosowo
przez Amazon Alexa Echo.
Obsługiwane są następujące komendy głosowe (jeżeli do klimatyzatora VACO VAC12W
przypisano nazwę „aircon”):
Alexa, turn on aircon
Alexa, turn off aircon
Alexa, set aircon to X degrees
Alexa, decrease aircon by X degrees
Alexa, increase aircon by X degrees
* Obsługa w wybranych językach i w krajach, w których urządzenie Amazon Alexa Echo jest
oficjalnie dostępne i obsługiwane.
52Sterowanie VACO VAC12W za pośrednictwem Google Home**
Krok 1: Dodawania urządzenia
Upewnij się, że klimatyzator znajduje się na liście urządzeń.
Krok 2: Zmiana nazwy urządzenia
Zmień nazwę urządzenia na taką, która będzie zrozumiała dla Google Home. Na przykład:
aircon, bedroom aircon, living room aircon.
Krok 3: Konfiguracja Google Home
Upewnij się, że językiem systemowym Twojego telefonu jest angielski (English). Pobierz
aplikację Google Home z Google Play lub iOS App Store. Skonfiguruj Google Home za
pomocą aplikacji Google Home.
Krok 4: Dodawanie działania do Home Control
Dodaj urządzenie do trybu Home Control aplikacji Google Home. Wybierz „Smart Life” lub
„Tuya Smart”, a następnie wpisz dane logowania do Twojego konta aplikacji, aby zakończyć
łączenie aplikacji. Twoje urządzenie powinno pojawić się na liście urządzeń Home Control.
Krok 5: Sterowanie urządzeniem
Od teraz możesz sterować klimatyzatorem VACO VAC12W głosowo poprzez Google Home.
Obsługiwane są następujące komendy głosowe (jeżeli do klimatyzatora VACO VAC12W
przypisano nazwę „aircon”):
OK Google, turn on aircon
OK Google, turn off aircon
OK Google, set aircon to X degrees
OK Google, decrease aircon by X degrees
OK Google, increase aircon by X degrees
** Obsługa w wybranych językach i w krajach, w których urządzenie Google Home jest
oficjalnie dostępne i obsługiwane.
53Dziękujemy!
Uwaga:
1) Ilustracje użyte w niniejszej instrukcji pochodzą z interfejsu systemu i aplikacji dla iOS.
Wersja na urządzenia z systemem Android posiada nieco inny interfejs.
2) Od czasu do czasu produkt i oprogramowanie są aktualizowane. Numer wersji i interfejs
aplikacji przedstawione w niniejszej instrukcji są jedynie poglądowe. Zmiany
wprowadzane są bez uprzedzenia.
54Mobile Klimaanlage
VAC12W
VAC-PO-0012-E06W
Kurzanleitung zur Konfiguration einer WLAN-Verbindung
55KURZANLEITUNG ZUR KONFIGURATION EINER
WLAN-VERBINDUNG
WILLKOMMEN!
Vielen Dank, dass Sie sich für die VACO VAC12W Klimaanlage mit WLAN entschieden haben.
Diese Kurzanleitung soll Sie dabei unterstützen, so einfach wie möglich eine Verbindung mit
Ihrem WLAN herzustellen, damit Sie sich so schnell wie möglich wohlfühlen können.
Eine vollständige Anleitung und Hilfestellung bei Problemen finden Sie im
Benutzerhandbuch.
BEVOR SIE BEGINNEN:
Wichtig:
• In Büros und an anderen Arbeitsplätzen könnte es Probleme damit geben, die
Klimaanlage mit dem WLAN zu verbinden, da dort möglicherweise Firewalls und andere
Sicherheitsvorkehrungen installiert sind.
• Stellen Sie sicher, dass sich die VACO VAC12W Klimaanlage mit WLAN in dem Raum
befindet, in dem Sie das Gerät verwenden wollen, und dass der Raum für die Aufstellung
des Geräts geeignet ist. Es muss eine eigens dafür vorgesehene Steckdose vorhanden
sein. Darüber hinaus muss das Gerät in der Nähe eines Fensters aufgestellt werden,
damit die heiße Luft mit Hilfe des im Lieferumfang befindlichen Fensterkits abgeführt
werden kann.
• Um eine Verbindung zwischen Ihren Geräten und der Klimaanlage herzustellen,
überprüfen Sie bitte, dass Ihr WLAN eingeschaltet ist und dass Ihr Internetzugang
funktioniert.
Das Gerät und die Software werden von Zeit zu Zeit aktualisiert. Die Versionsnummer und die
dargestellte Oberfläche der App dienen nur zur Illustrationszwecken. Im Falle von weiteren
Änderungen werden Sie nicht benachrichtigt.
Hinweise: Überprüfen Sie, dass keine Hindernisse vorliegen, die den Internetzugang
beeinträchtigen könnten (wie z. B. eine Firewall, ein Proxy, Authentifizierungen usw.). Ein
„Heim-WLAN“ besteht in der Minimalkonfiguration aus einem WLAN-Router mit
funktionierendem Internetzugang.
56Nr. 0: Herunterladen und Installieren der App
• iPhone
• Verwenden Sie Ihr iPhone, um den QR-Code zu scannen, oder suchen Sie im App-Store
nach der App „Tuya Smart“ oder „Smart Life-Smart Living“, um diese zu installieren.
• Android
• Verwenden Sie Ihr Smartphone mit Android-Betriebssystem, um den QR-Code zu
scannen, oder suchen Sie im App-Store nach der App „Tuya Smart“ oder „Smart Life-
Smart Living“, um diese zu installieren.
57Nr. 1
Registrierung/Anmeldung/Passwort vergessen
Registrierung
Wenn Sie noch kein Konto für die App haben, können Sie ein Konto registrieren oder sich mit
Hilfe eines Verifizierungscodes anmelden, den Sie per SMS erhalten.
Auf dieser Seite wird der Registrierungsvorgang beschrieben.
1. Tippen Sie, um auf die Registrierungsseite zu gelangen.
2. Das System erkennt Ihr Land/Gebiet automatisch. Sie können Ihren Ländercode auch
selbst auswählen. Geben Sie Ihre Handynummer/E-Mail-Adresse ein und tippen Sie wie
in Abbildung 2 gezeigt auf „Next“.
3. Wenn Sie Ihre Handynummer eingeben, geben Sie bitte wie in Abbildung 2 gezeigt den
Verifizierungscode ein, den Sie per SMS erhalten. Dann geben Sie Ihr Passwort ein.
Tippen Sie auf „Confirm“, um Ihre Registrierung abzuschließen.
4. Wenn Sie Ihre E-Mail-Adresse eingeben, geben Sie bitte wie in Abbildung 3 gezeigt Ihr
Passwort ein. Tippen Sie dann auf „Confirm“, um Ihre Registrierung abzuschließen.
Abbildung 1 Abbildung 2 Abbildung 3
58Anmeldung mit Benutzername und Passwort
1. Das System erkennt Ihr Land/Gebiet automatisch. Sie können Ihren Ländercode auch
selbst auswählen. Geben Sie Ihre Handynummer/E-Mail-Adresse ein und tippen Sie auf
„Next“.
2. Geben Sie Ihre registrierte Handynummer oder E-Mail-Adresse sowie Ihr Passwort ein,
um sich anzumelden.
Anmeldung mit einem Konto in einem sozialen Netzwerk
Wenn Sie Twitter auf Ihrem Smartphone installiert haben, tippen Sie bitte auf das
entsprechende Symbol, um sich nach einer Authentifizierung durch das soziale Netzwerk in
der App anzumelden.
59Anmeldung mit Verifizierungscode über SMS
1. Tippen Sie auf „Sign in with SMS verification“, um eine neue Seite zu öffnen.
2. Das System erkennt Ihr Land/Gebiet automatisch. Sie können Ihren Ländercode auch
selbst auswählen.
3. Geben Sie Ihre Handynummer ein und tippen Sie auf „Get“, um eine SMS zu erhalten.
4. Geben Sie den Verifizierungscode aus der Nachricht ein und tippen Sie auf „Login“, um
sich in der App anzumelden.
60Passwort vergessen
Um ein neues Passwort zu erhalten, führen Sie bitte die folgenden Anweisungen aus:
1. Tippen Sie wie in Abbildung 1 gezeigt auf „Forgot password“.
2. Das System erkennt Ihr Land/Gebiet automatisch. Sie können Ihren Ländercode auch
selbst auswählen. Geben Sie Ihre Handynummer/E-Mail-Adresse ein und tippen Sie wie in
Abbildung 2 gezeigt auf „Next“.
3. Geben Sie den Verifizierungscode aus der SMS/E-Mail wie in Abbildung 3 gezeigt ein.
Danach geben Sie das neue Passwort ein. Tippen Sie auf „Confirm“, um den Vorgang zu
beenden.
Abbildung 1 Abbildung 2 Abbildung 3
61Nr. 2
Gerät hinzufügen - CF-Modus
1. Öffnen Sie die App, klicken Sie auf „+“ oben rechts auf der Seite, um die Seite zur
Verbindung mit einem Netzwerk zu öffnen, und wählen Sie wie in der Abbildung gezeigt
„Air conditioner“ aus der Geräteliste aus.
2. Es gibt zwei Arten, sich mit dem Netzwerk zu verbinden (CF-Modus und AP-Modus). Die
Standardmethode ist der CF-Modus. Sie können in die obere rechte Ecke tippen, um den
Verbindungsmodus zum AP-Modus zu ändern.
3. Wenn Sie das Gerät im CF-Modus verbinden wollen, stellen Sie bitte sicher, dass „CF“ auf
dem Display der Klimaanlage angezeigt wird.
62Anzeige von CF auf dem Display der Klimaanlage
• Drücken Sie 6x die Taste „FAN“ auf der Klimaanlage (auf dem Display der Klimaanlage
wird „CF“ angezeigt).
• Tippen Sie in der App auf „Confirm indicator rapidly blink“, wenn auf dem Display der
Klimaanlage „CF“ angezeigt wird.
63Nr. 2
Gerät hinzufügen - AP-Modus
1. Wenn Sie das Gerät im AP-Modus verbinden wollen, stellen Sie bitte sicher, dass „AP“ auf
dem Display der Klimaanlage angezeigt wird.
2. Drücken Sie 6x die Taste „FAN“ auf der Klimaanlage (auf dem Display der Klimaanlage
wird „CF“ angezeigt).
3. Drücken Sie 6x die Taste „FAN“ auf der Klimaanlage (auf dem Display der Klimaanlage
wird „AP“ angezeigt).
4. Tippen Sie in der App auf „Confirm indicator slowly blink“, wenn auf dem Display der
Klimaanlage „AP“ angezeigt wird.
64Nr. 2
Gerät hinzufügen - WLAN-Passwort eingeben
Wählen Sie das WLAN aus, in dem das Gerät registriert ist, geben Sie das Passwort ein, in dem
sich das Gerät anmelden soll, und tippen Sie wie in der Abbildung angezeigt auf „Confirm“,
um die Verbindung mit dem Netzwerk zu starten.
65Nr. 2
Gerät hinzufügen - Verbindung mit dem Netzwerk
Wenn Sie den CF-Modus ausgewählt haben, um das Gerät mit dem Netzwerk zu verbinden,
durchläuft die App die in Abbildung 1 gezeigten Vorgänge. Wenn die Netzwerkverbindung
erfolgreich hergestellt wurde, zeigt die App die Seite an, die in Abbildung 2 dargestellt wird.
66Für den AP-Modus verbinden Sie sich bitte wie in der Abbildung gezeigt mit den WLAN-
Hotspot „SmartLife“.
Hinweise: Einige Geräte haben andere Hotspot-Bezeichnungen.
67Nachdem Sie sich mit dem Hotspot verbunden haben, kehren Sie bitte zur der Seite für die
Netzwerkverbindung zurück, um die Netzwerkverbindung fertigzustellen. Bitte warten Sie,
während die App den Vorgang durchläuft, der in Abbildung 1 angezeigt wird. Abbildung 2
zeigt die Seite der App, nachdem die Netzwerkverbindung erfolgreich hergestellt wurde.
Abbildung 1 Abbildung 2
68Nr. 2
Gerät hinzufügen - Hinzufügen fehlgeschlagen
Wenn die App die Anzeige ausgibt, die in der Abbildung zu sehen ist, bedeutet das, dass die
Netzwerkverbindung fehlgeschlagen ist. Bitte führen Sie den Vorgang erneut aus oder rufen
Sie die Hilfeseite auf.
69Nr. 3
Steuern des Geräts
Nachdem Sie das Gerät erfolgreich eingerichtet haben, erscheint es auf der Startseite. Tippen
Sie auf das Gerät, um die Seite zur Steuerung aufzurufen.
HINWEIS:
1. Wenn das Gerät online ist, kann es über Shortcuts gesteuert werden.
2. Wenn das Gerät offline ist, zeigt es „Offline“ an.
70Nr. 4
Smart Life-Szenario
Das Smart Life-Szenario unterstützt, dass Geräte entsprechende Befehle unter verschiedenen
Bedingungen ausführen. Zu den wichtigsten Bedingungen gehören:
1. Temperatur
2. Luftfeuchtigkeit
3. Wetter
4. Luftqualität
5. Zeit des Sonnenaufgangs/-untergangs
6. Befehle, die das Gerät ausführt (z. B. ein-/ausschalten)
71Nr. 5
„Profile“
Auf der Seite „Profile“ kann der Benutzer seine persönlichen Daten verwalten. Zu den
wichtigsten Daten gehören:
1. Persönliche Daten
2. Smart Life-Szenario
3. Geteilte Geräte: Zeigt Informationen zu geteilten Geräten an.
4. Nachrichtenzentrale
5. Häufig gestellte Fragen
6. Feedback geben
7. Über
72Auf der Seite „Profile“ werden Ihre persönlichen Daten angezeigt. Sie können Ihr Passwort
ändern, eine Handynummer verknüpfen und ein Entsperrmuster speichern.
73Nr. 5
„Profile“ - Entsperrmuster
Tippen Sie auf „Pattern Unlock“, um Ihr Muster festzulegen. Nachdem Sie das Muster
eingerichtet haben, müssen Sie es eingeben, um die App zu verwenden.
74Nr. 5
„Profile“ - Geteilte Geräte
Geteiltes Gerät hinzufügen: Wie in der Abbildung gezeigt, können Sie die Handynummer
eines neuen Benutzers eingeben und das Gerät mit ihm teilen. Der neue Benutzer kann dann
das geteilte Gerät steuern.
75Geteilte Geräte - Senden: Die Liste zeigt alle Benutzer, die von Ihrem Gerät aus hinzugefügt
wurden.
Sie können den Benutzer und das Teilen des Geräts löschen, indem Sie nach links wischen.
Geteilte Geräte - Empfangen: Die Liste zeigt alle Geräte, die Ihr Konto empfangen hat.
Sie können das Teilen des Geräts löschen, indem Sie nach links wischen.
76Nr. 5
„Profile“ - Nachrichtenzentrale
Nachrichtenzentrale: Hier werden Benachrichtigungen zu neuen Geräten und neuen geteilten
Geräten angezeigt.
77Steuerung Ihrer VACO VAC12W über Amazon Alexa Echo *
Schritt 1: Gerät hinzufügen
Stellen Sie sicher, dass die Klimaanlage in der Geräteliste auftaucht.
Schritt 2: Änderung des Gerätenamens
Ändern Sie den Gerätenamen zu einem Namen, den Alexa leicht verstehen kann. Beispiele:
Klima, Klimaanlage, Klimaanlage im Schlafzimmer, Klimaanlage im Wohnzimmer.
Schritt 3: Einrichtung von Amazon Alexa
Laden Sie die Amazon Alexa-App aus Google Play oder aus dem iOS-App Store herunter und
konfigurieren Sie Ihren Amazon Echo mit der Alexa-App
Schritt 4: Skill hinzufügen
Fügen Sie den Tuya Smart Skill in der Alexa-App hinzu, wenn Sie die Tuya Smart-App
verwenden.
Fügen Sie den Smart Life Skill in der Alexa-App hinzu, wenn Sie die Smart Life – Smart Living-
App verwenden.
Schritt 5: Steuerung des Geräts
Bitten Sie Alexa darum, neue Geräte zu entdecken. Danach können Sie Ihre VACO VAC12W
über Amazon Alexa Echo steuern.
Die folgenden Sprachbefehle werden unterstützt (wenn der Name Ihrer VACO VAC12W
„Klima“ ist):
Alexa, schalte Klima ein
Alexa, schalte Klima aus
Alexa, setze Klima auf X Grad
Alexa, reduziere Klima um X Grad
Alexa, erhöhe Klima um X Grad
* In ausgewählten Sprachen und in Ländern, in denen Amazon Alexa verfügbar ist und
unterstützt wird.
78Steuerung Ihrer VACO VAC12W über Google Home**
Schritt 1: Gerät hinzufügen
Stellen Sie sicher, dass die Klimaanlage in der Geräteliste auftaucht.
Schritt 2: Änderung des Gerätenamens
Ändern Sie den Gerätenamen zu einem Namen, den Google Home leicht verstehen kann.
Beispiele: Klima, Klimaanlage, Klimaanlage im Schlafzimmer, Klimaanlage im Wohnzimmer.
Schritt 3: Einrichtung von Google Home
Laden Sie die Google Home-App aus Google Play oder aus dem iOS-App Store herunter.
Verwenden Sie dann die Google Home-App, um Google Home einzurichten.
Schritt 4: Fügen Sie einen Home Control-Befehl hinzu
Fügen Sie unter „Home Control“ in der Google Home-App ein Gerät hinzu. Wählen Sie „Smart
Life“ oder „Tuya Smart“ aus und tragen Sie dann die entsprechenden Anmeldeinformationen
für Ihr App-Konto ein, um die Verknüpfung mit dem Konto fertigzustellen. Ihr Gerät sollte jetzt
in der Liste der Home Control-Geräte aufgeführt sein.
Schritt 5: Steuerung des Geräts
Jetzt können Sie Ihre VACO VAC12W über Google Home steuern.
Die folgenden Sprachbefehle werden unterstützt (wenn der Name Ihrer VACO VAC12W
„Klima“ ist):
OK Google, schalte Klima ein
OK Google, schalte Klima aus
OK Google, setze Klima auf X Grad
OK Google, reduziere Klima um X Grad
OK Google, erhöhe Klima um X Grad
** In ausgewählten Sprachen und in Ländern, in denen Google Home verfügbar ist und
unterstützt wird.
79Vielen Dank!
Hinweis:
1) Die Abbildungen, die in dieser Anleitung verwendet werden, zeigen die iOS-App. Die
Android-App unterscheidet sich geringfügig.
2) Das Gerät und die Software werden von Zeit zu Zeit aktualisiert. Die Versionsnummer
und die dargestellte Oberfläche der App dienen nur zur Illustrationszwecken. Im Falle
von weiteren Änderungen werden Sie nicht benachrichtigt.
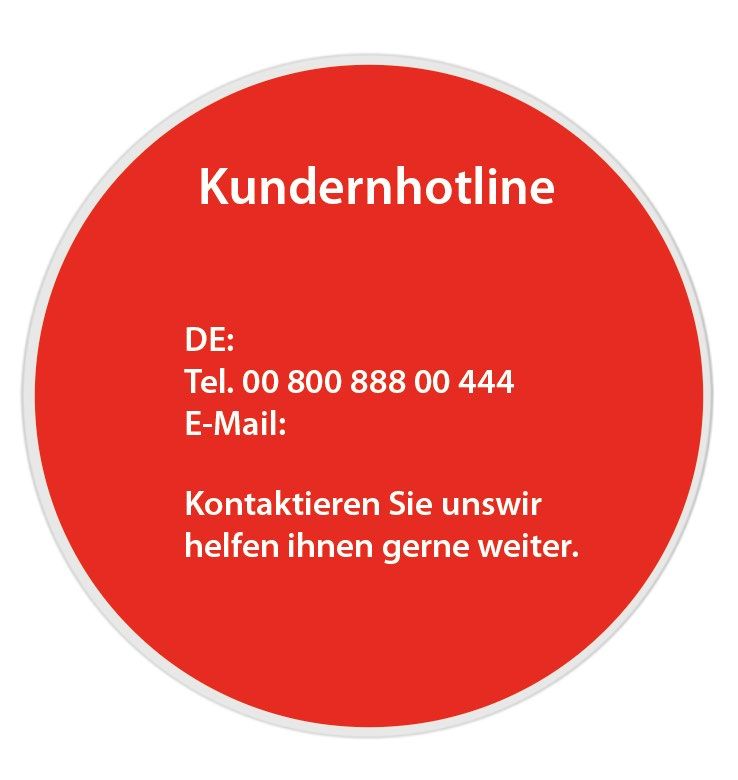
80KUNDENHOTLINE
81You can also read