MP3 Playback in CircuitPython with Lars the Sloth Puppet - Created by John Park - Last updated on 2020-08-03 04:35:09 PM EDT
←
→
Page content transcription
If your browser does not render page correctly, please read the page content below

MP3 Playback in CircuitPython with Lars the Sloth Puppet
                         Created by John Park

              Last updated on 2020-08-03 04:35:09 PM EDT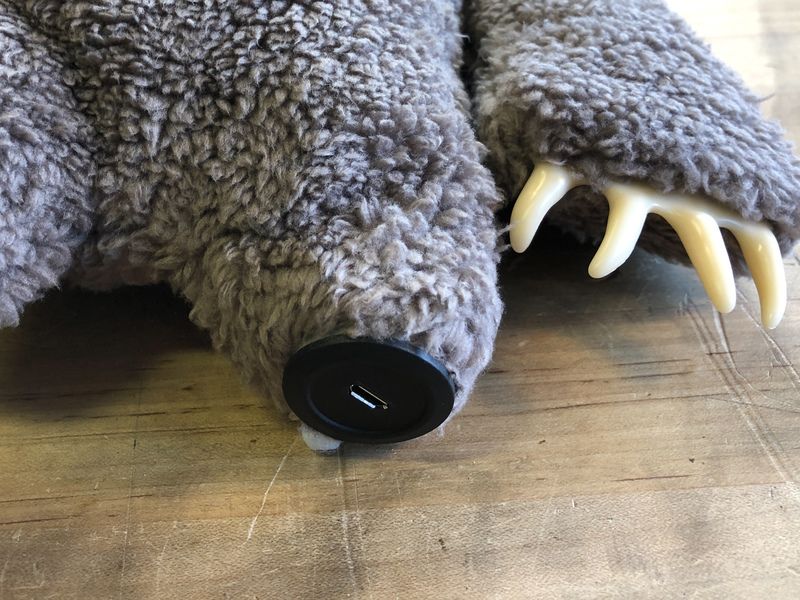
Overview
You can now play MP3 files directly in CircuitPython with no dedicated decoding hardware! You'll be able to use this
new capability in all sorts of projects, including this creepy Lars the Sloth voice box project!
The benefit of MP3 over other non-compressed file formats, such as WAV, has always been their small file size,
meaning you can pack a lot of songs or samples into limited memory. However, decompressing those small files for
playback was too taxing for older microcontrollers, so we had to use dedicated decoder chips at an additional cost,
including licensing fees.
Thanks to the raw speed of M4, the days of requiring a dedicated MP3 audio decoder chip are behind us. And, since
the patents have expired, we can now distribute MP3 playback libraries free of charge (https://adafru.it/Hey)!
Parts
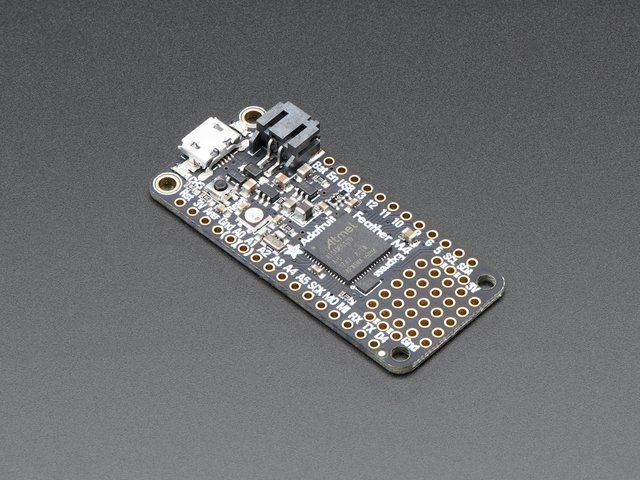
Adafruit Feather M4 Express - Featuring ATSAMD51
$22.95
IN STOCK
Add To Cart
Adafruit Prop-Maker FeatherWing
$9.95
IN STOCK
Add To Cart
© Adafruit Industries https://learn.adafruit.com/mp3-circuitpython-lars Page 3 of 32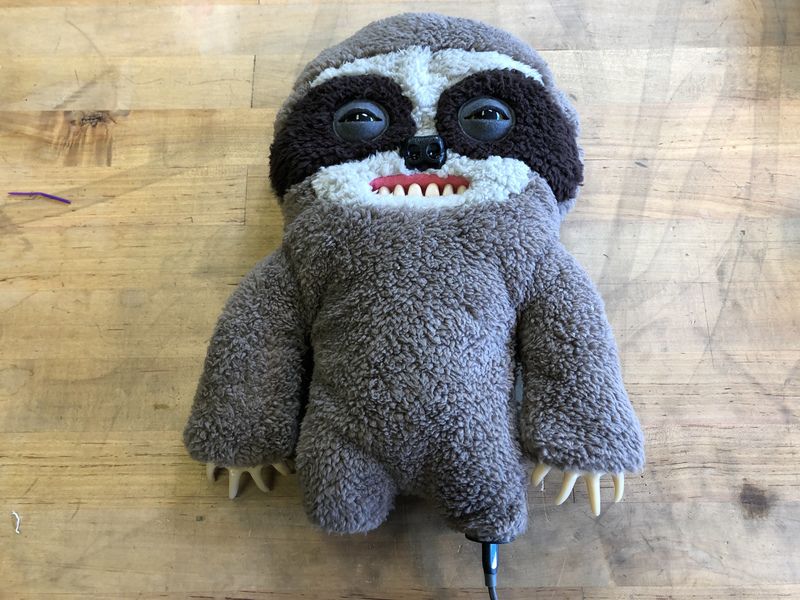
Mini Oval Speaker - 8 Ohm 1 Watt

                                       $1.95
                                       IN STOCK
                                       Add To Cart

                                       Lithium Ion Polymer Battery Ideal For Feathers - 3.7V
                                       400mAh

                                       $6.95
                                       IN STOCK

                                       Add To Cart

                                       Tactile On/Off Switch with Leads

                                       $3.95
                                       IN STOCK
                                       Add To Cart

                                       Micro B Round Panel Mount Extension Cable - 30cm

                                       $4.95
                                       IN STOCK
                                       Add To Cart

© Adafruit Industries   https://learn.adafruit.com/mp3-circuitpython-lars               Page 4 of 32
20-pin 0.1" Female Header - Red - 5 pack

                                       $2.50
                                       IN STOCK
                                       Add To Cart

                                       Break-away 0.1" 36-pin strip male header - Red - 10 pack

                                       $4.95
                                       IN STOCK
                                       Add To Cart

                                       Black Nylon Screw and Stand-off Set – M2.5 Thread

                                       OUT OF STOCK
                                       Out Of Stock

© Adafruit Industries   https://learn.adafruit.com/mp3-circuitpython-lars               Page 5 of 32
Plush Doll
                                                               The choice is yours, but if you want to embed creepy,
                                                               semi-threatening voice samples into a murder puppet,
                                                               you could do worse than a Sickening Sloth
                                                               Fuggler (https://adafru.it/LgB).

                                                               The teeth. Oh the teeth.

Who is Lars?
Lars (https://adafru.it/LgF) is the sworn enemy of CVT Joseph (https://adafru.it/Lha), the ice cream truck godfather of
Los Angeles, and owner of CVT Soft Serve (https://adafru.it/Lhb).

Lars is angry that Joe won't reveal the location of his Wonka-style Golden ice cream gift cards. This video linked below
will make everything clear:

https://www.instagram.com/p/B--_P8JJWWy/ (https://adafru.it/Lhc)

Actor Matt Biedel (https://adafru.it/Lhd) (Umbrella Academy, Narcos) has kindly given us permission to use Lars's voice.
At least that's what Joe claims.

 © Adafruit Industries               https://learn.adafruit.com/mp3-circuitpython-lars                       Page 6 of 32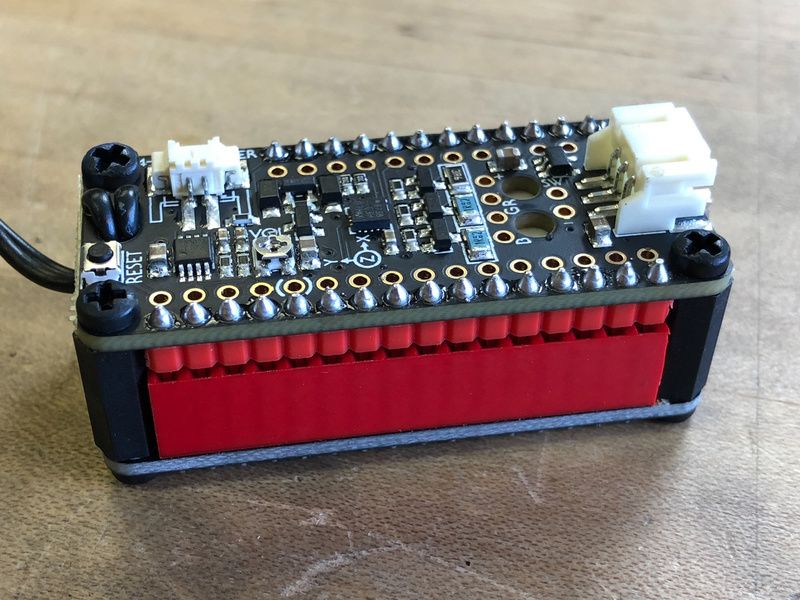
This project is not sponsored by CVT Soft Serve. John is is just really obsessed with Lars and great ice
      cream.

© Adafruit Industries              https://learn.adafruit.com/mp3-circuitpython-lars                      Page 7 of 32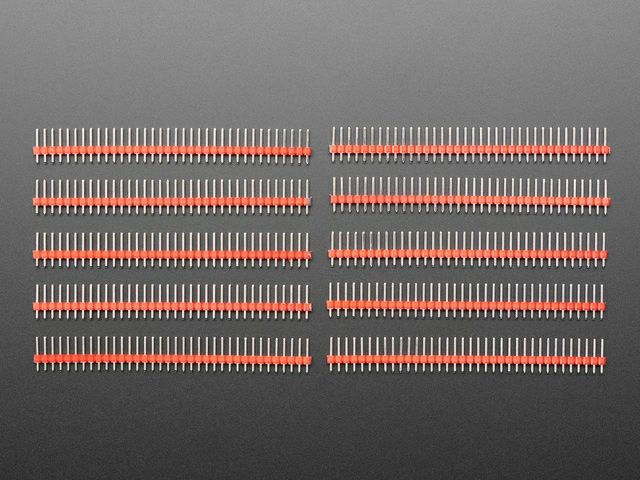
Build the MP3 Player

                                                   You can play .mp3 files with just a Feather M4 plus an
                                                   amplifier and speaker. However, for the puppet sound
                                                   playback, we'll make a nice, compact player with some
                                                   extra features.

                                                   The Propmaker FeatherWing gives us a very convenient
                                                   built-in amplifier and speaker output port, as well as an
                                                   accelerometer with tap-detection we will use to trigger
                                                   the sample playback.

                                                   With a small battery, USB port extender, and toggle
                                                   switch for powering the board on and off via the Enable
                                                   pin, we'll have a great little player that can be embedded
                                                   inside the puppet, while still allowing it to be triggered
                                                   from the outside, recharged and even coded without
                                                   requiring disassembly.

 © Adafruit Industries   https://learn.adafruit.com/mp3-circuitpython-lars                      Page 8 of 32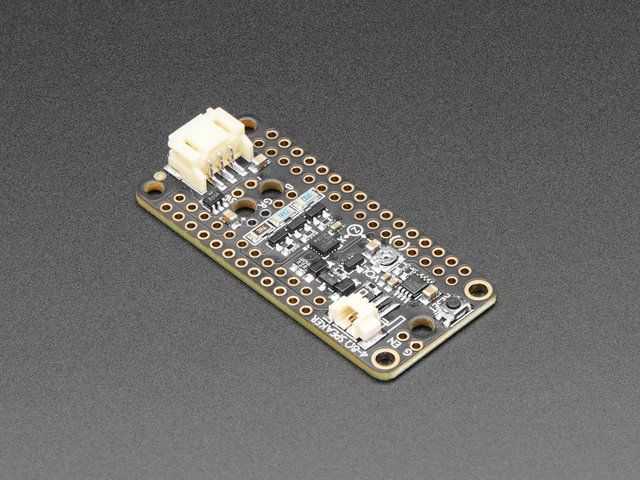
Add Header Pins
                                                  Solder a set of female and male header pins to the
                                                  Feather and FeatherWing respectively as shown here.

                                                  This guide (https://adafru.it/Lhe) shows how to solder in
                                                  the headers.

                                                  Enable Switch
                                                  The Enable pin on the Feather can be used to turn the
                                                  board on and off.

                                                  Push the wires through the Propmaker FeatherWing's
                                                  hold as shown (for strain relief) and then solder it to the

© Adafruit Industries   https://learn.adafruit.com/mp3-circuitpython-lars                        Page 9 of 32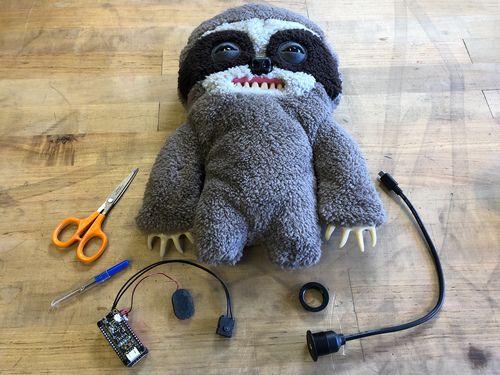
G and En pads (either wire in either hole is fine).

© Adafruit Industries   https://learn.adafruit.com/mp3-circuitpython-lars                       Page 10 of 32
Battery Power
                                                  Connect the battery to the JST battery jack and add a
                                                  little piece of double-stick foam tape to keep it secure
                                                  between the two boards.

© Adafruit Industries   https://learn.adafruit.com/mp3-circuitpython-lars                      Page 11 of 32
© Adafruit Industries https://learn.adafruit.com/mp3-circuitpython-lars Page 12 of 32
Fasten with Hardware
                                                  Use four M2.5 standoffs and eight short M2.5 screws to
                                                  fasten the boards together.

© Adafruit Industries   https://learn.adafruit.com/mp3-circuitpython-lars                   Page 13 of 32
Speaker
Next, plug in the speaker and you'll be ready for
programming and testing your .mp3 player!
© Adafruit Industries https://learn.adafruit.com/mp3-circuitpython-lars Page 14 of 32CircuitPython on Feather M4 Express
CircuitPython (https://adafru.it/tB7) is a derivative of MicroPython (https://adafru.it/BeZ) designed to simplify
experimentation and education on low-cost microcontrollers. It makes it easier than ever to get prototyping by
requiring no upfront desktop software downloads. Simply copy and edit files on the CIRCUITPY drive to iterate.
The following instructions will show you how to install CircuitPython. If you've already installed CircuitPython but are
looking to update it or reinstall it, the same steps work for that as well!
Set up CircuitPython Quick Start!
Follow this quick step-by-step for super-fast Python power :)
https://adafru.it/Emh
https://adafru.it/Emh
Click the link above and download the latest UF2 file.
Download and save it to your desktop (or wherever is
handy).
Plug your Feather M4 into your computer using a
known-good USB cable.
A lot of people end up using charge-only USB cables
and it is very frustrating! So make sure you have a USB
cable you know is good for data sync.
Double-click the Reset button next to the USB
connector on your board, and you will see the NeoPixel
RGB LED turn green. If it turns red, check the USB cable,
try another USB port, etc. Note: The little red LED next
to the USB connector will pulse red. That's ok!
If double-clicking doesn't work the first time, try again.
Sometimes it can take a few tries to get the rhythm right!
© Adafruit Industries https://learn.adafruit.com/mp3-circuitpython-lars Page 15 of 32You will see a new disk drive appear called
FEATHERBOOT.
Drag the adafruit_circuitpython_etc.uf2 file to
FEATHERBOOT.
The LED will flash. Then, the FEATHERBOOT drive will
disappear and a new disk drive called CIRCUITPY will
appear.
That's it, you're done! :)
Further Information
For more detailed info on installing CircuitPython, check out Installing CircuitPython (https://adafru.it/Amd).
© Adafruit Industries https://learn.adafruit.com/mp3-circuitpython-lars Page 16 of 32CircuitPython Libraries
As we continue to develop CircuitPython and create new releases, we will stop supporting older releases.
Visit https://circuitpython.org/downloads to download the latest version of CircuitPython for your board. You
must download the CircuitPython Library Bundle that matches your version of CircuitPython. Please update
CircuitPython and then visit https://circuitpython.org/libraries to download the latest Library Bundle.
Each CircuitPython program you run needs to have a lot of information to work. The reason CircuitPython is so simple
to use is that most of that information is stored in other files and works in the background. These files are called
libraries. Some of them are built into CircuitPython. Others are stored on your CIRCUITPY drive in a folder called lib.
Part of what makes CircuitPython so awesome is its ability to store code separately from the firmware itself. Storing
code separately from the firmware makes it easier to update both the code you write and the libraries you depend.
Your board may ship with a lib folder already, it's in the base directory of the drive. If not, simply create the folder
yourself. When you first install CircuitPython, an empty lib directory will be created for you.
CircuitPython libraries work in the same way as regular Python modules so the Python docs (https://adafru.it/rar) are a
great reference for how it all should work. In Python terms, we can place our library files in the lib directory because its
part of the Python path by default.
One downside of this approach of separate libraries is that they are not built in. To use them, one needs to copy them
to the CIRCUITPY drive before they can be used. Fortunately, we provide a bundle full of our libraries.
Our bundle and releases also feature optimized versions of the libraries with the .mpy file extension. These files take
less space on the drive and have a smaller memory footprint as they are loaded.
Installing the CircuitPython Library Bundle
© Adafruit Industries https://learn.adafruit.com/mp3-circuitpython-lars Page 17 of 32We're constantly updating and improving our libraries, so we don't (at this time) ship our CircuitPython boards with the
full library bundle. Instead, you can find example code in the guides for your board that depends on external libraries.
Some of these libraries may be available from us at Adafruit, some may be written by community members!
Either way, as you start to explore CircuitPython, you'll want to know how to get libraries on board.
You can grab the latest Adafruit CircuitPython Bundle release by clicking the button below.
Note: Match up the bundle version with the version of CircuitPython you are running - 3.x library for running any
version of CircuitPython 3, 4.x for running any version of CircuitPython 4, etc. If you mix libraries with major
CircuitPython versions, you will most likely get errors due to changes in library interfaces possible during major version
changes.
https://adafru.it/ENC
https://adafru.it/ENC
If you need another version, you can also visit the bundle release page (https://adafru.it/Ayy) which will let you select
exactly what version you're looking for, as well as information about changes.
Either way, download the version that matches your CircuitPython firmware version. If you don't know the version,
look at the initial prompt in the CircuitPython REPL, which reports the version. For example, if you're running v4.0.1,
download the 4.x library bundle. There's also a py bundle which contains the uncompressed python files, you probably
don't want that unless you are doing advanced work on libraries.
After downloading the zip, extract its contents. This is usually done by double clicking on the zip. On Mac OSX, it
places the file in the same directory as the zip.
Open the bundle folder. Inside you'll find two information files, and two folders. One folder is the lib bundle, and the
other folder is the examples bundle.
© Adafruit Industries https://learn.adafruit.com/mp3-circuitpython-lars Page 18 of 32Now open the lib folder. When you open the folder, you'll see a large number of mpy files and folders
Example Files
All example files from each library are now included in the bundles, as well as an examples-only bundle. These are
included for two main reasons:
Allow for quick testing of devices.
Provide an example base of code, that is easily built upon for individualized purposes.
Copying Libraries to Your Board
First you'll want to create a lib folder on your CIRCUITPY drive. Open the drive, right click, choose the option to create
a new folder, and call it lib. Then, open the lib folder you extracted from the downloaded zip. Inside you'll find a
number of folders and .mpy files. Find the library you'd like to use, and copy it to the lib folder on CIRCUITPY.
This also applies to example files. They are only supplied as raw .py files, so they may need to be converted to .mpy
using the mpy-cross utility if you encounter MemoryErrors . This is discussed in the CircuitPython Essentials
Guide (https://adafru.it/CTw). Usage is the same as described above in the Express Boards section. Note: If you do not
place examples in a separate folder, you would remove the examples from the import statement.
Example: ImportError Due to Missing Library
If you choose to load libraries as you need them, you may write up code that tries to use a library you haven't yet
loaded. We're going to demonstrate what happens when you try to utilise a library that you don't have loaded on your
board, and cover the steps required to resolve the issue.
© Adafruit Industries https://learn.adafruit.com/mp3-circuitpython-lars Page 19 of 32This demonstration will only return an error if you do not have the required library loaded into the lib folder on your
CIRCUITPY drive.
Let's use a modified version of the blinky example.
import board
import time
import simpleio
led = simpleio.DigitalOut(board.D13)
while True:
led.value = True
time.sleep(0.5)
led.value = False
time.sleep(0.5)
Save this file. Nothing happens to your board. Let's check the serial console to see what's going on.
We have an ImportError . It says there is no module named 'simpleio' . That's the one we just included in our code!
Click the link above to download the correct bundle. Extract the lib folder from the downloaded bundle file. Scroll
down to find simpleio.mpy. This is the library file we're looking for! Follow the steps above to load an individual library
file.
The LED starts blinking again! Let's check the serial console.
No errors! Excellent. You've successfully resolved an ImportError !
If you run into this error in the future, follow along with the steps above and choose the library that matches the one
you're missing.
© Adafruit Industries https://learn.adafruit.com/mp3-circuitpython-lars Page 20 of 32Library Install on Non-Express Boards If you have a Trinket M0 or Gemma M0, you'll want to follow the same steps in the example above to install libraries as you need them. You don't always need to wait for an ImportError as you probably know what library you added to your code. Simply open the lib folder you downloaded, find the library you need, and drag it to the lib folder on your CIRCUITPY drive. You may end up running out of space on your Trinket M0 or Gemma M0 even if you only load libraries as you need them. There are a number of steps you can use to try to resolve this issue. You'll find them in the Troubleshooting page in the Learn guides for your board. Updating CircuitPython Libraries/Examples Libraries and examples are updated from time to time, and it's important to update the files you have on your CIRCUITPY drive. To update a single library or example, follow the same steps above. When you drag the library file to your lib folder, it will ask if you want to replace it. Say yes. That's it! A new library bundle is released every time there's an update to a library. Updates include things like bug fixes and new features. It's important to check in every so often to see if the libraries you're using have been updated. © Adafruit Industries https://learn.adafruit.com/mp3-circuitpython-lars Page 21 of 32
Code the MP3 Player

                                                                Once your Feather is set up with CircuitPython 5.3.0 or
                                                                greater, you'll also need to add some libraries. Follow
                                                                this page (https://adafru.it/ABU) for information on how
                                                                to download and add libraries to your Feather.

                                                                From the library bundle you downloaded in that guide
                                                                page, transfer the following libraries onto the Feather's
                                                                /lib directory:

                                                                      adafruit_bus_device
                                                                      adafruit_lis3dh
                                                                      neopixel

Text Editor
Adafruit recommends using the Mu editor for using your CircuitPython code with the Feather boards. You can get more
info in this guide (https://adafru.it/ANO).

Alternatively, you can use any text editor that saves files.

Code.py
Copy the code below and paste it into Mu. Then, save it to your Feather as code.py.

 © Adafruit Industries                https://learn.adafruit.com/mp3-circuitpython-lars                      Page 22 of 32
# MP3 playback with tap trigger
# Works on M4 and nRF52840 based boards with accelerometer or Propmaker
import time
import board
import busio
import digitalio
import audioio
import audiomp3
import adafruit_lis3dh
startup_play = False # set to True to play all samples once on startup
# Set up accelerometer on I2C bus
i2c = busio.I2C(board.SCL, board.SDA)
int1 = digitalio.DigitalInOut(board.D6)
accel = adafruit_lis3dh.LIS3DH_I2C(i2c, int1=int1)
accel.set_tap(1, 100) # single or double-tap, threshold
# Set up speaker enable pin
enable = digitalio.DigitalInOut(board.D10)
enable.direction = digitalio.Direction.OUTPUT
enable.value = True
speaker = audioio.AudioOut(board.A0)
sample_number = 0
print("Lars says, 'Hello, CVT Joseph. Tap to play.'")
if startup_play: # Play all on startup
for i in range(10):
sample = "/lars/lars_0{}.mp3".format(i)
print("Now playing: '{}'".format(sample))
mp3stream = audiomp3.MP3Decoder(open(sample, "rb"))
speaker.play(mp3stream)
while speaker.playing:
time.sleep(0.1)
enable.value = speaker.playing
while True:
if accel.tapped and speaker.playing is False:
sample = "/lars/lars_0{}.mp3".format(sample_number)
print("Now playing: '{}'".format(sample))
mp3stream = audiomp3.MP3Decoder(open(sample, "rb"))
speaker.play(mp3stream)
sample_number = (sample_number + 1) % 10
enable.value = speaker.playing
Audio Samples
You can get started by using these .mp3 files. (Of course, you're free to use any files that you like, see below for more
info on that.)
Download the .zip file linked below and then uncompress the file. Drag the /lars directory onto the root level of your
Feather's CIRCUITPY drive.
© Adafruit Industries https://learn.adafruit.com/mp3-circuitpython-lars Page 23 of 32https://adafru.it/LgD
https://adafru.it/LgD
Make Your Own
To make your own .mp3, use audio software such as Audacity (https://adafru.it/Lee) to save them with these settings:
bit rate: anywhere from 16 to 320 kb/s (lower will be smaller, higher is better quality)
sample rate: 22050Hz or 44100Hz are recommended, although 16kHz, 24kHz, and 48kHz should also work
channels: mono or stereo
must be DRM free
How It Works
Here's what the code does:
Imports the necessary libraries for audiomp3 playback and accelerometer tap detection with the adafruit_lis3dh
Sets up the accelerometer
Specifies the speaker enable pin (this allows the speaker to be disabled when not in use)
If startup_play is set to True, each sample in the /lars directory with the name format of /lars_0*.mp3 will be
played using the mp3stream object
In the main loop of the program, the accelerometer is checked for tap detection. When the tap occurs, the next
sample is played. When the tenth one is played, the list loops around back to the first one again.
Test It
With the enable switch clicked on, try tapping the Feather/Propmaker to trigger a sample. When a sample has finished
you can tap again to trigger the next one.
Note, there is a small volume adjustment screw on the Propmaker FeatherWing that can be turned with a small
screwdriver to adjust the maximum volume.
Now, let's add the sound player to our puppet friend Lars!
© Adafruit Industries https://learn.adafruit.com/mp3-circuitpython-lars Page 24 of 32Implant the MP3 Player in
Puppet
Before making any incisions, we'll lay out the parts on
the puppet to get a feel for where things will go. This is
a good time to add the USB panel-mount port extender
to the micro USB jack on the Feather.
We want to get the speaker up near Lars's inexplicably
human-toothed maw, with the Feather board near the
center of his back so it is easy to tap it to trigger the
sound sample playback.
I decided to place the on/off switch for the enable pin in
Lars's right paw-claw-hand thing, and the USB port jack
in his left foot.
© Adafruit Industries https://learn.adafruit.com/mp3-circuitpython-lars Page 25 of 32Seam Ripper
Use a seam ripper or small scissors to open up the
seam on the bottom of Lars's left foot.
© Adafruit Industries https://learn.adafruit.com/mp3-circuitpython-lars Page 26 of 32Feed in the Speaker
Feed the speaker up through the foot hole and work it
up toward the head area.
© Adafruit Industries https://learn.adafruit.com/mp3-circuitpython-lars Page 27 of 32Bag It
To prevent the board from snagging on the doll's batting
on the way in, you can wrap the feather in a small bag
with a zip tie or rubber band to close off the neck as
shown here.
USB Jack
The last thing to push into the plush toy will be the USB
panel-mount jack.
Use a medium sized zip tie to secure it to the end of the
foot as shown, then trim off the excess zip tie end.
© Adafruit Industries https://learn.adafruit.com/mp3-circuitpython-lars Page 28 of 32© Adafruit Industries https://learn.adafruit.com/mp3-circuitpython-lars Page 29 of 32
You can now plug a USB cable into Lars's foot for battery charging, swapping out .mp3 files, or even adjusting the
CircuitPython code!

 © Adafruit Industries              https://learn.adafruit.com/mp3-circuitpython-lars                   Page 30 of 32
Test out your finished puppet now by making sure the Enable switch is clicked on, then tap his back to play!

You may need to wiggle the speaker around to get it to an optimal placement. Also ensure the battery is charged or
the USB cable plugged in to get sufficient power.

Note, in the video below I was using a double-tap to trigger.

 © Adafruit Industries               https://learn.adafruit.com/mp3-circuitpython-lars                  Page 31 of 32
© Adafruit Industries Last Updated: 2020-08-03 04:35:09 PM EDT Page 32 of 32
You can also read