Tier 1 Manual Blackboard Learn - UTech
←
→
Page content transcription
If your browser does not render page correctly, please read the page content below
Tier 1 Manual Blackboard Learn

Landing Page- https://www.utech.edu.jm/onlinelearning
BBL- utechjm.blackboard.com
Information on student email- https://www.utech.edu.jm/student-email
Students will utilise their utech email address and sign in using the third party account sign
in
Enrollment for BBL

   -   Auto-enrolment in BBL modules
   -   Auto enrolment runs once every 24 hours
Contact Information:
Project lead: Mrs. Demisha Gayle Walker

Project Administrators: Mrs. Wendy Dressekie-Gordon, Ms. Seanette Forbes
ODL support: Mrs. Kamla Anderson, Mr. Leon Grant
Integration
Students who have selected and confirmed their modules will be enrolled unto the Blackboard Learn
platform with 24 hours. To check if the student has confirmed any modules in the academic session:

   1. Log into Sits:Vision (i.e. ISAS-LIVE)

   2. Go to the SMO screen; type SMO then select Run

   3. When the SMO screen opens, enter:

            i.    The student’s ID [including the slash; enter
                                                                  Figure 1: Image showing where to type
                  gold star (.*) at the end of the ID, if you are SMO to access the screen
                  not sure which slash to use] e.g. 0605117/1 or 0605117.*
            ii.   The Year e.g. 2020/1
           iii.   The Period e.g. SEM2

         Figure 2: Image showing how to use the SMO screen

   4. Select F5 to retrieve the record. If no record is returned, it could mean:
         i.   You may have entered something incorrectly; double check to ensure the ID
              number, year and period are correct

           ii.    The student has not confirmed their modules.

Student Login Information

     Figure 3: Image showing the results returned for the student
Blackboard Learn
                                Frequently Asked Questions
                                         Students

1. When will we be required to exclusively use the Blackboard Learn platform for
   accessing our classes?

   Currently the project team is carrying out a pilot project with the participation of select
   lecturers and students for the duration of Semester 2 and the Summer Session of
   Academic Year 2020/2021. The project team is working to effect full adoption of BBL at
   the start of Semester 1 of the 2021-22 Academic Year.

2. How do I know whether my module is being offered on the Blackboard Learn?

   You will be notified in at least one of the following ways:
          1. Once you have selected and confirmed your modules, you will receive a
             message via the Students’ Portal notifying you that your module is on the
             Blackboard Learn Platform

          2. Your timetable may also indicate that the room for your module is “BB-
             Learn” (illustrated below). Note: This may not occur for all modules offered
             via Blackboard Learn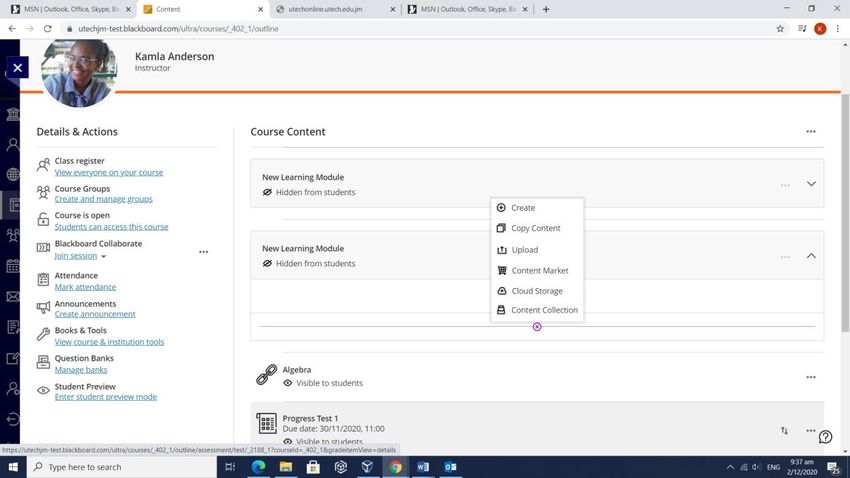
3. The list of all modules that are being offered on Blackboard can be accessed
             from the UTech E-Learning page (https://www.utech.edu.jm/onlinelearning)

3. Which credentials do I use to login to Blackboard Learn?

   As a student, you will use your UTech, Ja. Assigned email address and a default password,
   if this is your first time using your email address. If you have used your email address
   before, use the password you created.

   Your email address is your firstnamemiddleinitial(s)lastname@students.utech.edu.jm
   Example:     John       Anthony      Brown’s       email    address    would      be
   johnabrown@students.utech.edu.jm

   If you are not sure what your email address is, you may view this on the Students’ Portal
   (Personal Details)

   Your default password is your student ID number with the string ‘@nzhi’ appended.
   Example: If your student id number is 9995555 then your initial password
   is 9995555@nzh

   For more information about accessing your student email, select the link below:
   https://www.utech.edu.jm/student-email

4. What do I do if I do not remember my password?

   Go to https://www.office.com in your web browser and click the Sign in button. Enter
   your email address. You will see the forgot password option, select it and follow the
   instructions.

5. Where do I go to login to Blackboard Learn?

   You will be able to access Blackboard Learn from the UTech, Ja website via Quick Links.
   You may also access it by selecting the link below then selecting the ‘Bb’ icon:
   https://www.utech.edu.jm/onlinelearning

6. Do I need an enrolment key to access my module on Blackboard Learn?

   No. You will be automatically enrolled within 24 hours after confirming your module
   selections or after you have been added to the module by the Office of Admissions and
   Enrolment Management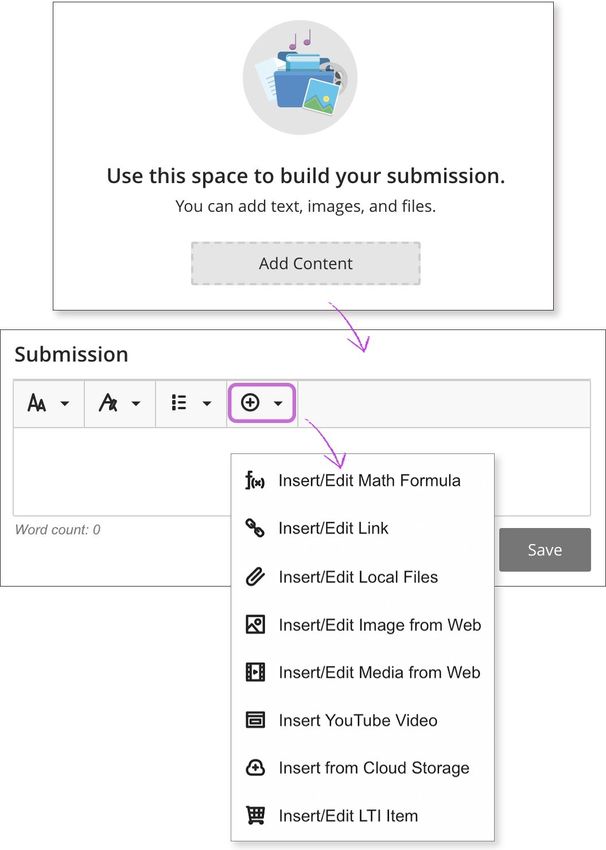
7. What do I do if I have confirmed my modules but I am not seeing it on Blackboard
   Learn?

   Check if 24 hours have passed since you confirmed your module. If 24 hours have not
   passed, wait. If 24 hours have elapsed, contact Tier 1 Support at
   Tier1support@utech.edu.jm

8. How will I know how to use Blackboard Learn?
   On the university’s main Online Learning page, https://www.utech.edu.jm/onlinelearning
   you will find links to several resources including outlines, videos and guide sheets to help
   you become comfortable with navigating the system. Please explore the site to begin
   your personal orientation, before your first web-conferencing session with your lecturer.

   For Semester 2, the Office of Distance Learning (ODL) will also be conducting orientation
   sessions for January 5- 29, 2020, so look out for the notices on your student portal.

9. Who do I contact if I am experiencing challenges on the Blackboard Learn?

   If the issue you are facing has to do with the content for your module, contact your
   lecturer. This can be done by sending a message directly from your course or module on
   the Blackboard Learn using the Message page or from the Course Roster. You may also
   use other methods of communication provided by your lecturer.
   Where it is a technical            issue,   you   may    contact   Tier   1   Support    at
   Tier1support@utech.edu.jm
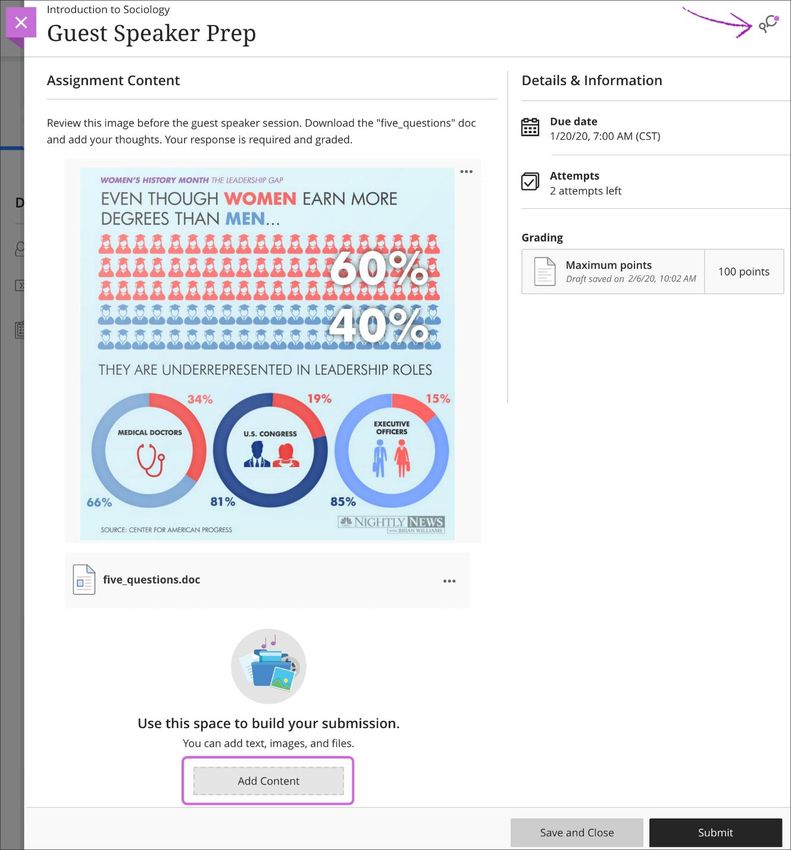
Submitting an assignment on BBL

Your instructor can also secure an assignment with the LockDown Browser. You need to
provide the correct access code before the LockDown Browser is launched.

Ready to start?

If no time limit exists, you can view an assignment and you don't have to submit it. When
you select View assessment, you can just view the assignment or add some work. Not ready
to submit? Select Save and Close in the panel. If you previously started the assignment, your
work was saved. Select View assessment to resume working.
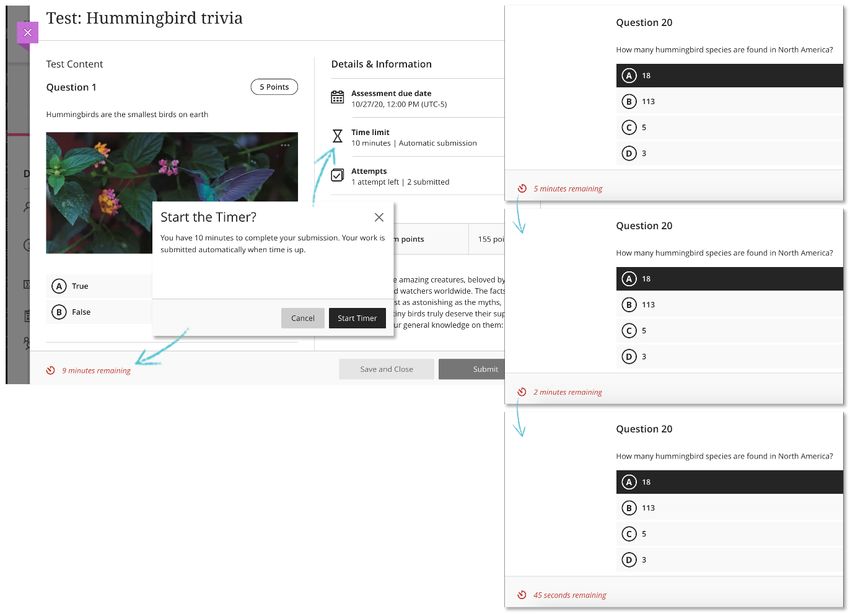
If your instructor added a time limit, it appears alongside other assignment details on
the Course Content page. You'll also see the time limit on the assignment's Details &
Information panel and within the assignment, as you work. You'll see Start attempt instead
of View assessment. When you select Start attempt, you'll receive a pop-up window to start
the timer before you can access the assignment. If you're not ready to start, select Cancel.
After you start, the assignment auto-submits when time is up.

More on time limits

Late work

After the due date has passed and you open an assignment, you’re alerted that your
submission will be marked late. You can view the alert in the Details & Information panel, on
the assignment page, and in the submit confirmation window. In the Details &
Information panel, you can also see if any submissions are or will be late.

In the panel, you can select your submission in the Grading section and also see that you
made a late submission.

If set up by your instructor, you may see zeros for work you haven't submitted after the due
date passes. You can still submit attempts to update your grade. Your instructor determines
grade penalties for late work.

More on zeros assigned to past due work

More on multiple attempts grades
ULTRA: Submit an assignment

ULTRA: View attached files

Your instructor may attach files that you need to read or use to complete an assignment.
Your instructor decides how files appear, such as inline or as attachments.

In most browsers, you can select where the files that you open in courses are downloaded.
For example, in Chrome, navigate to Settings > Advanced > Downloads. You can select the
location for file downloads and choose if you want the browser to ask each time. In Safari,
you have the same capabilities. Navigate to Preferences > General > File download location.
You can perform an internet search to learn about file download choices in other browsers.
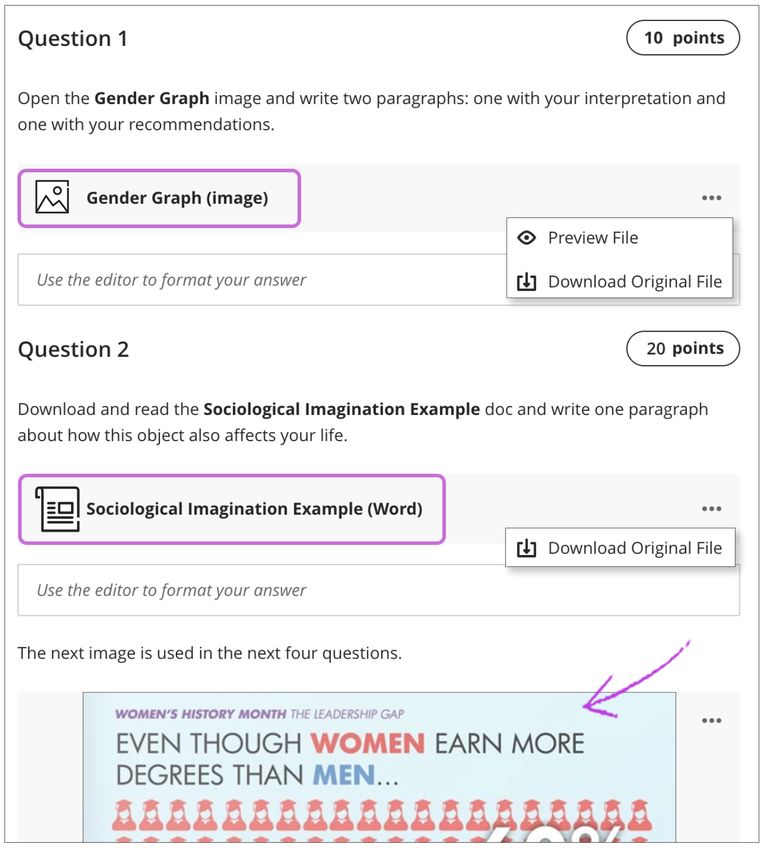
For video and audio files that appear inline, select the title to open them in new windows.
You have controls for play, pause, and volume control. For video files, you can view the
video in full screen. You can also download the file.

For media files that appear as attachments, open the menu. Select Download Original File to
download images, Word documents, PDFs, or slide presentations to your computer.
Select Preview File to open the file on the course page, such as an image.

For image files that appear inline, you can select an image to view it separately.

ULTRA: Submit an assignment

Doesn't seem familiar? Jump to the "Original" help about submitting assignments.

Your instructor provides all the information and files you need to complete an assignment.
Be mindful of the time. If your instructor put a time limit on the assignment, you can keep
track of how much time is left. A countdown appears at the bottom of your screen and
warns you as the time limit gets closer.

The timer keeps counting down when you save a draft or leave an attempt in progress.

Create your submission. Select Add Content to open the editor. You can use the options in
the editor to format the text and embed images and attach files. Visit the previous link to
see an expanded view of the editor options and detailed instructions.

If you view the editor on a smaller screen, select the plus icon to view the menu of options.
You'll find the option to attach a file to your assignment.

For example, select Insert/Edit Local Files—represented by the paper clip icon. Browse for a
file from your computer. A status window appears to show the progress of the file upload.
Only your instructor can view the content you add.

To use your keyboard to jump to the editor toolbar, press ALT + F10. On a Mac, press Fn +
ALT + F10. Use the arrow keys to select an option, such as a numbered list.

Insert from Cloud Storage: You can instantly connect to multiple web apps where you store
files, such as in OneDrive® and Google Drive™. The files you add are copies. If you make a
change to a file in cloud storage, you need to upload a new copy in your course. If your
browser allows, media files you add from cloud storage display inline.

More on cloud storage

Add to the conversation. If your instructor enabled conversations, select the Open class
conversation icon. Anyone can make a contribution to the assignment conversation,
including your instructor.

More on conversations

Not ready to submit? Select Save and Close to save your work and continue later. Your text,
comments, and files are saved on the page. When you return, you can resume working.

Submit your assignment. Finished? Select Submit when you're ready for your instructor to
grade your work. When you submit, a panel appears with the date and time you made the
submission. Select the View submission link at the bottom of the panel to review your
submission.

The Submit button is disabled until you add content or answer at least one question.

If your instructor allowed one attempt, you can't edit your work after you submit. If your
instructor allowed multiple attempts and you submit an attempt past the due date, the
attempt will be marked late. Any attempts you submit before the due date aren't marked
late.

ULTRA: Can I just view a group assignment? I'm worried if I open it, I'll have to submit it
for my group.

You can view a group assignment and you don't have to submit it. When you select View
assessment, you can just view the group assignment or add some work. Not ready to
submit? Select Save and Close in the panel. Your work on behalf of the group is saved
and not submitted. If you or another group member previously started the group
assignment, your work was saved. Select View assessment to resume working.
Everyone in the group can keep track of the latest version of the work. Until a member
selects Submit, you can open the group assignment as many times as you want.

More on submitting assignments
BBL FAQ- Communicating in BBL ULTRA: How do I send messages? Doesn't seem familiar? Jump to the "Original" help about sending email. You and your instructors can send messages to each other, multiple people, or an entire class. Messages activity remains inside the system. 1. Inside a course o On the Messages page In a course, all messages and responses stay together on the Messages page. You can easily scan the entire list, and expand a message to read all the responses and see who is participating. Select the New Message icon to send a message. Send to one person, multiple people, or the entire class. o From the course roster You can send a message to anyone involved with your course. Select a profile picture and then the envelope icon to open the New Message panel. You can add more recipients to the message as needed. 2. From the global messages page o Select Messages from the list where your name appears to access the global messages page. o Select the plus sign in a course card on the Messages page to open the New Messages panel. o Start typing to add recipients. As you type, matching recipient names pop up. You can continue to add as many names as you want or send to the whole class. o Lead with the most important info! The first 100 characters of a message appear in the list. Messages don't have titles, so recipients rely on the first part of your message as they choose what to read. You can format your text with the editor. ULTRA: How do I send messages? Doesn't seem familiar? Jump to the "Original" help about sending email. You and your instructors can send messages to each other, multiple people, or an entire class. Messages activity remains inside the system.
3. Inside a course o On the Messages page In a course, all messages and responses stay together on the Messages page. You can easily scan the entire list, and expand a message to read all the responses and see who is participating. Select the New Message icon to send a message. Send to one person, multiple people, or the entire class. o From the course roster You can send a message to anyone involved with your course. Select a profile picture and then the envelope icon to open the New Message panel. You can add more recipients to the message as needed. 4. From the global messages page o Select Messages from the list where your name appears to access the global messages page. o Select the plus sign in a course card on the Messages page to open the New Messages panel. o Start typing to add recipients. As you type, matching recipient names pop up. You can continue to add as many names as you want or send to the whole class. o Lead with the most important info! The first 100 characters of a message appear in the list. Messages don't have titles, so recipients rely on the first part of your message as they choose what to read. You can format your text with the editor. ULTRA: How do I receive messages? 1. From the global messages page Select Messages from the list where your name appears to access the global messages page. You'll see all your messages from all your courses. You can view messages for current, previous, and future courses. 2. Inside a course When you're inside a course, you can view and send messages for that course only.
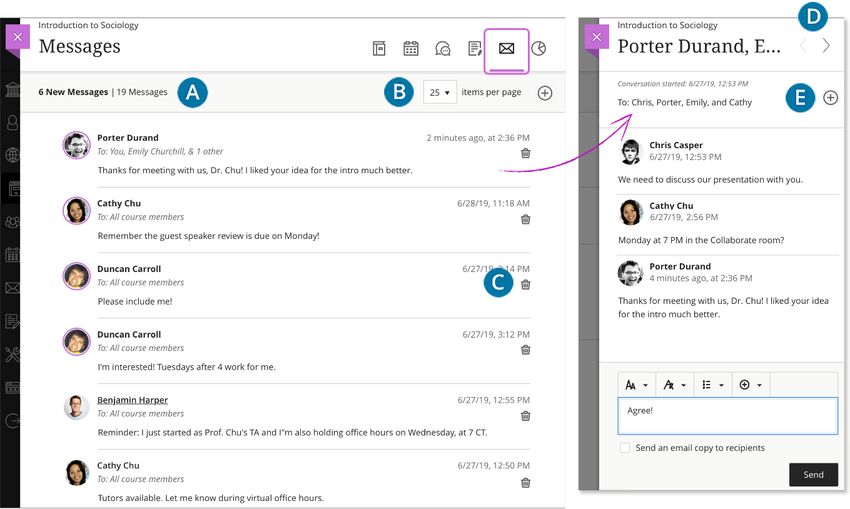
A. Easily view what's new. A count of messages appears above the list. New responses appear
   with a bold font.
B. Send a message. If allowed by your institution, select the New Message icon to send a
   message. Send to one person, multiple people, or the entire class.

   If you have many messages, select the number of messages you want to see per page to
   narrow your focus.

C. Delete a message. Use the Delete icon to delete a message. If more responses come in,
   you'll get them. You can't edit or delete individual responses in a message.
D. Navigate to another message. Messages open in a panel with all the responses. Use
   the View Previous Messages and Next Message icons at the top to view the previous or next
   message in the list.
E. Add more people. If allowed by your institution, when you create or respond to a message,
   select the Add Participants icon to add additional people unless the message was sent to the
   entire class. The original recipients see a note in the next message that you added new
   people or the whole class. The new recipients see the message from the point they were
   added.

   Your instructor can choose to send a copy of a course message to your email inbox. You only
   receive the email copy of a course message when you have a valid email address listed in
   your profile, so keep your profile up to date!
BBL- Checking Grades

As your instructors post grades, you'll find them in your activity stream. Select View your
grade to display your grade. If your instructor added feedback, you'll see it after the item's
title.

You can also access the assignment in your course to review your grade and feedback in
context.

Your grades also appear on the global and course grades pages.

More on accessing grades in the Ultra Course View

ULTRA: Where are my grades?

Your grades can appear in multiple places.
On your course's Grades page inside the relevant course In your activity stream On your global Grades page, accessed from the list where your name appears 1. Inside the course You can access your course grades on the course's navigation bar. Select the Grades icon to access all the coursework that is specific to the course you are in. Then, on the Course Grades page, select a title to see the grade and feedback from your instructor. 2. Activity stream As your instructors post grades, you will find them in your activity stream. Select View your grade to display your grade. If your instructor added feedback, you will see it after the item's title. If your instructor updates a grade, the grade is also updated in the stream. More on the activity stream 3. Your global Grades page To see your grades for all your courses in one place, select Grades from the list on the left where your name appears. All of your grades are organized by course. You can see what's due and set priorities across all of your courses. No need to navigate to each course individually. ULTRA: Grade pills Your instructor determines how to display your grade for each graded item: Letter grade
Points Percentage The grade pill for each assessment question and graded item may appear in colours or with dark backgrounds. For the coloured grade pills, the highest score range is green and the lowest is red. At this time, your instructors cannot change the colours or the percentages. The colours map to these percentages: > 90% = green 89–80% = yellow/green 79–70% = yellow 69–60% = orange 59–50% = red
Your institution can disable the colour scheme for all courses. The grade pills appear with
dark backgrounds and white grades. Colours won't be used to convey performance.
ULTRA: How do my grades compare to others?

You can use learning analytics to find out where you stand in relation to your classmates
and plan how to improve your position.

More on learning analytics
Frequently Asked Questions
                                          Lecturers

When will lecturers be required to exclusively use the Blackboard Learn platform for
delivery of classes?

   Currently the project team is carrying out a pilot project with the participation of select
   lecturers and students for the duration of Semester 2 and the Summer Session of
   Academic Year 2020/2021. The project team is working to effect full adoption of BBL at
   the start of Semester 1 of the 2021-22 Academic Year.

How do I know whether my module is being offered on the Blackboard Learn?

   You will be notified the following ways:
          4. For the pilot, if you are a non-editing lecturer i.e. another lecturer developed
             the content for the module on Blackboard Learn, you will be notified via
             email before classes commence.

          5. Your timetable will also indicate that the room for your module is BB-Learn
             (illustrated below)

          6. The list of all modules that are being offered on Blackboard can be accessed
             from the UTech E-Learning page (https://www.utech.edu.jm/onlinelearning)

Which credentials do I use to login to Blackboard Learn?

   As a staff member, for the pilot, you will use your UTech, Ja. Network username and an
   initial password which will be communicated to you via email.
What if I do not have a UTech, Ja. Network account? Contact your Supervisor to verify whether your information has been submitted to the Human Resource Department. If this was already done, contact the Human Resource Department to verify whether a request to create your network account was sent to the Information Systems (IS) Unit. If this was done, contact the IS Unit (876-970-5088 or EXT 2088) to obtain the status of the request. What if I do not remember my password? From the Blackboard Learn login page, select forgot password to regain access to your account. https://utechjm.blackboard.com/ Where do I go to login to Blackboard Learn? You will be able to access Blackboard Learn from the UTech, Ja website via Quick Links. You may also access it by selecting the link below, then selecting the ‘Bb’ icon: https://www.utech.edu.jm/onlinelearning If my module is one of the modules being piloted, how do I access my module on Blackboard Learn? Once you have been timetabled to teach the module by your Timetable Officer or the Scheduling Unit, you will be automatically enrolled unto your module on Blackboard Learn before classes commence (providing you have a network account). If my information was not submitted to the Scheduling Unit before the semester starts, how would I gain access to my module on Blackboard Learn? Request that your Programme Director/Leader forward your name to the Scheduling Unit for you to be assigned to your class (es). Once the Scheduling Unit has updated your information, you will be enrolled unto your module within 24 hours.
How will I know how to use Blackboard Learn?
  On the university’s main Online Learning page, https://www.utech.edu.jm/onlinelearning
  you will find links to several resources including outlines, videos and guide sheets to help
  you become comfortable with navigating the system. Please explore the site to begin
  your personal orientation.

   The Office of Distance Learning (ODL) will also be conducting orientation sessions for
   January 5- 29, 2020, so look out for the notices on the UTech Broadcaster or your email.

Who do I contact if I am experiencing challenges on the    Blackboard Learn?

       Please contact Tier 1 Support at Tier1support@utech.edu.jm
If I am interested in offering my module in AY2020, SEM3 on BBL, what should be my next
steps?
ANSWER: Send a request stating the module you wish to add content for to ODL,
copying the Project Manager (dgaylewalker@utech.edu.jm). Arrangements will be
made to create your module on BBL and you will be notified accordingly.
How will non-editing tutors have access to Blackboard Learn?
Non-Editing teachers i.e. lecturers who are not Content Developer for the module should be
scheduled for their classes via the University Timetable. Once scheduled, they will be given
access to their module occurrence (s) before classes commence. For the pilots, they will
receive an email notification with instructions for accessing the Blackboard Learn platform.
Links to resources designed to assist lecturers navigate Blackboard Learn will also be provided.
Will the students get an intro video on how to use BBL?
Yes. Starting January 5th we will engage these students and will be having
onboarding sessions with them so they understand the platform. Introductory videos
and documentation will be available and will shared via the portal. Some videos are
already on the website via the Office of Distance Learning Web-Page
(http://www.utech.edu.jm/academics/odl/blackboard-learn-ultra-experience-
tutorials-instructors)
More information will also be placed on the landing page created for LMSs as well as
the ODL page. We hope to replace all references to Utech Online on the website
with the following:
https://www.utech.edu.jm/onlinelearning
How will students know how/when to access their BBL online classes?
Student timetables are already updated to indicate where their classes will be held
(where the module is part of the BBL pilot – see example below). They will be
receiving personal notification messages via their portal once they select one of the
BBL pilot modules advising how to access etc (see attached).If you have any further questions, please advise.
ADDING CONTENT TO BLACK BOARD ULTRA
1. The University will create a template for you to add your content to and then when
your content has been added the template will be copied and the students will be
enrolled at the appropriate time
2. All content, files, and videos should be added to the institution’s content collection.
This helps to reduce the size of the file and ensures that the content is copied for the
next offering of the module.
TIPS for Adding content:
1. Content type: The recommended content type is PDF instead of word documents
2. Adding content: All content should be uploaded to the Content Collection folder and
then Institution content. This will help when the course is to be migrated in the
future
3. Create a learning module for each unit to add the information in
4. Delete file types in the file names and version numbers by editing the name
Accessing the Institution’s Content Collection
1. Click on tools
2. Click on Content Collection
3. Click on Institution Collection
4. Click on the folder with the name of your Faculty/College
5. Then click on the folder with the name of your school
6. Then click on the folder with the name of your module7. If you do not find a folder with the name of your module please contact ODL 8. Then upload the documents to the folders that exist under your module name- one is for files and one is for videos 9. Please note all documents, word documents, power points etc should be saved in a pdf format. This helps to reduce space and it makes the document readable for students especially when they are using a mobile device
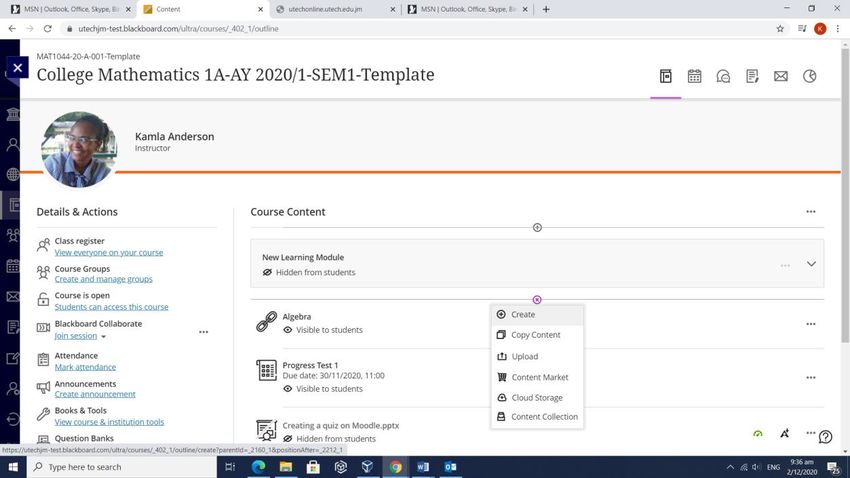
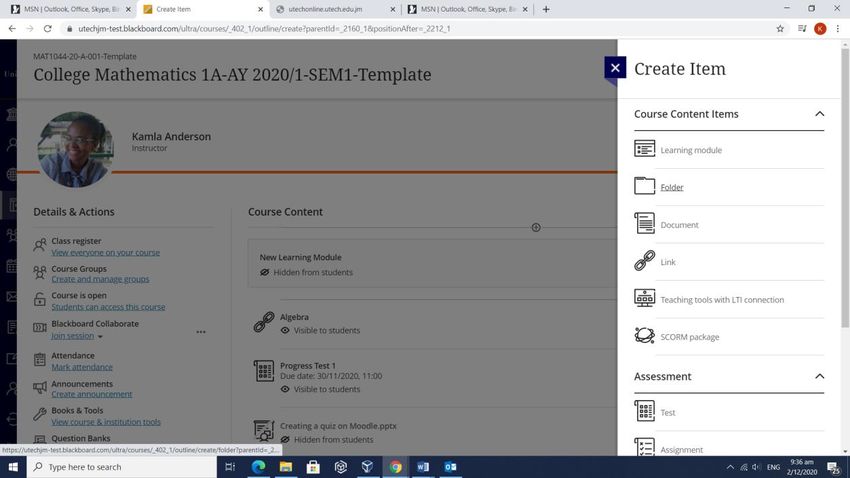
When adding content for each unit please create a learning module and then add your
content there.

   1. Course content click on the purple + sign
   2. Then click create
   3. Then click Learning Module
Add content within the Learning Module
In the Course Content page, you can create a document or page to present a combination of
content. For example, you can include introductory text for a lesson, an audio file of a
lecture, and an image. When students select the document title, the materials you added
are all presented together on one page. Students see the content just as you see it, without
the editing options.

Select the plus sign wherever you want to add a document. In the menu, select Create to
open the Create Item panel and select Document. The New Document page opens.

You can also expand or create a folder or learning module and add a document.
You can also read