DEEPSKYCAMERA FOR ANDROID
←
→
Page content transcription
If your browser does not render page correctly, please read the page content below
DeepSkyCamera for Android
App for astrophotography

Manual and reference

Based on version 1.6.0

July 2020

Michael Seeboerger-Weichselbaum

        https://www.youtube.com/channel/UCHIUeFGXThOF0GJ5aijnr8w/

        https://www.facebook.com/groups/745867855869000/

       https://www.instagram.com/deepskycamera/

       https://www.deepskycamera.de/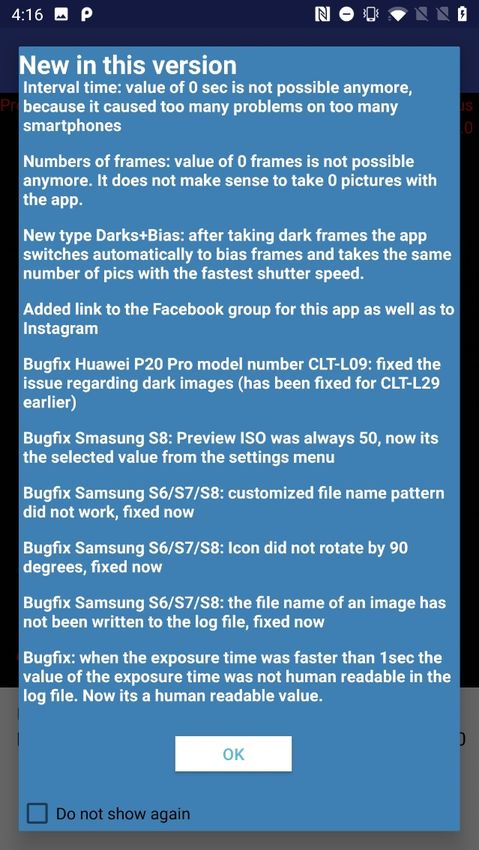
Table of contents
1.      Introduction..................................................................................................................................... 4
     Overview.............................................................................................................................................. 5
     How the DeepSkyCamera app works .................................................................................................. 5
     Astrophotography ............................................................................................................................... 7
        Astrophotography in general .......................................................................................................... 7
        Stacking software ............................................................................................................................ 7
        Postprocessing................................................................................................................................. 7
2.      Installation ....................................................................................................................................... 9
3.      Updates ........................................................................................................................................... 9
4.      First launch of the app..................................................................................................................... 9
5.      Main page of the app .................................................................................................................... 10
     Overview............................................................................................................................................ 10
     The left slider ..................................................................................................................................... 13
     The right slider for focus ................................................................................................................... 14
     Focus lock/unlock .............................................................................................................................. 15
     Grid .................................................................................................................................................... 15
     Zoom.................................................................................................................................................. 17
     The control bar with control elements ............................................................................................. 17
     Format ............................................................................................................................................... 18
     Type ................................................................................................................................................... 18
     Exposure time.................................................................................................................................... 18
     ISO ..................................................................................................................................................... 19
     Interval time ...................................................................................................................................... 19
     Frames ............................................................................................................................................... 20
     Whitebalance .................................................................................................................................... 20
     Aperture ............................................................................................................................................ 20
     Focal length ....................................................................................................................................... 20
6.      Shutter button ............................................................................................................................... 20
     Start ................................................................................................................................................... 20
     Stop.................................................................................................................................................... 21
7.      Internal file browser and displaying pictures ................................................................................ 22
     Overview............................................................................................................................................ 22
     Sorting ............................................................................................................................................... 22
     Displaying images .............................................................................................................................. 23
8.      Menu ............................................................................................................................................. 24

                                                                                                                                                               2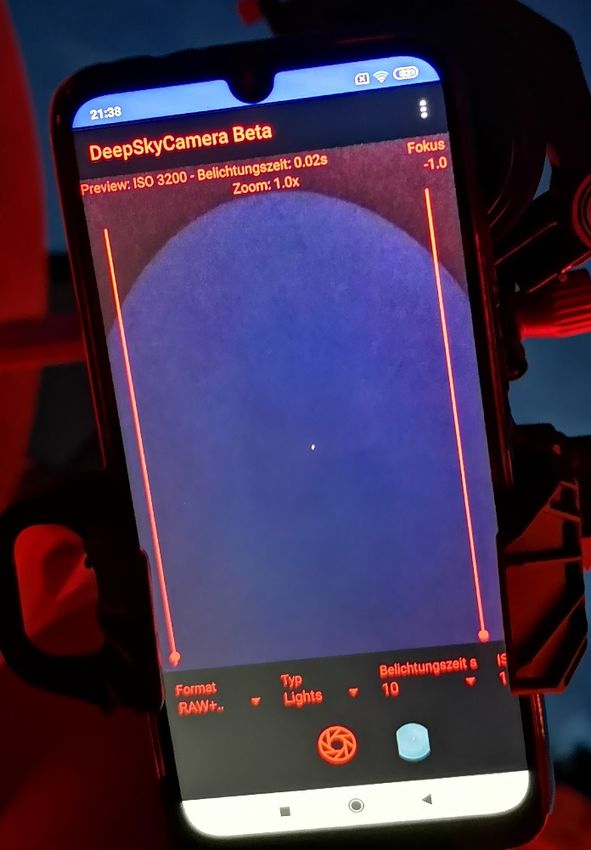
Settings .............................................................................................................................................. 25
   Focus.............................................................................................................................................. 26
   Preview exposure time .................................................................................................................. 26
   Preview ISO.................................................................................................................................... 27
   Preview Aperture f ........................................................................................................................ 27
   Preview Focal length mm .............................................................................................................. 28
   Delay .............................................................................................................................................. 28
   Digital zoom ................................................................................................................................... 29
   Display always on .......................................................................................................................... 30
   Noise reduction ............................................................................................................................. 30
   Nightmode ..................................................................................................................................... 30
   Action ............................................................................................................................................ 30
   Play Sound ..................................................................................................................................... 31
   Show image thumbnail .................................................................................................................. 31
   File name pattern .......................................................................................................................... 31
   Logging .......................................................................................................................................... 32
   Write errors to log file ................................................................................................................... 32
   Path to the images......................................................................................................................... 32
Info .................................................................................................................................................... 35
Supported devices ............................................................................................................................. 36
Report your phone ............................................................................................................................ 37
Help ................................................................................................................................................... 37
   About ............................................................................................................................................. 38
Manual............................................................................................................................................... 38
   Complete handbook ...................................................................................................................... 38
   PDF................................................................................................................................................. 38
YouTube............................................................................................................................................. 38
Facebook ........................................................................................................................................... 38
Instagram........................................................................................................................................... 38
Privacy policy ..................................................................................................................................... 38
Exit ..................................................................................................................................................... 39

                                                                                                                                                           3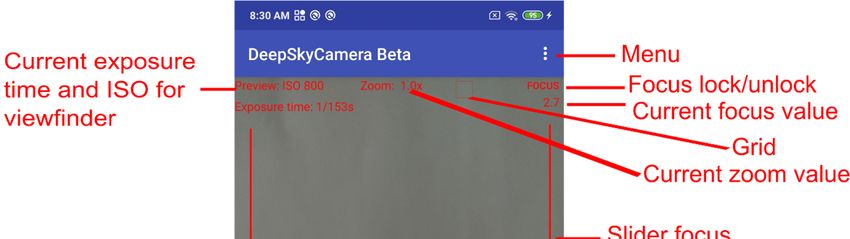
1. Introduction
DeepSkyCamera for Android is an app for astrophotography. You should be familiar with
astrophotography in general. The most important thing:

Astrophotography is not a 1-click solution!

If you are not familiar with astrophotography please read a little bit about astrophotography before
using this app (see chapter "Astrophotography" below which provides links on the Internet).

The image below shows Crab nebula M1 in constellation Taurus – taken with DeepSkyCamera app,
Xiaomi Pocophone F1, telescope Takahashi TOA 130, 1000mm focal length, APM Lunt 13mm 100
degrees eyepiece, 112 light frames each 35 sec, ISO 800, 65 min total exposure time, additionally
dark frames, bias frames and flat frames. Processed with DeepSkyStacker, Fitswork, Photoshop CC

                                                                                                       4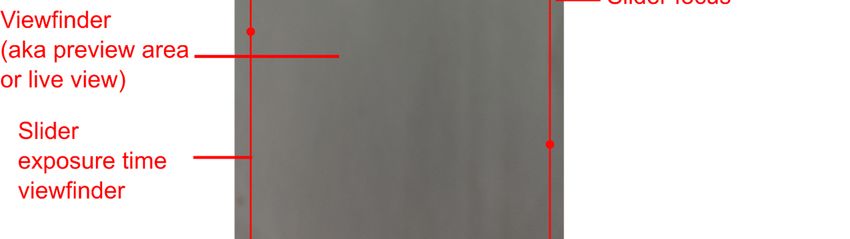
Overview
The app uses the camera sensor on the back of your smartphone. You can set up an imaging plan to
take pictures, including flat frames, darks frames and bias frames. The procedure is very similar to
astrophotography with a DSLR or a dedicated astro camera with a CCD/CMOS sensor. The app takes
the pictures – post processing (stacking, editing, processing) must be done with separate software
(DeepSkyStacker, Sequator, Astroniier, Photoshop, Gimp, PixInsight, AstroPixelProcessor, etc.). With
the upcoming Pro version you can do also the post processing.
This manual describes the free version of DeepSkyCamera for Android. Features:
Preview area to point to the stars
Focus methods: manual, auto, infinity, hyperfocal
Focus lock/unlock
Exposure time and ISO of viewfinder can be set independently from the exposure time and
ISO of the images
Synchronize exposure time of the images with exposure time of the live view
Set up a plan for your imaging session
Supported file formats: JPEG and RAW (DNG)
Manual settings:
o ISO
o Exposure time
o Interval time between two pics
o Number of pics
o Delay before the imaging session starts
o Whitebalance
You can store the images in the gallery or in a directory on the phone
Save pictures also in SD card, if your phone supports SD cards.
Night mode (black background and red text color) and daylight mode (white background,
black text color)
Whitebalance manually and automatically
Zoom function (not available on Samsung S6/S7/S8 and Note 5)
Grid
variable aperture (if supported, f.i. Samsung S9, S10, Note9, Note 10)
variable focal length (if supported)
Internal file browser with sorting functions
No ads
How the DeepSkyCamera app works
DeepSkyCamera app works different. The settings of the viewfinder are totally independent from the
settings of the images. This can be confusing but its essential. The advantage is that you can see the
brightest stars in the viewfinder when you set ISO to 12800 (or similar) and exposure time of the
viewfinder to 1 sec. This is also an advantage when the phone is attached to a telescope. With some
devices you can see the brightest objects in the viewfinder!
The images below shows Orion nebula M42 in the viewfinder of the app. The smartphone was
attached to a Taskahashi FS 60 refractor. You take the pictures with other values (f.i. ISO 800 and 30
sec shutter speed).
5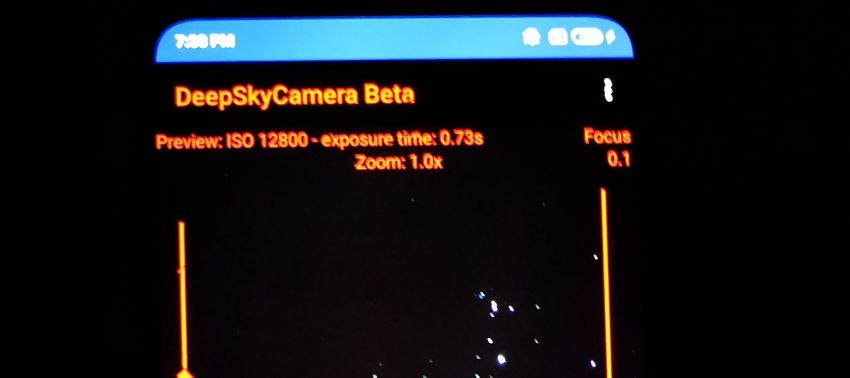
After taking light frames, dark frames, bias frames and flat frames you have lots of files. The image
files must be transferred to a computer. You must stack and process these files with separate
software.

                                                                                                        6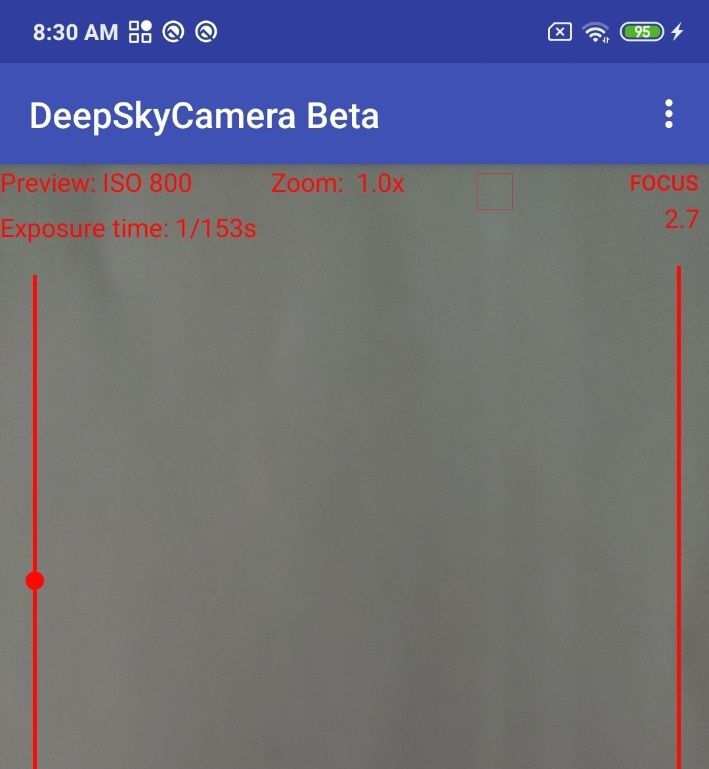
Astrophotography
This manual is NOT an introduction to astrophotography. This manual explains NOT what flat frames
are or how to process the image files. When you are not familiar with astrophotography you’ll find
here some links which explains all the necessary things.

Astrophotography in general
https://astrobackyard.com/beginner-astrophotography/

http://astronomyonline.org/Astrophotography/Introduction.asp?Cate=Astrophotography&SubCate=
AP01

https://loadedlandscapes.com/intro-to-astrophotography/

https://www.bhphotovideo.com/explora/photography/tips-and-solutions/how-to-do-basic-
backyard-astrophotography-part-i-introduction

Stacking software
DeepSkyStacker (DSS)

http://deepskystacker.free.fr/

Sequator

https://sites.google.com/site/sequatorglobal/

Fitswork
https://www.fitswork.de/software/

Astronizer

https://stackmatik.hellstorm.de/index.php/en-us/2-uncategorised/4-astronizer-astronomical-image-
processing

Nina

https://nighttime-imaging.eu/

PixInsight

https://pixinsight.com/

Astro Pixel Processor

https://www.astropixelprocessor.com/

Theli

https://www.astro.uni-bonn.de/theli/

StarTools

https://www.startools.org/

Postprocessing
Gimp

                                                                                                 7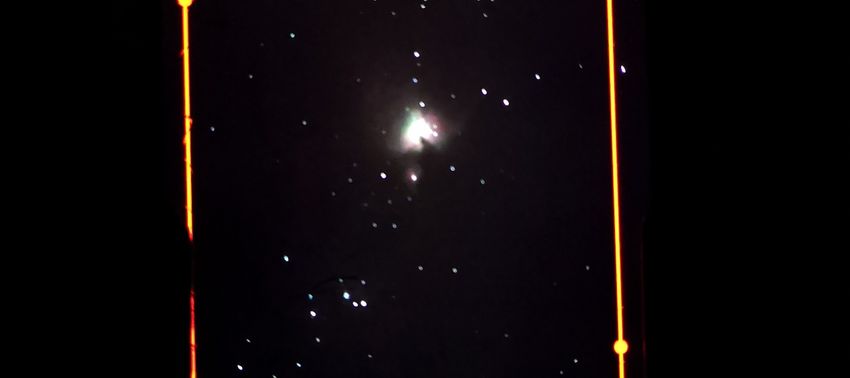
https://www.gimp.org/

Paint.net

https://www.getpaint.net/

Raw Therapee

https://rawtherapee.com/

Lightroom

https://www.adobe.com/products/photoshop-lightroom.html

Photoshop

https://www.adobe.com/products/photoshop.html

                                                          8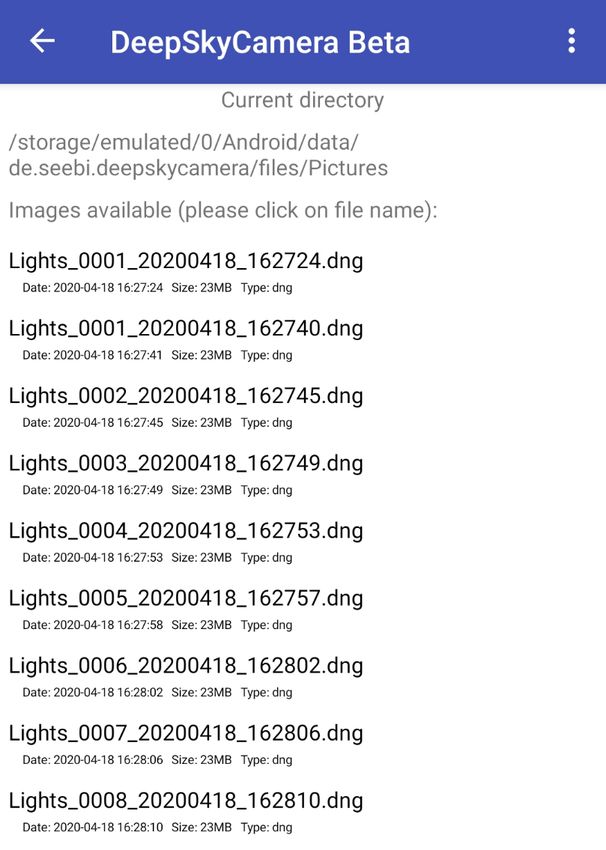
2.      Installation
The app is available at Google Playstore:

https://play.google.com/store/apps/details?id=de.seebi.deepskycamera

If you have a Huawei or Honor smartphone you can install the app from Huawei AppGallery:

https://appstore.huawei.com/app/C101316097

3.      Updates
Updates of the app are only available at Google Playstore or Huawei AppGallery. You will be notified
by Playstore or AppGallery, when a newer version is available.

4.      First launch of the app
When starting the app for the first time, you must grant some specific rights to the app, such as for
accessing the camera sensor. Whithout granting these rights, you cannot use the app.

You’ll see the welcome screen and a dialog which tells you what‘s new in this version. If you have a
Samsung, Nokia, OnePlus, Huawei, Honor or Xiaomi device, you‘ll get a dialog which gives you some
information. Please read carefully.

All the dialogs with blue background have an option at the end "Do not show again". If you don’t tick
the box, the dialog appears again after restart. On some devices with a small display, you must scroll
down to see the option "Do not show again".

                                                                                                        9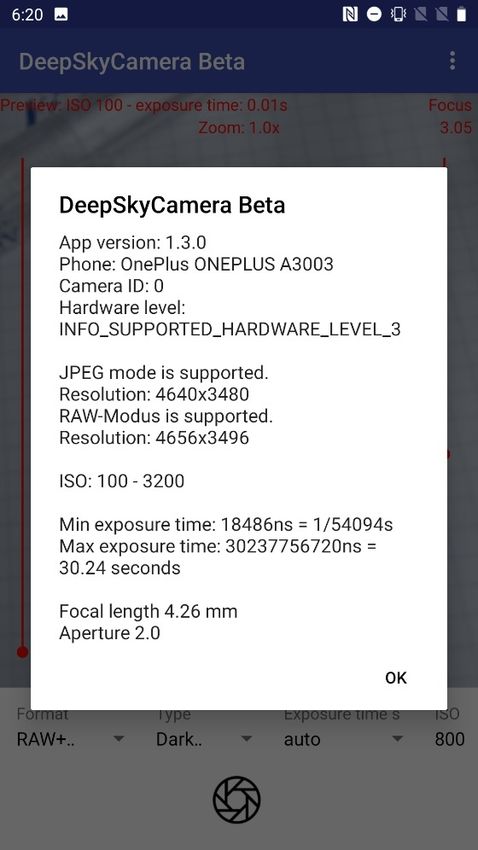
5.      Main page of the app
On the main page, you’ll find everything you need to take pictures. Important configurations and
settings are in the menu "Settings".

Overview
In the middle, you’ll find the viewfinder. This is the viewfinder and shows the live stream of the
camera sensor. It‘s also called preview area or live view.

It is possible that the preview area is black on some devices after start (see picture below). This is not
an error. The exposure time of the viewfinder is set to 0 sec – thats why it‘s dark on some devices.

                                                                                                       10
There is a simple solution: Move the slider on the left up. The slider on the left controls the exposure
time ONLY OF THE VIEWFINDER. You should see something now.
The following picture explains the elements on the main page.
11On the main page are these elements:
- In the middle of the main page is the viewfinder. This is a preview area which shows the live
stream from the camera sensor
- The slider on the left controls the exposure time ONLY FOR THE VIEWFINDER, not for the
pictures you take later when pushing the shutter button.
- The slider on the right controls the focus
- Above slider is the focus value
- Below the preview area is the control bar. Here are the control elements you need for taking
pictures (ISO, number of frames, interval time etc.).
You can move the bar from right to left. More control elments appear, when you move the
control bar.
- Below the control bar, you’ll find the shutter button, which starts or stops the imaging
session
- Right hand of the shutter button is the icon, which shows the latest taken picture. The icon is
not visible at the first start.
- Upper right corner is the app menu (three dots). Here are the settings, manual, supported
phones etc.
- Left to the word "FOCUS" are the current exposure time and ISO value of the viewfinder.
- Below is the current zoom value.
- Right to the zoom value is the grid icon.
12The left slider
With the slider on the left you can adjust exposure time of the viewfinder. This is necessary, because
the night sky is dark, and you must increase the exposure time to see some bright stars on the
viewfinder. The moon and the sun (with filter!) are very light, so you need to decrease the exposure
time on the viewfinder to see the details.
Note: The slider on the left is not available on legacy devices.
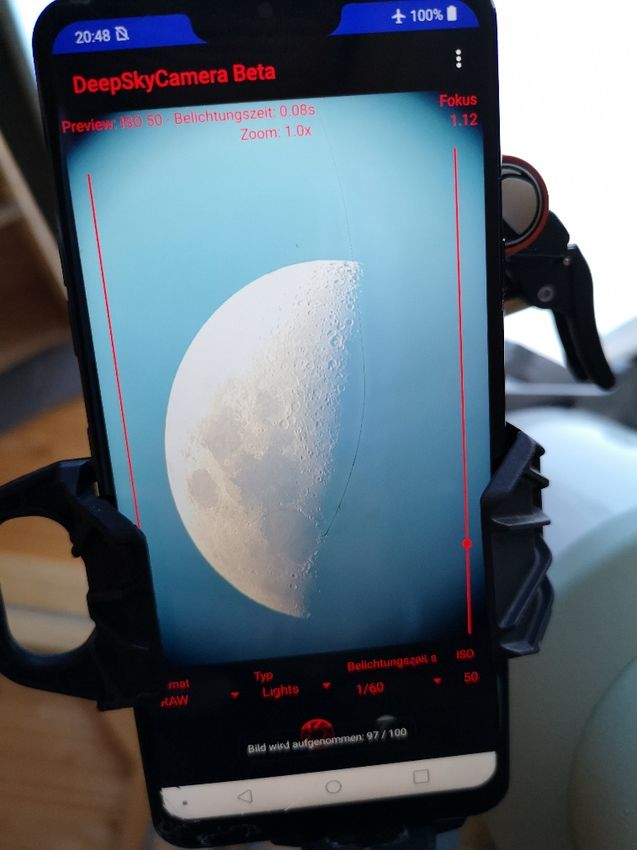
You can also change the ISO value ONLY FOR THE VIEWFINDER in the menu "Settings". The picture
below shows the moon with a telescope – ISO is set to 50 and exposure time is 0.08s.
Note: The exposure time on the viewfinder does not affect the exposure time of the pictures in the element
"Exposure time" of the control bar.
At night you should set the exposure time to a high value by moving the slider up. Also set ISO to a
high value on the "Settings" page. The picture below shows a star in a telescope with ISO 3200 and
0.02 sec exposure time at the viewfinder.
Note: The value of the exposure time of the viewfinder is stored on your device. When you restart the app
the value will be loaded and set.
By default the time range of the slider is between 0 sec and 1 sec. This means: When the slider is at
the top, the maximum exposure time of 1 sec is set. For moon and sun (only with solar filter!) you
need a finer time range, otherwise they will be overexposed. You can change the time range of the
slider between 0 sec and 1/10 sec, 0 sec and 1/100 sec, 0sec and 1/1000 sec and finally between 0s
and 1/10000 sec. Read chapter 8 "Settings: Preview exposure time" and how to change the time
range.
13Note for Samsung, Xiaomi and OnePlus devices
On some Samsung phones (f.i. S9, S10) as well as on Xiaomi and OnePlus 7 devices the left slider is disabled
during the imaging session. The slider will be enabled after the end of the session. After start of the app please
refocus otherwise the pictures can be blurry.
The right slider for focus
The slider on the right adjusts the focus of the viewfinder and for the pictures you take later. When
you move the slider up and down, the focus changes.
Note: The right slider is not available on legacy devices, or when you’ve set the focus method to "Auto",
"Infinity" or "Hyperfocal" in menu "Settings". Slider is also not available on Samsung S6/S7/S8 and Note 5.
Note: On some Samsung phones (f.i. S9, S10) as well as on Xiaomi and Oneplus 7 devices the right slider is
disabled during the imaging session. The slider will be enabled after the end of the session.
When you try to shoot the moon with a telescope, then it‘s easy to focus, because the moon is light
enough. But to get the correct focus for stars, it is not that easy. You can do it by follwoing these
steps:
1. Set ISO of the viewfinder to the highest value, e.g. 3200 or 6400 (go to the "Settings" menu).
Increase the exposure time of the viewfinder via the left slider up to 1 sec.
2. Point your phone to a bright star. You should see the star at the viewfinder.
3. Put two fingers on the preview area and zoom in to the star.
4. Now adjust the focus, by moving the right slider up or down until you get a good image of the
star. The star must be a pinpoint star. The focus value is shown above the right slider
5. Take one or two test images. Check the images, if the stars are pinpoint stars or not. If not, adjust
the right slider a little bit.
146. Take one or two test images again. Check the pictures again. If necessary adjust the right slider
again.
7. Repeat step 4 – 6 until you get pinpoint stars. Please be patient. Getting the correct focus can
take some minutes. The procedure is necessary.
The app provides a table with focus values for various devices. You’ll find the table at: app menu ->
Focus -> Focus help. If your phone is listed, try the advised value from table. If your device is not
listed you must do experiments yourself. If you found the correct focus value for your device, please
report the value to the developer of the app (go to menu -> Report your device). The developer adds
your phone and the focus value to the focus table.
Note: Focus value is stored on your device. When you restart the app, the focus value will be loaded and
set.
Focus lock/unlock
You can lock the focus. Thats really helpful because you can touch the focus slider by accident. When
you lock the focus the focus slider is disabled and you can not change the focus value.
You can lock focus in this way:
Tap the word "FOCUS"
The word is marked with an X and the focus slider is disabled.
If you want to unlock focus please tap again the word "FOCUS". The X is gone and the focus slider is
visible. You can now change the focus if you want.
Note: Focus lock/unlock is not available on Legacy devices. Legacy devices do not provide manual focus.
Function is also not available on Samsung S6/S7/S8 and Note 5.
Grid
You can put a grid at the viewfinder. This is very useful when you want to align the phone to the
horizont, a roof etc. The image below shows a rough grid.
15The grid is available in three forms:
No grid (default)
Rough grid
Fine grid
The viewfinder does not show a grid by default. The grid icon shows only the outer border.
To get the rough grid you must tap the grid icon. You see the rough grid on the viewfinder. The icon
changes.
To get the fine grid please tap again the icon.
16To turn grid off tap again the grid icon.
Note: Grid is available on Android 8 and higher.
Zoom
You can zoom in at the live view to get the object bigger. This is useful to get the correct focus value.
On the other hand you can take images with the zoom.
The current zoom value is shown at the top of the viewfinder:
When you want to take images with the zoom you must first go to the "Settings" menu. Tap on the
option "Digital zoom". You have three options:
Zoom off
Zoom at the viewfinder only (default)
Zoom at viewfinder and images
When you want to take pics with zoom you must select the third option. You can zoom in with your
fingers at the view finder and the image is taken with the same zoom value.
Pay attention that the zoom is a digital zoom. The quality of the pic can get worse because its not an
optical zoom.
Note: Zoom function is only applicable to JPEG files, not to RAW/DNG files.
Note: Zoom function is not available on Samsung S6/S7/S8 and Note 5.
The control bar with control elements
You’ll find the control bar above shutter button. The bar contains control elements, which are
necessary to setup the imaging session. You can move the bar from right to left with your finger.
Note: The settings of the control bar are stored on your device. When you restart the app the settings will
be loaded.
The picture above shows the first part of the bar. The bar contains more elements, but you must
move the bar from right to left. When you move the bar more elements will appear.
17In control bar you can set these control elements:
- Format of the images
- Type of the images
- Exposure time in seconds
- ISO
- Interval between two pics
- Number of frames
- Whitebalance
At the end of the bar are aperture and focal length. These two values cannot be changed. It‘s for
information only.
Format
You can choose between these formats:
- RAW: You take pictures in RAW with file extension .dng
- RAW+JPEG: You take pictures in RAW and in JPEG
- JPEG: You take pictures in JEPG with file extension .jpeg
Note: There are smartphones on the market, which do not provide RAW (especially legacy devices). On
those phones you can only take pictures in JPEG. The app detects automatically, what your device supports
and changes the values in the control bar "Format".
Type
You can choose between these types:
- Lights: These are "normal" pictures of the stars, moon, etc.
- Darks: These are so called dark frames. The pictures must be taken with the same exposure
time as the lights. You must cover the lens of your smartphone to take dark frames. The dark
frames are useful, when you want to stack your images with separate software
(DeepSkyStacker, Sequator, PixInsight, Astronizer, etc.). You can reduce the noise with dark
frames.
- Bias: These are bias frames. When you select "Bias" the exposure time is automatically set to
the fastest shutter speed available (e.g. 1/90000s or similar). You must cover the lens of your
smartphone to take bias frames. The bias frames are useful, when you want to stack your
images with separate software (DeepSkyStacker, Sequator, PixInsight, Astronizer, etc.). You
can reduce the noise with bias frames.
- Darks+Bias: This is a combination of dark frames and bias frames. The app takes first the dark
frames and then changes to bias frames with fastest shutter speed automatically. This saves
time.
- Flats: They are great in combination with a stacking software to reduce the vignetting, dust
on the sensor, etc. You need a flat field box or a T-Shirt for flat frames.
Exposure time
The control element "Exposure time" contains a list of available exposure times in seconds. The
values depend on the phone. Lots of smartphones provide max exposure time of 30 or 25 sec, other
18provide faster exposure times (8s or faster 1/4 sec). The list is dynamic. The app detects max
exposure time of your phone and creates the list. For pictures of the night sky you should choose the
highest possible value (20sec, 30 sec, etc.). For moon and the sun (with filter!) fast shutter speeds
(1/10 sec and faster) are better, otherwise the moon or the sun will be overexposed. "Auto"
exposure time is great only for sunsets, timelapse videos etc.
"Auto" is mostly not suitable in astrophotography. You can use is during daylight, sunsets etc. For
deep sky and night sky images you should the longest shutter speed available (f.i. 30 seconds). Only
for moon and sun images (sun always with appropriate solar filter!) you can set fast shutter speeds.
The entry "Preview" is useful when taking images of moon and sun (sun always with appropriate
solar filter!). This function synchronizes the exposure time of the images with the exposure time of
the viewfinder. The images will have the same shutter speed as the viewfinder.
Because moon and sun are very light objects you can change the time range of the preview exposure
time slider. By devault the time range of the slider is between 0 sec und 1 sec. There are more time
ranges available:
- between 0 sec and 1/10 sec
- between 0 sec and 1/100 sec
- between 0 sec and 1/1000 sec
- between 0 sec and 1/10000 sec
You can change the time range in the „Settings“ menu (option: „Preview exposure time“). When you
set the time range between 0 sec and 1/100 sec the max shutter speed you can set on the left slider
is 1/100 sec. Now you can adjust the shutter speed of the viewfinder until you get a nice pic of the
moon or the sun .
Check chapter 8 „Preview exposure time“ how to change the time range.
Note: On legacy devices only "Auto" is available.
When you select "Auto" exposure time in spinner "Exposure time" ISO is set to "Auto". This is a
behavior of the camera sensor on Android. Google defined that "Auto" means "Auto" exposure time
and "Auto" ISO. This can not be changed.
ISO
This is the sensitivity of the camera sensor. The normal term should be "Gain" but ISO is a term from
the analogue world. The default is 800. Because of the wide aperature of the smartphones (mostly
between f 1.5 and 2.5), you should not go higher than 800 or 1600. The values are device
dependend. The app detects, which values the camera sensor supports and creates the list
dynamically.
Note: On legacy devices only "Auto" is available.
The entry "Preview" means that the ISO for the images is the same ISO value of the viewfinder.
When you select "Auto" exposure time ISO is set to "Auto". This is a behavior of the camera sensor
on Android. Google defined that "Auto" means "Auto" exposure time and "Auto" ISO. This can not be
changed.
Interval time
The interval time between two pictures is like a waiting period. During the waiting period the app
reads the data from sensor and writes the data to your internal or external memory. The interval
time depends on your phone. The default is 5 sec and works on most of the phones. But on some
19devices, you must increase the interval time (on OnePlus 3 up to 30 sec and on Huawei P20 Pro with
Android 8.1/9 up to 20 sec and 5 sec with EMUI 10/Android 10). If the interval time is not long
enough the data will not be written on your memory. Please try it on your phone to figure out what
is the best interval time on your device.
Frames
This is the number of pictures you want to take. The default is 100. The range of possible values is
from 1 to 9999.
Whitebalance
In the control element "Whitebalance" you can set the color temperature. The color temperature is
listed in K (Kelvin). The list in the field "Whitebalance" is created dynamically. The values depend on
the phone. The app detects on startup, which values the camera sensor supports and creates the list.
Note: On legacy devices only "Auto" is available.
Aperture
The spinner contains the supported apertures of the camera sensor.
The values depend on the phone. Only a few phones provide a variable aperture. These are: Samsung
S9, S10, Note 9, Note 10 and Huawei P40 Pro (Juli 2020). Most of the phones don’t support a variable
aperture. The value can not be changed. Its for information only.
This option affects the images. If you want to change the aperture of the viewfinder go to menu
"Settings".
Focal length
The spinner contains the supported focal lengths of the camera sensor.
The values depend on the phone. Only one phone provides a variable focal length: Huawei P40 Pro
(Juli 2020). Most of the phones don’t support a variable focal length. The value can not be changed.
Its for information only.
This option affects the images. If you want to change the focal length of the viewfinder go to menu
"Settings".
6. Shutter button
The shutter button is the most important button.
Start
20Tap on shutter button and the imaging session starts. The app reads the settings from the control
bar. During exposure time a progress bar comes up and shows the progress. You can stop the
imaging session any time by pressing the shutter button again. Normally it‘s not necessary but when
you’ve made a mistake (e.g. set wrong ISO or wrong exposure time) you can stop the session. Please
be patient. On some devices, it takes a couple of seconds until the session will stopp.
During exposure time, all elements on main page are locked. The app seems to be frozen – but it
isn’t. The app is busy and is taking pictures. You cannot change ISO, exposure time, etc. and you
cannot go to the menu. If you need to call the menu, or you want to change the settings in the
control bar, you must stop the imaging session by tapping the shutter button.
On some devices (especially Huawei, Honor, Xiaomi, Redmi, Samsung, OnePlus) you should always
turn the display on. In menu "Settings" of the app is an option, where you can turn the display always
on. Without this option the display turns off automatically after 15 – 30 sec (depends on your
phone). The result is that the operating system sets the app into a hibernate mode. In hibernate
mode the app does not operate and takes no pictures. That means, no image files will be written!
You can test that very easily. Take a couple of pics (e.g. 20 frames) with max shutter speed and wait
until the display shuts off. Wait again 60 – 120 sec. Turn display on and check how many pics have
been taken. When you miss frames turn "Display always on".
Note: When you take pics of the stars, set the app into night mode (black background with red text color).
You can set the night mode in menu "Settings" of the app (three dots upper right corner).
Stop
You can stop the imaging session at any time. Please tap shutter button once and stop request is
send to the camera sensor. But please be patient. On some phones (Samsung, Xiaomi) it takes a
couple of seconds until the imaging session is stopped. If you are impatient and you "hammer" on
the button DeepSkyCamera app can stop or crash due to lots of requests to the camera sensor. On
other phones (Huawei, Honor) the imaging sessions will be stopped immediately.
It is enough to tap button only once. Please wait until the imaging session has ended and the app is
ready for the next session. Please be patient!
217. Internal file browser and displaying pictures
The pictures you‘ve taken can be displayed within the app. The app contains a file browser to browse
and to view the images. Right next to the shutter button appears an icon, which is a thumbnail of the
last taken image. Tap on the icon and you’ll get a list of images.
Overview
The file browser lists all the files from a directory.
You can scroll the list.Bewlo the filename you can see some additioonal data:
Date and time of the image was saved
File size in MB
File type
Sorting
You can sort the list of files. Tap on the three dots upper right corner and you’ll see only one entry:
"Sorting". Tap on the entry and a new page pops up.
22In the upper field you can select the type of sorting:
By file name
By date and time
By file type
By file size
In the lower field you can select the direction of sorting: ascending or descending.
I use very often "by date and time" and "descending". This means that the latest picture is at the top
of the list.
Note: To go back to the file list, tap the back arrow upper left corner.
Displaying images
Tap on the filename and the image will be displayed. Please be patient. When you tap on DNG files, it
can take up to 30 seconds to load and display the images. The reason is, that the images in
RAW/DNG are very large (on Huawei P20 Pro: 78 megabytes!). After tapping, a circle appears, which
indicates that the file is loading. JPEG files can be loaded and displayed faster than DNG files, because
they are much smaller.
Note: To go back to the main page, tap the back arrow upper left corner.
238. Menu
You’ll get the menu by tapping on the three dots upper right corner.
These entries are available:
- Settings: You can set or change the configuration of the app
- Info: Information about the camera sensor
- Supported devices: A list with compatible devices for DeepSkyCamera
- Report your device: You can report your phone to the developer.
- Help: Help section
- Manual: The manual (what else)
- About: Information about the app
- Pro Version: Information about Pro Version
- YouTube: Link to YouTube channel "DeepSkyCamera"
- Facebook: Link to the Facebook group "DeepSkyCamera"
- Instagram: Link to #deepskycamera on Instagram
- Privacy policy: the privacy statement
- Exit: closes app
24Settings
You can set and change the basic configuration on the "Settings" page.
To go back to the main page tap the back arrow upper left corner. It is also the same procedure on
every sub page of the "Settings" page.
On devices with smaller displays you must scroll down to view more settings.
25Focus
You can choose between these types of focussing:
- Infinity
- Hyperfocal
- Manual
- Autofocus
Note: The modes are not available on every phone. It depends on your phone and camera sensor.
The mode "Infinity" tries to determine the correct focus value for infinity. It works on some devices
pretty well (such as LG) but on other devices it doesn’t work. The calculation is based on calibration
data of the camera sensor. If "Infinity" does not work on your device and the stars are blurred you
must focus manually or try "Hyperfocal".
Note: When you choose "Infinity" the slider for focus on the main page is not accessible and disabled.
Note: On legacy devices only "Autofocus" is available.
"Hyperfocal" sets the focus to a value, where the foreground is sharp as well as the background.
Note: When you choose "Hyperfocal" the slider for focus on the main page is not accessible and disabled.
Note: On some devices "Hyperfocal" is not available (Huawei, Honor, Samsung S6/S7/S8/Note 5, legacy
devices).
"Manual" is the best focus mode for astrophotography. You have full control of the focus. Switching
to "Manual" enables the focus slider on the right on the main page of the app. You can move the
slider on the main page up or down to adjust the focus.
Note: On legacy devices "Manual" is not available.
Note: On Samsung S6/S7/S8, Note 5 only "Infinity" is available.
Preview exposure time
This option sets the mode for the exposure time of the preview:
- Auto
- Manual (between 0s and 1 sec)
- Manual (between 0s and 1/10s)
- Manual (between 0s and 1/100s)
- Manual (between 0s and 1/1000s)
- Manual (between 0s and 1/10000s)
26"Manual" controls the exposure time of the preview manually. The slider on the left on the main
page of the app is enabled. Move the slider up or down to adjust the exposure time of the preview.
The current exposure time of the preview is displayed at the top of the preview.
The five options set the time range of the left slider on the main page. This is ideal for sun (only with
solar filter!) and moon shots.
The option "Auto" controls the exposure time of the viewfinder. It’s automatically set by the camera
sensor. Great for daylight images, sunsets, timelapse videos etc.
Note: Legacy devices support only "Auto".
Preview ISO
You can set the sensitivity of the sensor only for the viewfinder. The ISO of the pictures you take later
will not be affected! The values, which are available, depend on the phone and camera sensor. The
app detects the possible values and creates the list on runtime. The image below shows some values
of a phone.
Note: On legacy devices only "Auto" is available.
Preview Aperture f
You can set the aperture of the preview when the camera sensors supports variable apertures.
27The values depend on the phone. Only a few phones provide a variable aperture. These are: Samsung
S9, S10, Note 9, Note 10 and Huawei P40 Pro (Juli 2020). Most of the phones don’t support a variable
aperture. The value can not be changed. Its for information only.
This option affects the viewfinder. If you want to change the aperture of the images go to the control
bar.
Note: This option is not available on legacy devices.
Preview Focal length mm
You can set the focal length of the preview when the camera sensors supports variable focal lengths.
The values depend on the phone. Only one phone provides a variable focal length: Huawei P40 Pro
(Juli 2020). Most of the phones don’t support a variable focal length. The value can not be changed.
Its for information only.
This option affects the viewfinder. If you want to change the focal length of the images go to the
control bar.
Note: This option is not available on legacy devices.
Delay
You can set the delay in seconds before the first image has been taken. Value varies between 0 sec
(no delay) and 60 sec. Default is 0 sec.
28Digital zoom
You have three options:
Zoom off
viewfinder only (default): the zoom is only available at the viewfinder
Zoom at viewfinder and images: zoom is available for both viewfinder and the images you
take
When you want to take pics with zoom you must select the third option. You can zoom in with your
fingers at the view finder and the image is taken with the same zoom value.
Note: Zoom function is only applicable to JPEG files, not to RAW/DNG files.
Note: Zoom function is not available on Samsung S6/S7/S8 and Note 5.
29Display always on
This function turns the display always on or off. On some device it‘s necessary to turn the display
always on, otherwise the display turns off after a small period and the app is set to hibernate mode
by the operating system. In this case the app does not take images anymore. To prevent this
behaviour, you should turn the display to mode "Display always on", especially on Huawei, Honor,
Samsung and Xiaomi.
Noise reduction
This function reduces the noise in the final image without taking dark frames and bias frames. The
function is disabled by default. These are the available options:
- Off: No noise reduction (default)
- Fast: Fast noise reduction mode, recommended for interval times around 1 sec
- High Quality: best method to get the best quality of the pics with less noise. Highly
recommended.
- Minimal: Simple method with minimal effect at the final image, but fast.
This functions reduces the noise in JPEG files as well as in DNG files.
Note: This function is not available on Huawei and Honor devices.
Note: The options depend on the camera sensor. The app detects automatically the possible options and
creates the list dynamically.
Nightmode
This option switches from daylight mode (default) to nightmode.
It is highly recommended to switch to nightmode (black background, red text color), when you want
to shoot pictures from the night sky.
Action
This function tells the app what to do when the imaging session has ended. These are the available
options:
- Nothing
- Exit app
- Shut down smartphone
30The Option "Nothing" does nothing. The app is idle and waits for your input
The option "Exit app" exits the app automatically, when the imaging session has ended. This is really
useful, when you want to take pictures for a couple of hours. It saves energy.
The option "Shutdown Smartphone" shuts down the phone at the end of the imaging session. But
take care: the option is on every phone available but to shut down, the device must be rooted.
Without a rooted phone, the app will not be able to shut down the phone. A popup will appear,
saying that you do not have enough rights.
Play Sound
This option turns on or off the sound. When this option is turned on you will hear a shutter sound at
the beginning of each new taken image. Also at the end of the imaging session a sound will be
played.
Show image thumbnail
If you turn on this option, a thumbnail will appear right next to shutter button.
Note: This function is especially for devices with less RAM. Turning off this option, performance of the app
will increase. On high end smartphones with enough RAM (3 GB or more), it‘s not necessary to turn off this
option.
File name pattern
This function controls the file names of the image files. You can choose between the default file
names or customizable file names.
The option "File name pattern provided by app" creates the file names as follows:
31- 1st step: Type of the image. The type can be selected on the main page of the app in the field
"Type". It can be "Lights" for instance.
- 2nd step: A number with four digits, e.g. 0006.
- 3rd step: The current date year month day, e.g. 20190906
- 4th step: The current time hours minutes seconds when the file is generated, e.g. 010305
The default pattern generates following file name (this is an example):
Lights_0006_20190906_010305.dng.
The file extension depends on the format (which can be selected in control element "Format" on the
main page). The extension is .jpg for JPEG files and .dng for RAW files.
The option "Customized file name pattern" gives you the possibility to define your own file name
pattern. The prefix can be set on your own, e.g. "Moon" or "M31". You must set one character or
more for the prefix. The number, date and time can be selected optionally.
Note: When you choose "Customized file name pattern" you should select two options or more. If you
choose only one option ("Prefix" for instance) the file name is always the prefix name and the next picture
overwrites the previous picture. That‘s why you should choose two or more options.
Logging
This option turns logging on or off. When logging is turned on, a log file is created in the directory
where the images are stored. The name of the file is "deepskycamera_log.txt". The log file logs every
new pic, which is saved in your internal or external memory. Errors will also be logged in the file,
when you turn on the option "Write errors to log file".
Write errors to log file
When this function is turned on, errors will be written into the log file. This is useful when you’ve
detect a bug.
Path to the images
This function sets the path to the images.
32The DNG- and JPEG-Files are here per default:
Android/data/de.seebi.deepskycamera/files/Pictures
This directory is sometimes hard to find. You can set the path to "Gallery". The images are stored
under:
DCIM/DeepSkyCamera
When you take images in JPEG format, the pictures will be added to the gallery.
You can set your own directory selecting "My location". When you store the images in a different
place then "Gallery", no images will be added to the gallery app. Don’t worry they are saved anyway.
By tapping the button "Change directory" a new page shows up, where you have the possibility to:
- Select an existing directory
- Create a new directory
33Below the four icons you’ll get a list of existing directories. You can choose one of these directories. If
you want to set a directory to the current storage location of your images tap on the directory name
(e.g. "Pictures"). The app opens the directory and the choosen directory is automatically set as the
new storage location. After that go back to "Settings" page via arrow button upper left corner!
By tapping first icon, app jumps always to the root directory of your device. If you want to set a
directory to the current storage location of your images tap on the directory name (e.g. "Pictures").
The app opens the directory, and the choosen directory is automatically set as the new storage
location. After that go back to "Settings" page via arrow button upper left corner!
By tapping second icon the app opens the root directory of the SD card and shows a list with several
directories. You can select another directory by tapping a directory name. But take care: it could be
34possible that you do not have enough rights to write files on the SD card. The app tells you, when you
have missing rights. In this case choose a different directory.
Note: If you do not have a SD card installed, you will be redirected to the root directory of your
internal memory.
By tapping this icon, you will always go one step back.
The fourth icon adds and creates a new directory on your internal memory or on your SD card. A new
dialog appears, where you can enter a name for your new directory (e.g. "Moon", "Orion" etc.).
The created directory is automatically set as your storage location. Please go back via arrow button
upper left corner.
Note: The app tells you when you do not have the appropriate rights to create a directory. In this case
choose a different parent directory.
Info
This lists some technical information about the first camera sensor on the back of your device.
35Supported devices
A listing of supported devices. The app runs fine on the listed devices. The list will be updated all the
time. To have the actual information of listed devices, drag from top to bottom.
36Select a phone name to see the technical details. Important for astrophotography is a device with a
high value for exposure time (30 sec, 35 sec etc.).
Note: If your phone is not in the list and the app runs fine anyway, please report your device to the
developer, tapping "Report your phone" in the menu of the app.
Note: The list can be empty when you don’t have any internet connection or a very slow connection. To get
the latest update please refresh the list of supported devices later, when you have a faster internet
connection.
Report your phone
You can send technical data of your device and comments, questions, problems etc. It’s a
communication channel to the developer. It helps to improve the app!!!
You can send anonymously. Name and mail address are optional.
The function "Report your device" sends the file deepskycamera_hardware_level.txt to the
developer. The txt file contains technical data about the camera sensors of your phone. The file is
stored on your device in the same directory where your images are stored. The file is generated by
the app during startup and contains definitely no personal data. The file is necessary for the
developer, to get the data about the camera sensors. This helps a lot, when reporting and fixing a
bug.
If you want, you can browse to the file and view the content.
Help
This menu entry contains some help functions:
- Hints: hints about general use
37- Focus help: a description how to focus manually. The page contains a table with focus values
for infinity on various devices. If your device is not on the list, you must do experiments on
your own to figure out what the best focus value for your device is. The stars must be
pinpoint stars.
If you have figured out the value of your device and your device is not listed, please report
the value to the developer. He will add the value and the phone to the focus table.
- Tutorial: Link to the web site.
- New in this version: History of changes.
About
Information about the app.
Manual
The manual is available in two ways:
Complete handbook
By tapping on this entry, you can read the manual locally within the app. Recommended, when you
have a slow internet connection or when you don’t have an internet connection.
PDF
By tapping the PDF logo, the app downloads the latest manual from the server as a PDF file. Here,
you need an internet connection.
YouTube
By tapping the YouTub logo, the app opens the YouTube app or the website and shows the YouTube
channel "DeepSkyCamera". The channel is open to the public.
Facebook
By tapping the Facebook logo, the app opens the Facebook app or the website and opens the
Facebook group "DeepSkyCamera". You need a Facebook account to view the content of the group.
You can post your images, ask questions etc.
Instagram
By tapping Instagram logo, the app opens the Instagram app or the website and shows
#deepskycamera. You need an Instagram account to view the content of the hashtag.
Privacy policy
The privacy statement.
38Exit
This exits the app. If you don’t use the app, please exit the app, otherwise the app runs in the
background and consumes energy from your battery.
39You can also read