User Manual pDoc Signer - Topaz Systems
←
→
Page content transcription
If your browser does not render page correctly, please read the page content below
User Manual
                          pDoc Signer
                                  Version 4.3

       Copyright © 2020 Topaz Systems Inc. All rights reserved.
For Topaz Systems, Inc. trademarks and patents, visit www.topazsystems.com/legal.
pDoc Signer User Manual

Table of Contents

1.0 – Introduction .............................................................................................. 4
    1.1 – pDoc Forms Designer................................................................................................................ 4
    1.2 – pDoc Signer .............................................................................................................................. 4

2.0 – Installing/Uninstalling pDoc Signer ........................................................ 5
    2.1 – Before You Begin ...................................................................................................................... 5
    2.2 – Installing Drivers ........................................................................................................................ 5
       2.2.1 – Topaz Signature Pad Use ...................................... 5                  2.2.2 – Topaz GemView Tablet Display Use ...................... 5

    2.3 – Installing pDoc Signer................................................................................................................ 5
    2.4 – Uninstalling pDoc Signer ........................................................................................................... 6
    2.5 – Silent Installation of pDoc Signer ............................................................................................... 6

3.0 – Features of pDoc Signer .......................................................................... 7
    3.1 – Basic Operations and PDF File Manipulation ............................................................................ 7
       3.1.1 – Opening PDF Documents....................................... 7                    3.1.8 – Send As Attachment .............................................. 9
       3.1.2 – Saving PDF Documents ......................................... 7                  3.1.9 – Switching Screens ................................................. 9
       3.1.3 – Page Navigation and Zooming ............................... 7                     3.1.10 – On-Screen Keyboard ......................................... 11
       3.1.4 – Hyperlinks .............................................................. 9       3.1.11 – Opening Certified PDF documents ..................... 11
       3.1.5 – XFA Forms ............................................................. 9         3.1.12 – Closing PDF Documents .................................... 11
       3.1.6 – Cropped PDFs ....................................................... 9            3.1.13 – Exiting pDoc Signer ........................................... 11
       3.1.7 – Using Font Information Specified in pDoc Forms                                    3.1.14 – About ................................................................. 11
       Designer ............................................................................ 9

    3.2 – Filling in Form Fields ............................................................................................................... 12
       3.2.1 – Electronic Signature Box ...................................... 12                3.2.5 – List Box................................................................ 13
       3.2.2 – Text Box ............................................................... 12       3.2.6 – Combo Box .......................................................... 13
       3.2.3 – Radio Button ........................................................ 12          3.2.7 – View Properties of Form Fields ............................ 13
       3.2.4 – Check Box............................................................ 13          3.2.8 – Setting the Font Options ...................................... 14

    3.3 – Electronic Signatures............................................................................................................... 14
       3.3.1 – Insert and Sign ..................................................... 14          3.3.6 – Specifying Signature Field Options ...................... 22
       3.3.2 – Signature Capture Process .................................. 15                   3.3.7 – Signature Capture Options................................... 24
       3.3.3 – Validation of Signatures ....................................... 16               3.3.8 – Signature Information........................................... 26
       3.3.4 – View Signed and Unsigned Signature Fields ........ 20                             3.3.9 – Automatic Configuration of Certificate .................. 28
       3.3.5 – Viewing Previous Versions of a Signed Document 21                                 3.3.10 – Certificate Selection ........................................... 28

    3.4 – Sticky Note Comments ............................................................................................................ 28
       3.4.1 – Adding Sticky Note Comments ............................. 29                      3.4.3 – Deleting Sticky Note Comments........................... 30
       3.4.2 – Viewing Sticky Note Comments............................ 30

4                                                                  www.topazsystems.com                                                       Back to Top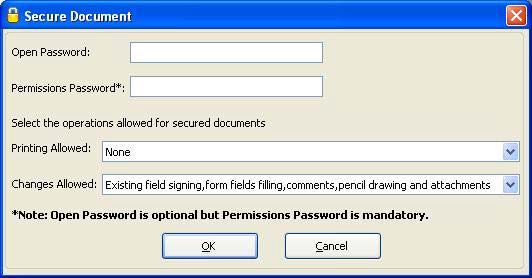
pDoc Signer User Manual

Table of Contents

    3.5 – Text Comments ....................................................................................................................... 31
       3.5.1 – Adding Text Comments ........................................ 31           3.5.3 – Deleting Text Comments ..................................... 33
       3.5.2 – Updating Text Comments ..................................... 33            3.5.4 – Editing Text Comments........................................ 34

    3.6 – Pencil Tool .............................................................................................................................. 34
       3.6.1 – Draw Pencil Mark-up ............................................ 35        3.6.3 – Settings For Using the Pencil Tool ....................... 36
       3.6.2 – Delete Pencil Mark-up .......................................... 35

    3.7 - Attachments ............................................................................................................................. 36
       3.7.1 – Adding Attachments ............................................. 37        3.7.3 – Viewing Attachments ........................................... 38
       3.7.2 – Deleting Attachments ........................................... 37

    3.8 – Stamps .................................................................................................................................... 38
       3.8.1 – Configuring Stamps .............................................. 38       3.8.4 – Inserting a Stamp into the Document ................... 41
       3.8.2 – Static Stamps ....................................................... 39   3.8.5 – Deleting a Stamp ................................................. 42
       3.8.3 – Dynamic Stamps .................................................. 40

    3.9 – Update License Key ................................................................................................................ 42
    3.10 – Securing Documents ............................................................................................................. 43
       3.10.1 – Opening Secured Documents............................. 45

    3.11 – Printing and Print Preview ..................................................................................................... 46
    3.12 – Merging and Splitting of PDF Documents .............................................................................. 47
       3.12.1 – Extract Pages ..................................................... 47    3.12.3 – Insert Pages ...................................................... 48
       3.12.2 – Delete Pages ..................................................... 47     3.12.4 – Replace Pages .................................................. 48

    3.13 – Command Line Arguments .................................................................................................... 51
    3.14 – Recent File List...................................................................................................................... 51

4.0 – Appendix ................................................................................................. 52
    4.1 – pDoc Signer Silent Installation Instructions .............................................................................. 52
    4.2 – Making pDoc Signer the Default Program for Opening PDF Documents ................................. 53

3                                                             www.topazsystems.com                                                   Back to Top
pDoc Signer User Manual

1.0 – Introduction
pDoc Signer allows signing of digital signature fields in PDF documents, and along with pDoc
Forms Designer, supports the creation and filling of form fields, in addition to providing
additional features and benefits. Signatures are captured using Topaz Systems signature
capture devices. See www.topazsystems.com.

1.1 – pDoc Forms Designer

The pDoc Forms Designer application is a graphical form tool to design PDF forms. Form
recipients can fill, sign, print and save completed forms. It supports Text Boxes, Check Boxes,
Radio Buttons, List Boxes, Combo Boxes and Electronic Signature fields.

After the PDF form is designed, the form can be secured if required using the Secure
Document feature of the pDoc Forms Designer.

1.2 – pDoc Signer

pDoc Signer is the application designed for the end-users who fill-in and sign the form. It also
supports inserting signatures using the Insert & Sign feature.

After the form is filled in and signed, the form can be secured if required using the Secure
Document feature of the pDoc Signer.

4                                www.topazsystems.com                          Back to Top
pDoc Signer User Manual

2.0 – Installing/Uninstalling pDoc Signer

2.1 – Before You Begin

    •   pDoc Signer is supported for operating systems Windows 7 and higher, and Windows 8
        Tablets and higher.

    •   Your system should have a minimum of 30 MB free space on the hard drive, in addition
        to the free space requirements for Windows.

    •   Before installing a new version of pDoc Signer, uninstall any older versions of pDoc
        Signer on your machine.

    •   pDoc Signer is offered in three different installers, each of which optimizes performance
        for the primary signature capture device:

           - Topaz signature pads
           - GemView Tablet Displays
           - Windows tablets

2.2 – Installing Drivers

2.2.1 – Topaz Signature Pad Use

Refer to the instructions provided with your Topaz signature pad for installation of SigPlus®.

2.2.2 – Topaz GemView Tablet Display Use

Download the GemView and DisplayLink Drivers from: www.sigpluspro.com. When using
pDoc Signer with GemView, SigPlus ActiveX version 4.4.0.25 or higher is required. Consult
Topaz for additional information.

2.3 – Installing pDoc Signer

Installing pDoc Signer software is accomplished by running the pDoc Signer installation file.
During installation an option will be presented to install pDoc Forms Designer as well.

5                                www.topazsystems.com                          Back to Top
pDoc Signer User Manual

After installing pDoc Signer:

    •   One can access the pDoc Signer application using “Start → Programs → pDoc Signer
        → pDoc Signer”.

    •   One can access the pDoc Forms Designer application using “Start → Programs →
        pDoc Signer → pDoc Forms Designer”.

2.4 – Uninstalling pDoc Signer

To uninstall pDoc Signer:

    •   Go to Start → Settings → Control Panel → Add/Remove programs.

    •   Select pDoc Signer and click on the “Remove” button. Follow the instructions to
        uninstall the software.

Signatures that have been placed into documents are not removed during un-installation.

Note: Deleting the pDoc Signer installation folder directly will not uninstall the software
completely.

2.5 – Silent Installation of pDoc Signer

See the appendix for details on silent installation of pDoc Signer.

6                                 www.topazsystems.com                           Back to Top
pDoc Signer User Manual

3.0 – Features of pDoc Signer

3.1 – Basic Operations and PDF File Manipulation

3.1.1 – Opening PDF Documents

PDF documents can be opened in pDoc Signer in two ways: either by using the
“File → Open” menu option or by using the “Open File” icon in the toolbar.

When you click on one of the two options above, you will be prompted to select the PDF
document to be opened. If another PDF document is already opened and there are changes to
be saved, pDoc Signer displays a message saying that “Only one document may be open at a
time. Do you want to save changes to the previously opened document?” Click on “Yes” or
“No” to proceed further and select a new document to open.

Once the file is selected, the first page of the PDF file is displayed in pDoc Signer.

If the PDF document that is being opened is secured document, refer to section 3.8.1 for further
explanation.

One can also select a PDF from the list of recently opened file list. Refer to section 3.12 for
more information.

3.1.2 – Saving PDF Documents

The PDF document opened in pDoc Signer can be saved in two ways: either by using the “File
→ Save” menu option or by using the “Save File” icon in the toolbar. The “Save” option is enabled
only when there are changes that are not yet saved.

You can use the “File → Save As” menu option to save the document to a new file.

Also, pDoc Signer prompts you to save the file (if there are any changes that are not yet
saved) when you try to open another PDF document while this document is still open or when
exiting the pDoc Signer application.

3.1.3 – Page Navigation and Zooming

One can use the page navigation buttons available on the pDoc Signer toolbar to navigate
between pages. Alternatively, one can select the page number in the Page Number list to
navigate directly to the selected page. If you are using a Windows Tablet and a licensed
version of pDoc Signer, you can use the tablet touch movements to navigate between pages. If
you swipe to the left, you will be navigated to the next page. If you swipe to the right, you will
be navigated to the previous page.

7                                www.topazsystems.com                            Back to Top

pDoc Signer User Manual

To move within a page, you can use the scroll bar available on the right side of the pDoc
Signer UI. If you are using a Windows Tablet and a licensed version of pDoc Signer, you can
use the tablet touch movements to move within a page. If you swipe up, the page will move up,
and if you swipe down, the page will move down.

To zoom in or zoom out, use the zoom buttons available in the toolbar. Every click of the zoom
button will change the percentage to the next available zoom in the dropdown list.
Alternatively, you can select the zoom percentage in the available list. The maximum allowed
zoom percentage is 400% and the minimum is 25%. If you are using a Windows Tablet and a
licensed version of pDoc Signer, you can use the tablet touch movements to zoom in or zoom
out. If you "pinch" your fingers towards each other while keeping contact with the screen, the
page will be zoomed out to the next available zoom percentage on the lower side. If you move
your fingers away from each other, the page will be zoomed in by the next available zoom
percentage on the higher side.

If you want the document to fill the entire available width of the page display, choose “Fit
Width” option in the zoom percentage drop down list. In you want the entire page to be visible
without any scrolling, choose the “Fit Page” option.

You can also set the default zoom percentage used when opening any document in pDoc
Signer. To set the default zoom, go to “Tools → Settings” and then select the “Default Zoom
Level” in the “Zoom” tab as shown below. This setting will be affected when you close the
pDoc Signer application and re-open it.

8                               www.topazsystems.com                         Back to Top

pDoc Signer User Manual

3.1.4 – Hyperlinks

pDoc Signer renders the hyperlinks present in the PDF document and allows you to click on
the hyperlinks (both internal and external) to navigate to their target. Using hyperlinks you can
link to topics within the document, external websites, downloadable files, email addresses, and
more.

In some cases, where some of the hyperlinks may not be properly recognized by pDoc Signer,
they will not be enabled.

3.1.5 – XFA Forms

pDoc Signer supports XFA documents and form field filling for the following form fields: text
boxes, check boxes, radio buttons, and simple list boxes.

3.1.6 – Cropped PDFs

pDoc Signer supports cropped PDF documents. Existing signature fields can be signed, form
fields can be filled and other features like text annotations, sticky note annotations, pencil
markups, and affixing stamps can be used with cropped PDFs. If the cropped PDF document
is a secured document, enabling and disabling of features will depend on the permissions on
the document.

3.1.7 – Using Font Information Specified in pDoc Forms Designer

pDoc Signer uses the information about the font (Font Family, Font Size, etc.) that is specified
when designing the PDF document, i.e., creating the form fields.

3.1.8 – Send As Attachment

Using this feature, the PDF that is open in pDoc Signer can be sent as an email attachment via
the default email client. If the PDF is not yet saved, you will be prompted to save the document
before you proceed with this operation.

3.1.9 – Switching Screens

If you are using a licensed version of pDoc Signer, to support system configurations that use a
GemView Tablet Display for signing a document (perhaps by someone other than the PC
user), there is a new function called screen switching that enables the PC user to move the
pDoc Signer UI window from the main PC monitor to the GemView Tablet Display. This can be
accomplished by clicking on the “Switch Screens” menu in the pDoc Signer UI. This menu item
is available only if a GemView Tablet Display is connected to the PC.

9                               www.topazsystems.com                           Back to Top

pDoc Signer User Manual

See the screenshot below for reference.

When this button is clicked, the pDoc Signer UI is moved to the GemView Tablet Display and
on the main PC monitor, you will see a window that has a button named “Recall pDoc Signer”.
This button can be used to move the pDoc Signer UI window back to the main PC monitor
anytime by the PC user. See the screenshot below for reference.

When the pDoc Signer UI is moved to the GemView Tablet Display for obtaining signatures,
the following features of the UI are grayed out and become inoperable.

             a.   File
             b.   Tools
             c.   About
             d.   The Open icon
             e.   The Save icon
             f.   Print
             g.   Print Preview
             h.   Attachments Pane
             i.   Signatures Pane

In the system configuration where the PC has two monitors and a GemView Tablet Display for
signing, pDoc Signer supports using the pDoc Signer UI with full functionality from either of the
main monitors before selecting the switch screen function to open the document on the
GemView for viewing, form filling and signing. When the pDoc Signer UI is recalled from the
GemView it appears on the monitor from which it was sent.

10                               www.topazsystems.com                          Back to Top
pDoc Signer User Manual 3.1.10 – On-Screen Keyboard The “OSK” tab in the pDoc Signer Settings window (“Tools → Settings”) allows you to specify if the On-Screen Keyboard should be made available for the signer during form-filling on a Tablet Display device. Select the option “Available for form filling” if it needs to enabled. When the On-Screen Keyboard is displayed for the first time, it is displayed on the main monitor and not on the Tablet Display. The system operator can move the keyboard manually to the Tablet Display. Subsequently, when the On-Screen Keyboard is invoked, it is displayed on the Tablet Display if it is connected. If the Tablet Display being used is the GemView 7 Tablet Display, when the On-Screen keyboard is displayed a part of it may be displayed on the main monitor while the major part is on the Tablet Display. The On-Screen Keyboard can be resized and then moved to the Tablet Display as required. 3.1.11 – Opening Certified PDF documents Certified PDF documents can be opened in pDoc Signer. Enabling and disabling of features like text comments, sticky note comments, pencil annotations and fill-in of form fields, and signing existing signature fields will depend on the permissions set during the certification of the PDF. If the PDF document was certified with any of the pDoc tools (e.g., pDoc SigEmbed SDK and pDoc Annotator Duo), then form filling and signing are enabled. 3.1.12 – Closing PDF Documents The PDF document that is currently opened in pDoc Signer can be closed using the “File → Close” menu option. If there are any changes that are not yet saved, pDoc Signer prompts you to do so before closing. 3.1.13 – Exiting pDoc Signer To exit completely from pDoc Signer, chose “File → Exit” menu option or the Red “X” button on the top right corner of the pDoc Signer application. If there are any unsaved changes in the currently opened PDF document, pDoc Signer prompts you to do so before exiting. 3.1.14 – About The “About” menu in pDoc Signer application contains three menu items: “About pDoc Signer”, “What’s New”, and “Introducing pDoc Signer”. 11 www.topazsystems.com Back to Top
pDoc Signer User Manual

“About pDoc Signer” provides info about the installed version of pDoc Signer. Clicking on the
“What’s New” menu item displays the “What’s New in pDoc Signer” PDF document in another
instance of pDoc Signer. Clicking on the “Introducing pDoc Signer” menu item displays the
Introducing pDoc Signer PDF document in another instance of pDoc Signer. This document
provides an introductory tutorial on pDoc Signer.

3.2 – Filling in Form Fields

When a PDF containing form fields is opened in pDoc Signer, pDoc Signer displays the form
fields that are available for filling at appropriate locations. The form fields that are supported
are Electronic Signature Box, Text Box, Radio Button, Check Box, and List and Combo Boxes.
Any other types of form fields present in the PDF are not displayed in pDoc Signer. One can fill
values in the displayed form fields and save the PDF to make the changes permanent.

3.2.1 – Electronic Signature Box

Place the mouse pointer on the electronic signature box. The mouse pointer will change from
default pointer to a hand sign. Now clicking on the electronic signature box will initiate the act-
of-signing. Once the act-of-signing is complete, the fields that are set to be made read-only
when this field is signed become read-only.

If the Electronic Signature Box was created or the properties were edited in any another PDF
manipulation tools, the only property that is honored by pDoc Signer is the “Mark as Read-
only”. Any other properties that have been set are ignored in pDoc Signer.

3.2.2 – Text Box

If the Text Box was created or the properties were edited in any another PDF manipulation
tool, the properties that are honored by pDoc Signer are “Tooltip” and “Multi-line”. Any other
properties that have been set are ignored in pDoc Signer.

3.2.3 – Radio Button

If the Radio Button was created or the properties were edited in any another PDF manipulation
tool, the properties that are honored by pDoc Signer are “Tooltip” and if buttons with same
name and export value are selected in unison or not. Any other properties that have been set
are ignored in pDoc Signer. Also, the presence of special characters like "# % ( ) / [ ] {  ;" in
the export value might lead to unexpected behavior in pDoc Signer.

12                               www.topazsystems.com                            Back to Top
pDoc Signer User Manual
3.2.4 – Check Box
If the Check Box was created or the properties were edited in any another PDF manipulation
tool, the properties that are honored by pDoc Signer are “Tooltip” and the export value. Any
other properties that have been set are ignored in pDoc Signer. Also, the presence of special
characters like "# % ( ) / [ ] { ;" in the export value might lead to unexpected behavior in
pDoc Signer.
3.2.5 – List Box
If the List Box was created or the properties were edited in any another PDF manipulation tool,
the properties that are honored by pDoc Signer are “Tooltip” and if the list box allows multiple
selection or not. Any other properties that have been set are ignored in pDoc Signer.
3.2.6 – Combo Box
If the Combo Box was created or the properties were edited in any another PDF manipulation
tool, the properties that are honored by pDoc Signer are “Tooltip” and if one can enter custom
text into the combo box or not. Any other properties that have been set are ignored in pDoc
Signer.
3.2.7 – View Properties of Form Fields
You can view the properties of the existing form fields by right clicking on them and then by
selecting the properties menu options.
Clicking on “Properties” displays the properties window of the particular form field and
populates the information of the form field in the displayed window. The properties displayed
will depend on the type of the form field being selected. Grayed out boxes imply that the values
cannot be changed.
13 www.topazsystems.com Back to ToppDoc Signer User Manual 3.2.8 – Setting the Font Options To set the font options for the entries displayed in form fields and comments, go to “Tools → Preferences”. Click on the “Font” tab and select the Font options such as Font Name, Font Style, Font Size, Font Color, and Font Effects such as underline. The selected effects will be applied to the sample text. Once the desired options are selected, click on ‘Apply’. Note that the default font settings are Times New Roman, Regular Face, Size 12, No Underline, and Black. 3.3 – Electronic Signatures pDoc Signer allows one to insert an electronic signature field and sign it immediately using the “Insert & Sign” toolbar icon. This toolbar icon is displayed by default. 3.3.1 – Insert and Sign Select the ‘Insert and Sign’ icon on the tool bar. The mouse pointer will change from default to cross bar. 14 www.topazsystems.com Back to Top
pDoc Signer User Manual

Now drag the mouse on the document to the required size and location of the signature field.
Upon completion of the selection, the signature field is displayed as shown here and the act-of-
signing is initiated.

If the signature field size selected is less than 15 pixels (for both width and height), the
signature field is treated as invalid and a message is shown saying “You are trying to create a
signature field that is too small. Please create a larger signature field”.

3.3.2 – Signature Capture Process

During the signature capture process, additional information like First Name, Last Name and
Email can optionally be input or one can select a pre-created signer from the list of signers
(see Section 3.3.8).

If the signer is not satisfied with the signature input, one can click on “Clear” and sign again. If
the signer wants to abort the act-of-signing, one can click on “Cancel”. Canceling the signature
capture process will delete the digital signature field too. Once the signer is satisfied with the
signature input, clicking on “OK” will affix the signature to the document.

15                                www.topazsystems.com                           Back to Top
pDoc Signer User Manual

The licensed version of pDoc Signer supports signing using Tablet Display devices. If a Tablet
Display device is connected to the PC, the signature capture screen is displayed on the Tablet
Display (an extended monitor). The signer can use the stylus that is attached to the Tablet
Display to scribble the signature.

3.3.3 – Validation of Signatures

By default, signatures are validated when you open a PDF in pDoc Signer. An icon appears in
the signature field on the document page to indicate the signature status. Further details about
the status appear in the Signatures panel and in the Signature Properties dialog box.

     •   The digital signature icon          along with the name of the field in the Signatures
         panel indicates the presence of an unsigned signature field.
     •   The check mark icon         indicates that the signature is valid.
     •   The red X icon       indicates that the signature is invalid.
     •   The caution triangle icon        indicates that the document was modified after the
         signature was added.
     •   The question mark       icon indicates that pDoc Signer is not able to verify the signature.

The Signature Properties dialog box can be invoked either by clicking on the Status icon or by
right clicking on the Signature Field and then selecting the “Validate Signature” option. Clicking
on the “Validate Signature” menu validates the signature first and then displays the Signature
Properties dialog box.

See the screenshots below for reference.

Unsigned Field Icon:

16                                 www.topazsystems.com                           Back to Top
pDoc Signer User Manual Status icons and validate right click menu: The status icons on the signed signature fields can be turned off by unchecking the option “Show signature validation status tick marks” option in the “Signature Field” tab of the pDoc Signer Settings screen. 17 www.topazsystems.com Back to Top
pDoc Signer User Manual

If the option "Show signature validation status tick marks" is unchecked, then depending on the
status of the document, the following are displayed in the status bar.

     •   If no signature is present in the document, then the status is displayed as “Document
         not signed”
     •   If only one signature is present in the document and there have been no changes to the
         document after the signature, then the status is displayed as “Signature valid and
         document unchanged since signing”.
     •   If only one signature with subsequent changes is present in the document, then status
         is displayed as “Signature valid but document has been changed.”
     •   If more than one signature is present in the document, then status is displayed as
         “Signatures valid but document has been changed.”
     •   If one or more signatures are corrupted, then status is displayed as "One or more
         signatures are invalid."

Signature Properties Dialog box:

Verification Details:

18                               www.topazsystems.com                         Back to Top
pDoc Signer User Manual Signer Details: Certificate Details: 19 www.topazsystems.com Back to Top
pDoc Signer User Manual

3.3.4 – View Signed and Unsigned Signature Fields

Click on the ‘Signatures’ tool button in the left pane to open the signature panel. The width of
the signature panel can be increased or decreased as required by using the splitter between
the panel and the document page. The list of signed and unsigned signature fields along with
details is displayed.

If we click on any of the signature fields in the list, the corresponding blank or signed signature
field in the document will be highlighted as shown in the screenshots below. Close the
signature panel by clicking again on the ‘Signatures’ tool button.

One can also use the arrow keys (i.e., up and down) or the TAB key to navigate through the
list of signatures in the signature panel and select a signature.

20                               www.topazsystems.com                            Back to Top
pDoc Signer User Manual

3.3.5 – Viewing Previous Versions of a Signed Document

Each time a document is signed in pDoc Signer, a signed version of the PDF is saved with the
PDF. Each version is saved as append-only so that it cannot be modified. In pDoc Signer, the
corresponding signed version of a signature can be viewed using the two following options.

     1. In the Signatures panel, select the signature, and click on the “View signed version”
        option available in the details of the signature.

     2. Right click on the signed signature field and select “View Signed Version” from the list of
        available options.

        See the screenshot here that displays the options mentioned above.

21                                www.topazsystems.com                          Back to Top
pDoc Signer User Manual Selecting one of the options specified above displays the signed version PDF in another instance of pDoc Signer in which the only options available to the user are scrolling through the document, zooming, the signature panel as shown below and saving the PDF using “Save As” option if required. 3.3.6 – Specifying Signature Field Options Each Signature Field must have a name associated with it. pDoc Signer can assign a name to a signature field automatically when a Signature Field is inserted into a PDF document if a “Prefix” for Name is supplied. Another alternative is to provide a name for the signature field when inserted manually. These options can be set in the “Signature Field” tab under “Tools→Settings”. 22 www.topazsystems.com Back to Top
pDoc Signer User Manual

If the option ‘prompt for Signature field name during field insertion’ is selected, a window
prompting for a Name for the signature field gets displayed when a signature field is inserted in
the PDF document using pDoc Signer.

If the option ‘Automatically insert Signature field name’ is selected, then the signature field
name Prefix will be appended with the next number in the sequence of created form fields and
set as signature field name for both the blank signature field and during signing.

Select the “Signature Field Transparency” option if the signature field should be transparent on
the PDF document. The option is checked on by default.

Select the “Show signature validation status tick marks” if the signature status icon should be
displayed on signed signature fields.

23                              www.topazsystems.com                           Back to Top
pDoc Signer User Manual

3.3.7 – Signature Capture Options

To set the Signature Capture options, go to “Tools→Preferences”.

Select the position of the signature details (the signer name and the date/time the signature
was collected) with respect to the signature. The five options available are “Behind”, “Beside”,
“Below (single line)”, “Image Only”, and “Automatic”. “Automatic” option is the default option.
When this option is selected, the signature details will be displayed either beside or behind the
squiggle depending on the width and height of the signature field.

24                               www.topazsystems.com                          Back to Top
pDoc Signer User Manual

If the option “Behind” is selected, the signature details are placed at the center of the signature
field with the signature squiggle behind the details as shown below.

If the option “Beside” is selected, the signature squiggle is shown on the left side of the field and
the details are shown on the right side of the signature field as shown below.

If the option “Below (single line)” is selected, the signature details will be displayed in single
line with the default font size of 8 below the signature image in the document. This font size
can be changed with the minimum value of 6 and maximum value of 20.

If the option “Image Only” is selected, only the signature squiggle is shown in the Signature
Field and details are not shown.

You can specify if the Maximum enlargement feature is enabled or not and also specify the
maximum enlargement percentage. The Maximum Enlargement Percentage is used only in
cases where the size of signature on the signature pad (after white space removal) is smaller
than the size of the Signature Field in the document. When the signature drawn on the
signature pad is smaller than the size of the Signature Field in the document, pDoc Signer will
enlarge the signature to fill the Signature Field. However, it will limit the enlargement to the
value of the Maximum Enlargement Percentage. The Maximum Enlargement Percentage
specifies the percentage of the destination to use in such cases. This prevents the signature
from looking too pixelated or jagged. The value of the maximum enlargement percentage can
be between 0 and 100. If a value of 0 is specified, the signature is not enlarged at all. If a value
of 100 is specified, the signature is enlarged to fit the complete destination.

You can specify the default ink color for the signatures in this screen by clicking on the “Color”
button and the ink thickness by selecting the required thickness from the drop down list. The
default color is Blue and the default thickness is 2.

25                                www.topazsystems.com                            Back to Top
pDoc Signer User Manual

You can also specify the minimum number of signature points required for accepting a
signature as a valid signature. The default value is 12. The number of signature points
reported per second (i.e., packet rate) varies from a smaller value to a larger value depending
on the connected signature capture device. Hence, this value should be set based on the
device you are using.

The Prefix and Date/Time format for date presentation in signature details can be specified in
the “Date Format” tab of the Settings screen.

Note: The display of Signature Title and the time/date stamp is on by default and non-
removable for “Behind” and “Beside” options. But, if the height of the signature field is less than
30 pixels or the width of the signature field is less than 50 pixels, then the signature details
(i.e., Signature Title and Date/time stamp) are not printed on the signature.

3.3.8 – Signature Information

     1. Creation of List of Signers

        This feature can be used to create a list of signers for the purposes of signing. During
        signing, in the signature capture screen, the list of signers available is displayed and a
        signer can be selected from the list. Each profile contains First Name, Last Name and
        Email of the signer. To create a profile, enter the required information and then click on
        the “Add” button. Once created, the Signer Information (i.e. First Name and Last Name)
        is added to the Signers List.

        A maximum of 10 profiles can be created here for use while signing.

26                                www.topazsystems.com                          Back to Top
pDoc Signer User Manual
To make a signer the default signer, select the Signer from the available list of Signers
and then click on OK. During the signature capture process, the selected signer
information is pre-filled in the signature capture window.
2. Remove a Signer from the List
To remove a signer from the list, select the signer from the available list and then click
on the “Remove” button.
27 www.topazsystems.com Back to ToppDoc Signer User Manual 3.3.9 – Automatic Configuration of Certificate pDoc Signer provides a default certificate for signing. The default certificate will be configured automatically during the installation of the pDoc Signer. If the user wants to change the certificate during signing, the user needs to go the “Select Certificate for Signing” in the “File Menu” and configure the certificate as shown in the certificate selection section. 3.3.10 – Certificate Selection Signing in pDoc Signer requires the use of a digital certificate. During its installation process, pDoc Signer automatically installs and configures a certificate that is used by default for signing. Users should select a different certificate that represents their organization. To select another certificate for signing, go to “File →Select Certificate for Signing...”. Selecting that option opens a window titled Select Certificate for Signing. In that window, the certificate path (i.e., PFX Path) to the previously selected certificate (or to the default certificate) will be shown. By default, the certificate path is set to the certificate (i.e., pDocSigner.pfx) that is installed and configured automatically during the pDoc Signer installation; the password for the default certificate is “pdocsigner”. To select another certificate for signing, browse to that certificate with the Browse button, then enter the password in the Password text box, and click on the OK button. 3.4 – Sticky Note Comments pDoc Signer allows insertion of sticky note comments in a PDF document. Sticky note comments are notes that communicate ideas or provide feedback for PDFs. You can type a text message using the sticky note comment tool. Text editing tools let you add editing marks to indicate changes you want in the source document. Most comments include two parts: the icon, or markup, that appears on the page and the text message that appears in a pop-up note when you double-click the icon. 28 www.topazsystems.com Back to Top
pDoc Signer User Manual

3.4.1 – Adding Sticky Note Comments

Click on the sticky note comment tool button. The mouse pointer changes from the normal
default arrow to an arrow with a sticky note comments icon attached to it. The sticky note
comment field button is shown in the image below.

Now click on the document where the sticky note comment field is required. A window is
displayed wherein the user can add the text for the comment. The image below shows the
sticky note comments input window.

Upon acceptance, a sticky note comment icon will be displayed on the document at the
specified location which indicates that the sticky note comment field is added in that position.

29                               www.topazsystems.com                           Back to Top
pDoc Signer User Manual

3.4.2 – Viewing Sticky Note Comments

Double click on any sticky note comment icon on the document. Sticky note comments
corresponding to the selected sticky note comment icon are displayed in a separate
transparent window.

3.4.3 – Deleting Sticky Note Comments

To delete a Sticky Note Comment, select the comment and then right click on it. Select the
“Delete” option. The user is prompted with a confirmation message that says "Do you want to
delete the selected Sticky Note Comment?" Upon Clicking “Yes” the sticky note comment will
be deleted.

Note: You cannot delete a sticky note comment if the PDF document contains at least one
signed signature field or if the PDF is secured.

30                             www.topazsystems.com                        Back to Top
pDoc Signer User Manual

3.5 – Text Comments

pDoc Signer allows insertion of Text Comments in a PDF document. Text Comments are notes
that communicate ideas or provide feedback in PDFs. You can type a text message using the
Text Comment tool. Text editing tools let you add editing marks to indicate changes you want
in the source document.

3.5.1 – Adding Text Comments

Click on the text comments tool button (the capital letter “T”). The mouse pointer changes from
the normal default arrow to cross hair. The text comments field button is shown in the image
below.

Now drag the mouse on the document to the required size and location of the text comments
field. Upon completion of the selection, the text comments field is displayed as shown below
and the text comments input window is displayed.

31                              www.topazsystems.com                         Back to Top
pDoc Signer User Manual

Using your keyboard, enter the text for the comment. Font attributes specified in the
Preferences windows for comments are applied for the text entered in this window.

Click on the “Add” button to the text comment to the PDF. The screenshot below shows the
text comments added in the PDF document.

Note:

     1. If the text comments field size selected is smaller than 15 pixels wide and 5 pixels high,
        the text comments field is treated as invalid and a message is shown saying “You are
        trying to create a text comment field that is too small. Please create a larger text
        comment field”.
     2. Text lines that are longer than the width of the text field are truncated by standard
        convention; they do not automatically wrap to the next line, so you should use line
        returns for multi-line comments.

32                                www.topazsystems.com                          Back to Top
pDoc Signer User Manual 3.5.2 – Updating Text Comments The existing text comments can be updated in pDoc Signer. Click on the text comment and alter the text as required. The updated text is applied to the text comment when the PDF is saved. The screenshot below shows a text comment after updates. Note: Text comments in place when the document is signed will not be editable after signing; however, after a document is signed new text comments can be added, but they cannot be modified after addition. 3.5.3 – Deleting Text Comments To delete a Text Comment, select the comment and then right click on it. Select the “Delete” option. The user is prompted with a confirmation message that says "Do you want to delete the selected Text Comment?" Upon Clicking “Yes” the Text Comment will be deleted. Note: You cannot delete a text comment if the PDF document contains at least one signed signature field or if the PDF is secured. 33 www.topazsystems.com Back to Top
pDoc Signer User Manual

3.5.4 – Editing Text Comments

To make text comments editable, go to “Tools → Preferences”. Click on the “Text Comment”
tab, select “Make text comments in the document editable” option, and click on “Apply”.

This option is applicable for existing text comments that are there when the document is
opened as well as for new text comments that you insert during the session. If you insert new
comments, they immediately become editable or non-editable depending upon the settings.

3.6 – Pencil Tool

The Pencil tool creates free-form drawings and the Pencil Eraser tool removes the pencil
markups.

34                              www.topazsystems.com                         Back to Top
pDoc Signer User Manual

3.6.1 – Draw Pencil Mark-up

Click on the pencil tool. The mouse pointer changes from the default pointer to a cross bar.
Drag where you want to begin drawing and release the mouse button where the pencil line
should end. The pencil markup with selected color and width will be drawn on the page.

3.6.2 – Delete Pencil Mark-up

To delete a Pencil Markup, select the markup and then right click on it. Select the “Delete”
option. The user is prompted with a confirmation message that says "Do you want to delete the
selected Pencil Markup?" Upon Clicking “Yes” the Pencil Markup will be deleted.

Note: You cannot delete a pencil markup if the PDF document contains at least one signed
signature field or if the PDF is secured.

35                              www.topazsystems.com                          Back to Top
pDoc Signer User Manual

3.6.3 – Settings For Using the Pencil Tool

To specify the line width and line color for pencil markups, go to “Tools → Preferences”. Click
on the ‘Pencil’ tab, select the Pencil line color and width of the line and click on ‘Apply’.

3.7 - Attachments

One can attach PDF documents and other types of files to a PDF. If you move the PDF to a
new location, the attachments move with it.

Click on the ‘Attachments’ tool button at the left pane to open the Attachments panel. The
existing attachments list with ‘Attach’, ‘Delete’ and ‘View’ buttons are displayed.

36                              www.topazsystems.com                          Back to Top
pDoc Signer User Manual

3.7.1 – Adding Attachments

Clicking on the ‘Attach’ button will open a file dialog. Select the file to be attached to the PDF
document and click “OK”. The selected file will be attached to the document and the attached
file list will be updated.

3.7.2 – Deleting Attachments

Select the attachment to be deleted from the list. Now click on the ‘Delete’ button present in
the Attachments panel to delete the attachment. The selected file will be deleted and the
attached files list will be updated.

Note: You cannot delete a file attachment if the PDF document contains at least one signed
signature field or if the PDF is secured.

37                               www.topazsystems.com                            Back to Top
pDoc Signer User Manual

3.7.3 – Viewing Attachments

To view an existing attachment, select the attachment and click on the ‘View’ button in the
Attachments panel. If the attachment is a PDF, it is opened in another instance of pDoc Signer.
For other types of attachments, the attachment is opened in their respective application.

3.8 – Stamps

pDoc Signer allows insertion of stamps in a PDF document. You apply a stamp to a PDF in
much the same way you apply a rubber stamp to a paper document. A stamp can be either
static or dynamic.

3.8.1 – Configuring Stamps

To select the stamps that can be placed into a document,

      a.   Go to Tools → Preferences; the pDoc Signer Preferences Window will open.
      b.   Click on the Stamp tab; the Stamp Information Window will appear.
      c.   Select the Stamp Type, either Static or Dynamic. The default is Static.
      d.   Configure the list of stamps as described in the following sections.
      e.   Click OK; the Preferences Window will close.

38                              www.topazsystems.com                         Back to Top
pDoc Signer User Manual
3.8.2 – Static Stamps
By default, pDoc Signer supports one static stamp named “Approved”. This stamp contains the
text “APPROVED”. A screenshot of this stamp is shown below. You can preview any stamp by
clicking the “Preview” button.
To add a new static stamp, follow the steps below.
1. Click on the “Add New” button.
2. Enter a name for the static stamp.
3. Click on “Browse” and the select the image containing the static stamp.
4. Click on “Save”.
Note: The maximum size allowed for the static stamp image is 600 pixels in width by 600
pixels in height.
39 www.topazsystems.com Back to ToppDoc Signer User Manual
To remove an existing static stamp, follow the steps below.
1. Select the stamp in the list of stamps.
2. Click on the “Remove” button.
3. Click on “Yes” in the confirmation message.
3.8.3 – Dynamic Stamps
To specify the usage of the dynamic stamp feature, select the “Stamp Type” as “Dynamic”.
The dynamic stamp configuration is displayed as shown below.
The dynamic stamp configuration contains the following steps.
1. Select the background image of the dynamic stamp. The maximum size allowed for the
background image is 600 pixels in width by 600 pixels in height. If a background image
is not specified, then the default white background image of size 400 by 200 is used.
2. Specify the names for the fields to display in the dynamic stamp. Information for these
fields will be collected during the insertion of the stamp into the PDF document. The
default names for the fields are “GL Code”, “Name”, and “Department”.
To see the preview of the configured dynamic stamp, click on the “Preview” button.
Note: The Dynamic Stamp should have either a background image or information in at least
one of the fields.
40 www.topazsystems.com Back to ToppDoc Signer User Manual
3.8.4 – Inserting a Stamp into the Document
To insert the stamp into a document,
a. Open the document to the page onto which you want to insert a stamp.
b. Click on the stamp icon in the tool bar; the cursor will take the shape of the stamp
icon.
c. Move the cursor to the location where the upper left corner of the stamp is to be
inserted.
d. Left click on that position
i. If you have selected a static stamp and there is only one static stamp, pDoc
Signer places the stamp at that location.
ii. If you have selected a static stamp and more than one static stamp exists,
pDoc Signer displays a window prompting the signer to select the static
stamp to be used as shown below.
iii. If you have selected a dynamic stamp, pDoc Signer opens a window with text
boxes. The labels besides the text boxes (e.g., GL Code, Name, and
Department) are specified in the Preferences Window. Fill in the text boxes
and click OK to place the stamp at that location.
41 www.topazsystems.com Back to ToppDoc Signer User Manual
3.8.5 – Deleting a Stamp
To delete a stamp from a document,
a. Click on the stamp you want to delete.
b. Right click on the stamp; pDoc Signer opens a window with the Delete option.
c. Click on Delete. pDoc Signer opens a confirmation window.
i. Click Yes to delete the stamp; if the document has not been signed, pDoc
Signer will delete the stamp.
ii. Click No to keep the stamp.
Note: You cannot delete a stamp if the PDF document contains at least one signed signature
field or if the PDF is secured.
3.9 – Update License Key
If you are using a licensed version of pDoc Signer with a trial License Key, once you obtain a
non-expiry license key, you can update the key using the “Update License Key” feature and
continue using the software.
When you see the following window while opening the pDoc Signer, to update the License
Key, click on the button “Update License Key”. The same window can be accessed using
“About → Acquire pDoc Signer” too.
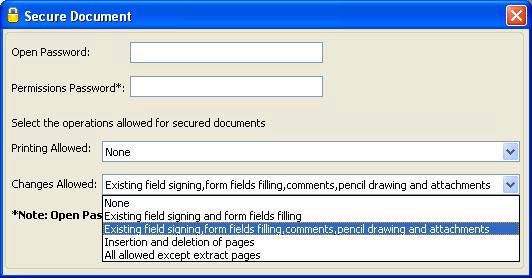
42 www.topazsystems.com Back to ToppDoc Signer User Manual The Software License Key window displays the current License Key and also the expiration date. You can enter the new License Key in the space provided and click on the “Update” button to update the key. Make sure that you are connected to the Internet to update the License Key. 3.10 – Securing Documents pDoc Signer can be used to secure an unsecured and unsigned PDF. For securing a document, go to “File→Secure Document”. The secure document dialog is displayed. Provide either “Permissions Password” or both “Open Password” and “Permissions Password”. “Permissions Password” is mandatory. The default operations allowed for secured documents are printing is not allowed and form filling and signing, comments, pencil drawing and attachments are allowed. Upon clicking “OK”, the document is secured with the information provided and is closed. The secured document must be opened again for further use in the pDoc Signer tool. 43 www.topazsystems.com Back to Top
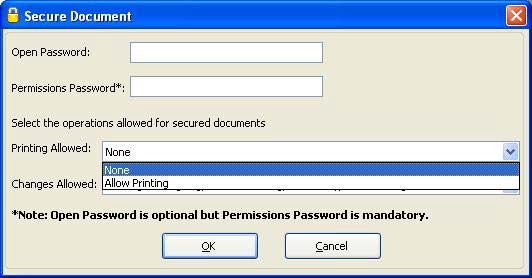
pDoc Signer User Manual

Open Password: One will be prompted to enter this password when the document is being
opened.

Permissions Password: One will need to provide this password if permissions on the
document need to be modified at a later point of time in other PDF containers. Permissions
password once provided cannot be changed in pDoc Signer.

Printing Allowed: Two options are available for the user to select print permissions.

None: If the user selects the “None” option in the printing allowed, the secured documents are
not allowed for printing.

Allow Printing: If the user selects the “Allow Printing” option in the printing allowed, the secured
documents are allowed from printing.

Changes Allowed: Five options are available for the user to select the changes allowed on
the PDF.

None: If the user selects the “None” option in the changes allowed, no changes are allowed on
the PDF after securing the PDF.

Existing field signing and form fields filling: If the user selects the “Existing field signing and
form fields filling” option, the secured document will allow existing form field filling and signing
of existing blank signature fields. All other operations are disabled.

Existing field signing, form fields filling, comments, pencil drawing and attachments: If the user
selects the “Existing field signing, form fields filling, comments, pencil drawing and
attachments” option, the secured document will allow existing form fields filling, signing of
existing blank signature fields, insertion of comments, insertion of pencil drawing and adding
attachments in the secured documents. All other operations are disabled.

Insertion and deletion of pages: If the user selects the “Insertion and deletion of pages” option,
the secured document will allow only insertion of the pages and deletion of the pages in the
“Manipulate Pages”. All other operations are disabled.

44                                www.topazsystems.com                            Back to Top
You can also read