Kindle Create User Guide - v1.4 English Feb. 27, 2018
←
→
Page content transcription
If your browser does not render page correctly, please read the page content below
Kindle Create
                           User Guide
                                                   v1.4
                                                 English
                                            Feb. 27, 2018

Copyright © 2018 Amazon.com, Inc. or its affiliates. All rights reserved.
Kindle Create User Guide
Revision History
Revision Revision Notes
Number
1.4 Added section 1.1, Changing Language Settings.
Added section 1.2, Supported Languages.
Updated section 1, Introduction, to clarify differences between Microsoft Word documents and
1.3
PDFs.
Added section 2.4, Saving Your Work.
Amazon.com 2
Kindle Create User Guide

Contents
1.     Introduction............................................................................................................................................ 5
     1.1.     Changing Language Settings ........................................................................................................ 5
     1.2.     Supported Languages ................................................................................................................... 5
2.     The Kindle Create Workspace .............................................................................................................. 5
     2.1.     Contents Pane............................................................................................................................... 6
     2.2.     Edit Pane ....................................................................................................................................... 7
     2.3.     Properties Pane ............................................................................................................................ 8
     2.4.     Saving Your Work ....................................................................................................................... 10
     2.5.     Searching Within Your Book ....................................................................................................... 10
     2.6.     Shortcuts ..................................................................................................................................... 10
3.     Building Your eBook from a Microsoft Word File ................................................................................ 12
     3.1.     Creating a New Project from a Microsoft Word File .................................................................... 12
     3.2.     Selecting Your Theme ................................................................................................................. 15
     3.3.     Formatting Your Content with Elements ..................................................................................... 15
       3.3.1.         Formatting the Title Page and Other Front and Back Pages .............................................. 16
       3.3.2.         Formatting Each Chapter .................................................................................................... 16
       3.3.3.         Formatting Text and Paragraphs ........................................................................................ 17
4.     Building Your Print Replica eBook from a PDF ................................................................................... 18
     4.1.     Creating a New Project from a PDF ............................................................................................ 18
     4.2.     Building Your Table of Contents ................................................................................................. 19
     4.3.     Adding Pages .............................................................................................................................. 20
     4.4.     Moving Pages.............................................................................................................................. 21
     4.5.     Deleting Pages ............................................................................................................................ 21
     4.6.     Preserving Hyperlinks ................................................................................................................. 21
     4.7.     Positioning Icons with Rulers and Guidelines ............................................................................. 21
     4.8.     Adding Plug-ins ........................................................................................................................... 22
       4.8.1.         Adding Plug-ins as Icons ..................................................................................................... 22
       4.8.2.         Adding Plug-ins as Hyperlinks ............................................................................................ 24
     4.9.     Moving Plug-in Icons ................................................................................................................... 25
     4.10.        Re-sizing Invisible Audio Buttons ............................................................................................ 25
     4.11.        Editing a Plug-in's Title Text, Descriptions, and Alternative Text............................................ 26
     4.12.        Replacing a Plug-in’s Media File ............................................................................................. 28
     4.13.        Deleting Plug-ins ..................................................................................................................... 28
5.     Previewing and Publishing your eBook (Microsoft Word or PDF) ...................................................... 29
     5.1.     Previewing Your eBook ............................................................................................................... 29
     5.2.     Publishing Your eBook ................................................................................................................ 29

Amazon.com                                                                                                                                                     3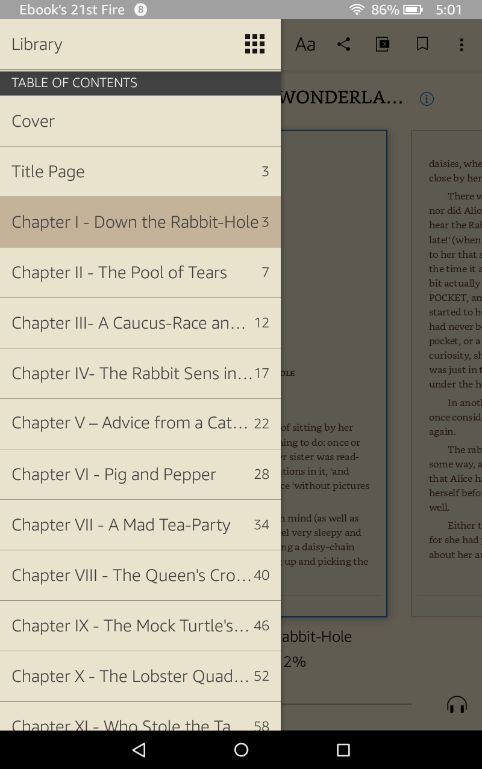
Kindle Create User Guide

6.   Contact Us........................................................................................................................................... 30

Amazon.com                                                                                                                                                 4

Kindle Create User Guide
1. Introduction
Kindle Create is a free stand-alone application that helps you transform your completed manuscript into a
beautifully formatted Kindle eBook. When you import a manuscript in the .doc/.docx format, Kindle Create
automatically detects chapter titles and adds styling to them. .
Kindle Create allows you to change the look and feel of your book by using a selection of book themes. It
also makes it easy to create a Kindle Table of Contents for your book from the chapter titles, helping
readers navigate your book easily. In addition, you can preview how your book will look on tablets,
phones, and Kindle E-readers with the Preview function.
Kindle Create builds eBook files only. If you want to create one file that you can use for both eBook and
print-on-demand paperback, Amazon recommends using Kindle Create Add-in for Microsoft Word (Beta).
There are two workflows available in Kindle Create: one allows you to create Print Replica eBooks from
PDF files and the other allows you to import a Microsoft Word document (.doc or .docx) and then review
and improve its appearance as an eBook.
Microsoft Word documents are converted to reflowable eBooks, which allow the reader to resize
text and are available on all Kindle devices and free Kindle reading applications.
PDF files are converted to Print Replica eBooks, which maintain the rich formatting and layout of
their print editions and offer many of the advantages of standard Kindle eBooks, but they do not
allow the reader to resize text and are only available on certain devices.
There are three fundamental steps to using Kindle Create:
1. Importing your document into Kindle Create so it can be converted into a Kindle-specific eBook
(DOC(X) format: section 3.1; PDF: section 4.1).
2. Improving your eBook (DOC(X): sections 3.3 through 3.3.3; PDF: sections 4.2 through 4.13).
3. Reviewing your eBook and preparing it for publishing (DOC(X) and PDF: sections 5.1 and 5.2).
1.1. Changing Language Settings
Kindle Create is available in Dutch, English, French, German, Italian, Portuguese, and Spanish. To
change the language of the Kindle Create display, select Help > Set UI Language and then choose your
preferred language.
1.2. Supported Languages
Kindle Create supports books in Dutch, English, French, German, Italian, Portuguese, and Spanish.
2. The Kindle Create Workspace
The Kindle Create workspace is broken into three separate panes: the Contents Pane, the Edit Pane,
and the Properties Pane (see Figure 1).
Amazon.com 5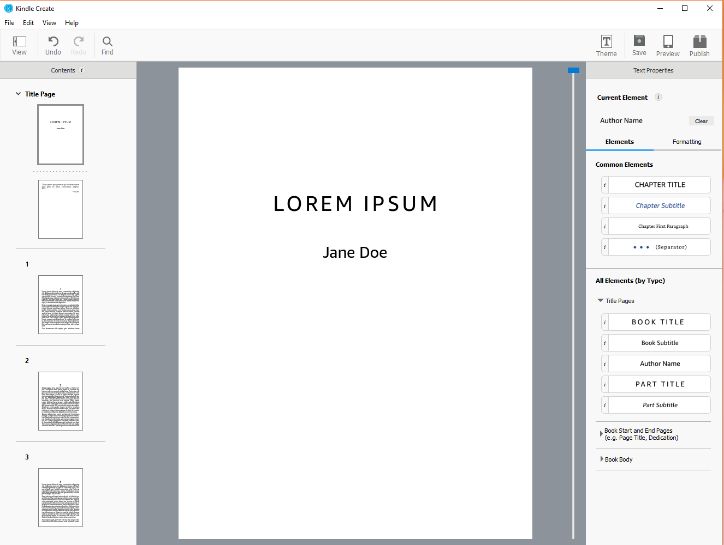
Kindle Create User Guide

                                    Figure 1: Kindle Create workspace

2.1. Contents Pane
The thumbnails in the Contents Pane show how your eBook has been divided to help you make certain
that your content is chaptered correctly. If your document includes a Microsoft Word Table of Contents
(TOC), those TOC entries are automatically used to create a Kindle Interactive TOC, sometimes referred
to as the NCX. Creating a Kindle Interactive TOC displays the hierarchical structure of a Kindle book and
allows the user to navigate it from any page via the Kindle menu (see Figure 2).

                                Figure 2: Kindle Interactive TOC example

In Kindle Create, a Kindle Interactive TOC entry can be recognized by the presence of a chapter label
above the live thumbnail of the 1st page of the section (e.g., the 1 label in the upper corner of Figure 3).

Amazon.com                                                                                                     6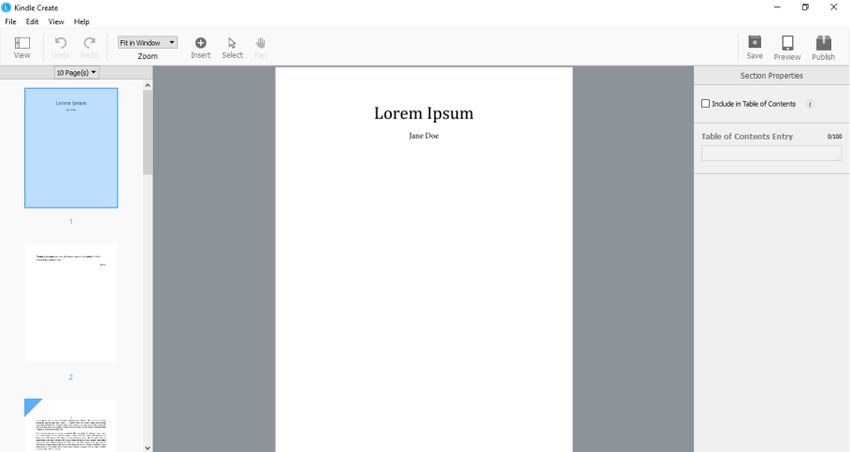
Kindle Create User Guide
Figure 3: Automatic Kindle Interactive TOC entry
If your document uses page breaks or section breaks to indicate a new chapter, the Contents Pane
shows you how the conversion process has interpreted your formatting as sections. (A section is a chunk
of text bounded by page breaks.) One of the most impactful reading improvements you can make with
Kindle Create is to develop a Kindle Interactive TOC.
There are multiple ways to develop a Kindle Interactive TOC in Kindle Create:
When importing a Microsoft Word file, Kindle Create offers the option to automatically detect
potential chapter title elements and review the results.
If you choose not to automatically detect chapter titles during Microsoft Word import, you can
choose this option later by selecting Edit > Chapter Detection.
When working with a Microsoft Word file, you can tag the chapters you want in the Kindle
Interactive TOC with the Chapter Title element (other parts of your eBook can be added to the
Kindle Interactive TOC by tagging them with the applicable Book Title, Part Title, or Dedication
elements).
When working with a Microsoft Word or PDF file, another method is to add a manual entry to the
Kindle Interactive TOC by selecting the thumbnail in the Contents Pane and then selecting the
Include in Table of Contents checkbox in the Properties Pane as shown in Figure 4.
Figure 4: Manual Kindle Interactive TOC entry
2.2. Edit Pane
In the center, the Edit Pane displays the current status of your eBook content. It is intended to represent
your eBook on a typical reading device with default font sizing. (To preview your eBook on multiple
simulated devices, use Previewer as described in section 5.1.) In the Edit Pane, you can select content
Amazon.com 7Kindle Create User Guide
to modify its appearance with elements in the Text Properties Pane. You can also add, edit, copy, paste,
and delete text.
You can move your cursor in the Edit Pane using up and down arrow keys (1 line at a time), PAGE UP or
PAGE DOWN keys (1 page at a time) or with the scroll wheel on your mouse or trackpad (1 page at a
time). There is also a slider bar on the side of the Edit Pane that you can use to reposition. When you
scroll the Edit Pane from one section to another, the appropriate thumbnail in the Contents Pane is
highlighted.
For eBooks imported from Microsoft Word, you may also edit the text if required. The most frequent
reasons for editing text within Kindle Create are to correct discrepancies in spacing that may have been
added in Microsoft Word, including spaces in the beginning of lines, carriage returns that were used to
adjust title positioning, and last minute corrections of typos.
If you have a larger quantity of text to update, you can copy the text from a Microsoft Word document and
paste it at the current location in the Edit Pane. Pasted text will take on the formatting active at the cursor
location in the Edit Pane. Copy/paste commands are available from the Edit menu or by shortcut: CTRL
+ C for Copy (CMD + C for Mac users), CTRL + V for Paste (CMD + V for Mac users).
If you make a change to your eBook that you are not happy with, Undo and Redo allow you to revert or
replay any actions. You can undo up to 25 prior actions in Kindle Create. Access Undo and Redo from
the Edit menu, by selecting the Undo or Redo arrows above the working panes, or with shortcuts: CTRL
+ Z for Undo (CMD + Z for Mac users), CTRL + Y for Redo (CMD + Y for Mac users).
2.3. Properties Pane
The Properties Pane supports modification of selected content and updates to support modifications
appropriate to the selection. When you select a thumbnail in the Contents Pane, the Properties Pane
displays Section Properties (see Figure 5).
Figure 5: Section Properties
For eBooks imported from Microsoft Word:
When you select text in the Edit Pane, the top section of the Properties Pane shows you the
formatting of the Current Element and the Elements and Formatting tabs of the Properties
Pane display all of the actions that you can take on selected text or paragraphs (see Figure 6).
Amazon.com 8Kindle Create User Guide
Figure 6: Text Properties: Elements and Formatting tabs
Hovering the mouse over any of the i elements displays information as shown in Figure 7.
Figure 7: Tool tip
The Properties Pane gives you access to the Elements tab. Elements add structure to your
eBook and allow Kindle Create to style your eBook according to the active Theme. By applying
Elements, you are improving the reading experience of your eBook. When your Kindle Create-
designed eBook is submitted to KDP, the intents are honored to yield a professionally designed
eBook interior for you and your readers.
Amazon.com 9Kindle Create User Guide
If you want to change the display of certain text independent of Element settings, highlight the
text you want to modify, select the Formatting tab in the Properties Pane, and use the options
to make changes. You can also change text or paragraph properties of an Element, but the
changes will only apply to the currently selected element. This type of change is reflected by a
plus sign next to the element name (see Figure 8).
Figure 8: Revised element
Note: Element settings affect one entire paragraph. When making selections in the Edit Pane, you only
need to have the cursor blinking within the paragraph. The entire paragraph will take on the
characteristics of that element in the active Theme.
2.4. Saving Your Work
As you work in Kindle Create, you will receive frequent reminders to save your work because Kindle
Create does not save your work automatically (see Figure 9). Amazon strongly recommends that you
save your work when prompted. If you’re not ready to save yet, you can select an option on the Remind
Me menu to choose when Kindle Create will remind you to save again.
Figure 9: Save Prompt
2.5. Searching Within Your Book
While working in Kindle Create, you can search the text in your Microsoft Word or PDF document by
clicking the Find icon or using the shortcut CTRL + F (CMD + F for Mac users). Enter the text you want to
find and click the Find Next button.
2.6. Shortcuts
To streamline use of Kindle Create, the following shortcuts are available. Some highlights:
Find command: Kindle Create includes a Find mode that you can use to quickly locate any text
(for example: chapter). Find mode remains active until dismissed. Find Next allows you to move
forward in your eBook until all examples of the searched text are displayed in the Edit Pane.
Select Edit > Find or use the CTRL + F shortcut (CMD + F for Mac users).
Element shortcuts: Kindle Create includes shortcuts for setting a Chapter Title element
(Windows: ALT + CTRL + T; Mac: OPT + CMD + T), Chapter Subtitle element (Windows: ALT +
CTRL + S; Mac: OPT + CMD + S), and First Paragraph element (Windows: ALT + CTRL + F;
Mac: OPT + CMD + F) to streamline these tasks as you review and build your Kindle TOC.
Insert or remove section breaks: Another helpful command for improving the structure of your
eBook is the ability to add or remove section breaks. The section break action is added at the
location of the cursor in the Edit Pane. For access to the section break capability, click the right
mouse button while the cursor is active in the Edit Pane or select Edit > Insert . You will have
Amazon.com 10Kindle Create User Guide
the option to insert a section break before or after the cursor location, depending on whether you
want the cursor location to represent the beginning or the end of a section. To remove an
unwanted page break in your eBook, place the cursor just before the text immediately after the
break and click the right mouse button to display the Remove Section Break option. The cursor
must be placed immediately before the text because Kindle Create won’t find the existing section
break if any text is highlighted.
Complete list of shortcuts:
Windows Shortcut Mac Shortcut
Book Manipulation
New Project CTRL + N CMD + N
Open Project CTRL + O CMD + O
Close Project CTRL + W CMD + W
Save Project CTRL + S CMD + S
Save Project As CTRL + SHIFT + S CMD + SHIFT + S
Publish CTRL + SHIFT + P CMD + SHIFT + P
Run Embedded Preview CTRL + SHIFT + R CMD + SHIFT + R
Launch Theme Picker CTRL + SHIFT + T CMD + SHIFT + T
Navigation
Contents Pane
Select Next Section DOWN ARROW DOWN ARROW
Select Previous Section UP ARROW UP ARROW
Scroll to Next Viewport (Set of Thumbnails) PAGE DOWN FN + DOWN ARROW
Scroll to Previous Viewport (Set of PAGE UP FN + UP ARROW
Thumbnails)
Collapse LEFT ARROW LEFT ARROW
Expand RIGHT ARROW RIGHT ARROW
Start of Book CTRL + HOME OPT + CMD + UP ARROW
End of Book CTRL + END OPT + CMD + DOWN
ARROW
Switching Panes
Enter Edit Mode ENTER ENTER
Enter Thumbnail Mode (Exit Edit Mode) ESC ESC
Edit Pane
Navigation
Move Right One Space RIGHT ARROW RIGHT ARROW
Move Left One Space LEFT ARROW LEFT ARROW
Move Down One Line DOWN ARROW DOWN ARROW
Move Up One Line UP ARROW UP ARROW
Scroll Down One Page PAGE DOWN FN + DOWN ARROW
Scroll Up One Page PAGE UP FN + UP ARROW
End of Section CTRL + END OPT + CMD + DOWN
ARROW
Beginning of Section CTRL + HOME OPT + CMD + UP ARROW
Beginning of Line HOME CMD + LEFT ARROW
End of Line END CMD + RIGHT ARROW
Go to Start of Prev. Paragraph CTRL + UP ARROW OPT + UP ARROW
Go to Start of Next Paragraph CTRL + DOWN OPT + DOWN ARROW
ARROW
Editing
Copy CTRL + C CMD + C
Cut CTRL + X CMD + X
Amazon.com 11Kindle Create User Guide
Windows Shortcut Mac Shortcut
Paste CTRL + V CMD + V
Paste and Match Destination Formatting CTRL + SHIFT + V OPT + SHIFT + CMD + V
Increase Selected Text Font Size CTRL + ] or SHIFT + CMD + =
CTRL + SHIFT + >
Decrease Selected Text Font Size CTRL + [ or SHIFT + CMD + _
CTRL + SHIFT + <
Applying Text Formatting
Bold CTRL + B CMD + B
Italic CTRL + I CMD + I
Underline CTRL + U CMD + U
Increase Indent Level CTRL + SHIFT + ] CMD + SHIFT + ]
Decrease Indent Level CTRL + SHIFT + [ CMD + SHIFT + [
Undo CTRL + Z CMD + Z
Redo CTRL + Y CMD + Y
Applying Semantics to Selection
Mark Chapter Title Element ALT + CTRL + T OPT + CMD + T
Mark Chapter Subtitle Element ALT + CTRL + S OPT + CMD + S
Mark Chapter First Paragraph Element ALT + CTRL + F OPT + CMD + F
Insert Separator Element ALT + CTRL + - OPT + CMD + -
Clear Formatting ALT + CTRL + B OPT + CMD + B
PDF
Delete Plug-in DELETE DELETE
Zoom In CTRL + = CMD + =
Zoom Out CTRL + - CMD + -
Fit to Window CTRL + 0 CMD + 0
Fit Page Width CTRL + 2 CMD + 2
Extras
Find CTRL + F CMD + F
Quit Kindle Create CTRL + Q CMD + Q
3. Building Your eBook from a Microsoft Word File
The following sections will guide you through the process of building your eBook from a Microsoft Word
file.
3.1. Creating a New Project from a Microsoft Word File
1. Opening Kindle Create displays the launch screen shown in Figure 10. From the launch screen,
you can start a new project by importing a Microsoft Word or PDF document (New Project from
File) or resume a previously saved project (Resume Existing Project or File > Open Recent).
Amazon.com 12Kindle Create User Guide
Figure 10: Launch screen
2. To start a new project, click the New Project from File button. You can also launch a new project
by selecting File > New Project or using the shortcut CTRL + N (CMD + N for Mac users). The
Choose File dialog box is displayed as shown in Figure 11. Click the Novels, Essays, Poetry,
Narrative Non-Fiction option.
Figure 11: Choose Starting File dialog box
3. Click the Choose File button, navigate to the Microsoft Word file on your local hard drive, select
the file, and click Open.
Once you have selected a file, Kindle Create begins processing your file to convert it into a Kindle
formatted eBook. Conversion optimizes font faces, line spacing, margins, indents, and other
typography characteristics to improve reading on electronic devices. It also converts every page
break in your Microsoft Word document into a new section.
While your file is imported, Kindle Create displays a set of rotating screens that tell you more
about Kindle Create. When conversion finishes, the Import Successful dialog box is displayed
as shown in Figure 12. Click the Continue button to proceed.
Amazon.com 13Kindle Create User Guide
Figure 12: Import Successful dialog box
4. The Automatic Chapter Titles dialog box is displayed as shown in Figure 13. Click the Get
Started button and Kindle Create begins applying Chapter Title elements to your eBook.
Figure 13: Automatic Chapter Titles dialog box
5. The Suggested Chapter Titles dialog box displays a list of possible chapter titles (see Figure
14). Uncheck any items that are not chapter headings and then click Accept Selected. The
checked items will be part of the table of contents. From this dialog box, you can also click a
chapter heading and Kindle Create takes you to that section so that you can apply formatting
elements while keeping the Suggested Chapter Titles dialog box open.
Amazon.com 14Kindle Create User Guide
Figure 14: Suggested Chapter Titles dialog box
6. Select File > Save Project to save your imported eBook. The Save Your Project dialog box
opens. Accept or change the file location and name, and then click Save.
3.2. Selecting Your Theme
Located next to the Save button, the Theme button lets you choose from pre-defined book styles. These
styles have been created by professional book designers and produce a well-styled eBook that will be
easy for your readers to enjoy. Select one of our themes to update your eBook appearance (see Figure
15). Any element that you have marked in your eBook is updated to the style defined in the active theme.
Modern theme is active by default.
Figure 15: Theme dialog box
3.3. Formatting Your Content with Elements
On import, all untagged content in Kindle Create is considered body text. When published, readers
control the font face of body text using the features of their Kindle device or application. To reflect the
Amazon.com 15Kindle Create User Guide
intention of your eBook, and to maintain the appearance of special text, you can apply Elements to
format the content within your eBook structure as described in sections 3.3.1 through 3.3.3.
3.3.1. Formatting the Title Page and Other Front and Back Pages
In the Properties Pane, on the Elements tab, click the arrow next to Title Pages to display the following
options for formatting the beginning of your eBook:
Book Title: Creates custom formatting for the book title on a new page and adds the book title
page to the Kindle Interactive TOC.
Book Subtitle: Adds custom formatting and positions descriptive text for the book part in relation
to the book title.
Author Name: Formats your name and places it relative to the book title on the title page.
Part Title: Creates a divider page and formats the selected text to identify a new book part in a
multi-part book. (In both fiction and nonfiction, chapters can be grouped together and labeled as
Part 1, Part 2, etc.)
Part Subtitle: Adds custom formatting and positions descriptive text for the book part in relation
to the part title.
In the Properties Pane, on the Elements tab, click the arrow next to Book Start and End Pages to
display the following options for formatting other front and back pages of your eBook:
Page Title: Formats the title of the page. Used for sections such as preface, contents, list of
illustrations, etc.
First Paragraph: Removes the indent for the paragraph, but doesn’t add drop cap.
Dedication: Formats the header for your dedication page and adds it to the Kindle Interactive
TOC.
Opening Quote: Formats an opening quote for your book and places it on its own page.
Opening Quote Credit: Formats the originator of your opening quote separately and distinctly
from the opening quote.
Copyright Text: Formats a paragraph of your copyright page.
3.3.2. Formatting Each Chapter
In the Contents Pane, the first page of every section converted is displayed as a thumbnail. Select a
thumbnail and that section is presented in the Edit Pane. Use this workflow to ensure that all of your
chapters were converted to a matching section. If there seem to be chapters missing in the Contents
Pane, they are likely embedded in a previous chapter. Highlight the previous chapter and then scroll
through the section in the Edit Pane to locate the buried chapter heading and tag it with the Chapter
Title element.
In the Properties Pane, on the Elements tab, use the options under Common Elements to control the
appearance of the first page of each chapter:
Chapter Title: Adds a font face and size, makes an entry in the Kindle Interactive TOC, and adds
a page break so that the current chapter begins on a new screen.
Chapter Subtitle: Decorates and positions descriptive text about the chapter below the chapter
title.
Amazon.com 16Kindle Create User Guide
Chapter First Paragraph: Removes any indent from the paragraph and adds a drop cap whose
appearance is set by the active Theme.
Separator (when used): Adds a decorative element to indicate a transition in the text.
Clicking the arrow next to Book Body displays additional formatting options:
Block Quote: Highlights long quotes that you want to distinguish from your narrative.
Poem: Improves formatting and readability of poetry.
3.3.3. Formatting Text and Paragraphs
The Properties Pane also includes a Formatting tab with traditional commands to change the
appearance of text and alter paragraph alignment (see Figure 16). Recommended workflow is to apply
Elements before making individual formatting changes, since Elements update positioning and
formatting of paragraphs.
Figure 16: Formatting options
Text changes that you might find useful to make with the paragraph formatting controls include:
Amazon.com 17Kindle Create User Guide
Adjusting the drop cap coverage: The First Paragraph element applies a drop cap to the first
character of a paragraph. If your first character is punctuation, such as a quotation mark, Kindle
Create automatically extends the drop cap coverage to include the punctuation and the first letter.
For other situations, you can use the Number of Characters control to extend the drop cap, if
needed.
Create differentiated text for storytelling impact:
o Adjusting paragraph indents: You can tweak paragraph indents (both 1 st line and
margins) using the Indents controls.
o Adjusting the spacing between paragraphs: In Kindle Create, Elements apply to a single
paragraph by default. You can apply the element to consecutive paragraphs and then
use the Spacing controls to reduce or eliminate the top or bottom spacing to bring the
adjacent paragraphs back together.
o Specify a font style.
Note: If you specify a font face to identify your differentiated text in Kindle Create, readers will not be able
to change that font on Kindle devices and reading applications. Per the Kindle Publishing Guidelines,
body text in a reflowable Kindle eBook (fiction and non-fiction) must be all defaults. Amazon encourages
authors to use creative styles for headings, special paragraphs, footnotes, tables of contents, etc., but not
for body text. The reason for this is that any styling on body text will override the user’s preferred default
reading settings. Users report such behavior as a poor reading experience.
If you have made so many changes that you can’t figure out a way to recover, clicking the Clear button
returns your paragraph to plain body text so that you can start fresh.
4. Building Your Print Replica eBook from a PDF
The following sections describe the process of building your Print Replica eBook from a PDF.
4.1. Creating a New Project from a PDF
1. Opening Kindle Create displays the launch screen shown in Figure 17. From the launch screen,
you can start a new project by importing a Microsoft Word or PDF document (New Project from
File) or resume a previously saved project (Resume Existing Project).
Figure 17: Launch screen
Amazon.com 18Kindle Create User Guide
2. To start a new project, click the New Project from File button. You can also launch a new project
by selecting File > New Project or using the shortcut CTRL + N (CMD + N for Mac users). The
Choose File dialog box is displayed as shown in Figure 18. Click the Textbooks, Travel Guides,
Cookbooks, Music Books option.
Figure 18: Choose Starting File dialog box
3. Click the Choose File button, navigate to the PDF on your local hard drive, select the file, and
click Open. Your PDF is imported and displayed in Kindle Create (see Figure 19).
Figure 19: Imported PDF
4. Select File > Save Project to save your imported eBook. The Save dialog box opens. Navigate
to the location on your computer where you want to save the file. Enter the File name. Click
Save.
4.2. Building Your Table of Contents
To build the table of contents for your eBook:
1. For each page that you want listed in the table of contents, select the page in the Contents
Pane, check the box next to Include Page in Table of Contents, and type the table of contents
entry in the Page Title box (see Figure 20). In the Contents Pane, each page that will be
Amazon.com 19Kindle Create User Guide
included in the table of contents is marked with a blue triangle in the upper corner (see Figure
21).
Figure 20: Table of Contents example
Figure 21: Page marked for table of contents
2. To save your work, click File > Save Project.
4.3. Adding Pages
To add pages to your eBook:
1. In the Contents Pane, right-click a thumbnail and select Insert Page(s) from the pop-up menu
(see Figure 22). The Import from a PDF File dialog box appears.
Figure 22: Insert Pages menu
Amazon.com 20Kindle Create User Guide
2. Navigate to the PDF on your local hard drive, select the file that contains the pages you want to
add, and click Open. The contents of the PDF are added to your eBook.
3. To save your work, click File > Save Project.
4.4. Moving Pages
To move pages in your eBook:
1. In the Contents Pane, drag and drop the pages in the order you prefer. To select multiple pages,
use SHIFT + click or CTRL + click.
2. To save your work, click File > Save Project.
4.5. Deleting Pages
To delete pages from your eBook:
1. In the Contents Pane, select the thumbnail of the page you want to delete. Right-click the
thumbnail and select Delete Selected Page from the pop-up menu. The page is deleted.
2. To save your work, click File > Save Project.
4.6. Preserving Hyperlinks
If there are internal or external hyperlinks in your PDF, select Edit > Preserve Links so that these links
will function properly in your eBook. If your PDF has hyperlinks and you do not use the Preserve Links
function, the eBook links will not work. Kindle Create displays preserved hyperlinks as a red underline
(see Figure 23).
Figure 23: Preserved links
4.7. Positioning Icons with Rulers and Guidelines
When you work with a PDF, rulers and guidelines make it easier for you to position icons and other
elements consistently throughout your eBook. To hide or display rulers in the Edit Pane, select View >
Show/Hide Rulers.
You can create vertical or horizontal guidelines by moving the cursor over the ruler, holding down the left
mouse button, and dragging the cursor onto the page. The guidelines appear as yellow lines in the
document window (see Figure 24).
Amazon.com 21Kindle Create User Guide
Figure 24: Rulers and guidelines
4.8. Adding Plug-ins
With Kindle Create, you can add audio, video, and image plug-ins to your eBook as icons (see Figure 25)
or hyperlinks (see Figure 26).
Figure 25: Video plug-in icon
Figure 26: Video plug-in hyperlink
4.8.1. Adding Plug-ins as Icons
You can add audio, video, and image plug-ins to your eBook as icons. Kindle Create accepts the
following file types:
Video: .mp4
Audio: .mp3
Images: .jpg, .jpeg or .png
Amazon.com 22Kindle Create User Guide
To add plug-in icons to your eBook:
1. Select Edit > Insert or click the Insert button (see Figure 27) and then select the type of plug-in
that you would like to add (image, audio, or video).
Figure 27: Insert button and menu
2. A dialog box appears asking you to select the file that you want to add. Navigate to the folder
where your file is saved and click Open. The cursor changes to show the plug-in icon attached to
it. Click the location where you want to place the plug-in and the icon appears on the page (see
Figure 28).
Figure 28: Video plug-in icon
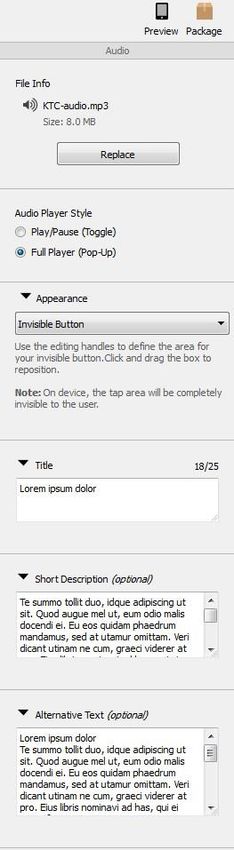
If you are adding an audio plug-in, you can click the audio icon and use the options in the
Properties Pane to customize the audio player (see Figure 29):
o Select Play/Pause for an inline audio player that keeps the user on the page.
o Select Full Player for a pop-up audio player.
o By default, the appearance of the audio player is Icon Button. If your content has an
image or text that indicates that clicking it will play audio, you can select Invisible
Button and place the invisible tap area over that image or text.
Amazon.com 23Kindle Create User Guide
Figure 29: Properties Pane--Audio options
3. To save your work, click File > Save Project.
4.8.2. Adding Plug-ins as Hyperlinks
You can add audio, video, and image plug-ins to your eBook as hyperlinks. Kindle Create accepts the
following file types:
Video: .mp4
Audio: .mp3
Images: .jpg, .jpeg or .png
To add plug-in hyperlinks to your eBook:
1. Click the Select button (see Figure 30) and select the text that you want to link to the plug-in.
Figure 30: Select button
2. Click the Insert button (see Figure 31), select Link from Selection, and then select the type of
plug-in that you would like to link to (image, audio, or video).
Amazon.com 24Kindle Create User Guide
Figure 31: Insert button and menu
3. A dialog box appears asking you to select the file that you want to add. Navigate to the folder
where your file is saved and click Open. The text that you selected is now hyperlinked to that file
(see Figure 32).
Figure 32: Video plug-in hyperlink
4. To save your work, click File > Save Project.
4.9. Moving Plug-in Icons
To move plug-in icons in your eBook:
1. Click the plug-in’s icon to select it. A blue border appears to let you know that it is selected (see
Figure 33).
Figure 33: Video plug-in icon (selected)
2. Once the plug-in is selected, drag and drop it to your desired location.
3. To save your work, click File > Save Project.
4.10.Re-sizing Invisible Audio Buttons
To re-size invisible audio buttons in your eBook:
1. Click the invisible audio button’s icon to select it. A blue box with selection points appears (see
Figure 34).
Amazon.com 25Kindle Create User Guide
Figure 34: Invisible audio button (selected)
2. Once the plug-in is selected, click one of the selection points in the direction that you want to
resize the plug-in. Drag and release to resize.
3. To save your work, click File > Save Project.
4.11.Editing a Plug-in's Title Text, Descriptions, and Alternative Text
To change a plug-in’s title text, description, or alternative text:
1. Click the plug-in’s icon or hyperlink to select it. If you have selected an icon, a blue border
appears. If you have selected a hyperlink, an orange border appears.
2. Once the plug-in is selected, the Properties Pane displays the plug-in’s Title, Short
Description, and Alternative Text (see Figure 35). Edit these fields as needed.
Amazon.com 26Kindle Create User Guide
Figure 35: Editing options in the Properties Pane
3. To save your work, click File > Save Project.
Note: For all plug-ins other than the Play/Pause audio toggle, this text is displayed in the plug-in pop-up
when viewed on Kindle reading platforms. The Title is displayed prominently as the heading for your pop-
up. The Short Description is placed below the title to accompany your content. The Alternative Text is
used for accessibility features on Kindle platforms. By default, this text is automatically populated with the
text from the Title and Short Description fields. For an example of how the text above would be
displayed in an audio pop-up to customers, see Figure 36.
Amazon.com 27Kindle Create User Guide
Figure 36: Caption and short description text in pop-up
4.12.Replacing a Plug-in’s Media File
To replace a plug-in’s media file:
1. Click the plug-in’s icon or hyperlink to select it. If you have selected an icon, a blue border
appears. If you have selected a hyperlink, an orange border appears.
2. Once the plug-in is selected, the Properties Pane displays the plug-in's properties. Click the
Replace button.
3. A dialog box appears asking you to select the file that you want to add. Navigate to the folder
where your file is saved and click Open. The plug-in icon appears on the page.
4. To save your work, click File > Save Project.
4.13.Deleting Plug-ins
To delete plug-ins from your eBook:
1. Click the plug-in’s icon or hyperlink to select it. (To select multiple plug-ins, SHIFT + click on each
plug-in.) If you have selected an icon, a blue border appears. If you have selected a hyperlink, an
orange border appears.
2. To remove the plug-in(s), select Edit > Delete or right-click the icon and select Delete.
3. To save your work, click File > Save Project.
Amazon.com 28Kindle Create User Guide
5. Previewing and Publishing your eBook (Microsoft Word or PDF)
When you have finished creating your eBook, you are ready to preview and publish it.
5.1. Previewing Your eBook
After you have made all the improvements and changes you wish to your eBook, you can review the
layout and formatting on a simulated device by launching Previewer. To use Previewer, select the
Preview button.
Previewer launches with its own controls for changing device type, text size, and font face (see Figure
37). You can move through your eBook page-by-page using the arrow keys. You can also type a book
location, or drag the scroll bar to change the position dynamically. There is also a Table of Contents view
that shows the Kindle Interactive TOC and allows you to navigate to the start of the chapter. You can also
navigate by key content such as 1st page of chapter, image by image, etc.
Figure 37: Previewer
5.2. Publishing Your eBook
Once you have completed previewing and updating your eBook, create a publishable file with the Publish
command. This process produces two files: a work file (.kcb) that allows you to update the eBook at a
later date, and a publishable file (.kpf) that you can submit to KDP.
1. Save your work file (.kcb) by selecting File > Save Project.
2. Click the Publish button. The Save File for Publication dialog box is displayed (see Figure 38).
Amazon.com 29Kindle Create User Guide
Figure 38: Save File for Publication dialog box
3. Accept or change the file location and name, and then click Save.
4. When packaging is complete, the confirmation box shown in Figure 39 is displayed. Submit the
.kpf file to KDP to complete the eBook creation process.
Figure 39: Confirmation box
6. Contact Us
To contact us about your experience with this tool, select Help > Provide Feedback or visit
https://kdp.amazon.com/en_US/contact-us.
Amazon.com 30You can also read