INTELLECHECK PRODUCT GUIDE - PAYMENT PROCESSING SOLUTION - EVISIONS HELP
←
→
Page content transcription
If your browser does not render page correctly, please read the page content below
Payment Processing Solution

      IntelleCheck Product Guide
                                  Product version 3.8

                              Last Updated 6/25/2021
Table of Contents
Introduction 3
What is IntelleCheck? 3
Accounts Payable 3
Payroll 4
Getting the Most out of IntelleCheck 4
IntelleCheck Use Cases 5
IntelleCheck Features 6
Positive Pay 7
BankMobile Disbursements 8
Queries – Card File Generation 9
Account Configuration 11
Customizing the Refund File 12
Imaging 13
Configuration 13
Sample Script 14
Testing 14
Email 15
Header 15
Attachment 16
Body 17
Server 18
Associate Accounts 18
Roadmap for Evisions MAPS Products 19
IntelleCheck Support Resources 20
Product Help 20
User Guides 20
Training 20
Additional Resources 20
www.evisions.com IntelleCheck Product Guide Page 2 of 20
Last Updated 6/25/2021Introduction
What is IntelleCheck?
IntelleCheck is Evisions’ solution for Ellucian’s™ Banner Digital Campus payment processing. IntelleCheck seamlessly integrates with Banner and
enhances Banner output for AP, Payroll, Student Refund checks and Direct Deposit Advices.
IntelleCheck uses blank check stock instead of costly pre-printed stock, and provides protection against fraudulent activity with the optional
Positive Pay module. IntelleCheck can integrate with 3rd party imaging solutions, so that check copies no longer need to be printed and stored.
IntelleCheck can be customized to email direct deposit advices to students, vendors and employees as password-protected and encrypted PDF
attachments.
The following is a brief overview of where IntelleCheck fits in to the Ellucian Banner Accounts Payable and Payroll procedures.
Accounts Payable
The following list includes Banner processes/reports/forms that might be run prior to processing the checks in IntelleCheck:
AP Checks
n FAABATC – Batch Check Print Form
n FAAONLC – Online Check Print Form
n FARINVS – Invoice Selection Report
n FABCHKS – Batch Check Process
n FABCHKP (Evisions version) – Check Print Process
FABCHKP
The check print process in the Banner® Finance module. The code for this process is modified by Evisions for use with IntelleCheck.
AP Direct Deposits
n FAPDIRD – Direct Deposit File Creation Process (Canada uses FAPCDIR)
n FAPTREG – Direct Deposit File Register
n FARDIRD (Evisions version) – Direct Deposit Process
FARDIRD
The direct deposit process in the Banner® Finance module. The code for this process is modified by Evisions for use with IntelleCheck.
After the FABCHKP or FARDIRD process is complete, IntelleCheck is executed and used to process the pending payments.
n IntelleCheck – Print/email checks/direct deposits, transmit payments from BankMobile Disbursements
Once the payments are processed via IntelleCheck, the final steps are completed in Banner:
n FABCHKR – Batch Check Register
n FABCHKA – Batch Check Accounting Process
n FGRACTG – Posting Process
www.evisions.com IntelleCheck Product Guide Page 3 of 20
Last Updated 6/25/2021Important Note:
Verify the payment processing via IntelleCheck is successful before running FABCHKA.
For detailed information about running Accounts Payable procedures, refer to the Ellucian Banner® documentation.
Payroll
The following list is a general guideline of the initial steps required to run Payroll in Banner:
n Time Entry – Creates time sheet entry for each employee
n Re-Extractions – Retrieves modified records
n Deletions – Removes unwanted time entries
n Payroll Proof, Leave, and Calc Processes – Checks error conditions, calculates leave, earnings, deductions, and taxes
n Check and Direct Deposit Processing – Calculates check and direct deposit amounts (PHPDOCM)
n PHPCHKL (Evisions version) – Generates the checks and/or the direct deposit advice output
PHPCHKL
The check print and direct deposit process in the Banner® Human Resources module. The code for this process is modified by Evisions for use with IntelleCheck
After PHPCHKL is complete, IntelleCheck is executed and used to process the pending payments.
n IntelleCheck - Print/email checks/direct deposits, transmit payments from BankMobile Disbursements
After payments are processed via IntelleCheck, the final steps are completed in Banner:
n Update and Accounting Processes - Update year-to-date records and financial ledgers
Important Note:
Verify the payment processing via IntelleCheck is successful before running the update and accounting processes.
For detailed information about running Payroll procedures, refer to the Ellucian Banner documentation.
Getting the Most out of IntelleCheck
IntelleCheck is an extremely efficient payment processing solution and Evisions wants to be sure you are taking advantage of everything it has to
offer. By understanding and utilizing all its capabilities, you can not only increase your ROI but you can better serve your constituents.
To help you get the most out of IntelleCheck, we offer you:
n A look at how your peers are using IntelleCheck and what they’ve been able to achieve by doing so.
n An overview of the functionality within IntelleCheck and its other available features. You’ll not only see what the software can do, but
also gain an understanding of how it can benefit you and your institution.
www.evisions.com IntelleCheck Product Guide Page 4 of 20
Last Updated 6/25/2021IntelleCheck Use Cases
“We used to print up to 10,000 bills a month and use an out-
sourcing company to send them out. With FormFusion, we now
print fewer than 500 bills a month and have saved a ton in print-
ing and postage.”
JOH N BILM ONT
Chief Financial Officer
City College of San Francisco
View all IntelleCheck Case Studies
www.evisions.com IntelleCheck Product Guide Page 5 of 20
Last Updated 6/25/2021IntelleCheck Features
IntelleCheck is Windows PC software which is web-enabled, meaning it is accessible from your web browser via an Internet connection. It is
designed to operate using Microsoft Internet Explorer, Mozilla Firefox, Google Chrome, and Apple Safari browsers.
IntelleCheck is a MAPS application and runs on the same server as the other Evisions Higher Education applications (Argos and FormFusion).
IntelleCheck connects to the MAPS service to retrieve data and perform other tasks.
The IntelleCheck main menu contains eight options:
n Process Pending - Process pending payments that have not yet been processed.
n Reprocess - Process payments that have been processed previously. You will be required to explain the reason for reprocessing.
n Void - Void or unvoid previously processed payments.
n Positive Pay - Generate an electronic account reconciliation file send to your bank before distributing printed checks. Used to prevent
fraud.
n Reports - Generate and customize reports to view information about your checking system.
n BankMobile - Manage BankMobile Disbursements enrollment options.
n Reconciliation - Reconcile processed BankMobile payments with the Banner payroll and finance systems.
n Administration - Allows administrators to configure IntelleCheck. This section is described in the IntelleCheck Administrator Guide.
Note: If your institution does not license Positive Pay or BankMobile, these optional modules will be visible but disabled.
www.evisions.com IntelleCheck Product Guide Page 6 of 20
Last Updated 6/25/2021Positive Pay
Positive Pay is an anti-fraud service offered by most commercial banks. An electronic file of checks issued is sent to the bank to allow banks to
verify that each check presented is legitimate.
Positive pay files can be created in two locations in IntelleCheck: Process Pending and Positive Pay. When creating the file in Process Pending, the
file is generated after the payment processing is complete.
The positive pay file can also be generated through the Positive Pay configuration, accessible from the Main Menu of IntelleCheck.
Note: Appropriate permissions must be assigned to users for each Account Code in order to generate Positive Pay files.
First, select the correct account code from the Account Code drop-down at the top of the screen. There are three options for selecting the
batches for positive pay:
All processed checks that has not been sent to Positive Pay yet – This will select all of the processed checks for this account that have not
yet been included in a positive pay file.
Select from batches that have checks yet to be sent to Positive pay – This will display a list of batches with checks that are available for
positive pay. Only checks from the selected batches will be included in the positive pay file.
Select from all existing batches of checks – Unlike the second method, this will display all of the batches for this account whether there are
checks available for positive pay or not.
There is a summary section on the bottom of the screen noting the total count and dollar amount of the checks that have been selected. Once
satisfied with the selection, click the Generate button to create the file. If the MAPS path is being used, the positive pay file will be stored in the
proper directory automatically. If the local path is used, give the filename and location of where to save the file.
www.evisions.com IntelleCheck Product Guide Page 7 of 20
Last Updated 6/25/2021BankMobile Disbursements
IntelleCheck integrates with BankMobile Disbursements to enable colleges and universities to quickly and efficiently distribute financial aid
refunds and payroll disbursements electronically.
This page discusses the administrative configuration area for BankMobile Disbursements. For a complete guide to BankMobile Disbursements
functionality, refer to Getting Started with BankMobile.
To enable BankMobile Disbursements in IntelleCheck, click on the BankMobile button from the list of administrative tasks. Then, click on green
plus icon to add a BankMobile Disbursements configuration.
Enter the BankMobile Disbursements configuration key provided by your BMTX Implementation Project Manager.
Refund File
The refund file is required by BankMobile Disbursements and includes all the pertinent information to disburse payments. This file is created by the end user
through the Process Pending menu. Please see Customizing the Refund File if modifications are needed to the refund file format.
File Delivery
Files can only be delivered after the required BankMobile Disbursements module has been added to your MAPS license.
www.evisions.com IntelleCheck Product Guide Page 8 of 20
Last Updated 6/25/2021Queries – Card File Generation
This is the area to generate the query to create a card file of students and/or employees.
n Schedule: Allows the query to run automatically and deliver the card files. Select the days and time for the query to run and card file to be
sent. Be careful to schedule a time which will not interfere with any backups.
n In order to be able to turn on scheduling, you must be logged into IntelleCheck as a MAPS user who has the User Type set to
Administrator in the MAPS Config.
n Execute As: Used for scheduled queries. The username must be a MAPS user who has sufficient database permissions to execute the
query or inherits permissions based on the ADO Connection properties.
n SQL: After a query has been created using the Query Builder, review the generated SQL and modify the WHERE clause if necessary. Click
on the Preview button to see a list and count of students/employees to be sent to BMTX.
n Preview: Displays the results of the SQL and provides a record count. Click on Select All, or select individually, then click the Deliver
button to manually send a card file to BMTX. The Deliver button is only enabled when Schedule is set to “Do not schedule the query.
(Manual)”
Click on the green plus under the Queries tab to bring up the Add New Query dialog box. Enter a name and select the type of query, Student
or Employee. Click OK. Next, click on the Query Builder button on the right.
www.evisions.com IntelleCheck Product Guide Page 9 of 20
Last Updated 6/25/2021The Query Builder has several input areas and check boxes:
n Shared Secret - Select a format for the shared secret from the list of available options. The shared secret can be constructed from several
variations on a partial date of birth and Banner ID number, or using the PIN from the Third Party Access (GOBTPAC) table.
n Role - The role of the users who are being selected in this query. Typically, this value is either 'STUDENT' or 'EMPLOYEE'.
n Address Hierarchy Internal Code - The Banner Crosswalk Validation form (GTVSDAX) allows you to enter hierarchy criteria. This field
should be set to the Internal Code that you wish to use. The corresponding Internal Group must be set to 'ADDRESS' on the Crosswalk
Validation form.
n Email Address Code - This field should be set to the Email Type you want to retrieve (for example, personal or business) from the Banner
Email Address Form (GOAEMAL). Valid choices come from the Email Type Validation (GTVEMAL) table.
n Limit to active email addresses - Check this box to only retrieve active email addresses.
n Limit to preferred email addresses - Check this box to only retrieve email addresses that are indicated as the person's preferred
address.
n Limit by age range - Check this box to restrict the query to people within the specified age range. Once checked, you can then set the
minimum and maximum ages using the boxes to the right.
Student queries have three additional fields:
n Term Code - Enter the desired term code. Only registered students for terms greater than or equal to the specified term will be retrieved.
Valid choices come from the Term Code Validation (STVTERM) table.
www.evisions.com IntelleCheck Product Guide Page 10 of 20
Last Updated 6/25/2021n Limit by student level - Check this box to limit the results by student level. Then, enter the student level code(s) for the level(s) of
students to retrieve (for example, undergraduate and credit, 'UG C'). Valid choices come from the Student Level Validation (STVLEVL)
table. Multiple values should be separated by a space.
n Limit by student type - Check this box to limit the results by student type. Then, enter the student type code(s) for the type(s) of
students to retrieve (for example, new and transfers, 'N T'). Valid choices come from the Student Type alidation (STVSTYP) table.
Multiple vales should be separated by a space.
Employee queries have two additional Payroll-related fields:
n Limit by Pay ID - Enter the Payroll ID(s) for the employees to retrieve (for example, monthly and biweekly, 'MN BW'). Valid choices come
from the Payroll Identification Code Rule (PTRPICT) table. Multiple values should be separated by a space.
n Limit by pay date within last [#] month(s) - Set this field to the desired number of months. Only employees who have been paid
within this time period will be retrieved by the query.
Enter values for all of the required fields and any optional criteria, then click OK to generate the SQL.
The SQL field will now be populated with the complete select statement with the criteria entered. This can be manually modified if needed.
Click on the Preview button on the right to view the results of the query. Select individual names or use the Select All button. Click Deliver to
send the card file to BMTX.
The queries can be run manually or scheduled to run at a specified time on select days.
Important:
Once an account is checked and a card file has been sent to BMTX, payments generated for the account will be delivered to BMTX for applicable payees.
A payment marked as a BankMobile payment CANNOT be changed to a check. The payment must be voided in IntelleCheck and Banner.
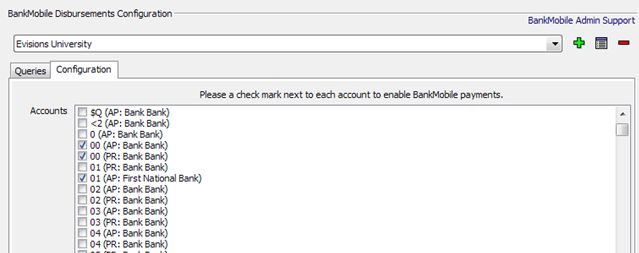
Account Configuration
Next, check the box for each account which will be processing payments from BankMobile Disbursements for the selected configuration.
Click the Save button to save the settings.
www.evisions.com IntelleCheck Product Guide Page 11 of 20
Last Updated 6/25/2021Customizing the Refund File
The standard refund file created by IntelleCheck includes payment number, amount, payee, and Banner Id. In some cases, additional id fields may
need to be included in the refund file to provide extended search criteria through BankMobileAdminSupport.com. To include additional fields, an
Oracle view, named EVIBCHO_VIEW, needs to be created in the Banner environment. Once this view exists, IntelleCheck will include the
additional fields in the refund file.
Important Note: The EVIBCHO_VIEW should be created in the Evisions schema. A public synonym should also be created.
CREATE OR REPLACE VIEW EVISIONS.EVIBCHO_VIEW AS
SELECT EVIBCCHK_CHECK_NUMBER AS CHECK_NUMBER, -- required
EVIBCCHK_ACCOUNT_CODE AS ACCOUNT_CODE, -- required
EVIBCCHK_ACCOUNT_TYPE AS ACCOUNT_TYPE, -- required
EVIBCCHK_BATCH_ID AS BATCH_ID, -- required
TABLE1_DATA1 AS ID2, -- custom data
TABLE2_DATA2 AS ID3 -- custom data
FROM EVIBCCHK, TABLE1, TABLE2
WHERE EVIBCCHK_PIDM = TABLE1.PIDM
AND EVIBCCHK_PIDM = TABLE2.PIDM;
CREATE PUBLIC SYNONYM EVIBCHO_VIEW FOR EVISIONS.EVIBCHO_VIEW
In the sample script above, you would need to replace TABLE1 and TABLE2 and related data fields with the names of the tables containing the
additional information to be included in the refund file. If for any reason the additional information can not be found, the refund file will still be
created and sent with the standard fields to prevent a delay in payment.
www.evisions.com IntelleCheck Product Guide Page 12 of 20
Last Updated 6/25/2021Imaging
IntelleCheck has the ability to send pdf file copies of checks, direct deposits, and BankMobile Disbursements payments to a 3rd party imaging
system such as Banner Xtender. A custom script can be executed as payments are processed which can accomplish the necessary tasks for
imaging.
Configuration
To access the Imaging area of IntelleCheck, click the Imaging button in the Administration menu.
Create a new template by clicking the button and giving the template a name. This will enable all of the fields and allow configuration.
Selecting “Yes” to Force Imaging? will force imaging to happen automatically each time new payments are processed through Process Pending.
Selecting “Prompt User” will allow the user to decide if the payments being processed should be imaged. When reprocessing payments, the user
will always be prompted, regardless of this setting.
Select the Document Types(s) to Image allows any combination of checks, direct deposit advices, and payments from BankMobile
Disbursements to be tied to the imaging layout. For example, a layout with only the “Checks” box selected for imaging would only image checks.
If a user processes a batch of checks and direct deposits and selects yes for imaging, only the checks from this batch will be sent to imaging. The
direct deposit advices will be ignored.
The Command to Execute is the name of a script the IT staff created. This script can ftp the file to a certain location or perform any other
functionality the IT staff sees necessary. The filename entered here must reside in the Scripts directory on the server where MAPS is installed. By
default, this is C:\Program Files\Evisions\MAPS\Service\Scripts
The Command Parameters field is used for any parameters for the script. Enter static variables here or access the IntelleCheck variables by
clicking the ellipsis to the right of this box. A common setting is to create a script which will take a parameter in for the name of the new file, the
CheckNumber, and add the [CheckNumber] variable here. If you want to use multiple command parameters, separate them with spaces. Note:
Any command parameters entered when producing a single PDF file (see below) will reference the first payment in the batch.
By default, IntelleCheck will set security on the pdf files so they cannot be modified. Some imaging systems require this setting to be turned off in
order for the pdfs to be added to the system. Check the Disable PDF Encryption box to turn off the encryption if problems are encountered.
www.evisions.com IntelleCheck Product Guide Page 13 of 20
Last Updated 6/25/2021Finally, choose whether you want to produce Individual Files or a Single File. If you choose Single File, each payment will appear on its own
page inside a single PDF document.
After the parameters have been entered click the Associate Accounts tab. Select which account codes this layout should run against. This allows
a separate imaging layout to be created for each account if necessary.
Sample Script
The following sample ftp script can be used as a starting point. This file takes in two parameters. The first is the name of the new file and the
second is the file to be sent via FTP to a different server. You will need to change the values at the beginning of this script to match your
institution's specific settings. If additional functionality is needed, it can be modified as desired.
@echo off
rem Evisions - FTP Script to Unix
set filename=%2
set chk_num=%1
set temp_ftp_file=temp.ftp
set log_file_from_session=YOUR_LOG_FILE_PATH
set system_name=SYSTEM_IP_ADDRESS
set login_name=YOUR_USERNAME
set login_password=YOUR_PASS
set remote_directory="YOUR_REMOTE_DIR"
rem now we will create the temp ftp file...
echo user %login_name% %login_password% > %temp_ftp_file%
rem echo %login_password% >> %temp_ftp_file%
echo cd %remote_directory% >> %temp_ftp_file%
rem still creating the temp ftp file...
echo put %filename% %chk_num%.pdf >> %temp_ftp_file%
rem change to binary mode
echo binary >> %temp_ftp_file%
echo quit >> %temp_ftp_file%
rem now we will call the temp ftp file...
ftp -n -s:%temp_ftp_file% %system_name% > %log_file_from_session% 2>&1
rem now we will delete the temp ftp file...
del %temp_ftp_file%
Testing
A good way to test imaging is to remove IntelleCheck from the equation. Save the sample script as ftpTest.bat. Then run the following from a
Windows command promp, where the first parameter is the name of the destination file and the second parameter is the source file to send via
ftp.
ftpTest.bat new_file old_file.pdf
This will send the “old_file.pdf” to the “system_name” in the “remote_directory” with the name of “new_file.pdf”. If the new_file.pdf is not in the
directory, modify the script accordingly until it works as expected.
Once the above test is successful, the next step is to use IntelleCheck.
In the Imaging menu, enter ftp.bat as the command to execute. Include the check number in the filename by entering [CheckNumber] as the
parameter. IntelleCheck will automatically add the pdf as the last parameter. When processing payments, IntelleCheck will call the ftp.bat script,
add the appropriate check number as a parameter, and send the pdf to the proper system and directory.
www.evisions.com IntelleCheck Product Guide Page 14 of 20
Last Updated 6/25/2021Email
Email is set up and delivered in an ICC file provided by an Evisions technician. In order to use the new Email template, the ICC file must first be
imported into IntelleCheck.
Select the appropriate email layout from the Email Layout dropdown. Typically there is one layout for accounts payable (AP) and one for payroll
(PR). Once the layout is selected the corresponding fields will be populated.
Header
The “Header” tab contains information on delivering the emails, sender, recipient, etc.
Email Address:
The variable set for the “To:” address is defined and populated in the check process, fabchkp or phpchkl. The email address must exist prior to
running the check process for each payee.
n To: The email address of the recipient. Evisions will pre-populate with a variable and should not be changed. Required
n CC: The recipient of a carbon copy. Optional
n BCC: The recipient of a blind carbon copy. Optional
n From: The email address which will be shown as the sender. Required
n Reply To: The email address replies will be sent to. Optional
n Receipt To: The email address return receipts will be sent to. Optional
n Character Set: Select a character set from the drop down list.
n Content Type: Select either HTML or Plain Text from the drop down. Selecting HTML allows you to enter HTML tags in the email Body
which will result in HTML formatted output in the email.
www.evisions.com IntelleCheck Product Guide Page 15 of 20
Last Updated 6/25/2021Attachment
The name and password of the pdf attachment are set on the “Attachment” tab.
Attachments:
Attachments are sent in PDF format so it is important to leave the .pdf extension in the name of the file.
The name of the attachment is set to receipt.pdf as a default. This can be customized by the institution and variables can be added to the name if
needed. To add a variable or function to the name, click on the Ellipses (…) button to the right of the “Filename:” field. This will provide a list of
variables that may be added. A common choice is adding the [CheckNumber] variable to the filename, [CheckNumber].pdf. This will name the pdf
100.pdf, 101.pdf, etc.
There is an option to password protect the attachments sent by IntelleCheck. The format of the password is decided on during the design of the
check template and added into the code accordingly. The password can be a combination of information from the Banner database. A common
choice is the first four letters of the last name and the last four of the SSN. The variable in the “Password:” field is set by an Evisions technician and
should not be changed by the institution. If the password ever needs to be changed Evisions should be contacted to update the files accordingly.
Additional attachments can be included by clicking the green plus sign shown in the figure above. A standard Windows File Open dialog will
appear where you can select any file type to attach. To remove an attachment select the attachment and click the red minus sign. Click the
magnifying glass icon beneath the red minus sign to preview a selected attachment.
www.evisions.com IntelleCheck Product Guide Page 16 of 20
Last Updated 6/25/2021Body
The “Body” tab allows the institution to customize the subject and body of the emails.
Email Body: The subject and body of the email can be changed at run time by an end user who was given Email Administration permissions.
Typically there is a message about using Adobe Acrobat Reader to view the attachment and a link to the free download. Many institutions also
mention something about the password in he body of the email so the recipient knows what to type in to view the pdf.
If within the Header tab you selected HTML as content type, you may enter HTML tags which will result in HTML formatted output in the email.
The ellipsis button (...) in the Subject line and the buttons underneath the body field allow you to insert variables and use functions in the subject
and body. There is also an option to check your syntax.
www.evisions.com IntelleCheck Product Guide Page 17 of 20
Last Updated 6/25/2021Server
Email servers are configured in MAPS.
The Server tab in IntelleCheck provides a list of the email servers from MAPS. Select the appropriate server for the emails from IntelleCheck to be
sent through.
Associate Accounts
The Associate Accounts tab indicates which accounts this layout should be used with. The delivered files from Evisions will have one layout for
all of the PR accounts and one layout for all of the AP accounts. Changing settings on this tab will allow the user to create a separate email layout
for each account if necessary.
Check the boxes for each account that you would like to associate with this layout.
www.evisions.com IntelleCheck Product Guide Page 18 of 20
Last Updated 6/25/2021Roadmap for Evisions MAPS Products
The roadmap covers all Evisions MAPS products (Argos, FormFusion, and IntelleCheck). It is a living document that is updated regularly by the
Evisions Product Success Team.
View Roadmap
www.evisions.com IntelleCheck Product Guide Page 19 of 20
Last Updated 6/25/2021IntelleCheck Support Resources
Evisions provides several sources of support for IntelleCheck users, including product Help and user guides, live and recorded training, and a
support website with many useful resources.
Product Help
To get to the help, select the Help button in a dialog box, press the F1 key, or select the Helpbutton in the lower right.
User Guides
The Help for IntelleCheck contains two user guides. Each guide contains step-by-step instructions for common and advanced tasks, and will help
you get started with IntelleCheck.
Training
Evisions provides free, live online training for all products. Visit the Training page to register for a session, or watch recorded training sessions at
your convenience.
Additional Resources
The Support page contains links to additional support resources:
n IntelleCheck Installation - Installation and upgrade information.
n Release Documentation - Release guides and release notes for all current and previous versions of IntelleCheck.
n Knowledge Base - Answers to common questions.
n HelpDesk - Technical support.
n CO-OP Share - Useful resources published by other institutions.
www.evisions.com IntelleCheck Product Guide Page 20 of 20
Last Updated 6/25/2021You can also read