FortiAuthenticator - RADIUS 2FA Interoperability Guide - Version 6.1.0 - AWS
←
→
Page content transcription
If your browser does not render page correctly, please read the page content below
FortiAuthenticator - RADIUS 2FA Interoperability
                      Guide
                   Version 6.1.0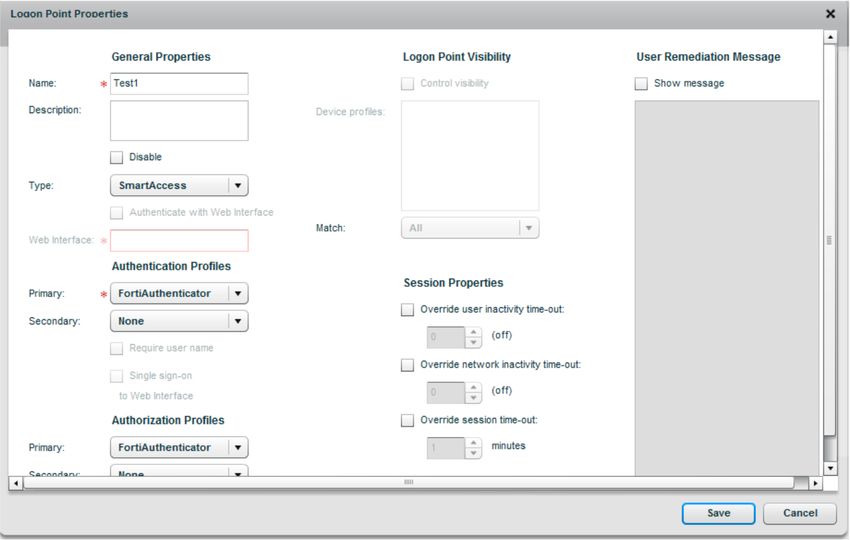
FORTINET DOCUMENT LIBRARY
https://docs.fortinet.com

FORTINET VIDEO GUIDE
https://video.fortinet.com

FORTINET BLOG
https://blog.fortinet.com

CUSTOMER SERVICE & SUPPORT
https://support.fortinet.com

FORTINET TRAINING & CERTIFICATION PROGRAM
https://www.fortinet.com/support-and-training/training.html

NSE INSTITUTE
https://training.fortinet.com

FORTIGUARD CENTER
https://fortiguard.com/

END USER LICENSE AGREEMENT
https://www.fortinet.com/doc/legal/EULA.pdf

FEEDBACK
Email: techdoc@fortinet.com

March 28, 2020
FortiAuthenticator 6.1.0 RADIUS 2FA Interoperability Guide
23-610-616362-20200328
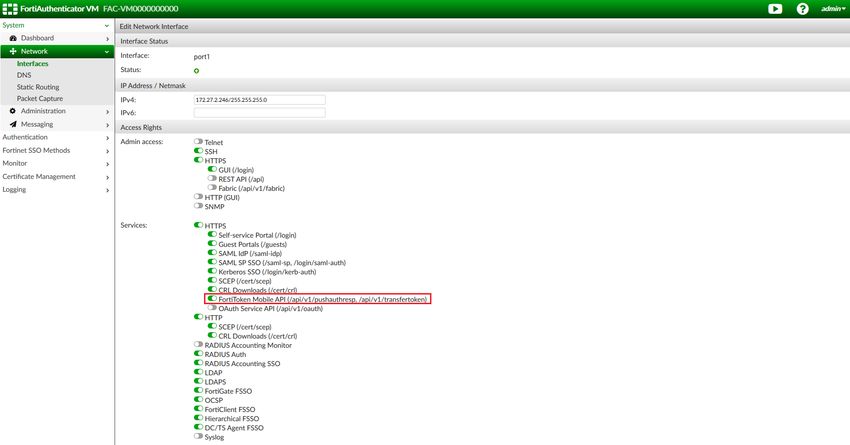
TABLE OF CONTENTS

           Change Log                                                   5
           About this guide                                             6
           FortiAuthenticator setup                                     7
             Initial setup                                              7
             System settings                                            8
                 DNS                                                    8
                 Time synchronization                                   8
             Creating a test user and token                             8
                 Registering FortiToken                                 8
                 Creating a test user                                   9
             Configuring RADIUS settings                               10
                 Adding the RADIUS client                              10
                 Creating the RADIUS policy                            11
             Optional: Enabling FortiToken Mobile push notifications   11
           FortiGate                                                   14
             Configuring the RADIUS server                             14
             Configuring authentication for administrators             15
               Creating user groups                                    15
               Creating administrators                                 17
               Creating a wildcard administrator account               17
             Configuring authentication for SSL-VPN users              18
             Configuring FortiToken Mobile push on FortiGate           19
           FortiManager                                                21
             Configuring the RADIUS server                             21
             Creating an admin user                                    21
               Creating a wildcard administrator account               22
           FortiAnalyzer                                               23
             Configuring the RADIUS server                             23
             Creating an admin user                                    23
               Creating a wildcard administrator account               24
           FortiWeb                                                    25
             Configuring the RADIUS server                             25
             Creating an admin group                                   25
             Creating an admin user                                    26
               Creating a wildcard administrator account               27
           FortiMail                                                   28
             Configuring the RADIUS server                             28
             Creating an admin user                                    29
               Creating a wildcard administrator account               29
           Cisco IOS-based switches and routers                        31
             Configuring telnet authentication                         31
             Configuring enabled authentication                        32

FortiAuthenticator 6.1.0 RADIUS 2FA Interoperability Guide                  3
Fortinet Technologies Inc.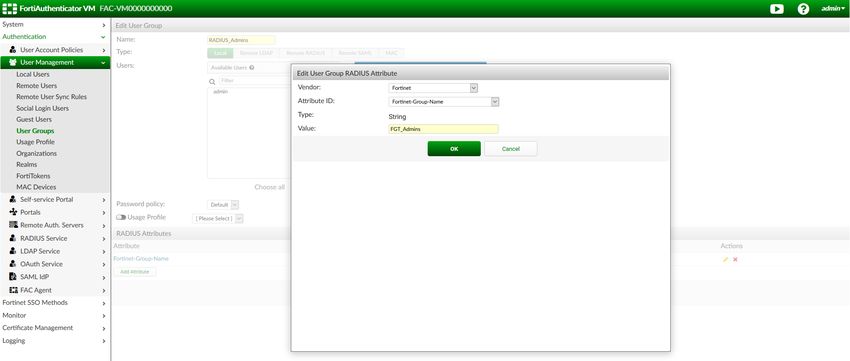
Citrix Access Gateway                                      34
             Configuring the RADIUS server                            34
             Creating a logon point                                   35
             Testing authentication                                   36
           Linux login                                                37
             Integrating Linux with RADIUS                            37
             Enabling strong authentication for SSH                   37
             Enabling challenge-response authentication               38
           Apache                                                     39
             Modifying the Apache configuration                       39
           Troubleshooting                                            41
             Logging                                                  41
             Extended logging                                         41
             Traffic sniffing                                         42
             RADIUS packet generation                                 42
           Appendix A - Supported two-factor authentication methods   43
           Appendix B - Synchronizing FortiTokens                     45
             Administrator synchronization                            45
             User synchronization                                     46

FortiAuthenticator 6.1.0 RADIUS 2FA Interoperability Guide                 4
Fortinet Technologies Inc.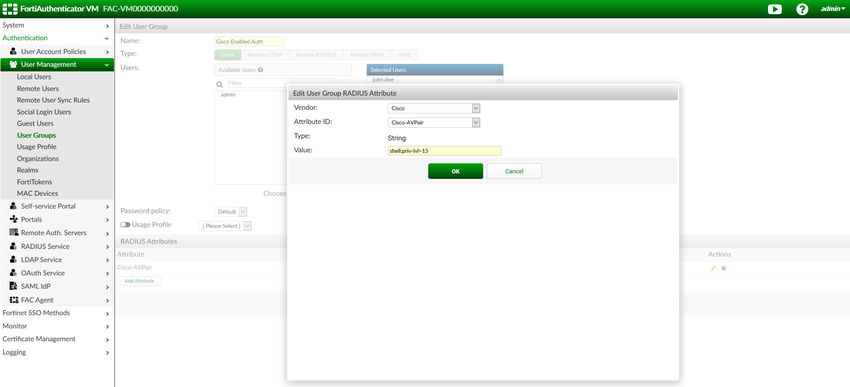
Change Log

    Date                     Change Description

    2020-03-28               Initial release.

FortiAuthenticator 6.1.0 RADIUS 2FA Interoperability Guide   5
Fortinet Technologies Inc.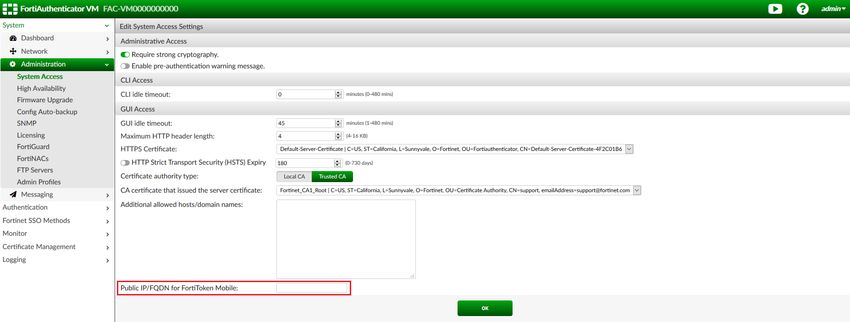
About this guide

About this guide

   The purpose of this guide is to aid in the configuration of two-factor authentication (2FA) using FortiAuthenticator for
   Fortinet solutions and other third party products.
   Testing was performed with the following product versions:
    l   FortiAuthenticator 6.1.0
    l   FortiGate 6.2.2
    l   FortiManager 6.2.2
    l   FortiAnalyzer 6.2.2
    l   FortiWeb 6.2.1
    l   FortiMail 6.2.1
    l   Cisco 2950 switch running IOS 12.1(13)
    l   Citrix Access Gateway 5.0
    l   OpenSSH version 5.8p1
    l   Apache version 2.2.17

FortiAuthenticator 6.1.0 RADIUS 2FA Interoperability Guide                                                                    6
Fortinet Technologies Inc.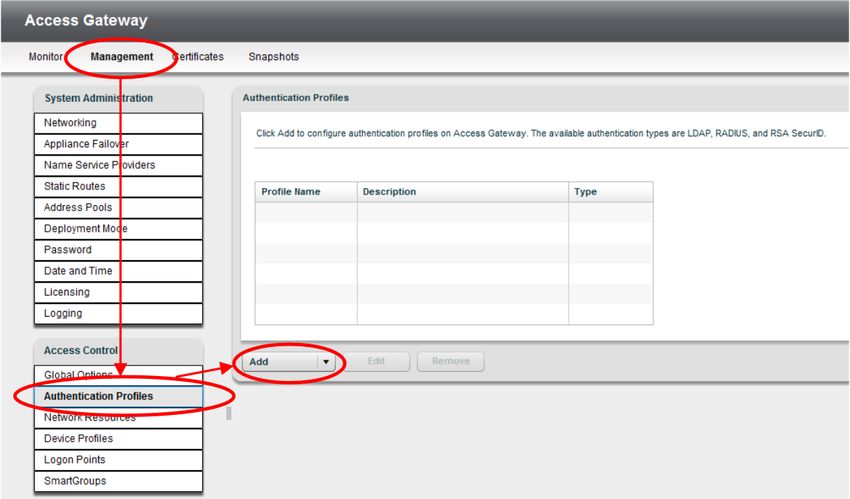
FortiAuthenticator setup

FortiAuthenticator setup

    This section includes configuration information for the FortiAuthenticator. Any deviations from this configuration will be
    detailed in the relevant section. For more information on the setup and configuration of the FortiAuthenticator, see the
    Administration Guide.
    This section includes the following information:
     l   Initial setup on page 7
     l   System settings on page 8
     l   Creating a test user and token on page 8
     l   Configuring RADIUS settings on page 10
     l   Optional: Enabling FortiToken Mobile push notifications on page 11

Initial setup

    Upon initial deployment, the FortiAuthenticator is configured to the following default settings:
    Port 1 IP: 192.168.1.99
    Port 1 Netmask: 255.255.255.0
    Default Gateway: 192.168.1.1

    These settings can be modified by configuring a PC to an address on the same subnet and accessing the GUI via
    https://192.168.1.99/. Alternatively, you can configure these settings using the CLI.

    To configure basic settings using the CLI:

    1. Connect the management computer to the FortiAuthenticator using the supplied console cable.
    2. Log in to the FortiAuthenticator unit using the default credentials below:
         Username: admin
         Password:
         You will be prompted to change and confirm your new password.
    3. Configure the network settings as required, for example:
         config system interface
            edit port1
               set ip /
               set allowaccess https ssh
            next
         end
         config router static
            edit 0
               set device port1
               set dst 0.0.0.0/0
               set gateway
            next
         end
         Substitute your own desired FortiAuthenticator IP address and default gateway. This will give you access to the
         GUI through the specified IP address.

 FortiAuthenticator 6.1.0 RADIUS 2FA Interoperability Guide                                                                      7
 Fortinet Technologies Inc.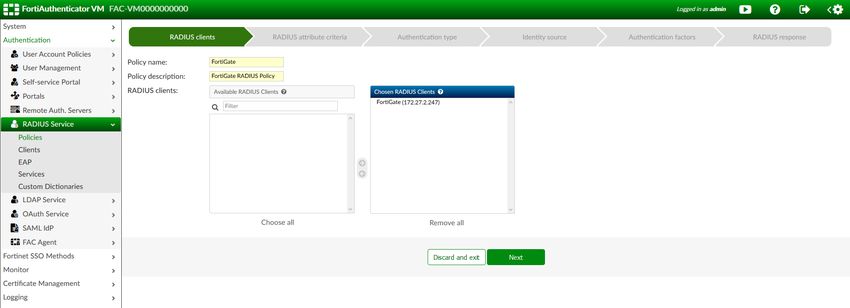
FortiAuthenticator setup

    For more information on FortiAuthenticator initial setup, see the FortiAuthenticator Administration Guide in the Fortinet
    Document Library.

System settings

    Once the initial setup of the FortiAuthenticator is complete, further configuration can be performed through the GUI.

DNS

    To enable resolution of the FortiGuard network and other systems such as NTP servers, set your DNS to your local or
    ISP nameserver configuration via Network > DNS.

Time synchronization

    FortiToken two-factor authentication uses a time-based algorithm to generate token PINs for use in the authentication
    process. It is essential that the time is accurate on the FortiAuthenticator system, therefore, NTP time synchronization
    is recommended. Change your settings to a local NTP server for accurate timing by going to Dashboard > Status and
    clicking the Edit button next to System Time in the System Information widget.

Creating a test user and token

Registering FortiToken

    In order to test two-factor authentication, a token is required. The configuration instructions included in this guide use
    FortiToken.

                              For security reasons, a token can only be automatically registered from the FortiGuard
                              network a single time. If you need to register it a subsequent time, please contact Fortinet
                              support.

 FortiAuthenticator 6.1.0 RADIUS 2FA Interoperability Guide                                                                      8
 Fortinet Technologies Inc.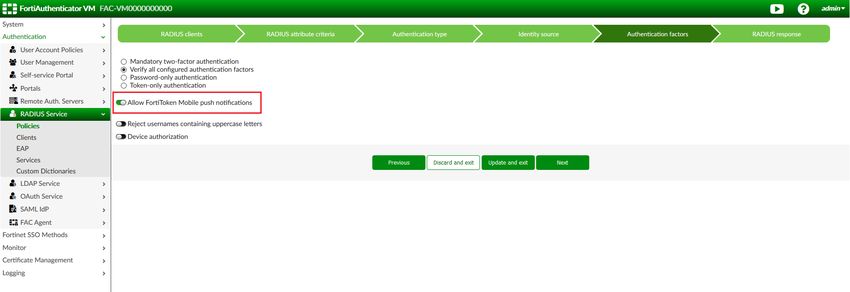
FortiAuthenticator setup
To register a FortiToken:
1. Go to Authentication > User Management > FortiTokens, and select Create New.
2. Select the Token type and enter the FortiToken Serial number or Activation code. Click OK.
Once registered, tokens will be displayed with an Available status.
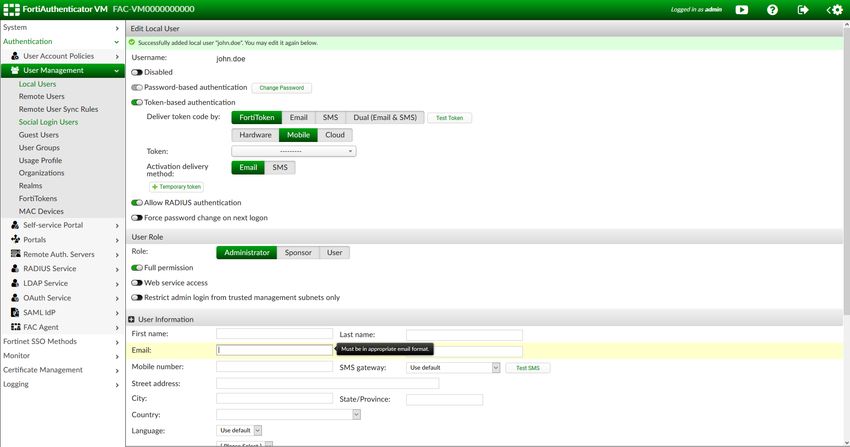
Creating a test user
Create a single test user with RADIUS authentication and FortiToken two-factor authentication enabled.
To create the user:
1. Go to Authentication > User Management > Local Users, and click Create New.
2. Enter a username and password for the local user.
The configuration instructions included in this guide use the username John.Doe.
3. Enable Allow RADIUS authentication, and click OK to access additional settings.
4. Enable Token-based authentication and choose Deliver the token code by FortiToken.
Select the FortiToken added earlier from the relevant dropdown menu.
5. Set the Delivery method to Email. This will automatically open the User Information section where you can enter
the user email address in the field provided.
FortiAuthenticator 6.1.0 RADIUS 2FA Interoperability Guide 9
Fortinet Technologies Inc.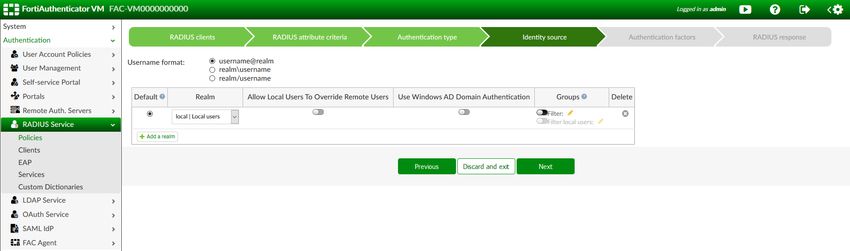
FortiAuthenticator setup

    6. Click OK to save changes to the local user.

Configuring RADIUS settings

    Before any device can connect to the FortiAuthenticator, it must be configured as a RADIUS client and assigned to a
    RADIUS policy. Until this is done, FortiAuthenticator will ignore authentication requests. You must repeat this process
    for each device that you wish to authenticate against the FortiAuthenticator.

Adding the RADIUS client

    To configure the RADIUS client:

    1. In Authentication > RADIUS Service > Clients, click Create New.
    2. Enter a unique name for the device and the IP from which it will be connecting.
       This is the IP address of the device itself, not the IP that users will be authenticating from.
    3. Click OK to save changes to the RADIUS client.

 FortiAuthenticator 6.1.0 RADIUS 2FA Interoperability Guide                                                                   10
 Fortinet Technologies Inc.
FortiAuthenticator setup
Creating the RADIUS policy
To create the RADIUS policy:
1. In Authentication > RADIUS Service > Policies, click Create New.
2. For RADIUS clients, enter an identifiable policy name and description, and add the newly created RADIUS client
to the policy. Click Next.
3. For RADIUS attribute criteria, no settings are required. Click Next.
4. For Authentication type, select Verify all configured authentication factors, and click Next.
5. For Identity source, choose a username format, and select the local realm. Click Next.
6. For Authentication factors, select Mandatory two-factor authentication, and click Next.
In this menu you can also enable the option to Allow FortiToken Mobile push notifications.
7. For RADIUS response, review the policy, and click Save and exit.
Optional: Enabling FortiToken Mobile push notifications
When push notifications are enabled, users can accept or deny authentication requests directly from a notification on
their device.
FortiAuthenticator 6.1.0 RADIUS 2FA Interoperability Guide 11
Fortinet Technologies Inc.FortiAuthenticator setup
To configure FTM push on FortiAuthenticator:
1. Before push notifications can be enabled, a Public IP/FQDN for FortiToken Mobile must be configured in System
> Administration > System Access.
If the FortiAuthenticator is behind a firewall, the public IP/FQDN will be an IP/port forwarding rule directed to one of
the FortiAuthenticator interfaces.
The interface that receives the approve/deny FTM push responses must have the FortiToken Mobile API service
enabled.
2. Once configured, FTM push notifications can be enabled for clients through the RADIUS policy in the
FortiAuthenticator 6.1.0 RADIUS 2FA Interoperability Guide 12
Fortinet Technologies Inc.FortiAuthenticator setup Authentication factors setting. FortiAuthenticator 6.1.0 RADIUS 2FA Interoperability Guide 13 Fortinet Technologies Inc.
FortiGate

FortiGate

                             Before proceeding, ensure that you have configured the RADIUS client and policy on
                             FortiAuthenticator. See System settings on page 8.

   The FortiGate appliance is the Gateway to your network, therefore, securing remote access, whether to the appliance
   itself (administration) or the network behind it (VPN), is critical.
   FortiOS supports native two factor authentication using FortiToken, however, to use two-factor authentication on
   multiple FortiGate devices, you should use a FortiAuthenticator to enable strong authentication.

   To configure two-factor authentication using FortiAuthenticator:

   1. Configure the RADIUS server on your FortiGate:
       l  Configuring the RADIUS server on page 14
   2. Set up authentication using one or more of the following configurations:
       l  Configuring authentication for administrators on page 15
       l  Configuring authentication for SSL-VPN users on page 18
   3. Optional: Configure timeout settings on the FortiGate when using FortiToken Mobile push.
       l  Configuring FortiToken Mobile push on FortiGate on page 19

Configuring the RADIUS server

   To configure the FortiGate authentication settings:

   1. Go to User & Device > RADIUS Servers, and click Create New.
   2. Configure the details of the FortiAuthenticator.
   3. Enter the shared Secret key, and click OK.

FortiAuthenticator 6.1.0 RADIUS 2FA Interoperability Guide                                                               14
Fortinet Technologies Inc.
FortiGate
Configuring authentication for administrators
To configure authentication for administrators with RADIUS 2FA from FortiAuthenticator, you will first need to create a
user group and administrator profile on the FortiGate. The administrator profile should match a user account on the
FortiAuthenticator.
Creating user groups
To create a user group:
1. Go to User & Device > User Group, and select Create New.
2. Enter a name for the user group, for example RADIUS_Admins.
3. Select Firewall as the type.
4. Under Remote Groups, click Add, and select the FortiAuthenticator RADIUS server from the dropdown list. Click
OK.
Do not add any local users to this policy in Members as this will cause
RADIUS authentication to fail.
FortiAuthenticator also supports sending group membership as an AVP. For example, when users configured in the
FortiAuthenticator group FGT_Admins authenticate, the AVP Fortinet-Group-Name=FGT_Admins will be sent in the
Authentication-Accept packet. This can be used to authorize the user onto the FortiGate by allowing only members of
that group.
FortiAuthenticator 6.1.0 RADIUS 2FA Interoperability Guide 15
Fortinet Technologies Inc.FortiGate
To specify group membership:
1. In the FortiGate user group:
a. Double-click on the FortiAuthenticator Remote Group.
b. Select Specify, and enter a RADIUS attribute group name (example: FGT_Admins).
2. On FortiAuthenticator, go to Authentication > User Management > User Groups.
3. Create or edit a Local user group, and add the administrator(s).
4. Click Add Attribute to add a RADIUS AVP with the following details:
a. Vendor: Fortinet
b. Attribute ID: Fortinet-Group-Name
c. Value: The RADIUS attribute group name (example: FGT_Admins).
RADIUS attributes can also be added directly to user profiles by going to Authentication > User Management > Local
Users, selecting a user, and clicking Add Attributes in the RADIUS Attributes menu.
FortiAuthenticator 6.1.0 RADIUS 2FA Interoperability Guide 16
Fortinet Technologies Inc.FortiGate
Creating administrators
To create a RADIUS administrator with 2FA:
1. In System > Administrators, click Create New and select Administrator from the dropdown menu.
2. In the New Administrator page, enter the following, then click OK.
a. Username: Enter the administrator's username (example: john.doe).
b. Type: Match a user on a remote server group.
c. Backup Password: Enter a backup password which can be used in the event that the RADIUS authentication is
unavailable.
d. Administration Profile: super_admin.
e. Remote User Group: Select the previously created RADIUS user group (example: RADIUS_Admins).
Do not select two-factor authentication at this point. The two factor authentication is
performed external to the FortiGate.
Creating a wildcard administrator account
Wildcard accounts can also be used in order to avoid specifying each user locally. When this option is enabled, any user
included in the remote user group will be able to authenticate as an administrator on the FortiGate.
In order for wildcard authentication to function, the selected remote user group must correspond with a user group on
the FortiAuthenticator. User groups can be created in the FortiAuthenticator GUI by going to Authentication > User
Management > User Groups.
To create a wildcard administrator account:
1. Create a new administrator with a descriptive name.
The name is for internal purposes only and is not used during authentication.
2. Select Match all users in a remote server group as the administrator Type.
3. Choose the Remote User Group previously created.
4. Select an Administrator Profile, and click OK.
FortiAuthenticator 6.1.0 RADIUS 2FA Interoperability Guide 17
Fortinet Technologies Inc.FortiGate
Once you have created the user group and administrator, log into the FortiGate GUI with the newly created
RADIUS administrator credentials.
After you have entered your username and password, you will be prompted to add the two-factor authentication PIN
from FortiToken. Successful authentication will provide the user with access to the FortiGate, and will generate a login
event on the FortiAuthenticator.
Configuring authentication for SSL-VPN users
The process described in this guide is for enabling secure authentication through FortiAuthenticator. It does not include
full configuration instructions for enabling SSL-VPN. For more information on configuring SSL-VPN, please see the
FortiGate Cookbook on the Fortinet Documentation Library.
In order to set up authentication for SSL-VPN users, you must first create a new user group.
To create a user group:
1. Go to User & Device > User Groups, and select Create New.
2. Enter a name for the user group, for example: SSL-VPN Group.
3. Select Firewall as the type.
4. Under Remote Groups, click Add, and select the FortiAuthenticator RADIUS server from the dropdown menu.
Click OK.
You can now create a firewall policy which enables SSL-VPN access into your chosen network.
To configure the SSL-VPN settings:
1. Configure the SSL VPN web portal.
a. Go to VPN > SSL-VPN Portals to edit the full-access portal.
b. Disable Enable Split Tunneling so that all SSL VPN traffic goes through the FortiGate.
2. Configure the SSL VPN settings.
a. Go to VPN > SSL-VPN Settings.
b. Select the Listen on Interface(s).
c. Set Listen on Port to 10443.
d. Set Service Certificate to the authentication certificate.
FortiAuthenticator 6.1.0 RADIUS 2FA Interoperability Guide 18
Fortinet Technologies Inc.FortiGate
e. Under Authentication/Portal Mapping, select the full-access portal for the SSL-VPN group, and choose a
portal for All Other Users/Groups.
3. Configure the SSL VPN Firewall policy.
a. Go to Policy & Objects > IPv4 Policy.
b. Fill in the firewall policy name.
c. Set the Incoming Interface to the SSL-VPN tunnel interface(ssl.root).
d. Set the Source Address to all and Source User to the SSL-VPN group.
e. Set the Outgoing Interface to the local network interface so that the remote user can access the internal
network.
f. Set the Destination to the internal protected subnet.
g. Set the Schedule to always, Service to ALL, and Action to ACCEPT.
h. Enable NAT.
i. Configure any remaining firewall and security options as desired.
j. Click OK.
Open a new browser and navigate to the SSL VPN web portal identified when you set up the SSL-VPN settings
(example: 172.27.2.247:10443). Enter a valid username and password, and select Login, and you will be
prompted to enter a FortiToken PIN. Once entered, you will have access to the SSL VPN tunnel.
Configuring FortiToken Mobile push on FortiGate
By default, the RADIUS servers on FortiGate are configured with a short timeout (5 seconds), which is not long enough
when using FTM push. The timeout must be long enough to allow for:
1. Sending the notification.
2. The end-user to pick up their mobile device and navigate to the FTM app.
3. The end-user to decide whether to approve or deny the request.
The FortiGate also has a short global authentication timeout (5 seconds). When larger than the RADIUS server timeout,
it allows for one or more retries before the FortiGate gives up. This timeout must be at least as long as the
RADIUS server timeout.
Both settings can only be configured using the CLI.
To configure the RADIUS server timeout:
config user radius
edit
set timeout
end
To configure the global authentication timeout:
config system global
set remoteauthtimeout
end
For FortiGate SSL-VPN configurations using 2FA, depending on the version of FOS, the push notification is either
automatically triggered after first factor is validated, or when the end user submits the string push in the VPN client.
FortiAuthenticator 6.1.0 RADIUS 2FA Interoperability Guide 19
Fortinet Technologies Inc.FortiGate
For instructions on enabling FortiToken Mobile push notifications on FortiAuthenticator, see:
Optional: Enabling FortiToken Mobile push notifications on page 11.
FortiAuthenticator 6.1.0 RADIUS 2FA Interoperability Guide 20
Fortinet Technologies Inc.FortiManager
FortiManager
Before proceeding, ensure that you have configured the RADIUS client and policy on
FortiAuthenticator. See System settings on page 8.
To configure two-factor authentication using FortiAuthenticator:
1. Configuring the RADIUS server on page 21
2. Creating an admin user on page 21
Configuring the RADIUS server
To configure the RADIUS server:
1. In FortiManager, go to System Settings > Admin > Remote Authentication Server.
2. Click Create New, and choose RADIUS Server from the dropdown menu.
3. Enter the details of the remote FortiAuthenticator, including the Shared Secret, and click OK.
Creating an admin user
To create a RADIUS administrator with 2FA:
1. In FortiManager, go to System Settings > Admin > Administrators, and click Create New.
2. Enter a user name for the administrator.
3. Choose RADIUS as the Admin Type, and select the RADIUS Server created in the previous step.
FortiAuthenticator 6.1.0 RADIUS 2FA Interoperability Guide 21
Fortinet Technologies Inc.FortiManager
4. Enter and confirm the administrator's password, and click OK.
Once completed, log into the FortiManager GUI with the newly created RADIUS administrator credentials.
After you have entered your username and password, you will be prompted to add the two-factor authentication PIN
from FortiToken. Successful authentication will provide the user with access to the FortiManager, and will generate a
login event on the FortiAuthenticator.
Creating a wildcard administrator account
Wildcard accounts can also be used in order to avoid specifying each user locally. When this option is enabled, users
included on the RADIUS server will be able to authenticate as an administrator on the FortiManager.
To create a wildcard administrator account:
1. Create a new administrator profile with a descriptive name.
The name is for internal purposes only and is not used during authentication.
2. Select Match all users in a remote server group as the administrator Admin Type.
3. Choose the RADIUS Server previously created.
4. Select an Admin Profile, and click OK.
FortiAuthenticator 6.1.0 RADIUS 2FA Interoperability Guide 22
Fortinet Technologies Inc.FortiAnalyzer
FortiAnalyzer
Before proceeding, ensure that you have configured the RADIUS client and policy on
FortiAuthenticator. See System settings on page 8.
To configure two-factor authentication using FortiAuthenticator:
1. Configuring the RADIUS server on page 23
2. Creating an admin user on page 23
Configuring the RADIUS server
To configure the RADIUS server:
1. In FortiAnalyzer, go to System Settings > Admin > Remote Authentication Server.
2. Click Create New, and choose RADIUS Server from the dropdown menu.
3. Enter the details of the remote FortiAuthenticator, including the Shared Secret, and click OK.
Creating an admin user
To create a RADIUS administrator with 2FA:
1. In FortiAnalyzer, go to System Settings > Admin > Administrators, and click Create New.
2. Enter a user name for the administrator.
3. Choose RADIUS as the Admin Type, and select the RADIUS Server created in the previous step.
FortiAuthenticator 6.1.0 RADIUS 2FA Interoperability Guide 23
Fortinet Technologies Inc.FortiAnalyzer
4. Enter and confirm the administrator's password, and click OK.
Once completed, log into the FortiAnalyzer GUI with the newly created RADIUS administrator credentials.
After you have entered your username and password, you will be prompted to add the two-factor authentication PIN
from FortiToken. Successful authentication will provide the user with access to the FortiAnalyzer, and will generate a
login event on the FortiAuthenticator.
Creating a wildcard administrator account
Wildcard accounts can also be used in order to avoid specifying each user locally. When this option is enabled, users
included on the RADIUS server will be able to authenticate as an administrator on the FortiAnalyzer.
To create a wildcard administrator account:
1. Create a new administrator profile with a descriptive name.
The name is for internal purposes only and is not used during authentication.
2. Select Match all users in a remote server group as the administrator Admin Type.
3. Choose the RADIUS Server previously created.
4. Select an Admin Profile, and click OK.
FortiAuthenticator 6.1.0 RADIUS 2FA Interoperability Guide 24
Fortinet Technologies Inc.FortiWeb
FortiWeb
Before proceeding, ensure that you have configured the RADIUS client and policy on
FortiAuthenticator. See System settings on page 8.
To configure two-factor authentication using FortiAuthenticator:
1. Configuring the RADIUS server on page 25
2. Creating an admin group on page 25
3. Creating an admin user on page 26
Configuring the RADIUS server
To configure the RADIUS server:
1. In FortiWeb, go to User > Remote Server, select the RADIUS Server tab, and click Create New.
2. Enter the details of the remote FortiAuthenticator, including the shared Server Secret.
3. Select OK to create the RADIUS server.
Creating an admin group
To create an admin group with RADIUS authentication:
1. In FortiWeb, go to User > User Group > Admin Group, select Create New.
2. Enter a name for the admin group, and click OK.
3. Click Create New, choose RADIUS User as the User Type, and select the FortiAuthenticator RADIUS server
FortiAuthenticator 6.1.0 RADIUS 2FA Interoperability Guide 25
Fortinet Technologies Inc.FortiWeb created in the previous step. Creating an admin user To create a RADIUS administrator with 2FA: 1. In FortiWeb, go to System > Admin > Administrators, and click Create New. 2. Enter a username and password for the administrator. 3. Select Remote User as the Type. 4. Choose the previously created Admin User Group. 5. Select the Access Profile for the administrator, and click OK. Once completed, log into the FortiWeb GUI with the newly created RADIUS administrator credentials. FortiWeb allows users to authenticate without using a secondary form by entering both their password and token code in the password field. The RADIUS server extracts the token code automatically. The combined entry uses the following format: For example, if the password is fortinet and the code is 123456, the user enters fortinet123456 in the Password field. Successful authentication will provide the user with access to the FortiWeb, and will generate a login event on the FortiAuthenticator. FortiAuthenticator 6.1.0 RADIUS 2FA Interoperability Guide 26 Fortinet Technologies Inc.
FortiWeb

Creating a wildcard administrator account

    Wildcard accounts can also be used in order to avoid specifying each user locally. When this option is enabled, any user
    included on the RADIUS server associated with the selected Admin User Group will be able to authenticate as an
    administrator on the FortiWeb.

    To create a wildcard administrator account:

    1. Create a new administrator profile with a descriptive name.
       The name is for internal purposes only and is not used during authentication.
    2. Choose Remote User as the Type, and enable Wildcard.
    3. Choose the RADIUS Admin User Group previously created.
    4. Select an Access Profile, and click OK.

 FortiAuthenticator 6.1.0 RADIUS 2FA Interoperability Guide                                                                    27
 Fortinet Technologies Inc.
FortiMail
FortiMail
Before proceeding, ensure that you have configured the RADIUS client and policy on
FortiAuthenticator. See System settings on page 8.
To configure two-factor authentication using FortiAuthenticator:
1. Configuring the RADIUS server on page 28
2. Creating an admin user on page 29
Configuring the RADIUS server
To configure the RADIUS server:
1. In FortiMail, go to Profile > Authentication, select the RADIUS tab, and click New.
2. Enter the details of the remote FortiAuthenticator, including the Server secret, and click Create.
FortiAuthenticator 6.1.0 RADIUS 2FA Interoperability Guide 28
Fortinet Technologies Inc.FortiMail
Creating an admin user
To create a RADIUS administrator with 2FA:
1. In FortiMail, go to System > Administrator, and click New.
2. Choose an Admin profile.
3. Select RADIUS as the Authentication type.
4. Select the RADIUS profile created in the previous step, and click Create.
Once completed, log into the FortiMail GUI with the newly created RADIUS administrator credentials.
After you have entered your username and password, you will be prompted to add the two-factor authentication PIN
from FortiToken. Successful authentication will provide the user with access to the FortiMail admin GUI, and will
generate a login event on the FortiAuthenticator.
Creating a wildcard administrator account
Wildcard accounts can also be used in order to avoid specifying each user locally. When this option is enabled, any user
included on the RADIUS server will be able to authenticate as an administrator on the FortiMail.
To create a wildcard administrator account:
1. Enable the remote_wildcard account.
a. In FortiMail, enter Advanced View from the admin user dropdown menu.
b. Go to System > Administrator, and enable the remote_wildcard account.
2. Configure the administrator profile.
a. Edit the remote_wildcard account.
b. Select an Admin profile.
FortiAuthenticator 6.1.0 RADIUS 2FA Interoperability Guide 29
Fortinet Technologies Inc.FortiMail
c. Select RADIUS as the Authentication type, and choose the RADIUS profile. Click OK.
FortiAuthenticator 6.1.0 RADIUS 2FA Interoperability Guide 30
Fortinet Technologies Inc.Cisco IOS-based switches and routers
Cisco IOS-based switches and routers
Before proceeding, ensure that you have configured the RADIUS client and policy on
FortiAuthenticator. See System settings on page 8.
The following was tested with a Cisco 2950 switch running IOS 12.1(13). Although these instructions may work for other
versions and IOS based routers, the command structure on the Cisco IOS will vary between versions. Please consult the
Cisco documentation for changes.
To configure two-factor authentication using FortiAuthenticator:
1. Configuring telnet authentication on page 31
2. Configuring enabled authentication on page 32
Configuring telnet authentication
To allow remote access via telnet:
1. Enter enable mode on the switch, and execute conf t to begin editing the config.
2. Enter the following commands to enable an IP address on the switch, and enable telnet management.
3. Enter the following commands to enable two-factor authentication.
4. Log in to the switch via telnet.
You are presented with a two-factor enhanced login.
FortiAuthenticator 6.1.0 RADIUS 2FA Interoperability Guide 31
Fortinet Technologies Inc.Cisco IOS-based switches and routers
By default, the user has been placed into the non-privledged admin level, denoted by the greater-than symbol (>).
Enable mode is accessed via the command enable, and entering the enable password.
Configuring enabled authentication
To directly authenticate the user into enable mode, it is possible to include an authorization attribute in the
RADIUS Access-Accept packet. Cisco uses the following attribute from their standard RADIUS dictionary for this
purpose: Cisco-AVPair = shell:priv-lvl=15
To add a RADIUS attribute to a user group:
1. On FortiAuthenticator, go to Authentication > User Management > User Groups.
2. Create or edit a Local user group, and add the administrator(s).
3. Click Add Attribute to add a RADIUS AVP with the following details:
a. Vendor: Cisco
b. Attribute ID: Cisco-AVPair
c. Value: shell:priv-lvl=15
RADIUS attributes can also be added directly to user profiles by going to Authentication > User Management > Local
Users, selecting a user, and clicking Add Attributes in the RADIUS Attributes menu.
FortiAuthenticator 6.1.0 RADIUS 2FA Interoperability Guide 32
Fortinet Technologies Inc.Cisco IOS-based switches and routers
To configure the Cisco switch to accept the RADIUS attributes:
1. Enter the following configuration:
Switch (config) #aaa authorization exec default radius
2. Log in again.
The user has been granted the enable (15) privilege level, indicated by the pound symbol (#).
FortiAuthenticator 6.1.0 RADIUS 2FA Interoperability Guide 33
Fortinet Technologies Inc.Citrix Access Gateway
Citrix Access Gateway
Before proceeding, ensure that you have configured the RADIUS client and policy on
FortiAuthenticator. See System settings on page 8.
To configure two-factor authentication using FortiAuthenticator:
1. Configuring the RADIUS server on page 34
2. Creating a logon point on page 35
3. Testing authentication on page 36
Configuring the RADIUS server
To configure the RADIUS server:
1. In the Citrix Gateway Management GUI, go to Management > Access Control > Authentication Profiles, and click
Add.
FortiAuthenticator 6.1.0 RADIUS 2FA Interoperability Guide 34
Fortinet Technologies Inc.Citrix Access Gateway
2. Enter the details of the remote FortiAuthenticator, including the IP address and shared Secret, and click Save.
Creating a logon point
A Citrix Access Gateway logon point is the URL to which the user logs on to access a protected resource. In this
example, a new test logon point is created, but the same details can be used to modify an existing logon point.
To create a logon point:
1. In the Citrix Access Gateway, go to Access Control > Logon Points, and click New.
2. Create a test logon point (example Test1) with SmartAccess as the Type.
3. Select the FortiAuthenticator as the Primary Authentication Profile, and click Save.
Optionally you can also configure an authorization profile using the same FortiAuthenticator setting.
FortiAuthenticator 6.1.0 RADIUS 2FA Interoperability Guide 35
Fortinet Technologies Inc.Citrix Access Gateway
Testing authentication
To authenticate the user:
1. Log into the Citrix Access Gateway user GUI with the user credentials from the FortiAuthenticator.
As there is no Token PIN, the FortiAuthenticator will send a RADIUS challenge, and the Citrix Access Gateway will
present the user with a new dialog to enter their FortiToken PIN.
2. Enter your PIN, and click Submit.
Successful authentication will provide the user with access to the Citrix Access Gateway resource, and will generate
a login event on the FortiAuthenticator.
FortiAuthenticator 6.1.0 RADIUS 2FA Interoperability Guide 36
Fortinet Technologies Inc.Linux login
Linux login
Before proceeding, ensure that you have configured the RADIUS client and policy on
FortiAuthenticator. See System settings on page 8.
Linux uses pluggable authentication modules (PAM) to extend the usual local authentication methods out to external
third party devices.
This means Linux is flexible in how it can be integrated with two-factor authentication. For example, applications can be
configured so that locally accessed services can be authenticated using only a password, while applications accessible
over the Internet can be authenticated using strong two-factor methods.
To configure two-factor authentication using FortiAuthenticator:
1. Integrating Linux with RADIUS on page 37
2. Enabling strong authentication for SSH on page 37
3. Enabling challenge-response authentication on page 38
Integrating Linux with RADIUS
To integrate with RADIUS authentication through FortiAuthenticator:
1. Install the PAM RADIUS module.
$ sudo apt-get install libpam-radius-auth
2. Edit /etc/pam_radius_auth.conf.
The default configuration will contain the following examples (commented out):
#127.0.0.1 secret 1
#other-server other-secret 3
3. To configure FortiAuthenticator, add an additional line using the following format:
For example:
192.168.0.110 fortinet 3
Enabling strong authentication for SSH
Before proceeding with configuration, ensure that the user you are authenticating already
exists on the Linux system.
FortiAuthenticator 6.1.0 RADIUS 2FA Interoperability Guide 37
Fortinet Technologies Inc.Linux login
To enable two-factor authentication in SSH, edit the file /etc/pam.d/ssh, and insert the following before the line #
Standard Un*x authentication.
# Enable Two-Factor Authentication with FortiAuthenticator
auth sufficient pam_radius_auth.so debug
The debug option at the end of the line increases debugging sent to /var/log/auth.log
and can be removed once successfully configured.
Log in to SSH using your chosen client with your new credentials. The username and password used to authenticate will
include the six-digit two-factor authentication PIN from your token. For example:
Username: john.doe
Password:
Successful authentication will provide the user with access to the system via SSH and will generate a login event log on
the FortiAuthenticator.
Enabling challenge-response authentication
The configuration described in the previous section requires that the user to log in with the RADIUS username and
password appended with their token PIN. The benefit of this configuration is that it can support most systems which can
authenticate using RADIUS.
FortiAuthenticator also supports a challenge-response mechanism that returns a dialog requesting the token PIN when
it detects that only a password has been entered during authentication. This configuration requires that the Linux client
supports enabling the challenge-response mechanism.
To configure a challenge-response mechanism on the SSH server:
1. Edit /etc/ssh/sshd_config.
2. Enable challenge-response authentication by changing ChallengeResponseAuthentication no to
ChallengeResponseAuthentication Yes
3. Restart the SSH server to apply the setting.
$ sudo restart ssh.
FortiAuthenticator 6.1.0 RADIUS 2FA Interoperability Guide 38
Fortinet Technologies Inc.Apache
Apache
Before proceeding, ensure that you have configured the RADIUS client and policy on
FortiAuthenticator. See System settings on page 8.
This document details how to enable RADIUS authentication in Apache2 for use with FortiAuthenticator two-factor
authentication.
If Apache2 is not already installed, you can install it using the following command:
sudo apt-get install apache2
The Ubuntu 11.04 build of Apache2 comes with the mod-auth-radius module already installed and enabled. If you need
to install and enable it manually, you can follow the instructions below.
To install and enable the module manually:
1. Install the module:
sudo apt-get install libapache2-mod-auth-radius
2. Enable the module:
a2enmod auth_radius
3. Confirm that you can browse to the Apache2 server via http://localhost/ or via the IP/FQDN of your test server.
Once the mod-auth-radius module has been successfully installed and enabled, you can modify the Apache
configuration.
See Modifying the Apache configuration on page 39
Modifying the Apache configuration
To modify the Apache configuration:
1. Edit the default site (/etc/apache2/sites-enabled/000-default) or your specific server site if
configured, adding the lines shown in bold in the positions specified:
ServerAdmin webmaster@localhost
AddRadiusAuth 192.168.0.110:1812 fortinet 5:3
AddRadiusCookieValid 5
DocumentRoot /var/www
Options FollowSymLinks
AllowOverride None
AuthType Basic
AuthName "FortiAuthenticator Secure Authentication"
AuthBasicAuthoritative Off
AuthBasicProvider radius
AuthRadiusAuthoritative on
AuthRadiusActive On
FortiAuthenticator 6.1.0 RADIUS 2FA Interoperability Guide 39
Fortinet Technologies Inc.Apache
Require valid-user
Options Indexes FollowSymLinks MultiViews
AllowOverride None
Order allow,deny
allow from all
2. Restart the Apache2 daemon.
sudo /etc/init.d/apache2 restart
3. Clear the cache on your browser and restart it to avoid any locally cached content from being displayed without the
need for authentication.
4. Browse to the website configured (e.g. http://localhost/) and you will be prompted to enter your credentials.
The username and password used to authenticate will include the six-digit two-factor authentication PIN from your
token.
For example:
Username: john.doe
Password:
Successful authentication will provide the user with access to the website and will generate a login event on the
FortiAuthenticator.
FortiAuthenticator 6.1.0 RADIUS 2FA Interoperability Guide 40
Fortinet Technologies Inc.Troubleshooting
Troubleshooting
Logging
If authentication fails, you can check the FortiAuthenticator log files for additional information.
To debug a bad password:
If the user insists that they have the correct credentials, try resetting the password.
If authentication continues to fail, verify that you have entered the correct shared Secret on both the client and
FortiAuthenticator.
To debug a bad token code:
This issue may be due to a user error (entering the incorrect Token), or caused by a timing issue.
To troubleshoot this issue, verify the following:
l The user is not attempting to use a previously used PIN. You cannot log in twice with the same token PIN.
l The time and time zone on the FortiAuthenticator is correct, and preferably synchronized using NTP.
l The token is correctly synched with FortiAuthenticator.
To debug when nothing is logged:
If the logs do not include either a failure or a successful authentication logged, it is likely due to one of the following:
l The request is not reaching the FortiAuthenticator.
l Verify that any intervening firewalls are permitting the required traffic through the network. RADIUS
authentication traffic requires UDP Port 1812 to be open to the FortiAuthenticator and that pseudo-stateful
responses are allowed to return.
l The request is reaching the FortiAuthenticator but is being ignored.
l If traffic is seen reaching the FortiAuthenticator (e.g. by packet sniffing) but is being ignored, it is likely that the
requesting client is not configured in the FortiAuthenticator.
l Verify that the client is sending the traffic from the expected IP address and not from a secondary IP address or
alternative interface. The FortiAuthenticator RADIUS server will not respond to requests from an unknown
client for security reasons.
Extended logging
The logs found at Logging > Log Access > Logs provide a summary of events occurring on the system, particularly the
information required for audit purposes (e.g. who logged in and where from). When a more detailed view is required in
order to troubleshoot issues, detailed system application logs can be found by navigating to
https:///debug.
RADIUS authentication debugging mode can be accessed to debug RADIUS authentication issues.
FortiAuthenticator 6.1.0 RADIUS 2FA Interoperability Guide 41
Fortinet Technologies Inc.Troubleshooting
From the Service dropdown menu, select RADIUS Authentication, and click Enter debug mode from the toolbar.
Enter the username and password and select OK to test the RADIUS authentication and view the authentication
response and returned attributes.
Traffic sniffing
Wireshark can be used to monitor traffic being sent and received to the FortiAuthenticator by setting it to capture traffic
on UDP port 1812.
RADIUS packet generation
Testing authentication directly without the use of a NAS device is useful to rule out issues with the client. This is most
easily achieved using a tool such as NTRADPing on Windows or radclient on Linux.
FortiAuthenticator 6.1.0 RADIUS 2FA Interoperability Guide 42
Fortinet Technologies Inc.Appendix A - Supported two-factor authentication methods
Appendix A - Supported two-factor authentication methods
Product Version Authentication Token-appended Token-challenge Wildcard
in type authentication
guide
FortiGate 6.2.2 Web Yes Yes Yes
management
CLI based Yes Yes Yes
management
SSL-VPN (Web) Yes Yes Yes
SSL-VPN Yes Yes Yes
(FortiClient)
Identity based Yes Yes Yes
policy
FortiManager 6.2.2 Web based Yes Yes Yes
management
CLI based Yes Yes Yes
management
FortiAnalyzer 6.2.2 Web based Yes Yes Yes
management
CLI based Yes Yes Yes
management
FortiWeb 6.2.1 Web Yes Yes
management
CLI based Yes Yes
management
FortiMail 6.2.1 Web based Yes Yes Yes
management
CLI based Yes Yes Yes
management
Cisco Switch IOS Web based Yes
12.1(13) management
CLI based Yes
management
Citrix Access 5.0 Web based Yes Yes Yes
Gateway management
FortiAuthenticator 6.1.0 RADIUS 2FA Interoperability Guide 43
Fortinet Technologies Inc.Appendix A - Supported two-factor authentication methods
Product Version Authentication Token-appended Token-challenge Wildcard
in type authentication
guide
CLI based Yes Yes Yes
management
Linux 5.8p1 SSH Login Yes Yes Yes
OpenSSH
Apache 2.2.17 Web Yes Yes Yes
Authentication
FortiAuthenticator 6.1.0 RADIUS 2FA Interoperability Guide 44
Fortinet Technologies Inc.Appendix B - Synchronizing FortiTokens
Appendix B - Synchronizing FortiTokens
Under normal circumstances, it is not necessary to synchronize FortiToken unless the time on the host
FortiAuthenticator system has been allowed to deviate from the correct time. It is essential that the time is accurate in
order to prevent synchronization issues from occurring, therefore configuration of an NTP server is recommended.
The natural drift time of the FortiToken is accounted for automatically by the FortiAuthenticator. Every time a user logs
in, the FortiAuthenticator calculates the drift, and if it is within +/- 1 (where 1 is a token cycle of 60 seconds), the drift is
adjusted accordingly. Should the drift deviate by greater than 1 (i.e. the clock is more than 60 seconds out) since the last
login, a manual synchronization is required.
If manual synchronization is required for multiple tokens, this could be a sign that the
FortiAuthenticator time is inaccurate. Verify the current time and the NTP settings.
Administrator synchronization
It is possible for the administrator to synchronize a token for use on the FortiAuthenticator. This can be useful when new
tokens have been issued which have been held in storage for an extended period of time or are being reissued to a new
user.
To perform a drift adjustment on a FortiToken:
1. In a browser, go to:
https:///admin/fac_auth/fortitokendrift/
2. Select the FortiToken to adjust, then select Adjust Drift.
The Adjust Token Drift window opens.
3. Enter the required Time adjustment in minutes.
Make sure to include a minus sign (-) for a negative value, but don’t use a plus sign (+) for a positive value.
4. Select OK to adjust the token drift.
Key points to note during the synchronization process are:
l Ensure that the FortiAuthenticator time is accurate before proceeding.
l Ensure that the serial of the token you are synchronizing matches that on the reverse of the token.
l Ensure that the token has not been used in the proceeding 60 seconds. All tokens are one-time passwords and
cannot therefore be used to authenticate (successful or otherwise) and synchronize.
l Once successfully synchronized, wait a further 60 seconds before attempting to log in. A token used to synchronize
cannot be re-used to authenticate.
FortiAuthenticator 6.1.0 RADIUS 2FA Interoperability Guide 45
Fortinet Technologies Inc.Appendix B - Synchronizing FortiTokens User synchronization Should it be required, FortiAuthenticator provides a mechanism allowing the user to perform their own manual synchronization. The user should be allowed to access the FortiAuthenticator GUI (https:///login/). Upon logging into the FortiAuthenticator, the user will be prompted to enter their token PIN. If the token PIN is out of sync, they will be prompted to enter two consecutive PINs. If the user does not receive the prompt, the token is already correctly synchronized. FortiAuthenticator 6.1.0 RADIUS 2FA Interoperability Guide 46 Fortinet Technologies Inc.
Copyright© 2020 Fortinet, Inc. All rights reserved. Fortinet®, FortiGate®, FortiCare® and FortiGuard®, and certain other marks are registered trademarks of Fortinet, Inc., in
the U.S. and other jurisdictions, and other Fortinet names herein may also be registered and/or common law trademarks of Fortinet. All other product or company names may be
trademarks of their respective owners. Performance and other metrics contained herein were attained in internal lab tests under ideal conditions, and actual performance and
other results may vary. Network variables, different network environments and other conditions may affect performance results. Nothing herein represents any binding
commitment by Fortinet, and Fortinet disclaims all warranties, whether express or implied, except to the extent Fortinet enters a binding written contract, signed by Fortinet’s
General Counsel, with a purchaser that expressly warrants that the identified product will perform according to certain expressly-identified performance metrics and, in such
event, only the specific performance metrics expressly identified in such binding written contract shall be binding on Fortinet. For absolute clarity, any such warranty will be
limited to performance in the same ideal conditions as in Fortinet’s internal lab tests. In no event does Fortinet make any commitment related to future deliverables, features or
development, and circumstances may change such that any forward-looking statements herein are not accurate. Fortinet disclaims in full any covenants, representations, and
guarantees pursuant hereto, whether express or implied. Fortinet reserves the right to change, modify, transfer, or otherwise revise this publication without notice, and the most
current version of the publication shall be applicable.
You can also read