SUBWAY SURVEILLANCE SYSTEM - INSTALLATION & REGISTRATION GUIDE Powered by
←
→
Page content transcription
If your browser does not render page correctly, please read the page content below

SUBWAY SURVEILLANCE SYSTEM
INSTALLATION & REGISTRATION GUIDE

                                    Powered by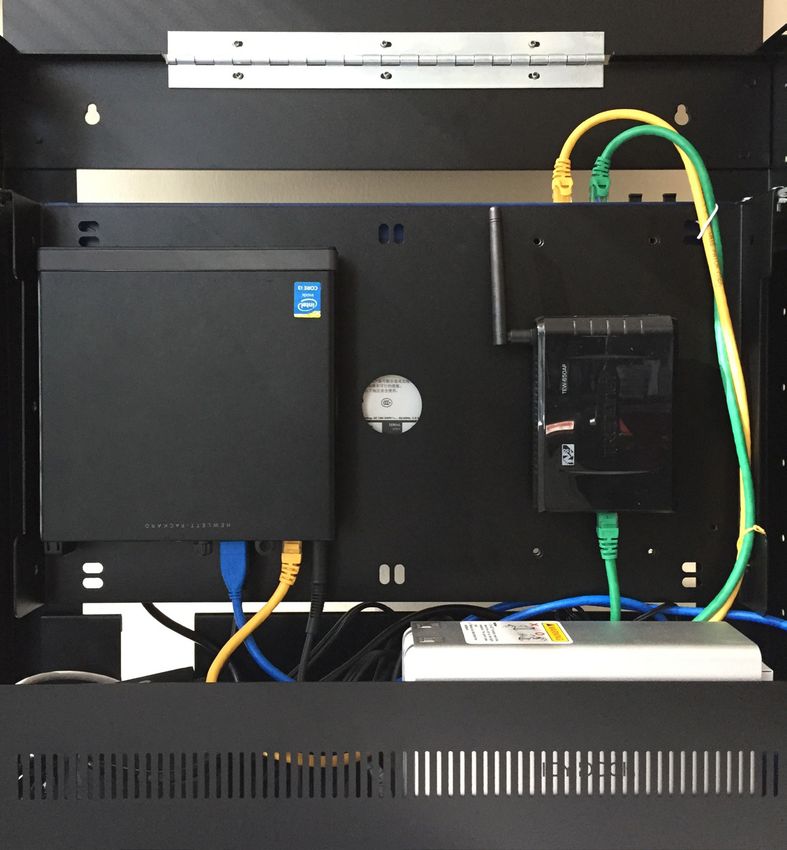
Video & Big Data Businesswww.EZUniverse.com
                          Intelligence           Packaged Together
                                            | support@ezuniverse.com | +1 888 694 8301 ext. 1 or ext. 2

TABLE OF CONTENTS

EQUIPMENT
STANDARD STORE CAMERA SETUP (NAMES/ANGLES)......................3
HP VIDEO GATEWAY.................................................................................5
POE SWITCH.............................................................................................5
USB 3.0 TO RJ45 ADAPTER......................................................................6
                                                                                                           SYSTEM IN BRIEF
USB TRENDNET WI-FI HOTSPOT............................................................6
POE READY 360IQ IP CAMERA (DOME AND MINI DOME)....................6                                        Video (H264, MJPG),
ADDITIONAL EQUIPMENT........................................................................6              ONVIF COMPATIBLE
                                                                                                           50 video High Definition (HD) streams at 30
                                                                                                           FPS. Runs FIFO logic - an intelligent process
INSTALLATION PROCESS
                                                                                                           that moves data packets from drive to drive on
HARDWARE INSTALLATION INSTRUCTIONS.........................................7                               the First-IN-First-OUT basis.
EXTERNAL USB HARD DRIVE SETUP...................................................13
HP GATEWAY INSTALLATION DIAGRAM................................................14                          HDD Extended Lifecycle
                                                                                                           Our technology extends
PRE REGISTRATION SETUP..................................................................15
                                                                                                           life of any HDD
IMPORTANT INFORMATION...................................................................15
CONNECTING TO HP GATEWAY............................................................15                     SUBWAY® SURVEILLANCETM System
CONNECTING TO GATEWAY USING ETHERNET CABLE....................15                                           Base Components
                                                                                                           • Durable Cabinet with Lock
                                                                                                           • PC NVR/Data Gateway
REGISTRATION STEP-BY-STEP                                                                                  • USB to RJ45 Connector
OPENING INSTALLER APPLICATION....................................................16                        • Wi-Fi Access Point
REGISTRATION VIA IPHONE INSTALLER APPLICATION.....................17                                       • POE Switch
                                                                                                           • IP cameras
TABLET OR PC REGISTRATION USING HTML.....................................23
ADDING OR REPLACING CAMERAS (IPHONE)....................................31
                                                                                                           Operating System
ADDING OR REPLACING CAMERAS PC/ANDROID BROWSER ..........35                                                Windows 8.1 Embedded Professional
LOCAL VIDEO (LIVE)..............................................................................39
CALLING SUPPORT FROM THE IPHONE APP..................................... 39                                Software
                                                                                                           Windows - Client Application
                                                                                                           Mobile - iOS (iPhone, iPad) and Android
SETTING PORT FORWARDING ON LOCAL ROUTER
OPEN THE RIGHT PORT TO SEE VIDEO REMOTELY...........................40                                                  Powered by

                                                www.EZUniverse.com | support@ezuniverse.com | +1 888 694 8301 ext. 1 or ext. 2
                                                                                 PAGE 2
www.EZUniverse.com | support@ezuniverse.com | +1 888 694 8301 ext. 1 or ext. 2

Standard Store Camera Setup (Names/Positions)
Our remote Loss Prevention and Auditing team suggests a minimum of 3-6 camera positions, which will be displayed
below. Other shots are also recommended as per owner/operator jurisdiction. If placing cameras, in the spots below, be
sure to follow the recommended guidelines and review the examples.

1.      POS Cameras

2.      Front Line Camera

3.      Beverage Station (not needed if 360 placed in dining room)

4.      Back/Prep Area

5.      Back door

6.      Dining Room/360 Camera

 Camera View                                             Position description

                                                         1 – POS Camera

                                                         Shows the entire check-out area and has a clear view from the
                                                         top down of the register, cash, customer and employee area as
                                                         well as the counter where food and items are being exchanged.
                                                         Camera angle should be directly above or to the side of the
                                                         register facing the food bain and register, never directly behind
                                                         which could block remote view of the transaction.

                                                         2 – Front Line

                                                         The front line of the employee and customer area is a very
                                                         important shot. This helps visualize the entire transaction, from
                                                         start to finish, and is very helpful in all investigations.

                                                                         PAGE 3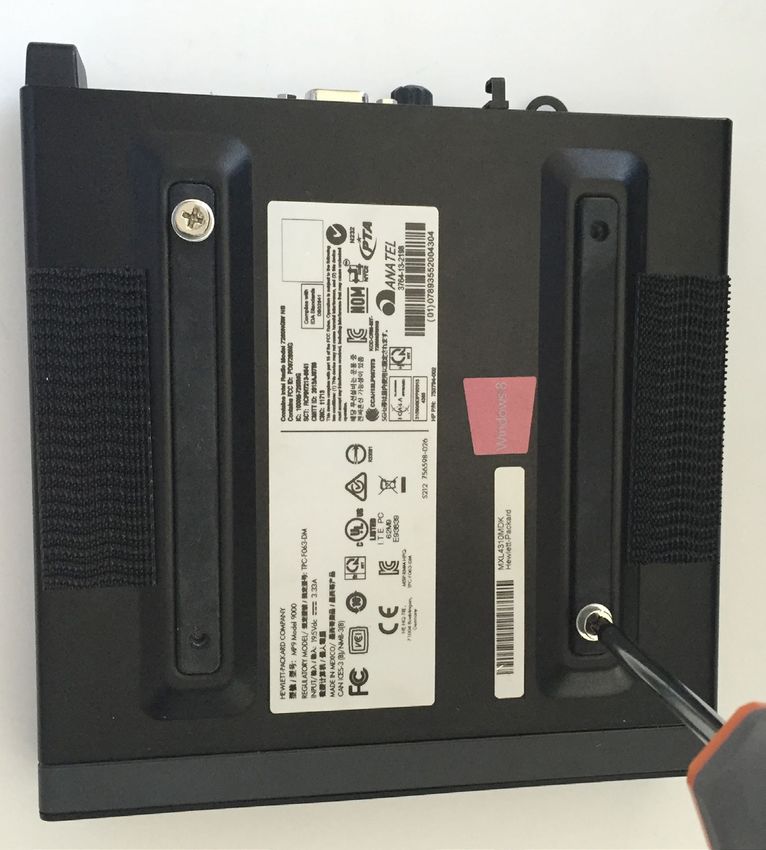
www.EZUniverse.com | support@ezuniverse.com | +1 888 694 8301 ext. 1 or ext. 2

Camera View   Position description

              3 – Beverage Station

              This shot is important because it covers all drinks being sold or taken in
              the restaurant, and can aid any LP investigations.

              4 – Back/Prep Area

              This shot allows you or your remote auditing team to review
              cleanliness, procedure, and improve visibility into your operations.
              You may also get a shot of the freezer/cooler to improve any LP
              Investigations.

              5 – Back Door

              The back door shot allows you to see who is entering and exiting your
              restaurant. You can also assign motion detection on this camera to
              send you alerts if this door is opened before or after a certain time.

              6 – Dining Room/360 Camera

              If you’re installing a 360 Camera, be sure to place it in the middle of the
              room (or somewhere that will get you the best birds-eye view). Whether
              it’s in the back or the front, this camera will let you see everything you
              need in the area.

              We don’t recommend just using a 360 Camera for Loss Prevention
              activities. A dedicated POS camera is always recommended.

                                      PAGE 4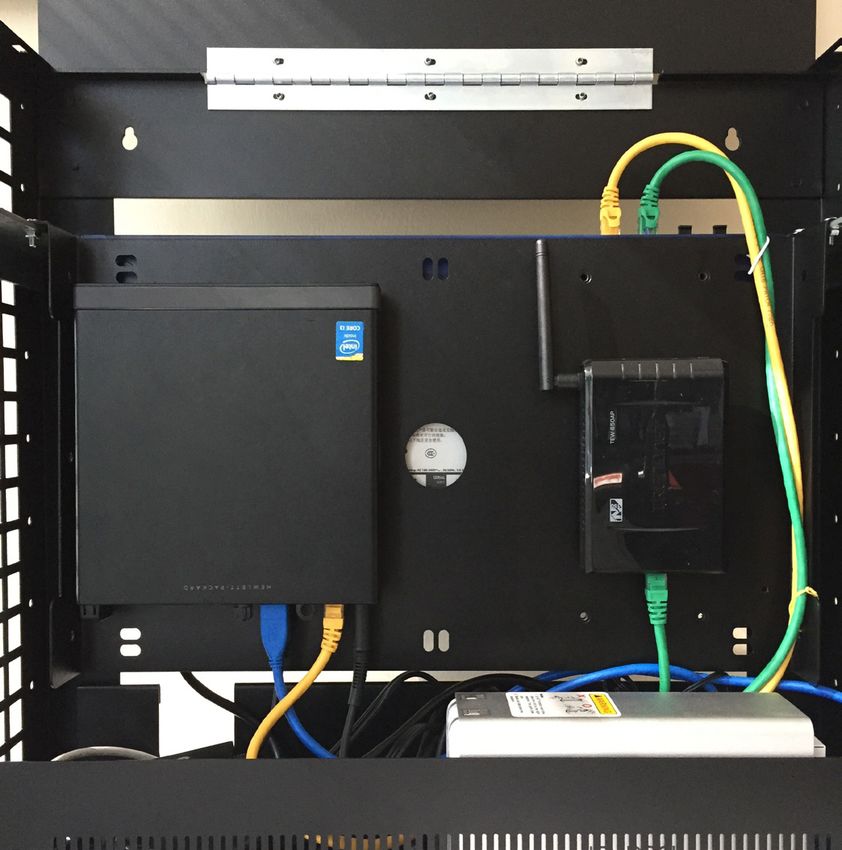
www.EZUniverse.com | support@ezuniverse.com | +1 888 694 8301 ext. 1 or ext. 2

HP Video Gateway

POE switch*
➊ POE ports – will be connected to camera via CAT5
                                                                                                    * Actual switch may vary

➋ 1st Uplink port – will be connected to HP Gateway via Ethernet port

➌ 2nd Uplink port – will be connect to TrendNet Wi-Fi access point

                                                                         PAGE 5
www.EZUniverse.com | support@ezuniverse.com | +1 888 694 8301 ext. 1 or ext. 2

USB 3.0 to RJ45 Adapter
Will be connected to the USB 3.0 port on the video gateway. Will serve as the data connector between the outside
Internet and video gateway.

USB TrendNet Wi-Fi hotspot
This unit will be used to connect your iPhone or tablet to the HP’s own
internal network, and allow for configuration and camera angle preview

POE Ready Hikvision Camera* (Dome and Mini Dome)
Camera of choice for all indoor IP cameras

                                                                            * Actual camera models may vary

Additional equipment
Patch cables

Power supplies for POE switch, HP Gateway

                                                                          PAGE 6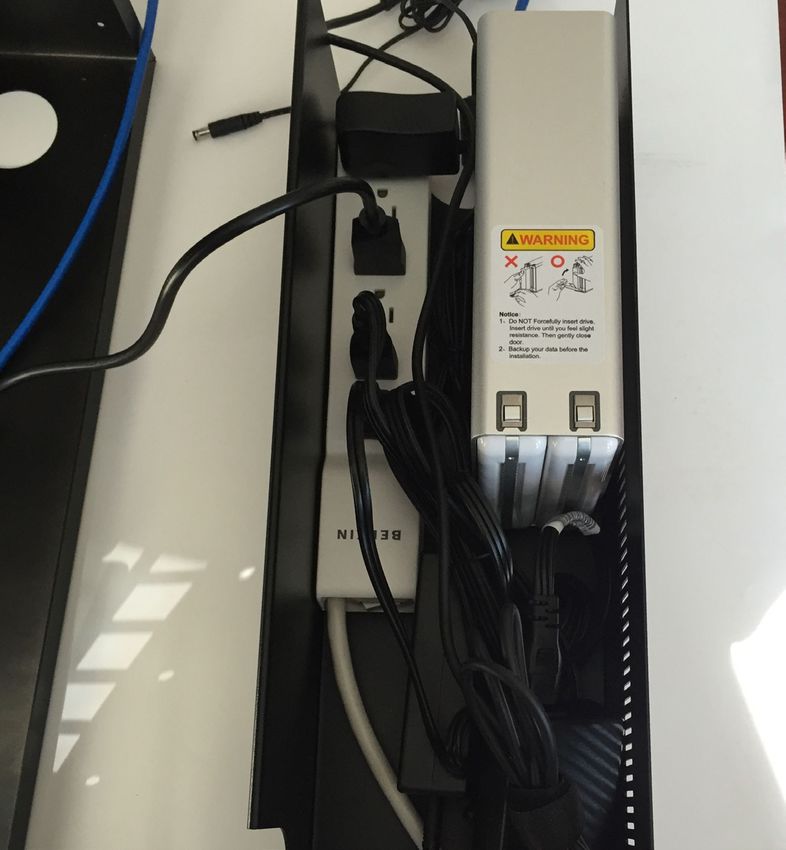
www.EZUniverse.com | support@ezuniverse.com | +1 888 694 8301 ext. 1 or ext. 2

Installation Process
Hardware Installation Instructions – Your enclosure may come locked. The standard unlock combination is “360”.
The cabinet enclosure is highly recommended to ensure a quick, clean, and easily maintainable installation.

                                                                1. Cabinet enclosure installation

                                                                The cabinet should be installed in the desired place,
                                                                usually in a back office or secure location. Installation
                                                                in a higher place is recommended.
                                                                NOTE: Do not install the cabinet enclosure on drywall only; the cabinet with
                                                                the backup battery, PoE switch, and Video Gateway is heavy and could be a
                                                                safety hazard. It should be attached to studs of plywood.

                                                                To mount enclosure use the provided French Cleat.
                                                                Affix the French Cleat to studs/plywood if possible.
                                                                There should be a space between the top of the
                                                                cleat and the wall. Hang enclosure on the cleat, and
                                                                secure it to the wall with 2 extra screws to lock it in
                                                                place.

                                                                Run cabling through the wall and snake it into the
                                                                enclosure as shown in the photograph. The hole
                                                                (2.5”) must be drilled approximately 2.5” from the
                                                                bottom-left sidewall of the enclosure to ensure the
                                                                equipment tray will comfortably fit in the enclosure.
                                                                We recommend adding the base tray to see
                                                                placement prior to drilling.

                                                                2. Battery (optional)

                                                                NOTE: If your system did not come with a rack-
                                                                mountable battery, the system will be powered by a
                                                                power-strip. Please skip this step and go to STEP 3.

                                                                Please place the battery in the enclosure. Secure it on
                                                                both sides with the provided screws. Pull the battery
                                                                power cord through the hole on the bottom of the
                                                                enclosure (to be connected to a power source later).

                                                                     PAGE 7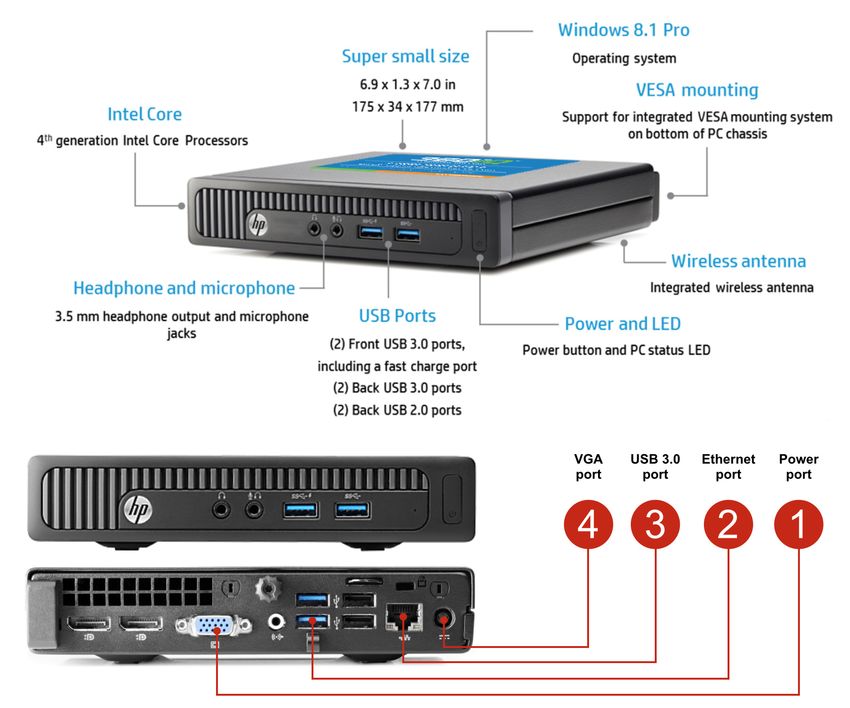
www.EZUniverse.com | support@ezuniverse.com | +1 888 694 8301 ext. 1 or ext. 2

                    2a. Battery (optional)

                    Make sure that your battery outlets are on the left hand
                    side. Plug all power cords in before you put the PoE
                    switch in the enclosure. Remember to plug the USB
                    cable into the battery – this will later be connected to
                    the Video Gateway. Do not connect the other ends of
                    the cords with their respective devices yet.

                    3. PoE switch

                    Please install the PoE switch (actual switch may look
                    differently) into the enclosure. Secure it on both sides
                    with the provided screws.

                                   NO                             WITH
                                 BATERY                          BATERY

                        PAGE 8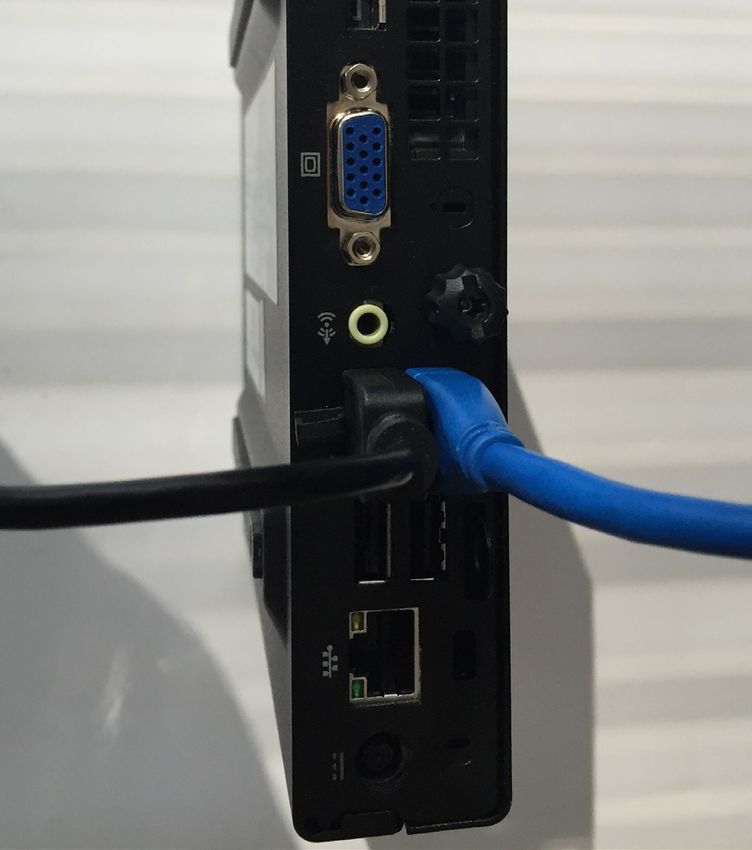
www.EZUniverse.com | support@ezuniverse.com | +1 888 694 8301 ext. 1 or ext. 2

                   4. Tray and external drive

                   A tray is provided with each cabinet enclosure.
                   For your convenience, the tray can be hung off the
                   front of the enclosure as you are preparing your
                   equipment.

                   As you are preparing the enclosure space, plug in the
                   power cords connecting the battery and PoE switch
                   and place the external HDD with disks inside on the
                   tray. See 4a.

                    4a. Tray and external drive

                    Connect both the power plug & the USB3.0 cables
                    to the back of the HDD bay once the HDD’s are
                    securely inside (p.13). Remember, the External Drive
                    MUST be connected to a USB3.0 slot on the Video
                    Gateway for the system to discovery the external
                    hard drives.

                    If your system did not come with an external HDD
                    bay, you can skip this step.

                    EXTERNAL HDD BAY SETUP
                    INSTRUCTIONS ON p.13

                        PAGE 9
www.EZUniverse.com | support@ezuniverse.com | +1 888 694 8301 ext. 1 or ext. 2

                   5. HP gateway

                   Prepare the HP Gateway for mounting by screwing
                   in the screws provided with the Gateway (as shown
                   in the picture). Hang the HP with the HP logo facing
                   upwards (as in the picture below). The HP Gateway,
                   with the attached screws, should fit snugly into the
                   provided key holes.

                    6. Gateway shelf

                    Install the shelf provided with the enclosure into
                    the rack. Secure it on both sides with the provided
                    screws. The Video/Data Gateway (NVR) will mount
                    into the provided holes on the left-hand side of the
                    shelf.

                        PAGE 10
www.EZUniverse.com | support@ezuniverse.com | +1 888 694 8301 ext. 1 or ext. 2
7. TrendNet Wi-Fi hotspot
Your system should have come with a small Wi-Fi
access point (Trendnet). Screw the provided antenna
onto the device, then mount the device on the
gateway shelf to the space on the right of the shelf.
Each cabinet should come with a 3” Velcro mounting
strip. Mount this TrendNet Wi-Fi hot spot using this
Velcro strip. See the picture below in step 8.
8. Connect all components 8.
Please connect all pieces using the provided color- Ple
coded Cat5 patch cables. Ca
Label all black camera Cat5 cables and connect them La
to the PoE sockets by neatly running the cat5e cables the
in the enclosure. Feel free to use the oval punched the
holes to assist with cable management.
Co
Connect the Yellow patch cable from the HP Et
Gateway’s built-in Ethernet port to the camera switch’s
first Gigabit Uplink port. Do not connect this cable to a Co
PoE port. See picture on the left. po
Connect the Green patch cable from the TrendNet to Co
the 2nd uplink port on the camera switch. an
to
Connect the USB to Ethernet adapter to the HP wh
Gateway’s USB 3.0 port, and connect this to the grey
cable connecting the NVR to the outside router or
Internet line. See the picture below.
PAGE 11www.EZUniverse.com | support@ezuniverse.com | +1 888 694 8301 ext. 1 or ext. 2
9. HP plugs
USB to RJ45 to Internet
USB to external HDD
Ethernet to PoE Camera Switch
HP power
10. PoE plugs
From cameras
Yellow, From HP
Green, From TrendNet WiFi device
Note: For camera
connections, remember
to use PoE ports which
PAGE 12www.EZUniverse.com | support@ezuniverse.com | +1 888 694 8301 ext. 1 or ext. 2
11. Connect all components
Once all components are properly connected and the
system has been tested (at the end of registration),
you can close the cabinet. First close the upper lid,
then the main door.
Please remember the LOCK combination is 360.
Note: When using the Wi-Fi hotspot to connect to the
Video Gateway to register and check camera angles,
please make sure the cabinet door is OPEN to permit
Wi-Fi signal.
External USB hard drive setup ➊ Insert hard drives into the ICY DOCK HDD bay
➋ Set the RAID switch to JBOD position
➌ Open bays and insert disks carefully
➍ Connect the ICY Dock to HP Gateway using
the accompanying USB3 plug to the back
socket. Remember, the External Drive MUST
be connected to a USB3.0 slot on the HP
(blue USB port)
➎ Connect power cord
➏ Turn on the unit, by switching the POWER
SWITCH on to ON position.
* Supports 4TB in each slot for all four RAID modes for up to 8TB of storage
PAGE 13www.EZUniverse.com | support@ezuniverse.com | +1 888 694 8301 ext. 1 or ext. 2
HP Gateway installation diagram
➊ The YELLOW patch cable is connected to the gigabit uplink port on Netgear PoE switch. This connects the Video
Gateway to the Cameras.
➋ The GREY patch cable and USB to Ethernet (RJ5) adapter connects the HP Gateway to the store router or internet.
➌ Connect cameras into the POE ports securely. ➊
➍ The GREEN patch cable connects the TrendNet Wi-Fi hotspot into the 2nd gigabit uplink port on the PoE switch. This
allows you to register the HP Video Gateway via your WiFi device. ➋
➎ Once several cameras have been set up and plugged in, plug the power cords to the POE switch, HP Gateway, ➌
TrendNet, and external HDD. The HP should be connected and powered on last.
➍
Note: The HP will turn off automatically if one of the components is missing, or if one of the components is not properly
connected. If HP will shut itself off, please check all connections and ensure all other devices are powered on, then power
on the HP again. ➎
N
PAGE 14
c
owww.EZUniverse.com | support@ezuniverse.com | +1 888 694 8301 ext. 1 or ext. 2
Pre registration Setup
Now that you have installed the unit and connected the cameras, it’s time to connect to the Subway Surveillance system
for registration, either through our own Wi-Fi server or an Ethernet cable hooked to the camera switch.
Power on ALL devices including the Wi-Fi spot, HP Gateway,
PoE Switch, battery, and External HDD. Wait 5 minutes for the
Gateway to send out all scripts.
You can use your iPhone (with our dedicated App), as well as
an iPad tablet or PC Laptop with Firefox or Chrome browsers.
In your Wi-Fi connections, you should see one connection
named “Subway_Gateway.”
The iPhone app should have been provided to you prior to the installation (see “iPhone Installer app” below).
NOTE: If you are not able to connect to “Subway_Gateway” Wi-Fi. Please forget this network and try again. Make sure
that you are not connected with 2 devices at the same time.
Password: subway2014
Important information:
◗ After first power up, wait for restart (to allow auto configuration). The blue power led on HP will turn off and turn on again.
◗ Listen to the voice prompts from the NVR in case of issues.
◗ After first automatic reset, you are good to go.
◗ Local mode on the application will be available after the system is registered.
Connecting to the HP Gateway
➊ Connect to the “Subway_Gateway” Wi-Fi network using your device
➋ When prompted enter subway2014 as the password
➌ Wait for connection (NOTE: Sometimes it may take more than 1min)
➍ To start registration – open browser or iPhone Installer App
◗ iPhone (NOTE: With iPhone use a dedicated Installer Application to register or configure the gateway)
◗ iPad or Tablet (NOTE: Use Safari browser to register or configure the gateway)
➎ If you are registering via the Browser, open your browser and go to http://ipcoop.us
Connecting to the Gateway using an Ethernet cable & browser
➊ Hook your PC laptop with an Ethernet cable to an open port on the POE switch deployed with the system
➋ Open browser (Firefox or Chrome) on your PC laptop
➌ Go to http://ipcoop.us
➍ Type in your name, email and password to get to the setup wizard (default password: universe)
PAGE 15www.EZUniverse.com | support@ezuniverse.com | +1 888 694 8301 ext. 1 or ext. 2
Registration step-by-step
iPhone Installer Application
(Contact IPC to get the instructions on how to download
and install the application on your iPhone.)
Note: iPhone 5 and iPhone 6 compatible) Installer app is
available here:
https://portal.go360iq.com/appsdownload/InstStd/
Opening the Installer Application on your iPhone
1 QR code 2
1 Opening application
QR code to run Open the app and scan the QR code provided with the Subway
installer – please print Gateway or installation document (pictured on the left)
PAGE 16www.EZUniverse.com | support@ezuniverse.com | +1 888 694 8301 ext. 1 or ext. 2
Registration step-by-step
Now it’s time to register the new Subway Surveillance system.
Registration via iPhone Installer Application
1 2 2a
MAIN MENU SCREEN WELCOME SCREEN Gateway Configuration
After starting the app on your iPhone, Tap the green button to register a Choose DHCP
a main menu screen should appear. new system
(the other option is for non-Subway
Tap the registration button to Tap the blue button to restore a new stores with static IP)
begin! (upper left). HP unit after warranty replacement.
(See instructions in the document
called “UNIT RMA PROCEDURE.”)
Please note: If at any time you run
into issues and have to call support,
the TeamViewer ID# is the 9-digit #
located at the bottom of each page.
If the system has internet connection,
giving our technicians the 9-digit ID
will allow remote connection to the
device.
PAGE 17www.EZUniverse.com | support@ezuniverse.com | +1 888 694 8301 ext. 1 or ext. 2
2b 3 3a
Gateway Configuration Camera Discovery Camera Discovery
This option is only for restaurants Now the application will start the The system should auto-discover
with a special dedicated IP for the camera discovery script. each camera that you have
Gateway. In most cases it is for non- connected. Now it is time to adjust the
The system will automatically detect camera angles, and name cameras.
subway customers.
all approved cameras that are
The DHCP option should be used by plugged into the POE port of the Note: If a camera does not show up,
default. POE switch. please disconnect the cable leading
to the camera (on the POE port)
Note: Please remember to have
the cameras plugged into the POE and reconnect it to the POE port to
switch, and the HP Video Gateway power-cycle the camera. Then try
connected to the POE to re-discover the cameras. If this
does not work, power cycle the POE
switch from the built-in ethernet port. switch, and try to re-discover the
The USB 3.0 to RJ45 (ethernet) cameras.
adapter should be used as Gateway Tap the arrow next to each discovered
connection to the store internet. camera to name the camera properly
Note: Please remember each and to see a larger picture of the
camera you wish to identify must camera.
be connected to the POE port on Note: Do not name cameras before
the POE end, and the camera RJ45 all cameras are connected and
connection on the camera end. discovered. Re-running the whole
process may wipe names from the
system.
PAGE 18www.EZUniverse.com | support@ezuniverse.com | +1 888 694 8301 ext. 1 or ext. 2
3b 3c 4
Camera Discovery Camera Discovery POS discovery
Now you can name the camera If one of the discovered cameras has Now it is time to discover POS
and adjust the angle as necessary. a microphone attached and you want terminals.
(Please see recommended angles to enable recording from
in this manual for ideal camera The script that is looking for any POS
positioning). this microphone, please tap the blue terminal on the store network will be
button. initialized automatically and search
Tap the green button to Save and for signals from the POS.
return to the camera list. The following note will appear:
Repeat the steps with all listed “ The following audio device
cameras and tap green NEXT button has been enabled at your
to get to the POS discovery. facility. Please be advised that
audio recording laws vary by
local jurisdiction. EZUniverse
nor IPC and any affiliates are
not responsible for any audio
surveillance laws – these are left
to the discretion of the operator/
owner.”
Tap green NEXT button to get to the
POS discovery.
PAGE 19www.EZUniverse.com | support@ezuniverse.com | +1 888 694 8301 ext. 1 or ext. 2
4a 4b 5
POS discovery POS discovery Match POS with Camera
If the script was not able to discover If the installer is not authorized to run Tapping the camera name will
any POS in the store network it will transactions on the POS terminal this bring up the menu with all available
prompt the user to run transaction step can be omitted by tapping green cameras.
on the store POS and repeat the SKIP button.
discovery process. Choose the camera name that
covers each POS. For example,
select “POS Front” camera for the
POS Front POS.
PAGE 20www.EZUniverse.com | support@ezuniverse.com | +1 888 694 8301 ext. 1 or ext. 2
6 7a 7b
Store info Prefix Prefix
When registering a new store or If you are adding new store to your If you are adding new store to your
restaurant, all information can be enterprise you probably already have enterprise and you wish to add a
downloaded automatically. Simply a unique prefix (3-6 character code new prefix, set switch to YES and tap
type in your store number where it added in front of your user name, next.
says “Store #,” and select the blue e.g.: SUB100/ username). Set
arrow to download the information. switch to NO and tap next. The system will automatically
If for any reason this does not generate a new prefix for you. An
download automatically, please fill this If this is your FIRST Subway automatic email with all information
information our manually. Surveillance system, please see the will follow this prompt. Please check
next step, 7b. the inbox of the email account
associated with the order of your
surveillance system.
PAGE 21www.EZUniverse.com | support@ezuniverse.com | +1 888 694 8301 ext. 1 or ext. 2
8 8 8
Time Zone Summary and registration Thank You Screen
Please set the correct time zone. The scrollable screen with all details At this moment, the restaurant’s
Use the blue button to refresh and should appear as a last step of the gateway is registered in the Data
check if the NVR time has been registration process. Base. It may take up to 15 minutes
corrected. for welcome information to be sent to
Please review and tap REGISTER the email of the order issuer.
Once selected, tap NEXT to go to the to finish.
summary screen.
PAGE 22www.EZUniverse.com | support@ezuniverse.com | +1 888 694 8301 ext. 1 or ext. 2
Tablet or PC registration using regular HTML protocol (if installer cannot use iPhone)
Connect your tablet to the WiFi hotspot or your PC using patch cable to the PoE switch.
➊ Connect to the “Subway_Gateway” Wi-Fi network using your device
➋ When prompted enter subway2014 as the password
➌ Wait for connection (NOTE: Sometimes it may take more then 1min)
➍ To start registration – open browser or iPhone Installer App
◗ iPhone (NOTE: With iPhone use a dedicated Installer Application to register or configure the gateway)
◗ iPad or Tablet (NOTE: Use Safari browser to register or configure the gateway)
➎ If you are registering via the Browser, open your browser and go to http://ipcoop.us
Connecting to HP Gateway using Ethernet cable
➊ Hook your PC laptop with an Ethernet cable to an open port on the POE switch deployed with the system
➋ Open browser (Firefox or Chrome) on your PC laptop
➌ Go to http://ipcoop.us
➍ Type in your name, email and password to get to the setup wizard (default password: universe)
Log in to the setup wizard.
1 (Password: universe – If you have problems please contact our support line at 1-866-360-0121)
PAGE 23www.EZUniverse.com | support@ezuniverse.com | +1 888 694 8301 ext. 1 or ext. 2
Provide your name, phone and email. Tap green button to get to the next screen.
2
3
Tap NEXT
PAGE 24www.EZUniverse.com | support@ezuniverse.com | +1 888 694 8301 ext. 1 or ext. 2
NOW: Follow the steps to set and register your store
4
Tap the green button to register a brand new system. Tap the blue button to restore a new unit for
warranty replacement. (See instructions in the section called “UNIT RMA PROCEDURE”
Please note: If at any time you run into issues and have to call support, the TeamViewer ID# is the 9-digit
# located at the bottom of each page. If the HP Gateway has internet connection, this will allow remote
connection to the device.
Choose DHCP (other option is for non-Subway stores with static IP)
5 Choose DHCP (the other
option is primarily for
non-Subway stores with
static IP
PAGE 25www.EZUniverse.com | support@ezuniverse.com | +1 888 694 8301 ext. 1 or ext. 2
In the next step, the system will auto-discover cameras
6
NOTE: Click the arrow next to each camera to edit the discovered camera information and view a preview of the camera image (low FPS).
Now you can name each camera and adjust the angle as necessary. (Please see recommended angles in this manual for
ideal camera positioning.) Tap the green button to Save and return to the camera list. If one of the discovered cameras
has a microphone attached and you want to enable recording from this microphone please tap the blue button prior to
saving the camera.
A note will appear: “The following audio device has been enabled at your facility. Please be advised that audio
recording laws vary by local jurisdiction. EZUniverse nor IPC and any affiliates are not responsible for any audio
surveillance laws – these are left to the discretion of the operator/owner”.
Tap green NEXT button to get to the POS discovery.
PAGE 26www.EZUniverse.com | support@ezuniverse.com | +1 888 694 8301 ext. 1 or ext. 2
7 Now it is time to discover any POS terminals
NOTE: SubwayPOS is being discovered only when a transaction is punched in during the POS auto discovery process. If
you cannot find a POS and ran a transaction, the POS can be added later during configuration (after NVR is registered).
➊ If you wish rediscover a POS terminal, tap the RED button called Previous. To Skip this step, use the green button.
PAGE 27www.EZUniverse.com | support@ezuniverse.com | +1 888 694 8301 ext. 1 or ext. 2
➋ Match the POS with a cameras
NOTE: If you have discovered a POS, please match the correct camera to the POS.
Store information. When registering a new store, all fields should be filled automatically. To get the
8 automatic info, fill in the first field with the correct Store #, then select the BLUE button on the top to fill in the
other fields automatically. If this does not work, then all fields must be manually filled in. Remember to fill out
the correct time zone at the bottom of the page.
PAGE 28www.EZUniverse.com | support@ezuniverse.com | +1 888 694 8301 ext. 1 or ext. 2
Create prefix
9
If you are adding new store to your enterprise you probably already have a unique prefix (3-6 character code added in
front of your user name, e.g.: SUB100/ username). Set switch to NO and tap next.
If this is your FIRST Subway Surveillance system, please see the next step.
If this is your FIRST Subway Surveillance system or would like to create a brand new organization, select YES and tap
next. The system will automatically generate a new prefix for you. The automated email with all information will follow this
prompt. Please check your inbox on the email account associated with your surveillance system order.
9 Time Zone
Please set the
correct time zone.
Use the blue button
to refresh and
check if the NVR
time has been
corrected.
Select the GREEN
button to accept
and jump to the
Summary screen.
PAGE 29www.EZUniverse.com | support@ezuniverse.com | +1 888 694 8301 ext. 1 or ext. 2
Registration summary
10
A summary list appears with all registers, cameras and Store info on one page. Scroll down and review – if you will find
errors you can go back and change the information.
11 Last step – by hitting register all information is sent to the Data Center.
PAGE 30www.EZUniverse.com | support@ezuniverse.com | +1 888 694 8301 ext. 1 or ext. 2
Adding or Replacing Cameras using iPhone Installer app
1 2 3
Configuration Options Adding or removing camera
Launch the EZU Installer When you tap the configuration Choose the first option from the top
button you will see 3 choices. – Camera Configuration – and wait
(see page 16) until the app will scan the system.
1. Camera Configuration
Tap the configuration button
You can choose to set up / configure
/edit and remove cameras
2. POS Configuration
Where you can rediscover POS
terminals or rematch your POS’ with
the right cameras
3. Store Information
Here you can edit store details
PAGE 31www.EZUniverse.com | support@ezuniverse.com | +1 888 694 8301 ext. 1 or ext. 2
4 5 6
Adding or removing camera Adding or removing camera Adding or removing camera
Discovered cameras will be listed. Please delete the camera you wish Rescan the system (See step 3).
to remove by swiping right.
If one of the cameras is broken A new list of available cameras will
or disabled it will show up as A Delete button will appear. Tap the appear.
highlighted in red. Remove by delete button.
swiping right. See step 5. The newly installed/discovered
Note: It is important to DELETE the camera will be listed in RED.
defective camera PRIOR to removing
it. This allows the system to use the NEXT
same IP. Tap the grey arrow on the right of
NOW: Please remove the unwanted the camera to view the video and
or broken camera from the celling or rename the camera.
wall. Tap green button on the bottom to
confirm the new name and position.
PAGE 32www.EZUniverse.com | support@ezuniverse.com | +1 888 694 8301 ext. 1 or ext. 2
7 8 9
Adding or removing camera Adding or removing camera Adding or removing camera
Tap the grey arrow on the right of Rename the camera and view the The new camera is listed with the
the camera to view the video and video to set the right angle and focus new name
rename the camera. the camera.
NEXT: Tap the home icon to get back
You can also tap the blue button to the main menu.
under the image to reset the camera.
To switch microphone (if connected
to thsi camera) on / off tap the blue
button with the microphone icon.
When you turn it
on the following
note will appear.
Tap green
button on
the bottom
to confirm
the new name
and position.
PAGE 33www.EZUniverse.com | support@ezuniverse.com | +1 888 694 8301 ext. 1 or ext. 2
10 11 11
Adding or removing camera Adding or removing camera Adding or removing camera
Tap video to view connected You may need to wait a few minutes Tap any camera to view a single
cameras in a local mode. for the Video Server to reset video stream locally.
streams.
PAGE 34www.EZUniverse.com | support@ezuniverse.com | +1 888 694 8301 ext. 1 or ext. 2
Adding or Replacing Cameras - PC/Android Browser-based Method
If you do not have an iPhone, make sure you are connected to the Subway Gateway network (see page 15).
If you cannot connect to the Wi-Fi for whatever reason, try power-cycling the Trendnet Wi-Fi Access Point at the front of
the shelf (the small Wi-Fi device).
If you are still unable to connect, connect your PC to the camera PoE switch directly with a PC Laptop
➊ Open Firefox or IE browser
➋ Type: http://ipcoop.us
➌ Hit Enter
➌ Login to the setup wizard as discribed on pages 23-24
NOTE: This method will work only on PC Laptop Computers running Windows OS
1
Select the arrow next to “Cameras” to begin your RMA/Camera swap.
The system will scan for all the connected cameras. Please hold a moment.
PAGE 35www.EZUniverse.com | support@ezuniverse.com | +1 888 694 8301 ext. 1 or ext. 2
2
Choose the camera you know must be replaced. Click and drag to the right as if you were using a touch screen. A red
“Delete” button will appear. If this is the camera that must be swapped out, please select delete.
Note: Please delete the camera and remove the camera from the installation prior to swapping in the new camera.
3
Select the green checkmark when you have removed the camera. This will take you back to the home page.
PAGE 36www.EZUniverse.com | support@ezuniverse.com | +1 888 694 8301 ext. 1 or ext. 2
Swap out the broken camera with the new camera.
4 Select the “Cameras” icon on the home page again. This will allow you to re-discover the cameras.
You will notice a new camera highlighted in red lettering has now appeared. Select this new camera by
5 selecting the grey arrow to the right to configure it.
PAGE 37www.EZUniverse.com | support@ezuniverse.com | +1 888 694 8301 ext. 1 or ext. 2
Name the camera properly. Make sure the camera view is as you would like it to be.
6 Select the green CHECK to save your settings.
You have now successfully replaced, adjusted, and configured the replacement camera.
7 Select the green CHECK to SAVE your replacement camera.
PAGE 38www.EZUniverse.com | support@ezuniverse.com | +1 888 694 8301 ext. 1 or ext. 2
Call support Local video (live on iPhone app only)
Tap the Call Support button on the When your iPhone is connected to the local Subway_Gateway Wi-Fi
main menu to get connected to the network, you can view your live cameras. Tap Video to view multiple or single
EZUniverse Global support line. live streams locally without consuming remote bandwidth or tampering with
your firewall.
PAGE 39www.EZUniverse.com | support@ezuniverse.com | +1 888 694 8301 ext. 1 or ext. 2
Port forwarding (this step is necessery to view video remotely)
HOW TO FORWARD PORTS ON VERIZON ROUTER
• Log to router with administrative priviliges
• Click on Firewall Settings then confirm that you ‘re fully aware about changes
• Choose Port Forwarding and ... ADD
PAGE 40www.EZUniverse.com | support@ezuniverse.com | +1 888 694 8301 ext. 1 or ext. 2
• Specify Local Host IP ( in our case 192.168.1.43 ( IP of controller )
• Protocol – choose User Defiend
• Type friendly name in Service Name field: eg. VideoServerPort
• Choose Add Server Ports
• Protocol: Choose TCP
• Source Ports: Leave ANY
• Destination Ports: Choose SINGLE and type 5050
• Click on Apply
PAGE 41www.EZUniverse.com | support@ezuniverse.com | +1 888 694 8301 ext. 1 or ext. 2
• Click on Apply
• Click on Apply
• In Final window click on Apply
Summary: Right now port is open and forwarded to specified IP
Please repeat this scheme for ports :
Type: TCP
Name: VideoServer
Port: 5050
Type: TCP In case of problems please
contact our IT Department
Name: WebService IT@ezuniverse.com
Port: 80
PAGE 42www.EZUniverse.com | support@ezuniverse.com | +1 888 694 8301 ext. 1 or ext. 2
SUBWAY SURVEILLANCETM is all you need to for your restaurant!
®
POE SWITCH - comes
with 2 options (24+2 ports
or 8+2 ports
(OPTIONAL) ANALOG
ENCODER - H.264
Encoder 4x I/O 4 Port
for Analog Camera
NVR - Small Footprint PC Recording
NVR/Data Gateway
POWER STRIP /
SURGE PROTECTOR
- as an option unit can
host 1U size
UPS Battery
(OPTIONAL)
EXTERNAL MEMORY
2 BAY ENCLOSURE
for external USB HDD
What’s inside the enclosure
PROCESSOR POE SWITCH
• Intel® Core™ i3 4010U Processor • 24 POE Ports + 2 or 8 POE Ports + 2
(1.7 GHz Dual-Core processor with 3 MB smart cache)
• Supports Intel® Hyper-Threading Technology4 ENCLOSURE DIMENTIONS
• Supports Intel® 64 architecture 5 • 20¨ W x 21¨ H x 6¨ D
• 50.8cm x 53.34cm x 15.24cm
SYSTEM MEMORY
• 4 GB RAM BASEBOARD POWER REQUIREMENTS
• DC Power 12 - 19 V, 65 W
MEMORY
• 120GB 50mm mSATA SSD ENVIRONMENT OPERATING TEMPERATURE
• 2.5 Inch, 9.5mm 2TB Hard Drive • 0° C to +50° C (32° F to 122° F)
PERIPHERAL CONNECTIVITY OPTIONAL COMPONENTS
• Integrated Intel 10/100/1000 Network Connection • H.264 Encoder 4x I/O 4 Port for Analog Cameras
• Four Super Hi-Speed USB 3.0 ports • External USB3 Enclosure with HDD space up to 8TB
• Two additional Hi-Speed USB 2.0 ports via internal header
Powered by
WEB: www.ipcoop.com | Toll-Free: (888) 445-9239
Independent Purchasing Cooperative: 9200 S. Dadeland Blvd., Suite 800 Miami, FL 33156
PAGE 43You can also read