INDOOR COOLER CONSTRUCTION GUIDE - DIY ECONOMY 8' X 8' WALK-IN COOLER - CoolBot
←
→
Page content transcription
If your browser does not render page correctly, please read the page content below
PHONE: 888-871-5723
WWW.STOREITCOLD.COM                           SUPPORT@STOREITCOLD.COM

   INDOOR COOLER CONSTRUCTION GUIDE
                 DIY ECONOMY 8’ X 8’ WALK-IN COOLER

                                                                          1
2017 © Store It Cold, LLC.     Rev 2017-03a             All Rights Reserved.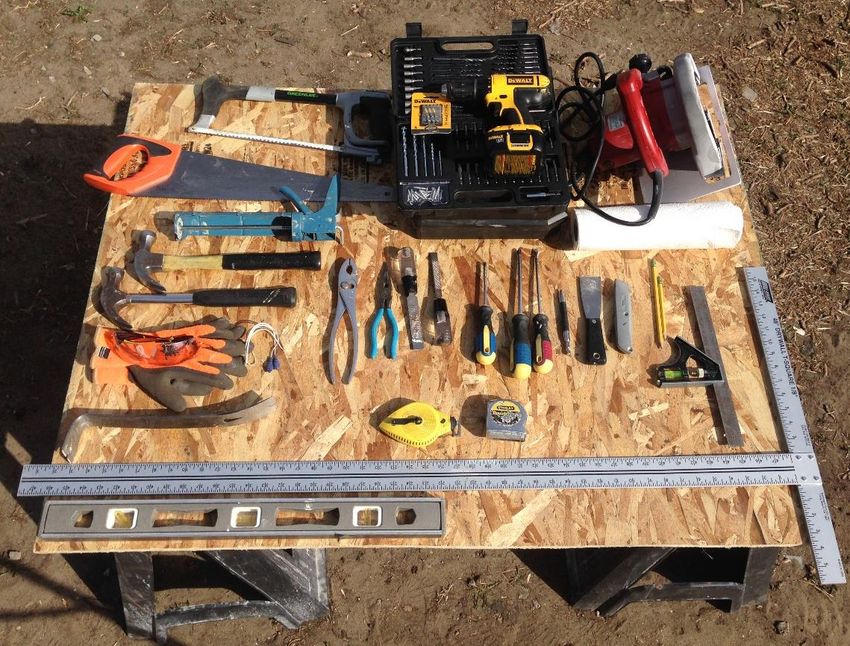
PHONE: 888-871-5723
WWW.STOREITCOLD.COM                                                          SUPPORT@STOREITCOLD.COM

DISCLAIMER
Store It Cold, LLC. is here to help and assist the DIYer. All information/advice is free to use. The
information/advice is for general guidance only and whilst every effort is made to ensure that it is
correct, it should not be relied upon as accurate. The information/advice contained within this
document is intended for persons of no less than 18 years of age. Use of the information/advice
contained within this document is at your own risk. It is the sole responsibility of any person(s) using the
information/advice contained within this document that their level of competence is appropriate for the
task they want to complete. All users of information/advice contained within this document should have
all work checked/tested by a professional qualified trades person where applicable.

You should be aware of current Local Regulations on buildings, gas, water and electrical works (i.e. Part
P) if you have any doubts we would advise you to research further information or contact the
appropriate professional body.

LIABILITY
Store It Cold, LLC. and individuals associated with the document through ownership and contribution
will not accept any liability for any loss, damage, injury or negligence direct or indirect from use of the
information/advice contained within this document. Any dispute arising from use of this document or
disclaimer will be decided by the US courts under the relevant US law.

COPYRIGHT
The contents of these and other pages (graphics, text and arrangement) are owned unless otherwise
noted by Store It Cold, LLC and no part of this document may be reproduced without written permission
of the owners at Store It Cold, LLC. Information may be stored on computer for personal use only, not
for presentation or publication.

                                                                                                              2
2017 © Store It Cold, LLC.                      Rev 2017-03a                               All Rights Reserved.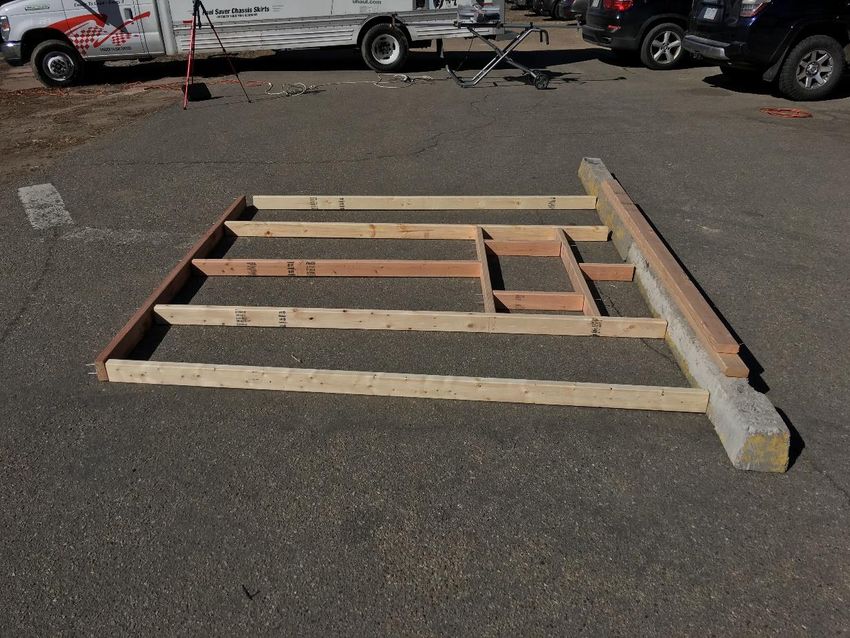
PHONE: 888-871-5723
WWW.STOREITCOLD.COM                                                                                            SUPPORT@STOREITCOLD.COM

TABLE OF CONTENTS
BEFORE YOU START....................................................................................................................................... 4
MATERIALS LIST ............................................................................................................................................ 5
TOOLS YOU WILL NEED ................................................................................................................................. 6
BUILDING THE BACK WALL............................................................................................................................ 7
BUILDING THE FRONT WALL ....................................................................................................................... 11
BUILDING THE RIGHT AND LEFT WALLS ...................................................................................................... 13
CONNECTING THE WALLS TO THE FLOOR................................................................................................... 14
BUILDING THE CEILING ............................................................................................................................... 20
EXTERIOR SHEETING ................................................................................................................................... 23
INSTALLING THE DOOR ............................................................................................................................... 23
INSULATING YOUR ROOM .......................................................................................................................... 24
ELECTRICAL.................................................................................................................................................. 35
OPTIONAL: MOTION DETECTOR LIGHT ....................................................................................................... 35
OPTIONAL: CEILING RACK - SLIDING GAMBREL SYSTEM INSTALLATION .................................................... 38
AIR CONDITIONER INSTALLATION............................................................................................................... 40
COOLBOT INSTALLATION ............................................................................................................................ 43
UPGRADES AND OPTIONS FOR YOUR COOLER ........................................................................................... 47

                                                                                                                                                             3
2017 © Store It Cold, LLC.                                            Rev 2017-03a                                                 All Rights Reserved.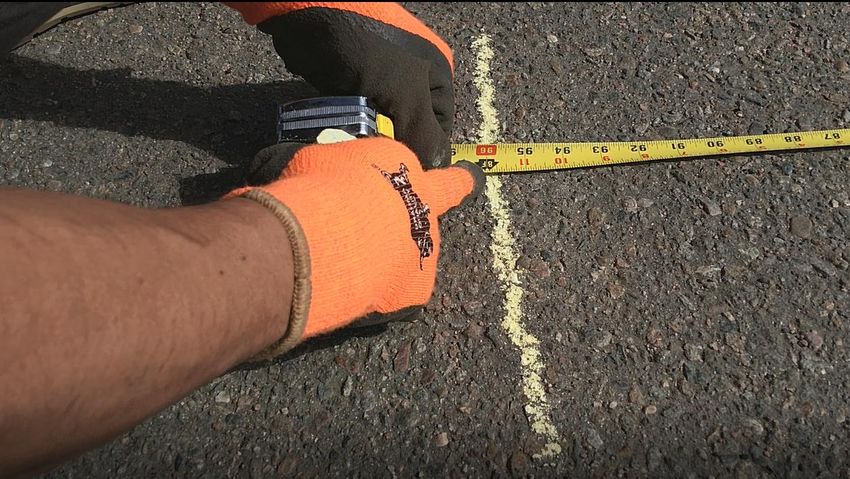
PHONE: 888-871-5723
WWW.STOREITCOLD.COM SUPPORT@STOREITCOLD.COM
BEFORE YOU START
This indoor Cooler construction guide is intended for an Indoor application only. Please ensure that a flat
level and structurally sound surface is available. A concrete slab is the best alternative. If you are
building on an elevated surface such as a deck, a second floor, above a crawling space, or your cooler
needs to be below 37°F, insulating the floor is highly recommended in order to get the best performance
and efficiency out of your DIY Walk-In Cooler.
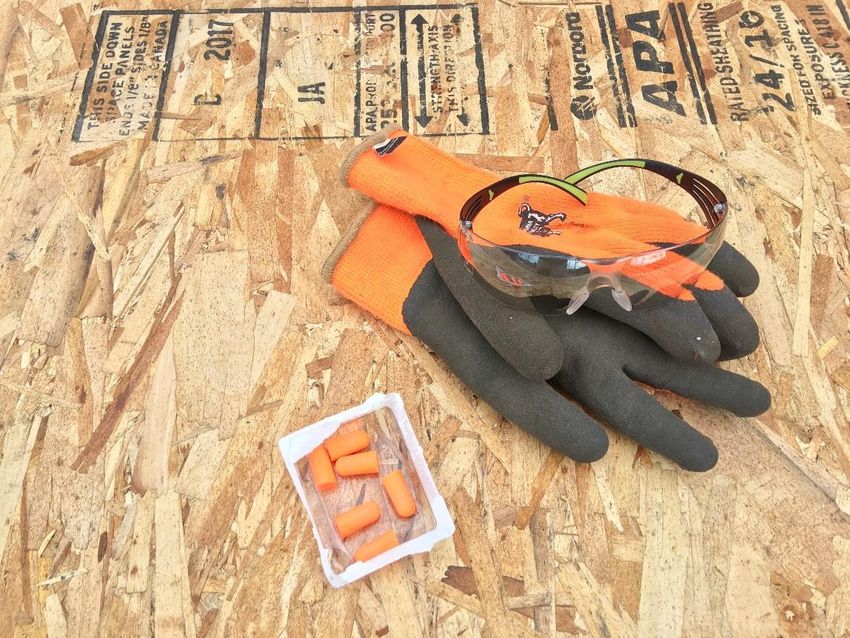
SAFETY TIP
At all times wear appropriate personal protective equipment to ensure a safe and enjoyable
construction experience.
THRIFTY TIP
Repurpose lumber from a shed or building that is being torn down or purchase reclaimed lumber from
a local resale lumber supplier.
4
2017 © Store It Cold, LLC. Rev 2017-03a All Rights Reserved.
PHONE: 888-871-5723
WWW.STOREITCOLD.COM                                                    SUPPORT@STOREITCOLD.COM

MATERIALS LIST
The materials listed below were purchased for less than $1,100 in March of 2017 at our local Denver
area home improvement store. In addition to these materials you will need to purchase a CoolBot and a
digital window air conditioner. The dimensions in the guide are for an LG 15,000 BTU Model: LW1516ER.
 BACK WALL (A/C WALL)                                        QTY              SIZE
 2" X 4" TREATED                                             1                96"
 2" X 4" WHITE WOOD                                          4                96"
 2" X 4" WHITE WOOD                                          5                92-5/8"
 7/16" OSB                                                   2                4' x 8'

 FRONT WALL (DOOR WALL)                                      QTY              SIZE
 2" X 4" TREATED                                             1                96"
 2" X 4" WHITE WOOD                                          3                96"
 2" X 4" WHITE WOOD                                          6                92-5/8"
 7/16" OSB                                                   2                4' x 8'

 RIGHT WALL                                                  QTY              SIZE
 2" X 4" TREATED                                             1                96"
 2" X 4" WHITE WOOD                                          2                96"
 2" X 4" WHITE WOOD                                          7                92-5/8"
 7/16" OSB                                                   2                4' x 8'

 LEFT WALL                                                   QTY              SIZE
 2" X 4" TREATED                                             1                96"
 2" X 4" WHITE WOOD                                          2                96"
 2" X 4" WHITE WOOD                                          7                92-5/8"
 7/16" OSB                                                   2                4' x 8'

 CEILING                                                     QTY              SIZE
 2" X 6" WHITE WOOD                                          4                96"
 4 X 4 JOIST HANGERS                                         4                -
 2" X 4" WHITE WOOD                                          1                96"
 1/2" PLYWOOD SCRAPS                                         4                -

 INSULATION                                                  QTY              SIZE
 RMAX THERMASHEATH POLYISOCYANURATE RIGID R-13.1             20               4' x 8' x 2"
 PLASTIC ROUND CAP ROOFING NAILS 1 LB. (117-PACK)            2                #11 x 3 in.
 HEAVY DUTY LIQUID NAILS                                     15               Tube
 FOIL HVAC TAPE                                              1                2.5" x 60 yd
 GREAT STUFF                                                 5                Can

 DOOR                                                        QTY              SIZE
 STEEL PREHUNG INSULATED DOOR (OUTWARD SWING)                1                36" x 80"
 HARDWARE                                                    QTY              SIZE
 GALVANIZED FRAMING NAILS (1 LB.-71/BOX)                     1                16-Penny
 VINYL-COATED STEEL SINKER NAILS (1 LB.-64/BOX)              2                16-Penny
 VINYL-COATED STEEL SINKER NAILS (1 LB.-153/BOX)             1                8-Penny
 POLYMER COATED EXTERIOR SCREW (73/PK)                       1                #10 x 3"
 16-PENNY VINYL-COATED STEEL SINKER NAILS (1 LB.-64/BOX)     2                #9 x 3-1/4"
 DOOR SHIM PACK                                              1                -

                                                                                                       5
2017 © Store It Cold, LLC.                  Rev 2017-03a                             All Rights Reserved.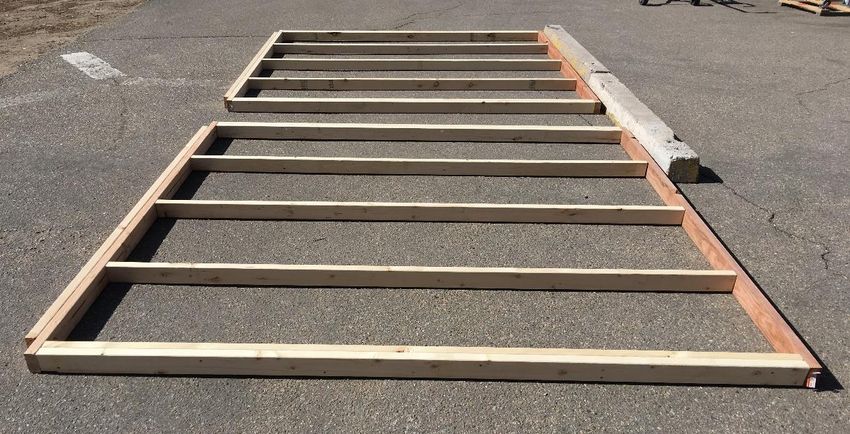
PHONE: 888-871-5723
WWW.STOREITCOLD.COM                                                  SUPPORT@STOREITCOLD.COM

TOOLS YOU WILL NEED
    •   Safety glasses
    •   Ear plugs
    •   Gloves
    •   Pencil
    •   Tape measure
    •   Claw hammer
    •   Combination or framing square
    •   4’ level
    •   Circular saw or table saw
    •   #2 Phillips screwdriver
    •   Caulk gun
    •   Snap-off blade knife with minimum 2-1/2” of extended blade
    •   Chalk line

                                                                                                 6
2017 © Store It Cold, LLC.                  Rev 2017-03a                       All Rights Reserved.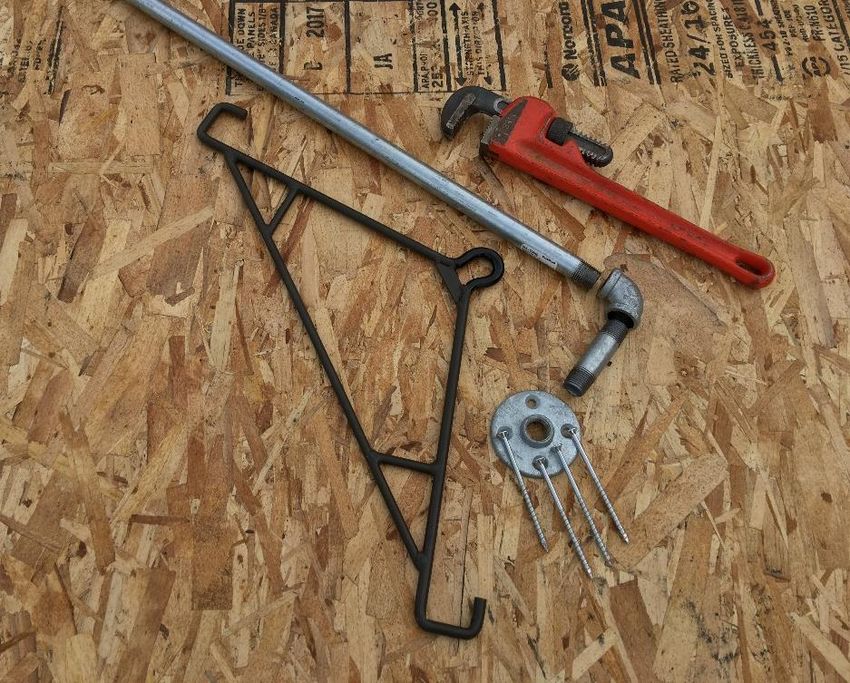
PHONE: 888-871-5723
WWW.STOREITCOLD.COM                                                         SUPPORT@STOREITCOLD.COM

BUILDING THE BACK WALL
Construction of the Cooler starts with the back wall. This wall is opposite to the door and is where the
A/C unit will be installed in.

The dimensions in the diagram are for an LG 15,000 BTU Model: LW1516ER. Take extra care to ensure
that the air conditioner cutout dimensions are correct for the air conditioner you have selected. Leave a
1/4" gap all around the air conditioner - make the cutout 1/2" taller and 1/2" wider than your air
conditioner.

Treated lumber is used for the BOTTOM PLATE since the BOTTOM PLATE may be mounted to the
concrete and on occasion get wet. White wood is not treated and used for all other boards in
construction of the cooler.

    •   For the BOTTOM PLATE cut an 8' long treated 2 x 4 to 89" long.
    •   Mark the location of each wall stud on the 2 x 4.
    •   Do the same for the TOP PLATE by cutting an 8’ long white wood 2 x 4 to 89" long.
    •   Mark all 2 x 4s with a pencil and straight edge to identify the edge of the mating 2 x 4s.
    •   Mark an "X" on the side of the line that will be covered by the mating 2 x 4.

                                                                                                           7
2017 © Store It Cold, LLC.                     Rev 2017-03a                              All Rights Reserved.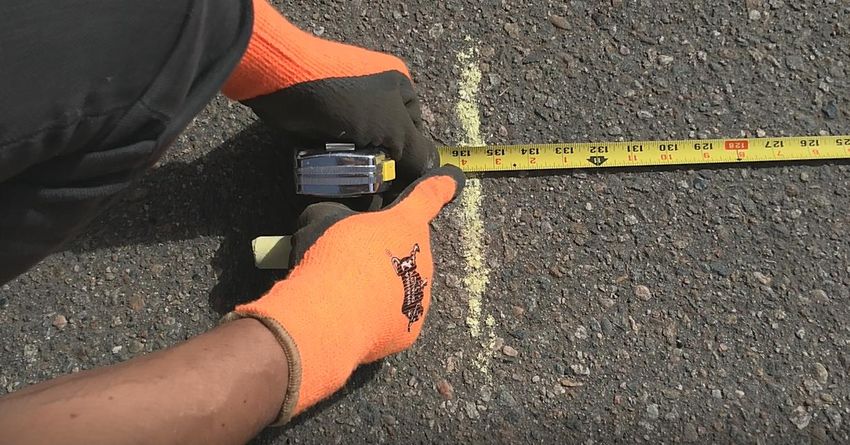
PHONE: 888-871-5723
WWW.STOREITCOLD.COM                                                        SUPPORT@STOREITCOLD.COM

    •   On a flat surface with a backstop that will not move layout four 92-5/8" long 2 x 4s.
    •   Also cut to length and layout the 2 x 4s for the air conditioner opening.

                                                                                                          8
2017 © Store It Cold, LLC.                     Rev 2017-03a                             All Rights Reserved.
PHONE: 888-871-5723
WWW.STOREITCOLD.COM                                                          SUPPORT@STOREITCOLD.COM

All nails used with treated lumber must be galvanized to prevent corrosion of the nails. Galvanized
nails have a rough dull silvery appearance.

                                                  PRO TIP

Starting nails in a board is much easier if the board is lying flat on a rigid surface than if you are trying
to hold it in position. Start the nails and pound them until they just break through the backside of the
board.

    •   Nail the treated BOTTOM PLATE to the four 92-5/8" and one 61" STUDS using two 16 penny
        galvanized nails into each stud.
    •   Use two 16 penny vinyl-coated sinker nails per joint for the remaining nailing of the back wall
        frame.

                                                                                                             9
2017 © Store It Cold, LLC.                      Rev 2017-03a                               All Rights Reserved.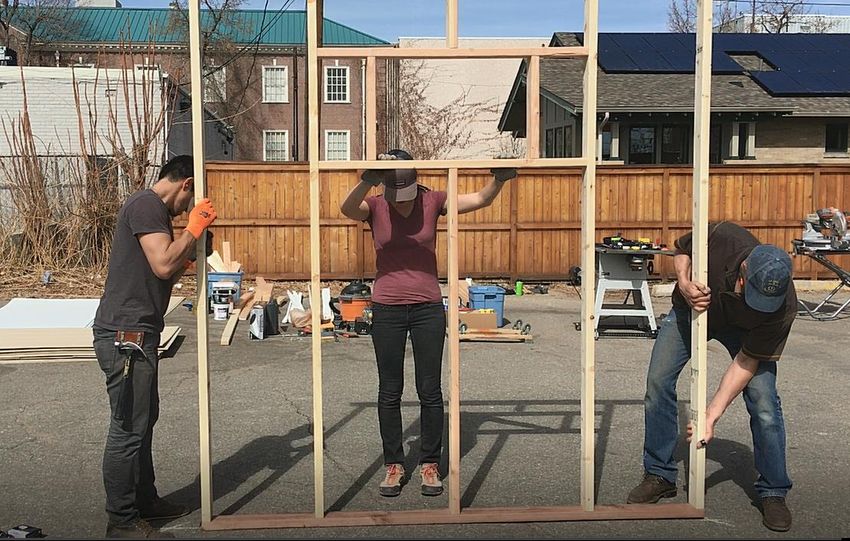
PHONE: 888-871-5723
WWW.STOREITCOLD.COM                                                   SUPPORT@STOREITCOLD.COM

    •   Nail together the four boards that make up the AIR CONDITIONER FRAME and then nail the
        frame to the adjacent STUDS.

    •   Rotate the entire back wall frame 180˚ and place the BOTTOM PLATE against the backstop.
    •   Nail the TOP PLATE to the STUDS using two nails into each STUD.
    •   Align the TOP DOUBLE PLATE centered on the TOP PLATE which will leave 3-1/2" overhang on
        each side.
    •   Nail the TOP DOUBLE PLATE to the TOP PLATE with nails approximately every 12" staggered side
        to side.

The back wall is now complete.

                                                                                                    10
2017 © Store It Cold, LLC.                  Rev 2017-03a                           All Rights Reserved.
PHONE: 888-871-5723
WWW.STOREITCOLD.COM SUPPORT@STOREITCOLD.COM
BUILDING THE FRONT WALL
The second wall frame on the process is the front wall frame. This wall has the doorway. Take extra care
to ensure that the doorframe dimensions are correct for the door you have selected.
• Cut and layout the 2 x 4s for the front wall in a similar manner to the back wall
• Nail together the two pairs of doubles STUDS for the doorway using 16 penny vinyl-coated
sinker nails staggered every 12". Nailing from the shorter 81” STUD through the taller 92-5/8”
stud will ensure that the protruding nail tips do not face into the doorway.
11
2017 © Store It Cold, LLC. Rev 2017-03a All Rights Reserved.PHONE: 888-871-5723
WWW.STOREITCOLD.COM SUPPORT@STOREITCOLD.COM
• Nail the treated BOTTOM PLATE to the six 92-5/8" STUDS using two 16 penny galvanized nails in
each STUD.
• Rotate the entire front wall frame 180˚ and place the BOTTOM PLATE against the backstop.
• Use two 16 penny vinyl-coated sinker nails per joint for the remaining nailing of the front wall
frame.
• Nail the TOP PLATE to the studs.
• Nail the DOORWAY HEADER 2 x 4s on edge to the adjacent STUDS with the faces of the
DOORWAY HEADERS flush with the outside of the STUDS.
• Nail the short STUDS above the doorway in place.
• Nail the TOP DOUBLE PLATE to the TOP PLATE with nails approximately every 12" staggered side
to side.
The front wall is now complete.
12
2017 © Store It Cold, LLC. Rev 2017-03a All Rights Reserved.PHONE: 888-871-5723
WWW.STOREITCOLD.COM SUPPORT@STOREITCOLD.COM
BUILDING THE RIGHT AND LEFT WALLS
Repeat the process for the left and right walls in a similar manner to that done for the back and front
walls.
13
2017 © Store It Cold, LLC. Rev 2017-03a All Rights Reserved.PHONE: 888-871-5723
WWW.STOREITCOLD.COM SUPPORT@STOREITCOLD.COM
CONNECTING THE WALLS TO THE FLOOR
Please ensure that a flat level and structurally sound surface is available. A concrete slab is the best
alternative. If you are building on an elevated surface such as a deck, a second floor, above a crawling
space, or your cooler needs to be below 38°F, insulating the floor is highly recommended in order to get
the best performance and efficiency out of your DIY Walk In Cooler. A non-insulated wood building
floor will not suffice.
• The next step is to layout a "perfect" 96" by 96" square on the floor you will be placing your
cooler.
• Mark and "X" where you would like the front left corner of the cooler.
• Mark another "X" 96" away for the front right corner.
14
2017 © Store It Cold, LLC. Rev 2017-03a All Rights Reserved.PHONE: 888-871-5723
WWW.STOREITCOLD.COM SUPPORT@STOREITCOLD.COM
• Swing an arc 96" from the front left corner for the back left corner.
15
2017 © Store It Cold, LLC. Rev 2017-03a All Rights Reserved.PHONE: 888-871-5723
WWW.STOREITCOLD.COM SUPPORT@STOREITCOLD.COM
• Swing an arc 135-3/4" from the front left corner for the back right corner.
• Swing an arc 96" from the front right corner for the back right corner.
16
2017 © Store It Cold, LLC. Rev 2017-03a All Rights Reserved.PHONE: 888-871-5723
WWW.STOREITCOLD.COM SUPPORT@STOREITCOLD.COM
• Swing an arc 135-3/4" from the front right corner for the back left corner.
• Snap chalk lines from the arc intersections to mark the perimeter walls of your cooler.
17
2017 © Store It Cold, LLC. Rev 2017-03a All Rights Reserved.PHONE: 888-871-5723
WWW.STOREITCOLD.COM SUPPORT@STOREITCOLD.COM
• Starting with the back wall move each wall into place by laying the outside of each wall along
the chalk lines.
• Note that the top double plates on the back and front wall overlap the top plates on the left and
right walls.
18
2017 © Store It Cold, LLC. Rev 2017-03a All Rights Reserved.PHONE: 888-871-5723
WWW.STOREITCOLD.COM SUPPORT@STOREITCOLD.COM
• Screw the walls together using #10 x 3" long polymer coated exterior screws staggered every
12".
Ensure that the exterior of the walls align with the chalk lines.
Finally, anchor the bottom plates to the concrete or asphalt using an appropriate anchor. We
recommend anchors spaced 16" apart or closer along each wall.
19
2017 © Store It Cold, LLC. Rev 2017-03a All Rights Reserved.PHONE: 888-871-5723
WWW.STOREITCOLD.COM SUPPORT@STOREITCOLD.COM
BUILDING THE CEILING
Now that the walls are fastened together and the cooler is mounted to the floor we can install the
ceiling joists.
We used two double ceiling joists to allow for the hanging of items from the ceiling of your cooler.
• Make two double ceiling joists by nailing together two 89 inches long white wood 2 by 6 boards
with two pieces of 5-1/2" x 5-1/2" x 1/2" thick plywood spacers – one spacer on each end.
20
2017 © Store It Cold, LLC. Rev 2017-03a All Rights Reserved.PHONE: 888-871-5723
WWW.STOREITCOLD.COM SUPPORT@STOREITCOLD.COM
• Nail four joist hangers to the back and front walls to accept the double ceiling joists.
• Place the double joists into the double joist hangers.
21
2017 © Store It Cold, LLC. Rev 2017-03a All Rights Reserved.PHONE: 888-871-5723
WWW.STOREITCOLD.COM SUPPORT@STOREITCOLD.COM
• Nail the double joists in place with two 16 penny vinyl-coated sinker nails per joist hanger.
• In order to support the ceiling light, we will install a 2 by 4 support. Measure the distance
between the double joists and cut a 2 by 4 to this length. Nail the 2 by 4 between the double
joists center from front to back of the cooler.
22
2017 © Store It Cold, LLC. Rev 2017-03a All Rights Reserved.PHONE: 888-871-5723
WWW.STOREITCOLD.COM SUPPORT@STOREITCOLD.COM
EXTERIOR SHEETING
Before installing the door and in order to provide structural rigidity to your cooler we recommend
sheeting the outside of the cooler with 4’ x 8’ x 7/16” sheets of OSB. The outside sheathing also creates
an air gap between the insulation in effect increasing the R-factor of your cooler.
Cut and fit each OSB board as necessary depending on the wall (cutting around A/C and door openings)
and screw them or nail them to the walls at the top, bottom and along the studs every 9 - 12 inches.
INSTALLING THE DOOR
Prior to insulating your Cooler, it is best to install the door frame and door.
It is important to use an exterior door as it will be insulated reducing the cooling loss through the door
area of your cooler.
If you purchase a pre-hung insulated door it is important that the door is an outward swing door.
You can also use an insulated door without a frame and either build your own frame or purchase a door
frame kit.
If you purchase a new exterior door frame and door they should come with weather sealing.
Be careful to not damage the weather sealing during installation.
THRIFTY TIP
You can repurpose an exterior insulated door or make your own by building a frame and sandwiching
between 2 - 4" of insulation between sheets of plywood or OSB.
If you repurpose a door or make your own it is important to have good weather sealing in order to
maintain cold temperatures within your cooler.
IMPORTANT TIP
Whichever method you choose for your door frame and door it is important that the door is installed
plumb and square in order to ensure easy opening and closing of your door as well as achieving a
good seal.
23
2017 © Store It Cold, LLC. Rev 2017-03a All Rights Reserved.PHONE: 888-871-5723
WWW.STOREITCOLD.COM SUPPORT@STOREITCOLD.COM
INSULATING YOUR ROOM
Now that you have your cooler built and the door installed you are ready for insulation.
We recommend that the walls and ceilings of the cooler have two layers of 2" Rmax Thermasheath-3.
This is a polyisocyanurate rigid foam insulation that when two 2" layers and a 3-1/2" air space are
combined yields a system R-factor great than R-30.
THRIFTY TIP
Do not skimp on insulations. The quality, thickness, and tightness of your insulations will impact your
electricity bill. Spending a few extra dollars on quality insulation to achieve a higher R-value will help
reduce your electricity bills for years to come.
• Measure and cut a 2" sheet of Rmax to fit between the outer wall top plate and double ceiling
joist.
• Install the insulation and use spray foam to fill any gaps form both the inside and outside of the
cooler.
24
2017 © Store It Cold, LLC. Rev 2017-03a All Rights Reserved.PHONE: 888-871-5723
WWW.STOREITCOLD.COM SUPPORT@STOREITCOLD.COM
• Spray insulation in the gap between the double joists also.
PRO TIP
If the insulation is loose and falls out drive a few nails or screws on an angle to temporarily hold the
insulation in place. Once the spray foam cures the nails can be removed and the insulation will remain
in place.
25
2017 © Store It Cold, LLC. Rev 2017-03a All Rights Reserved.PHONE: 888-871-5723
WWW.STOREITCOLD.COM SUPPORT@STOREITCOLD.COM
• Measure and cut a 2" sheet of Rmax to fit between the double ceiling joists.
• Measure, cut, and place a 2" piece of Rmax above the light support that is at least 8" longer than
the gap and center this piece over the gap.
• From the outside of the cooler drive two #12 x 4" long plastic cap nails through this small piece
of Rmax and into the light support 2 by 4.
• Do not drive the nails all of the way - allow for the Rmax to rise 1/2" above the 2 x 4 as shown by
the finger gap in the photo.
• Use spray foam insulation to fill the 1/2" gap cementing this piece to the main ceiling insulation.
26
2017 © Store It Cold, LLC. Rev 2017-03a All Rights Reserved.PHONE: 888-871-5723
WWW.STOREITCOLD.COM SUPPORT@STOREITCOLD.COM
PRO TIP
Mark the wall stud locations on the floor at least 6" out to make location of the studs easier when
installing the insulation.
• Measure and cut two 2" sheets of Rmax to fit over the studs of the back wall covering the air
conditioner opening. NOTE THAT THE INSULATION GOES OVER THE STUDS AND DOES NOT FIT IN
BETWEEN THE STUDS. THIS IS IMPORTANT TO ENSURE MAXIMUM R-VALUE.
• Flush the edge of the insulation with the exterior of the left and right cooler walls.
• Put the sheets of Rmax in place and fasten to the studs with #12 x 3" long plastic cap nails.
27
2017 © Store It Cold, LLC. Rev 2017-03a All Rights Reserved.PHONE: 888-871-5723
WWW.STOREITCOLD.COM SUPPORT@STOREITCOLD.COM
• Use spray foam to fill any gaps and wipe excess spray foam off the insulation face and corners.
• Repeat for the front wall.
• Repeat for the left and right wall.
• Take another look at all joints and fill any gaps with spray foam insulation.
28
2017 © Store It Cold, LLC. Rev 2017-03a All Rights Reserved.PHONE: 888-871-5723
WWW.STOREITCOLD.COM SUPPORT@STOREITCOLD.COM
• To reduce any air leakage, we will tape all joints with 2-1/2" wide foil HVAC tape.
• The butt joints between sheets are the easiest to tape.
• Cut the tape to match the length of the joint being taped and apply from top to bottom by
slowly pulling off the backing paper and firmly pressing the tape in place.
• Take care to center the tape on the joint.
29
2017 © Store It Cold, LLC. Rev 2017-03a All Rights Reserved.PHONE: 888-871-5723
WWW.STOREITCOLD.COM SUPPORT@STOREITCOLD.COM
• Taping the corners is a bit trickier yet with proper technique is easily achieved.
• Cut the tape to match the length of the joint and remove the first 12" of backing paper.
• Cup the tape inward toward the wall and apply the tape to only one wall.
• Remove another 24" of backing paper and pull tight and again apply to only one wall.
• Repeat until the entire strip is attached to one wall.
• Go back to the top and with your fingers on the side of the tape that is taped to the wall slide
your finger towards but not all of the way to the corner.
30
2017 © Store It Cold, LLC. Rev 2017-03a All Rights Reserved.PHONE: 888-871-5723
WWW.STOREITCOLD.COM SUPPORT@STOREITCOLD.COM
• If the tape contacts the opposite wall gently unstick it from the opposite wall and roll it away
from the opposite wall.
• Go back to the top and firmly slide a board from the taped side to the un-taped side allowing
the tape to now contact the second side.
• Firmly press the tape in place with the board and your fingers from top to bottom.
Now that we have the first 2" layer of insulation on the entire inside of the cooler we will put on the
second 2" layer.
• Measure and cut two 2" sheets of Rmax for both the left and right walls.
• Apply Heavy Duty Liquid Nails generously in a thick bead to the installed sheets of insulation on
the left and right walls.
• One to one and a half 10 oz. tubes per 4' x 8' sheet is about right.
31
2017 © Store It Cold, LLC. Rev 2017-03a All Rights Reserved.PHONE: 888-871-5723
WWW.STOREITCOLD.COM SUPPORT@STOREITCOLD.COM
• Move the second layer Rmax in place and push tightly against the first layer of Rmax to ensure
adhesion.
• Gently pound each sheet with the flat of your fist up and down and across for several minutes in
order to help ensure adhesion.
• Do not pound so hard as to leave marks on the Rmax.
PRO TIP
Cut each piece of Rmax 1/4" smaller than the measured dimension to take into account any out of
square construction of the cooler and out of square cutting of the Rmax. Then dry fit each sheet of
Rmax prior to applying the liquid nails and trim if necessary.
Repeat for the back and front walls.
PRO TIP
Before putting the second layer of insulation on the ceiling, remember to mark on the side walls the
location of your joists (to hang the rack system) as well as the 2 by 4 in between the joists that will
hold your Light fixture.
• Repeat for the ceiling using both Heavy Duty Liquid Nails and #12 x 4" long plastic cap nails to
hold the ceiling insulation sheets in place. Place 2 x 4 braces from the ceiling to the insulation as
32
2017 © Store It Cold, LLC. Rev 2017-03a All Rights Reserved.PHONE: 888-871-5723
WWW.STOREITCOLD.COM SUPPORT@STOREITCOLD.COM
appropriate to ensure that the 2nd insulation layer is tight to the first insulation layer. Take care
to not put too much pressure on the insulation as to cause permanent damage.
• As was done for the first layer of insulation, fill all gaps with spray foam insulation and tape all
joints with 2-1/2" wide foil HVAC tape.
33
2017 © Store It Cold, LLC. Rev 2017-03a All Rights Reserved.PHONE: 888-871-5723
WWW.STOREITCOLD.COM SUPPORT@STOREITCOLD.COM
To trim the excess insulation of the door opening and to cut out the insulation over the A/C opening
follow these steps:
• Using a hand saw, carefully insert the tip of the saw flush with the door frame and start cutting
the excess insulation from top to bottom. To finish the cut, flip the saw (teeth facing up) and cut
flush against the frame going up until you reach the top part of the frame.
• Follow the same procedure on the other side of the door frame and on the top.
• From the outside back wall, use the A/C cut out on the OSB sheeting as a guide for your saw,
and follow the same procedure as in the door opening to cut the insulation out for the A/C
opening.
34
2017 © Store It Cold, LLC. Rev 2017-03a All Rights Reserved.PHONE: 888-871-5723
WWW.STOREITCOLD.COM SUPPORT@STOREITCOLD.COM
ELECTRICAL
IMPORTANT
Once your cooler is built and insulated, have a certified electrician install the electrical for the air
conditioner, CoolBot, lights, and any other accessories you may add to your cooler.
On occasion, condensation may drip from the front of your air conditioner so make sure all electrical is
mounted to the side of the air conditioner and not directly beneath.
We also recommend surface mounting the electrical boxes inside of the cooler to minimize
compromising the insulation integrity and the chance for condensation within the electrical box.
PRO TIP
OPTIONAL: MOTION DETECTOR LIGHT
A motion detector light is an added convenience and may simplify the electrical installation by
avoiding the need for a light switch.
We chose a motion activated LED light fixture made by Lithonia that can hang from the ceiling or can be
mounted directly on the 2 by 4 that we installed in between the 2 ceiling joists. The model number for
the light is: SGLL 24 80CRI 40K PIR M4
35
2017 © Store It Cold, LLC. Rev 2017-03a All Rights Reserved.PHONE: 888-871-5723
WWW.STOREITCOLD.COM SUPPORT@STOREITCOLD.COM
To install the light fixture, follow these steps:
• Carefully remove the clear cover of the front of the light and place to the side.
• Remove the Philips center screw holding the lamp assembly and place aside.
• Gently squeeze both ends of the metal section in the center of the fixture and flip the metal
cover to expose the wires and the mounting holes.
36
2017 © Store It Cold, LLC. Rev 2017-03a All Rights Reserved.PHONE: 888-871-5723
WWW.STOREITCOLD.COM SUPPORT@STOREITCOLD.COM
• Locate the position of the 2 by 4 under the ceiling insulation.
• Position the fixture longways along the direction of the entrance and the back wall. Leave the
end with the cord plug towards the back wall (A/C unit wall). This will simplify electrical
connections as it can be plugged in in the same outlet as the CoolBot and the A/C without
having to run additional outlets.
• Using 4” wood screws anchor the fixture to the ceiling panels. It is very important to make sure
that the screws are going in the 2 by 4 and not just through the insulation to ensure that the
fixture is properly anchored to the ceiling.
• Screw the metal cover back in place using the Philips screw that was removed at the beginning.
• Replace the clear covering of the light fixture.
• Install the electrical cord supplied with the fixture and plug in the power outlet.
37
2017 © Store It Cold, LLC. Rev 2017-03a All Rights Reserved.PHONE: 888-871-5723
WWW.STOREITCOLD.COM SUPPORT@STOREITCOLD.COM
OPTIONAL: CEILING RACK - SLIDING GAMBREL SYSTEM INSTALLATION
You may ask how do I hang this season's deer, elk, or wild boar in my cooler? With a pipe style ceiling
rack and gambrel hangers of course!
When we constructed the ceiling, we used double 2" x 6" joists - just so we can hang this season's game
meat in our new cooler.
• Materials List for (2) sliding gambrel systems:
o (4) ½” galvanized floor flanges
o (4) ½” x 3” galvanized pipe nipples
o (4) ½” galvanized 90 degree FPT x FPT elbow
o (2) ½” x 48” long galvanized pipe threaded both ends
o (6) gambrel hangers that freely slide on ½” galvanized pipe (actual outside diameter of
pipe is 0.84”)
• Preassemble the two pipe style ceiling racks with up to three gambrel hangers per side.
• It is important to install the gambrel hangers on the pipes prior to mounting them to the ceiling
otherwise you will not be able to install the gambrel hangers.
38
2017 © Store It Cold, LLC. Rev 2017-03a All Rights Reserved.PHONE: 888-871-5723
WWW.STOREITCOLD.COM SUPPORT@STOREITCOLD.COM
• Most gambrel hangers will slide on 1/2" galvanized pipe - check your gambrel hangers to ensure
a fit prior to construction.
• Center the pipe style ceiling hangers front to back in the cooler and mount them to the double
joist hangers using four #14 x 4" long wood screws per pipe floor flange.
39
2017 © Store It Cold, LLC. Rev 2017-03a All Rights Reserved.PHONE: 888-871-5723
WWW.STOREITCOLD.COM SUPPORT@STOREITCOLD.COM
AIR CONDITIONER INSTALLATION
It is now time to install the air conditioner into our new cooler.
For an 8' x 8' walk-in cooler we recommend a 15,000 BTU air conditioner for most applications.
We use an LG 15,000 BTU Model: LW1516ER for our cooler. LG is our most preferred brand due to
reliability and easiness of installation with the CoolBot. For a list of compatible brands for your cooler
please visit our website at: https://www.storeitcold.com/ac-selection/
• Carefully remove the air conditioner from its box and read all instructions.
• Remove the 4 screws holding the unit to the housing. Two on the sides and two on the back.
• Pulling from the handle slide the unit out of the housing.
40
2017 © Store It Cold, LLC. Rev 2017-03a All Rights Reserved.PHONE: 888-871-5723
WWW.STOREITCOLD.COM SUPPORT@STOREITCOLD.COM
• Install the housing into the air conditioner cutout so the top bar is resting against the wall.
• Screw the housing to the wall with two wood screws. Make sure the cabinet tilts down at least
1/2" in the back. The weight of the air conditioner is usually sufficient to ensure 1/2" of tilt - if
not shim up the front to achieve the recommended tilt.
41
2017 © Store It Cold, LLC. Rev 2017-03a All Rights Reserved.PHONE: 888-871-5723
WWW.STOREITCOLD.COM SUPPORT@STOREITCOLD.COM
• Slide the air conditioner into the housing from inside of the cooler.
• Replace the screws that hold the housing and the air conditioner together.
42
2017 © Store It Cold, LLC. Rev 2017-03a All Rights Reserved.PHONE: 888-871-5723
WWW.STOREITCOLD.COM SUPPORT@STOREITCOLD.COM
COOLBOT INSTALLATION
Now that your air conditioner is installed we can install the CoolBot and start cooling down the cooler.
• Remove the CoolBot from its box and read all instructions. Familiarize yourself with the device
and all its functions and parts.
• Mount the CoolBot with two screws alongside your air conditioner - do not plug into the power
source.
43
2017 © Store It Cold, LLC. Rev 2017-03a All Rights Reserved.PHONE: 888-871-5723
WWW.STOREITCOLD.COM SUPPORT@STOREITCOLD.COM
• Locate your A/C’s temperature sensor. It is the only thing attached to the front fins of your A/C.
If the A/C has a clip holding the sensor into the fins, remove both of them from the fins and then
remove the sensor from the clip.
• Install the Heater Cable by laying the red tip and air conditioner temperature sensor alongside
of each other. Using the provided aluminum foil wrap both together ensuring that they are in
contact.
44
2017 © Store It Cold, LLC. Rev 2017-03a All Rights Reserved.PHONE: 888-871-5723
WWW.STOREITCOLD.COM SUPPORT@STOREITCOLD.COM
• Plug the heater cable into the "Heater" jack on the CoolBot.
• Ease the fins apart to make a small gap by gently pushing a pencil between the fins in the center
of the A/C and within one inch from the bottom.
• Install one of the temperature sensors with the blue cable and black tip into the small gap by
gently sliding the sensor in place ¼” only. Route the cable sensor to allow for replacement of the
air conditioner front grill without pinching the cable. Plug the temperature sensor cable into the
"Fins" jack on the CoolBot.
45
2017 © Store It Cold, LLC. Rev 2017-03a All Rights Reserved.PHONE: 888-871-5723
WWW.STOREITCOLD.COM SUPPORT@STOREITCOLD.COM
• Plug the other temperature sensor into the “Room” jack of the CoolBot and make sure it is
freely hanging in the cooler and not touching anything.
• PLEASE PROCEED CAREFULLY IN THIS STEP.
NOTE: You do not have to replace the front cover of the A/C if you don’t want to. This
is for aesthetic purposes only and it won’t affect the functioning or the warranty of your
system. An A/C unit with the front cover removed, will give you much easier access to
the coil and Fin sensor for troubleshooting purposes and regular maintenance (coil
cleaning).
Replace the front cover of the A/C starting with the top and then carefully routing the
sensor and heater cables through the small opening that the A/C cover has on the right
side near the bottom. The A/C power cable and the Heater-A/C sensor connection will be
routed through the small opening at the bottom of the front cover. The Fin Sensor and
the Heater Cable will go through the notch on the right side of the cover as they make
their way to connect with the CoolBot digital controller. After the cover is in place secure
it on the front with the 2 screws that came with your A/C installation package.
IMPORTANT! Ensure that you do not pinch any cables while trying to attach the front of
the A/C.
IMPORTANT! After the front cover is in place, visually inspect through the louvres of the
cover to ensure that the Fin Sensor end (tip) did not come loose out of the fins.
46
2017 © Store It Cold, LLC. Rev 2017-03a All Rights Reserved.PHONE: 888-871-5723
WWW.STOREITCOLD.COM SUPPORT@STOREITCOLD.COM
• Plug your air conditioner in and turn it on.
• Set the air conditioner to the lowest temperature, make sure the air conditioner is set to "COOL"
mode and the fan is on "HIGH".
• Plug the power supply cable into the "power" jack on the CoolBot and plug the power supply
into the cooler electrical outlet.
• To set the temperature on the CoolBot, press the checkmark button - the current set
temperature will blink.
• Use the right and left arrows to set the temperature to the desired value.
• Press the checkmark to save the value.
UPGRADES AND OPTIONS FOR YOUR COOLER
There are many optional upgrades you can make to your cooler such as:
- Sheeting the interior walls and ceiling over the insulation with plywood, OSB, or FRP
- Sheeting the exterior of the cooler with plywood or even a nice siding
- Adding a tap system with your cold keg of beer in the cooler and a tap handle on the outside of the
cooler
- Adding metal or wood shelving to store produce, canned goods, or other items
47
2017 © Store It Cold, LLC. Rev 2017-03a All Rights Reserved.You can also read